PainChek Android User Guide - Exported on 29/01/2018
←
→
Page content transcription
If your browser does not render page correctly, please read the page content below
PainChek Android User Guide
                Exported on 29/01/2018

                         PainChek Ltd
PainChek Android User Guide

1 Table of Contents

1        Table of Contents............................................................................................2

2        Introduction ....................................................................................................5
2.1      Document History ............................................................................................................... 5
2.2      Approval .............................................................................................................................. 5
2.3      Intended Audience.............................................................................................................. 5
2.4      Referenced Documents ...................................................................................................... 5
2.5      Glossary ............................................................................................................................... 5
2.6      Compliance Information .................................................................................................... 7

3        General Instructions for Use...........................................................................9
3.1      Intended Use ....................................................................................................................... 9
3.2      Users .................................................................................................................................... 9
3.3      Supported Devices .............................................................................................................. 9
3.4      Operating Environment .................................................................................................... 10
3.5      Internet Connectivity ........................................................................................................ 10
3.6      Updating the PainChek App ............................................................................................. 10
3.7      Warnings and Cautions..................................................................................................... 10
3.7.1    Automated and Manual Facial Assessments .................................................................................................10

4        Setting up the PainChek App........................................................................11
4.1      Securing Your Device ........................................................................................................ 11
4.2      Downloading PainChek .................................................................................................... 11
4.3      Setting up your PainChek account................................................................................... 11
4.4      Defining target audience .................................................................................................. 12
4.5      Data Synchronisation ....................................................................................................... 13

5        Login ..............................................................................................................15
5.1      Quick login......................................................................................................................... 15
5.2      Resetting your password .................................................................................................. 16

PainChek Ltd                                                                                                                         Page 2 of 46

PainChek Android User Guide

5.3      Devices linked to your PainChek account ....................................................................... 17

6        Personal Settings ..........................................................................................19
6.1      Profile settings .................................................................................................................. 19
6.2      PainChek Dashboard ........................................................................................................ 20

7        Patient Settings.............................................................................................21
7.1      Patient Profile ................................................................................................................... 21
7.2      Recent Patients ................................................................................................................. 23
7.3      Editing a Patient................................................................................................................ 24
7.4      Adding a Patient................................................................................................................ 26
7.5      Archiving a Patient............................................................................................................ 28
7.6      Creating a Personalised Patient List ................................................................................ 30
7.7      Searching for a Patient ..................................................................................................... 33

8        Pain Assessments..........................................................................................34
8.1      Conducting a Pain Assessment ........................................................................................ 34
8.2      Completing a Manual Facial Assessment ........................................................................ 40
8.3      Configuring Pain Assessment Time.................................................................................. 41
8.4      Reviewing a Pain Assessment .......................................................................................... 41

9        Pain Relief and Therapies.............................................................................43
9.1      Recording Pain Relief........................................................................................................ 43
9.2      Adding New Medication.................................................................................................... 45
9.3      Add New Therapies ........................................................................................................... 46

PainChek Ltd                                                                                                                    Page 3 of 46
PainChek Android User Guide
Welcome to the PainChek Android User Guide.
Here you'll find details on how to use the PainChek Android mobile application.
If you don't find the information you are looking for, email us at support@painchek.com.
PainChek Ltd Page 4 of 46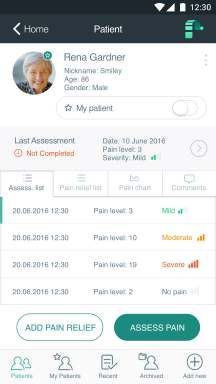
PainChek Android User Guide

2 Introduction
The PainChek Mobile Application assists healthcare workers and carers in assessing the levels of pain in non-
communicative patients with cognitive impairment, especially those with dementia.
PainChek uses facial recognition technology to detect facial cues indicative of the presence of pain and then
combines these with non-facial pain cues to assess a pain severity score.
This guide documents the use of the PainChek App.

2.1 Document History
VersionDate                        Author                      Comment
1.0       16th November 2017Darwin Digital (Jessica)Initial Version
1/1       29th January 2018        Scott Robertson             Update company name

2.2 Approval
Term              Description         Approval Date
Product OwnerScott Robertson29th January 2018

2.3 Intended Audience
This document is intended for use by any person using the PainChek Mobile app.
NB: See the "WAP User Guide” for the instructions on how to use the corresponding Web Administration Portal web
site.

2.4 Referenced Documents
Document NameComment
WAP User Guide The PainChek Web Administration Portal user guide

2.5 Glossary
Term Description
Patie For the purpose of this user guide and to avoid any ambiguity, the term patient will be
nt    applied for anyone on which the app may be used. The term patient encompasses
      residents and clients or anyone for whom a pain assessment is being carried out. Within
      an installation of the PainChek app users can select what terminology they would like to
      use, patient, resident or client.

PainChek Ltd                                                                                            Page 5 of 46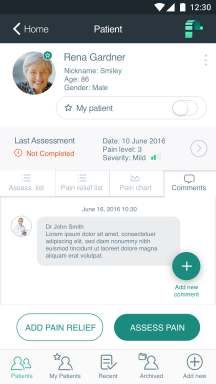
PainChek Android User Guide

Term Description
Resid See Patient
ent
Client See Patient
Admi Admin accounts are only available for PainChek commercial licenses. Admins have access
n    to all of the functionalities on the Mobile App.
Instit Institutions include hospitals, aged care facilities, primary care centres (e.g. GP practices
ution or outpatient clinics).
User The person utilising the PainChek Mobile App to assess patients, residents or clients. User
     accounts are only available for PainChek commercial licenses. Users have access to all of
     the functionalities on the Mobile App
Com Type of license giving access to all of the functionalities on the Mobile App and the Web
merci Admin Portal including creating users with specific roles.
al
Licen
se
Privat Type of license giving access to all of the functionalities on the Mobile App with restricted
e      uses of the Web Admin Portal. It excludes creating additional users.
Licen
se
App An Android App that runs on a device enabling a user to perform pain assessments and
    other PainChek Adult functions
Web A website that allows a user to perform administration functions of the PainChek system
Admi
n
Porta
l
WAP See Web Admin Portal
Devic A supported Apple device running the PainChek app
e
TGA Therapeutic Goods Administration (https://www.tga.gov.au/tga-basics)
PainC Means PainChek Adult
hek
PainC A system intended to be used to assess and monitor pain in people who cannot verbalise
hek such as people with dementia or communication difficulties. The major components are
Adult the App and the Web Admin Portal.

PainChek Ltd                                                                              Page 6 of 46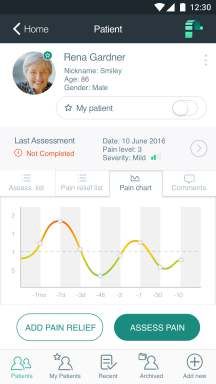
PainChek Android User Guide

Term Description
Googl The Google online store used to download and install apps on Android devices
e Play
Store
Manu An assessment of a patient where the user evaluates if the 9 items in the “facial domain”
al     are present or absent
Facial
Asses
smen
t
Auto Assessment of a patient where the PainChek app evaluates if the 9 items in the “facial
mate domain” are present or absent
d
Facial
Asses
smen
t
Doma One of 6 areas that the PainChek app assesses for a patient – the 6 domains are being:
in   “The Face”, “The Voice”, “The Movement”, “The Behaviour”, “The Activity”, “The Body”

2.6 Compliance Information
PainChek Adult is a certified Class I medical device, with CE Marking and TGA Australian Register of Therapeutic
Goods (ARTG) inclusion

Item                       Symbol                     Details
Manufacturer and                                      PainChek Ltd
Australian Sponsor                                    Suite 401, 35 Lime
                                                      Street
                                                      Sydney NSW 2000,
                                                      AUSTRALIA
Authorised European                                   Priory Analysts Ltd
Representative                                        The Pinnacle
                                                      160 Midsummer
                                                      Boulevard
                                                      Milton Keynes
                                                      MK9 1FF
                                                      United Kingdom

PainChek Ltd                                                                                            Page 7 of 46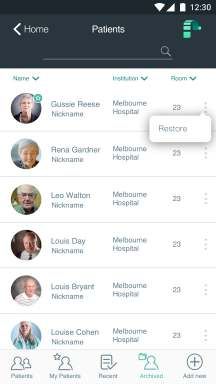
PainChek Android User Guide

Item                  Symbol             Details
Device Identifier                        PainChek Adult
Year of manufacture                      2017

CE marking

Serial Number                            Refer to the product
                                         version number
                                         displayed on the iOS
                                         app login page

PainChek Ltd                                                    Page 8 of 46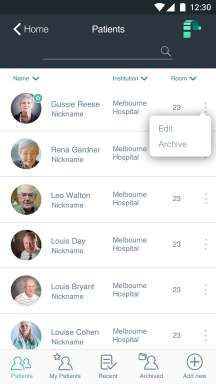
PainChek Android User Guide

3 General Instructions for Use
The PainChek App is a mobile application that is downloaded from the Google Play Store and it is generally used in
much the same way as any other app.
Devices running the PainChek app should be used, charged, maintained and disposed of according to the standard
instructions provided by Google– search the Google Play web site https://support.google.com/
googleplay#topic=3364260 for the user guide relevant to your particular device.

3.1 Intended Use
PainChek is a software system which is comprised of the following components:
a) Mobile Application (the App)
b) Web Admin Portal
PainChek is intended to be used to assess and monitor pain in people who cannot verbalise such as people with
dementia or communication difficulties
PainChek is a point-of-care App which uses a smart-device camera to capture a short video of a person’s face, this is
then analysed in real-time using facial recognition technology to detect nine muscle movements - these are
indicative of the presence of pain. This data is then combined with non-facial pain cues including movements,
behaviours and vocalisations and inputted into the App to allow the automatic calculation of a pain severity score.
The App has a graphing function which allows monitoring the person’s pain over time.

3.2 Users
All users must thoroughly read and comprehend this user manual.
If any aspect of this user guide is unclear or you have any questions about the use or suitability of the app, seek
assistance from the support team (via support@painchek.com)1 before using the application.

3.3 Supported Devices
PainChek can only be used on supported devices running the Android mobile operating system: version 5.0 and
above.
You should keep the operating system up-to-date and download the latest official patch versions from Google
when they are made available to the public (version 5.0 as of November 2014).
The supported devices are:

Model                          Specification
Samsung Galaxy S6              Display size: 5.1 inches, 71.5 cm2 (~70.7% screen-to-body ratio)
                               Resolution: 1440 x 2560 pixels, 16:9 ratio (~577 ppi density)
                               https://www.gsmarena.com/samsung_galaxy_s6-6849.php

1 mailto:support@painchek.com)

PainChek Ltd                                                                                               Page 9 of 46
PainChek Android User Guide

Model                         Specification
Samsung Galaxy S7             Display size: 5.1 inches, 71.5 cm2 (~72.1% screen-to-body ratio)
                              Resolution: 1440 x 2560 pixels, 16:9 ratio (~577 ppi density)
                              https://www.gsmarena.com/samsung_galaxy_s7-7821.php

3.4 Operating Environment
The app is designed to be used indoors, in areas with good lighting. As the PainChek app relies on using the devices
camera, good lighting (such as you would find in an office) is essential to ensure consistent results.

3.5 Internet Connectivity
The app relies on internet connectivity in order to synchronise the data collected on the app with the data stored in
the PainChek cloud database. The app can use WiFi and/or mobile (cellular) data connections. Please follow the
standard instructions from Android or from your organisation in order to set-up internet connectivity on your
device.
You do not need to be continuously connected to the internet in order to use the app, but you do when you are:
     •   Downloading the App from the Google Play Store
     •   Setting up the app for the first time
     •   Logging onto a device for the first time
     •   Synchronising data between your device and the PainChek cloud database

3.6 Updating the PainChek App
It is recommended that the PainChek app up is kept up-to-date. If a new version is released onto the App Store,
your device will notify you automatically. You should download the new version as soon as is practical.

3.7 Warnings and Cautions

3.7.1 Automated and Manual Facial Assessments
The App requires that patients be reasonably still and co-operative in order to record a video of sufficient duration
to allow for an automated facial assessment.
It might not be possible to perform an automated facial assessment due to:
     •   The patients face not being clearly visible
     •   The patient moving too much
     •   Lighting being of poor quality
     •   The patient preferring that they are not recorded

In any of these circumstances, a manual assessment should instead be performed.

PainChek Ltd                                                                                            Page 10 of 46
PainChek Android User Guide
4 Setting up the PainChek App
4.1 Securing Your Device
PainChek stores some data on your device. This is not the main copy of the data (which is securely stored and
backup on our servers) and so it doesn't matter if you device fails or is lost.
However, in order to completely secure that local data, it's necessary to encrypt your device. Fortunately, with
modern versions of Android, that is very easy. On devices (running android Gingerbread 2.3 or later) this is
achieved by enabling encryption (go to Settings and then Security) and check to see if your device is already
encrypted. If not, enable it.
It is also recommended that you have a PIN, password, or pattern on the lock screen to further boost the
security. A strong passcode (6 or more random characters/numbers) should be used..
Encrypting your device is considered industry best practices and it is beneficial, not just for PainChek data, but
for all data on your Android device
4.2 Downloading PainChek
Once your device is secured (encrypted), the Mobile App can be downloaded through the Google Play Store, users
need to have a Google account to download on their phone the PainChek Mobile App.
When the PainChek Mobile App is found on the Google Play Store, users need to click on the download button and
sign into their PainChek account.
At this moment, it is checked the license number registered on the Web Admin Portal according to the users
account. The system allows the downloading if the account is active. If the account is not active, the system shows
an alert message. Once the Mobile App is downloaded, there are no configurations requirements. Users can directly
open the Mobile Application and sign in.
Commercial licenses can install the Mobile App on unlimited number of devices as they have unlimited users
accounts. Users created for that license can access the Mobile App with their accounts. Private licenses can install
the Mobile App on five devices but can only access through one account as this license can only have one user
account registered in the Web Admin Portal. Every device that has installed the Mobile App, it will be shown on the
Web Admin Portal.
4.3 Setting up your PainChek account
To set up your account successfully, your device needs to be connected to the Internet. Type in your email and
password to sign in. If you make a mistake and enter an incorrect email address or password, you will be asked to
re-enter this information. For security reasons, your PainChek account will be blocked after ten successive incorrect
entries of your username and password. If your account has been locked, please contact the PainChek support
team.
Once you have entered your email and password correctly, you will be logged in. PainChek will then download your
personal settings, company information (only applies to professional license holders), your data and those of the
license holder onto the app from the PainChek Web Administration Portal[1].
PainChek Ltd Page 11 of 46PainChek Android User Guide 4.4 Defining target audience When you log into your PainChek mobile application for the first time you have a choice as to how you would like to refer to the people you look after in your PainChek installation. This is dependent on your place of practice and preference. You can select between a) Patients b) Residents or c) Clients. You need to choose one of the options and click ‘Continue’. PainChek will then synchronise this information. PainChek Ltd Page 12 of 46
PainChek Android User Guide

4.5 Data Synchronisation
When the application is connected to the Internet, it will synchronise new or updated data. You can manually
synchronise your data by swiping up on the PainChek dashboard. You will receive a confirmation message once the
synchronisation has been completed. Patient, application, and user information will be synchronised on all mobile
devices belonging to the license key.

PainChek Ltd                                                                                        Page 13 of 46
PainChek Android User Guide

[1] The PainChek Web Administration Portal is a secure website that allows users to manage patient data, their
PainChek licence, institutions (for professional licences), users, installations and edit your PainChek profile
settings.

PainChek Ltd                                                                                          Page 14 of 46
PainChek Android User Guide

5 Login

5.1 Quick login
After your first login you have the option of signing in using the quick login function. This functionality can be
activated in the profile settings. If you have switched on the quick login function, you will be able to identify
yourself by selecting an icon displaying your profile picture and name. You will be prompted to enter your four-digit
PIN along with the icon to log into the PainChek application.
1. Activate quick login from your profile settings

2. When you open the app, select the account you want to log in with

*For Private licenses, there will be only one account registered. This screenshot shows the home page of a device
under a commercial license. This type of license can have unlimited accounts created.

3. Enter PIN

PainChek Ltd                                                                                           Page 15 of 46
PainChek Android User Guide

5.2 Resetting your password
If you have forgotten your password, you can reset it on the sign in page by tapping Forgot your password? under
Password.
Then enter the email address you use to sign in to the email field. Once you hit ‘Confirm’ a reset password link will
be sent to your inbox. The link will redirect you to a web page on the PainChek Web Administration Portal where
you can reset your password by entering your new password twice.
The password must be at least eight alpha-numeric characters and cannot be the same as your previous password.
Once this process has been completed, you will receive a confirmation email in your inbox notifying you that your
password has been changed.
If you did not request this change and you suspect that your account has been compromised, please contact the
PainChek support team. The PainChek mobile application must be connected to the Internet for the first login after
changing your password.
1. Tap Forgot your password ? in the login page

2. Enter email address and press OK

PainChek Ltd                                                                                             Page 16 of 46
PainChek Android User Guide

5.3 Devices linked to your PainChek account
Private PainChek license holders can install the PainChek app on up to three devices whereas professional license
holders can install the app on an unlimited number of devices.
If you have downloaded PainChek on a device that is not yet linked to your PainChek account, you will be prompted
to confirm that you want to activate the new device. If you are a private license holders and have reached the limit
of three devices you can no longer install the application on new devices unless you deactivate the installation on
other devices.
You can manage your installations on the PainChek Web Administration Portal.
1. Activate device

2. Device blocked

PainChek Ltd                                                                                          Page 17 of 46
PainChek Android User Guide

PainChek Ltd                                 Page 18 of 46
PainChek Android User Guide

6 Personal Settings

6.1 Profile settings
You can update your personal information in the profile settings. The profile settings can be accessed by clicking on
your profile picture at the top of the screen on the PainChek dashboard. You can update your Name, Phone
Number, Institution and Job Title. If you want to add a profile picture to your user account or change the picture
you can also do this in the profile settings by clicking on the edit button that appears next to your profile picture
when you click on it. You can also activate the quick login function in your profile settings by entering a four-digit
PIN.
1. Click your name or picture in the top left corner. You can also go to Profile Settings

2. In this section, you can edit your personal details and change your profile picture by tapping Edit photo

3. Take a new picture with your camera phone, or browse to the photo you want to use

PainChek Ltd                                                                                            Page 19 of 46
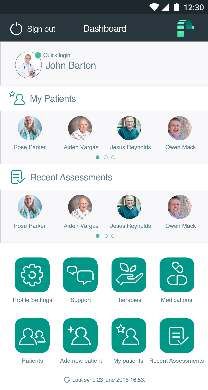
PainChek Android User Guide

6.2 PainChek Dashboard
After you have successfully logged into PainChek, you will be able to see your dashboard. The dashboard gives you
an overview of the people you are currently caring for, recently conducted pain assessments and quick links to
various sections of PainChek such as Therapies, Medications, Patients, Add New Patient, My Patients and Recent
Patients.
1. The dashboard

PainChek Ltd                                                                                        Page 20 of 46
PainChek Android User Guide
7 Patient Settings
The PainChek mobile application allows you to view and manage patients.
You can:
• View the profile of a patient
• See which patients have recent been updated
• Edit a patient
• Archive a patient
• Create a personalised patient list
• Search for patients
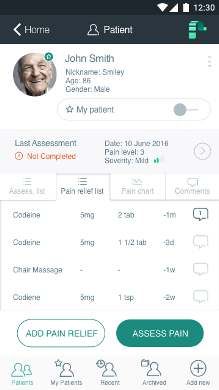
7.1 Patient Profile
If you click on a patient profile, you will be able to see an overview of a person’s personal information such as Full
Name, Nickname, Age and Gender. You can access information about past pain assessments, administered pain
relief, as well as a pain chart that displays the pain level of the person over time and comments. You can start a pain
assessment from the patient profile screen and log the type of pain relief administered to a person. You can also
edit existing profile information or archive a profile.
1. Patient profile
2. The pain chart shows the pain level and the severity score of a patient in a timeline
PainChek Ltd Page 21 of 46PainChek Android User Guide 3. Add comments about your patient, resident or client by tapping on Add new comment button 4. Enter your comment in the text form PainChek Ltd Page 22 of 46
PainChek Android User Guide

7.2 Recent Patients
People who have recently had their pain assessed are displayed.
It displays their name, how much time has passed since the last pain assessment and their last pain level. A graph
shows the evolvement of pain levels over time.
1. Recent patients

PainChek Ltd                                                                                          Page 23 of 46
PainChek Android User Guide

7.3 Editing a Patient
After creating a new patient, you can edit the person’s profile details and photo.
1. Go to My Patients (Residents or Clients) from your Dashboard

2. Select Patients (Residents or Clients) in the bottom left corner
3. Press the options button next to the person’s name you want to edit
4. Select Edit

5. Modify now the personal details or photo of your patient, resident or client

PainChek Ltd                                                                         Page 24 of 46
PainChek Android User Guide

6. Press OK

PainChek Ltd                                 Page 25 of 46
PainChek Android User Guide

7.4 Adding a Patient
Add a new patient by clicking on ‘Add New Patient’ on the PainChek dashboard. You will be asked to set up a new
patient profile. You can add a photo to make identification easier as well as personal information such as First
Name, Last Name, Nickname and Date of Birth. Complementary information such as Institution Name, Room and
Bed Numbers can also be added and saved.
1. Tap Add new Patient (Client or Resident) button on your Dashboard

2. To add a photo tap Add photo on the profile circle above the form

3. Choose one of the options available: Take Picture with your camera phone, or Upload from gallery. If you
choose the second option browse to the photo you want to use and select it. The photo will appear on the profile

PainChek Ltd                                                                                         Page 26 of 46
PainChek Android User Guide

4. Fill in all fields in the form (First Name, Last name, Nickname, Gender, Date of birth (dd/mm/yyyy) and Residence
(home or institution)

5. Press OK. You can now find the new profile saved on My Patients (Residents or Clients) section on your
Dashboard

6. If you do not want to create the profile, click on CANCEL instead of OK. You will lose all the information
previously entered

PainChek Ltd                                                                                              Page 27 of 46
PainChek Android User Guide 7.5 Archiving a Patient You need Admin permissions to use this functionality If you have admin permissions, you have the option to archive an existing patient. Recently archived patients can be accessed by clicking on ‘Archived Patients’ on the PainChek dashboard. You can access a list of the last 20 patients that were archived (along with their Name, Institutions, Room Number and Gender) or search for a particular patient by entering their names in the search field at the top of the screen. By clicking on an archived patient profile you have the possibility to restore the profile and add it again to your active patient list. Equally, you can click on an existing active patient profile and archive the person. You will be asked why you want to archive a person and can choose between a) Discharged b) Transferred c) Deceased or d) Other. 1. Tap My Patients (Residents or Clients) button on your Dashboard 2. Select Patients (residents or clients) in the bottom left corner PainChek Ltd Page 28 of 46
PainChek Android User Guide

3. Press the options button next to the person’s name
4. Select Archive

5. Choose the reason for archiving: discharged, transferred, deceased or other

6. Press OK or Cancel if you decide not to archive
7. Go to Archived and browse Patients (residents or clients) that are not active anymore
8. To restore a patient tap again the options button on a patient’s profile and select Restore

PainChek Ltd                                                                                     Page 29 of 46
PainChek Android User Guide

9. Confirm you want to restore by pressing Restore or Cancel if you decide not to restore

7.6 Creating a Personalised Patient List
PainChek patient’s data from a license number is synchronised with all devices belonging to the same institution or
organisation.
This means that you can see not only the patients you have assessed but other patients from your colleagues too.
Every new patient added is saved in the “Patients” section which is a general list.
However, you can create a personal list that filters your patients. This information is shown in “My patients”
section. To create a personal list follow the steps below.

1. Tap My Patients (Residents or Clients) button on your Dashboard.

PainChek Ltd                                                                                            Page 30 of 46
PainChek Android User Guide

2. Select Patients (residents or clients) in the bottom left corner.

3. Select the profile you want to include in your personal list by pressing on the person’s name, institution or room
4. Activate My Patient (resident or client) button

PainChek Ltd                                                                                            Page 31 of 46
PainChek Android User Guide

5. Check your new list on My Patients (residents or clients)

PainChek Ltd                                                               Page 32 of 46
PainChek Android User Guide

7.7 Searching for a Patient
To find easily patients use the search bar available in the app.
1. Go to My Patients (Residents or Clients) on your Dashboard

2. Click directly in the search text box and type the first name or last name of the person you want to find

3. If the patient, resident or client exists, the person’s profile will appear on the list

PainChek Ltd                                                                                            Page 33 of 46
PainChek Android User Guide

8 Pain Assessments
The PainChek mobile application allows you to view and manage patient assessments.
You can:
        •   Conduct a pain assessment
        •   Conduct a manual facial assessment
        •   Adjusting the time for an automated facial assessment
        •   Reviewing an assessment

8.1 Conducting a Pain Assessment
To assess the pain level, the application does not need to be connected to the Internet to function correctly.
However, it is recommended to stay connected whenever possible to ensure all data is quickly synchronised and
updates are installed in a timely manner.
It is recommended to use the PainChek app in a well-lit indoor environment that allows accurate observation of the
person whose pain level you want to assess and accurately enter visual and audible pain cue data.
When you and the patient are ready, start pain assessment by clicking on the ‘Assess Pain’ button on the respective
patient profile. You need to complete the steps described below to successfully conduct a pain assessment.
 1. Tap My Patients (Residents or Clients) button on your Dashboard

If the person does not appear on the list, check the full list by tapping Patients (residents or clients) in the bottom
left corner
2. Select the profile you want to assess from the list by pressing on the person’s name, institution or room
3. Tap Assess Pain button

PainChek Ltd                                                                                               Page 34 of 46
PainChek Android User Guide 5. The first pain cue will appear on the screen The Face, few seconds later your camera phone is activated 6. Focus your patient’s (resident or client) face with your camera phone. The screen will become in color where the focus is accurate. Use the blue square on the screen as a guide to center your patient’s face on the screen PainChek Ltd Page 35 of 46
PainChek Android User Guide

Press on Start analysis. The default time is set to 3 seconds
8. When the assessment is done, you will find a list with the pain cues The Face identified by the system. You will
now see the results of your analysis. Please verify if every element was checked by the system and include any other
pain cue you have identified

 9. The Voice: You will need to check ten statements regarding any vocalisations made by the person. You also have
the option to type in additional remarks at the bottom or add an audio recording of the person’s voice by pressing
the REC button

PainChek Ltd                                                                                          Page 36 of 46
PainChek Android User Guide

10. The Movement: You will need to check eight statements regarding the movements of the person whose pain
level you want to assess. You can also type in additional remarks

11. The Behaviour: You will need to check eight statements regarding the behaviour of the person whose pain level
you want to assess. You can also type in additional remarks

PainChek Ltd                                                                                       Page 37 of 46
PainChek Android User Guide

12. The Activity: You will need to answer five questions regarding the activity of the person whose pain level you
want to assess. You can also type in additional remarks

13. The Body: You will need to answer seven questions regarding the person whose pain level you want to assess.
You can also type in additional remarks

PainChek Ltd                                                                                           Page 38 of 46
PainChek Android User Guide

You can move back and forth between the different screens by swiping left or right.
14. When you finish The Body pain cues press on SUBMIT ASSESSMENT. The pain assessment will output a total
score
     At the end of the pain assessment you will be able to see separate scores for Face, Voice, Movement,
     Behaviour, Activity and Body as well as the total aggregated pain score and its intensity level (absent, mild,
     moderate, severe). This level is assigned according to the scale below:
     1-6 = No pain
     7-11 = Mild
     12-15 = Moderate
     > 16 = Severe

     The total score is calculated by the addition of inputs in each domain. In the example above, John Smith has a
     total score of 14.
     Once the pain assessment has been completed you can save the data. Unfinished assessments will be
     discarded after 15 minutes if the assessment is not saved.

PainChek Ltd                                                                                            Page 39 of 46
PainChek Android User Guide
15. If you want to verify a specific pain cue’s score press on the pain cue. Press SAVE to end the pain assessment or
stop the assessment process by pressing on CANCEL.
The information is not lost but the process is not completed. You can come back later to SAVE the results
16. Delete assessment under CANCEL and SAVE buttons. If you choose this option, you will lose all the information.
This option is available if you have not saved the pain assessment. After saving it, deletion is not possible
8.2 Completing a Manual Facial Assessment
If the automatic facial assessment fails when conducting a Pain assessment, a manual function is available to
complete the pain cue “The Face”.
1. Tap Assess Pain button
2. When the error message appears, select Manual
3. The pain cue The Face will appear on the screen. You will need to check eight statements regarding the face of
the person whose pain level you want to assess
PainChek Ltd Page 40 of 46PainChek Android User Guide 4. Continue with the other pain cues as described in previous sections 8.3 Configuring Pain Assessment Time The default assessment time is set to 3 seconds, if you want to extend the time follow the steps below. 1. In the screen before commencing an assessment, touch the timer icon in the upper right corner 2. Choose a setting between 3 and 90 seconds 3. Press Done 8.4 Reviewing a Pain Assessment In order to review a pain assessment, go to your patient, resident or client’s profile. Please note that Pain assessments of a patient, resident or client can only be edit if they are not completed. Once you save a pain assessment, this will be stored permanently. PainChek Ltd Page 41 of 46
PainChek Android User Guide

1. From your dashboard select the person on My Patients (Residents or Clients) or Recent Patients section

2. Click on Recent assessment >. If there is not any assessment saved you need to create a new one

3. Tap the pain cue you wish to review. For example: The face

PainChek Ltd                                                                                         Page 42 of 46
PainChek Android User Guide

9 Pain Relief and Therapies
The PainChek mobile application allows you to view and manage the Pain Relief and the Therapies applied to
patients.
You can:
    •   Record Pain Relief
    •   Record Therapies
    •   Create new Pain Relief types
    •   Create new Therapy types

9.1 Recording Pain Relief
Once a pain assessment has been completed you may decide to administer pain relief to a person. Any pain relief
you administer should be recorded in the PainChek application. To record the administration of pain relief, select
the ‘+ Pain Relief’ button from the corresponding patient profile. You can either select the appropriate pain relief
you aim to administer from your medication list within the PainChek app or add the Name, Dose and Date and Time
manually. In addition, you can also choose from your therapies list what type of pain relief therapy you decide to
administer.
1. Tap Add pain relief from the patient’s profile

2. Add a therapy or a medication

PainChek Ltd                                                                                          Page 43 of 46
PainChek Android User Guide 3. Add it manually 4. Enter details PainChek Ltd Page 44 of 46
PainChek Android User Guide

5. Or add it from an existing list

9.2 Adding New Medication
To facilitate the recording of administered pain relief, you can create a list of medications that you administer on a
regular basis. To add a new medication, click on ‘medications’ on the dashboard. At the bottom of your medication
list you can click the ‘Add Medication’ button. You can either add information about the medication manually by
typing in the Name, Formulation, Strength and Additional Remarks relating to the medication or select an existing
one from the list. You can decide to either save or discard the information and go back to entering the data
manually. Once you have saved a medication, it will appear in your medications list along with the information
when it was last administered.
1. Add medication

2. Enter details

PainChek Ltd                                                                                            Page 45 of 46
PainChek Android User Guide

9.3 Add New Therapies
To facilitate the recording of therapies, you can create a list of therapies that you use on a regular basis. To add a
new therapy, click on therapies on the dashboard. At the bottom of your therapies list you can click the ‘Add
Therapy’ button. To add a new therapy, you can type in the Name and a Description of the treatment manually.
Once you have saved a therapy, it will appear in your therapies list.
1. Add therapy

2. Enter details

PainChek Ltd                                                                                               Page 46 of 46
You can also read