ACTIVITYTIMELINE ADMIN GUIDE
←
→
Page content transcription
If your browser does not render page correctly, please read the page content below
ActivityTimeline Admin Guide
https://activitytimeline.com

                  Copyright © 2019 ActivityTimeline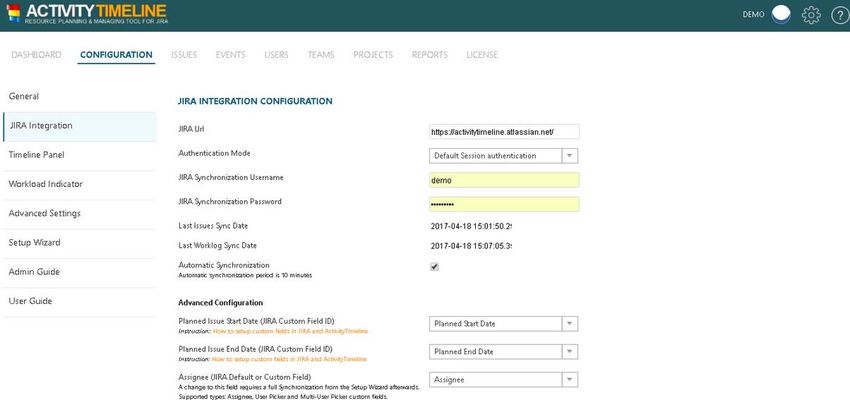
Contents
1.     Introduction                                                               3
2.     Installation                                                               4
     2.1 ActivityTimeline Cloud option: System Requirements                       4
     2.2 ActivityTimeline Server option: System Requirements                      4
     2.3 Server Deployment                                                        5
3.     Setup                                                                      6
4.     User Management                                                        11
5.     User Roles                                                             13
     5.1 Administrator Role                                                   13
     5.2 Manager Role                                                         13
     5.4 Employee Role                                                        13
     5.5 Limited Employee Role                                                13
     5.6 Read Only User Role                                                  13
6.     Workload Calculation modes                                             14
7.     General Settings                                                       16
8.     Jira Integration Configuration Settings                                17
9.     Single Sign-On Setup                                                   18
10.       Timeline Panel Settings                                             21
11.       Workload Indicator Settings                                         24
12.       Advanced Settings                                                   26
13.       Miscellaneous                                                       28
     13.1 ActivityTimeline Upgrade                                            28
     13.2 Install ActivityTimeline as Windows service                         29
     13.3 How to switch database engine                                       29
     13.4 Configuring ActivityTimeline to be accessible through HTTPS (SSL)   29
14.       Troubleshooting                                                     30
     14.1 ActivityTimeline application does not start                         30
     14.2 Ngnix Configuration                                                 30
     14.3 Running ActivityTimeline from a context path                        30
     14.4 Shifted Jira tickets                                                30
     14.5 Cannot parse date format error                                      31
     14.6 Synchronization does not work after upgrade                         31
     14.7 ActivityTimeline cannot connect to Jira                             31
     14.8 ActivityTimeline Sync stopped working                               32
     14.9 Cannot login to ActivityTimeline using my Google Apps account       32

                                                                              1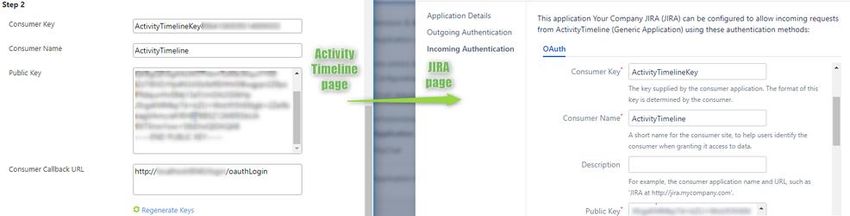
14.10 Cannot login to ActivityTimeline Cloud with Jira Cloud two-factor authentication enabled   32
  14.11 ActivityTimeline Data is gone after restart                                                33
15.    Help Portal                                                                                 33

                                                                                                   2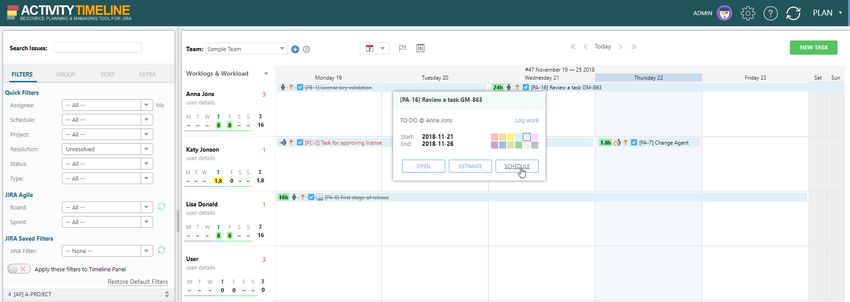
1. Introduction

Activity Timeline application for Atlassian Jira provides a visual resource planning and project tracking
dashboard to schedule Jira tasks along with custom events; calculate workload, availability and utilization;
generate timesheets and reports.

It works with both Jira Server/Data Center and Jira Cloud installation options.                                It
does not require any extra installations inside of Jira. ActivityTimeline is installable outside of Jira.

Activity Timeline provides four modules for a full workflow: Plan. Work. Track. Report

                              Plan. This module of ActivityTimeline add-on allows to do resource/project and
                            capacity planning. Plan and manage teamwork, schedule events, vacations,
                            bookings and tasks, calculate workload and availability.

                              Work. This module provides an all-inclusive personal workspace for everyday
                            work: personal tasks and schedule, logging worked hours, see overall progress of
                            own timesheet and display required utilization on the worklog charts.

                              Track. Timesheets module on Track view provides managers with a quick and
                            easy overview of logged time and ability to approve/export the timesheets.

                            Report. ActivityTimeline add-on allows generating various Web and Excel reports
                            based on workload, skills, availability, logged work hours and utilization.

ActivityTimeline is intended to help managing service, consultancy and creative teams with a dynamic working
schedule, frequent changes requests and people shared between projects.

                                                                                                               3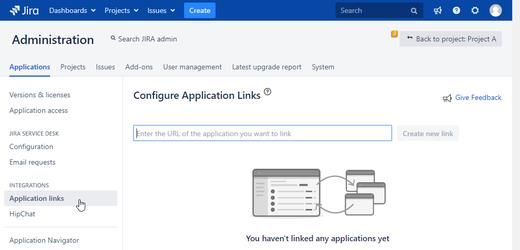
2. Installation

There are two possible installation/licensing options:
● Server: downloadable web application hosted on your server behind your firewall;
● Could: web application hosted in our secured cloud.
Both options use Jira REST API to connect to Jira.
Application works with both Jira Cloud and Jira Server/Data Center from version 6.0 to 8.x (the latest).

2.1 ActivityTimeline Cloud option: System Requirements

There are no server requirements as your instance of ActivityTimeline is hosted in our secured AWS Cloud.

2.2 ActivityTimeline Server option: System Requirements

Minimum server configuration:

    •   4GB available RAM or more
    •   10GB disk space or more
    •   2500MHz CPU or higher

                                                                                                            4
2.3 Server Deployment

  1. Download ActivityTimeline application from the https://activitytimeline.com/start-trial.html link or
     contact our Support Team (support@activitytimeline.com). The downloadable archive contains
     pre-configured ActivityTimeline application that goes together with Tomcat 6 server and built-in H2
     database for indices.
     Optionally, you may switch default database from H2 to MySQL, PostgreSQL, Oracle DB or MSSQL
     2008 or higher. Those databases are not included in the package and should be installed separately.

  2. It is fine to run ActivityTimeline on the same server as Jira or a different one.

  3. Unzip activitytimeline-version.zip or activitytimeline-version.tar.gz file

  4. Launch /bin/startup.bat (Windows) or /bin/startup.sh (Linux) to start application on 8040 port.
     ActivityTimeline application should be available at http://localhost:8040 url.

      Important note: do not extract ActivityTimeline package into a folder with spaces in folder path.
                      OK: C:\apps\activitytimeline
                      NOT OK: C:\Program Files\activitytimeline

  5. Open Setup Wizard (http://localhost:8040/setup) after 1-2 minutes from the launch.
     It should automatically launch the Jira integration wizard and guide you through the integration
     process.

                                                                                                          5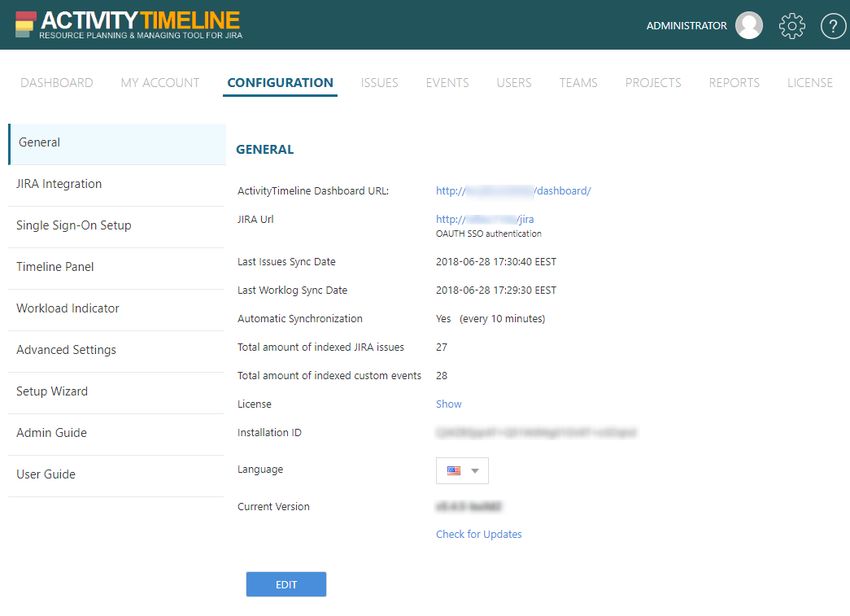
3. Setup

  1. Open http://localhost:8040/setup URL in a Web Browser.

     Double check if Jira REST API is enabled and you have Jira Administrator privileges.

     Those privileges are required to retrieve the list of users from Jira as well as the list of Jira custom
     fields for one of the next setup steps. There is no need to have an administrator rights after the
     setup process.
     On the first page of Setup Wizard check I have Jira administration rights > click Next:

  2. Make sure you read License Setup Pre-requirements on the next page > click Next:

                                                                                                                6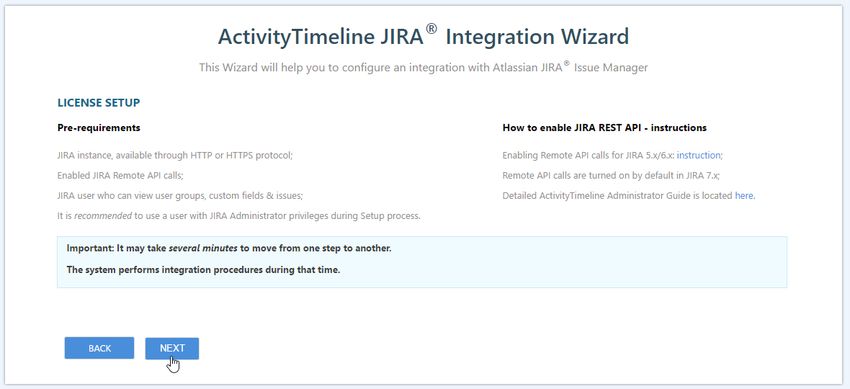
3. On Step 1 of Jira Integration Configuration setup specify Jira Home URL, Jira
       username and Password, and Authentication option > click Next:

Jira OAUTH SSO authentication instructions: Jira OAUTH SSO authentication instruction

4.     ActivityTimeline will automatically load the list of projects from Jira. Deselect the projects you do
not want to be shown on ActivityTimeline Dashboard. Click Next:

                                                                                                               7
5. ActivityTimeline loads the list of users from Jira (this step will only be available for admin users. If
you selected ‘I am a regular Jira user’ on the very first page, you will not be able to see the list of
users loaded from Jira)
• Specify how users should be loaded:
- All Users from Jira;
- Users from Jira Groups - load users from specified Jira group only;
- Users from Tempo Teams - load users from specified Tempo group only (Tempo
Timesheets should be installed and you should have administrative permissions for it);
or let the system load users from default group.
• You may tick “Create ActivityTimeline Teams from Jira groups” or “Create ActivityTimeline
Teams from Tempo teams” checkbox to automatically create teams of people in
ActivityTimeline. Click Next:
6. You may create two "Date Picker" custom fields in Jira for planned start & end dates of issue.
You can assign Jira custom fields to ActivityTimeline's issue start & end dates (this step will only be
available for admin users. If you selected ‘I am a regular Jira user’ on the very first page, you will not
be able to assign custom fields)
• ActivityTimeline will automatically update those custom fields every time you schedule a
task on ActivityTimeline’s Dashboard.
• ActivityTimeline will automatically load all changes of those custom fields from Jira every
10 minutes and update tasks on the ActivityTimeline's Dashboard.
Setup Instruction: How to setup custom fields in Jira
● If you do not want to make changes in Jira while drag’n’drop issues on a Dashboard then
choose “None” in Timeline Assignee fied;
● Please leave “Planned Issue Start Date” & “Planned Issue End Date” fields blank if you are
not sure what to do:
87. On Step 5 run full synchronization of Jira issues by pressing Synchronize button.
NO CHANGES WILL BE MADE TO JIRA DURING THIS OPERATION.
Click Next after successful finish of the synchronization process:
98. All steps of Setup Wizard are successfully passed. Press Go to Dashboard button to navigate to
ActivityTimeline Dashboard:
9. Start using ActivityTimeline’s Dashboard for planning, working, tracking and reporting.
• Configure teams by clicking on blue plus icon above the calendar;
• Drag'n'drop issue to assign it to a person;
• Move issue to change planned start date;
• Resize issue to change planned end date;
• Click on a cell to create a custom event (booking, day off, note, vacation etc.)
104. User Management
Important Note: Adding/deleting or updating users here will NOT affect Jira system.
By default, every Jira user with valid Jira credentials can login to ActivityTimeline Dashboard.
User should just login with their Jira login/password, and ActivityTimeline will automatically create or
update a corresponding user in ActivityTimeline add-on. If you would like to restrict an access to the
Dashboard for someone, you can do that on "Edit Person page".
To navigate to users management page click on Configuration icon on Dashboard toolbar and switch to
Users tab. Direct link is http:///integrationConfig/users.
You should see a page like this:
The list of all available users is represented on this page. Here you can change default person involvement
for all active users, edit existing users, add position and skills, check the teams list of a user, delete users
from ActivityTimeline.
On Vacation Management page possible to define how many approved vacation days each user can have
in every calendar year.
Detailed documentation: User Management and Vacation Management
Press Create User button to create a new user in ActivityTimeline but NOT in Jira. This option is useful
when for some reason ActivityTimeline was not able to retrieve all Jira users during setup process.
Add position and skills possible directly on the Users page by clicking on the field next to the user’s name.
Click on Edit link to edit user's details and roles/permissions. You should see the page like below:
11You may edit a Jira username, Jira password, full name and email address. In addition, you may define
person’s involvement in hours per day. For example, 8 hours can correspond to a full-time and 4 hours for
part-time involvement.
Uncheck Enabled checkbox to restrict an access for that user to the Dashboard. Also, you may restrict an
access by unselecting all roles.
A click on Update button will save your changes. A click on Delete from ActivityTimeline button will delete
this user from ActivityTimeline but NOT from Jira.
To refresh the list of ActivityTimeline users from Jira switch to Refresh Users from Jira page. The system will
trigger a connection to Jira and will try to retrieve newly added users in Jira:
Important Note: Deleting a user in ActivityTimeline will NOT restrict his/her access to ActivityTimeline
Dashboard, as the user may login one more time and the system will automatically create an account for
him/her. Use “Enabled” checkbox to restrict an access.
As alternative, you may set Default role for added users property in Users > Users Settings to No Access so
that newly created users will not have an access to ActivityTimeline’s Dashboard by default.
125. User Roles
There are six user roles available in ActivityTimeline application. Those roles may not match the roles in Jira.
5.1 Administrator Role
User with this role has full access to all ActivityTimeline configuration settings including Plan, Work, Track,
Report pages. This user may delete other users and change permissions of other users.
Only a user with an Administrator role may access Setup Wizard, perform a refresh of users or projects
from Jira, see and manage teams’ and users’ data. Administrator Role has full access to all ActivityTimeline
configuration settings including the Dashboard.
5.2 Manager Role
User with this role has full access to Plan, Work, Track, Report pages and can manage users and teams.
He/she can edit members of existing teams and create new teams. User can create/edit and approve
custom events like Placeholders or Vacations.
5.3 Power Employee Role
User with this role can access Plan, Work and Report pages, view Jira tickets and perform a drag'n'drop,
move or resize of Jira tickets. User can create/edit custom events. The system will not update Jira ticket of
Jira project 'A' if user does not have permission to view/edit issues in Jira project 'A'. The changes will
disappear from the Dashboard after page refresh.
5.4 Employee Role
User with this role has an access to Plan, Work and Report pages and to the data of the teams he/she
belongs to. This user can see just the issues that were assigned to him/her and their teammates. User can
create/edit custom events for teams he/she belongs to.
5.5 Limited Employee Role
User with this role can see his/her own data only on Plan, Work and Report pages. This user will see just the
issues that were assigned to him/her. User can create/edit custom events on his/her timeline only.
This role is set as default role for newly added users.
This can be changed by Default role for newly self-created users setting in Users > Users Settings.
5.6 Read Only User Role
User with this role can access and view the Dashboard. He/she can also open/search/filter Jira tickets. Read
Only User Role does not allow any changes on the Dashboard. This role can be applied in addition to any
other role.
136. Workload Calculation modes
Workload Indicator displays how many hours are used per each work day by each person based on
remaining estimate of scheduled Jira issues. The system respects weekends, days off, sick leaves, holidays
and vacations during workload calculation.
It calculates all Jira tasks across all projects assigned and scheduled to every person. In addition, Workload
Indicator displays total amount of person's work hours for the week.
There are two workload calculation modes:
• BALANCE - number of remaining hours are split equally across scheduled days. Examples:
o 12 hours task scheduled for two days would take 6 hours each day;
o 12 hours task scheduled for three days would take 4 hours each day;
o 3 hours task scheduled for three days would take 1 hour each day.
• LIQUID - workload is calculated based on the remaining estimate and 8 hours work day. Work
hours will transfer to the next day if the issue is scheduled for more than one day and the previous
days are fully booked. Examples:
o 10 hours task scheduled for two days will get 8 hours scheduled for the first day and 2
hours moved to the second day;
o 1 hour task scheduled for two days would be completely moved to the second day if there
are already 8 hours of tasks scheduled for the first day;
o 4 hours task scheduled for two days would take 4 hours of the first day and 0 hours of the
second day.
By default, BALANCE mode is turned on.
Detailed documentation: Workload indicator
You may change Workload calculation mode in Configuration > Workload Indicator page.
Direct link is http:///config/edit_workload
In Time Tracking section change Workload Calculation Algorithm property.
14Different color indicates person’s workload of any particular day:
• grey (0 hours - nothing scheduled)
• yellow (less than 50% h/day)
• olive (between 50-88% h/day)
• green (between 88-100% h/day )
• light red (between 100-125% h/day)
• red (more than 125% h/day)
• purple (issue is assigned on Logged time, Day Off, Vacation, Sick Leave or Holiday)
• blue (Day Off, Vacation, Sick Leave or Holiday is scheduled on a user)
Workload ranges are automatically adjusted in accordance to person’s involvement.
Worklogs & Workload mode displays both past and future: work logs for past, workload for future (based
on remaining estimate of scheduled issues):
Availability mode displays how many hours the person is still available to do in future (capacity):
157. General Settings
ActivityTimeline administrator can change general settings, Jira integration settings, the settings for timeline
panel, workload indicator, Advanced settings etc.
To navigate to Configuration setting from the Dashboard view click on Configuration (gear) icon on a toolbar
or go to direct link http:///config/general
In General tab admin user can see general settings such as:
● ActivityTimeline Dashboard URL
● Jira URL
● Last Issues and Last Worklog Sync Dates
● Automatic Synchronization (Yes/No)
● Total amount of indexed Jira Issues and custom events
● License
o click Show link to be redirected to License page
● Installation ID
● Language
● Current Version of ActivityTimeline
Admin can also check if newer version ActivityTimeline is available. Simply click 'Check for Updates' → the
system will redirect you to a website page with the latest version of the add-on.
To edit General Settings click Edit button, you will be navigated to Jira Integration Configuration page.
168. Jira Integration Configuration Settings
To change Jira Integration configuration, log into ActivityTimeline as an administrator, click Configuration icon
on Dashboard toolbar and switch to Jira Integration page:
Here you can specify access to Jira and set of custom things:
1. Administrator can change Jira URL, specify Authentication Mode
a. Default session authentication
OR
b. HTTP Basic Authentication
2. Change Jira Synchronization Username and Jira Synchronization Password
a. They are used to synchronize data from Jira service to log Jira project lists, issues and users in
Jira groups. If a certain user does not have access to a particular project, then those issues will
not appear in the ActivityTimeline.
3. Switch Automatic Synchronization by checking the box
a. by default, the system automatically synchronizes the changes every 10 minutes.
4. In the Advanced Configuration section map Jira custom fields of date, namely, Planned Issue Start
Date and Planned Issue End Date.
a. Due date can be set as Planned Issue End Date: click on Advanced link to set custom option.
5. Map Assignee (default value = Assignee, supported types: Assignee, User Picker, Multi-User Picker
fields)
6. Map Rank Field Name, Sprint Field Name and Epic Link Field Name
a. Those are Jira Agile fields
179. Single Sign-On Setup
To setup Single Sign-On link (oAuth) between Jira and ActivityTimeline user should have administration
permission in ActivityTimeline and administration permission in Jira.
There are two statuses of oAuth SSO connection:
● ActivityTimeline has configured oAuth SSO connection
● ActivityTimeline without configured oAuth SSO connection
Procedure to configure Single Sign-On (SSO) between Jira and ActivityTimeline:
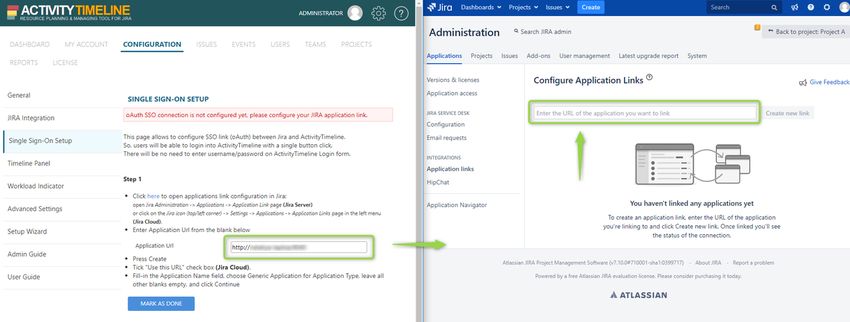
Step 1
● Open Jira → Click on Gear icon → Jira Administration → Applications (Jira Server)
or click on the Jira icon (top/left corner) → Settings → Products → Application Links page in the left
menu (Jira Cloud)
● Click on "Application links"
18● Copy "Application Url" from the blank on Single Sign-On Setup in Activity Timeline → to blank on
Configure Application Links tab in Jira
● Click "Create new link" button → Click "Continue"
● Tick "Use this URL" checkbox
● Fill-in the "Application Name" field, choose Generic Application for Application Type, leave all other
blanks empty
● Сlick "Continue" button
● On Single Sign-On Setup page in ActivityTimeline click "Mark as done" button
Step 2
Generate ActivityTimeline certificate and token, to use for Jira Application Link:
Click "Generate" button:
Public Key is created.
Step 3
● Click on a pencil icon on Application Links page created in Step 1
● Choose Incoming Authentication link and fill-in the details using data from ActivityTimeline in Step 2
19● You can leave all other fields as default
● Click "Save" button on Jira Application Link Configuration
● Click "Verify" button on Single Sign-On Setup page
Jira should ask whether you allow the connection as a currently logged-in Jira user.
Important: Please make sure the currently logged-in user in Jira has Administrator role in ActivityTimeline.
Click "Allow" to grant connection and finish the setup of SSO. ActivityTimeline will make that user as
Synchronization user (that loads updates from Jira).
2010. Timeline Panel Settings
In Configuration tab administrator can define the settings of Timeline Panel. The page has two sections:
Timeline View and Events where you can change different options.
Reuse Agile Sprint period for start/end dates of its issues
If task does not have planned start/end dates, then the system will use Agile sprint's start/end dates as
start/end dates of a task. This will be applied to all tickets that belong to a sprint.
● Possible values: checked = turned on, unchecked = turned off
● Default value = unchecked
● Required: perform Refresh of Agile Boards/Sprints and Full Issues Synchronization after turning this
feature on.
Default color for issues
Allows user to select default color for Jira issue bars on the dashboard.
● Possible values: Blue, Red, Orange, Yellow, Green, Purple, Violet, Livid, Teal, Olive, Silver, Gray
● Default Value: Blue
Default color for events
Allows user to select default color for custom event bars like Notes, Holidays etc. on the dashboard.
● Possible values: Green, Red, Orange, Yellow, Blue, Purple, Violet, Livid, Teal, Olive, Silver, Gray
● Default Value: Green
First Day of week
Defines the first day of the week on the calendar
● Possible values = Sunday, Monday, Tuesday, Wednesday, Thursday, Friday, Saturday
● Default value = Monday
● Workload Indicator works properly with Monday as a first day of the week only.
First Week of year
Defines the first week numbering scheme.
● Possible values:
o Starts on Jan 1 (first week starts on Jan 1 if a year starts on Monday otherwise first week
starts on the last Monday of the previous year)
o First 4-day week (first week starts on the first week of the year that contains 4 days in this
year)
o First full week (first week starts on the first full week of the year)
● Default value: Starts on Jan 1
21Weekend displaying mode
Show thin or full-sized weekend columns (Saturday and Sunday) on the calendar.
● Possible values:
o Thin weekend columns.
o Full sized weekend columns.
● Default Value: Thin weekend columns
Planned Start/End Dates format
Defines whether Planned Start/Planned End date custom fields has Date Picker type or Date/Time Picker type.
● Possible value:
o Date Only (for Date Picker type)
o Date/Time (for Date/Time Picker type)
● Default Value: Date Only
● Time zone shift/fix setting in Advanced Settings section must be set to 0 in case of Date/Time mode.
Time format
Defines time format for Date/Time fields.
● Possible values:
o 12h am/pm clock
o 24h clock
● Default value: 12h am/pm clock
Confirmation on Event removal
Specifies if ActivityTimeline should show a confirmation box when user clicked on an icon of custom event to
remove it.
● Possible values:
o unchecked - remove custom events without a confirmation dialog
o checked - show confirmation dialog.
● Default Value: checked
Displaying of Resolved Tickets
Controls whether to show resolved issues on timelines and whether to count their remaining time estimate
for the workload.
● Possible values:
o display resolved tickets and count their remaining time estimate for the workload
o display resolved tickets but do not count their remaining time estimate for the workload
o hide resolved tickets and do not count their remaining time estimate for the workload
● Default value: Show on timelines with remaining estimates
22Deadline Warning Period
Defines the amount of days from current date till the due date of the task.
● Default Value: 7 (days)
If the due date is shorter, then the task will appear emphasized (in bold black color by default).
2311. Workload Indicator Settings
ActivityTimeline administrator can define and change the settings of Workload indicator in timeline panel.
Workload Indicator Settings page has 3 sections: Time Tracking, Work Time, Past Days.
Show Workload Indicator
Defines whether ActivityTimeline should show or hide workload/availability indicators.
● Possible values:
o checked - Workload Indicator is shown
o unchecked - Workload Indicator is hidden
● Default value: checked
Workload Calculation Algorithm
Defines calculation algorithm for Workload Indicator.
● Possible values (refer to the Admin Guide for the details):
o BALANCE
o LIQUID.
● Default Value: BALANCE
Time Estimate Format
Defines 'Original Time Estimate' and 'Remaining Time Estimate' values displaying format.
● Possible values:
o Auto - estimate is grouped by periods e.g. 10 hours estimate will show up as '1d 2h';
o Hours - estimate is displayed in hours only e.g. '10h'
o Days - estimate is displayed in days only e.g. '1.25d'
o Weeks - estimate is displayed in weeks only e.g. '0.2w'
● Default Value: Hours
Work hours in day
Defines the number of working hours in a day (default person's involvement in hours per a working day). It
has an influence on the workload/availability indicator.
Also, this setting is used to convert long time estimates from days to hours. E.g. 2 days = 16 work hours by
default.
● Default Value: 8
Work days
Defines the list of work days. 'sat' and 'sun' are treated as weekend and workload indicator will ignore them
during workload calculation as well as vacations, holidays, sick leaves and days off.
● Default Value: Mon, Tue, Wed, Thu, Fri
24Past Days
Determines how worklogs are calculated in the past days.
● Possible values:
o Include past days in workload calculation
o Exclude days from workload calculation
o Exclude past days and current day from workload calculation
o Exclude past weeks from workload calculation
● Default Value: Include past days in workload calculation
Workload & Availability Modes
Choose how the task estimate is split across days if a task is scheduled from the past to the future and has
remaining time estimate.
● Possible values:
o Distribute remaining estimate into past days (not recommended)
o Exclude past (days/weeks/ days and today) from distributing remaining estimate
Detailed documentation: Workload indicator
2512. Advanced Settings
In Advanced Settings ActivityTimeline administrator can turn on REST API, change date and time formats, and
modify Jira integration settings.
Public Jira URL
You may set a custom Jira public URL for issue preview. Useful when you have used localhost as Jira Home
URL in the Jira Integration Settings/Setup Wizard page, but regular Jira users do not have an access to it.
● Default Value: [EMPTY] (ActivityTimeline will use the default Jira Home URL)
ActivityTimeline REST API
Turns on or off ActivityTimeline REST API that enables an access to the scheduling data.
Documentation: http://activitytimeline.com/docs/activitytimeline-rest-api.html
● Possible values:
o checked - REST API is turned on
o unchecked - REST API is turned off
● Default value: unchecked
Default Date Format
Specifies Date format. Should be the same as for Jira Date Picker field.
● Default Value: d/MMM/y
Default Date/Time Format
Specifies DateTime format. Should be the same as for Jira DateTime Picker field.
● Default Value: dd/MMM/yy h:mm a
Timezone shift/fix
Defines Time Zone shift in hours. Please change this value if tasks appear shifted by one day on the
dashboard.
● Possible values:
o negative value - move tasks few hours back;
o positive value - move tasks few hours forward;
o 0 value - no time zone shift.
● Default Value: 11.5
Custom Functionality
Turn On or Off features that are currently not turned on by default.
● Set value to a specific keyword or a combination of them to enable custom ActivityTimeline features.
Default Value: 0
26Reuse Jira Project permissions for each User
Defines whether ActivityTimeline should reuse Jira Project Permissions in addition to built-in ActivityTimeline
User roles. The system will reuse Jira Project Permissions for each logged in user if enabled. Turning on this
feature will decrease performance of the dashboard.
● Possible values:
o unchecked - default ActivityTimeline User Roles are used to filter issues/teams
o checked - Jira Project Permissions and ActivityTimeline User Roles are enabled to filter
issues/projects/teams
● Default value: unchecked
Number of Issues to Load from Jira
Defines the maximum amount of tasks that ActivityTimeline should retrieve from Jira during Setup Wizard
Synchronization
● Recommended maximum: 100000
● Default Value: 30000
Ignore issues older than (NN months)
Do not synchronize issues, which were last modified more than NN months ago.
● Default Value: 12
Amount of Issues to load per request
Defines the amount of issues to load per each request to the server.
● Default Value: 150
Issue ID in Jira
System property. Should not be changed manually.
● Default Value: 10011
Unresolved Resolution ID
Defines an extra resolution status id. Jira tasks with this ID will appear in left issues panel in addition to all
unresolved tasks.
● Default Value: [EMPTY]
2713. Miscellaneous
13.1 ActivityTimeline Upgrade
1. Stop ActivityTimeline application;
2. Backup /activitytimeline/bin/atdb folder and
/activitytimeline/webapps/ROOT/WEB-INF/classes/configuration.properties file
3. Rename current installation directory to /activitytimeline-old;
4. Install new version of ActivityTimeline from an archive into folder;
5. Copy previously backed up atdb folder and configuration.properties file into corresponding folders
of upgraded ActivityTimeline application;
6. Start upgraded ActivityTimeline application (startup location should remain the same);
7. Perform Full Synchronization at http:///issue/issues if you upgraded from an earlier
than v4.0 version of the add-on (screen shot below).
Note: The location of atdb folder is different when running ActivityTimeline as a Windows service.
It is located in Windows system directory:
\System32\atdb or \System32\SysWOW64\atdb
Note 2: You would need to re-install ActivityTimeline Windows Service if upgraded from an earlier than v4.0
version of the add-on.
2813.2 Install ActivityTimeline as Windows service
Please perform the following steps to install ActivityTimeline as Windows service:
• Run the following command to install the service:
c:\path\to\activitytimeline\bin\service.bat install
• Open Start -> Windows Control Panel -> Administration -> Services and find service called
"ActivityTimeline"
• Switch startup mode from Manual to Automatic and start it.
Note: You might need to re-run through the setup wizard steps after switching to a Windows service as the
location of ActivityTimeline data folder (atdb) is different while running from a startup.bat script and as a
Windows service. As an alternative, you may copy all data files from \bin\atdb to
\System32\atdb or \System32\SysWOW64\atdb folder (the folder depends
on Windows version – 32bit or 64bit).
Uninstallation:
Simply launch c:\path\to\activitytimeline\bin\service.bat uninstall command to uninstall the service.
Note: Avoid spaces in folder names.
13.3 How to switch database engine
1. ActivityTimeline is pre-configured to use built-in H2 database.
2. Please refer to activitytimeline/webapps/ROOT/WEB-INF/classes/configuration.properties file if
you'd like to change a database engine to external Oracle DB, MySQL 5.x, PostgreSQL or MSSQL
2008 and above.
3. Please make sure external database is installed on your server before changing the database
connection configuration file.
4. It is also required that “timeline” database already exists and uses UTF8 character set by default.
MSSQL note: It is recommended to use the same collation as for Jira. Usually:
'SQL_Latin1_General_CP437_CI_AI' or 'Latin1_General_CI_AI' case-insensitive.
13.4 Configuring ActivityTimeline to be accessible through HTTPS (SSL)
1. ActivityTimeline uses Tomcat 7 as application server, so HTTPS configuration is the same as for a
regular Tomcat application server.
2. Please refer to the following guide for details:
https://activitytimeline.com/how-to-setup-https-activitytimeline.html
2914. Troubleshooting
14.1 ActivityTimeline application does not start
Please make sure Oracle Java 8 or Oracle JRE 8 is installed on the server. You may download Java 8 at
http://www.oracle.com/technetwork/java/javase/downloads/index.html
It is important to use Oracle Java or JRE (Java Runtime Environment). OpenJDK is not supported.
14.2 Ngnix Configuration
ActivityTimeline works behind the reverse proxy like Apache HTTPD or nginx. It is important to make sure the
proxy server conveys the request headers with underscore. This includes SYNCHRONIZER_TOKEN and
SYNCHRONIZER_URI for CSRF security.
Nginx config sample:
server {
........
underscores_in_headers on;
location / {
proxy_set_header Host $host;
proxy_set_header X-Real-IP $remote_addr;
proxy_set_header X-Forwarded-For $proxy_add_x_forwarded_for;
proxy_set_header X-Forwarded-Proto $scheme;
proxy_pass_request_headers on;
proxy_pass http://127.0.0.1:8040;
}
}
14.3 Running ActivityTimeline from a context path
If you would like to run ActivityTimeline from a context path like http://server:8040/activitytimeline/ then the
following steps should be performed:
1. Stop ActivityTimeline
2. Open /activitytimeline/webapps folder
3. Rename “ROOT” folder to “activitytimeline”
4. Start ActivityTimeline
5. ActivityTimeline should be accessible at http://server:8040/activitytimeline/ url
14.4 Shifted Jira tickets
If ActivityTimeline displays all Jira tickets shifted by one day on the dashboard, then it indicates a time zones
configuration issue. This usually happens when Jira and ActivityTimeline are running on two different
servers with different Time Zone settings.
Please perform the following steps to fix the issue:
• Update the Time Zone on the server with ActivityTimeline to match the Jira server’s one;
30• Reboot the server with ActivityTimeline so the time zone setting are applied to applications;
• Start ActivityTimeline, open step 5 of ActivityTimeline Setup Wizard and perform a complete
synchronization one more time so the system will update all date caches to a proper time zone
setting.
• Alter Time zone shift/fix setting in Configuration > Advanced Settings to compensate the shift.
14.5 Cannot parse date format error
This error occurs if you have configured custom Date or DateTime format in Jira or you are using a locale
different from US (United States).
Please go to http://localhost:8040/config/edit_advanced URL and change the next three fields to match the
settings in Jira:
• Default Date Format d/MMM/yy
• Default Date/Time Format dd/MMM/yy h:mm a
You may specify Default Date/Time Format for Default Date Format field if Jira custom fields have
Date/Time Picker type (Configuration > Timeline Panel settings).
Please take a looks at http://activitytimeline.com/how-to-setup-jira-start-end-date-custom-fields.html for the
details.
14.6 Synchronization does not work after upgrade
This could occur if you were using old version of Jira that was connected through SOAP communication
mode. The latest version of Jira does not support this protocol and uses REST communication mode.
Please go to http://localhost:8040/config/edit_advanced URL and change the next two fields to REST:
• Issues Synchronization Mode REST
• Users Synchronization Mode REST
14.7 ActivityTimeline cannot connect to Jira
Please make sure there is no proxy server between ActivityTimeline and Jira. If ActivityTimeline and Jira are
installed on the same server then you can use localhost in the Jira Home URL.
In this case, Jira Home URL will look like http://localhost:8080
This will require to change Jira URL ActivityTimeline Configuration setting (Configuration >Jira Integration
Configuration page) to point to the external Jira Home URL where all users normally access Jira.
As a result, ActivityTimeline will communicate with Jira internally through a local connection while all
external users will access Jira issues through an external (public) link.
3114.8 ActivityTimeline Sync stopped working
Most likely, the username or password of the synchronization user that ActivityTimeline is using to receive
updates from Jira has changed. You should update them.
Open ActivityTimeline Dashboard > Configuration > Jira Integration Configuration page. Update username
and password of the Synchronization User. Save changes by clicking on Update button at the bottom of the
page.
14.9 Cannot login to ActivityTimeline using my Google Apps account
If you have Google account connected to Jira then you should create a special Atlassian Cloud password to
access ActivityTimeline (separate to your Google Apps password).
If you haven't set an Atlassian Cloud password yet, go to the login page and choose Unable to access your
account? in the Atlassian Cloud login section.
Details: https://confluence.atlassian.com/cloud/manage-your-profile-and-password-744721602.html
14.10 Cannot login to ActivityTimeline Cloud with Jira Cloud two-factor
authentication enabled
It is required to login using email address and Atlassian Login Token as a password when Jira Cloud two-factor
authentication is enabled.
Each user can create an individual API Token at the following page:
https://id.atlassian.com/manage/api-tokens
Afterwards, login into ActivityTimeline by using your email address as username and created API token as a
password (shown on the screenshot below).
Also, you should update the credentials of the AT Synchronization user in the same way (email and token) at
Dashboard -> Configuration -> Edit page.
3214.11 ActivityTimeline Data is gone after restart
Make sure you start ActivityTimeline from the same base folder each time. The system may look for the
configuration data and cache in a different empty folder if started differently.
Also, you can search the hard drive of the server for atdb data folder. If there is more than one occurrence
then you can stop ActivityTimeline, backup both atdb folders, swap them and start ActivityTimeline again.
15. Help Portal
You can access the latest version of the Administrator and User Guides, FAQ and other documentation at
our online portal at:
https://activitytimeline.atlassian.net/wiki/spaces/AC
33You can also read