Cisco Secure Email Cloud Mailbox User Guide - Cisco Systems, Inc.
←
→
Page content transcription
If your browser does not render page correctly, please read the page content below
Cisco Secure
Email Cloud Mailbox User Guide

             Cisco Systems, Inc.   www.cisco.com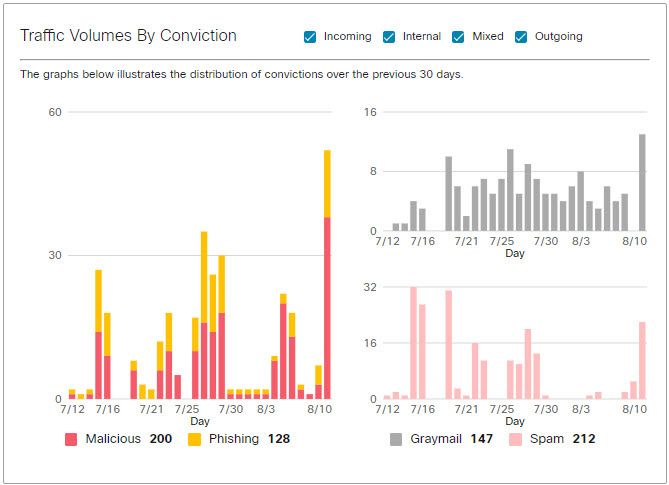
2
Contents
  Introduction . . . . . . . . . . . . . . . . . . . . . . . . . . . . . . . . . . . . . . . . . . . . . . . . . . . . . . . . 5

  Requirements . . . . . . . . . . . . . . . . . . . . . . . . . . . . . . . . . . . . . . . . . . . . . . . . . . . . . . . 7

  Set Up Your Business. . . . . . . . . . . . . . . . . . . . . . . . . . . . . . . . . . . . . . . . . . . . . . . . . 9
           Import Your Domains. . . . . . . . . . . . . . . . . . . . . . . . . . . . . . . . . . . . . . . . . . . . . . . . . 11

  Policy Settings . . . . . . . . . . . . . . . . . . . . . . . . . . . . . . . . . . . . . . . . . . . . . . . . . . . . . 13
           Policy Settings with a Gateway . . . . . . . . . . . . . . . . . . . . . . . . . . . . . . . . . . . . . . . . . 14
           Policy Settings for CES IMD Customers. . . . . . . . . . . . . . . . . . . . . . . . . . . . . . . . . . . 14

  Messages . . . . . . . . . . . . . . . . . . . . . . . . . . . . . . . . . . . . . . . . . . . . . . . . . . . . . . . . 15
      Messages Page Icons. . . . . . . . . . . . . . . . . . . . . . . . . . . . . . . . . . . . . . . . . . . . . . . . . . .             17
      Retrospective Verdicts . . . . . . . . . . . . . . . . . . . . . . . . . . . . . . . . . . . . . . . . . . . . . . . . . .           17
          Retrospective Verdict Email Notifications. . . . . . . . . . . . . . . . . . . . . . . . . . . . . . . . . .                     18
      Investigate Messages . . . . . . . . . . . . . . . . . . . . . . . . . . . . . . . . . . . . . . . . . . . . . . . . . . .           18
          Timeline . . . . . . . . . . . . . . . . . . . . . . . . . . . . . . . . . . . . . . . . . . . . . . . . . . . . . . . . . .     18
          Conversation (Beta) . . . . . . . . . . . . . . . . . . . . . . . . . . . . . . . . . . . . . . . . . . . . . . . . .            19
      Move and Reclassify Messages . . . . . . . . . . . . . . . . . . . . . . . . . . . . . . . . . . . . . . . . . . .                   20
          Audit Mode . . . . . . . . . . . . . . . . . . . . . . . . . . . . . . . . . . . . . . . . . . . . . . . . . . . . . . . .       20
          Audit with Enforcement Mode . . . . . . . . . . . . . . . . . . . . . . . . . . . . . . . . . . . . . . . . . .                  20
              Delete Messages. . . . . . . . . . . . . . . . . . . . . . . . . . . . . . . . . . . . . . . . . . . . . . . . .             21
              About Hybrid Accounts . . . . . . . . . . . . . . . . . . . . . . . . . . . . . . . . . . . . . . . . . . . .                22
      Download Search Results . . . . . . . . . . . . . . . . . . . . . . . . . . . . . . . . . . . . . . . . . . . . . . . .              22
          Download History . . . . . . . . . . . . . . . . . . . . . . . . . . . . . . . . . . . . . . . . . . . . . . . . . . .           22

  Insights . . . . . . . . . . . . . . . . . . . . . . . . . . . . . . . . . . . . . . . . . . . . . . . . . . . . . . . . . . 23
      Trends . . . . . . . . . . . . . . . . . . . . . . . . . . . . . . . . . . . . . . . . . . . . . . . . . . . . . . . . . . . . . .   23
         About Timezones . . . . . . . . . . . . . . . . . . . . . . . . . . . . . . . . . . . . . . . . . . . . . . . . . . .             23
         Messages by Direction . . . . . . . . . . . . . . . . . . . . . . . . . . . . . . . . . . . . . . . . . . . . . . .               24
         Malicious & Phishing . . . . . . . . . . . . . . . . . . . . . . . . . . . . . . . . . . . . . . . . . . . . . . . . .            25
         Spam . . . . . . . . . . . . . . . . . . . . . . . . . . . . . . . . . . . . . . . . . . . . . . . . . . . . . . . . . . . .      25
         Graymail . . . . . . . . . . . . . . . . . . . . . . . . . . . . . . . . . . . . . . . . . . . . . . . . . . . . . . . . . .      25
      Impact Report . . . . . . . . . . . . . . . . . . . . . . . . . . . . . . . . . . . . . . . . . . . . . . . . . . . . . . . . .      26

  Manage Users . . . . . . . . . . . . . . . . . . . . . . . . . . . . . . . . . . . . . . . . . . . . . . . . . . . . . 29

                                            Cisco Systems, Inc.            www.cisco.com

                                                                     3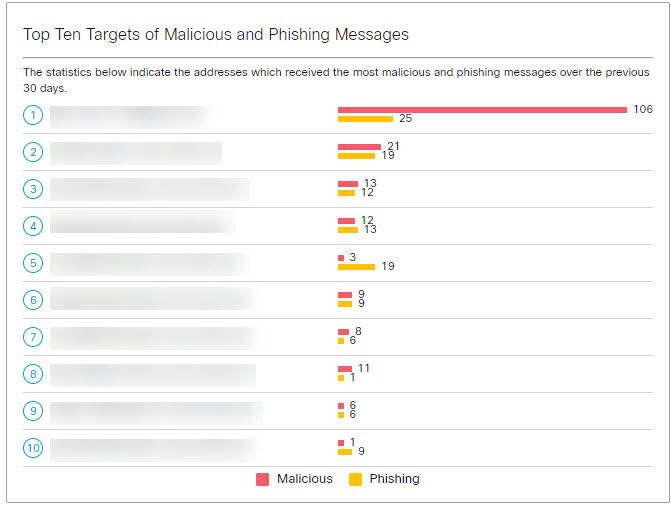
User Roles . . . . . . . . . . . . . . . . . . . . . . . . . . . . . . . . . . . . . . . . . . . . . . . . . . . . . . . . . .       29
    Create a New User . . . . . . . . . . . . . . . . . . . . . . . . . . . . . . . . . . . . . . . . . . . . . . . . . . . .            29
    Edit a User . . . . . . . . . . . . . . . . . . . . . . . . . . . . . . . . . . . . . . . . . . . . . . . . . . . . . . . . . .      30
    Delete a User . . . . . . . . . . . . . . . . . . . . . . . . . . . . . . . . . . . . . . . . . . . . . . . . . . . . . . . .        30

Administration Settings. . . . . . . . . . . . . . . . . . . . . . . . . . . . . . . . . . . . . . . . . . . . . . . 31
    Account Details . . . . . . . . . . . . . . . . . . . . . . . . . . . . . . . . . . . . . . . . . . . . . . . . . . . . . . .        31
    Preferences . . . . . . . . . . . . . . . . . . . . . . . . . . . . . . . . . . . . . . . . . . . . . . . . . . . . . . . . .        31
       Notification Email . . . . . . . . . . . . . . . . . . . . . . . . . . . . . . . . . . . . . . . . . . . . . . . . . . .          31
       Audit Logs . . . . . . . . . . . . . . . . . . . . . . . . . . . . . . . . . . . . . . . . . . . . . . . . . . . . . . . .        31
       Google Analytics . . . . . . . . . . . . . . . . . . . . . . . . . . . . . . . . . . . . . . . . . . . . . . . . . . .            31

User Settings . . . . . . . . . . . . . . . . . . . . . . . . . . . . . . . . . . . . . . . . . . . . . . . . . . . . . . 33
    Details. . . . . . . . . . . . . . . . . . . . . . . . . . . . . . . . . . . . . . . . . . . . . . . . . . . . . . . . . . . . . .   33
    Preferences . . . . . . . . . . . . . . . . . . . . . . . . . . . . . . . . . . . . . . . . . . . . . . . . . . . . . . . . .        33
       SecureX Ribbon. . . . . . . . . . . . . . . . . . . . . . . . . . . . . . . . . . . . . . . . . . . . . . . . . . . .             33
       Themes . . . . . . . . . . . . . . . . . . . . . . . . . . . . . . . . . . . . . . . . . . . . . . . . . . . . . . . . . .        33

SecureX Integration . . . . . . . . . . . . . . . . . . . . . . . . . . . . . . . . . . . . . . . . . . . . . . . . . 35
    SecureX Dashboard . . . . . . . . . . . . . . . . . . . . . . . . . . . . . . . . . . . . . . . . . . . . . . . . . . .              35
       Authorize SecureX Dashboard for your Cloud Mailbox Business . . . . . . . . . . . . . . .                                         35
       Revoke SecureX Dashboard Authorization for your Cloud Mailbox Business . . . . . .                                                36
    SecureX Ribbon . . . . . . . . . . . . . . . . . . . . . . . . . . . . . . . . . . . . . . . . . . . . . . . . . . . . . .           36
       Authorize SecureX Ribbon . . . . . . . . . . . . . . . . . . . . . . . . . . . . . . . . . . . . . . . . . . . .                  36
       Revoke SecureX Ribbon Authorization . . . . . . . . . . . . . . . . . . . . . . . . . . . . . . . . . . .                         37

Deactivate Cloud Mailbox . . . . . . . . . . . . . . . . . . . . . . . . . . . . . . . . . . . . . . . . . . . . . 39
    Delete your Cloud Mailbox journal entry . . . . . . . . . . . . . . . . . . . . . . . . . . . . . . . . . . . . 39
    Delete the Cloud Mailbox application from Azure . . . . . . . . . . . . . . . . . . . . . . . . . . . . . 39

Frequently Asked Questions (FAQ). . . . . . . . . . . . . . . . . . . . . . . . . . . . . . . . . . . . . . 41

                                                                        4
Introduction
  Cisco Secure Email Cloud Mailbox (formerly Cloud Mailbox Defense (Cloud Mailbox)) is an integrated cloud-native
  security solution for Microsoft 365 that focuses on simple deployment, easy attack remediation, and superior visibility.

  A subset of Cloud Mailbox is available to Cisco CES customers as Internal Mailbox Defense (IMD). IMD allows CES
  customers to scan and remediate internal mail.

                                      Cisco Systems, Inc.      www.cisco.com

                                                          5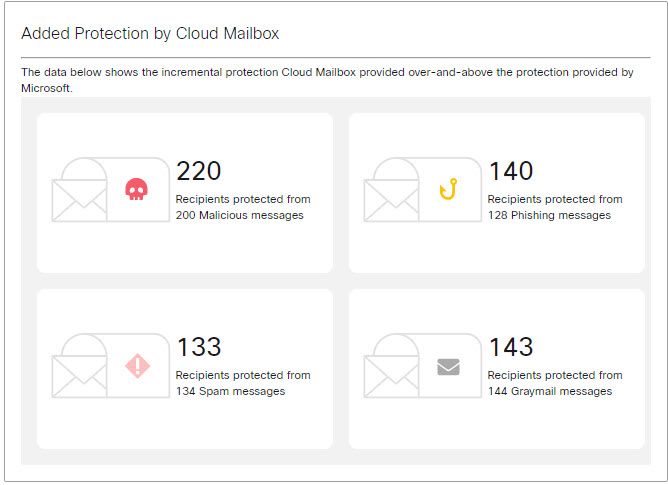
Introduction

               6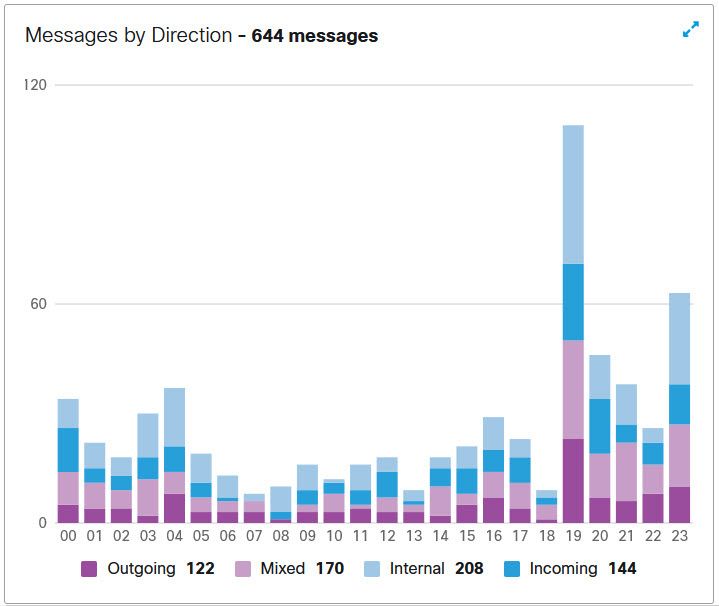
Requirements
The following are required to successfully set up and use Cisco Secure Email Cloud Mailbox:
You have purchased Cloud Mailbox and received a welcome email.
The latest version of one of the following browsers:
— Google Chrome
— Microsoft Edge
— Mozilla Firefox
A Microsoft 365 account with Global Admin rights.
An email address in your Microsoft 365 environment capable of receiving undeliverable journal reports. The email
address used will not be journaled; do not use an address you want Cloud Mailbox to analyze.
Cisco Systems, Inc. www.cisco.com
7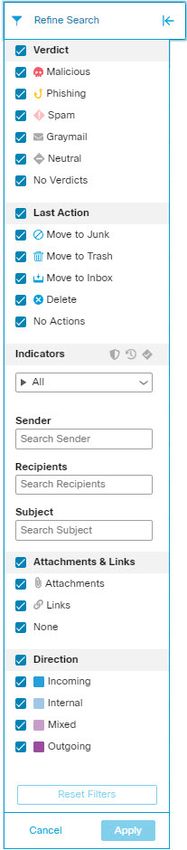
Requirements

               8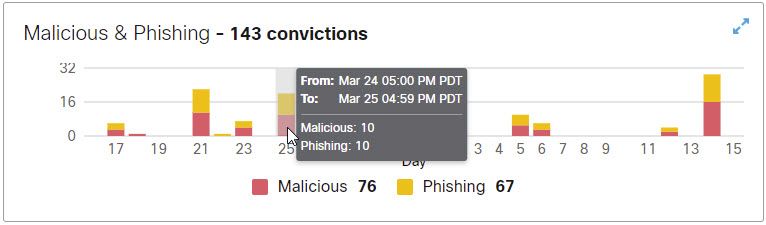
Set Up Your Business
Complete the following steps to set up your Cloud Mailbox business. These steps assume you meet the Requirements,
page 7.
1. Follow the directions in the welcome email from Cisco to set up your account.
Cloud Mailbox uses Cisco SecureX sign-on to manage user authentication. For information on SecureX sign-on, see
https://cisco.com/go/securesignon. If you are an existing SecureX Threat Response, Cisco Secure Malware
Analytics (formerly Threat Grid), or Cisco Secure Endpoint (formerly AMP) customer, be sure to sign in with your
existing credentials. If you are not an existing user, you will be prompted to create a new SecureX sign-on account.
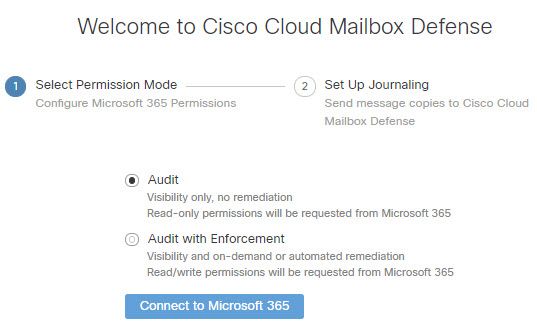
You now have access to the Welcome to Cisco Cloud Mailbox Defense page.
2. Select your Permission Mode.
The Permission Mode defines the type of remediation policy you can apply. There are two Permission Mode options:
— Audit – Allows visibility only, no remediation. Read-only permissions will be requested from Microsoft 365.
— Audit with Enforcement – Allows visibility and on-demand or automated remediation (that is, move or delete
suspect messages). Read/write permissions will be requested from Microsoft 365.
Note: If you choose Audit with Enforcement, you will need to turn on Automated Remediation in your Policy
Settings, page 13. To apply auto-remediation to all internal emails, ensure the Apply auto-remediation to
domains not in the domain list toggle is set to On.
3. Connect to Microsoft 365.
a. Click Connect to Microsoft 365.
b. Log in to your Microsoft 365 account, as prompted. This account must have Global Admin rights so you can set
up journaling in Microsoft 365; the account will not be stored or used by Cloud Mailbox. For information on why
these rights are needed, see Cisco Secure Email Cloud Mailbox FAQ: Why are Microsoft 365 Global Admin rights
required to set up Cloud Mailbox?.
c. Click Accept to accept the permissions for the Cloud Mailbox app. You are redirected to the Cloud Mailbox setup
page.
Cisco Systems, Inc. www.cisco.com
9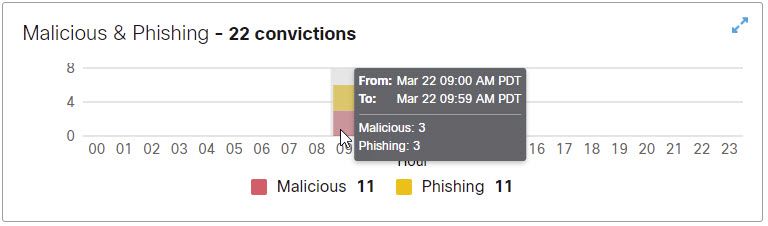
Set Up Your Business

       4. For users with a secure email gateway: Add a connector in Microsoft 365.

          To insure journals are sent directly from Microsoft 365 to Cloud Mailbox without needing to pass through the secure
          email gateway, we recommend adding an outbound connector in Microsoft 365. The connector needs to be added
          before you set up journaling.

          From the Microsoft 365 Exchange Admin Center, create a new connector by using the following settings in the Add
          a connector wizard:

          —    Connection from: Office 365

          —    Connection to: Partner organization

          —    Connector name: Outbound to Cisco Secure Email Cloud Mailbox (select the Turn it on check box)

          —    Use of connector: Only when email messages are sent to these domains (add mail.cmd.cisco.com)

          —    Routing: Use the MX record associated with the partner’s domain

          —    Security restrictions:

               •   Always use Transport Layer Security (TLS) to secure the connection (recommended)

               •   Issued by a trusted certificate authority (CA)

          —    Validation email: Your journal address from the Cloud Mailbox setup page

       5. Set up journaling in Microsoft 365.

          You must configure Microsoft 365 to send journals to Cloud Mailbox. To do this, you add a journal rule.

          Note: Data starts flowing to the Cloud Mailbox back end as soon as you set up your journal rule. The default Cloud
          Mailbox policy settings are applied. You will start seeing data in the console within 10-60 minutes of enabling the
          journal rule.

          Note: A minimal Cisco Secure Malware Analytics (formerly Threat Grid) account will be created and you will receive
          a welcome email from them. The new account is not linked to any existing Malware Analytics/Threat Grid account
          you may have. You do not need to take any action on the Malware Analytics/Threat Grid account to set up Cloud
          Mailbox.

          a.   Copy your journal address from the Cloud Mailbox setup page. If you need to repeat this process later, you can
               also find your journal address on the Administration page.

          b.   Go to your Microsoft 365 Admin Center https://admin.microsoft.com/AdminPortal/Home#/homepage.

               Note: These instructions assume you are using the Classic Exchange Admin Center.

          c.   Navigate to Admin centers > Exchange > compliance management > journal rules.

          d.   Add an Exchange recipient to the Send undeliverable journal reports to field. The email address used will not
               be journaled; do not use an address you want Cloud Mailbox to analyze. If you do not have a recipient you want
               to use for this purpose, you will need to create one.

          e.   Click the + button to create a new journal rule.

          f.   Paste the journal address you copied from the Cloud Mailbox setup page into the Send journal reports to field.

          g.   Enter Cisco Cloud Mailbox in the Name field.

          h.   Select Apply to All Messages from the If the message is sent to or received from drop-down.

          i.   Select the appropriate option from the Journal the following messages drop-down:

                                                                    10
Set Up Your Business
— If you are a Cloud Mailbox customer, select All messages.
— If you are a CES Internal Mailbox Defense (IMD) customer, select Internal messages only.
j. Click Save.
6. Return to the Cloud Mailbox setup page. Click enable policy enforcement.
Note: You will start seeing data in the console within 10-60 minutes of enabling the journal rule. During this caching delay
from the time of tenant integration to the time of journaling being fully enabled, you may receive undeliverable message
reports from Microsoft 365. These messages will stop once the system integration is complete.
For information on reviewing or changing your policy settings, see Policy Settings, page 13. If you have chosen Audit
with Enforcement mode, you should verify your Automated Remediation settings now. To apply automated remediation
to all internal emails, insure Apply auto-remediation to domains not in the domain list is selected.
Import Your Domains
Import your domains so you can apply automated remediation to specific domains.
1. Navigate to Settings (gear icon) > Policy.
2. Click the Update Imported Domains button to import your domains into Cloud Mailbox.
3. Use the check box next to each domain to adjust the automated remediation setting for that domain.
4. Click Save and Apply.
11Set Up Your Business
12Policy Settings
The settings on the Settings (gear icon) > Policy page determine how mail is handled by Cisco Secure Email Cloud
Mailbox. Default settings are applied when you Set Up Your Business, page 9. To change your settings, make the change
and then click the Save and Apply button.
Table 1 Policy Settings
Setting Description Options Default
Permission Mode Defines the type of Audit - Allows visibility only, no Selected when you set up your
remediation policy you can remediation. Read-only business.
apply. permissions will be requested
from Microsoft 365. If you change the Permission
Mode, you will be redirected to
If you select Audit, you need reset your Microsoft 365
only set the Attachment permissions.
Analysis and Message You may also be directed to set
Analysis directions. Other up your journaling; you can skip
policy settings are not this step if you have already set
applicable. up journaling.
Audit with Enforcement - Note: When you choose Audit
Allows visibility and with Enforcement mode, you
on-demand or automated should also verify your
remediation (that is, move or Automated Remediation
delete suspect messages). settings.
Read/write permissions will be
requested from Microsoft 365.
Message Analysis Direction of messages to Incoming All
be dynamically analyzed.
Outgoing
Internal
Attachment Analysis Direction of mail Incoming Incoming
attachments to be
analyzed by Cisco Secure Outgoing
Malware Analytics
(formerly Cisco Threat Internal
Grid).
Remediation Actions Remediation actions for Move to Trash Malicious - Move to Trash
messages found to be
containing Malicious, Move to Junk Phishing - Move to Trash
Phishing, Spam, or
Graymail content. No Action Spam - Move to Junk
Note: If the sender address belongs Graymail - No Action
to a sender allow list in Exchange or
if the message has already been
remediated by Microsoft 365,
remediation actions are not applied.
Cisco Systems, Inc. www.cisco.com
13Policy Settings
Table 1 Policy Settings
Setting Description Options Default
Automated Remediation
Domain-specific Applies automated Checked or Unchecked Unchecked. When you turn on
auto-remediation remediation to a specific Audit with Enforcement mode,
domain. select these check boxes to
apply auto-remediation to
specific domains.
Apply Applies when a domain is Checked or Unchecked Unchecked. When you turn on
auto-remediation to not explicitly listed. For Audit with Enforcement mode,
domains not in the example, if a new domain select this check box to ensure
domain list above has been added to your auto-remediation is applied to
Microsoft 365 account but all internal emails.
not imported into Cloud
Mailbox.
Policy Settings with a Gateway
If you have a Cisco Email Security appliance or similar gateway in place, consider using the following policy settings.
Table 2 Suggested Policy Settings with Gateway
Setting Name Recommended Selection
Message Analysis Outgoing and Internal
Attachment Analysis None
Remediation Actions Malicious - Move to Trash
Phishing - Move to Trash
Spam - Move to Junk
We also recommend bypassing your appliance so journals are sent directly to Cloud Mailbox. Depending on your
appliance, this may involve adding an allow rule with your Cloud Mailbox journal address.
Policy Settings for CES IMD Customers
If you are a CES Internal Mailbox Defense (IMD) customer, your Policy settings are slightly different than they are for
standard Cloud Mailbox customers:
Message Analysis is set to Internal and is not shown on the Policy page.
Attachment Analysis can be set to Enabled or Disabled. If you set this to Enabled, internal attachments are
scanned.
All other Policy settings are as described in the previous sections.
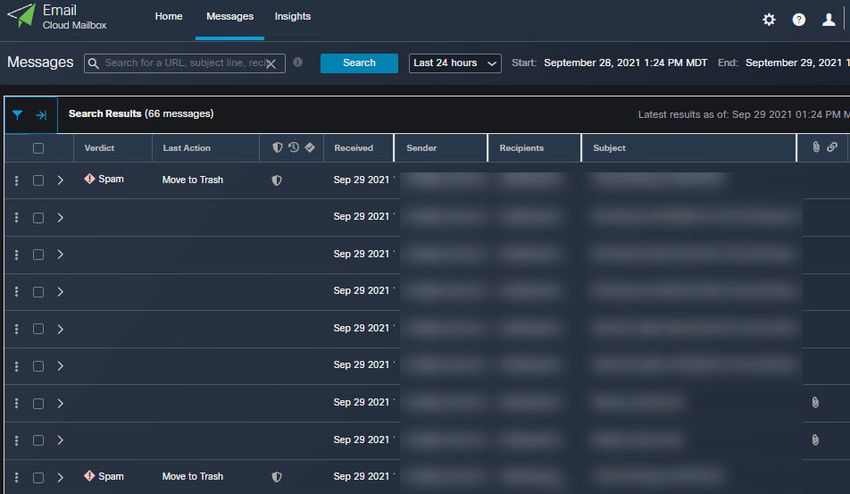
14Messages
The Messages page shows your messages and search results and allows you to look for possible compromises. You can
display up to 100 messages per page.
Use the drop-down menu to show data for a defined time period (Last 24 hours, Last 7 days, Last 30 days), or set a
specific Day, Week, or Custom time frame within the last 90 days.
Use the search field to search for strings or indicators of interest, such as hashes or URLs.
Use the Refine Search filter panel to refine your search. For example, you may want to see all mail sent from a specific
sender, mail with a specific verdict, mail with attachments or links, or mail that has been moved to Junk.
1. Click the arrow to expand the filter panel.
Cisco Systems, Inc. www.cisco.com
15Messages
2. Make your selections, then click Apply. Note that you must have at least one verdict selected.
Use the Reset Filters button to reset the filters to their defaults.
16Messages
Messages Page Icons
Messages Page Icons
The following table shows icons used on the Messages page and their meanings.
Table 1 Messages Page Icons
Icon Name Description
Links Message contains link(s).
Attachments Message contains attachment(s).
Auto-remediated Message was auto-remediated by
Cloud Mailbox.
Retrospective Verdict A Retrospective Verdict was
applied. A Retrospective Verdict is
one that was applied after the
message was first scanned by
Cloud Mailbox.
MS Allow List Cloud Mailbox honored your
Microsoft 365 spam filter allow lists.
Neutral Message has been marked as
Neutral.
Spam Message has been marked as
Spam, either manually or through
auto-remediation.
Phishing Message has been marked as
Phishing, either manually or through
auto-remediation.
Malicious Message has been marked as
Malicious, either manually or
through auto-remediation.
Graymail Message has been marked as
Graymail. Graymail is mail that has
been determined to be marketing,
social, or junk.
Retrospective Verdicts
A retrospective verdict is one that was applied to a message sometime after the message was first scanned by Cloud
Mailbox.
A retrospective verdict in Cloud Mailbox is slightly different that in other Cisco Security products. Although Cloud Mailbox
is not an inline mail processor, it does have a fixed time range for completing its initial analysis of a message. Newer
content engines that have longer analysis times, such as Talos’ Deep URL Analysis, are treated as a retrospective verdict.
As the verdict is delayed, so is the remediation. Thus, Cloud Mailbox tags these convictions distinctly.
17Messages
Investigate Messages
Retrospective verdicts are indicated on the Messages page as shown here.
Retrospective Verdict Email Notifications
To turn email notifications for retrospective verdicts on or off:
1. Select Settings (gear icon) > Administration > Business.
2. Under Notification Email Address, select or deselect Send Notifications for Retrospective Verdicts.
Email notifications for retrospective verdicts are sent to the specified notification email address if the check box is
selected. These notifications are turned on by default.
Investigate Messages
To investigate a message within your Messages page search results, select the > icon to expand a message and see
more details including Sender IP, Microsoft Message ID, Attachments, Links, and more.
Timeline
Select More (vertical ellipses) > Timeline to see the events timeline for a specific message.
The events timeline shows:
Received: when a message was received and details about the message
Verdict: information about any verdict that was rendered
18Messages
Investigate Messages
Action: information about any action that was taken on the message
Conversation (Beta)
Note: This feature is currently in Beta. You may encounter some issues as we work to make it better. Known issues
include:
The + symbols don’t disappear until you click them, even if there are no additional messages
There is a limit of 9 horizontal nodes
Conversation view provides a holistic view of a conversation. Use the conversation view to track the messages in a
conversation and gain a complete understanding of the mail flow. This can be useful in determining where a threat
originated and how it spread within your organization.
Select More (vertical ellipses) > Conversation to see messages that are connected to a specific email.
The node filled in blue represents the message you started with. Click the + icons to expand nodes of the conversation
so you can see messages that came earlier or later in the conversation. Nodes that are expanded are added to the
message grid. shown below the nodes. Nodes and messages are color-coded to indicate Incoming, Outgoing, Mixed,
or Internal.
19Messages
Move and Reclassify Messages
The number within the node circle indicates how many addresses the message was sent to. An icon within a node
indicates if a threat was detected. When you select a node, the corresponding message in the grid is highlighted.
Move and Reclassify Messages
Use the Messages page to move or reclassify messages if you think they have been incorrectly classified. You can move
or reclassify up to 100 messages at a time by changing the number of messages displayed per page.
Note: Reclassifying only affects the verdict on the selected message(s). It does not indicate any change to future
messages from the selected sender or based on the message content. The message will be queued for review by Cisco
Talos. Talos may use the feedback to influence future classifications.
Audit Mode
If you are in Audit mode, you can reclassify (apply a different verdict to) messages.
1. Select the message(s) you want to reclassify.
2. Select a verdict from the drop-down menu. You can reclassify the messages as Malicious, Phishing, Spam,
Graymail, or Neutral.
3. Click Update to apply the new classification.
Audit with Enforcement Mode
If you are in Audit with Enforcement mode, you can move suspicious messages out of user Inboxes and into their Junk
or Trash. Similarly, if you determine a message that was moved to Junk or Trash is not suspicious, you can move it back
to user Inboxes. You can also Delete messages entirely. This process also allows you to reclassify (apply a different
verdict to) messages.
1. Select the message(s) you want to move or reclassify.
20Messages
Move and Reclassify Messages
2. Select a verdict from the Reclassify drop-down menu. You can reclassify the messages as Malicious, Phishing,
Spam, Graymail, or Neutral, or you can Keep verdict.
3. Select an action from the Request Action drop-down menu. You can Move to Junk, Move to Trash, Move to Inbox,
Delete, or Do Not Move.
4. Click Update to apply the new classification and take action on the messages.
If a message has been moved, it is indicated in the Last Action column.
Delete Messages
Super-admin and admin users can use the Delete action in the Reclassify/Remediate workflow to permanently delete
messages from mailboxes. Deleted messages are moved to the recoverableitemspurges folder. This folder is not
accessible to users and Cloud Mailbox cannot restore deleted messages to inboxes.
1. Select the message(s) you want to delete.
2. Select a verdict from the Reclassify drop-down menu. You can reclassify the messages as Malicious, Phishing,
Spam, Graymail, or Neutral, or you can Keep verdict.
3. Select Delete from the Request Action drop-down menu.
4. Click Update to delete the message(s).
5. A Confirm Deletion dialog indicates that messages cannot be recovered and verifies that you want to continue. Click
Delete to continue.
Delete is indicated in the Last Action column. The item cannot be selected or acted upon.
21Messages
Download Search Results
About Hybrid Accounts
Cloud Mailbox can act only on mailboxes located in Exchange Online (O365). If you are in the process of migrating your
mailboxes from on-premises Exchange to Exchange Online (O365), remediation (move or deletion) will only work for
mailboxes located in Exchange Online (O365). You will not be notified that the remediation for on-premises Exchange
mailboxes has failed.
Download Search Results
You can download a CSV file of the data for messages in your search results. Downloads are limited to 10,000 messages.
Complete the following steps to download your data:
1. Click the Download button and select Create Download (.csv).
2. A banner indicating that your request is in progress appears. Click the text to be taken to the Download History:
Messages page.
3. When your download is ready, download your file by clicking the Download icon under the Actions column.
Download History
Your download history is kept for 90 days. Click the Download button and select View Download History to go to the
Download History: Messages page.
This page shows you the date range, who requested the download, the date it was initiated, and the status. Download
your file by selecting the Download icon under the Actions column.
22Insights
Trends
The Trends page shows graphical information about your email data.
Use the drop-down menu to show data for the last 24 hours, the last 30 days, or a specific day within the last 90
days.
Click data of interest in the graphs to be taken to the data details on the Messages page.
Click legend items to be taken to the relevant data on the Messages page. For example, click Incoming to see all
Incoming messages that are currently showing on the chart.
Download your trend data by clicking the download button. The results are exported as a CSV file that
includes:
— an hourly roll-up of the past 90 days of data if you are viewing the last 24 hours or a specific day
— 24-hour roll-ups of the past 90 days of data if you are viewing the last 30 days
Print your Trends charts or save as PDF by clicking the print button.
About Timezones
Each bar on a Last 24 Hours or specific Day chart shows the data for one hour. These charts are based in your bowser’s
local timezone.
Each bar on a Last 30 Days chart shows the data for one 24-hour day. The day is based on UTC 00:00 through 11:59
p.m. and then converted to your browser’s local time.
Cisco Systems, Inc. www.cisco.com
23Insights
Trends
For example, if you are in Pacific Daylight Time (PDT) UTC−07:00, a bar on a Last 30 Days chart would show from
March 24 5:00 p.m. through March 25 4:59 p.m. Pacific.
Messages by Direction
The Messages by Direction graph shows your total email traffic. Mail is divided into the following categories:
Outgoing: mail sent to recipients outside of your business
Mixed: mail with internal and external recipients
Internal: mail sent within your business
Incoming: mail received from outside your business
The legend shows the number of messages in each category.
24Insights
Trends
Malicious & Phishing
The Malicious & Phishing graph shows a snapshot of messages that were determined to be Malicious or Phishing. The
legend shows the number of messages in each category. When you click the data to be taken to the Messages page,
you will be shown either malicious or phishing messages, depending on where your pointer is on the graph.
Spam
The Spam graph shows a snapshot of messages that were determined to be Spam. The legend shows the total number
of messages determined to be Spam.
Graymail
The Graymail graph shows a snapshot of messages that were determined to be Graymail. The legend shows the total
number of messages determined to be Graymail.
25Insights
Impact Report
Impact Report
The Impact Report shows the benefits Cloud Mailbox provided to your business over the last 30 days. Click data of
interest in the report to be taken to the data details on the Messages page.
Data shown includes:
Malicious, Phishing, Spam, and Graymail messages caught by Cloud Mailbox in the last 30 days, and a 1-year
projection of this data. The 1-year projection is calculated as the daily average multiplied by 365.
Traffic Volumes by Conviction. This chart shows the distribution of convictions over the past 30 days. You can filter
this chart by direction.
Added Protection by Cloud Mailbox. This chart shows convictions added by Cloud Mailbox over-and-above those
provided by Microsoft. The data in this chart is based on what was known at the time journals were received.
Depending on your Microsoft license, you may have added protection that could convict additional messages over
time. Any such convictions are not included in this chart’s calculation because they occur post gateway processing.
The values for this chart are calculated as follows:
— Recipients - The number of times Cloud Mailbox stopped the delivery of a convicted message to a recipient
address. A recipient is counted each time they would have received a message.
26Insights
Impact Report
— Messages - The number of messages convicted by Cloud Mailbox that were not convicted by the Exchange
gateway.
Top Ten Targets of Malicious and Phishing Messages. This chart shows the top ten internal targets of malicious and
phishing messages.
27Insights
Impact Report
Top Internal Threats. This chart shows the top ten internal senders of malicious or phishing messages.
28Manage Users
Manage your user accounts from the Settings > Administration page.
Cloud Mailbox uses Cisco’s SecureX sign-on SSO solution for user authentication management. For information on
SecureX sign-on, see https://cisco.com/go/securesignon.
Note: If you are an existing SecureX Threat Response, Cisco Secure Malware Analytics (formerly Threat Grid), or Cisco
Secure Endpoint (formerly AMP) customer, be sure to sign in with your existing credentials. If you are not an existing user,
you must create a new SecureX sign-on account
Although SecureX sign-on allows you to sign on with other types of accounts, we recommend using a SecureX sign-on
account to keep your Cisco security product accounts connected.
User Roles
Role-based access control (RBAC) allows you to have users with different levels of control or access within the
application. Cloud Mailbox users can be created in the roles described in the following table.
Table 1 User Roles
Role Description
super-admin These users have access to all features in Cloud Mailbox. They can alter settings and
policies, and reclassify and remediate messages.
admin These users have all the capabilities of super-admins, except they cannot create, edit, or
delete super-admin or admin users.
analyst These users can use the search and insight capabilities. They can reclassify and remediate
messages, but cannot delete messages from user mailboxes. They cannot make changes
to the business setup or policies or create new users.
read-only These users can use the search and insight capabilities. They cannot reclassify or remediate
messages, make changes to the business setup or policies, or create new users.
Note: You cannot edit an existing user’s role. If you wish change a user’s role, delete the existing user then create a new
user with the same email address and the desired role.
Create a New User
Complete the following steps to create a new user:
1. Select Settings (gear icon) > Administration > Users.
2. Click Add New User.
3. Enter the user's credentials, select a role, then click Create.
Note: The user’s email address must match the one they use for their SecureX sign-on account.
Cisco Systems, Inc. www.cisco.com
29Manage Users
Edit a User
The user receives an email with the subject Welcome to Cisco Cisco Secure Email Cloud Mailbox. They must follow
the directions in the email to set up a SecureX sign-on account (if they do not already have one) and log in.
Edit a User
If a user changes their name you can edit it inline on the Administration page. You cannot edit a user's email address or
role.
To edit a user’s information:
1. Select Settings (gear icon) > Administration > Users.
2. Hover over the name you want to change and click the pencil icon to edit the name.
3. Enter your updated text, then click the check mark to save the change.
Delete a User
Complete the following steps to delete a user:
1. Select Settings (gear icon) > Administration > Users.
2. Click the trash can icon next to the user's name.
3. Click Delete in the Confirm Deletion dialog to complete the action.
A status message shows the deletion is complete. This deletes the user’s account from Cloud Mailbox, but does not
delete their SecureX sign-on account.
30Administration Settings
The administration settings described in this section are accessible from Settings (gear icon) > Administration >
Business.
Account Details
The Account Details section shows the following identifiers for your business:
Microsoft 365 tenant ID
journal address
business ID
support subscription ID
It also includes the license information table that shows your license type, subscription ID, seat count, and the start and
end dates of your license.
Preferences
The Preferences section includes your notification email address, access to audit logs, and your Google Analytics setting.
Notification Email
The notification email address is the address Cisco sends emails about Cloud Mailbox to. For example, we may send
notifications about updates to the system, new features, scheduled maintenance, and so on. This is initially set to the
email address of your business’s initial user.
You can choose whether or not to send notifications for retrospective verdicts to your notification email address. An email
will be sent when a retrospective verdict is applied to messages.
Audit Logs
You can download audit logs for the previous 3 months as CSV files. Select a date range from the drop-down, then click
Download CSV.
Google Analytics
Google Analytics is initially enabled or disabled when you set up Cloud Mailbox and accept the Terms and Conditions.
When enabled, Cisco collects non-personally-identifiable usage data, including but not limited to sender, recipient,
subject, and URLs, and may share that data with Google Analytics. This data allows us to better understand the way Cloud
Mailbox meets your needs.
Cisco Systems, Inc. www.cisco.com
31Administration Settings
Preferences
32User Settings
Settings for individual user profiles are accessible from User (profile icon) > User Settings.
Details
The Details section includes your user name, role, and organization.
Preferences
The Preferences section includes your SecureX Ribbon authorization and theme appearance settings.
SecureX Ribbon
Cloud Mailbox is integrated with SecureX ribbon. The ribbon allows you to navigate between Cisco security products,
access casebook, search observables, and view incidents. SecureX ribbon is authorized per user. For more information,
see SecureX Integration, page 35.
Themes
You can choose to view Cloud Mailbox with a light or dark background. To switch the mode, go to User (profile icon)>
User Settings > Preferences > Theme. Images in this guide are usually shown in the light theme. The dark background,
dusk, is shown below.
Cisco Systems, Inc. www.cisco.com
33User Settings
Preferences
34SecureX Integration
Cisco SecureX connects Cisco security products into an integrated platform. Cloud Mailbox is integrated with SecureX
dashboard and SecureX ribbon.
SecureX dashboard allows you to see Cloud Mailbox information alongside data from your other Cisco security
products.
SecureX ribbon allows you to navigate between Cisco security products, access casebook, search observables, and
view incidents.
For details on SecureX not provided in this document, see the SecureX documentation:
https://securex.us.security.cisco.com/help/securex/topic/introduction
SecureX Dashboard
Cloud Mailbox provides the following tiles that can be viewed in the SecureX dashboard:
Messages by direction: Shows your total email traffic by direction. Mail is divided into Outgoing, Mixed, Internal, and
Incoming.
Malicious and Phishing: Shows a snapshot of messages that were determined to be Malicious or Phishing.
Spam: Shows a snapshot of messages that were determined to be Spam.
Graymail: Shows a snapshot of messages that were determined to be Graymail.
For information on SecureX dashboard, see the SecureX documentation:
https://securex.us.security.cisco.com/help/securex/topic/dashboard
Authorize SecureX Dashboard for your Cloud Mailbox Business
Before you can authorize SecureX for Cloud Mailbox, you must have a SecureX account and be part of a SecureX
organization. For more information, see the SecureX documentation:
https://securex.us.security.cisco.com/help/securex/topic/introduction
Cloud Mailbox super-admin and admin users can authorize the SecureX module for their Cloud Mailbox business:
1. Select Settings (gear icon) > Administration > Business.
2. Under Preferences > SecureX Dashboard, click Authorize SecureX Integration.
3. Complete the authorization flow.
A banner appears, stating that SecureX configuration was successful.
You can now add Cloud Mailbox tiles to your SecureX dashboard. For information on how to do this, see the SecureX
documentation: https://securex.us.security.cisco.com/help/securex/topic/configure-tiles
Cisco Systems, Inc. www.cisco.com
35SecureX Integration
SecureX Ribbon
Revoke SecureX Dashboard Authorization for your Cloud Mailbox Business
Note: Any super-admin or admin user can perform this task. It does not have to be performed by the user who authorized
SecureX Dashboard for the business.
To revoke SecureX authorization for your Cloud Mailbox business:
1. Select Settings (gear icon) > Administration > Business.
2. Under Preferences > SecureX Dashboard, click Revoke Authorization.
A banner appears, stating that SecureX configuration was successfully updated.
SecureX Ribbon
The SecureX ribbon is located in the lower portion of the page, and persists as you move between Cloud Mailbox and
other Cisco security products in your environment. Any Cloud Mailbox user can authorize the SecureX Ribbon for their
use. Use the ribbon to navigate between your Cisco security applications, access casebook, search observables, and
view incidents.
For information on SecureX Ribbon, see the SecureX documentation:
https://securex.us.security.cisco.com/help/securex/topic/ribbon
When you authorize the ribbon, SecureX pivot menus are added within the Cloud Mailbox expanded message view.
These menus give you a central point of access to additional information about each observable, depending on which
Cisco security products you have purchased.
For information on SecureX pivot menus, see the SecureX documentation:
https://securex.us.security.cisco.com/help/securex/topic/pivot-menu
Authorize SecureX Ribbon
SecureX ribbon is authorized at the user level. You can authorize the ribbon from within the ribbon or from the User
Preferences menu.
Note: Your SecureX account needs to be activated before you can authorize ribbon. You can do this by following the
instructions in Authorize SecureX Dashboard for your Cloud Mailbox Business, page 35 or by integrating any other
modules in SecureX.
36SecureX Integration
SecureX Ribbon
Authorize from within Secure X Ribbon
To authorize your SecureX ribbon from within the ribbon:
1. Click Get SecureX in the SecureX ribbon.
2. In the Grant Application Access dialog, click Authorize Cisco Secure Email Cloud Mailbox Ribbon.
Your SecureX ribbon is now authorized. A banner appears, stating that SecureX configuration was successfully updated.
Authorize from Cloud Mailbox User Settings
To authorize your SecureX ribbon from the User Settings menu:
1. Select User (profile icon) > User Settings.
2. Under Preferences > SecureX Ribbon, click Authorize SecureX Ribbon.
3. In the Grant Application Access dialog, click Authorize Cisco Secure Email Cloud Mailbox Ribbon.
Your SecureX ribbon is now authorized. A banner appears, stating that SecureX configuration was successfully updated.
Revoke SecureX Ribbon Authorization
SecureX ribbon is authorized at the user level. You can revoke authorization from within the ribbon or from the User
Preferences menu.
Revoke Authorization from within Secure X Ribbon
To revoke your SecureX ribbon authorization from within the ribbon,
1. Select Settings > Authorization > Revoke in the SecureX ribbon.
2. In the Revoke dialog, click Confirm.
SecureX ribbon is no longer authorized for your Cloud Mailbox account.
Revoke Authorization from Cloud Mailbox User Settings
To revoke your SecureX ribbon authorization from the User Settings menu:
1. Select User (profile icon) > User Settings.
2. Under Preferences > SecureX Ribbon, click Revoke Authorization.
SecureX ribbon is no longer authorized for your Cloud Mailbox account. A banner appears, stating that SecureX
configuration was successfully updated.
37SecureX Integration
SecureX Ribbon
38Deactivate Cloud Mailbox
To deactivate Cloud Mailbox, there are two main tasks:
Delete your Cloud Mailbox journal entry from Microsoft Exchange Admin Center
Delete the Cloud Mailbox application from your Microsoft Azure tenant
Delete your Cloud Mailbox journal entry
1. Go to your Microsoft 365 Admin Center https://admin.microsoft.com/AdminPortal/Home#/homepage
2. Navigate to Admin centers > Exchange > compliance management > journal rules.
3. Select the Cloud Mailbox journal rule, then click Delete. Select Yes to confirm you want to delete the journal rule.
Delete the Cloud Mailbox application from Azure
1. Go to portal.azure.com.
2. Search for and select Enterprise applications.
Note: If you are using an older view in Azure, this may be called App registrations.
3. Locate and select the CMD and/or CMD (Read Only) application.
4. In the left pane, select Properties.
5. Click the Delete button, then select Yes to confirm you want to delete the CMD app.
Cisco Systems, Inc. www.cisco.com
39Deactivate Cloud Mailbox
Delete the Cloud Mailbox application from Azure
40Frequently Asked Questions (FAQ)
Frequently asked questions are available in the Cisco Secure Email Cloud Mailbox FAQ.
Cisco Systems, Inc. www.cisco.com
41Frequently Asked Questions (FAQ)
42You can also read