UR Courses v3.1 Gradebook - University of Regina
←
→
Page content transcription
If your browser does not render page correctly, please read the page content below
UR Courses v3.1
Gradebook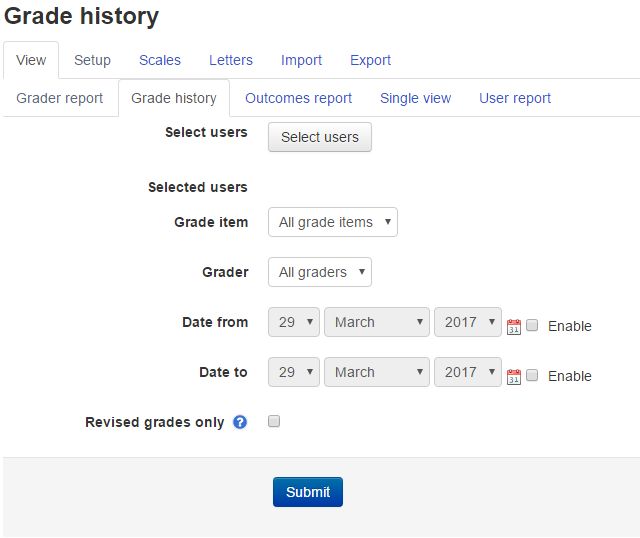
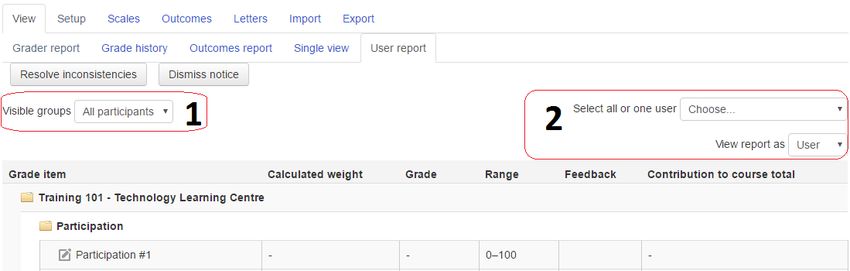
Table of Contents

Chapter 1   Gradebook Overview ................................................................ 6
            Access Gradebook..................................................................... 6
            Instructor View ......................................................................... 6
            Anatomy of the Gradebook ....................................................... 7
            I.      Columns ....................................................................... 7
            II.     Categories .................................................................... 7
            Viewing the Gradebook............................................................. 8
            I.      Grader Report .............................................................. 8
            II.     Grade History ............................................................. 10
            III.    Outcome Report ......................................................... 11
            IV.     Single View ................................................................. 11
            V.      User Report ................................................................ 12
            Entering Grades ...................................................................... 12
            Grades Display ........................................................................ 14
            Show/Hide Icons ..................................................................... 14

Chapter 2   Gradebook Setup .................................................................... 14
            Gradebook Setup Tab ............................................................. 14
            Adding a Grade Item ............................................................... 16
            Adding a Category ................................................................... 18
            Moving Categories and Items .................................................. 20
            Editing a Category or an Item .................................................. 21
            Aggregation ............................................................................ 21
            Extra Credit ............................................................................. 24
            Setting Max Grades ................................................................. 24

Chapter 3   Scales...................................................................................... 25
            Outcomes ............................................................................... 25
            Scales...................................................................................... 25
            Custom Scales ......................................................................... 28

Chapter 4   Settings and Preferences......................................................... 30
            Settings................................................................................... 30
            I.      Course Settings........................................................... 30
            II.     Activity Settings .......................................................... 31
            III.    Gradebook Settings .................................................... 31
            Course Grade Settings............................................................. 32
            Preferences: Grader Report .................................................... 33
            Hiding the Course Total ........................................................... 34

Chapter 5   Exporting and Importing ......................................................... 36
            Importing Grades to the Gradebook........................................ 36
            I.      CSV Import ................................................................. 36
            II.     XML Import ................................................................ 38
            Exporting Grades from the Gradebook .................................... 39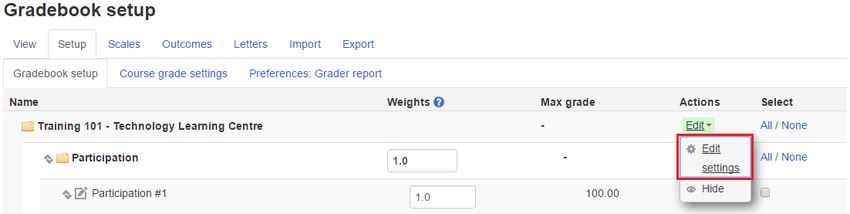
Exporting Gradebook to DOME ............................................... 40
Chapter 1 Gradebook Overview
Both instructors and students have Grades in the Administration block within each course. Grade items
are automatically added when an assignment or quiz is created. You may also manually create items to
add to the grader report. The Gradebook is a robust tool with many advanced features including
formula calculations.

       Access Gradebook
       To access Grades module:
           1. Login and select the course title.
           2. Select Grades in the Administration side block to view the Grader report which lists
              student names, ID, and grading columns.
           OR
           1. Select Gradebook setup in the Administration side block to setup the Gradebook.

                      Instructor View                                 Student view

Note: Some courses with customized templates may also have a Grades icon along the top of the page.

6|P a ge                         UR Courses Gradebook • May 2018                  University of Regina
Anatomy of the Gradebook
When you navigate to the gradebook in your course, you will see one or more columns and one
or more categories.
I. Columns
Columns are grade items, which will correspond to the assignments and other activities created
in your course or will correspond to items added manually (more on that later).
II. Categories
Categories are folders. Categories allow you to group similar kinds of grade items (quizzes, for
example) and assign weight to a group of assignments. A main parent category for the course
will automatically be created and it will be labeled with the course name by default.
The default view is the Grader Report:
1. Tabs: These Tabs allow you to navigate to different parts of the gradebook, including
different views of the gradebook as well as the Gradebook setup (more on this later).
2. Participants: You can choose to organize the gradebook by groups (if you have enabled
groups at the course level) or by selecting corresponding first letters of student’s first
and last names.
3. List of Participants: Here your students will be listed as per how you have elected to
organize the gradebook.
4. Category: Here is an example of a category, which includes one grade item as well as a
category total. You can build other categories to organize your gradebook and
distribute weight (in this case, there is an Assignments category).
University of Regina UR Courses Gradebook • May 2018 P age |75. Grade Items: These are the columns that correspond to other grade items. When you
turn your editing on, you will be able to enter grades for each student in the appropriate
columns.
6. Course Total: The default in UR Courses is to show the course total, which will calculate
the total based on how you have set up the aggregation of your course and categories.
It is possible to disable the course total.
Note: This course total is not the official course total. Final marks must be entered in to DOME at the
end of the semester.
7. Range and Overall Average: These two rows display the grade range for the grade item
or category total and the class average for grade items.
Viewing the Gradebook
When you click on the View tab there are subtabs were you can view:
I. Grader Report
The Grader report is where you can view and enter grades. You can view and enter grades for
each individual student, and you can view and enter grades for groups of students (if you have
Groups enabled at the course level).
Grader Report – Editing OFF
8|P a ge UR Courses Gradebook • May 2018 University of ReginaGrader Report – Editing ON
If you have groups enabled in your course settings and you have created groups from your class
list, you can separate your grade book into group views.
To view Groups:
1. Access the gradebook for your course.
2. In the View tab of the Grader Report, click the dropdown menu on the left side of the
page underneath the tabs. The default is “All participants”. Click the name of the group
you want to view.
3. You will now see grades for only that group of students. The group view includes the
group average for assignments as well as the overall course average for each
assignment.
University of Regina UR Courses Gradebook • May 2018 P age |9II. Grade History
The Grade history report allows you to view the grade history of a specific student(s), grade
item(s), and/or grader(s) between specific dates.
10 | P a g e UR Courses Gradebook • May 2018 University of ReginaIII. Outcome Report
The outcome report shows the progress of a student through outcomes if you have outcomes
set up for your course. The report shows the name, course, site wide average, the activity,
average values, and the number of grades given.
IV. Single View
The single view report allows you to view all the grades of one student OR all the grades of
every student for a grade item. Use the drop down menus on the right side of the screen to
change what type of single report you are viewing.
University of Regina UR Courses Gradebook • May 2018 P a g e | 11V. User Report
The User report in the view tab is much like the Grader report, in that the grader can view
student grades, but in the User Report, you are viewing one student’s record at a time.
1. This dropdown menu gives you the ability to organize and view students via their
assigned groups, if applicable.
2. Here you can select which student you wish to view. Additionally, the View report as
menu allows to see the report as the student would see it.
Entering Grades
You may enter grades directly into the Gradebook or you may enter grades through the
assignments. If you are entering grades directly into the Gradebook, the
Gradebook is constructed like an Excel spreadsheet.
To enter grades into the gradebook:
1. Access the Gradebook.
2. Turn editing on. Ensure you are in the Grader Report.
3. Type grades into the boxes with solid lines in the corresponding
grade item column and student row.
4. To enter feedback, type text directly into the box with the
checkered lines directly to the right of the grade field.
TIP: The student’s name and ID will always be visible on screen,
regardless of how many assignments you have in your gradebook.
Note: Entering a grade from the grader report causes the grade to be flagged as "Overwrite," meaning
you have manually entered a grade rather than using the grade sheet for a specific assignment.
This is not a problem; it is just an alert that this grade has been manually overwritten. This does,
however, finalize the grade and will not let you change the grade in any page other than the
grader report.
12 | P a g e UR Courses Gradebook • May 2018 University of ReginaTo enter grades through assignments:
1. Access the assignment from the course homepage.
2. Click the View/grade all submissions link at the link underneath the Grading summary.
3. A submission overview page will appear. Click the Edit button underneath the Grade
column link for the student whose grade you would like to enter.
4. A submission status and grading window will appear. Here you can choose the grade
according to the value range, scale, or outcome you’ve specified for the assignment,
enter feedback in the text box, and browse for and upload response files to send
directly to the student. The grade will now automatically be included in the Gradebook.
Quick grading:
Quick grading allows you to grade right from the assignment’s grading page instead of opening
up a grading window for each student.
1. Access the assignment from the course homepage.
2. Click the View/grade all submissions link at the link underneath the Grading summary.
3. The submission overview page will appear. Scroll to the bottom of the page to the
Options section. Click on the checkbox beside Quick grading.
4. You will now see a box underneath the Grade and Feedback columns for each student
where you can now enter your grades and comments.
University of Regina UR Courses Gradebook • May 2018 P a g e | 13Grades Display
There are three ways categories/folders can be displayed in the Grader report. Each section has
a small icon immediately to the right of its name. Clicking this will cycle through these display
modes for that category. is grades only view, goes to full view and goes to collapsed
view.
1. Grades only view - without the category totals column
2. Collapsed view - category total column only
3. Full view - grades and the aggregates (the totals column for the category)
Show/Hide Icons
Once you are inside the gradebook, in the Grader Report view, and you have turned your editing
on, you should see a number of icons and boxes. The boxes are where you will enter grades
and feedback comments. In addition to the boxes appearing, icons in the shape of eye will
appear beside every category, grade item, and grade cell. These icons allow you to hide the
marks from students. You can hid the entire gradebook, hide the marks for an entire category,
hide the marks for an entire grade item, or hide a single mark for a student.
To hide the marks you just need to click on the “eye” for the corresponding category, item or
mark you wish to hide. The eye will then have a slash through it.
To show the marks you have hidden, you just need to click on the “eye”.
Chapter 2 Gradebook Setup
Gradebook Setup Tab
The gradebook setup tab allows you to view the gradebook in a different format, giving you a
visual of all your categories and items, without being cluttered by marks. Here you can also add
categories (folders) and grade items (columns in the gradebook) manually for occasions that you
need to post a mark for an assignment or activity that is not submitted through UR Courses.
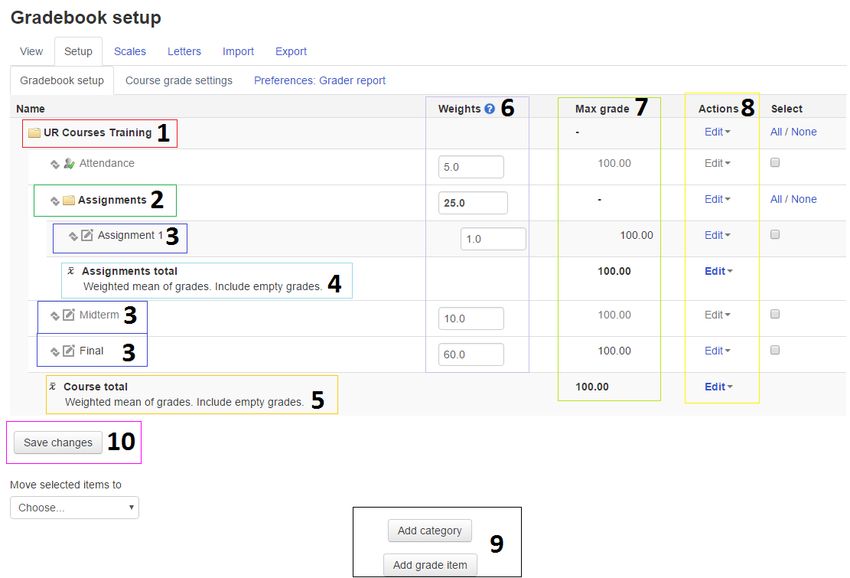
14 | P a g e UR Courses Gradebook • May 2018 University of Regina1. Parent Folder: This is usually the name of the course. This folder acts as the parent
folder for all other items in the gradebook.
2. Category: This is also called a folder. Categories are used to collect a group of
assignments, quizzes, exams or other activities and to distribute weight.
3. Grade Item: A grade item may automatically appear in the gradebook from an item
built into the course, or it may be added to the gradebook manually (for items graded
outside UR Courses).
4. Category Total: The category total is calculated as per your aggregation settings. The
category total can be named or left with the default name of “Total”.
5. Course Total: This is the total that belongs to the parent category for the course (1) and
is calculated based on your aggregation settings.
6. Weights/Aggregation: This is where you can adjust the weights for your categories and
grade items towards the course total, depending on your aggregation settings.
7. Max Grade: The maximum grade a student can achieve in an assignment (grade item)
or category.
University of Regina UR Courses Gradebook • May 2018 P a g e | 158. Actions: Actions include deleting the grade item (this is dependent on how the grade
item was set up initially as most assignments require you to delete them from the main
course page), hiding/unhiding the grade item, and editing the grade item settings.
9. Add category/ Add grade item: You can move selected items to another category by
selecting a category from the menu.
10. Save changes: Any edits or additions made must be saved via the “Save changes”
button for them to be applied to the gradebook.
Adding a Grade Item
There are two ways to add grade items (assignment columns) to the gradebook:
1. Build an assignment or quiz into your course. Any activities you build into the main
page of your course will automatically appear in the gradebook if the activity has a built-
in grade option and you use it. For example, if you use the “Add an Activity” on the
main page of your course, you will have a corresponding grade item (column)
automatically appear in your gradebook.
2. Add a Grade Item manually in the Gradebook.
To Add a Grade Item Manually:
1. Access the Gradebook.
2. Click the Setup tab and then the Gradebook setup tab.
3. Click Add grade item at the bottom of the page.
4. Set your settings appropriately.
1. Item name: The item name should be descriptive and meaningful for students
(Midterm Essay, for example).
16 | P a g e UR Courses Gradebook • May 2018 University of Regina2. Grade type: Specifies the type of grade used. Types include:
1. Value – enables the maximum and minimum grade settings.
2. Scale – enables the scale setting
3. Text – feedback only.
Only value and scale grade types may be aggregated. The grade type for an activity
based grade item is set on the update/edit page for that activity.
3. Scale: You can choose a scale if you are using the scale Grade type.
4. Maximum grade: The maximum grade allowed for the assignment.
5. Minimum grade: The minimum grade allow if needed.
6. Grade to Pass: This setting can be used to set a grade that users must equal or
exceed to pass.
7. Grade display type: Specifies how to display grades in the grader and user
reports. Grades may be shown as actual grades, as percentages or as letters.
University of Regina UR Courses Gradebook • May 2018 P a g e | 178. Overall decimal points: Specifies the number of decimal points to display for
each grade. This setting has no effect of grade calculations, which are made
with an accuracy of 5 decimal places.
9. Hidden: Checkbox allows you to hide the assignment column.
10. Hidden Until: Enables you to enter the date until which the grades will be
hidden to participants (usually after the end of the activity and of the grading
process).
11. Locked: Checkbox allows you to lock the grade item. Both whole columns and
individual grades can be locked in the gradebook via the locked field. Teachers
may want to do this to prevent further changes from the modules or from other
teachers. When a grade is locked, any changes that might affect that grade are
ignored. When the graded item is unlocked, activities are asked to resend the
latest grades. One way to lock is to click the lock icon beside the grade item
either in the Categories and Items tab or in the Grader Report.
12. Locked after: Allows you to specify the date after which the grades will be
locked. Usually this date is set to the end of the activity and the beginning of
the grading process.
13. Weight adjusted: If using weights unchecking this will reset the grade item
weight to its automatically calculated value. Checking it will allow you able a
weight manually.
14. Weight: If you checked the Weight adjusted setting you can set weight of the
item relative to the category/course.
15. Grade category: Select the parent category for the grade item.
Note: Grade items added manually to the Gradebook will not appear as “clickable” links. Grade items
that appear in the Gradebook automatically as a result of an activity added to the course, will
appear as a green “clickable” link that will take you directly to that assignment, exam or activity.
Adding a Category
Categories act as folders to group similar grade items in the gradebook (“Essays” for example).
Using categories enables you to have totals for groups of assignments and otherwise manage
assignments as a group.
To add a category:
1. Access the Gradebook.
2. Click the Setup tab and then the Gradebook setup
tab.
3. Click Add category at the bottom of the page
4. Set your Grade category settings appropriately.
18 | P a g e UR Courses Gradebook • May 2018 University of Reginaa. Category name: Should be descriptive and meaningful to students (“Essays” for
example).
b. Aggregation: The way grades will be totaled for a category. See Aggregation
section for more information.
c. Exclude empty grades: If checked, any grade items that do not have a mark for a
student will not be included when calculating the category total.
d. Include outcomes in aggregation: If enabled, outcomes are included in the
aggregation. This may result in unexpected category totals.
e. Drop the lowest: Enables you to automatically drop the lowest x number of grades
within a category.
5. Set your Grade item (Category Total) settings.
a. Category total name: The grade item here is the Category total column. The item
name should be meaningful and reflect this (“Essays Total” for example). If you do
not give the totals column a name, the default will be “Total” which can be
confusing especially if you have a number of categories.
University of Regina UR Courses Gradebook • May 2018 P a g e | 19b. Set other settings according to “Add a grade item” instructions.
6. Click Save changes. The category will now appear in your gradebook.
Note: The category (column) will expand as you add grade items to it.
Moving Categories and Items
Now that you have your categories and items created in the gradebook, you may want to move
some items around. For example, if you create a category after you have created all the grade
items you need, you will have to move the grade items into the category folder.
To move items in the gradebook:
1. Access the Gradebook.
2. Click the Setup tab.
3. Click the “Move” icon next to the item you would like to move.
20 | P a g e UR Courses Gradebook • May 2018 University of Regina4. A series of blocks will appear. Click the block between the items where you want the
item to go.
5. Click Save changes.
To move several grade items at the same time:
1. Access the gradebook.
2. Click the Setup tab.
3. Click the checkbox to the right of any items you want to move in the
Select column.
4. At the bottom, the Move selected items to box should now be enabled.
5. Click on the box and choose the category you would like to move the
items to.
6. The items should now appear in the chosen category. Click “Save
changes”.
Editing a Category or an Item
If you need to, you can easily go back and edit a category or item using the edit/update icons
beside the item in the Setup tab.
To edit a category or grade item click on the Edit menu in the Actions column. Then click on
Edit Settings.
Aggregation
The aggregation is the way in which the grades will be totaled for a category.
University of Regina UR Courses Gradebook • May 2018 P a g e | 21To Adjust Aggregation:
1. Access the gradebook via the Administration block.
2. Click the Setup tab.
3. Click on Edit button in the Actions column and the Edit settings option in the menu that
appears.
4. Select Aggregation type from the drop-down menu.
Aggregation Types:
Mean of Grades
The sum of all grades divided by the total number of grades
A1 70/100, A2 20/80, A3 10/10, category max 100:
(0.7 + 0.25 + 1.0)/3 = 0.65 65/100
Setting the Course aggregation to Mean of Grades gives everything in the gradebook
equal weight in the course total, even if the marks are different for each assignment.
For example, if one essay out of 10 would have the same weight as an essay out of 20.
Weighted Mean of Grades
Each grade item can be given a weight, which is then used in the arithmetic mean aggregation to
influence the importance of each item in the overall mean. In simple terms, the category total
will be equal to the sum of the scores in each grade item, these scores being multiplied by the
grade items’ weights, and that sum being finally divided by the sum of the weights.
A1 70/100 weight 10, A2 20/80 weight 5, A3 10/10 weight 3, category max 100:
(0.7*10 + 0.25*5 + 1.0*3)/18 = 0.625 62.5/100
Once this aggregation is selected, a weight box will appear in the
gradebook setup. Enter the weight in the box and press Enter for each
item to be weighted.
Weights may be fractions (.25, .5) or integers (25, 5). However, be
consistent in your use of fractions or integers.
Weights do not have to add up to 100, although they usually will.
Simple Weighted Mean
The difference from Weighted mean is that weight is calculated as Maximum
grade – Minimum grade for each item. Such as, 100 point assignment has weight 100, 10 point
assignment has weight 10.
22 | P a g e UR Courses Gradebook • May 2018 University of ReginaA1 70/100, A2 20/80, A3 10/10, category max 100:
(0.7*100 + 0.25*80 + 1.0*10)/190 = 0.526 52.6/100
Weights are determined by the number of possible points in a graded item.
Similar to Sum of Grades, the difference being that Simple Weighted Mean displays
percentages (when the category max is 100) and Sum of Grades displays points.
Lowest Grade
The result is the smallest grade after normalization. It is usually used in combination with
Aggregate only non-empty grades.
A1 70/100, A2 20/80, A3 10/10, category max 100:
min(0.7 + 0.25 + 1.0) = 0.25 25/100
Highest Grade
The result is the highest grade after normalization.
A1 70/100, A2 20/80, A3 10/10, category max 100:
max(0.7 + 0.25 + 1.0) = 1.0 100/100
Mode of Grades
The mode is the grade that occurs most frequently. It is more often used for non-numerical
grades. The advantage over the mean is that it is not affected by outliers (grades which are
uncommonly far from the mean). However it loses its meaning once there is more than one
most frequently occurring grade (only one is kept), or when all the grades are different from
each other.
A1 70/100, A2 35/50, A3 20/80, A4 10/10, A5 7/10 category max 100:
mode(0.7; 0.7; 0.25; 1.0; 0.7) = 0.7 70/100
Natural
The sum of all grade values, scaled by weight. The Maximum grade of the category is the sum of
the maximums of all aggregated items.
A1 70/100, A2 20/80, A3 10/10, without forcing weights:
(70 + 20 + 10)/(100 + 80 + 90) 100/190
University of Regina UR Courses Gradebook • May 2018 P a g e | 23 The gradebook shows point totals, not percent. The student report shows point totals
and percent.
It is not possible to ignore empty grades – an empty grade is counted as zero.
Note: An empty grade is a missing gradebook entry, and can mean different things. For example, it
could be a participant who hasn't yet submitted an assignment, an assignment submission not
yet graded by the teacher, or a grade that has been manually deleted by the gradebook
administrator. Caution in interpreting these "empty grades" is thus advised.
Extra Credit
The Extra Credit in the Gradebook allows you to assign extra credit to an assignment. An
assignment marked Extra credit will not add to the category total, but will allow a student to
obtain extra marks up to the category maximum.
To Use the Extra Credit Feature:
1. Access the Gradebook.
2. Click the Setup tab.
3. If you haven’t already, you will need to add a Grade Item for the extra credit.
4. Mark the item Extra Credit by clicking in the checkbox in the Extra Credit column.
5. If you have the Extra Credit item inside a category, note that the category total does not
change to include the Extra Credit total.
Note: The Extra Credit feature is available only if your main/parent category aggregation is set to Sum
of Grades, Simple Weighted Mean of Grades, or Mean of Grades (with Extra Credits).
Setting Max Grades
Setting Max Grade and totals:
Any max grade you set is the maximum grade allowed for that assignment/column.
Max grades for Extra Credit will not affect category totals.
There are two ways to edit Max grades:
1. For manually added grade items and columns, click Edit and then Edit settings in the
Actions column exit to the item in the Setup tab.
2. For items built into your course, on the main page of your course Turn editing on and
then find the item on the main page of your course. Then click the Edit icon beside the
assignment.
Note: Changing Max Grades after grades have already been entered for students may cause course
totals to not calculate appropriately, especially when using Weights.
The latest version of UR Courses does recalculate, but we sure to double-check totals.
24 | P a g e UR Courses Gradebook • May 2018 University of ReginaChapter 3 Scales
Outcomes
Outcomes are descriptions used to describe a student’s demonstrated ability and
comprehension of an activity or course. Each outcome is rated by a scale.
To add an outcome:
1. Access the gradebook for your course.
2. Click on the Outcomes tab.
3. Click on the Edit outcomes tab.
4. Click on Add a new outcome.
5. Fill in the required fields, Full name, Short name, and Scale.
6. Click on Save changes.
Note: You can use a built in Scale or create your own.
Scales
Scales are a way of evaluating or rating a student’s performance and can be used with activities
that allow a grade. Activities that use a “scale” instead of a “point” grade will still appear in the
Grade book.
University of Regina UR Courses Gradebook • May 2018 P a g e | 25Default Standard scales include:
1. Separate and Connected Ways of Knowing
2. Satisfactory
3. Pass/Fail
4. Like – A single item scaled used to “Like” an item
5. Forum Comments
6. Default competence scale
1. Separate and Connected Ways of Knowing
Individual posts can be rated using a scale based on the theory of separate and connected
knowing. This theory may help you to look at human interactions in a new way. It describes two
different ways that we can evaluate and learn about the things we see and hear. The results are
not used towards student assessment in any way, they are just to help improve communication
and learning.
Separate knowers like to remain as 'objective' as possible without including feelings and
emotions. When in a discussion with others who may have different ideas, separate knowers
like to defend ideas using logic to find holes in his opponent's ideas. Separate knowers are
critical of new ideas unless they are proven facts from reputable sources such as textbooks,
respected teachers or direct experience.
Connected knowers are more sensitive to other people. They are skilled at empathy and tend to
listen and ask questions until they feel they can connect and "understand things from their point
of view". Connected knowers learn by trying to share experiences that led to the knowledge
they find in other people. They avoid confrontation and will often try to help others if possible,
using logical suggestions.
For a collaborative and effective group of learners it may be best if everyone were able to use
BOTH ways of knowing.
In a particular situation like an online forum, a single post by a person may exhibit either of
these characteristics, or even both. Someone who is generally very connected may post a very
separate-sounding message, and vice versa. The purpose of rating each post using this scale is
to: a) help you think about these issues when reading other posts b) provide feedback to each
author on how they are being seen by others.
2. Satisfactory
The satisfactory scale allows you to choose to mark a student as Outstanding, Satisfactory and
Unsatisfactory.
26 | P a g e UR Courses Gradebook • May 2018 University of Regina3. Pass/Fail
In the Gradebook, the Pass/Fail scale allows you to choose an entry of Pass or Fail instead of
entering a number or letter.
4. Like
This scale allows you to give a mark of “Like” instead of entering a number or letter.
5. Forum Comments
This scale allows you provide a comment as a grade.
6. Default Competence Scale
This scale allows you to give a mark of “competent” or “not yet competent”.
University of Regina UR Courses Gradebook • May 2018 P a g e | 27To apply a scale:
1. From the main page of your course, Turn editing on.
2. Locate the activity that will use the scale on the main page of your course.
3. Click on the Edit button and then Edit settings.
4. Scroll to the Grade section of the activity settings and change the grade type to “Scale”.
5. Select which scale you would like to use.
6. Scroll down and click on Save changes.
Custom Scales
It is also possible to create custom scales. For example, you can give the student a word or small
phrase as a way of rating or giving a student feedback.
To create a custom scale:
1. Click Grades in the Administration block.
2. Click the Scales tab.
3. Scroll down and click the Add a new scale button.
4. Enter a Name for the scale.
5. Enter the ordered list of values to be used in the scale, from negative to positive, and
separate by commas.
6. Click the Save changes button.
Editing a scale:
If a scale has not yet been used, you will see an edit, move, and delete icon in the edit column.
Once a scale is used for an activity, it is no longer possible to move or delete it, and you can only
edit the scale name and description.
Example custom scales (from Moodledocs)
28 | P a g e UR Courses Gradebook • May 2018 University of ReginaThe Cool Scale - Not cool, Not very cool, Fairly cool, Cool, Very cool, The coolest thing ever!
(Valued as 0/5pts, 1/5pt, 2/5pts, 3/5pts, 4/5pts, and 5/5pts respectively in any
normalized aggregation method)
(Valued as 1, 2, 3, 4, 5, and 6 respectively in the sum aggregation method)
General Introductions (The Affirmative Scale) - Welcome!, Glad to have you here!, Great post!
(Valued as 0/2pts, 1/2pt, and 2/2pts respectively in any normalized aggregation
method)
(Valued as 1, 2, and 3 respectively in the sum aggregation method)
If you would like two options in your scale (incomplete and complete) type "incomplete,
complete" in the scale box.
(Valued as 0/1pts and 1/1pt respectively in any normalized aggregation method
like weighted mean, mean, simple weighted mean, etc.)
(Valued as 1 and 2 respectively in the sum aggregation method)
Generic Social Forum (This scale only worked prior to the averaging function) - Please clarify., I
don’t understand., Hmmm. Tell me more., Interesting, Very cool., Awesome!
(Valued as 0/6pts, 1/6pt, 2/6pts, 3/6pts, 4/6pts, 5/6pts, and 6/6pts respectively
in any normalized aggregation method)
(Valued as 1, 2, 3, 4, 5, 6, and 7 respectively in the sum aggregation method)
"Refer", pass, merit, distinction
(Valued as 0/2pts, 1/2pt, and 2/2pts respectively in any normalized aggregation
method)
(Valued as 1, 2, and 3 respectively in the sum aggregation method)
"Hesitant" Fail, Acceptable, Average, Excellent
(Valued as 0/3pts, 1/3pt, 2/3pts, and 3/3pts respectively in any normalized
aggregation method)
(Valued as 1, 2, 3, and 4 respectively in the sum aggregation method)
"Stars" ☆----, ☆☆---, ☆☆☆--, ☆☆☆☆-, ☆☆☆☆☆
University of Regina UR Courses Gradebook • May 2018 P a g e | 29 (Valued as 0/4pts, 1/4pt, 2/4pts, 3/4pts, and 4/4pts respectively in any
normalized aggregation method)
(Valued as 1, 2, 3, 4, and 5 respectively in the sum aggregation method)
Chapter 4 Settings and Preferences
Settings
There are multiple settings in UR Courses that effect the Gradebook, how grades are calculated,
and how marks are displayed to students.
It is important to remember that course settings take precedence over activity settings, and
activity settings take precedence over gradebook settings.
Course Settings
Activity Settings
(Assignments,
quizzes, forums, etc)
Gradebook
Settings
I. Course Settings
To access your course settings:
1. From the main page of your course, navigate to the Administration block.
2. Click on Edit Settings.
The main setting located here that will affect the Gradebook is the Show gradebook to students
setting located in the Appearance section. If set to “No” the students will not be able to see
their grades, even if they have been added to the gradebook.
30 | P a g e UR Courses Gradebook • May 2018 University of ReginaII. Activity Settings
Depending on the type of activity, the settings available will change. However, generally, you
will find the below settings:
1. Grade: Select the type of grading used for this activity. If "scale" is chosen, you can
choose the scale (pass/fail, satisfactory, etc) from the "scale" dropdown. If using "point"
grading, you can then enter the Maximum grade available for this activity.
2. Grading Method: Choose the advanced grading method for calculating grades in the
given context. To disable advanced grading and switch back to the default grading
mechanism, choose 'Simple direct grading'.
3. Grade category: This setting controls the category in which this activity's grades are
placed in the gradebook.
4. Grade to pass: This setting determines the minimum grade required to pass.
5. Blind marking: Blind marking hides the identity of students from markers. Blind marking
settings will be locked once a submission or grade has been made in relation to this
assignment.
6. Use marking workflow: If enabled, marks will go through a series of workflow stages
before being released to students. This allows for multiple rounds of marking and allows
marks to be released to all students at the same time.
7. Use marking allocation: If enabled together with marking workflow, markers can be
allocated to particular students.
III. Gradebook Settings
Settings for grade items and categories can be set from the Gradebook setup tab. This settings
can be accessed by:
1. Clicking on the Edit button in the Actions column.
University of Regina UR Courses Gradebook • May 2018 P a g e | 312. Clicking on Edit settings in the menu that appears.
Settings available to grade items can be reviewed in the Adding a Grade Item section of this
manual.
Settings available to grade categories can be reviewed in the Adding a Category section of the
manual.
Course Grade Settings
While much of how activities display and interacted with the gradebook will depend on the
activity settings, there are several settings within the gradebook that you can access to change
how grades are calculated and displayed to students.
The Course grade settings tab in the Gradebook setup allows you to manage your settings that
affect how the Gradebook appears for all participants in the course.
32 | P a g e UR Courses Gradebook • May 2018 University of ReginaGeneral Settings:
1. Aggregation position: Defines the position of the aggregation total column in the
report related to the grades being aggregated. Default position is Last.
2. Min and max grades used in calculation: Determines whether to use the initial
minimum and maximum grades from when the grade was given, or the minimum and
maximum grades as specified in the settings for the grade item. The default is to use
the minimum and maximum grades as defined in the grade item settings.
Grade Item Settings:
1. Grade display type: Specifies how to display grades in the grader and user reports.
Grades may be shown as actual grades, as percentages (in reference to the minimum
and maximum grades) or as letters. Default is Real.
2. Overall decimal points: Specifies the number of decimal points to display for each
grade. This setting has no effect on grade calculations, which are made with an
accuracy of 5 decimal places. Default is 2.
Overview Report:
1. Show rank: Whether to show the position of the user in relation to the rest of the class,
for each grade item. Default is Hide.
2. Hide totals if they contain hidden items: Specifies whether totals which contain hidden
grade items are shown to students or replaced with a hyphen. If shown, the total may
be calculated either excluding or including hidden items. If hidden items are excluded,
the total will be different to the total seen by the teacher in the grader report, since the
teacher always sees totals calculated from all items, hidden or unhidden. If hidden
items are included, students may be able to calculate the hidden items. Default is Hide.
User Report:
1. Show rank: Whether to show the position of the user in relation to the rest of the class,
for each grade item. Default is Hide.
2. Show percentage: Whether to show the percentage value of each grade item. Default is
Show.
3. Show hidden items: Specifies how hidden grade items are shown. If Hide is selected,
they are hidden completely. If Show is selected, the hidden grade item row is shown in
grey with the grade hidden completely. If "Only hidden until" is selected, grade items
with a "hide until" date set are shown in grey with the grades hidden completely until
the set date, after which the whole item is shown. Default is Hide.
4. Hide totals if they contain hidden items: This setting specifies whether totals which
contain hidden grade items are shown to students or are replaced with a hyphen. If
shown, the total may be calculated either excluding or including hidden items. Default
is Hide.
Preferences: Grader Report
The Preferences: Grader Report tab allows you to set your preferences for the Grader report.
These are settings that only you will see.
Click the button for a description of each setting.
University of Regina UR Courses Gradebook • May 2018 P a g e | 33NOTE: It is highly recommended to set your Show show/hide icons setting to Yes. Otherwise, you will
have restricted functionality in the Grader report.
Hiding the Course Total
There are two ways to hide the course total.
1. Change the Grade type to “None” in a Category. This method of “hiding” the course
total eliminates the course total entirely. This means that graders will no longer be able to
view the course total when entering or viewing grades.
To Change the Grade Type to “None”:
1. Go into the Gradebook setup tab.
2. Click on the Edit button in the Actions column.
3. Click on Edit settings in the menu that appears.
4. In the Category total section, set Grade type to None.
34 | P a g e UR Courses Gradebook • May 2018 University of Regina5. Scroll down to the bottom of the page and click Save Changes. You will no longer be
able to see the course totals in the Grader report.
6. Students will see a Course Total line, but the student’s grade will be blank. The course
total range will show as “—“.
2. Close the hide (eye) icons. This way of hiding the course total enables the grader to view
course totals, but hides the course total from the students.
To Hide the Course Total using the Hide Icons:
1. Go into the Gradebook. Make sure editing is turned on and make sure you are in the
Grader Report. For this to work, the category Grade types should be set at “Value”.
Note: When your editing is ON, the editing button will read “Turn editing off”.
2. Click the hide/show icon, , in the Course total column. This will hide the Course total
for the column AND for every student.
University of Regina UR Courses Gradebook • May 2018 P a g e | 35Note: The course total calculated in UR Courses may not end up being the exact final mark for a
student, for a variety of reasons. It is important to remember that the final mark for students
must be updated into DOME and a student’s final grade will be displayed in UR Self-Service.
Chapter 5 Exporting and Importing
Importing Grades to the Gradebook
Many instructors keep track of their student’s marks outside of UR Courses such as in an
Microsoft Excel spreadsheet. Luckily, the Gradebook in UR Courses allows us to import grades
from .CSV and .XML files.
Some things to note:
1. Importing grades is equivalent to manual grading in the Grader report. This will cause
the cells in the Grader report to turn colour and the grade can no longer be edited via
the activity submission page.
2. Importing grades will also override any grades that have already been entered.
I. CSV Import
To import grades from a CSV file:
1. Edit the file you will be importing appropriately, ensuring that the column headers are
meaningful and match the grade items in your gradebook. (It may be easier to Export
the gradebook to use as a template.)
36 | P a g e UR Courses Gradebook • May 2018 University of Regina2. Save the file as a .CSV file by changing the Save as type to CSV.
3. From the main page of your course, navigate to the Administration block and click on
Grades.
4. Click on the Import tab.
5. Click on the CSV Tab.
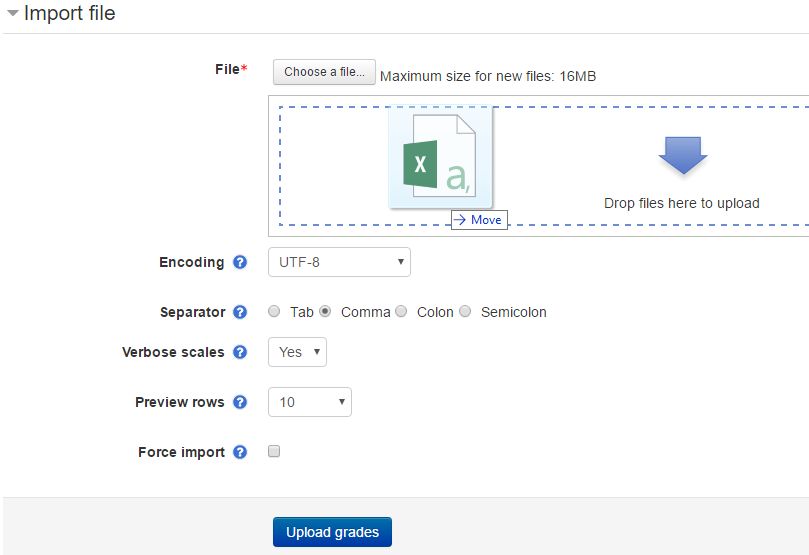
6. Upload your .CSV file either by dragging and dropping the file into the space provided or
click on the Choose a file… button to browse for your file.
7. Select the Encoding. UTF-8 is the default and standard for most .CSV files. If the wrong
encoding is selected, it will be noticeable in the preview of your upload.
University of Regina UR Courses Gradebook • May 2018 P a g e | 378. Select how data is separated in the .CSV with the Separator setting. Normally, this is
comma.
9. Select “Yes” for the Verbose scales setting.
10. Choose how many rows you will see in the preview of the upload with the Preview rows
setting.
11. Click on Upload Grades.
12. Review the preview to ensure the data is correct.
In the Identify user by section, choose how to map the marks. The best is to use a
student’s ID number.
In the Grade item mappings section, you may specify how grades are mapped. If
your .CSV file is set up correctly, this may not be necessary, but it can be done for
each individual grade item.
13. Click on Upload grades. If there are any issues mapping or uploading the marks UR
Courses will provide you with the appropriate message(s).
II. XML Import
To import grades from an XML file:
38 | P a g e UR Courses Gradebook • May 2018 University of Regina1. Edit the file you will be importing appropriately, ensuring that the column headers are
meaningful and match the grade items in your gradebook. (It may be easier to Export
the gradebook to use as a template.)
2. Save the file as an .XML file by changing the Save as type to XML.
3. From the main page of your course, navigate to the Administration block and click on
Grades.
4. Click on the Import tab.
5. Click on the XML file tab.
6. Select whether or not you wish to Import feedback.
7. Upload your .XML file either by dragging and dropping the file into the space provided
or click on the Choose a file… button to browse for your file.
8. Click on Upload Grades. If there are any issues with the XML code UR Courses will
provide you with the appropriate message(s).
Exporting Grades from the Gradebook
UR Courses allows us to export the gradebook as a Microsoft Excel spreadsheet, an
OpenDocument spreadsheet, a plain text CSV file, and as an XML file.
Instructors can also export the gradebook to be uploaded to DOME.
To export the gradebook:
1. From the main page of your course, navigate to the Administration block and click on
Grades.
University of Regina UR Courses Gradebook • May 2018 P a g e | 392. Click on the Export tab.
3. Click on the tab corresponding with the desiref format of the exported file, either Excel
spreadsheet, OpenDocument spreadsheet, Plain Text CSV file, or XML file.
4. Select which grade items you wish to include in your exported file.
5. Adjust the Export format options as needed.
6. Click on Download.
Note: If you intend to re-import the exported grades, use the Plain Text CSV file or XML file export
options.
Exporting Gradebook to DOME
Final grade entry into Dynamic Online Mark Entry (DOME) is required at the end of each
semester. Grades can be exported from UR Courses and imported into DOME without any grade
reentry.
To upload to DOME:
1. Open UR Courses.
2. In the Administration block, click on Grades to open the Gradebook.
40 | P a g e UR Courses Gradebook • May 2018 University of Regina3. Click on the Export tab.
4. Click DOME spreadsheet and click on Download.
5. Save the spreadsheet. (No changes will need to be made to the spreadsheet.)
6. Open DOME.
7. On the Menu screen, enter the Year and Term.
8. Press ‘Select this Role’ for the role you are in.
9. Select the “Classes” tab to view all your classes for the chosen term.
10. Find the desired class and click ‘View/Enter’ Grades.
11. Click the ‘Upload Grades’ button.
12. Select the ‘Browse’ button.
13. Find and choose the file to be uploaded and press ‘Open.’
14. Press ‘Load File.’
15. The grades from your spreadsheet have been entered into a Preview Grades screen.
16. Review to confirm that grades have been entered correctly.
17. Press ‘Save Upload’ if entries are correct
OR
If grade entries are incorrect, press ‘Clear Upload’. Grades will revert back to the last
saved version of grades.
18. When you are satisfied that the grades have been entered correctly, enter your PIN and
press ‘Submit.’
Note: To upload grades into DOME, the file must be an Excel or .csv file. The 9-digit student ID number
must be in the first column and final grades in the third column. The columns MUST have
titles/headers.
University of Regina UR Courses Gradebook • May 2018 P a g e | 41You can also read