Turbo Hotspot 2 User Guide - DOC20200705 - CNET Content Solutions
←
→
Page content transcription
If your browser does not render page correctly, please read the page content below
Turbo Hotspot 2
User Guide

             DOC20200705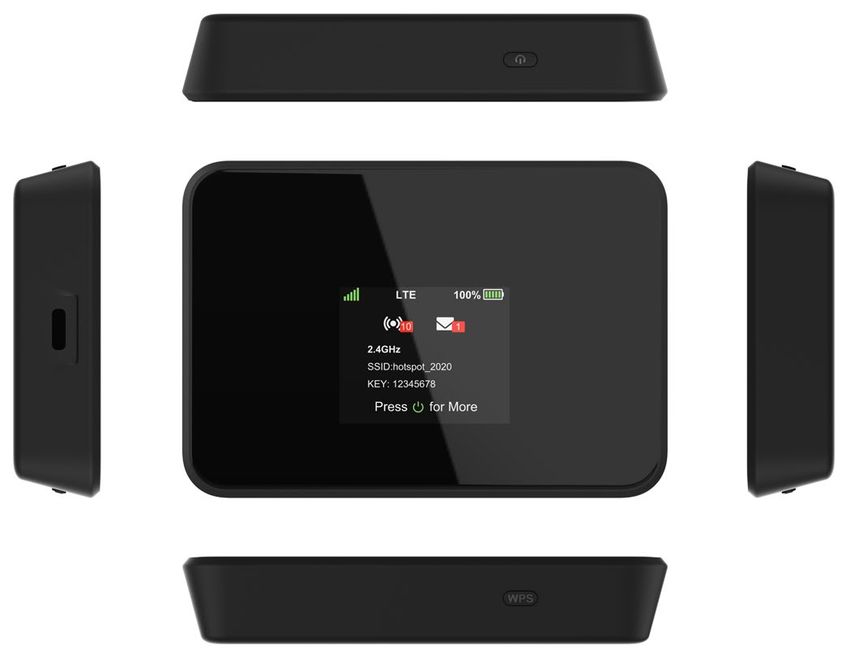
Table of Contents

                             Introduction.................................................................................................. 4
                             About this user guide................................................................................ 4
                             Before using your hotspot......................................................................4
                             Screenshots and icon labels.................................................................4
                             Getting started............................................................................................. 4
                             Getting Started........................................................................................... 5
                             Meet your Turbo Hotspot 2....................................................................5
                             Setting Up Your Mobile Hotspot.........................................................6
                             Insert SIM card............................................................................................ 6
                             Re-insert the battery.................................................................................. 6
                             Charge mobile hotspot fully...................................................................6
                             Turn the device on...................................................................................... 6
                             Display Layout and Screens..................................................................7
                             Home Screen................................................................................................ 7
                             Message Screen......................................................................................... 7
                             Device Details Screen............................................................................... 7
                             Wi-Fi Info Screen......................................................................................... 7
                             More Settings Screen............................................................................... 7
                             Using Your Device..................................................................................... 8

                             Connecting to the Internet.....................................................................8
                             Connecting.................................................................................................... 8
                             Connecting via WPS Button...................................................................9
                             Connecting via Tethering........................................................................9
                             Charging the Hotspot............................................................................... 9

                             Online WebUI Manager......................................................................... 10
                             Accessing the Online WebUI Manager........................................... 10
                             Change the admin password............................................................. 10
                             Online WebUI Manager: Managing Wi-Fi Settings................... 10
                             Change your Wi-Fi login credentials................................................ 10
                             Disable a Wi-Fi network........................................................................ 11
                             Change maximum connected devices........................................... 11
                             View all connected devices................................................................. 11
                             Connect a device via WebUI WPS.................................................... 11

Turbo Hotspot 2 User Guide                                                                                                                2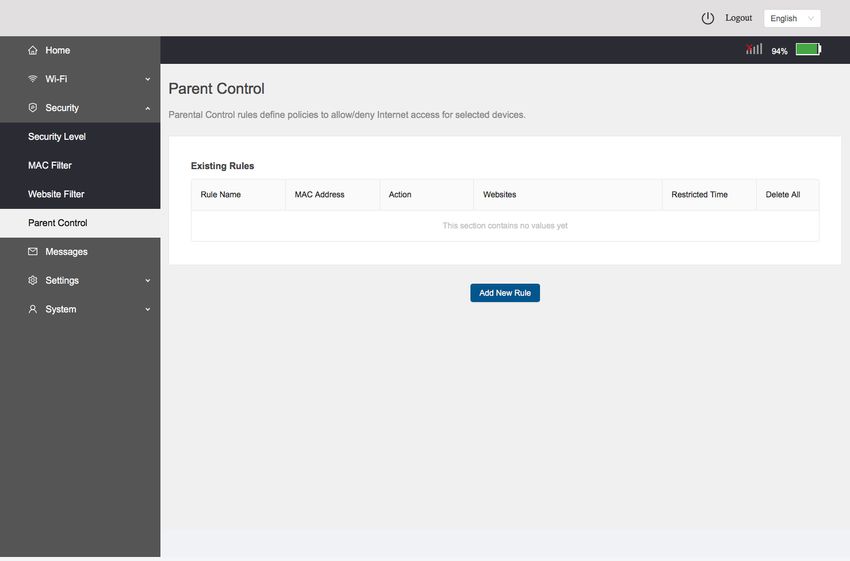
Accessing Messages............................................................................ 12
                             Viewing messages on the Turbo Hotspot 2................................. 12
                             Reading messages on the Online WebUI Manager................... 12
                             Deleting messages on the Online WebUI Manager.................. 12
                             Online WebUI Manager: Adjusting Security Settings............. 13
                             Set parental controls.............................................................................. 13
                             Block unwanted devices....................................................................... 13
                             Block unwanted websites.................................................................... 14
                             Online WebUI Manager: Configuring Network Settings........ 14
                             LAN Settings............................................................................................. 14
                             Enable/Disable Cellular Data.............................................................. 14
                             Access Point Name (APN) Settings................................................ 14
                             Add an APN for another network...................................................... 14
                             Port Forwarding....................................................................................... 15
                             Enable VPN Pass-Through.................................................................. 15
                             Online WebUI Manager: Manage System Settings.................. 16
                             Device Settings Backup........................................................................ 16
                             Backup settings....................................................................................... 16
                             Restore settings from a backup file................................................ 16
                             Adjust the display settings to increase battery life................... 16
                             Adjust the device sleep settings to increase battery life........ 16
                             Update Mobile Hotspot Software..................................................... 17
                             Perform a Factory Reset...................................................................... 17
                             View device information....................................................................... 18
                             Troubleshooting...................................................................................... 18

                             Product Specifications......................................................................... 20

                             Warranty Information............................................................................ 20
                             Warranty...................................................................................................... 20
                             Warranty Duration .................................................................................. 20
                             Implementation of the Warranty ...................................................... 21
                             Warranty Exclusions ............................................................................. 21

Turbo Hotspot 2 User Guide                                                                                                                 3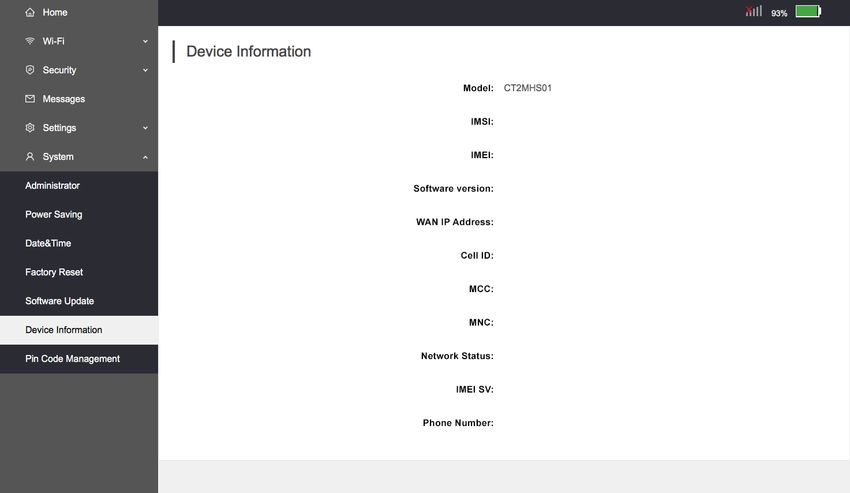
Introduction

                             About this user guide
                             Thank you for purchasing your new Turbo Hotspot 2. Read
                             below to learn how best to use this guide to get the most out
                             of your mobile hotspot.

                             Before using your hotspot
                             First, read the Quick Start Guide and Safety Information
                             Guide that came with your device thoroughly for proper
                             usage. Accessible services may be limited by subscription
                             contract conditions.

                             Screenshots and icon labels
                             Screenshots, icon labels, and other visuals are simplified for
                             illustrative purposes in this user guide and may appear
                             different from your hotspot’s display.

                             Getting started
                             The topics in this next section will introduce you to your
                             mobile hotspot, help you get set up with service, provide an
                             overview of the device screen, and get you started with basic
                             device operations.

Turbo Hotspot 2 User Guide                                                                4
Getting Started
Meet your Turbo Hotspot 2
Familiarize yourself with the various screens, icons, and buttons to use your device.
Power/Navigation
Button
USB Type-C
Charging Port LCD Home Screen
WPS Button
Battery Back Cover
Factory Reset
Pinhole
Turbo Hotspot 2 User Guide 5Setting Up Your Mobile Hotspot
The mobile hotspot includes a SIM card in the box.
Insert SIM card Back Cover
1. Remove the back cover and take the battery out.
2. Remove the SIM card from the outer card.
3. Locate the SIM card slot. Hold SIM so that the
cut corner is at the top and gold contacts are
facing downward. Insert SIM by pressing down Battery
on the clip and sliding into the SIM slot.
Warning: To avoid any damage to your device,
only use the standard Nano-SIM card provided. Battery
Contacts
SIM Slot
Re-insert the battery
1. Align the battery contacts with the terminals
in the battery compartment. Push the battery
down until it clicks into place.
2. Line up the groove at the back of the device
with the battery cover (the arrow will be
pointing down).
3. Replace the battery cover over the battery
compartment and press down on the four
corners of the battery cover until it clicks
into place. SIM Slot
SIM Card
Charge mobile hotspot fully
Your device includes a charger. To charge, plug one
end of the charger into an electrical outlet and the
other end into the device’s USB-C port. Clip
Turn the device on
Press and hold the Power/Navigation button for
3 seconds to turn on.
If needed, here is how to remove the SIM card:
1. Remove back cover and take the battery out.
2. Locate the SIM card slot.
3. Push down on the plastic clip in front of the SIM
card while sliding the SIM card out of its slot.
Turbo Hotspot 2 User Guide 6Display Layout and Screens
There are four different screens on this device. Use the Power/Navigation button to loop
through them.
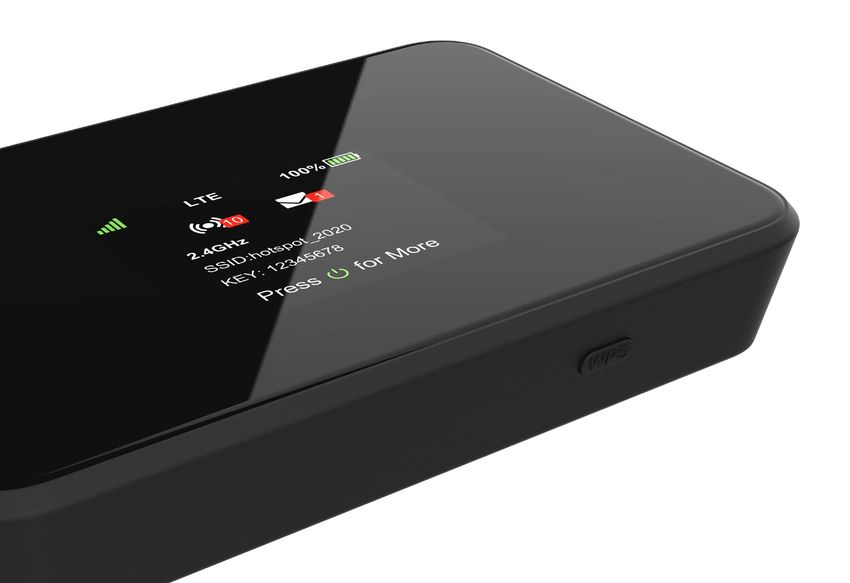
Home Screen
Network indicator
Signal strength
Battery indicator
Number of
connected devices
Wi-Fi network name (SSID) New message notification
Password (Key)
for Wi-Fi network
Briefly press the Power/Navigation button to scroll through the screens.
Message Screen Wi-Fi Info Screen
The Message
Screen will only
appear when
there is an unread
message on your
mobile hotspot.
Device Details Screen More Settings Screen
Turbo Hotspot 2 User Guide 7Using Your Device Use the Power/Navigation Button to perform these basic operations. Power On: Press and hold for 3 seconds or until you see “Hello” appear on the screen. Restart Device: Press and hold for 10 seconds. Power Off: Press and hold for 3 seconds or until you see “Goodbye” appear on the screen. Wake Screen: Press and release. Navigate Screens: Press and release. Connecting to the Internet When you turn on your mobile hotspot (with SIM card inserted), it will automatically connect to your carrier’s network. Connect your Wi-Fi enabled device, such as a computer, smartphone, or tablet, to the mobile hotspot Wi-Fi network to access the Internet. Keep the Turbo Hotspot 2 in range of the device you want to connect with and follow the instructions below. Connecting 1. Turn on your mobile hotspot by pressing and holding the Power/Navigation button for 3 seconds. 2. Open your Wi-Fi network manager on your computer, smartphone, tablet, or other Wi-Fi enabled device. This will be typically found in your device’s network settings or connections menu. 3. Connect your Wi-Fi enabled device to the Turbo Hotspot 2 by selecting your mobile hotspot’s network name (SSID) “hotspot_XXX” for the 2.4 GHz Wi-Fi network or “hotspot_XXX_5GHz” for the 5 GHz Wi-Fi network. 4. Once selected, enter the password (KEY) which can be found on your mobile hotspot’s home screen. 5. Open a web browser and visit your favorite website to confirm a successful connection. Note: Your mobile hotspot’s Wi-Fi network name (SSID) and Wi-Fi network password (KEY) can be changed in the Online WebUI Manager under Wi-Fi Basic Settings. See “Change your Wi-Fi login credentials” section on the page 10. Turbo Hotspot 2 User Guide 8
Connecting via WPS Button
This is a quick and easy alternative to connect your devices securely.
1. Keep the Turbo Hotspot 2 in range of the device you want to connect with.
2. Turn on your mobile hotspot by pressing and holding the Power/Navigation button
   for 3 seconds.
3. Open your Wi-Fi network manager on your computer, smartphone, tablet, or other
   Wi-Fi enabled device.
4. Connect your Wi-Fi enabled device to the Turbo
   Hotspot 2 by selecting your mobile hotspot’s network name (SSID) “hotspot_XXX”
   for the 2.4 GHz Wi-Fi network or “hotspot_XXX_5GHz” for the 5 GHz Wi-Fi network.
5. Press and hold the WPS button located on the
   bottom of the mobile hotspot.
6. Your Wi-Fi enabled device will start connecting.
7. “WPS Success” will be displayed on the hotspot
   screen to confirm a successful connection.
   Your Wi-Fi enabled device should also show a                               WPS
   successful connection.                                                    Button

Connecting via Tethering
You can also connect your Wi-Fi enabled device to the mobile hotspot using a USB-C
cable instead of using the Wi-Fi network.
1.   Make sure your mobile hotspot is on and has an active data connection.
2.   Connect one end of the USB-C cable to the hotspot and the other end to your device.
3.   Your device will detect a network connection via USB automatically.
4.   Check your connection by visiting a website.

Charging the Hotspot
To charge, plug one end of the charger into an electrical outlet or a laptop and the other
end into the device’s USB-C port.
1. When the device is charging, the battery icon will display a lightning symbol   .
2. The hotspot will automatically turn on when plugged into charge, even if it was
   previously off or the battery was fully dead.
3. When the device is plugged in and charging, the display screen will timeout
   after 1 minute.

Note: It will take the hotspot up to 2.5 hours to charge fully from 0% when using the wall
charger and cable provided. Charging times may vary when using other 3rd-party
chargers and accessories.

Turbo Hotspot 2 User Guide                                                                   9
Online WebUI Manager
The Online WebUI Manager is a virtual dashboard to manage your mobile hotspot’s
settings, features and security controls.

Accessing the Online WebUI Manager
1. After connecting the hotspot to your Wi-Fi enabled
   device, open a web browser and enter
   http://192.168.1.1 (or http://hotspot.webui) in the
   address bar.
2. Enter the WebUI password and select Login.
   Note: The admin password is the last 8 digits of the
   mobile hotspot’s IMEI code. The IMEI code is printed
   on the device label underneath the battery. You can
   also find it listed on the Device Details Screen of your
   Turbo Hotspot 2.
3. The admin password can be changed in the Online
   WebUI Manager under System > Administrator.

Change the admin password
1. Select System   > Administrator.
2. Enter new password and re-confirm the new password.
3. Click Save.

Online WebUI Manager: Managing Wi-Fi Settings
Once you’re logged in to the Online WebUI Manager you can make adjustments to the
following Wi-Fi settings.

Change your Wi-Fi login credentials
1. You can customize your mobile hotspot’s Wi-Fi network name (SSID) and Wi-Fi
   network password (KEY).
2. Select Wi-Fi    > Wi-Fi Basic Settings.
3. To rename the SSID, delete the default network name listed in the Network Name
   (SSID) and replace with your custom name. Note, you can change the Network Name
   (SSID) for both of the respective Wi-Fi networks: 2.4 GHz or 5 GHz Wi-Fi networks.
4. To change the password (KEY), delete the default network key listed in the Password
   field and replace. Note: You can change the password for both respective Wi-Fi
   networks: 2.4 GHz or 5 GHz networks.
5. Click Save.
6. The hotspot will refresh with the updated Wi-Fi credentials.
Note: You will need to reconnect any connected Wi-Fi enabled devices to the hotspot
upon updating credentials.

Turbo Hotspot 2 User Guide                                                            10
Disable a Wi-Fi network
1. Select Wi-Fi    > Wi-Fi Basic Settings.
2. Click the Enable/Disable            switch under the network you would like to disable.

Change maximum connected devices
1. Go to Wi-Fi    > Wi-Fi Advanced Settings.
2. Go to the drop-down menu under Max Connected Devices. Choose your preferred
   maximum number of devices allowed from 1-15.
3. Click Save.

Note: You will need to reconnect any connected Wi-Fi enabled devices to the hotspot
upon updating the maximum number.

View all connected devices
1. Go to Wi-Fi    > Connected devices.
2. All devices currently connected will be listed.

Note: Block any connected device by clicking on the + symbol next to the device. Unblock
a device by clicking the - symbol next to the device listed under Blocked Devices.

Connect a device via WebUI WPS
1.   Go to Wi-Fi   > WPS.
2.   Activate the WPS connection on the device you want to connect to the hotspot.
3.   Click Push WPS Button on the Online WebUI Manager.
4.   WPS Success will be displayed on the hotspot to confirm connection.

Note: You can disable the WPS feature from the device by unchecking the Enable box       .

Turbo Hotspot 2 User Guide                                                             11
Accessing Messages
The message icon on the Home Screen will indicate
when a new message is received. Log into the Online
WebUI Manager to view and delete your messages.

Viewing messages on the Turbo Hotspot 2
1. Press the Power/Navigation button from the Home
   Screen to scroll to the Message Screen.
2. The highlighted message will automatically scroll left
   to right to display the entire contents of the message.
3. Press the Power/Navigation button to switch to the
   next message.
4. You can delete messages only via the Online
   WebUI Manager.

Note: If there are no unread messages, the Message
Screen will not appear on the hotspot.

Reading messages on the Online WebUI Manager
1. Select Messages     .
2. A list of messages will be displayed.
3. Click on the message to open it in full display.

Deleting messages on the Online WebUI Manager
1.   Select Messages     .
2.   A list of messages will be displayed.
3.   Select the checkbox next to the message you want to delete.
4.   Click Delete.

Turbo Hotspot 2 User Guide                                         12
Online WebUI Manager: Adjusting Security Settings
The Online WebUI Manager lets you set the limits for certain websites and block
unwanted connections.

Set parental controls
Limit the websites certain Wi-Fi enabled devices are able to connect to and the times
they are allowed to connect.
1.   Select Security    > Parent Control.
2.   Click the Add New Rule button to enable Parent Control.
3.   Add MAC address for the device that you want to set limits for.
4.   Restrict specified websites and limit usage times or days, as desired.
5.   Click Save.

Block unwanted devices
Block unwanted devices from connecting to your mobile hotspot.
1.   Select Security     > MAC Filter.
2.   Select blacklist or whitelist mode.
3.   Click Add New Rule then input a MAC address to add a new whitelist or blacklist rule.
4.   Click Save.

Turbo Hotspot 2 User Guide                                                              13
Block unwanted websites
Block your device from connecting to unwanted websites while connected to your
mobile hotspot.
1.   Select Security     > Website Filter.
2.   Select blacklist or whitelist mode.
3.   Click Add New Rule then input the website’s URL to add a new whitelist or blacklist rule.
4.   Click Save.

Online WebUI Manager: Configuring Network Settings
LAN Settings
1. Manual LAN settings (IP, DHCP, etc.) can be configured through the Online
   WebUI Manager.
2. Select Settings    > LAN Settings.
3. Configure settings by filling out the following fields: IPv4 Address, IPv4 Subnet Mask,
   DHCP Address Pool Start, DHCP Address Pool End, DHCP Lease Time.
4. Click Save.

Enable/Disable Cellular Data
Turn off Cellular Data to block all internet traffic on the mobile hotspot.
1. Select Settings           > Mobile Settings.
2. Click the toggle             switch under Cellular Data to switch on or off.
3. Click Save.

Access Point Name (APN) Settings
Your mobile hotspot comes pre-configured with the access point name (APN) for your
network service provider. The mobile hotspot checks the APN to determine the type
of network connection to establish.

Add an APN for another network
1. Select Settings        > Mobile Settings.
2. Click Add New Rule.
3. Fill out the following fields:
   a. For Profile Name, enter the Profile Name of APN.
   b. For APN, enter the APN provided by carrier.
   c. For Username and Password, enter the Username and Password provided by the
        carrier (if they are required for the network).
   d. For Authentication, select the authentication mode: PAP/CHAP (recommended
        default); PAP; CHAP.
   e. For IPType, select the type: IPv4v6 (recommended default); IPv4.
4. When completed, click Save.

Turbo Hotspot 2 User Guide                                                                 14
Select an APN to use
1. Select Settings > Mobile Settings.
2. Select the Action radio button next to the APN entry.
3. Click Save.
Port Forwarding
Port forwarding allows remote computers on the Internet to connect to a specific
computer or service within the private LAN. When enabled, incoming traffic is forwarded
to specific ports and devices on your network using their local IP addresses.
Note: Port forwarding creates a security risk. When not required, it is recommended to
keep it disabled.
1. Select Settings > Port Forwarding.
2. Click Add New Rule.
3. Fill out the following fields:
a. For Name, use a meaningful name to identify the purpose of the forward rule.
b. For Protocol, choose the protocol option to match forwarding rule. The options
include TCP+UDP, TCP, UDP.
c. For External Ports, enter the destination port (for example: 5060) or port range
(for example: 5000-5050) on the incoming traffic from the external network.
d. For Internal IP, enter the IP address of the internal host. Redirect matched incom-
ing traffic to the specified internal host.
e. For Internal Ports, enter the port code of the internal host. Redirect matched
incoming traffic to the given port (for example: 5060) or port range (for example:
5000-5050) on the internal host.
4. When completed, click Save.
Enable VPN Pass-Through
To connect to a corporate network using VPN, you must first enable VPN connections
(pass-through).
1. Select Settings > VPN Passthrough.
2. Click the toggle switch on .
Turbo Hotspot 2 User Guide 15Online WebUI Manager: Manage System Settings Device Settings Backup You can back up and restore mobile hotspot settings. Backing up and restoring are useful if you use more than one device and you want the same settings on all of your devices. You can also save your settings before resetting to factory defaults or changing the settings. Backup settings 1. Select Settings > Backup and Restore. 2. Click Export. 3. The backup file will be saved to your hard drive. Restore settings from a backup file 1. Select Settings > Backup and Restore. 2. Click Choose File. 3. Select the backup file from your hard drive. 4. Click Import. Adjust the display settings to increase battery life Set the screen time-out to a shorter period to reduce the amount of time the mobile hotspot waits before the screen turns blank. 1. Select System > Power Saving. 2. Select the length of time the device will wait before the screen turns blank in the Display Timeout drop-down menu. 3. Choose between 1, 3, 5, 10 minutes or Always on. 4. Click Save. Note: The display timeout is defaulted to 1 minute. Adjust the device sleep settings to increase battery life Set the Wi-Fi standby time to a shorter period to reduce the amount of time the mobile hotspot is inactive and turns off the network. 1. Select System > Power Saving. 2. Select the length of time the device will wait before the screen turns blank in the Wi-Fi Standby drop-down menu. 3. Choose between 1, 3, 5, 10 minutes or Always on. 4. Click Save. Note: The Wi-Fi standby time is defaulted to 10 minutes. Turbo Hotspot 2 User Guide 16
Update Mobile Hotspot Software
You can check for new software updates through the Online WebUI Manager.
1.   Select System      > Software Update.
2.   Click Check for Updates.
3.   Wait a moment as the device searches for updates.
4.   If there is an update, you will be prompted to activate the update on the Online
     WebUI Manager.

Note: The battery life must be over 30% to proceed with the software update.

Perform a Factory Reset
You can restore your mobile hotspot to default factory settings. It will reset all of the
custom settings saved.
1.   Select System      > Factory Reset.
2.   Click Reset.
3.   Click Confirm.
4.   Wait a moment as the device is restored to the default settings.
5.   You will need to re-connect to the device with its default Wi-Fi login credentials
     shown on the display.

You can also manually perform a factory reset by
inserting a paperclip (or a long, narrow object) into
the reset pinhole located on the bottom of device
and holding for 6 seconds.

Note: The Online WebUI Manager admin password
will be restored to its default after a factory reset.
The default password is the last 8 digits of the
device IMEI that can be found on the label under
the battery or on the Device Details screen.                Factory Reset Pinhole

Turbo Hotspot 2 User Guide                                                                  17
View device information
Device details such as Model, IMEI, SW version, IP address, Network status, and the phone
number associated with your hotspot can be viewed on the Online WebUI Manager.
Select System > Device Information.
Troubleshooting
Check below for solutions to common problems you may experience.
Problem: The device cannot connect to the mobile hotspot.
If you are experiencing problems connecting to the mobile hotspot, try the following
suggestions:
• Restart the mobile hotspot
• Restart the device you want to connect (laptop, smartphone, etc.)
• Confirm the Wi-Fi network name (SSID) and password (KEY) and establish a new
connection to the mobile hotspot
Problem: The device is connected to the mobile hotspot but cannot access the internet.
If your device has successfully connected to the mobile hotspot’s Wi-Fi network but you
cannot access the internet, try the following suggestions:
• Check the signal strength and network indicator on your device’s display home
screen and confirm the hotspot has network coverage in the area
• Make sure your SIM card is active and properly installed. See Insert SIM Card
section on page 6
• Check to see if Cellular Data is enabled in the Online WebUI Manager. See
Enable/Disable Cellular Data section on page 14
Turbo Hotspot 2 User Guide 18Problem: Download and/or upload speeds are slow.
If you are experiencing a slow internet connection while connected to the mobile
hotspot, try the following suggestions:
• Check the signal strength on your device’s display home screen. A low signal
strength can indicate a weak connection to the network in your area
• Please make sure your device is in close range to the mobile hotspot to optimize the
Wi-Fi connection
Problem: Forgot the password to the Wi-Fi network.
The password to your Wi-Fi network can be easily found on your device’s Home screen
and Wi-Fi Info screen. If you need to change your Wi-Fi password, this can be done
through the Online WebUI Manager. See Change your Wi-Fi login credentials section on
page 10.
Problem: Forgot the password to the Online WebUI Manager.
The default admin password to the Online WebUI Manager is the last 8-digits of the
IMEI code, which is printed on the device label (underneath the battery) or found on the
Device Details screen of your device.
If you have changed your password and need to reset the password back to the default
password, please perform a manual factory reset by inserting a paperclip (or a long,
narrow object) into the reset pinhole located on the bottom of device and holding for
6 seconds.
Turbo Hotspot 2 User Guide 19Product Specifications
Display 1.77" LCD color display
Chipset Qualcomm MDM9250
Memory 256 MB RAM / 512 MB ROM
Battery Removable Li-ion battery, 3,000 mAh
Charging Port USB Type-C
Dimensions 101.8 mm (L) x 70.8 mm (W) x 18.3 mm (H)
Weight 145 g
Operating System Linux
Network Frequency LTE/4G Bands: 2, 4, 5, 12, 14, 29, 30, 66
Wi-Fi Connectivity 802.11 a/b/g/n/ac; Dual-Band: 2.4 GHz & 5 GHz
Warranty Information
The Turbo Hotspot 2 is covered by the AT&T 2-year warranty.
See att.com/warranty for details.
Warranty
With this manufacturer’s warranty (hereinafter: the “Warranty”), Emblem Solutions
(hereinafter: the “Manufacturer”) guarantees this product against any material, design,
and manufacturing defects. The duration of this Warranty is specified in article 1 below.
This Warranty does not affect your statutory rights, which cannot be excluded or limited,
in particular in relation to the applicable legislation on defective products.
Warranty Duration
The product may consist of several parts, which may have separate warranty periods, to
the extent permitted by local laws. The “Warranty Period” (as defined in the table below)
takes effect on the date of purchase of the product (as indicated on the proof of purchase).
1. Warranty Period
Phone 24 Months
USB Cable and Charger 12 Months
Other Accessories (if included in the box) 12 Months
2. Warranty period for repaired or replaced parts: Subject to special provisions of local
laws in force, the repair or replacement of a product does not, under any circumstances
whatsoever, extend the original warranty period of the product concerned. However,
the repaired or replaced parts are guaranteed in the same manner and for the same
defect for a period of ninety days after delivery of the repaired product, even if their
initial warranty period has expired. Proof of purchase required.
Turbo Hotspot 2 User Guide 20Implementation of the Warranty
If your product is faulty under normal conditions of use and maintenance, in order
to benefit from the present warranty, please contact AT&T Customer Service at
1-800-331-0505 for assistance. The customer support center will then provide you
with instructions on how to return the product for support under warranty.
Warranty Exclusions
Manufacturer guarantees its products against material, design, and manufacturing
defects. The Warranty does not apply in the following cases:
1. Normal wear and tear of the product (including on the camera lenses, batteries, and
screens) requiring periodic repair and replacement.
2. Defects and damages due to negligence, to the product being used other than in a
normal and customary manner, to the non-compliance with the recommendations of
this User Manual, to an accident, regardless of the cause. Instructions for use and
maintenance of the product can be found in your product’s User Manual.
3. The opening, unauthorized disassembly, modification being carried out or repair of
the product by the end-user or by persons or by service providers not approved by
Manufacturer and/or with spare parts not approved by Manufacturer.
4. Use of the product with accessories, peripherals, and other products whose type,
condition, and/or standards do not meet Manufacturer’s standards.
5. Defects associated with the use or connection of the product to equipment or
software not approved by Manufacturer. Some defects may be caused by viruses
due to unauthorized access by yourself or by a third-party service, computer
systems, other accounts, or networks. This unauthorized access may take place
through hacking, misappropriation of passwords, or various other means.
6. Defects and damage due to the exposure of the product to humidity, extreme
temperatures, corrosion, oxidation, or to any spillage of food or liquids, chemicals,
and generally any substance likely to alter the product.
7. Any failure of embedded services and applications that have not been developed by
Manufacturer and whose functioning is the exclusive responsibility of their designers.
8. Installation and use of the product in a manner that does not comply with the
technical or security standards of regulations in force in the country where it’s
installed or used.
9. Modification, alteration, degradation or illegibility of the IMEI number, serial number
or EAN of the product.
10. Absence of proof of purchase.
Upon expiration of the warranty period or upon an exclusion of warranty, Manufacturer
may, at its discretion, provide a quote for the repair and offer to provide support for the
product, at your cost.
The Manufacturer contact and after-sales service details are subject to change. These
Warranty terms may vary substantially according to your country of residence.
Turbo Hotspot 2 User Guide 21You can also read