GO MCXD user guiDe - Green-GO Digital
←
→
Page content transcription
If your browser does not render page correctly, please read the page content below
GO
MCXD user guide

             Copyright © 2020 Green-GO
GO
MCXD user guide
model nr. GGO-MCXD
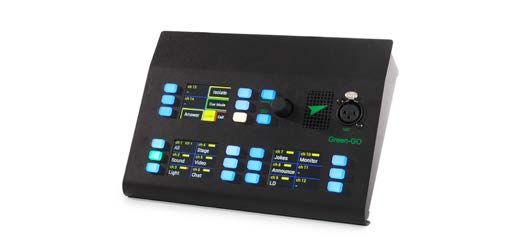
The Multichannel Deskstation gives you easy direct access to all desired stations on the Green-GO network through an
interface with 3 TFT touchscreens and 20 Pushbuttons. Apart from the standard functions like Talk, Listen and Call, the
deskstation can, amongst other things, send cues, connect to remote Green-GO networks, interface with GPIO, add external
audio to the Green-GO network and output audio from the Green-GO network. Optional microphone and/or headset can be
connected. Speaker is built in.
Whats in the box: Green-GO Multichannel desk MCXD + Quickstart guide
Contents
Overview 2
The Main Interface 2
Basic Functions Explained 3
How to… 4
GPIO 8
Reference 8
The Setup Menu 12
Specifications 17
page 2 of 20 Copyright © 2020 Green-GOGO
MCXD user guide
TOP VIEW
SETUP Pushbutton
SHIFT Pushbutton
Pushkno
b
Speaker
MIC XLR 4
connecto
r
TFT Touchscreens
Channel Pushbuttons
Overview
TFT Touchscreens: Provides text information and button functionality.
Channel Pushbuttons: Color indications of activity and button functionality.
Setup Pushbutton: Used for Setup menu and direct Channel modifications.
Shift Pushbutton: Page change and direct Function selection.
Pushknob: Volume control, Scroll and ‘Enter’.
Speaker: Audio output.
MIC connector: Microphone connector.
REAR VIEW
12 VDC LAN 1
12V DC Connector PoE IN
GPIO LINE OUT LINE IN HEADSET LAN 2 LAN 1
PoE IN
GPIO connector LINE IN LAN 2
LINE OUT Headset XLR connecto
r
12VDC: Connector for optional 12VDC external PSU.
GPIO connector: Used for external control interfacing.
Line Out: Outputs the main audio or a groups audio to an external component or system.
Line In: Audio input for integrating external audio as a group in the Green-GO system.
Headset connector: For connecting a headset.
LAN 1: For connecting to network devices. This LAN port can supply PoE for the deskstation.
LAN 2: For connection to network devices that should not supply PoE for the deskstation.
page 3 of 20 Copyright © 2020 Green-GOGO
MCXD user guide
The Main Interface
ch 13
Setup Pushbutto
n Channel Push buttons
All Isolate
ch 14
Sound Cue Mode Pushknob
ch 15
Light Listen Call Shift Pushbutton
ch 1 ch 4 ch 7 ch 10
All Stage All Stage
ch 2 ch 5 ch 8 ch 11
Sound Video Sound Video
ch 3 ch 6 ch 9 ch 12 TFT Touchscreen - divided into 6 sections
Light Chat Light Chat relating to the Pushbutton xt
neto it.
– Pushknob: Used for volume control or inside the setup menu for scroll and select (push)
– Setup pushbutton: Used for entering or leaving the setup menu with short presses. Outside the Setup menu
this button can be used as a shortcut to the settings for a selected channel. Make one long press, the button
will start blinking and you can press the Talk button or the touchscreen to select an assigned channel. This will
take you to the settings for the selected channel
– Shift Pushbutton: One short press will change between the two pages of assigned channels. A Long press will
make the button blink and the Talkbuttons turn Magenta, this takes you to the button assignment menu. Here
you can choose which function to assign to the selected button. The functions are:
– No Function: The button does nothing.
– Default function: The button controls the next channel in succession.
– Program audio: Controls the volume of program audio. *
– Speaker Volume: Controls the volume of the Speaker. *
– Headset Volume: Controls the volume in the Headset. *
– Sidetone Volume: Controls the volume of the Sidetone. *
– Listen/Call mode: Assign the Listen/Call mode selector to the button.
– Listen mode: Assign the Listen mode selector to the button.
– Call mode: Assign the Call mode selector to the button.
– Cue mode: Assign the Cue mode selector to the button.
– Isolate: Assign the Isolate function to the button.
– Answer: Assign the Answer function to the button.
– Mic Kill: Assign the Mic Kill function. Switches off the local speech input as long as the button is pressed.
Mic Kill Latch: Assign the Mic Kill Latch function. Switches off the local speech input. Press for OFF and
ON. Audio Input Select: The Deskstation can remember two sets of audio input settings. When choosing
– Mic Kill Latch: Assign the Mic Kill function. Switches off the local speech input as TOGGLE
– Audio Source Select: you get access to switch between the two. See following pages.
– Channel 1- 32: Select a channel to assign to the button.
* Press the button down and simultaneously adjust the volume with the Pushknob
– 18 Channel pushbuttons: The remaining 18 pushbuttons relates to the area of the touchscreens next to
them. They can be assigned different functions using the Shift pushbutton (see above). The default setup is:
– Page one:
– 15 Pushbuttons for the first fifteen channels. Push the button to Talk.
– 1 Pushbutton for the Isolate function: When isolate is on, Talking on a channel will mute all others. 1 Cue
mode Pushbutton: Selecting Cue mode allows you to send Cues. See following pages.
– 1 Listen/Call mode Pushbutton: Choose between Listen and Call mode. See following pages.
– Page two:
– 17 Pushbuttons for channels 16-32 + 1 Pushbutton for Program Audio
– The Color Codes the color codes, in the Display and the Indicator LED’s, mean:
– Blue: Inactive
– Green: Channel open for you to Talk
– Yellow: Someone is Talking on the channel
page 4 of 20 Copyright © 2020 Green-GOGO
MCXD user guide
– Red flashing: Call signal received on the channel
– Red /white flashing: Incoming Alert received on the channel.
Basic Functions Explained
– Audio Profile It is possible to create an Audio Profile in the Green-GO Control software containing the Desk-
station settings. The profile is contained in the configuration file and can be loaded on to any Deskstation.
– Configuration fileThe configuration file is a system configuration file containing information about Users,
Groups and their interaction. For a beltpack to communicate with the other Green-GO devices on the net-
work, they need to have an identical configuration file loaded. The configuration file can be loaded/cloned from
another device, the Factory default file can be chosen or a custom config file can be created in the Green-GO
Control software.
– Clone config The configuration file can be cloned from another Green-GO device on the network that con-
tains the desired file.
– Connections By setting the connection type the Deskstation can work in different setups. It can be a Master
unit controlling extensions, it can be connected to a remote site via a bridge or it can operate in normal setup.
These connection types are called Master, Remote and Local connection.
– User selection A Deskstation can be setup to use a predefined User profile. The rules for these User profiles
are defined in the configuration file.
– Channel assignment The Deskstation has 32 available channels. To Talk to or Call a user or group of users,
you need to assign them to one of the available channels.
– Talk Talk to any User or Group assigned to one of the 32 channels on the Deskstation
– Call Call any User or Group assigned to one of the 32 channels on the Deskstation.
– Cue It is possible to send Attention Cues, Acknowledge cue reception and send GO cues.
– Answer Answer an incoming signal or conversation.
– GPIO General Purpose In/Out - Enables external switches to initiate commands on the Deskstation and also
allows the Deskstation to set off external switch-controlled events using conditions such as Talk, Cue etc.
– Alert C Send a visual and audio alert signal to any User or Group assigned to one of the 32 channels on the
Deskstation. Volume adjustment - Volume adjustment can be done for both the main volume and the individu-
al channel volumes.
How to…
Enter and navigate the setup menu
This is done by clicking the Setup Pushbutton. When in the Setup menu, scrolling and selecting is done using the Pushknob.
Set User
– Enter the Setup menu.
– Scroll to ’Set User’. Click ’Enter’
– Scroll to the desired user and click ’Enter’
Clone Configuration File
– Enter the Setup Menu and scroll to Clone Config. Click ’Enter’
page 5 of 20 Copyright © 2020 Green-GOGO
MCXD user guide
– scroll to select the desired Configuration file. The Factory default configuration file can be found at the end of
the list.
– Click ’Enter’ to load the Configuration file.
Assign channels
– You can assign Users or Groups to any of 32 available channels.
– Enter the Setup menu. Scroll to ’Channel Assignment’ and click ’Enter’.
– Scroll to the channel you want to assign a Group or User to and click ’Enter’ Scroll to ID and click ’Enter’.
– Scroll to select what you want to assign; Group, User or None. Click ’Enter’ A list of available Groups or Users
will appear.
– Scroll to the desired Group or User and click ’Enter’
Load Audio Profile
– Enter the Setup Menu and go to Audio Settings/Load Profile. Click ’Enter’
– Scroll to select the desired profile. The default audio profile file can be found at the end of the list.
– Click ’Enter’ to load the profile.
Assign functions to the Channel Pushbuttons
You can assign different functions to the Pushbuttons.
– Press and hold the Shift Pushbutton. All Pushbuttons that can be assigned a new function turns magenta.
– Now press the desired Pushbutton.
– In the top left TFT screen a list of functions that can be applied appears.
– Using the Pushknob, scroll to the one you want and select it by pressing the Pushknob. See page 3 for func-
tions and explanations. Audio Input Select is described further below.
Audio Input Select
Example:
You want to make a preset for a Headset and one for a Front mic. To avoid to much confusion, all we want to change
is IN (the Audio Input) and the Bias (Mic power)
To start with both presets are similar: (The underlined is the active one)
- 1st preset: IN: Headset – Bias: Off - 2nd preset: IN: Headset – Bias: Off You go to the Setup Menu/Audio settings
and select: IN: Front Mic – Mic Pwr: On (The bias setting automatically changes to ‘Mic Pwr: On’, when ‘Front Mic’ is
selected.) Exit the menu.
Notice that the touchscreen next to the pushbutton you assigned Audio Input Select to, now reads ‘Front Mic’ Now
you have two visible different presets that you can cycle between using the pushbutton:
- 1st preset: IN: Front Mic – Mic Pwr: On - 2nd preset: IN: Headset – Bias: Off
Now we want to change the Threshold of the 2nd preset.
- Press the pushbutton so it reads ‘Headset’. Enter the Setup menu and go to Audio settings/Thld and change the
value to -20 dB. Exit the menu.
page 6 of 20 Copyright © 2020 Green-GOGO
MCXD user guide
Now your presets will look like this:
- 1st preset: IN: Front Mic – Mic Pwr: On - Thld: -35dB - 2nd preset: IN: Headset – Bias: Off – Thld: -20dB
So in short, select the preset to edit, make your changes and they will automatically be saved. Exit the menu to select
the desired Audio Input..
Assign a group to Program Audio
Program Audio allows you to set a group as the underlying audio source. This could be Stage Sound or any other group. To
assign a group as the Program Audio go to Setup Menu/Program Audio/Src: Scroll to the desired Group and Select it.
Assign Line In to a Group
Go to Setup Menu/Line In-Out/Line In/Group and scroll to and select the desired Group to assign the Line In to.
Assign a Group to Line Out
Go to Setup Menu/Line In-Out/Line Out/Group and scroll to and select the desired Group to assign to Line Out. A couple of
things to consider;
– If you want the Line In audio to be included on Line Out set a volume on Audio Settings/Line In-Out/Line Out/
Loopback. Setting Line In and Out to the same Group will prevent loopback as Group will not Output it’s own
audio.
– If you need your main mix (e.g. what you hear in your headset) also available on a Line out, then set the Main
Mix volume. This can be done in Setup Menu/Line In-Out/Main Mix Output This will mix the main mix with
what ever is selected for the line out.
Adjust the Volume and Mute
– Turning the Pushknob will adjust the Main volume.
– Pressing on the Channel No./Group name on the TFT Touchscreen and simultaneously turning the Pushknob
will adjust the volume of that Channel No./Group
– Pressing on a Groups Volume indicator will Mute/UnMute that Group.
– The volume of the individual channels can also be set in the Setup menu.
– The setting ranges from MUTE over -36dB to 12dB with 0dB as default.
– To do this enter the Setup menu, Scroll to Channel Assignment and Click ’Enter’.
– Scroll to the desired channel and Click ’Enter’.
– Scroll to volume and Click ’Enter’.
– Scroll to the desired setting and Click ’Enter’.
Talk
Press the Pushbutton next to the part of the TFT display that show the channel you want to talk to. A short press will enable
Talk and requires another press to disable Talk again. (Latch functionality) A Long press will enable Talk until the button is
released again.(Momentary functionality)
page 7 of 20 Copyright © 2020 Green-GOGO
MCXD user guide
Listen /Listen Mode
When Listen is selected, which is done by either pressing on it on the TFT Touchscreen or by using the associated Listen/Call
toggle pushbutton, it is possible to Mute/Un-mute and adjust the individual channel volume. See above: ’Adjust the Volume
and Mute’
Call /Call Mode
A Call sends a visual signal to a selected Channel. (Group/User)
– The Group/User can choose to Answer the Call.
– When Call is selected, which is done by either pressing on it on the TFT Touchscreen or by using the associ-
ated Listen/Call toggle pushbutton, it is possible to make a Call by shortly pressing the Channel No./Name on
the TFT touchscreen. Alternatively the Talk button can be used as well if the Channel Pushbutton has been set
to Talk/Call/Cue in the menu under Setup Menu/Device Options/ChnBtn.
– A long press will cause an Alert to be sent.
Cue /Cue Mode
Two different cues can be sent. An Attention cue indicating that a Go cue is coming and the actual Go cue. The Deskstation
can be set in Cue Mode by selecting it on the TFT touchscreen or the associated Pushbutton. This enables the user to send
an Attention Cue followed by a Go cue or to skip the Attention cue and send a Direct Go Cue.
Sending an Attention Cue followed by a Go Cue:
– Select Cue Mode - The text changes from ’Cue Mode’ to ’Direct Go’
– press the Channel area on the TFT touch screen*
– The TFT Channel area will begin to flash yellow and a visual attention popup and an attention audio signal will
be sent to the recipient/recipients. The text will change from ’Direct Go’ to ’GO’
– If the recipient responds with an Acknowledgement, the TFT channel area will stop blinking and turn red. This
is called a Hold cue. At the recipients end the display will turn red.
– Pressing a second time on the Channel area* will send the GO Cue. The Channel area will turn Green for 5
secs and the text will change to ’Clear’. (Pressing again the Go cue will be cleared from the display immediately
instead.) A visual Go cue and a Go audio signal will be sent to the recipient.
Sending a Direct Go cue:
– Select Cue Mode - The text changes from ’Cue Mode’ to ’Direct Go’
– press and hold ’Direct Go’ and the Channel area on the TFT touch screen* - this will skip Attention and Hold
cues and go to directly sending a GO cue.
*Alternatively the Talk button can be used if the Channel Pushbutton has been set to Talk/Call/Cue in the menu
under Setup Menu/Device Options/ChnBtn.
Reset Multi Channel Deskstation to default settings
– Enter the Setup menu.
– Scroll to Info and click ’Enter’.
– Scroll to ’Reset All Settings’ and click ’Enter’.
– Click ’Yes Reset’ to confirm.
page 8 of 20 Copyright © 2020 Green-GOGO
MCXD user guide
Updating firmware
The firmware can be uploaded via ethernet The latest firmware can be found at www.greengodigital.com Download the
latest firmware and the Green-GO Update Connection software.
– start the software
– click Scan to search for the MCXD on the network
– Next select the MCXD or multiple MCXD’s and click on Update.
– This will open a file selection window, browse to select the firmware for the device and click on Open, the
updating of the firmware now starts.
– After the update is successful, the device will reboot.
GPIO
General Purpose In/Out GPIO enables external switches to initiate commands on the Deskstation and also allows the Desk-
station to set off external switch-controlled events using conditions such as Talk, Cue etc.
The GPIO’s connection is located on the rear on a female 9-pin D-sub connector.
GP Inputs
Using the GP Inputs it is possible to trigger local commands at the Deskstation. Commands that can be triggered on the
Deskstation are:
– Talk: As an Answer to a Call or as Talk on a channel as set in Setup Menu.
– Call: A Call on a channel as set in the setup menu
– Call: A Call on a channel as set in the setup menu
– Cue: Allows to either send ’Acknowledge’ as response to a re-
ceived cue or to send an Attention, Hold or Go cue to a channel as
set in the setup menu.
Setting the Normal state:
The Inputs can be set to either Normally Open or Normally Closed If set
to Normally Open the command will be executed whenever the switch is - + - + - +
Closed If set to Normally Closed the command will be executed whenever
PIN NO.: 1
the switch is Open
IN 1 IN 2 OUT 2 + 5 V
Example for driving small 5V relays
The input works with a contact to GND to activate , open voltage +5V. The Output is an optocoupler for max. 5mA and 50V
when open.
GP Outputs
The below mentioned settings can changed or set in the Setup Menu under GP Input-Output/Out 1 or Out 2
page 9 of 20 Copyright © 2020 Green-GOGO
MCXD user guide
Conditions that can be used as triggers are:
– Active: When Activity occurs on any channel or a specific channel as set in the setup menu. Call: A Call re-
ceived on any channel or a specific channel as set in the setup menu
– Cue Receive: When receiving a Cue either a Hold, Attention, Go or either one of two; e.g. Hold/Att or Att/Go
it will trigger either continuously or as a pulse/blinking.
– Talk: Locally enabled Talk on any channel or a channel as set in Setup Menu.
Setting the Normal state:
The Outputs can be set to either Normally Open or Normally Closed If set to Normally Open, the internal Switch/Opto-
coupler is not activated until the conditions have been met. If set to Normally Closed, the internal Switch/Optocoupler is
activated until the conditions have been met.
Reference
Alert
Audio and Visual Alert sent from one User to another User or Group. Depending on you UI settings, you can send an Alert
signal to a channel(User/Group) by doing a long press on the Call button. This will result in a visual alert (Red flash) and a
Buzzer sound at the selected channel(User/Group).
Announce
Any group can be placed on the Announce channel. Announce channel is listen only. Any activity on the channel will be han-
dled according to priority. Announce is higher priority than High Priority but is Muted by Emergency.
Answer
Is a response to an incoming signal or conversation. A User can choose to respond to an call by pressing and holding the
answer function button.
Audio Input Select function
Is a function that can be assigned to a Channel Pushbutton. The Deskstation has two sets of Audio Input Settings that the
user can cycle between. See the How To section for further information.
Call
Is a conversation request that can be sent between Users and Groups. Depending on the UI settings a call can be placed by a
short press of the Call button for the desired Channel (User/Group). A response to a Call is an Answer. Sending and receiving
Calls can be enabled and disabled for individual channels.
Channel
A channel is a ’line’ reserved for a specific User or Group. 32 channels are available on a unit. Each channel can have a User or
Group assigned to them. You select the Users and Groups you want to communicate with and assign them to a channel.
page 10 of 20 Copyright © 2020 Green-GOGO MCXD user guide Channel assignment To have access to a specific User or Group via the hardware interface (buttons and encoders), it is necessary to assign them to one of the 32 channels. This is done in the Setup Menu: Channel Assignment. Channel ID Name of the Group or Channel Configuration File/Config File The Configuration File is a file containing information about the system setup. What Users and Groups are available and what the rules are for their communication. The Config File has to be the same on every Unit in the GreenGo Intercom system for the units to be able to communicate. A Factory default Configuration file is available on every unit, but a custom Configuration file can be created in the Green-GO Control software. The Config File can also be cloned from other Units containing the file. A Unit can only have one Config File loaded. Cue Cues can be sent from multichannel stations like the MCXD or an MCX. Cue’s can be sent to Users or Groups. The cues can be sent as either a direct GO cue or as a Standby/Attention Cue + a GO cue. For more information see the ’How To’ section. Direct Channel/ Direct Call A direct channel is a channel reserved for incoming calls from Users that the recipient haven’t assigned to one of the 32 avail- able channels. Those calls are called Direct Calls. It is only available for User to User communication. Emergency Any group can be placed on the Emergency channel. Emergency channel is listen only. Emergency is highest priority in the Green-GO System and Mutes all other channels. Extensions Extensions adding 24 channels each can be connected to the deskstation. A max. of 9 extensions can be connected. GPIO connector General Purpose In/Out - allows the Deskstation to trigger or to be triggered by switch controlled events. Group A group of Users. Users can be part of one or more groups. This could be a group for Sound Crew, Lighting crew, Stage Crew etc. This enables you to communicate with all members of the group at the same time. Isolate If isolate is enabled it all other channels are muted during Talk on a selected channel. page 11 of 20 Copyright © 2020 Green-GO
GO
MCXD user guide
Latch (also used in connection with Momentary)

A latch press will toggle the current talk state. A simple button-press to enable and another button-press to disable.

Listen Mode

If in Listen mode the user has the option to listen to/mute a channel. If the Channel Pushbutton has been set to Talk/Call/Cue
it is necessary to be in Listen Mode to allow the Channel Pushbutton to work as a Talk button.

Listen on Talk

If Listen on Talk is on, Talking on a Muted channel will be temporarily un-mute the channel for the reply to be heard. Local
connection Normal operating mode.

Master connection

The Deskstation has extensions connected to it as slaves and works as their Master.

Mic Kill

A function that can be assigned to a Channel Pushbutton. It allows the user to temporarily switch off the Speech Input from a
Microphone or Headset.

Power Over Ethernet

is what it says. The power to the units is supplied by the PoE switch via the Ethernet cable. This could be Antennas, Desk
stations, Wired beltpacks etc.

Popup

Popups occur when receiving a Cue or Direct Call. The behavior of Popups can be set in Setup Menu: ‘Options/Popup’

Priority

A priority can be set for each channel. A higher priority channel will override a lower priority channel. Levels are from lowest
to highest: Program audio, Low, Normal, High, Announce and Emergency. When a channel with higher priority becomes ac-
tive, the lower priority channels will be dimmed according to the setting in Setup Menu: ‘Options/PriorityDim’. The exception
to dimming settings is Emergency, which Mutes all other channels.

Remote connection

This connection is chosen when connecting to a remote site via a bridge at that location.

Program Audio

Your background sound; it can be any user, group or the analog audio input (Line In) from e.g. the Deskstation or the Inter-
face X

page 12 of 20                                                                                 Copyright © 2020 Green-GO
GO
MCXD user guide
Set User -

When starting to use a beltpack or other station, you can choose which User profile to use. The User profile has been set
up in the Configuration File. In the Factory Default Configuration file you can find Users like Stagemanager, FOH, Monitor,
Director etc. Choose the one that fits best.

SideT

Side Tone is the users own voice. A volume can be set for how high the users own voice should be in his/her own speakers/
headset. This can be done in the Setup Menu: Audio settings/SideT

Talk -

Is to enable your microphone audio to be transmitted to an assigned channel. (user or group) This is done by pressing the
Talk pushbutton for the desired Channel(User/Group)

Threshold

Threshold is the maximum level at which the microphone should avoid transmitting the audio that it picks up. Users have in-
dividual voice levels, individual ways of positioning the microphone and one microphone has different sensitivity than others.
To avoid unwanted audio to be transmitted, like breathing set the threshold, if necessary.

Tone

The level of the audio signal. Used for Alert, Cue, Connection status and Battery status. The volume can be set in Setup
Menu:‘Options/Tone’

User

You’re a User. Everyone using the intercom are Users. Users can be part of Groups. Custom Users and Groups can be
created in the Green-GO Control software. When created, the User gets a named profile and is automatically saved in the
Configuration File (see Config File for further information). That user can then be loaded onto any device and can be loaded
on to several devices at the same time.

The Setup Menu
The following will introduce you to the Setup menu. Where to find what you are looking for and a complete list of the Setup
Menu with notations.

The Sections
         – Program In/Program Audio: This section allows you to set parameters for the Program Audio
         – Channel Assignment: You have 32 channels available. Here you can assign Groups and Users to those chan-
           nels. Audio Settings: Here you can load Audio profiles and set the options for your speech input.
         – Options: You will find general options here
         – Line In/Out: Adjust settings for Line In and Out
         – GP Input/Output: GPIO - General Purpose Input Output conditions can be configured here.
         – Set User: This is the place to choose which User profile to use for your Deskstation

page 13 of 20                                                                                Copyright © 2020 Green-GO
GO
MCXD user guide
– Connection: Choose Normal operation, Master+extensions setup, Remote connection and the settings.
– Clone Config: Clone a Configuration File from another Green-GO device or load the Factory Default
– Device Options: Options specifically for your device’s interface.
– Network: Choose between dynamic or manual network configuration
– Info: Information about your Deskstation and where you can choose to reset your Deskstation settings.
The Setup Menu Tree
– Exit //Leave menu
– Program Audio
– Exit //Go back
– Src:_ //Select group to use as Program Audio source
– Vol: Default: 0dB - Range:+12dB - -36dB - and MUTE //Volume of Program Audio
– Dim: Default: -6dB - Range: 0 - -24dB and MUTE //Program audio volume dimming during communica-
tion
– Channel Assignment
– Exit //Go back
– 1 – 32 //Select what User/Group to assign to channel
– Exit //Go back
– ID: 258 //ID of User or Group assigned to the channel
– Exit //Go Back
– Group //Assign Group to channel
– User //Assign User to channel
– None //Remove assignee from channel
– Set Label //Change channel label – Changed label indicated by a ‘ in front of label e.g. ‘Stage
– Cancel //Go Back
– Group //Select a group label
– User //select a user label
– Clear //Clear the label set
– Talk: Latch/Momentary //Set the way the Talk button acts when pressed
– Latch/Momentary //Short press: Latch - Long press: Momentary
– Latch //A press on the Talk button enables talking - a second press disables talking
– Momentary //If selected, the Talk button must be kept pressed to enable talking
– Disabled //Disable Talking for this channel
– Listen On:
– Listen On // Enable listening to this channel
– Listen Off// Display will still indicate talking, but audio will be Off.
– Volume: //Set the volume for this channel
– Default 0dB - Range: Mute , -36dB to 12dB
– Normal Priority//Set the priority level of the channel. Also see ’Options/Priority dim.
– High Priority, Normal Priority, Low Priority
– Call Send Enabled//Enables or disables the ability to send calls to the channel.
– Call Send Enabled/Call Send Disabled
– Call Receive Enabled//Enables or disables the ability to receive calls from the channel
– Call Receive Enabled/Call Receive Disabled
– Normal Bandwidth/ Enhanced bandwidth // If set to Enhanced, bandwidth increases during Talk
from 7 to 15 kHz. Data bandwidth usage doubles.
– An: Assign Group to be handled as Announce Channel. See Priority and Announce
– Em: Assign Group to be handled as Emergency Channel. See Priority and Emergency
page 14 of 20 Copyright © 2020 Green-GOGO
MCXD user guide
– Audio Settings
– Exit//Go back
– Load Profile//Load an audio profile from the configuration file or choose the default.
– Exit//Go Back
– SideT: SideTone //Set the volume for how high the user should hear himself
– Default: 0dB Range: MUTE - 0dB
– Auto/AutoGain: //Set the dynamic amplification to avoid distortion
– Default: Medium Range: Slow - Off If set to ‘Off’ the MaxG, Max Gain, option is replaced with Gain –
a set fixed value.
– MaxG 50dB/ Gain 50dB: //Set the maximum gain/fixed gain of the input signal/microphone signal
– Default: 50dB Range: 60dB - 30dB
– Thld: Threshold //Set the level required for the input signal/microphone audio to be transmitted.
– Default: -35dB Range: -20dB - Off In ‘off’ setting, the microphone/input signal will transmit when
Talk is active If Threshold is set too high the input signal/microphone audio can become sporadic.
– Hold: //How long will a gate stay open after activity goes below the set threshold.
– Default: Fast Range: XLong - Fast
– Spkr Dim: Speaker dimming
– Default: Off
– Range: Off, -6Db, -12Db, -24Db
– In://Select audio input source
– Default: Headset
– Range: Line In, Front Mic, Headset, 14kHz, 12kHz, 8 kHz, 4 kHz, 3 kHz, 2,5 kHz, 2 kHz, 1,5 kHz,
1,25 kHz, 1 kHz, 875 Hz, 750 Hz, 625 Hz, 500 Hz, 375 Hz, 250 Hz, 125 Hz,
– Bias: //If an electret microphone is used Bias needs to be enabled to supply the power.
– Default: Off Range: On - Off
– Options
– Exit //Go Back
– Active Time: //Set the time in seconds, for a channel to be active after last audio activity.
– Default: 4.0s Range: 45.0s - 0.5 s
– Buzzer: //Enable or disable the buzzer sound that will sound if an alert is received.
– Default: Off Range: On - Off
– Tone: //Volume of audio signal used for Alert, Cue, Connection Status and Battery status.
– Default: -12dB Range: Max, -1dB - -48dB, MUTE
– No Listen on Talk: //Allow a Muted channel to be temporarily Un-muted after enabling Talk on the chan-
nel.
– Default: No Listen on Talk Range: No Listen on Talk- Listen on Talk
– Answer Enabled: // Enable or disable ability to Answer a call.
– Default: Answer Enabled Range: Answer Enabled - No answer
– Popup All: //Select Popup behavior
– Popup All //All popups are shown
– Popup Cue+Direct //Popups for Cue signals and direct Talk only
– Popup Cue //Popups for Cue signals only
– No Popup //(Yup, You guessed it)
– Priority Dim: //Dimming level of a lower priority channel if a higher priority channels becomes active
– Default: -6dB Range: 0dB - -24dB, MUTE
– Direct Priority: //Set the priority for direct channels
– Default: Normal Range: High - Low
– Direct Volume: //Set the volume for direct channels.
– Default: 12dB Range: 12dB - -36dB, MUTE
– Auto Talk: //Talk is automatically enabled on the selected channel
page 15 of 20 Copyright © 2020 Green-GOGO
MCXD user guide
– Default: Off Range: Off, Channel 1, Channel 2…….Channel 32
– Cue Mode: //Set the response on Cue signals
– Default: Normal
– Range:
– Ignore//Do nothing
– Auto Answer//Automatically sends a ‘cue received’ confirmation to the sender
– Normal//Requires the user to send a confirmation or reply
– Output Cue Time: //Set the length of time for the GO cue to be transmitted.
– Default: 5s Range: Off, 0,5s, 1s, 2s, 3s, 5s, 8s, 12s, 15s, 20s, 25s, 30s, 45s, 60s
– Line In/Out:
– Exit //GO back
– Line In: //Assign Line In to a group and adjust the settings of Line In Exit – Go Back
– Group: //Assign Line In to a group
– Range: None, ‘named groups’, Group 1-10, Program 1 – 5, Announce 1 - 5
– AutoGain: //Set the dynamic amplification to avoid distortion
– Default: Off Range: off, Fast, Medium, Slow.
– In the setting ‘Off’ the following MaxG (MaxGain) option is replaced with Gain - a set fixed
value.
– MaxG 50dB / Gain 50dB //Set the amplification or maximum amplification of the input signal/micro-
phone signal
– Range:-12dB - -1dB,0, 1-28dB
– Threshold: //Set the level required for the input signal/microphone audio to be transmitted.
– Range:Off, -45dB - -20dB
– If set to ‘off’ the input signal/microphone audio will always be transmitted if Talk is active. If set
too high the input signal/microphone audio can become sporadic.
– Hold: //Set for how long the gate should stay open after activity goes below set threshold
– Range: Fast, Medium, Long, XLong
– Normal bandwidth/Enhanced bandwidth
– Line Out: -
– Exit // Go Back
– Group: // Select the Group to be transmitted on Line Out
– Output: 0dB //Set the volume for Line Out
– Range: Mute, - 42dB, -39 dB, -36 dB, -33 dB, -30 dB, -27dB, -24dB – 06dB
– LoopBack: //Sends the audio received on Line In to Line Out
– Default: Off Range: Off, -39 dB, -36 dB, -33 dB, -30 dB – 0dB
– Main Mix Output: //Main Mix is the audio that can be heard in the speaker or headphones of the unit. By
setting a volume other than MUTE, you can choose to add the Main Mix to the Line Out.
– Default: Mute
– Range: Mute, -48 dB, -45 dB, - 42 dB, -39 dB, -36 dB, -33 dB, -30 dB – 0 dB
– GP Input/Output
– Exit //Go Back
– In 1: //Settings for GP input 1
– Exit //Go Back
– Func: //Select what function the Input 1 switch should trigger Talk, Call, Cue,
– Option: //Select the action to the given function.
– Func = Talk : Answer, Channel 1 – 32
– Func = Cue: Acknowledge, Send Att Chn 1 – 32, Send Hold Chn 1 – 32, Send Go Chn 1- 32, If Cue is
triggered what should the action be:
– Acknowledge // Send Acknowledged to a received cue
– Send Att Chn 1-32 // Send an Attention cue to the selected channel
page 16 of 20 Copyright © 2020 Green-GOGO
MCXD user guide
– Send Hold Chn 1-32 // Send a Hold cue to the selected channel
– Send Go Chn 1-32 // Send a Go cue to the selected channel
– Normally Closed/Normally Open // Set the Normal state of the switch
– Normal Open: then the switch is not activated except when the condition is met.
– Normal Closed: then the switch is not deactivated except when the condition is met.
– In 2: //Settings for GP input 2
– Same as In 1
– Out 1: //Settings for GP Output 1
– Exit// Go Back
– Func: //Select what function should trigger the switch connected to Output 1 Active, Call, Cue
Receive, Talk
– Option: //Specify the action causing the trigger
– When Func = Active : Any Channel, Channel 1 – 32 // Activity on any channel or a specific
channel
– When Func = Call : Any Channel, Channel 1 – 32 // A Call on any channel or a specific channel
– When Func = Cue Receive: Hold, Hold Blink, Att, Att Blink, Go, Go Blink, Hold/Att, Hold/Att
Blink, Hold/Go, Att/Go
– What kind or kinds of Cue status’ should trigger the switch and how. When the selected con-
dition is received then it will either be active or blink
– When Func = Talk: Any Channel, Channel 1 – 32 // Locally enabled Talk on any channel or a
specific channel
– Normally Closed/Normally Open //What is the Normal state of the switch
– Normal Open: then the switch is not activated except when the condition is met.
– Normal Closed: then the switch is not deactivated except when the condition is met.
– Test: //Test if hardware connection works without having the Function+Option occurring. -, Closed,
Open,
– Out 2: //Settings for GP Output 2
– Same as Out 1
– Set User: //Select the user to be used with for the device
– Cancel//Go Back
– ’User A - Z’
– Connection: //Set the connection type for the device to use.
– When entering this menu you will go to the menu of the selected connection type, which is either: Local
connection, Remote connection or Master connection.
– Local Connection: Local Connection is normal operation
– // A click here will send you to Local/Remote/Latency/Master connection choice menu.
– Save //Save settings
– Cancel //Go Back
OR
– Remote Connection: //Remote connection is used when connecting to a remote site via a Bridge at that
location. The device becomes a complete member of that location.
– // A click here will send you to Local/Remote/Latency/Master connection choice menu.
– Password: //Set the password for the connection
– Turn knob to scroll, click turn knob to select, Tool key exits.
– Enter password; 8 digits available,A-Z,a-z,0-9,!,@,#,$,%,^,&,*,(,),
– Generate Password://Selects random password
– Remote Port: // Select remote port
– Turn knob to scroll, click turn knob to select, Tool key exits.
– Remote IP: 0.0.0.0 //Select remote IP
– Turn knob to scroll, click turn knob to select, Tool key exits. Backup: Off //If enabled and the con-
page 17 of 20 Copyright © 2020 Green-GOGO
MCXD user guide
nected bridge fails it will reconnect Off, 0.0.0.1
– SndBuf: // Set the buffer to compensate for internet jitter
– Default, Small, Normal, Large
– RecvBuf: // Set the buffer to compensate for internet jitter. Auto will adjust according to connection.
– Default: Auto, Small, Normal, Large, Save //Saves the connection settings
– Cancel //Go Back
OR
– Master Connection: //Master connection is used when connecting Extensions to the Deskstation
– // A click here will send you to Local/Remote/Latency/Master connection choice menu.
– Default: Auto Range: Auto,1 – 9 Save //Saves the connection settings
– Cancel //Go Back
– Clone Config //Clone a configuration file from the network or load the Factory Default
– Cancel // Go Back
– ’Configuration File A-Z’ Factory Default
– Device Options
– Exit //Go Back
– Backlight: //Set timeout for LCD Touchscreen backlight
– Default: 10 min Range: Always On, 10 sec, 30 sec, 1 min, 10 min, 30 min, 1 Hour, 2 Hours.
– Screen Bright: //Set LCD Touchscreen brightness
– Default: 6 Range: Low, 2, 3, 4, 5, 6, 7, Max
– LED Bright: //Set the brightness for the Pushbutton LED
– Default: 6 Low, 2, 3, 4, 5, 6, 7, Max
– Speaker: //Set the Front speaker volume
– Default:-12Db Range:MUTE,-48dB,-45dB,-42dB,-39dB,-36dB,-33dB,30dB–0dB
– Headset: //Set headset speaker volume
– Default:-12Db Range:MUTE,-48dB,-45dB,-42dB,-39dB,-36dB,-33dB,30dB–0dB
– ChnBtn Talk: //Set the function of the Channel Pushbutton - Talk function or Talk, Call and Cue when in
either Listen, Call or Cue mode.
– Default: Talk Range: Talk - Talk/Call/Cue
– Shift Page Enable/Disable // Enable or disable page change using the Shift Pushbutton
– Network
– Dynamic: //Choose dynamic network settings or configure your own.
– Default: ON
– OFF:
– IP address: 169.254.181.58
– Netmask: 255.255.0.0
– Gateway: 0.0.0.0
– Save //Save the settings
– Cancel //Go Back
– Save //Save network settings
– Cancel //Go Back
– Info //Shows information about the unit
– Name set //The Name of the Unit. Can be set in the Green-GO Control or Connection software
– Access Protection //Shows the access protection that has been set in the Green-GO Control software
– SN: 214 //Unit serial number
– MCXD 4a45 //Firmware version
– MCXD 4a45 //Firmware version
– Jun 12 2049 //Firmware release date
– 13:01:02 //Firmware release time
– IP: 169.254.181.58 //Device IP
page 18 of 20 Copyright © 2020 Green-GOGO
MCXD user guide
– Mac: XX:XX:XX:XX:XX:XX //Device Mac address.
– Reset All Settings //Resets all IP, User, Audio and Channel settings
Specifications
Physical: Dimensions: 220mm x160mm x45mm
Weight: 975g
Connectors: 1x Neutrik XLR Male 4 pin,
2 x Neutrik Female 3 pin,
1 x Neutrik Male 3 pin,
2 x Neutrik Ethercon Ethernet,
1 x D-Sub Female 9p,
1 x DC 12V
Power: PoE or optional 12VDC external Power Supply
General Audio Specifications:
Measurements made with MCX(D) amd BPX wired beltpack Output headset, volume 0 dB Values are RMS 22Hz - 22kHz
unweighted Digital audio format: Linear 16 bit 16/32 kHz sample rate (Standard/Enhanced audio)
Input Headset mic Panel Mic Line
Connector XLR 4M pin 1-2 XLR 3F XLR 3F
Type unbalanced balanced balanced
Electret mic bias / Phan- 0/+2.5v 0/+10v
tom power
Gain +30 - +70dB +24 - +64dB -9 - +31dB
Limit-level AGC -12dBFS = +2dBu
Gate Threshold Off, -45dB - -20dB 5dB step
Sidetone level Mute, -24dB - 0dB 3dB steps
All wired units
Noise -70 - -55dBu -70 - -55dBu -70 - -55dBu
Latency mic-network - 12ms 12ms 12ms
headphone
Frequency response 240 - 7000 Hz 200 - 7000 Hz 140 - 7000 Hz
standard
Frequency response 240 - 14000 Hz 200 - 14000 Hz 140 - 14000 Hz
enhanced
Output
Connector XLR4M pin 3-4 XLR 3M
Nominal level 0 dBu 0 dBu
Max output +20 dBu >2W +12 dBu
Load 120-600 Ohm >8Ohm 0/p imp 240 Ohm
page 19 of 20 Copyright © 2020 Green-GOGO MCXD user guide page 20 of 20 Copyright © 2020 Green-GO
You can also read