Oracle Eloqua and Salesforce Closed- Loop Reporting - Configuration Guide - 16-Mar-2021
←
→
Page content transcription
If your browser does not render page correctly, please read the page content below
Oracle Eloqua and Salesforce Closed-
  Loop Reporting

  Configuration Guide

©2021 Oracle Corporation. All rights reserved   16-Mar-2021
Contents
   Closed-loop reporting with Salesforce                                               3
   Steps to configure closed-loop reporting                                            6
   Preliminary setup for closed-loop reporting                                         8
   Creating campaign response rules for closed-loop reporting                         10
   Configuring campaign revenue settings for closed-loop reporting                    14
      Creating the Salesforce opportunity stages                                      14

      Configuring the default revenue attribution method                              16
   Configuring auto synchs for closed-loop reporting                                  18
      Creating the Get Campaigns auto synch                                           19
      Creating the Get Opportunities auto synch                                       24
      Creating the Get Opportunities auto synch to associate opportunities with
      contacts                                                                        29
      Disabling auto synchs for closed-loop reporting                                 35
   Configuring external calls for closed-loop reporting                               37
      Preconfiguration: Creating folders                                              38
      Creating external calls                                                         39

   Sending campaign data to Salesforce for closed-loop reporting                      45
      Filtering contacts that responded to campaigns                                  46
      Creating the send campaign information program                                  47
   Updating the CRM update program for closed-loop reporting                          55
   Initializing closed-loop reporting                                                 57
      Enabling the auto synchs                                                        57
      Enabling the internal events                                                    58
      Validating auto synch processing                                                58
      Configuring system notifications about errors                                   59
      Closed-loop reports                                                             61

©2021 Oracle Corporation. All rights reserved                                     2 of 61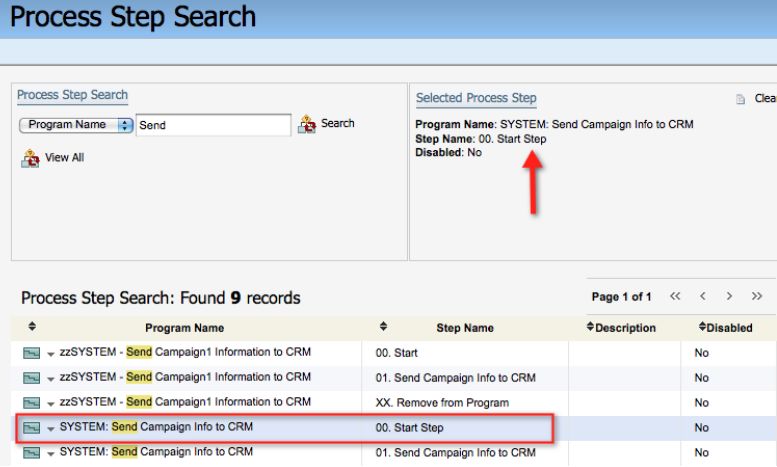
Closed-loop reporting with Salesforce Important: Typically organizations work with Oracle or with Oracle partners to ensure a successful CRM integration. Find out more about Oracle's implementation services. This documentation provides you with a starting point to show how you can integrate Oracle Eloqua and Salesforce. However, your specific integration will require customizations to support your unique business needs. Our steps are based on a non-customized Oracle Eloqua instance and a non-customized Salesforce instance. Closed-loop reporting allows you to attribute sales opportunity revenue to marketing campaigns so that you can analyze your overall campaign revenue performance (ROI), and identify the best and worst performing campaigns. In a Salesforce and Oracle Eloqua integration, closed-loop reporting allows you to monitor opportunities and sales against campaign responses. This allows you to attribute opportunities and closed-won revenue back to your campaign activities and costs, and gives you a more complete understanding of campaign performance and ROI. Learn more by watching the video To implement closed-loop reporting with a Salesforce and Oracle Eloqua integration, there are several configuration tasks that you must complete. After implementation, you can use closed-loop reports in Insight to demonstrate real ROI and revenue impact from your marking campaigns. While you can set up closed-loop reporting in parallel with the Salesforce integration, consider implementing after the primary integration is complete. ©2021 Oracle Corporation. All rights reserved 3 of 61
This allows you to ensure that the Salesforce integration works as expected before you
introduce additional data synchronization.
Note: You do not have to implement closed-loop reporting functionality.
Configuring closed-loop reporting is an optional task.
Consider the benefits of using Oracle Eloqua campaigns for closed-loop reporting:
l Create, execute, and maintain your campaigns in one system versus multiple systems.
l Save on resources, time, training, and expenses.
l Generate report views that include metrics for all of your marketing assets, such as forms,
landing pages, and emails.
l Automatically send required campaign information to Salesforce so that your Sales and
Customer Service teams can access it.
l Evaluate ROI reports to determine the effectiveness of your marketing campaigns in
generating revenue.
Learn more by watching the video
Campaign costs
Before implementing closed-loop reporting, develop a consistent way to determine
campaign costs. Understanding the actual costs for a campaign is a very important step
in enabling closed-loop reporting. Without the costs, the ROI reports are unable to
calculate a return value against the campaign investment. Establish a method for
calculating the cost of each campaign type. Consistently use that costing methodology
©2021 Oracle Corporation. All rights reserved 4 of 61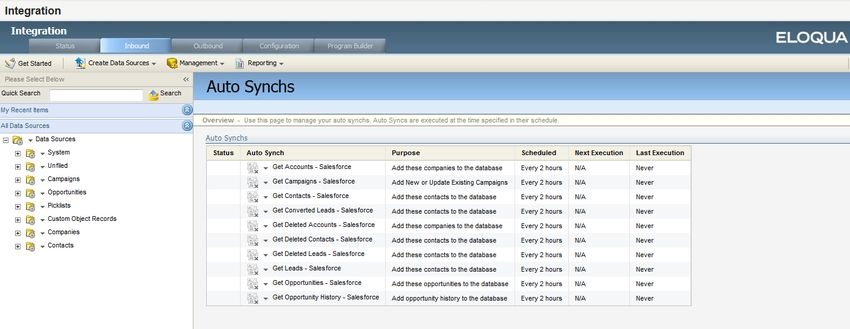
across all campaign owners in the organization so that your measurements are
consistent and you can get a better performance comparison.

The most important aspect when determining your costs is keeping your approach
consistent. If you are just getting started with closed-loop reporting, consider simply
including all discretionary costs spent on campaign development and execution. This
can include sponsorship fees dedicated to demand generation efforts, infrastructure
costs from discretionary budgets, and outsourced creative, imagery, or copy writing
support.

Take a quarterly thought-leadership webinar as an example. You may include the follow
costs:

    l   Webinar host provider

    l   Thought leader speaker fee

    l   Creative budget (imagery, copy writing for campaign assets)

    l   Online ad space dedicated to promotion

©2021 Oracle Corporation. All rights reserved                                          5 of 61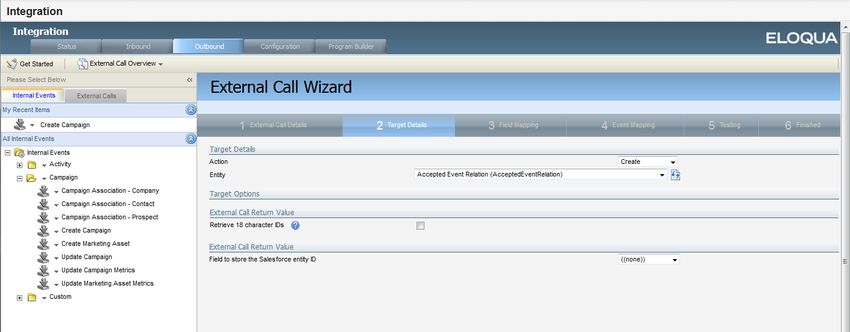
Steps to configure closed-loop reporting
The following table provides an overview of the steps you need to configure closed-loop
reporting with Salesforce:

Step                                      Description
Preliminary setup                         Create the necessary campaign fields and external assets.

                                          See Preliminary setup for closed-loop reporting

Configure campaign                        Create response rules that defines campaign activities that
response rules                            are important to your organization and will be used to
                                          update the Salesforce campaign member status.

                                          See Creating campaign response rules for closed-loop
                                          reporting

Configure campaign                        Setup the Salesforce opportunity stages in Oracle Eloqua
revenue settings                          and configure how to attribute revenue to campaigns.

                                          See Configuring campaign revenue settings for closed-loop
                                          reporting

Configure the auto synchs Configure the auto synchs used to import campaign and
                                          opportunity data from Salesforce.

                                          See Configuring auto synchs for closed-loop reporting

Configure external calls                  Configure the external calls to export campaign data and
                                          campaign associations to Salesforce.

                                          See Configuring external calls for closed-loop reporting.

Configure the programs                    Configure the program used to send campaign data to
                                          Salesforce and update the main CRM update program.

©2021 Oracle Corporation. All rights reserved                                                      6 of 61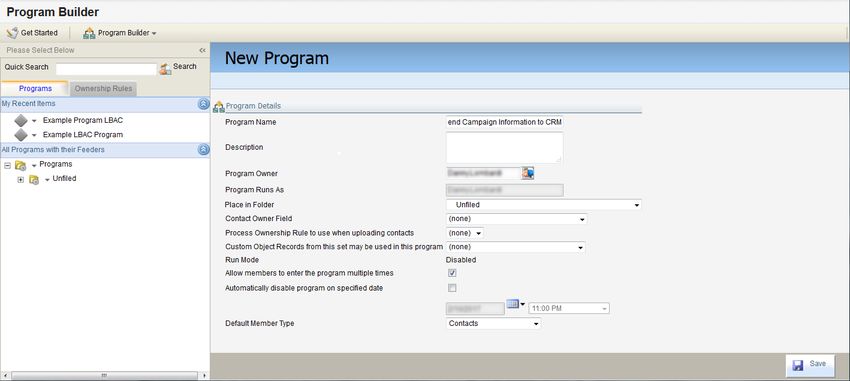
Step                                      Description
                                          See Sending campaign data to Salesforce for closed-loop
                                          reporting and Updating the CRM update program for
                                          closed-loop reporting.

Initializing and monitoring               Re-initialize the systems that were disabled during the
the Salesforce integration                preliminary setup, then configure the notifications needed
                                          to monitor and maintain the integration.

                                          See Initializing closed-loop reporting.

©2021 Oracle Corporation. All rights reserved                                                       7 of 61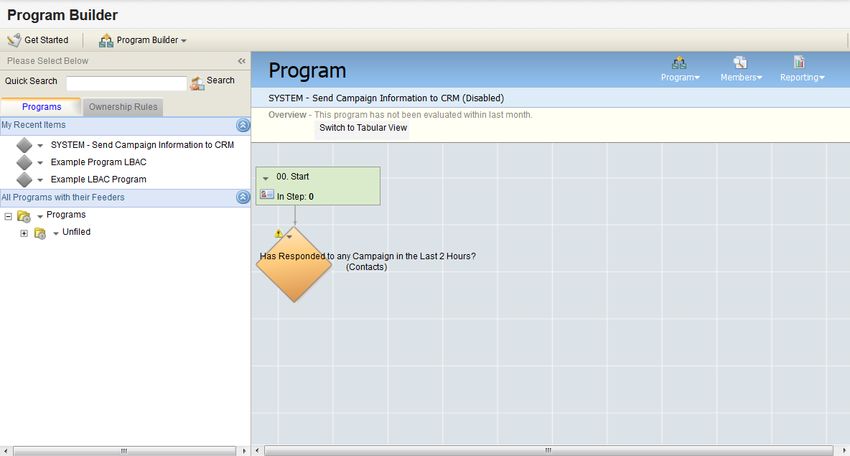
Preliminary setup for closed-loop reporting
Before implementing closed-loop reporting with Salesforce, you must perform the
following in Oracle Eloqua:

    l   Creating campaign fields

    l   Creating external assets and activities

Creating campaign fields

Custom campaign fields allow you to mimic the campaign structure in your Salesforce
system. When a campaign is created in Oracle Eloqua, the custom campaign fields are
synchronized to Salesforce. Similarly, changes to the campaign fields in Salesforce are
synchronized into Oracle Eloqua.

The following table lists the default campaign fields for Oracle Eloqua campaigns and
their data types. An asterisk (*) denotes required fields in Oracle Eloqua.

Default campaign fields                Data type
Campaign Name*                         Text
Start Date*                            Date
End Date*                              Date
SFDC Campaign ID                       Text
Budgeted Cost                          Currency
Actual Cost                            Currency
Region                                 Picklist
Product                                Picklist
Campaign Type                          Picklist

If you've identified the need for additional custom campaign fields, see Creating custom
campaign fields. The custom fields should be setup to allow users to configure them in a

©2021 Oracle Corporation. All rights reserved                                      8 of 61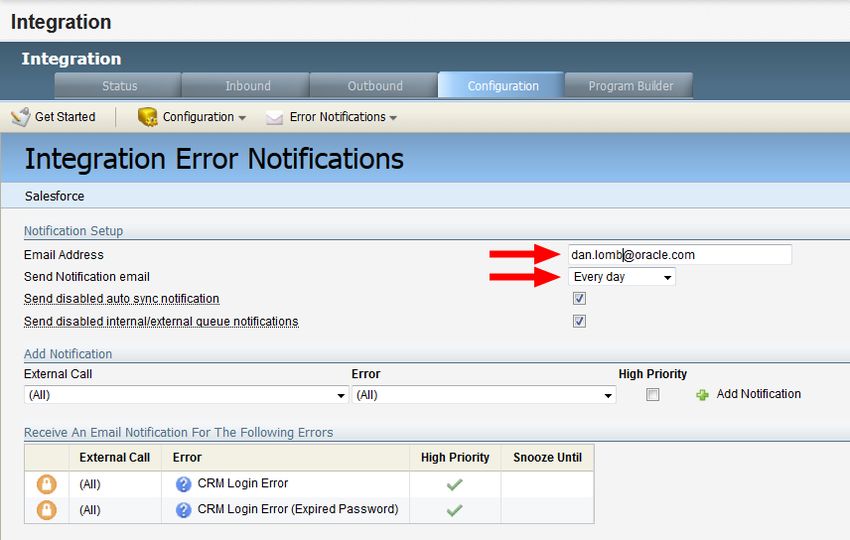
way expected by Salesforce. For example, if Salesforce is expecting a date, set the
campaign field up to only allow for dates.

Creating external assets and activities

External activities are those activities that are not tracked by Oracle Eloqua. For
example, trade show attendance is not tracked by Oracle Eloqua, while an email open
is. External activities help give your organization a full view of all marketing activities
within Oracle Eloqua.

For your Salesforce integration, take some time to identify the external activities you
want to leverage as part of closed-loop reporting. External activities can be attributed to
Oracle Eloqua campaigns and shared with sales.

List the activities that you want to track using a table like the one below. After planning,
create the external assets and activities. For more information, see External assets and
activities.

External asset type                    External activity type
Trade show                             Visited booth
                                       Viewed a demo
Webinar                                Registered
                                       Attended
                                       Registered - did not
                                       attend

©2021 Oracle Corporation. All rights reserved                                            9 of 61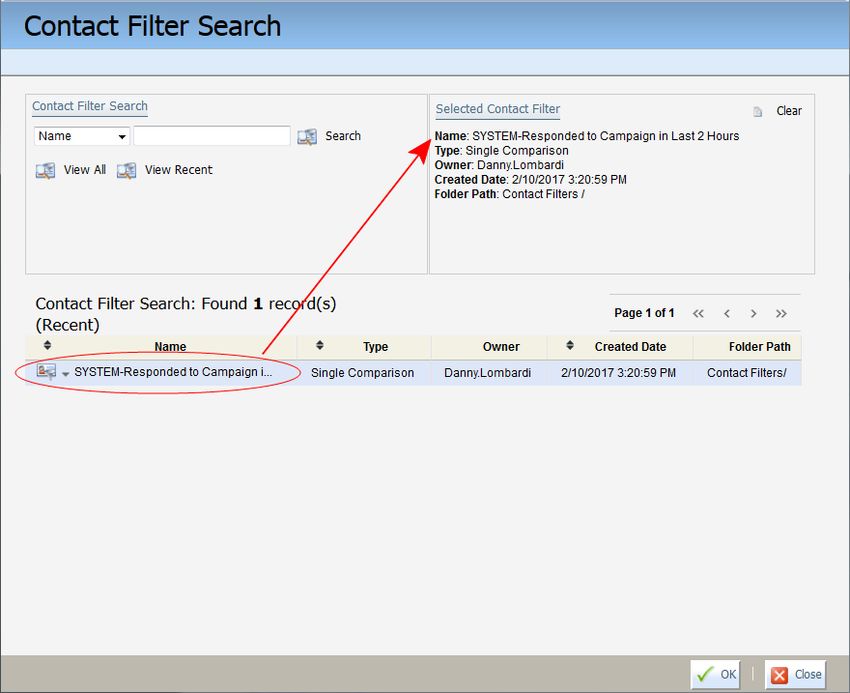
Creating campaign response rules for
closed-loop reporting
Campaign response rules define the campaign activities that are important to your
organization and allow you to update the Salesforce campaign member status.
Campaign activities can include:

    l   Inbound activities, such as email opens, clickthroughs, and form submissions.

    l   External activities, such as trade shows and conferences.

Oracle Eloqua campaign responses are mapped to Salesforce campaign member status
as determined by the response rule. Every hour (5 minutes after the hour) Oracle Eloqua
evaluates campaign responses. When a response occurs, Oracle Eloqua records the
response and later the response is sent to Salesforce.

Response rules are prioritized so that only the highest priority response is sent to
Salesforce. This ensures that when an activity that is lower in priority occurs, it does not
overwrite the campaign member status that is higher in priority. It also does not overwrite
the action that caused the lead to be a response to a campaign in Oracle Eloqua.

Using a webinar campaign as an example, when someone initially clicks through on the
invitation email, the member status changes to Responded. If they then complete the
registration form, their member status changes to Registered. Registering for a webinar
is a higher priority and is reflected in the Salesforce campaign member status.

For your closed-loop reporting implementation, consider the Oracle Eloqua inbound
activities and external activities. Which activities matter most for determining
conversion? What campaign member status should these activities map to?

Use a table like the one below to help you plan.

©2021 Oracle Corporation. All rights reserved                                           10 of 61
Priority Response activity Salesforce campaign member status
1 Tradeshow - Viewed a demo Viewed a demo
2 Tradeshow - Visited booth Visited booth
3 Webinar - Registered Registered
4 Webinar - Attended Attended
5 Form submit Responded
Before you begin:
l Set up your external activities before setting up response rules. See Creating external assets
and activities.
l Verify the campaign member status setup in Oracle Eloqua. You can import the status options
from Salesforce, or create new ones in Oracle Eloqua. For more information, see Creating
campaign member status values.
l Oracle Eloqua evaluates campaign responses every hour (5 minutes after the hour).
Campaign responses are recorded by Oracle Eloqua for 12 months after the campaign end
date.
l We recommend that you do not create a response rule for the Email Sent activity. This would
create a response whenever an email is sent to a contact.
To create campaign response rules:
1. Click Settings .
2. Click Response Rules under Database Setup.
3. Click Add Response Activity . A new row appears in the Default Campaign Response Rule
Details table.
©2021 Oracle Corporation. All rights reserved 11 of 614. Map the Oracle Eloqua response to the corresponding CRM response using the Response
Activity and Member Campaign Status .
5. Select the Salesforce Responded check box, then select the Salesforce Default check box
for the campaign response rule that you want to set as the default. Enabling the Salesforce
Responded setting ensures that the response is recorded in Salesforce as a response.
6. Repeat these steps until you have created all the response rules you want.
Note: If you delete or modify a response rule, the change is applied the next time the
response is sent to CRM.
7. Order the response rules in the table from highest priority to the lowest priority using the
arrows table. Oracle Eloqua records all response activities but only sends over the highest
priority response to CRM.
8. Select Use Program Builder for Campaign Associations in the Salesforce Integration
section.
©2021 Oracle Corporation. All rights reserved 12 of 61 Note: This setting determines how responses are sent to Salesforce. We
recommend using a program to update your CRM with campaign information.
However, you organization might use another method. For more information on the
program, see Sending campaign data to Salesforce for closed-loop reporting.
9. Click Save.
©2021 Oracle Corporation. All rights reserved 13 of 61Configuring campaign revenue settings for
closed-loop reporting
As part of closed-loop reporting with Salesforce, you must decide how to attribute
revenue to Oracle Eloqua campaigns. The revenue attribution helps identify the
marketing campaigns that help create opportunities and close a deal.
To configure campaign measurement:
1. Creating the Salesforce opportunity stages
2. Configuring the default revenue attribution method
Note: Revenue attribution is for reporting purposes. This configuration does not
impact how campaign and opportunity data is synchronized with Salesforce.
Creating the Salesforce opportunity stages
As part of closed-loop reporting with Salesforce documented in this configuration guide,
any opportunity created in Salesforce is included in Oracle Eloqua. Opportunity data
includes:
l The opportunity itself (the deal in progress)
l The attributed campaign (whether this is the first campaign they responded to, the last
campaign, or a custom value)
l The opportunity’s associated contact and that contact’s activity
©2021 Oracle Corporation. All rights reserved 14 of 61 Important: To capture opportunity data from Salesforce, you need to create the
Salesforce opportunity stages in Oracle Eloqua exactly as they appear in
Salesforce. If the opportunity states set up in Oracle Eloqua do not match, the
opportunity will not be imported from Salesforce.
Before you begin:
l Create the Salesforce opportunity stages in Oracle Eloqua exactly as they appear in
Salesforce. Opportunity stages are defined by your CRM administrator. They might include
stages such as prospecting, developing, negotiation, closed (won), and closed (lost).
l The stages you create in Oracle Eloqua are active by default. You can deactivate them
whenever necessary, but you cannot reactivate those you deactivate.
l You cannot change an opportunity stage in Oracle Eloqua after you save it.
To create the Salesforce opportunity stages:
1. Navigate to Orchestration , then click Campaigns .
2. Click Actions , then click Opportunity Settings .
3. Click Add New Opportunity Stage in the Opportunity Stage Details area.
4. Enter the Opportunity Stage Name exactly as it appears in Salesforce.
5. Specify the Probability of Closing percentage. For example, for Closed Lost, this would be
0%.
©2021 Oracle Corporation. All rights reserved 15 of 616. If you want closed or lost opportunities to be flagged and excluded from the ROI calculations,
select Indicate Closed/Lost.
Note: This is the only setting you can change after you save the opportunity.
7. Click Save and New to set up additional stages.
8. Click Save and Close after you have created all of the required stages. The opportunities are
displayed in the Opportunity Stage Details table.
After you finish:
l
If you want to change the closed or lost flag, click next to the stage you want to change ,
then click Edit. Update the Indicate Closed/Lost setting.
l
If you want to deactivate a stage, click next to the stage you want to change and click
Inactivate Stage.Warning: You cannot reactivate a stage after you deactivate it. This hides
the stage but keeps a record for reporting purposes.
l
Use in the first column of the table to change the order of the opportunity stages. If you
created the opportunity stages out of order, you can place them in order to match the sales
cycle.
Configuring the default revenue attribution method
After creating the opportunity sages in Oracle Eloqua, you must configure the default
revenue attribution method. The revenue attribution method lets you identify the
©2021 Oracle Corporation. All rights reserved 16 of 61campaign responses to include in revenue attribution calculations and how to distribute
attributed revenue across campaigns.
To configure the default revenue attribution method for closed-loop reporting:
1. Navigate to Orchestration , then click Campaigns .
2. Click Actions , then click Opportunity Settings .
3. Click Edit in the Default Revenue Attribution Method area of the Opportunity Settings page.
4. Under Which Campaign responses do you want to include in the revenue attribution?, select
an option to indicate which campaign responses you want to include in the revenue attribution.
You can choose to include:
l ALL Campaign responses from Lead Creation in Oracle Eloqua to Opportunity Close in the CRM.
If this setting is selected, attribution will only include opportunities with a Closed Won status.
l Campaign responses from Lead Creation in Oracle Eloqua to ONLY Opportunity Creation in the
CRM. If this setting is selected, attribution will only include Open and Closed Won status
opportunities.
5. Under How do you want to distribute the revenue across the Campaigns?, select an option to
indicate how you want to distribute the revenue across campaigns. You can attribute the
revenue in the following ways:
l Evenly across all campaigns
l To the first or last campaign responded to
l By specific percentages to the first, last, and other campaigns
6. Save your changes.
©2021 Oracle Corporation. All rights reserved 17 of 61Configuring auto synchs for closed-loop
reporting
Auto synchs are scheduled imports to Oracle Eloqua. For closed-loop reporting with
Salesforce, you must configure the following auto synchs:
l Get campaigns
l Get opportunities
l Get Opportunities to associate opportunities with contacts
Preconfiguration: Creating folders
Auto synchs are organized into folders. If they don't already exist, you should create a
Campaigns folder and a Opportunities folder for closed-loop reporting auto synchs.
Note: The folders and paths discussed in this document are the defaults or
recommendations. Your environment may use different names.
To create the required folder:
1. Click Settings .
2. Click Integration under Platform Extensions.
3. Click the Outbound tab.
4. Click the External Calls tab in the left pane.
©2021 Oracle Corporation. All rights reserved 18 of 615. Under All External Calls, expand the External Calls folder.
6. Click the arrow beside the Retrieve Data folder, then click Create New Folder.
7. Enter Campaigns in the Folder Name box.
8. Add a folder description.
9. Click Save and Close.
10. Repeat this process to create the Opportunities folder in the same location.
Creating the Get Campaigns auto synch
As part of closed-loop reporting, the Get Campaigns auto synch imports campaigns to
Oracle Eloqua from Salesforce. The auto sync described here will only import those
campaigns created by Oracle Eloqua. This means that campaigns created in Salesforce
will not be imported. Campaigns in the systems are matched using the CRM campaign
ID.
Before you begin:
l Before setting up a new auto synch, check to see if it already exists. If the auto synch does
exist, you can use the steps below to help configure the auto synch.
l To ensure that only campaigns created by Oracle Eloqua are importing, you will filter for
campaigns created by the Oracle Eloqua integration user. To create this filter, you will require
the user ID.
To get the Salesforce user ID from Oracle Eloqua
1. Click Settings .
2. Click Integration under Platform Extensions.
©2021 Oracle Corporation. All rights reserved 19 of 613. Click the Configuration tab.
4. Click Manage System CRM Users in the Configuration menu.
5. In the CRM System Users area, click next to Default Salesforce User, then click Edit
User.
6. In the Login Credentials area of the CRM System User window, copy the text in the User ID
box.
7. Click Close.
8. Click the Inbound tab to return to step 4 of the External Call Wizard.
To configure the Get Campaigns auto synch:
1. Click Settings .
2. Click Integration under Platform Extensions.
3. Click the Inbound tab.
4. Click Create Data Source with External Call in the Create Data Sources menu. The
External Call Wizard opens displaying step 1 of 8.
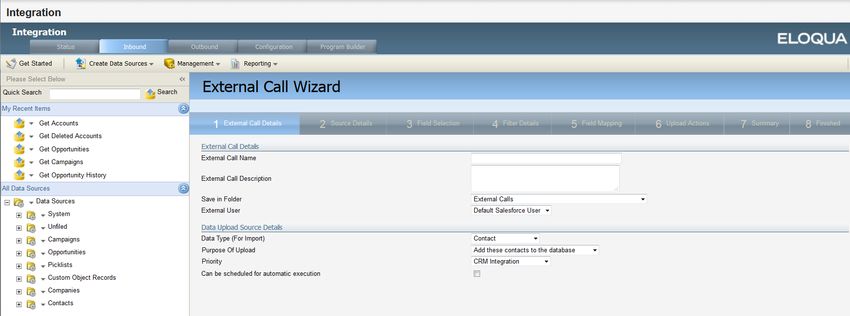
©2021 Oracle Corporation. All rights reserved 20 of 615. Configure the settings in the External Call Details step.
l External Call Name : Get Campaigns
l External Call Description : Get Salesforce Campaigns
l Save in Folder : Retrieve Data - Campaigns
l External User : Default Salesforce User
l Data Type (for Import): Campaign
l Purpose of Upload : Add New or Update Existing Campaigns
l Can be scheduled for automatic execution : Enabled
6. Click Next.
7. Configure the settings in the Source Details step.
l Action : Retrieve
l Entity: Campaign (Campaign)
l Retrieve 18 character IDs: Enable if applicable (15 character IDs are typical when integrating
with Oracle Eloqua)
Note: If you do enable this setting, you must ensure that all auto synchs are set up to
retrieve 18 character IDs.
©2021 Oracle Corporation. All rights reserved 21 of 618. Click Next.
9. In the Field Selection step, select the Salesforce campaign fields that you want to populate in
Oracle Eloqua when importing campaigns. For example, fields associated to campaign costs
or fields that you might want to use for segmentation. You must select the Campaign ID as this
will be used to uniquely match campaigns.
10. Click Next.
11. In the Filter Details step, create a filter that looks for those campaigns created by Oracle
Eloqua. Configure the first filter row as follows:
l Salesforce Campaign Fields : Created By ID
l Operator: Equals
l Expression:The Salesforce ID of the Oracle Eloqua Integration User.
Note: Use additional filter criteria if you want only certain Salesforce
campaigns to be pulled into Oracle Eloqua. For example, Record Type ID
could be used to filter for only those campaigns related to specific business
unites.
12. Click Next.
©2021 Oracle Corporation. All rights reserved 22 of 6113. Configure the settings in the Field Mapping step to map the fields you selected in the Field
Selection to the Oracle Eloqua campaign fields. The Uniquely Match On field should be set to
External Campaign ID.
14. Click Next until you get to the Summary step.
15. In the Summary step, review the details. If no changes are required, select Schedule
automatic data imports using these settings . Additional settings appear.
16. Set up the notification details and schedule the auto sync. We recommend:
l Auto Synch Name : Get Campaigns
l Execute after : No change
l Send email on success: Enabled
l Send email on failure : Enabled
l Scheduling : Leave as default
Note: Set a schedule that makes sense for your business process. The default
schedule is runs every night at 10 PM EST.
©2021 Oracle Corporation. All rights reserved 23 of 61Here is an example summary of the Get Campaigns auto synch.
17. Click Finish.
To verify that the auto synch was created, on the Inbound tab, click Management > Auto
Synchs.
Creating the Get Opportunities auto synch
The Get Opportunities auto synch imports opportunities from Salesforce to Oracle
Eloqua.
Before you begin:
l Before setting up a new auto synch, check to see if it already exists. If the auto synch does
exist, you can use the steps below to help configure the auto synch.
To configure the Get Opportunities auto synch:
©2021 Oracle Corporation. All rights reserved 24 of 611. Click Settings .
2. Click Integration under Platform Extensions.
3. Click the Inbound tab.
4. Click Create Data Source with External Call in the Create Data Sources menu. The
External Call Wizard opens displaying step 1 of 8.
5. Configure the settings in the External Call Details step.
l External Call Name : Get Opportunities
l External Call Description : Get SFDC Opportunities
l Save in Folder : Retrieve Data - Opportunities
l External User : Default Salesforce User
l Data Type (For Import) : Opportunity
l Purpose of Upload : Add these opportunities to the database
l Can be scheduled for automatic execution : Enable
6. Configure the settings in the Source Details step.
l Action : Retrieve
l Entity: Opportunity
l Retrieve 18 character IDs: Enable if applicable (15 character IDs are typical when integrating
with Oracle Eloqua)
©2021 Oracle Corporation. All rights reserved 25 of 61 Note: If you do enable this setting, you must ensure that all auto synchs are set up to
retrieve 18 character IDs.
7. Click Next.
8. Configure the settings in the Field Selection step. Select these Salesforce opportunity and
account fields.
l Salesforce Opportunity Fields
l Amount
l Close Date
l Created Date
l Name
l Opportunity ID
l Stage
l Salesforce Related Fields - Account
l Account Name
l Currency (only if you use multiple currencies to record Salesforce Opp Amounts)
l Forecast to Close Date (only if necessary; this field is not required for closed-loop reports)
9. Click Next.
10. In the Filter Details step, create following filter that looks for those opportunities created since
the last import.
l Salesforce Opportunity Fields: Last Modified Date
l Operator : Greater Than or Equal
l
Expression : Click , then click Add Date . In the Add Date window, select Use the start
date of the last successful upload
©2021 Oracle Corporation. All rights reserved 26 of 61 Note: If you have specified a Record Type ID, create the filter for it.
11. Click Next.
12. Configure the settings in the Field Mapping step to map the fields you selected in the Field
Selection to the Oracle Eloqua campaign fields. The Uniquely Match On field should be set to
Opportunity ID.
l Uniquely Match On : Opportunity ID
l Perform a case-sensitive match : Enable
13. In the Summary step, review the details. If no changes are required, select Schedule
automatic data imports using these settings . Additional details appear.
14. Set up the notification details and schedule the auto sync. We recommend:
l Auto Synch Name : Get Opportunities
l Execute after : No change
©2021 Oracle Corporation. All rights reserved 27 of 61l Send email on success: Enabled
l Send email on failure : Enabled
l Scheduling : Configure a schedule that matches the frequency of your other Salesforce auto
synchs. Oracle Eloqua only imports opportunities modified since the last successful import.
Here is an example completed summary step.
15. Click Finish.
To verify that the auto synch was created, on the Inbound tab, click Management > Auto
Synchs.
©2021 Oracle Corporation. All rights reserved 28 of 61Creating the Get Opportunities auto synch to associate
opportunities with contacts
For closed-loop reporting with Salesforce, you must create an auto synch to attribute
revenue to a campaign. This is done by associating opportunities to Oracle Eloqua
contacts. This auto synch runs after the Get Opportunities auto synch created earlier.
Before you begin:
l Before setting up a new auto synch, check to see if it already exists. If the auto synch does
exist, you can use the steps below to help configure the auto synch.
Choosing the right contact association
Before setting up this Get Opportunity auto synch, you must determine how you want to
associate an opportunity to a contact. For example, should an opportunity be associated
with a primary contact that the sale was closed with or with all contacts associated with
the opportunity in the CRM? Should the opportunity be associated with accounts and all
contacts on the account?
The opportunity association can be tied to contacts in one of the following ways:
A. Link to primary contact: Only the primary contact on the account is associated with the
opportunity in Oracle Eloqua.
B. Link to all contacts : All contacts that are part of the opportunity in Salesforce are associated
with the opportunity in Oracle Eloqua.
C. Link to account contacts : All contacts associated with the account are associated wit the
opportunity in Oracle Eloqua. This option requires that accounts with Salesforce account IDs
©2021 Oracle Corporation. All rights reserved 29 of 61have been imported into Oracle Eloqua and that contacts in Oracle Eloqua are linked to
accounts. All contacts in Oracle Eloqua that are associated with the account are associated
with the opportunity.
The option you choose depends on your organization and how your business
associates customers or prospects to opportunities. Some organizations associated an
account to the opportunity with other associate the named contacts. For a short-term ROI
approach, fewer contacts will provide better visibility into cause and effect. If Salesforce
adoption or data management presents a challenge of inconsistent mapping of Contacts
to Opportunities, option C may be the only choice. Whatever decision you make, it
applies to all opportunities and closed-loop reports.
Configuring the Get Opportunities auto synch for opportunity
association
To configure the Get Opportunities auto synch:
1. Click Settings .
2. Click Integration under Platform Extensions.
3. Click the Inbound tab.
4. Click Create Data Source with External Call in the Create Data Sources menu. The
External Call Wizard opens displaying step 1 of 8.
©2021 Oracle Corporation. All rights reserved 30 of 615. Configure the settings in the External Call Details step.
Association Type Settings
A. Link to primary External Call Name: Get Opportunities and Link to Contacts
contact
External Call Description: Get SFDC opportunities and link to
B. Link to all contacts contacts
Save in Folder: Retrieve Data - Opportunities
External User: Default Salesforce User
Data type (For Import): Retrieve Data - Opportunity
Purpose of Upload: Link these opportunities to contacts
Can be scheduled for automatic execution: Enable
C. Link to account External Call Name: Get Opportunities and Link to Accounts
contacts
External Call Description: Get SFDC opportunities and link to
accounts
The remaining settings are the same as for the Link to primary contact
external call (A), described in the first row.
6. Configure the settings in the Source Details step.
©2021 Oracle Corporation. All rights reserved 31 of 61Association Type Settings
A. Link to primary Action: Retrieve
contact
Entity: Opportunity Contact Role
B. Link to all contacts
Retrieve 18 character IDs: Enable if applicable (15 character IDs
are typical when integrating with Oracle Eloqua)
Note: If you do enable this setting, you must ensure that all
auto synchs are set up to retrieve 18 character IDs.
C. Link to account Action: Retrieve
contacts
Entity: Opportunity (Opportunity)
The remaining settings are the same as for the Link to primary contact
external call (A) above.
7. Configure the settings in the Field Selection step. Select the following Salesforce contact role
fields.
Association Type Settings
A. Link to primary Contact ID
contact
Opportunity ID
Primary
B. Link to all contacts Contact ID
Opportunity ID
C. Link to account Account ID
contacts
Opportunity ID
©2021 Oracle Corporation. All rights reserved 32 of 618. In the Filter Detailsstep, create following filter that looks for those opportunities created since
the last import.
l Salesforce Opportunity Contact Role Fields: Last Modified Date
l Operator : Greater Than or Equal
l
Expression : Click , then click Add Date . In the Add Date window, select Use the start
date of the last successful upload
Note: If you have specified a Record Type ID, include a filter for it.
9. Configure the settings in the Field Mapping step to map the fields you selected in the Field
Selection to the Oracle Eloqua fields.
Association Type Settings
A. Link to primary Uniquely Match on Eloqua Opportunity Field: Opportunity ID
contact
Upload Source Field: Opportunity Contact Role: Opportunity ID
B. Link to all contacts
Perform a case-sensitive match: Enable
C. Link to account Uniquely Match on Eloqua Opportunity Field: Opportunity ID
contacts
Upload Source Field: Opportunity: Opportunity ID
Perform a case-sensitive match: Enable
10. Configure the settings in the Upload Actions step.
Association Type Settings
A. Link to primary
Source Field: Opportunity Contact Role: Contact ID
contact
©2021 Oracle Corporation. All rights reserved 33 of 61Association Type Settings
B. Link to all contacts Field Name: SFDC Contact ID (This is the Oracle Eloqua contact
field that stores the Salesforce contact ID.)
Case sensitive match: Enable
Is Primary Contact: Opportunity Contact Role: Primary
C. Link to account Source Field: Opportunity Contact Role: AccountID
contacts
Field Name: SFDC Account ID (This is the Oracle Eloqua account
field that stores the Salesforce account ID.)
Case sensitive match: Enable
11. In the Summary step, review the details. If no changes are required, use the following settings.
Association Type Settings
A. Link to primary Schedule automatic data imports using these settings: Enable
contact
Auto Synch Name: Get Opportunities and Link to Contacts
B. Link to all contacts
Description: Get SFDC opportunities and link to contacts
Execute after: Get Opportunities
Send email on success: Optional
Send email on failure: Enable
C. Link to account Auto Synch Name: Get Opportunities and Link to Accounts
contacts
Description: Get SFDC opportunities and link to accounts
Execute after: Get Opportunities
Send email on success: Optional
Send email on failure: Enable
©2021 Oracle Corporation. All rights reserved 34 of 6112. Configure a schedule that matches the frequency of your Get Opportunities auto synch.
13. Click Finish.
To verify that the auto synch was created, on the Inbound tab, click Management > Auto
Synchs.
Disabling auto synchs for closed-loop reporting
If you do not want to import Salesforce campaigns or opportunities into Oracle Eloqua
until after you have performed testing, disable the auto synchs.
Before you begin:
l Create the auto synchs for closed-loop reporting.
To disable the campaign and opportunity auto synchs:
1. Click Settings .
2. Click Integration under Platform Extensions.
3. Click the Inbound tab.
©2021 Oracle Corporation. All rights reserved 35 of 614. Click Management > Auto Synchs .
5. For each of the closed-loop reporting auto synchs in the list, select Disable Auto Synch from
the drop-down list.
©2021 Oracle Corporation. All rights reserved 36 of 61Configuring external calls for closed-loop
reporting
External calls are the external CRM system calls that Oracle Eloqua uses to keep
Salesforce and Oracle Eloqua synchronized. For general information about external
calls, see Managing external calls.
The initial integration with Salesforce included external calls to synchronize leads and
contacts. Now you must configure the external calls required for closed-loop reporting:
l Create Campaign
l Update Campaign
l Contact Campaign Association
l Lead Campaign Association
These external calls will be triggered by internal activities that will be enabled at the end
of the close-loop reporting configuration. See Initializing closed-loop reporting for more
information.
Before you begin:
l Create any necessary campaign fields in Oracle Eloqua. See Creating campaign fields for
more information.
l The external calls used for campaign association may have been setup after you ran the CRM
Integration Wizard. If is the case, you can use the steps below to configure those calls instead
of creating new ones.
©2021 Oracle Corporation. All rights reserved 37 of 61Preconfiguration: Creating folders External calls are organized into folders. If they don't already exist, you should create a Campaigns folder for the closed-loop reporting external calls. Note: The folders and paths discussed in this document are the defaults or recommendations. Your environment may use different names. To create the required folders: 1. Click Settings . 2. Click Integration under Platform Extensions. 3. Click the Outbound tab. 4. Click the External Calls tab in the left pane. 5. Under All External Calls, expand the External Calls folder. 6. Click the arrow beside the Send Data folder, then click Create New Folder. 7. Enter Campaigns in the Folder Name box. 8. Add a folder description. 9. Click Save and Close. ©2021 Oracle Corporation. All rights reserved 38 of 61
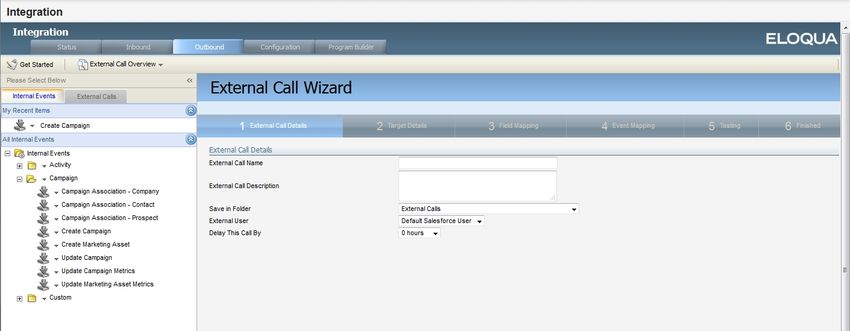
Creating external calls

Before creating an external call, check to see if it already exists. If the external call does
exist, you can use the steps below to help configure it.

To create the external calls for closed-loop reporting:

   1. Click Settings         .

   2. Click Integration under Platform Extensions.

   3. Click the Outbound tab.

   4. On the Internal Events tab, expand the Campaign folder.

   5. Click the arrow next to the internal event, and select Create New External Call . Refer to the
       following table for the internal events to use.

        External call                  Internal event

        Create Campaign                Create Campaign

        Update Campaign                Update Campaign

        Contact Campaign
                                       Campaign Association - Contact
        Association

        Lead Campaign
                                       Campaign Association - Contact
        Association

       The External Call Wizard opens.

©2021 Oracle Corporation. All rights reserved                                                 39 of 61
6. Configure the External Call Details settings for each of the four external calls as follows:
External call Configuration
Create Campaign External Call Name: Create Campaign
External Call Description: (Optional)
Save in Folder: Send Data - Campaigns
External User: Default Salesforce User
Delay This Call By: 0
This delay setting means that there will be no time delay to start the
activity after it is triggered.
Update Campaign External Call Name: Update Campaign
The remaining settings are the same as for the Create Campaign
external call.
Contact Campaign External Call Name: Contact Campaign Association
Association
The remaining settings are the same as for the Create Campaign
external call.
Lead Campaign External Call Name: Lead Campaign Association
Association
The remaining settings are the same as for the Create Campaign
external call.
©2021 Oracle Corporation. All rights reserved 40 of 617. Click Next. The Target Details settings are displayed.
8. Configure the Target Details settings as follows:
External call Configuration
Create Campaign Action: Create
Entity: Campaign
Retrieve 18 character IDs: Enable if applicable (15 character IDs are
typical when integrating with Salesforce)
Note: If you do enable this setting, you must ensure that all
external activities are set up to retrieve 18 character IDs.
Field to store the Salesforce entity ID: System Defined
Update Campaign Action: Update
The remaining settings are the same as for the Create Campaign
external call.
Contact Campaign Action: Create
Association
Entity: Campaign Member
©2021 Oracle Corporation. All rights reserved 41 of 61External call Configuration
The remaining settings are the same as for the Create Campaign
external call.
Lead Campaign Configure these settings the same as the Contact Campaign
Association Association external call.
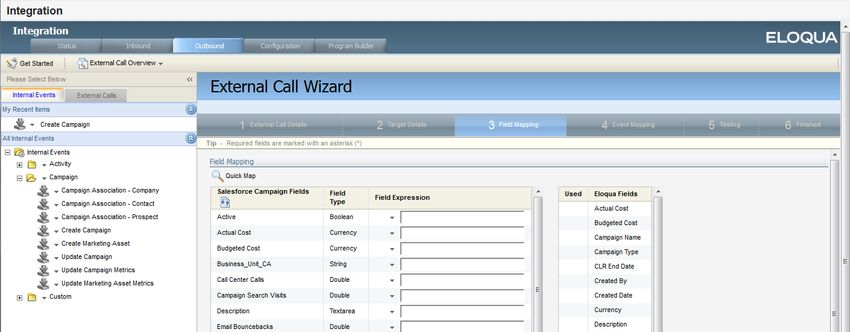
9. Click Next. The Field Mapping settings are displayed.
10. Configure the mappings between Salesforce and Oracle Eloqua fields by dragging and
dropping Oracle Eloqua fields into the Field Expression column. The following table provides
details for configuring mappings for each external call.
External call Mapping configuration details
Create Campaign l For the Salesforce Active field, set the value to 1. This will set the
campaign as active in Salesforce when the campaign information is
sent over.
l Map Oracle Eloqua fields to Salesforce to meet your specific
requirements.
Update Campaign l Map the Oracle Eloqua External Campaign ID field to the Salesforce
Campaign ID field.
l Map other Oracle Eloqua fields to Salesforce to meet your specific
©2021 Oracle Corporation. All rights reserved 42 of 61External call Mapping configuration details
requirements.
Contact Campaign l Map the Oracle Eloqua Campaign ID to Salesforce Campaign ID.
Association l Map the Oracle Eloqua SFDC Contact ID to Salesforce Contact ID.
l Map the Oracle Eloqua Status to Salesforce Status.
Lead Campaign Map only the following Oracle Eloqua fields to Salesforce:
Association
l Map the Oracle Eloqua Campaign ID to Salesforce Campaign ID.
l Map the Oracle Eloqua SFDCLeadID to Salesforce Lead ID.
l Map the Oracle Eloqua Status to Salesforce Status.
11. Click Next. The Event Mapping page opens.
12. Confirm that the internal event triggers external call you are creating. Click Next.
The following image shows that the Create Campaign internal event is triggering the Create
Campaign external call.
13. The Testing step is optional.
a. Click to select an existing Oracle Eloqua campaign to test the external call.
b. Click Prepare for Test to ensure there are no errors.
©2021 Oracle Corporation. All rights reserved 43 of 61c. Click Execute Test when there are no errors to be resolved.
d. Use the Testing Data table to confirm that the Oracle Eloqua data was sent to Salesforce.
14. Click Finish.
©2021 Oracle Corporation. All rights reserved 44 of 61Sending campaign data to Salesforce for
closed-loop reporting
The SYSTEM - Send Campaign information to CRM program sends campaign data to
Salesforce. It is run after the SYSTEM - CRM Update program. This program creates
campaign memberships in Salesforce based on the campaign responses that occurred
in Oracle Eloqua.
The program works in the following way:
l Oracle Eloqua evaluates responses every hour (5 minutes after the hour). Responses are
captured and recorded against the appropriate Oracle Eloqua campaign based on the
response rule setup.
©2021 Oracle Corporation. All rights reserved 45 of 61l After contacts flow through the SYSTEM - Update CRM program, they enter into the
SYSTEM - Send Campaign information to CRM program. A decision rule looks for contacts
that have responded within the last 2 hours.
l If contacts meet the filter criteria, the action step sends all new responses over to Salesforce
using the Campaign Association - Contact internal event.
l If contacts do not meet the filter criteria, the decision rule is retried for 2 hours to ensure a
response is not missed.
Before you begin
l Set up response rules. See Creating campaign response rules for closed-loop reporting.
l Set up the external calls. See Configuring external calls for closed-loop reporting
Filtering contacts that responded to campaigns
The SYSTEM - Send Campaign information to CRM program requires a shared contact
filter that includes contacts that responded to a campaign within the last 2 hours.
To create a shared filter to include contacts that responded to a campaign:
©2021 Oracle Corporation. All rights reserved 46 of 611. Navigate to Audience > Tools , then click Shared Filters .
2. Click New.
3. Double-click Untitled Shared Filter, then enter the filter name: SYSTEM - Responded to
Campaign in Last 2 Hours.
4. Add the Responded to Any Campaign filter criteria.
5. Modify the criteria to include contacts who have responded to any campaign at least once
within the last 2 hours. Keep the default setting (All) for the Campaign Fields option.
6. Click Save.
Creating the send campaign information program
To build the SYSTEM - Send Campaign Information to CRM program for closed-loop
reporting:
1. Navigate to Orchestration , then Tools , then click Program Builder.
2. Click Create New Program from the Program Builder menu.
3. Enter the program name, SYSTEM – Send Campaign Information to CRM , and select
Contacts as the Default Member Type.
©2021 Oracle Corporation. All rights reserved 47 of 614. Click Save. Configure the program entry step and decision step: 5. Click Edit Program Flow. 6. Click to add the first step in the program. ©2021 Oracle Corporation. All rights reserved 48 of 61
7. Name the first step 00. Start, then click Save and Close.

   8. Click          beside the step name, then click Edit Step Path.

   9. Select Send to New Decision Rule, then click Continue.

 10. Name the decision rule Has Responded to any Campaign in the Last 2 Hours?

©2021 Oracle Corporation. All rights reserved                                    49 of 61
11. Select Data in the Type list, then select Contact is Contact Filter in the Decision Rule list.

 12. Click         in the Decision Rule Parameters area, then select the shared filter you created

       earlier: SYSTEM – Responded to Campaigns within the last 2 hours. Click OK. See Filtering

       contacts that responded to campaigns.

©2021 Oracle Corporation. All rights reserved                                                    50 of 61
13. Click Save and Close. The program is updated with the new step. Configure the yes path: ©2021 Oracle Corporation. All rights reserved 51 of 61
14. Click on the Has Responded to any Campaign in the Last 2 Hours decision rule, then click
Edit Decision Yes Path.
15. Select Send to a new step.
16. Click Continue.
17. Name the step 01. Send Campaign Information to CRM , then click Save and Continue.
18. Name the action 01. Send Campaign Information to CRM , then select Send Campaign
Information to CRM System in the Action list.
19. Click in the Action Parameters area, then select the default lead stage system identified in
the search results.
Note: You must select a Lead Stage System in order to enable the program.
©2021 Oracle Corporation. All rights reserved 52 of 6120. Click OK, then click Save and Close.
Configure the no path:
21. Click on the Has Responded to any Campaign in the Last 2 Hours decision rule, then click
Edit Decision No Path.
22. Select Send to New Step.
23. Check Re-try decision rule every , then select 10 minutes for 1 hour starting with Has
Responded to a Campaign within 2 Hours .
24. Click Continue.
25. Click on Step 01, then click Edit Step Path.
26. Select the option Send to New Step.
©2021 Oracle Corporation. All rights reserved 53 of 6127. Name the action XX. Remove from Program , then select the Remove from Program action.
28. Click Save and Close.
Configure the priority mode:
29. It is recommended you enable the program in priority mode.
a. Click Enable Program from the Program menu.
b. Select Enable below Priority Mode.
©2021 Oracle Corporation. All rights reserved 54 of 61Updating the CRM update program for
closed-loop reporting
After creating the program to send campaign data to Salesforce, you must update the
SYSTEM - CRM Update program. The SYSTEM - CRM Update program is the primary
program used to integrate Salesforce with Oracle Eloqua. You must update the program
to direct contacts from the SYSTEM - CRM Update program to the SYSTEM - Send
Campaign information to CRM.
Before you begin:
l Create the SYSTEM - Send Campaign information to CRM program. See Sending campaign
data to Salesforce for closed-loop reporting.
To update the CRM Update program for closed-loop reporting:
1. Navigate to Orchestration , then Tools , then click Program Builder.
2. Locate and click the CRM update program. You can use quick search or the folder pane.
3. Click Disable Program in the Program menu on the right.
4. Click on the XX. Remove from Program step, then click Edit Step Default Action.
5. Change the action from Remove from Program to Move to Another Program .
6. Click under Action Parameters. In the pop up window, search for the SYSTEM - Send
Campaign information to CRM program.
©2021 Oracle Corporation. All rights reserved 55 of 617. Select the first step in the program, then click Close. 8. Save your changes. 9. Click Enable Program in the Program menu. 10. Click Enable for the mode you want to use. 11. Click Close. ©2021 Oracle Corporation. All rights reserved 56 of 61
Initializing closed-loop reporting
The final step in closed-loop reporting is enabling auto synchs and internal events.

Enabling the auto synchs

To enable auto synchs:

   1. Click Settings         .

   2. Click Integration under Platform Extensions.

   3. Click the Inbound tab.

   4. Click Management > Auto Synchs .

   5. For each of the closed-loop reporting auto synchs in the list, select Enable Auto Synch from
       the drop-down list.

©2021 Oracle Corporation. All rights reserved                                               57 of 61
Enabling the internal events
Internal events trigger the external activities created earlier. For more information, see
Configuring external calls for closed-loop reporting.
To enable the internal events:
1. Click Settings .
2. Click Integration under Platform Extensions.
3. Click the Outbound tab.
4. On the Internal Events tab, expand the Campaign folder.
5. For each of the following events in the folder, click Enable Internal Event from the drop-down
list:
l Campaign Association - Contact
l Create Campaign
l Update Campaign
Validating auto synch processing
To test your auto synchs:
1. Click Settings .
2. Click Integration under Platform Extensions.
3. Click the Inbound tab.
©2021 Oracle Corporation. All rights reserved 58 of 614. In the Management menu, click Auto Synchs . All the existing auto synchs are listed. A green
check mark beside an auto synch indicates that it was successfully completed the last time it
ran.
5. To view the history of the auto synch, click Auto Synch History from the drop-down list:
l Campaign Association - Contact
l Create Campaign
l Update Campaign
Configuring system notifications about errors
With both the integration auto synchs and the internal and external queues re-enabled,
you can now set up error notifications.
Errors can cause issues with the synchronization between Oracle Eloqua and
Salesforce. Configure error notifications to send alerts when specified errors occur.
Determine who on your team should receive these notifications on an on-going basis.
For closed-loop reporting, these are the recommended errors to trigger notification:
External Call: Create Campaign Error: (All)
External Call: Update Campaign Error: (All)
External Call: Contact Campaign Association Error: (All)
External Call: Lead Campaign Association Error: (All)
To configure error notifications:
1. Click Settings .
2. Click Integration under Platform Extensions.
©2021 Oracle Corporation. All rights reserved 59 of 613. In the Configuration tab, select Manage Error Notifications on the Error Notifications menu.
The Integration Error Notifications window opens.
4. In the Notification Setup area, enter the Email Address for the notification recipient and select
the frequency with which the email will be sent.
5. In the Add Notification area, select the external call and the specific error that should trigger a
notification. It is typically a good idea to select (All) for the error type. You can also select
whether this is a high priority error, which overrides the defined schedule and sends a
notification every hour.
6. Click Add Notification. The notification appears in the Receive An Email For The Following
Errors table.
7. Repeat to add more error notifications.
8. Click Save.
©2021 Oracle Corporation. All rights reserved 60 of 61Closed-loop reports
After initializing closed-loop reporting, you can use the following Insight reports to
evaluate campaign performance:
l Campaign Cost Metrics : Shows the results of campaign spend in terms of cost per response,
cost per lead, and cost per opportunity.
l Campaign Revenue Analysis : Shows the attributed revenue results, resulting ROI and cost
metrics for each campaign.
l Opportunity Overview: Shows a list of the opportunities and deals.
For more information on Insight, see Insight.
©2021 Oracle Corporation. All rights reserved 61 of 61You can also read