100GB BACKUP SOLUTION - ORACLE
←
→
Page content transcription
If your browser does not render page correctly, please read the page content below

100Gb Backup Solution

Oracle Exadata Database Machine X8M with Oracle ZFS Storage Appliance ZS7-2

September, 2020 | Version 1.0
Copyright © 2020, Oracle and/or its affiliates
Public
DISCLAIMER
This document in any form, software or printed matter, contains proprietary information that is the exclusive property of Oracle.
Your access to and use of this confidential material is subject to the terms and conditions of your Oracle software license and
service agreement, which has been executed and with which you agree to comply. This document and information contained
herein may not be disclosed, copied, reproduced or distributed to anyone outside Oracle without prior written consent of Oracle.
This document is not part of your license agreement nor can it be incorporated into any contractual agreement with Oracle or its
subsidiaries or affiliates.
This document is for informational purposes only and is intended solely to assist you in planning for the implementation and
upgrade of the product features described. It is not a commitment to deliver any material, code, or functionality, and should not
be relied upon in making purchasing decisions. The development, release, and timing of any features or functionality described in
this document remains at the sole discretion of Oracle.
Due to the nature of the product architecture, it may not be possible to safely include all features described in this document
without risking significant destabilization of the code.

2   WHITE PAPER | 100Gb Backup Solution | Version 1.0
    Copyright © 2020, Oracle and/or its affiliates | Public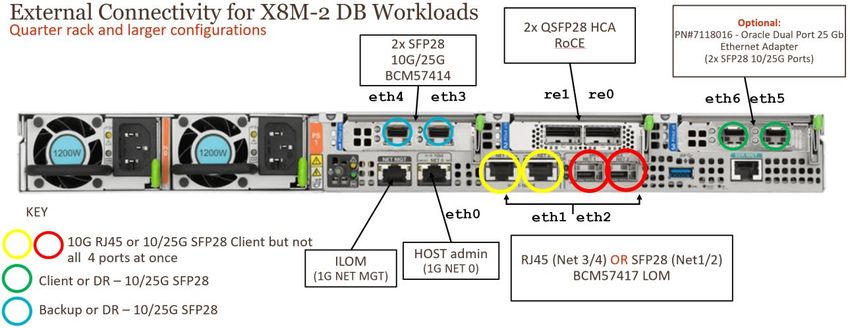
TABLE OF CONTENTS
Disclaimer                                                                       2
Executive Overview                                                               4
Introduction                                                                     7
Configuring the 100Gb Network                                                    8
    Switch Configuration Best Practices                                           9
           VLAN                                                                   9
           MTU                                                                    9
           LACP                                                                   9
           Speed and Duplex                                                       9
           Golden Configuration Templates                                         9
    Switch Configuration Steps                                                    9
           Switch 1                                                               9
           Switch 2                                                              10
    Backup for Multiple Environments                                             10

Configuring the Oracle ZFS Storage Appliance                                     11
    Choosing a Controller                                                        11
    Choosing the Correct Disk Shelves                                            11
    Choosing a Storage Profile                                                   11
           Double Parity                                                         12
    Configuring the Storage Pools                                                12
    Configuring the Projects and Shares                                          13
    Configuring the NFS Server                                                   16
    Configuring IO Cards                                                         16
    Configuring Data Path Network                                                16
           Configuring Network Datalinks                                         17
           Configuring VNIC Datalinks                                            18
           Confirm Switch Link Status                                            18
           Configuring Network Interfaces                                        19
           Creating IP multipathing groups                                       20
    Choosing Direct NFS Client                                                   21
           Oracle Intelligent Storage Protocol                                   22
    Performance                                                                  22
           Storage Compression Benefit                                           22
           Single Storage Pool                                                   22
           Multi-section support to effectively utilize all available channels   22

Configuring the Oracle Exadata Database Machine                                  23
    Backup Network                                                               23
    Configure Backup Shares                                                      23
    Configuring Direct NFS Client                                                24
           Optional oranfstab                                                    24
    Configuring Oracle RMAN Backup Services                                      25
    Preparing Oracle Database for Backup                                         25
           Archivelog Mode                                                       25
           Block-Change Tracking                                                 26
    Oracle RMAN Configuration                                                    26
           Compression                                                           26
           Optimizing Channels                                                   26
           Section Size                                                          27
           Filesperset Parameter                                                 27
           Snapshot Control File                                                 27
           Sample Run Block                                                      27

Conclusion                                                                       29

3   WHITE PAPER | 100Gb Backup Solution | Version 1.0
    Copyright © 2020, Oracle and/or its affiliates | Public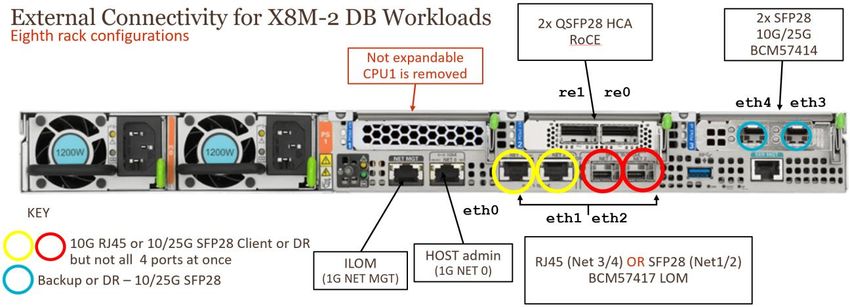
EXECUTIVE OVERVIEW
The Oracle Exadata X8M generation introduces a new and improved networking infrastructure built on high-speed,
low latency network fabric optimized for RDMA over Converged Ethernet (RoCE). This paper focuses on
configuration best practices when using an Oracle ZS7 Storage Appliance to provide data protection services for a
RoCE based Oracle Exadata Database Machine.
Protecting the mission-critical data that resides on Oracle Exadata Database Machine (Oracle Exadata) is a top
priority. The Oracle ZFS Storage Appliance is ideally suited for this task due to superior performance, enhanced
reliability, extreme network bandwidth, powerful features, simplified management, and cost-efficient
configurations.
The Oracle ZS7 Storage Appliance is the first platform to offer a 100Gb backup solution by directly connecting to
the Exadata RoCE network fabric at 100Gb. This bypasses the traditional backup network and provides a local
backup option that is optimized for performance and simplicity. 100Gb Ethernet adapters are installed in the ZS7-2
controllers and backups are run from the Exadata database servers using standard TCP.
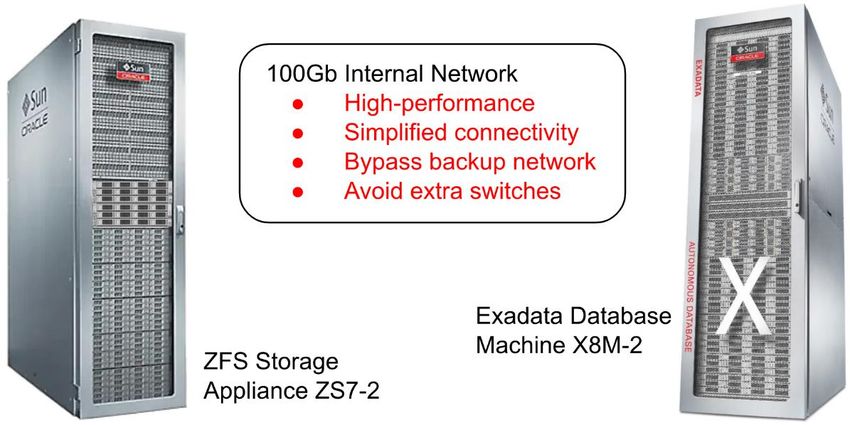
Figure 1. Oracle Exadata X8M and Oracle ZFS Storage Appliance ZS7-2 100Gb backup solution overview
Directly connecting to the Exadata RoCE network eliminates the need to acquire and manage dedicated switches.
This provides superior ROI and tighter integration. Oracle Exadata RoCE network switches are also managed as part
of the Engineered System’s hardware and software infrastructure, including monitoring, maintenance and security
updates. The solution therefore does not require additional knowledge or skillset to maintain.
The following graph shows maximum sustainable Oracle Recovery Manager (RMAN) rates that were achieved with
a quarter-rack X8M Extreme Flash attached to a ZS7-2 high-end with 4 high capacity disk shelves. The graph shows
rates for an Oracle Database backing up to either a single ZS7 controller or both (dual) controllers. Physical
throughput rates were measured at the network level for RMAN workloads between Oracle Exadata and Oracle ZFS
Storage Appliance systems.
4 WHITE PAPER | 100Gb Backup Solution | Version 1.0
Copyright © 2020, Oracle and/or its affiliates | Public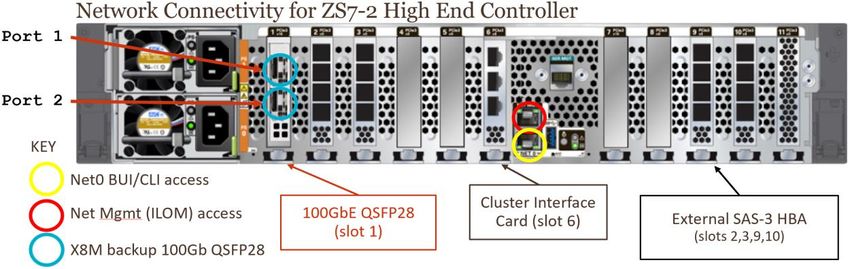
Figure 2. RMAN rates achieved with quarter-rack X8M and 4-shelf ZS7-2 using 100Gb direct attach backup solution. Includes database backup
rates to a single ZS7-2 controller and both (dual) controllers.

A backup rate of 35.3 TB/hr for this X8M quarter-rack/ZS7-2 configuration was recorded in the lab environment
using a double parity storage profile. These are complete, real-world results using Oracle Database 19c and an online
transactional processing (OLTP) database that was populated with sample customer data in a sales order-entry
schema. Advanced Row Compression, an Oracle Database feature, was used at the database level to align with best-
practice recommendations for customers that are running OLTP workloads. These throughput rates were not
obtained using a database or input/output (I/O) generator test tool, which can be misleading. Also, they were not
projected based on low-level system benchmarks.

The performance data collected for this document was measured using level 0 backup operations for an Oracle
Database with no concurrent front-end transactional load. When testing the same configuration with a moderate
OLTP transactional workload running concurrently with the backup, a rate of 32.0 TB/hr was recorded. The
database workload with a concurrent RMAN backup load still achieved 90.9% of the performance recorded on an
idle system. When accounting for database-level compression or incremental backup strategies, effective backup
rates that are much higher than the physical rates documented here are routinely observed.

High performance is an important consideration when choosing a solution to protect Oracle Exadata. The following
technologies make it possible for Oracle ZFS Storage Appliance systems to achieve these backup and restore rates:

» Oracle Recovery Manager Integration – Oracle Recovery Manager (Oracle RMAN) is a highly parallelized
    application that resides within Oracle Database and optimizes backup and recovery operations. Oracle ZFS
    Storage Appliance systems are designed to integrate with Oracle RMAN by utilizing up to 3,000 concurrent
    threads that distribute I/O across many channels spread across multiple controllers. This improves performance
    dramatically with sequential large block streaming I/O workloads that are typical for most backup and restore
    situations.
» Oracle Database’s Direct NFS Client feature – The optimized Direct NFS Client feature is an aggressive
    implementation that allocates individual TCP connections for each Oracle Database process, in addition to

5     WHITE PAPER | 100Gb Backup Solution | Version 1.0
      Copyright © 2020, Oracle and/or its affiliates | Public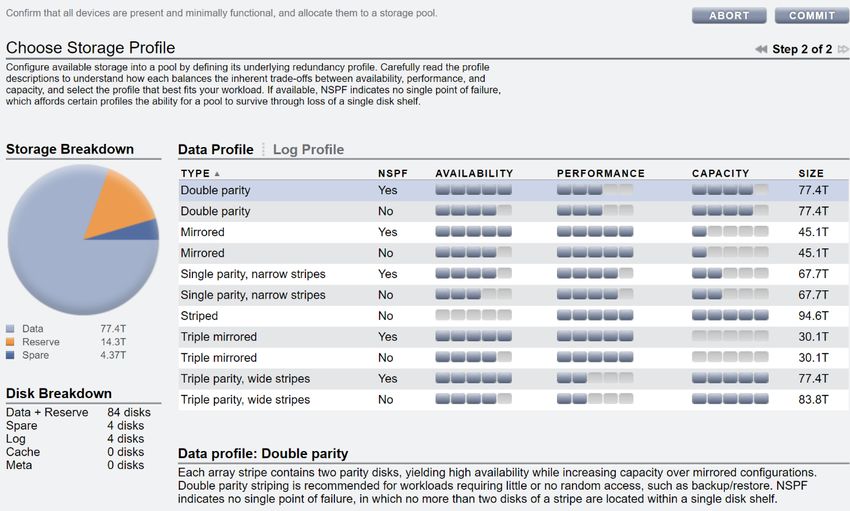
reducing CPU and memory overhead, by bypassing the operating system and writing buffers directly to user
    space.
» 1 MB Record Sizes – Oracle ZFS Storage Appliance systems enable larger 1 MB record sizes. This reduces the
    number of input/output operations per second (IOPS) that are required to disk, preserves the I/O size from Oracle
    RMAN buffers to storage, and improves performance of
    large-block sequential operations.
» Hybrid Storage Pools – Oracle ZFS Storage Appliance systems have an innovative Hybrid Storage Pool (HSP)
    architecture that utilizes dynamic storage tiers across memory, flash, and disk. The effective use of dynamic
    random-access memory (DRAM) and enterprise-class software specifically engineered for multilevel storage is a
    key component that facilitates the superior performance of Oracle ZFS Storage Appliance systems.

The performance benefits of the Oracle ZFS Storage Appliance are well documented and independently verified.
Oracle periodically publishes Storage Performance Council’s SPC-1 and SPC-2 benchmark results, as well as
Standard Performance Evaluation Corporation’s SPEC SFS benchmark results to demonstrate performance results
for the Oracle ZFS Storage Appliance. Combine this with the powerful features, simplified management, and
Oracle-on-Oracle integrations, and it is easy to see why these systems are a compelling solution for protecting
mission-critical data on Oracle Exadata.

6    WHITE PAPER | 100Gb Backup Solution | Version 1.0
     Copyright © 2020, Oracle and/or its affiliates | Public
INTRODUCTION
This document focuses on networking guidelines for setting up a 100Gb-attached local backup solution with Oracle
ZFS Storage Appliance ZS7-2 for optimal backup and recovery of Oracle Databases running on an Oracle Exadata
X8M Database Machine. Selecting the right backup strategy, understanding encryption options and when to deploy
a deduplication solution are all important considerations. Guidelines to help understand and make these deployment
decisions are provided in My Oracle Support document 2087231.1 “Guidelines when Using ZFS Storage in an
Exadata Environment.” This solution brief illustrates the 100Gb networking guidelines by utilizing a reference
architecture with a standard RMAN backup strategy and no encryption or deduplication requirements.

This paper addresses the following topics:
» Configuring the 100Gb network
» Configuring the Oracle ZFS Storage Appliance
» Configuring the Oracle Exadata X8M

Database, system, and storage administrators are faced with a common dilemma when it comes to backup and
recovery of Oracle Database instances—how to back up more data, more often, in less time, and within the same
budget. Moreover, practical challenges associated with real-world outages mandate that data protection systems be
simple and reliable to ensure smooth operation under compromised conditions. The Oracle ZFS Storage Appliance
helps administrators meet these challenges by providing cost-effective and high-bandwidth storage systems that
combine the simplicity of the NFS protocol with ZFS-enhanced disk reliability. Through Oracle ZFS Storage
Appliance technology, administrators can reduce the capital and operational costs associated with data protection
while maintaining strict service-level agreements with end customers.

7   WHITE PAPER | 100Gb Backup Solution | Version 1.0
    Copyright © 2020, Oracle and/or its affiliates | Public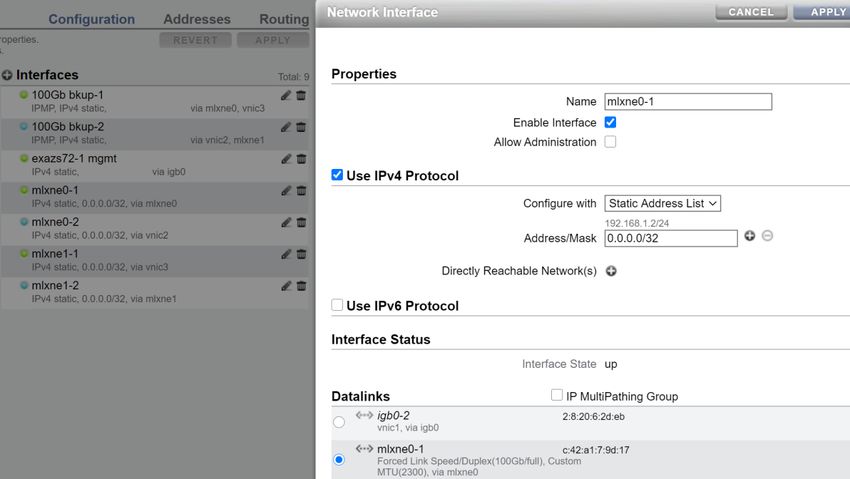
CONFIGURING THE 100Gb NETWORK
This section documents specific cabling guidelines and networking best practices to support a high performance and highly
available data protection solution using direct-attached 100Gb interfaces.

The Oracle ZFS Storage Appliance leverages a dual-port 100Gb Ethernet adapter in each ZS7-2 controller to directly connect to the
Oracle Exadata X8M internal leaf switches. These are Cisco 9336C-FX2-OR 100Gb Ethernet switches.

There are a limited number of ports available on the Exadata X8M switches. Ports 4 through 33 are reserved for the RoCE internal
network and are not to be used. These ports should be reserved even in a partial rack configuration to enable the option of future
expansion. This solution uses ports outside of the dedicated RoCE range. This architecture currently supports X8M leaf switches
with standard golden configuration templates for single-rack or multi-rack. Support for RoCE secure fabric isolation switch
configurations with multiple VLANs is planned for a future release.

Port 1 of the 100Gb adapter in each Oracle ZS7-2 controller connects to the lower Exadata leaf switch (Switch 1). Port 2 connects
to the upper Exadata leaf switch (Switch 2). Controller 1 connects to switch port 3 while controller 2 connects to port 35. The
configuring IO cards section of this document provides more details on the installation and setup of network cards on the storage.

Figure 3 depicts the network cabling diagram for the 100Gb local backup solution. This configuration provides a high-performance
fault-tolerant architecture for local backup using Oracle ZFS Storage Appliance.

Figure 3. Network diagram for 100Gb local backup solution.

Ports 4 through 33 are part of the internal RoCE network fabric and remain unchanged. Ports 3 and 35 are used to connect 100Gb
interfaces of the Oracle ZFS Storage Appliance. The following table documents the port mapping details of this network solution.

TABLE 1. 100GB BACKUP NETWORK PORT MAPPING EXADATA LEAF SWITCHES

       Group                           Switch 1                          Switch 2                             Comments

Eth1/3                    Controller 1 PCIe 1 port 1           Controller 1 PCIe 1 port 2      ZS7-2 controller 1 100Gb links

                          Database and Storage                 Database and Storage Servers,   Range dedicated for internal RoCE
Eth1/4-33
                          Servers, Inter-switch links          Inter-switch links              network fabric

Eth1/34                                                                                        RoCE port in certain X8M-8 configurations

8    WHITE PAPER | 100Gb Backup Solution | Version 1.0
     Copyright © 2020, Oracle and/or its affiliates | Public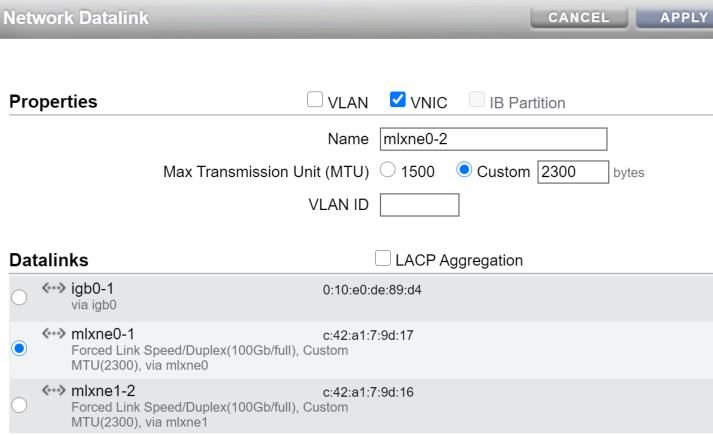
Eth1/35                  Controller 2 PCIe 1 port 1           Controller 2 PCIe 1 port 2   ZS7-2 controller 2 100Gb links

Switch Configuration Best Practices

VLAN
The Oracle ZS7-2 100Gb ports should be configured to match the Virtual Local Area Network (VLAN) ID used for the RoCE
network fabric during the initial installation of the Exadata deployment. If this VLAN ID is unavailable, it is possible to change the
RoCE VLAN ID during Exadata deployment to another ID in the range of 2744-3967. In most environments this will be 3888.

MTU
The Maximum Transmission Unit (MTU) setting helps determine the largest packet size that can be communicated over the
network. The default MTU is 1500 bytes. Larger MTU sizes reduce the level of IP fragmentation and allow for more efficient
processing of large streaming workloads with lower CPU overhead.

The Exadata Database Server RoCE interfaces are optimized to use an MTU of 2300. The Oracle ZS7-2 100Gb ports should be
configured to match the client MTU size of 2300.

LACP
Link Aggregation Control Protocol (LACP) is not necessary in this solution because the Database Server RoCE ports use active path
management. The Oracle ZS7-2 100Gb Ethernet ports will provide redundancy by using IP Multi-Pathing (IPMP) groups. LACP
should not be configured on the switches.

Speed and Duplex
The Oracle Exadata X8M Database Server RoCE ports have auto negotiation disabled, therefore the connecting 100Gb ZS7-2 ports
must be configured to match. To match the RoCE ports it is required to disable auto negotiation, set speed to 100000 and set duplex
to full.

Golden Configuration Templates
Oracle Exadata X8M leaf switches are configured with a template during the deployment process. For more information on RoCE
network fabric switch configurations refer to Oracle Exadata Installation Documentation.

This architecture currently supports standard single-rack switch configurations and standard multi-rack switch configurations.
Support for secure RDMA fabric isolation switch configurations is planned for a future release.

Switch Configuration Steps
This section provides an example on the steps necessary to configure the Oracle Exadata X8M leaf switches for 100Gb local backup.
The example provided here assumes the default VLAN ID of 3888 is in use for the RoCE network fabric.

Switch 1
Login to switch1 as the admin user. Set default settings on ports 3 and 35 to cleanup any stale configuration before proceeding.
switch1# conf t
switch1(config)# default int Eth1/3
switch1(config)# default int Eth1/35

Modify ports 3 and 35 to configure ZS7-2 100Gb connections on switch1.
switch1(config)# int Eth1/3
switch1(config-if)# description ZS72-1_100gb_p1
switch1(config-if)# switchport access vlan 3888
switch1(config-if)# mtu 2300
switch1(config-if)# speed 100000
switch1(config-if)# no negotiate auto
switch1(config-if)# duplex full
switch1(config-if)# priority-flow-control mode off
switch1(config-if)# spanning-tree bpduguard enable
switch1(config-if)# spanning-tree port type edge

9   WHITE PAPER | 100Gb Backup Solution | Version 1.0
    Copyright © 2020, Oracle and/or its affiliates | Public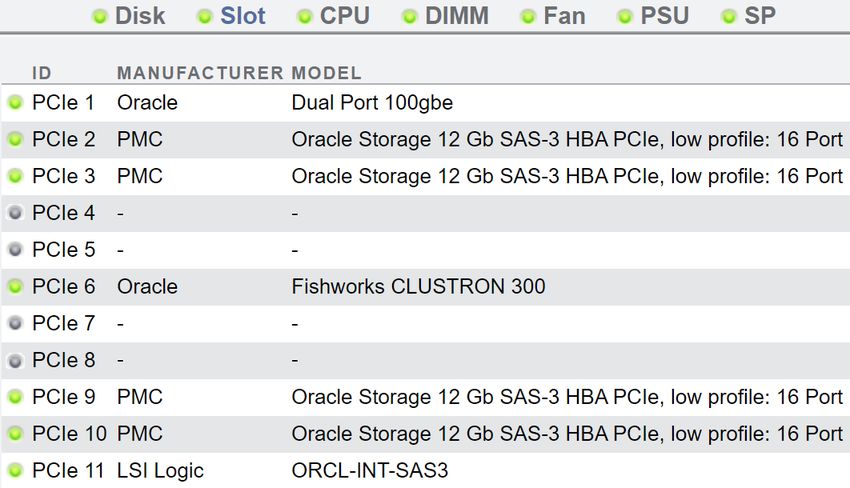
switch1(config-if)# no cdp enable
switch1(config-if)# no shut
switch1(config-if)# ex
switch1(config)# int Eth1/35
switch1(config-if)# description ZS72-2_100gb_p1
switch1(config-if)# switchport access vlan 3888
switch1(config-if)# mtu 2300
switch1(config-if)# speed 100000
switch1(config-if)# no negotiate auto
switch1(config-if)# duplex full
switch1(config-if)# priority-flow-control mode off
switch1(config-if)# spanning-tree bpduguard enable
switch1(config-if)# spanning-tree port type edge
switch1(config-if)# no cdp enable
switch1(config-if)# no shut
switch1(config-if)# ex

Exit the config prompt and save the configuration on switch1.
switch1(config)# end
switch1# copy running-config startup-config

Switch 2
Login to switch2 as the admin user. Set default settings on ports 3 and 35 to cleanup any stale configuration before proceeding.
switch2# conf t
switch2(config)# default int Eth1/3
switch2(config)# default int Eth1/35

Modify ports 3 and 35 to configure ZS7-2 100Gb connections on switch2.
switch2(config)# int Eth1/3
switch2(config-if)# description ZS72-1_100gb_p2
switch2(config-if)# switchport access vlan 3888
switch2(config-if)# mtu 2300
switch2(config-if)# speed 100000
switch2(config-if)# no negotiate auto
switch2(config-if)# duplex full
switch2(config-if)# priority-flow-control mode off
switch2(config-if)# spanning-tree bpduguard enable
switch2(config-if)# spanning-tree port type edge
switch2(config-if)# no cdp enable
switch2(config-if)# no shut
switch2(config-if)# ex
switch2(config)# int Eth1/35
switch2(config-if)# description ZS72-2_100gb_p2
switch2(config-if)# switchport access vlan 3888
switch2(config-if)# mtu 2300
switch2(config-if)# speed 100000
switch2(config-if)# no negotiate auto
switch2(config-if)# duplex full
switch2(config-if)# priority-flow-control mode off
switch2(config-if)# spanning-tree bpduguard enable
switch2(config-if)# spanning-tree port type edge
switch2(config-if)# no cdp enable
switch2(config-if)# no shut
switch2(config-if)# ex

Exit the config prompt and save the configuration on switch2.
switch2(config)# end
switch2# copy running-config startup-config

Backup for Multiple Environments
The Oracle ZFS Storage Appliance ZS7-2 can serve as a 100Gb backup target for a single-rack or multi-rack X8M environment.
However, the ZS7-2 controllers can each support only one 100Gb Ethernet adapter. This prevents the system from serving as the
backup target for multiple X8M environments. For use cases where a single Oracle ZFS Storage Appliance must provide data
protection for multiple Oracle Exadata environments please refer to the top of rack switched 25Gb or 40Gb solutions provided in
Exadata X8M Backup with ZFS Storage Appliance.

10   WHITE PAPER | 100Gb Backup Solution | Version 1.0
     Copyright © 2020, Oracle and/or its affiliates | Public
CONFIGURING THE ORACLE ZFS STORAGE APPLIANCE
This section provides best practices for optimizing an Oracle ZFS Storage Appliance system to provide Oracle Database protection
in an Oracle Exadata X8M environment with a standard RMAN backup strategy.
Choosing a Controller
Oracle ZFS Storage Appliance systems are available in two models: Oracle ZFS Storage ZS7-2 mid-range and Oracle ZFS Storage
ZS7-2 High-End. The following table provides details for each model.
TABLE 2. ORACLE ZFS STORAGE APPLIANCE DETAILS
Features Oracle ZFS Storage ZS7-2 Mid-Range Oracle ZFS Storage ZS7-2 High-End
CPU Cores 72 96
DRAM 1 or 2 TB 3 TB
Maximum Read-Optimized Up to 737 TB Up to 1.4 PB
Flash
Maximum Write-Optimized Up to 18.6 TB Up to 37.5 TB
Flash
Raw Storage Capacity 24 TB to 8 PB Scalability 24 TB to 16 PB Scalability
High-Availability Cluster Yes Yes
Option
Focus Medium-sized Scalability
Please refer to oracle.com/storage/nas/index.html for the latest Oracle ZFS Storage Appliance model specifications.
Oracle ZFS Storage ZS7-2 High-End is a flagship product that offers maximum levels of scalability, CPU, and DRAM. This is a
highly scalable platform that can support up to 16 PB of raw storage capacity.
Oracle ZFS Storage ZS7-2 Mid-Range is a cost-efficient model that can still achieve high levels of throughput and redundancy but
does not provide the same level of scalability that the high-end model does.
A ZS7-2 high-end model is recommended for Exadata backup.
Choosing the Correct Disk Shelves
Oracle ZFS Storage Appliance systems include a configurable number of disk shelves. A standard RMAN backup use case should
use high-capacity (DE3-24C) disk shelves. Oracle Storage Drive Enclosure DE3-24C features high-capacity 14 TB disks. Each disk
shelf contains 24 disks and can be configured with optional write-optimized flash. (Up to four disks per disk shelf can be replaced
with solid-state drive [SSD] write-flash accelerators.) Oracle ZFS Storage ZS7-2 can be customized based on disk shelf and write-
optimized flash requirements. A minimum of 3 disk shelves should be included in the configuration to provide full redundancy.
This will allow for a No Single Point of Failure (NSPF) storage configuration that can tolerate the loss of a disk shelf.
For standard RMAN backup use cases it is recommended to include write-flash accelerators at a minimum ratio of 4 per every 4
disk shelves. For example, an 8 disk shelf configuration would include 6 shelves of 24 14 TB drives and 2 shelves of 20 14 TB drives
and 4 write-flash accelerators. If standard RMAN backup is the primary use case but the ZS7-2 will also be handling other use cases
that generate a significant number of synchronous writes, then it is recommended to include write-flash accelerators at a minimum
ratio of 4 per every 2 disk shelves.
Choosing a Storage Profile
When a storage profile is selected to protect Oracle Exadata, mirrored, single-parity, and double-parity profiles are all worthy of
consideration. The following table provides a comparison of the storage profiles. For a standard RMAN backup use case it is
recommended to use a double parity storage profile.
TABLE 3. STORAGE PROFILE COMPARISON
Profile Usable Capacity Advantages Negatives
Mirrored 42.2% Restore performance Costly
11 WHITE PAPER | 100Gb Backup Solution | Version 1.0
Copyright © 2020, Oracle and/or its affiliates | PublicMaximum protection
Maximum flexibility
Single Parity 69.3% Backup performance Limited redundancy
Moderate flexibility
Double Parity 76.7% Streaming performance Limited IOPS
Most efficient
Note: Useable capacity accounts for raw capacity lost due to parity, spares, and file system overhead, as well as small amounts of space lost on each disk due to operating
system (OS) overhead, drive manufacturer overhead, and scratch space reservations. This will vary slightly depending on the size of the storage pool; this example
assumes a configuration with four disk shelves.
Double Parity
Double parity provides the best usable capacity and performs as well as single parity for large streaming I/O, which is typical for
standard Oracle RMAN workloads. It accomplishes this by utilizing a wide stripe width. The width varies at the time of storage
pool creation depending on the number of disks in the configuration, but it ranges up to 14 disks. As a result, the number of virtual
devices (vdevs) in a double-parity storage pool is far fewer than with mirrored or single parity profiles. The ability to handle IOPS-
intensive workloads is severely diminished.
Double parity is recommended when Oracle ZFS Storage Appliance systems are 100 percent dedicated to large sequential
workloads, such as traditional Oracle RMAN backup and restore workloads. It is not advisable for use cases such as cloning for
DevTest provisioning or utilizing an incrementally updated backup strategy. Mirrored or single-parity profiles are more flexible for
handling additional use cases that might result in heavier disk IOPS with lower latencies. Figure 4 reflects raw disk capacity
distribution for different storage profiles.
Figure 4. Raw disk capacity distribution
Configuring the Storage Pools
In most situations it is recommended to configure two storage pools with one primary on each controller. This allows for an
active/active backup environment that leverages the CPU, memory and networking resources of both ZS7 controllers. This
provides better performance and Return on Investment (ROI).
In situations where strict performance Service Level Agreements (SLA)s must be maintained even during failure scenarios it may
be recommended to configure a single storage pool and enable an active/standby backup environment where one of the ZS7
controllers will sit idle waiting to take over for the active controller.
In an active/active backup environment each storage pool should be configured with half of the data disk drives in each Oracle
Storage Drive Enclosure DE3-24C disk shelf. Each storage pool should also include half of the write-flash accelerators in each DE3-
24C disk shelf. This allows for maximum performance and redundancy.
12 WHITE PAPER | 100Gb Backup Solution | Version 1.0
Copyright © 2020, Oracle and/or its affiliates | PublicIt is recommended to select the No Single Point of Failure (NSPF) option when configuring the storage pool. This ensures that the
loss of an entire disk shelf does not compromise the availability of data. To enable NSPF a minimum of three disk shelves is needed
for double-parity profiles.
Follow these steps to configure storage pools for an active/active standard backup deployment using the ZFS Storage Appliance’s
Browser User Interface (BUI).
Build a storage pool that will be primary on controller 1:
1. Access the BUI on controller 1, select Configuration > Storage and configure a storage pool by clicking the plus icon next
to Available Pools.
2. Provide a descriptive name for the new storage pool. Controller 1 will have primary ownership for this storage pool. In
this example the storage pool is named “BACKUP1”. Click apply to move to the device allocation screen.
3. Select half of the data devices and half of the log devices from each disk shelf to be included in the storage pool. This
method of device allocation will provide optimal performance and redundancy. Select commit to move to the storage
profile configuration screen.
4. Choose a data profile of double parity with NSPF. For maximum redundancy it is recommended to select a log profile of
mirrored. Select commit to complete the configuration and build the new storage pool.
Figure 5. Choosing a storage profile
Build a storage pool that will be primary on controller 2:
1. Access the BUI on controller 2, select Configuration > Storage and configure a storage pool by clicking the plus icon next
to Available Pools.
2. Provide a descriptive name for the new storage pool. Controller 2 will have primary ownership for this storage pool. In
this example the storage pool is named “BACKUP2”. Click apply to move to the device allocation screen.
3. Select the remaining data and log devices from each disk shelf to be included in the storage pool. Select commit to move
to the storage profile configuration screen.
4. Choose a data profile of double parity with NSPF. For maximum redundancy it is recommended to select a log profile of
mirrored. Select commit to complete the configuration and build the new storage pool.
Configuring the Projects and Shares
A project provides a single access and control point for managing filesystems (shares). Projects can be used for grouping logically
related shares together. Shares within a project typically share common settings. Quotas can be enforced at the project level in
addition to the share level.
13 WHITE PAPER | 100Gb Backup Solution | Version 1.0
Copyright © 2020, Oracle and/or its affiliates | PublicIt is recommended to use a project for managing the Oracle Exadata backup solution. Projects for different storage pools can share
the same name.
Create a project for the BACKUP1 storage pool:
1. Access the BUI on controller 1, select Shares > Projects and create a new project by clicking the plus icon next to
Projects.
2. Provide a descriptive name for the new project such as “bkup_x8m”.
3. Click apply to create the new project.
Repeat this process to create a project on the BACKUP2 storage pool by accessing the BUI on controller 2.
Project settings can be configured so that any filesystem (share) created within the project with inherit settings from the project.
Optimize the new project settings for a standard RMAN backup use case:
1. Access the BUI on controller 1, select Shares > Projects > “bkup_x8m” (project name) > General.
2. Configure the mountpoint. A mountpoint of “/export/zs1” was used in this example.
3. Select LZ4 compression. LZ4 compression should be enabled on the storage. It provides additional benefit when
combined with Oracle Database compression by reducing the bandwidth to back-end disk with only minor impact to
Oracle ZFS Storage Appliance ZS7-2 CPU utilization.
Physical network throughput is typically increased when using LZ4 since SAS bandwidth and disk utilization are often
limiting factors.
With Advanced Row Compression enabled for an OLTP Oracle Database, LZ4 typically provides additional space savings
in the range of 1.8x to 2.4x.
4. Set cache device usage to “do not use cache devices”. Read-optimized flash should not be used for caching standard
Oracle RMAN workloads because there is little benefit from storing Oracle RMAN backup sets in cache. Moreover, the
level 2 ARC is not intended for streaming workloads.
5. Set synchronous write bias to throughput. This is a share setting that controls behavior for servicing synchronous writes.
It can be optimized for latency or throughput.
All writes are initially written to the ZFS adaptive replacement cache (ARC), regardless of whether they are
asynchronous, synchronous, latency-optimized, or throughput-optimized. Also, all writes are copied from the ARC to the
storage pool.
An asynchronous write returns an acknowledgement to the client after the write to ARC is complete. When
synchronous writes are optimized for throughput, an acknowledgement is not returned until the write is copied to the
storage pool.
When synchronous writes are optimized for latency, an additional copy is written to persistent storage so that
acknowledgements can be returned to the client faster. When write-optimized flash is configured in the storage pool, it is
used as the persistent storage for latency-sensitive synchronous writes.
Standard RMAN backup use cases generate bandwidth-sensitive workloads and writes are mostly asynchronous.
6. Configure the record size to 1 MB. The record size influences the size of back-end disk I/O.
Optimal settings depend on the network I/O sizes used by the application—in this case, Oracle RMAN. Standard Oracle
RMAN workloads with Direct NFS Client generate large 1 MB writes and reads at the network layer. In this case, a 1 MB
record-size setting should be used.
The ability to use large record sizes has significant advantages, such as increased throughput performance, which is
critical for bandwidth-intensive workloads. Other benefits include reduced utilization of controller CPU resources.
In recent years, HDD capacities have grown as quickly as ever, yet the IOPS these disks can deliver has leveled off.
Oracle RMAN workloads often generate datasets on the TB scale, with only a small frequency of read-backs. As such,
caching is not an optimal solution for handling IOPS. Maximizing the throughput and limiting the IOPS to disk are
important factors for achieving the best performance from the backup solution. Oracle RMAN standard backup strategies
enable this by delivering large, multichannel network I/O that greatly benefits from large record sizes on the filesystem.
14 WHITE PAPER | 100Gb Backup Solution | Version 1.0
Copyright © 2020, Oracle and/or its affiliates | Public7. Configure permissions for the oracle user (1001) and dba group (1002) with file access of 750. Reference figure 6 for an
example.
8. Click apply to configure the default settings for all shares in this project.
Repeat this process to optimize settings for the other storage pool’s project by accessing the BUI on controller 2.
Figure 6. Setting default share settings for each project
Configure the NFS share mode:
1. Navigate to Shares > Projects > “bkup_x8m” (project name) > Protocols and set the NFS share mode to read/write.
2. Ensure that the NFS protocols settings match figure 7 and then click apply.
3. Repeat this step for the other project.
Figure 7. NFS protocols settings for “bkup_x8m” project
The next step is to create the shares that will be mounted and accessed by the NFS clients.
Create a filesystem (share) for the BACKUP1 storage pool:
1. Access the BUI on controller 1 and select Shares > Projects > “bkup_x8m” (project name) > Shares.
2. Create a filesystem by clicking on the plus icon next to Filesystems.
3. Assign the filesystem a unique name. This example creates a filesystem named “bkup_x8m_1”. The filesystem will inherit
the properties that were configured for the “bkup_x8m” project. No further configuration is required.
4. Click apply to create the filesystem.
15 WHITE PAPER | 100Gb Backup Solution | Version 1.0
Copyright © 2020, Oracle and/or its affiliates | PublicCreate a filesystem (share) for the BACKUP2 storage pool:
1. Access the BUI on controller 2 and select Shares > Projects > “bkup_x8m” (project name) > Shares.
2. Create a filesystem by clicking on the plus icon next to Filesystems.
3. Assign the filesystem a unique name. This example creates a filesystem named “bkup_x8m_2”.
4. Click apply to create the filesystem.
Two filesystems have been created, one on each storage pool.
Configuring the NFS Server
Start the NFS service and optimize settings:
1. Access the BUI and navigate to Configuration > Services and select NFS
2. Ensure that the service is enabled and online.
3. Set the maximum supported version to NFSv4.1.
4. Configure the maximum # of server threads to 3000.
5. Click apply to commit the changes.
It is only required to perform this step on one controller.
Configuring IO Cards
It is recommended that the Oracle ZFS Storage Appliance ZS7-2 high-end system be configured with four SAS-3 cards (slots 2, 3, 9
and 10) and one dual port 100Gb Ethernet card (slot 1) in each controller. Slot 1 is the only slot with a 16-lane configuration.
Figure 8 shows the recommended PCIe configuration.
Figure 8. Oracle ZFS Storage Appliance ZS7-2 high-end PCIe configuration
Configuring Data Path Network
The data path network is represented by the blue 100Gb QSFP28 ports in figure 9.
These interfaces are connected to the Cisco 9336C-FX2-OR 100Gb Ethernet switches that are configured as RoCE leaf switches in
the Oracle Exadata X8M rack. Port 1 is connected to switch 1 and port 2 is connected to switch 2. Controller 1 connects to switch
port 3 while controller 2 connects to port 35. Reference the network configuration chapter for detailed port mapping.
16 WHITE PAPER | 100Gb Backup Solution | Version 1.0
Copyright © 2020, Oracle and/or its affiliates | PublicFigure 9. 100Gb backup network connectivity for ZS7-2 high-end
An IPMP group is active on each controller to provide full HA redundancy. The Oracle Direct NFS Client can provide a level of
HA, but currently relies on the kernel NFS mount for opening or creating files. IPMP is required to provide full HA in all
situations.
A Virtual Network Interface Card (VNIC) is defined on the Oracle ZFS Storage Appliance to provide secondary access to the
physical datalink. The physical datalink will provide data path services for the primary storage pool while the VNIC will provide
data path services for the storage pool that is primary on the other controller.
Storage pools and the data path network are clustered resources and will transfer ownership during a controller failover.
Configuring Network Datalinks
Create a 100Gb physical datalink for mlxne0:
1. Access the BUI on controller 1, select Configuration > Network > Configuration and build a new datalink by clicking the
plus icon next to the Datalinks column.
2. Provide a descriptive name for the new datalink. This datalink will provide primary data path for the BACKUP1 storage
pool. Controller 1 has primary ownership for this storage pool. In this example the datalink’s name is mlxne0-1.
3. Select the Maximum Transmission Unit (MTU). The MTU setting helps determine the maximum packet size that can be
communicated over the network.
The default MTU is 1500 bytes. Larger MTUs improve performance for backup networks by allowing for more efficient
processing of large streaming workloads with lower CPU overhead.
The database server RoCE interfaces are optimized to use an MTU of 2300. It is required to configure the 100Gb datalinks
for an MTU of 2300 to match the clients.
5. Set the link speed to 100Gb and the duplex to full. The Oracle Exadata X8M database server RoCE ports have auto
negotiation disabled so the connecting 100Gb ZS7-2 ports must be configured to match.
6. Click apply to create the 100Gb physical datalink for mlxne0.
Figure 10. Create 100Gb physical datalink
17 WHITE PAPER | 100Gb Backup Solution | Version 1.0
Copyright © 2020, Oracle and/or its affiliates | PublicCreate a 100Gb physical datalink for mlxne1:
4. Access the BUI on controller 2, select Configuration > Network > Configuration and build a new datalink by clicking the
plus icon next to the Datalinks column.
5. Provide a descriptive name for the new datalink. This datalink will provide primary data path for the BACKUP2 storage
pool. Controller 2 has primary ownership for this storage pool. In this example the datalink’s name is mlxne1-2.
6. Select the Maximum Transmission Unit (MTU). The database node RoCE interfaces are optimized to use an MTU of
2300. It is required to configure the 100Gb datalinks for an MTU of 2300 to match the clients.
7. Set the link speed to 100Gb and the duplex to full.
8. Click apply to create the 100Gb physical datalink for mlxne1.
Configuring VNIC Datalinks
VNICs datalinks are used in this solution to provide full network redundancy.
Create an VNIC of the physical datalink for mlxne0:
1. Access the BUI on controller 2, select Configuration > Network > Configuration and build a new datalink by clicking the
plus icon next to the Datalinks column.
2. Provide a descriptive name for the new datalink. This datalink will provide standby data path for the BACKUP2 storage
pool. Controller 2 has primary ownership for this storage pool. In this example the datalink’s name is mlxne0-2.
3. Configure the MTU. Set the MTU to 2300 to match the previously created physical datalink.
4. Select the VNIC checkbox under properties and add the previously created mlxne0 100Gb physical datalink. Reference
figure 11 for an example.
5. Click apply to create the VNIC datalink.
Figure 11. Create a VNIC for 100Gb datalink
Create an VNIC of the physical datalink for mlxne1:
1. Access the BUI on controller 1, select Configuration > Network > Configuration and build a new datalink by clicking the
plus icon next to the Datalinks column.
2. Provide a descriptive name for the new datalink. This datalink will provide standby data path for the BACKUP1 storage
pool. Controller 1 has primary ownership for this storage pool. In this example the datalink’s name is mlxne1-1.
3. Configure the MTU. Set the MTU to 2300 to match the previously created physical datalink.
4. Select the VNIC checkbox under properties and add the previously created mlxne1 100Gb physical datalink.
5. Click apply to create the VNIC datalink.
Confirm Switch Link Status
Login to switch1 as the admin user. Check status and confirm both ports have connected with the following settings before
continuing.
18 WHITE PAPER | 100Gb Backup Solution | Version 1.0
Copyright © 2020, Oracle and/or its affiliates | Publicswitch1# show int Eth1/3,Eth1/35 status
--------------------------------------------------------------------------------
Port Name Status Vlan Duplex Speed Type
--------------------------------------------------------------------------------
Eth1/3 ZS72-1_100gb_p1 connected 3888 full 100G QSFP-100G-CR4
Eth1/35 ZS72-2_100gb_p1 connected 3888 full 100G QSFP-100G-CR4
Login to switch2 as the admin user. Check status and confirm both ports have connected with the following settings before
continuing.
switch2# show int Eth1/3,Eth1/35 status
--------------------------------------------------------------------------------
Port Name Status Vlan Duplex Speed Type
--------------------------------------------------------------------------------
Eth1/3 ZS72-1_100gb_p2 connected 3888 full 100G QSFP-100G-CR4
Eth1/35 ZS72-2_100gb_p2 connected 3888 full 100G QSFP-100G-CR4
Configuring Network Interfaces
Interfaces are associated with datalinks and will function as members of IP multipathing groups.
Create an interface for mlxne0-1:
1. Access the BUI on controller 1, select Configuration > Network > Configuration and build a new interface by clicking the
plus icon next to the Interfaces column.
2. Provide a descriptive name for the new interface. This interface will provide active data path for the BACKUP1 storage
pool. Controller 1 has primary ownership for this storage pool. In this example the interface’s name is mlxne0-1.
Uncheck the allow administration box.
3. Select the associated datalink for this interface. Choose the mlxne0-1 datalink.
4. Define an IP address for this interface. This will be an underlying interface that is part of an IP multipathing group so set
an IP address of 0.0.0.0/32. Reference figure 12 for an example.
5. Click apply to create the interface.
Figure 12. Create a 100Gb underlying interface
Create an interface for mlxne1-1:
1. Access the BUI on controller 1, select Configuration > Network > Configuration and build a new interface by clicking the
plus icon next to the Interfaces column.
19 WHITE PAPER | 100Gb Backup Solution | Version 1.0
Copyright © 2020, Oracle and/or its affiliates | Public2. Provide a descriptive name for the new interface. This interface will provide standby data path for the BACKUP1 storage
pool. Controller 1 has primary ownership for this storage pool. In this example the interface’s name is mlxne1-1.
Uncheck the allow administration box.
3. Select the associated datalink for this interface. Choose the mlxne1-1 datalink.
4. Define an IP address for this interface. This will be an underlying interface that is part of an IP multipathing group so set
an IP address of 0.0.0.0/32.
5. Click apply to create the interface.
Create an interface for mlxne0-2:
1. Access the BUI on controller 2, select Configuration > Network > Configuration and build a new interface by clicking the
plus icon next to the Interfaces column.
2. Provide a descriptive name for the new interface. This interface will provide standby data path for the BACKUP2 storage
pool. Controller 2 has primary ownership for this storage pool. In this example the interface’s name is mlxne0-2.
Uncheck the allow administration box.
3. Select the associated datalink for this interface. Choose the mlxne0-2 datalink.
4. Define an IP address for this interface. This will be an underlying interface that is part of an IP multipathing group so set
an IP address of 0.0.0.0/32.
5. Click apply to create the interface.
Create an interface for mlxne1-2:
1. Access the BUI on controller 2, select Configuration > Network > Configuration and build a new interface by clicking the
plus icon next to the Interfaces column.
2. Provide a descriptive name for the new interface. This interface will provide active data path for the BACKUP2 storage
pool. Controller 2 has primary ownership for this storage pool. In this example the interface’s name is mlxne1-2.
Uncheck the allow administration box.
3. Select the associated datalink for this interface. Choose the mlxne1-2 datalink.
4. Define an IP address for this interface. This will be an underlying interface that is part of an IP multipathing group so set
an IP address of 0.0.0.0/32.
5. Click apply to create the interface.
Creating IP multipathing groups
IPMP groups will be comprised of two interface members. They will provide full network redundancy.
Create an IP multipathing interface for the first storage pool:
1. Access the BUI on controller 1, select Configuration > Network > Configuration and build a new interface by clicking the
plus icon next to the Interfaces column.
2. Provide a descriptive name for the new interface. This interface will provide data path for the BACKUP1 storage pool.
Controller 1 has primary ownership for this storage pool. In this example the interface’s name is 100Gb bkup-1.
3. Assign a unique IP address to this interface. This will be the address used by the Oracle Exadata Database Servers to
access the first storage pool. This example uses an address of 192.168.8.201/22. The default subnet for the RoCE network
is 192.168.8.0/22 and database server RoCE interfaces typically start at 192.168.10.1. This interface must be configured
with an available address on the RoCE network fabric.
4. Configure the IP multipathing group. Select the IP multipathing group checkbox. Add mlxne0-1 as an active interface to
this group. Add mlxne1-1 as a standby interface to this group.
In this configuration mlxne0-1 will serve as the primary data path interface for the BACKUP1 storage pool. The mlxne1-
1 interface will serve as a standby and seamlessly take over if there is a fault or disruption in the network path to mlxne0-
1. Because these are 100Gb interfaces, a single primary path can saturate the storage pool with no network bottlenecks.
20 WHITE PAPER | 100Gb Backup Solution | Version 1.0
Copyright © 2020, Oracle and/or its affiliates | PublicAn active-standby IPMP configuration consumes less CPU overhead than active-active. Reference figure 13 as an
example.
5. Click apply to create the interface.
Figure 13. Create an IP multipathing interface for data path
Create an IP multipathing interface for the second storage pool:
1. Access the BUI on controller 2, select Configuration > Network > Configuration and build a new interface by clicking the
plus icon next to the Interfaces column.
2. Provide a descriptive name for the new interface. This interface will provide data path for the BACKUP2 storage pool.
Controller 2 has primary ownership for this storage pool. In this example the interface’s name is 100Gb bkup-2.
3. Assign a unique IP address to this interface. This will be the address used by the Oracle Exadata compute nodes to access
the second storage pool. This example uses an address of 192.168.8.202/22. This interface must be configured with an
available address on the RoCE network.
4. Configure the IP multipathing group. Select the IP multipathing group checkbox. Add mlxne1-2 as an active interface to
this group. Add mlxne0-2 as a standby interface to this group.
5. Click apply to create the interface.
Enable adaptive routing for the multihoming policy to ensure that outbound traffic from an Oracle ZFS Storage Appliance system
is spread over the network links and IP addresses. Access the BUI, select Configuration > Network > Routing, and then select
option multihoming=adaptive.
Choosing Direct NFS Client
The Direct NFS Client feature of Oracle Database is highly recommended for all Oracle RMAN workloads between Oracle Exadata and
Oracle ZFS Storage Appliance systems, and it is required to achieve optimal performance.
Direct NFS Client is a custom NFS client that resides within the Oracle Database kernel and provides several key advantages:
» Significantly reduces system CPU utilization by bypassing the OS and caching data just once in user space with no second copy
in kernel space
» Boosts parallel I/O performance by opening an individual TCP connection for each Oracle Database process
» Distributes throughput across multiple network interfaces by alternating buffers to multiple IP addresses in a round-robin
fashion
» Provides high availability (HA) by automatically redirecting failed I/O to an alternate address
21 WHITE PAPER | 100Gb Backup Solution | Version 1.0
Copyright © 2020, Oracle and/or its affiliates | PublicThese advantages enable increased bandwidth and reduced CPU overhead.
No additional steps are required on Oracle ZFS Storage Appliance systems to enable Direct NFS Client.
Oracle Intelligent Storage Protocol
Oracle Intelligent Storage Protocol, a feature of Oracle ZFS Storage Appliance systems, was introduced to interact with Direct NFS
Client in Oracle Database 12c. It enables Oracle Database–aware storage by dynamically tuning record size and synchronous write
bias on Oracle ZFS Storage Appliance systems. This simplifies the configuration process and reduces the performance impact of
configuration errors. Hints are passed from the Oracle Database kernel to the Oracle ZFS Storage Appliance system. These hints are
interpreted to construct a workload profile to dynamically optimize storage settings.
Oracle Intelligent Storage Protocol is an optional protocol that requires NFSv4 and SNMP. For instructions on how to enable
Oracle Intelligent Storage Protocol, see My Oracle Support document 1943618.1 “Oracle ZFS Storage Appliance: How to Enable
Oracle Intelligent Storage Protocol (OISP).”
Performance
An Oracle ZS7-2 high-end system in this solution is capable of sustaining single-database backup rates of 38.6TB/hr and restore
rates of 37.5TB/hr. Achieving these rates is contingent on having an Oracle Exadata X8M configuration large enough and with
enough available resources to support this performance. Small configurations and configurations with a heavy concurrent
workload will have difficulty achieving maximum throughput rates that the storage can support. In our testing a quarter-rack X8M
with Extreme Flash configuration recorded an average backup rate of 32.0TB/hr with a concurrent moderately-intense OLTP
transaction workload running. All rates in this document were achieved using the recommended double parity storage profile with
No Single Point of Failure (NSPF). NSPF provides redundancy even in extreme cases where an entire shelf of disks is taken offline.
In large configurations with plenty of available resources the smaller MTU size of 2300 is a limiting factor for backup and restore
performance. In some cases, more RMAN channels may be necessary to saturate the hardware resources.
Storage Compression Benefit
The rates documented above were achieved while using storage LZ4 compression averaging 2.39x footprint reduction. This was in
addition to Advanced Row Compression already in effect on the database. Total effective compression ratios during this testing
were greater than 4x. LZ4 compression is compatible with both recommended types of database compression, Advanced Row
Compression or Hybrid Columnar Compression (HCC). LZ4 compression increases the CPU load on the Oracle ZS7-2 controllers
but is recommended due to the storage footprint reduction and increased performance that is often achieved due to reducing the
load on backend disk.
Single Storage Pool
In scenarios with many databases on the Oracle Exadata X8M and where backups are typically run concurrently, better
performance and simplicity can be achieved by backing up some of the databases to just one storage pool and some of the databases
to just the other storage pool. An Oracle ZS7-2 high-end system in this solution is capable of sustaining single-pool backup rates of
20.5TB/hr and single-pool restore rates of 33.2TB/hr. Alternating between two NFS servers can negatively impact streaming
efficiency. In scenarios with single large database or scenarios where backups are run serially, it is recommended to spread the
backup across both storage pools.
Multi-section support to effectively utilize all available channels
Better performance is achieved when the RMAN work can be effectively run in parallel and all available channels are utilized. This
occurs naturally when backing up or restoring a standard file tablespace. Since the underlying datafiles in a standard file tablespace
are limited to 32GB there are typically many datafiles that can be processed independently by RMAN when backing up or
restoring a database. Databases that use bigfile tablespaces can also achieve optimal performance, but more care should be taken to
ensure that multi-section support is in place for both backup and restore. A backup configuration that exclusively processes one
exceptionally large datafile with limited multi-section support will have difficulty achieving optimal performance from the storage
hardware. Oracle recommends a 64GB section size. Additional details on RMAN configuration are provided in the next chapter.
22 WHITE PAPER | 100Gb Backup Solution | Version 1.0
Copyright © 2020, Oracle and/or its affiliates | PublicCONFIGURING THE ORACLE EXADATA DATABASE MACHINE
This section provides best practices for configuring an Oracle Exadata X8M when using an Oracle ZFS Storage Appliance ZS7-2 to
provide 100Gb Oracle Database protection with a standard RMAN backup strategy.
Backup Network
This architecture bypasses the backup network and leverages the RoCE interfaces (re0 and re1) on the database nodes to provide a
100Gb local backup solution. Other networking interfaces such as eth3, eth4, eth5 (optional) and eth6 (optional) are left available
for client network, archive or disaster recovery (DR) functionality.
Oracle Exadata X8M database node network connectivity is represented in figure 14 and figure 15.
Figure 14. Network connectivity for X8M-2 quarter rack or larger database nodes
Figure 15. Network connectivity for X8M-2 eighth rack database nodes
The Oracle ZFS Storage Appliance uses 100Gb direct connections to the RoCE leaf switches. RMAN workloads leverage the
database server re0 and re1 RoCE network fabric interfaces for high-speed local backup and restore operations to the ZS7-2.
The database server RoCE interfaces use active path management and do not require LACP or bonded configurations. These
interfaces are configured during the Exadata deployment process and require no further modifications. Each database server is
connected to the RoCE VLAN on both leaf switches in the rack. They use an MTU size of 2300.
Configure Backup Shares
The following mount options are recommended for shares dedicated to standard RMAN backup use cases:
rw,_netdev,hard,rsize=1048576,wsize=1048576,tcp,nfsvers=4,timeo=600 0 0
23 WHITE PAPER | 100Gb Backup Solution | Version 1.0
Copyright © 2020, Oracle and/or its affiliates | PublicThe Direct NFS Client does not utilize NFS mount options. However, setting the proper mount options is recommended to follow
Oracle Database best practices and to improve performance and functionality if Direct NFS Client is not available and the system
reverts to NFS.
Backup shares should be mounted on all Oracle Database nodes.
Mount the Oracle ZFS Storage Appliance backup shares:
1. Edit the /etc/fstab file to add entries like the following three-line example
######## lines added for zs7-2 with a 100Gb backup workload ########
192.168.8.201:/export/zs1/bkup_x8m_1 /zfssa/zs1/bkup_x8m_1 nfs
rw,_netdev,hard,rsize=1048576,wsize=1048576,tcp,nfsvers=4,timeo=600 0 0
192.168.8.202:/export/zs1/bkup_x8m_2 /zfssa/zs1/bkup_x8m_2 nfs
rw,_netdev,hard,rsize=1048576,wsize=1048576,tcp,nfsvers=4,timeo=600 0 0
In this example, 192.168.8.201 is the data path IP address for the “BACKUP1” storage pool and 192.168.8.202 is the data
path IP address for the “BACKUP2” storage pool. The export path of the filesystems are /export/zs1/bkup_x8m_1 and
/export/zs1/bkup_x8m_2. The mount points on the compute nodes are /zfssa/zs1/bkup_x8m_1 and
/zfssa/zs1/bkup_x8m_2.
2. Copy these changes to the other compute nodes.
3. Create the /zfssa base directory on all compute nodes (mkdir /zfssa) and change ownership to the oracle user and dba
group (chown oracle:dba /zfssa).
4. As the oracle user, create the mount points used in the fstab on all compute nodes.
~]$ mkdir -p /zfssa/zs1/bkup_x8m_1
~]$ mkdir -p /zfssa/zs1/bkup_x8m_2
5. Mount the backup shares on all compute nodes.
mount /zfssa/zs1/bkup_x8m_1; mount /zfssa/zs1/bkup_x8m_2
Configuring Direct NFS Client
In Oracle Database 12c and later, Direct NFS Client is enabled by default.
Confirm that Direct NFS Client is enabled by checking the Oracle Database alert log for an Oracle Disk Manager (ODM) message
after Oracle Database startup:
Oracle instance running with ODM: Oracle Direct NFS ODM Library Version 6.0
Direct NFS Client activity can also be confirmed by SQL query:
SQL> select * from v$dnfs_servers;
Database v$ dnfs views will only be populated if Direct NFS Client IO has occurred since the last database start.
For a complete list of recommended patches for Direct NFS see My Oracle Support document 1495104.1 “Recommended Patches for
Direct NFS Client.”
Optional oranfstab
The oranfstab file is an optional configuration file that is required to use advanced features of Direct NFS. The Direct NFS client
will still function without an oranfstab file and will use NFSv3 from a single source IP address to a single destination IP address. It
is not required for this solution.
The oranfstab file configures load spreading of Direct NFS Client connections over multiple addresses on an Oracle ZFS Storage
Appliance system (represented by “path”) or multiple addresses on Oracle Exadata for Oracle Database (represented by “local”).
Since the ZS7-2 data path network is using an active-standby IP multipathing configuration there will be just a single “path” IP
address for each controller. The database server RoCE network uses active-active management with multiple IPs. X8M-2
configurations will have two “local” IP addresses.
24 WHITE PAPER | 100Gb Backup Solution | Version 1.0
Copyright © 2020, Oracle and/or its affiliates | PublicYou can also read