4G terminal - Sail Satellite
←
→
Page content transcription
If your browser does not render page correctly, please read the page content below
USER MANUAL I MANUEL UTILISATEUR

       4G terminal
       BROADBAND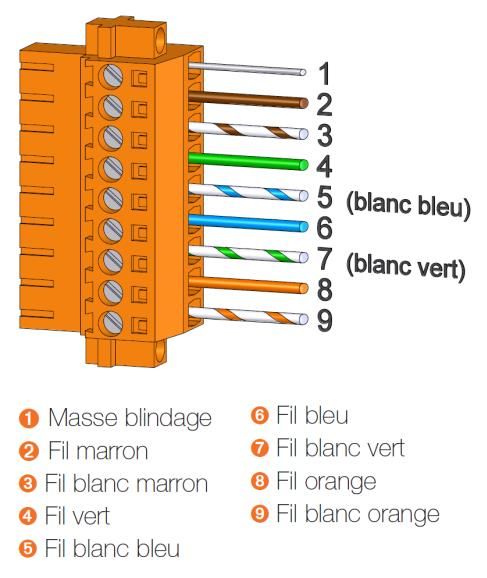
Usage precautions
                                                • To ensure a safe and correct operation,
                                                  please read this user manual and all pre-
                                                  cautions carefully before using the terminal.
                                                • Once the terminal is installed and in use,
    MVG INDUSTRIES                                make sure to maintain a minimum distance
    User Manual                                   of 20 cm from the device.
    MUT.119.1.16.SATB.F                         • Should a dysfunctional error occur, turn off
                                                  and unplug the terminal from the power
    Notice                                        supply immediately.
    © Copyright 2018 by MVG Industries.
    All rights reserved. No part of this doc-   • This manual must be kept with the prod-
    ument may be reproduced or distribut-         uct’s end user. It must be transferred with
    ed, in any form or by any method,             the product if the terminal is passed on to a
    whether electronic or mechanical, in-         new user.
    cluding photocopying, recording or sav-     • The available functions may vary depend-
    ing to any information storage or re-
                                                  ing on the terminal, the software version, or
    trieval system, without written authori-
                                                  the telephone service provider.
    zation from MVG Industries, 17 avenue
    de Norvège, 91140 Villebon-sur-Yvette,      • MVG Industries cannot be held responsible
    France.                                       for any performance problems or incompat-
                                                  ibility issues resulting from user modifica-
    Trademarks                                    tions to the operating system or the set-
    All product names and brands men-             tings. Any attempt to customize the operat-
    tioned in this document are trademarks        ing system may cause your terminal to mal-
    or brand names owned by their respec-         function.
    tive holders.

    Conditions                                  Conventions used
    In order to improve the design, reliabil-   in this manual
    ity or operating functions of its prod-
                                                Please familiarize yourself with the symbols
    ucts, MVG Industries reserves the right
                                                used in these operating instructions before
    to modify any of the items described in
                                                set- ting up your terminal.
    this document without notice.

                                                SYMBOL       DESCRIPTION
                                                             Remarks, user tips or additional infor-
                                                             mation.

    CONTACT
                                                             Situation likely to damage your terminal.
    Telephone: +33 (0)2 98 05 13 34
    Fax: +33 (0)2 98 05 53 87
    Web: www.neptulink.com
    Email: contact@neptulink.com
          support@neptulink.com

2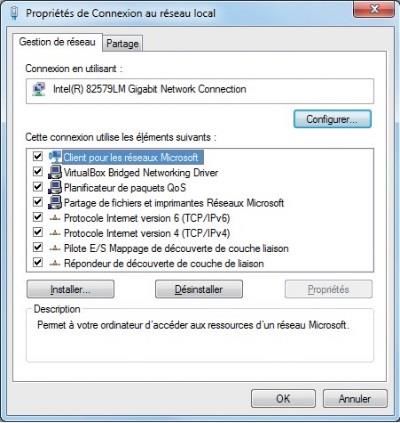
EN

FCC statement

This device complies with Part 15 of the
FCC Rules. Operation is subject to the fol-
lowing two conditions: (1) this device may
not cause harmful interference, and (2) this
device must accept any interference re-
ceived, including interference that may
cause undesired operation.

NOTE:
    The grantee is not responsible for any
changes or modifications not expressly
approved by the party responsible for com-
pliance. Such modifications could void the
user’s authority to operate the equipment.

     This equipment has been tested and
found to comply with the limits for a Class B
digital device, pursuant to part 15 of the
FCC Rules. These limits are designed to
provide reasonable protection against harm-
ful interference in a residential installation.

    This equipment generates, uses and can
radiate radio frequency energy and, if not
installed and used in accordance with the
instructions, may cause harmful interfer-
ence to radio communications. However,
there is no guarantee that interference will
not occur in a particular installation.

    If this equipment does cause harmful in-
terference to radio or television reception,
which can be determined by turning the
equipment off and on, the user is encour-
aged to try to correct the interference by
one or more of the following measures:

—Reorient or relocate the receiving antenna.
—Increase the separation between the equip-
   ment and receiver.
—Connect the equipment into an outlet on a
   circuit different from that to which the re-
   ceiver is connected.
—Consult the dealer or an experienced ra-
   dio/TV technician for help.

                                                  3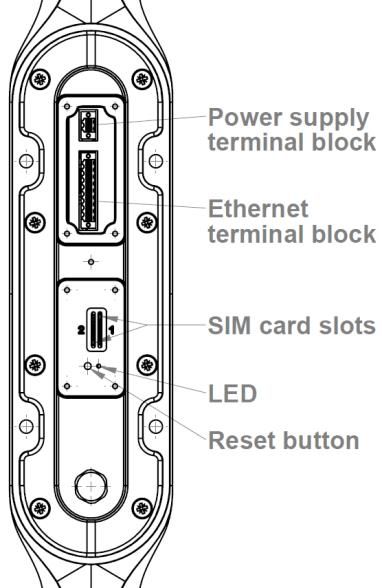
Contents
     TECHNICAL FEATURES                                  05

     PACK                                                06
       PACK CONTENTS                                     06

     DESCRIPTION OF THE TERMINAL                         06
       • View of the interface with covers in position   06
       • View of the interface with covers removed       06

       PREREQUISITES                                     07
       • Required SIM configuration                      07

       GETTING STARTED                                   07
       • Inserting the SIM card                          07
       • Removing the SIM card                           08
       • Electrical connections                          08
       • Standard power connection                       09
       • PoE connection                                  09
       • Switching off the terminal                      10
       • Configuring the terminal                        10
       • 4G configuration                                11
       • Unblock SIM card                                12
       • Advanced configuration                          13

       Wi-Fi CONFIGURATION                               13
       • Connecting to a Wi-Fi network                   13
       • Disconnecting from a Wi-Fi network              14
       • Editing a Wi-Fi connection                      14
       • Deleting a Wi-Fi connection                     14

       Wi-Fi ACCESS POINT CONFIGURATION                  15
       • Connecting to the access point                  15
       • Editing the access point                        15

       UPDATING THE TERMINAL                             16
       • Manual updates                                  16
       • Remote updates                                  16

       NETWORK CONFIGURATION                             17
       • Changing IP address configuration               17
       • Configure DHCP server                           17

       CONFIGURING THE MODEM                             18
       • Changing the modem configuration                18

       OTHER                                             18
       • Rebooting the terminal                          18
       • Resetting to factory defaults                   18
       • Change language setting                         18

     TROUBLESHOOTING AND FAQ                             19

     APPENDIX                                            20
       CONFIGURING YOUR COMPUTER FOR DHCP                20
       CONTACTING TECHNICAL SUPPORT                      21

4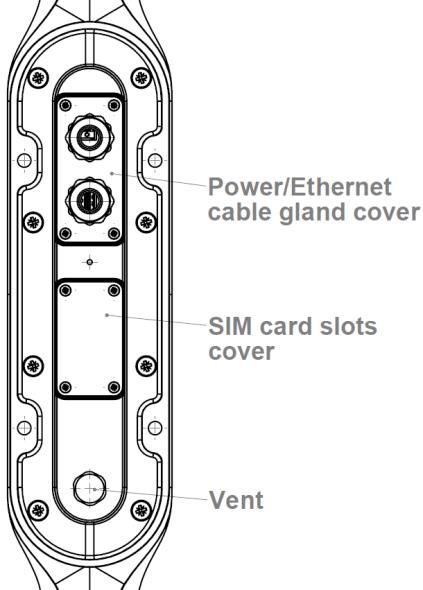
EN

     Technical features
 TRANSMITTER - RECEIVER
 Frequency bands                              • LTE with MIMO diversity:            • UMTS (WCDMA), HSDPA, HSUPA,
                                                Band 1 (2100 MHz)                     DC-HSPA+ with diversity:
                                                Band 2 (1900 MHz)                     Band 1 (2100 MHz)
                                                Band 3 (1800 MHz)                     Band 2 (1900 MHz)
                                                Band 4 (AWS)                          Band 3 (1800 MHz)
                                                Band 5 (850 MHz)                      Band 4 (AWS)
                                                Band 7 (2600 MHz)                     Band 5 (850 MHz)
                                                Band 12 (700a)                        Band 8 (900 MHz)
                                                Band 13 (700c)
                                                Band 20 (800DD)
                                                Band 25 (1900+)
                                                Band 26 (850+)
                                                Band 29 (700d)
                                                Band 41 (TD2500)
 Distance from transmitter 1                  Up to 20 NM
 Antenna gain                                 2 dBi (± 1dB)
 System weight                                3.5 Kg
 System dimensions                            750 x 225 x 83 mm
 SIM type (Dual SIM)                          Mini SIM (a Micro SIM or Nano SIM may be used with a Mini SIM adapter)
 POWER SUPPLY FEATURES
                                              - By cable: 12 VDC to 24 VDC
 Power supply
                                              - By passive PoE: 24 VDC
                                              - Start: 15 W
 Power consumption
                                              - Operation: 12 W (max)
 AMBIENT CONDITIONS
 Operating temperature                        -20°C to +60°C
 Storage temperature                          -40°C to +85°C
 IP protection                                IP66
 INTERFACES
 Data link                                    Ethernet Port and Wi-Fi 2.4 GHz 802.11b/g/n
 PIN code and APN configuration               Via web interface

(1) The actual distance will depend on your telecommunications service provider

                                                                                                                       5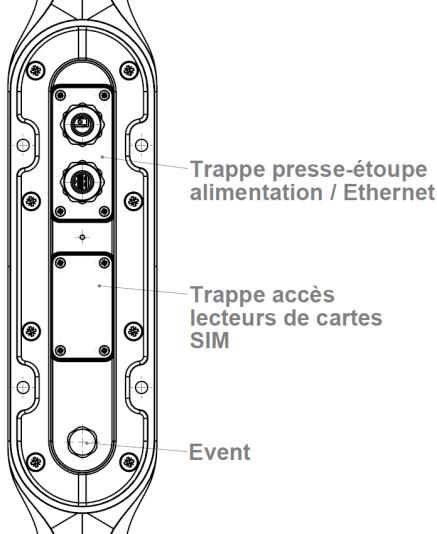
VIEW OF THE INTERFACE
        Pack                                             WITH COVERS IN POSITION

    Pack contents
    The pack contains the following items:
    • 4G terminal.
    • 2- and 9-point terminal blocks.
    • User guide.
    If any of these items is incorrect, missing or
    damaged, please contact MVG Industries or
    your retailer.

    Please retain the packaging for future use,
    should you need to return the product for
    repair.

                Accessories other than those provided
                may not be compatible with your termi-
                nal.

                                                         VIEW OF THE INTERFACE
        Description                                      WITH COVERS REMOVED

        of the terminal
    For best performance, the system must be
    placed vertically (vent at bottom).

                Avoid any contact of thread lock or
                Tef-Gel on the radome of the device.

6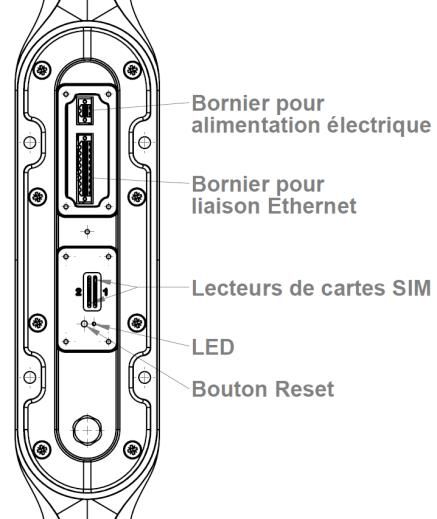
EN

Prerequisites
                                                             Ensure that you check the network cover-
Ensure that you have the following items                     age and compare the offers available
ready before installing your terminal:                       from different service providers.

• Active Internet access from a telephone
                                                             Stay at least 20 cm away from the termi-
  service provider (3G/4G data package).                     nal when it is switched on.

• Configuration settings for the SIM card(s) -
  see below.

• Computer configured for DHCP (Dynamic
  Host Configuration Protocol, see appendix).    INSERTING THE SIM CARD

                                                 Follow the steps below to insert either of
                                                 the SIM cards into your terminal.
REQUIRED SIM CONFIGURATION
                                                             This terminal is designed to accept one or
Depending on how your SIM card(s) are
                                                             two Mini SIM cards.
configured, you will need one or more con-
                                                             Using an incompatible SIM card may
figuration settings to connect your terminal
                                                             damage your terminal or your card.
to the Internet:

• APN setting (Access Point Name).               ➊ Switch the device off.
• PIN code (Personal Identification Number).     ➋ Unscrew the center cover to access the
Your telephone service provider should              SIM card slots.
have given you all the necessary infor-          ➌ Insert the SIM card into its slot. The chip
mation to enable you to connect to the In-
                                                    must be positioned with its cut-off edge
ternet. Please contact your service provid-
                                                    facing towards the terminal, as shown in
er if you cannot find this information.
                                                    the figure below. When using only one
                                                    chip, insert it in the slot marked "1".
Getting started
Your terminal can be configured in five steps:

➊ Insert the SIM card(s).
➋ Connect the terminal.
➌ Install the terminal on its mounting.
➍ Configure the terminal.
➎ Connect to internet.
Ask your telephone service provider for
your SIM card’s configuration settings be-
fore you start.                                  ➍ Screw the cover back on.
                                                 ➎ Switch the device back on.

                                                                                                          7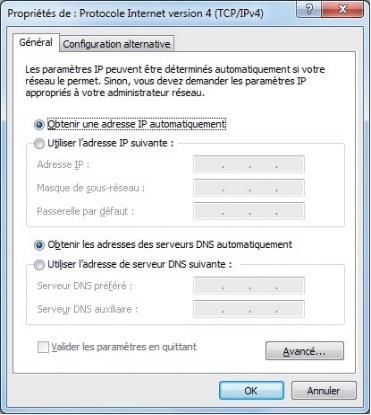
ELECTRICAL CONNECTIONS
Inserting a second SIM card:
The terminal can be powered in two ways:
• Power supply through the 12-24 V DC
socket.
• 24 VDC Power over Ethernet (PoE) con-
nection using a passive injector.
Stay at least 20 cm away from the termi-
nal when it is switched on.
If you have the PoE option, do not con-
nect the PoE injector and the standard
power supply at the same time.
For passive PoE power supply, do not
REMOVING THE SIM CARD connect/disconnect the power cable when
the injector is on.
Follow the steps below to remove either of
the SIM cards from your terminal.
Before installing the terminal blocks and
➊ Switch the device off. plugging in, the cable(s) must be screwed
through the cable glands (one cable per
➋ Unscrew the center cover. gland).
➌ Push in then release the SIM card to re- When using PoE, only one cable gland is
move it from the slot. used. A cap (fitted with a nut) must be in-
stalled in the free hole of the plate to achieve
➍ Screw the cover back on. the sealing of the device.
➎ Switch the device back on.
Never remove the SIM card when the
terminal is switched on, as this may
damage the card and/or the terminal.
EMI Suppressor Ferrites must be installed on
each cable, at the output of the device.
Typical Impedance on each cable:
3 k at 100 MHz
1.5 k at 25 MHz
(e.g. 12 ferrites No. 7427007 from Würth
Elektronik).
8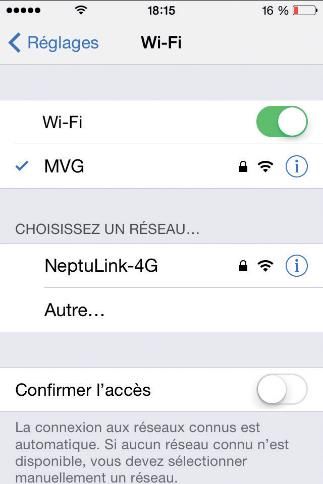
EN
STANDARD POWER CONNECTION PoE CONNECTION
Connect the 2 electrical wires to the 2-point Follow the steps below to connect the termi-
terminal block, as shown below: nal to the network and power supply in the
PoE power supply configuration.
➊ Thread the cable through the grommet.
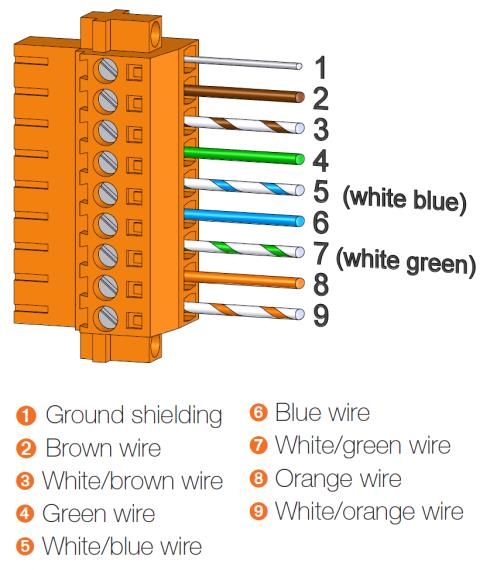
➋ Prepare the wires of the cable and screw
them into the 9-point terminal block, ob-
serving the color codes shown below.
Observe the polarity of the wires to avoid
damaging the terminal.
The guarantee does not cover any dam-
age resulting from improper use.
Check that the connectors on the power
cable are compatible with your electrical
system.
Follow the steps below to connect the termi-
nal to the network and power supply in the
standard power supply configuration.
➊ Thread the cable through the grommet.
Do not use damaged power cords or
plugs.
Do not twist or damage the power cable.
➌ Plug the end of the cable into your PoE
➋ Prepare the wires in the cable and screw injector’s Power+Data ("PD") port. Install
the 9-point terminal block in the matching
them onto the 2-point terminal block, ob-
baseplate. Tighten the two holding screws
serving the polarities shown above.
fitted to the ends of the terminal block.
➌ Install the 2-point terminal block in the
matching baseplate. Tighten the two hold-
ing screws fitted to the ends of the termi-
nal block.
The terminal must be supplied with a
voltage of between 12 and 24 VDC.
9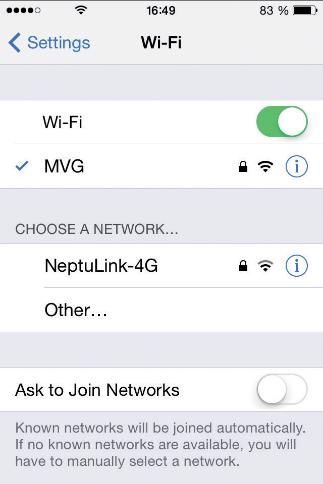
CONFIGURING THE TERMINAL
                 Ensure that the Ethernet connection
                 terminal block is fully screwed in.   Follow the instructions below to configure
                 Do not twist or damage the Ethernet   and test the 4G connectivity.
                 cable.
                 Do not use damaged Ethernet cables                Your computer must be configured for
                 or plugs.                                         DHCP. For instructions on DHCP configura-
                                                                   tion, please refer to your computer docu-
                 Do not use the standard power cord.               mentation or see the Appendix "Configuring
                                                                   your computer for DHCP".
     ➍ Connect the Data port on your PoE injec-
       tor to the Ethernet port on your computer
       or router.                                      ➊ Switch your computer on if it is off.

     ➎ Switch on your PoE injector.                                The terminal will automatically assign an
                                                                   IP address to your computer.
     SWITCHING OFF THE TERMINAL

     To switch off the terminal                        ➋ Type the URL http://192.168.1.1 into the
                                                         address field of a browser such as Mi-
     • Standard configuration: unplug the power
                                                         crosoft   Internet   Explorer, Google
       cord by unscrewing the screws on the 2-           Chrome or Mozilla Firefox.
       point terminal block.

     • PoE configuration: switch off the PoE injec-
       tor by unplugging its power cord.

                                                       ➌ The following login box will appear:

                                                       Type in admin as the user name and admin
                                                       as the password, all in lower case.

                                                       Click the login button to proceed to the ter-
                                                       minal’s administration interface.

                                                       You can configure your terminal to connect
                                                       to Internet through a 4G or Wi-Fi connec-
                                                       tion.

10
EN
4G CONFIGURATION
➍ When the welcome page appears, click the
Network/Interfaces tab.
➎ Click Edit to edit the NeptuLink interface.
You are now ready to configure your ter-
minal for connection to the Internet.
➐ Click Save & Apply to save and apply the
settings.
➑ Test your Internet connection.
Click the Status/Overview tab, then check
In the "General" tab, use the SIM Selection
that the connection status appears as shown
drop-down list to switch from one of the two
below:
SIM cards to the other.
Your terminal is now configured to allow
your computer to access the Internet. Your
terminal will automatically establish an In-
ternet connection when your computer re-
quires access.
➏ For each SIM card, enter your telephone
service provider’s APN as well as the SIM
To access Internet from a computer con-
card’s PIN code in the correct tab (SIM 1 and
nected to your terminal, launch a web
SIM 2 tabs).
browser such as Microsoft Edge or Google
Chrome. The browser should display a
If you enter an incorrect PIN code three
times, the SIM card will be blocked. If web page.
this happens, contact your service
provider to obtain a PUK (PIN Unblock-
ing Key) code.
11UNBLOCK SIM CARD
Follow the steps below to unblock your SIM
card.
➊ Click on the link “Click here to unblock
your SIM card” from the main panel.
➋ Unblock panel is displayed:
Type the 8-digit PUK code in the correspond-
ing field.
To display the PUK code, click on
➌ Type a new PIN code.
➍ Re-enter the new PIN code.
➎ Click Save & Apply to unblock your SIM
card.
12EN
ADVANCED CONFIGURATION Wi-Fi configuration
Click the Advanced Settings tab for the ad- CONNECTING TO A Wi-Fi NETWORK
vanced settings (repeat steps ➍ and ➎ if
Follow the steps below to connect to a Wi-
necessary to return to the Common Configu-
Fi network.
ration interface).
Disconnect from 4G if it is active (Net-
work/Interfaces tab and Disconnect
button for 4g-NeptuLink).
➊ Click the Network/WiFi Network tab on the
upper band.
➋ Click Scan to detect nearby Wi-Fi networks.
A list of available networks is displayed.
2
Enable Roaming : use this option to configure
the terminal for using data connections when This may take a few seconds to complete.
you change to a different country.
Depending on your subscription package, ➌ To join a network, click the Join Network
sending or receiving data outside your button for the network you want to access.
service provider’s coverage zone may
incur additional costs. ➍ A settings box is displayed:
Contact your service provider for further
information.
Enable PIN Protection: activates or deac-
tivates the PIN code protection function. If
the box is checked, you will need to re-enter
the PIN code for your SIM card.
(2) Roaming: this service allows you to connect trans- Type the Wi-Fi network’s connection key in the
parently to a mobile network in a foreign country when
Passphrase field.
you travel beyond your service provider’s coverage area.
To display the key, click on
Entering a wrong password requires you
to restart the operation.
Entering a wrong password resets the
access point of the terminal.
13➎ Then click Submit. A box containing net- ➊ Click the Network/Wi-Fi Network tab on the
work connection information is displayed. upper band.
➋ Click Disable to disconnect from the Wi-Fi
network, as shown below.
➌ A confirmation box is displayed. Click OK
to confirm.
EDITING A Wi-Fi CONNECTION
Follow the steps below to edit an existing
Wi-Fi connection.
➏ Click Save & Apply to save and apply the
settings. ➊ Click the Network/WiFi Network tab on the
upper band.
➐ Test your Internet connection.
Click the Status/Overview tab, then check ➋ Click Edit to display the Wi-Fi network's
that the Active Connection status appears as connection settings.
shown below:
➌ Change the settings as required, then click
Save & Apply to save and apply the new
settings.
DELETING A Wi-Fi CONNECTION
Your terminal is now configured to allow your Follow the steps below to delete an existing
computer to access the Internet. Wi-Fi connection.
To access Internet from a computer connected ➊ Click the Network/WiFi Network tab on the
to your terminal, launch a web browser such upper band.
as Microsoft Edge or Google Chrome. The
browser should display a web page. ➋ Click Remove to delete the Wi-Fi network
connection.
DISCONNECTING ➌ A confirmation box is displayed. Click OK
to confirm.
FROM A Wi-Fi NETWORK
Follow the steps below to disconnect from
Deleting a Wi-Fi connection will reset the
a Wi-Fi network.
Wi-Fi access point of the terminal.
When the Wi-Fi network is no longer
in range, you are automatically
disconnected.
14EN
EDITING THE ACCESS POINT
Wi-Fi Access Point configura- Follow the steps below to edit the Wi-Fi ac-
tion cess point.
CONNECTING TO THE ACCESS POINT Disconnect from 4G if it is active (Net-
work/Interfaces tab and Disconnect
Follow the steps below to connect to a Wi- button for 4g-NeptuLink).
Fi access point.
➊ Click the Network/WiFi Network tab on the
upper band.
➋ Click Edit to display the Wi-Fi access point's
connection settings.
➌ A settings box is displayed:
➊ Activate your device's Wi-Fi connection.
➋ Click the network named NeptuLink-4G.
A password may be required for net-
work access.
Once connected, you can access Internet
without using the Ethernet cable.
You can also use your smartphone to
access your device’s web configuration
interface.
From this box, you can change the follow-
ing:
• Communications channel.
Channel 6 is the default channel.
15REMOTE UPDATES
• Transmit power.
Follow the steps below to update your ter-
Ensure you comply with your country’s minal remotely.
current regulations.
➊ Click the System/Firmware Upgrade tab
• SSID - access point identifier. on the upper band.
• Network security settings. ➋ Click Check to check if a new version of the
software is available.
➍ Click Save & Apply to save and apply the
new settings.
This may take a few seconds to complete.
➎ Reboot the terminal.
➌ The result of this query may vary:
Updating the terminal If there is a message showing:
MANUAL UPDATES • "Not connected" means your terminal is not
connected to Internet and therefore cannot
Follow the steps below to update your ter- check whether an update is available.
minal manually.
• "No new firmware version available"
➊ Click the System/Flash Firmware tab on means that the terminal is already running
the upper band. the latest update version.
➋ Click Browse then select the update file. • If an update is available, a strip containing
information on the new version is displayed
➌ Click Flash image to start the process. on the lower part of the interface.
➍ A confirmation box is displayed. Click
Proceed to start the update process.
➍ Click Perform upgrade to start the process.
➎ A confirmation box is displayed. Click OK to
start the update process.
16EN
Network configuration CONFIGURE DHCP SERVER
This section is intended for users with a Follow the steps below to configure the
minimum knowledge in network configura- DHCP server.
tion.
In case of wrong configuration, perform a ➊ First follow the steps 1 and 2 of the pre-
reset factory “RESETTING TO FAC- vious section “CHANGING IP ADDRESS CON-
TORY DEFAULTS”. FIGURATION”.
CHANGING IP ADDRESS CONFIGURA- ➋ A section at the bottom of the General
TION tab allows you to:
Follow the steps below to change your • Enable/disable DHCP
terminal’s network configuration.
• Change IP address range
➊ Click the Network/Interface tab on the • Define lease time.
upper band.
➋ Click Edit to edit the LAN interface.
➌ From the "General" tab you can change ➌ Click Save & Apply to save and apply
the new settings.
the network settings of the terminal (IP
address, netmask…).
➍ Click Save & Apply to save and apply the
new settings.
17Configuring the modem Other
CHANGING THE MODEM CONFIGURA- REBOOTING THE TERMINAL
TION
➊ Click the System/Reboot tab on the upper
band.
In some specifics cases, it might be
necessary to change the modem configu-
➋ Click Perform Reboot.
ration to suit it with your network service
provider. ➌ A dialog box is displayed. Click OK to re-
boot the terminal.
Follow the steps below to change your
terminal’s modem configuration. This can take 1-2 minutes.
➊ Click the System/4G Modem tab on the
upper band.
➋ Select the firmware you want to use in the RESETTING TO FACTORY DEFAULTS
Available Firmware drop-down list. ➊ Click the System/Reset tab on the upper
➌ Then, select one of the Available Configu- band.
rations for this firmware in the Available
➋ Click Perform Reset.
Configuration drop-down list.
➌ A dialog box is displayed. Click OK to reset
the terminal to factory defaults.
CHANGE LANGUAGE SETTING
➊ Click the System/Language tab on the up-
per band.
➍ Click Apply Configuration to start the mo-
dem reconfiguration. ➋ Select a language from the language list.
➎ A confirmation box is displayed. Click OK to ➌ Click Save & Apply.
start the process.
The change will be applied when reload-
ing the page from your web browser.
This may take a few seconds to complete.
18EN
Troubleshooting and FAQ
Should you experience any problems with your terminal, please use the table below to find a solu-
tion. If you can’t find the right solution, please contact our Technical Support team or your retailer.
PROBLEM DESCRIPTION POSSIBLE CAUSE POSSIBLE SOLUTION
Check your network coverage.
You are too far away from any of your
To send and receive data, you must be
Poor reception quality service provider’s mobile network base
in a zone covered by your service
stations to receive a high-quality signal.
provider’s network.
Faulty or damaged SIM card. Contact your mobile operator.
SIM card error Insert your SIM card correctly following
SIM card inserted incorrectly. the steps described under
“INSERTING THE SIM CARD”.
Contact your service provider to obtain a
SIM card blocked You have entered the wrong PIN code.
PUK code to unblock the SIM card.
Check your network coverage.
You are not in a 3G/4G service You should see reception bars displayed
coverage zone. on your terminal's configuration interface,
together with “3G” or “4G”.
Internet connection unavaila- Weak reception signal. Bring your vessel closer to land.
ble or slow
Contact your service provider to find
You have used up your Internet data out how much data you have used.
volume. If you have exceeded your data allowance,
your bandwidth may be reduced.
Check the power cord. Connect the
terminal.
Cannot access the terminal’s
The terminal is not switched on. If you are using the PoE configuration,
administration interface
ensure that the injector is connected
to the power supply.
The SIM card settings you have entered Contact your service provider to obtain
are incorrect. the correct SIM card settings.
The connection status is
displayed as “Not Connected” Click “Connect” on the NeptuLink inter-
You have changed the SIM card settings. face or unplug and then reinsert the
power cable.
“Getting Carrier” connection You are not in a 3G/4G service coverage
Check your network coverage.
status continuously displayed zone.
19Appendix
This appendix contains links to reference
documents explaining the technologies that
your terminal uses:
Document Link
Technical features NeptuLink_Datasheet_EN.pdf
Configuring your computer for
DHCP
To access your terminal, you will need to use
the DHCP (Dynamic Host Configuration Proto-
col). Your terminal will contact a DHCP server,
which automatically assigns an IP address to ➎ Click Obtain an IP address automatically.
the computer connected to the Ethernet port.
➏ Click Obtain DNS Server addresses
To activate DHCP, follow the steps below: automatically.
➊ Click Start , then Control Panel and
Network and Sharing Center.
➋ To display the network connections, click
the Change card settings link on the left-
hand side of the Network and Sharing
Center panel.
➌ Right-click the connection you wish to
change, then click Properties . Enter
an administrator password or confirm the
change if prompted to do so.
➍ Click Internet Protocol version 4 (TCP/
IPv4) then Properties.
➐ Click OK to close the dialog box. Your
computer is now configured for DHCP.
20EN
Contacting Technical Support
For any request for assistance, please contact the Technical Support of NeptuLink
supplier.
Please have the following information to hand before you contact us:
• The serial number (found on the label at the back of your terminal or accessi-
ble via the web interface).
• Firmware version (found on the Status/Advanced page of the web interface).
21Précautions d’usage
• Avant toute utilisation du terminal, veuillez lire
attentivement le manuel utilisateur et toutes
les précautions qui y sont indiquées afin de
pouvoir l’utiliser correctement et en toute
sécurité.
MVG INDUSTRIES • Lorsque vous installez et utilisez le termi-
Manuel Utilisateur nal, laissez une distance minimum de 20
MUT.119.1.16.SATB.F cm entre le terminal et vous.
• En cas de dysfonctionnement, arrêter im-
Notice médiatement l’appareil et déconnecter
© Copyright 2018 par MVG Industries.
l’alimentation électrique.
Tous droits réservés. Aucune partie de
ce document ne peut être reproduite ou • Ce manuel doit rester à disposition de
transmise sous quelque forme ni par l’utilisateur final du produit. Dans le cas où
quelque moyen que ce soit, électro- l’utilisateur final du produit change, transfé-
nique ou mécanique, y compris la pho- rer également ce manuel au nouvel utilisa-
tocopie, l’enregistrement ou les sys- teur.
tèmes de stockage et de récupération
des informations, sans la permission • Les fonctions disponibles peuvent varier
écrite de MVG Industries, 17 avenue de selon le terminal, la version logicielle ou
Norvège, 91140 Villebon-sur-Yvette, l’opérateur téléphonique.
France. • MVG Industries ne peut être tenu respon-
Marques commerciales sable des problèmes de performance ou
Les marques et noms de produits sont des incompatibilités découlant des modifi-
des marques commerciales ou des cations faites par l’utilisateur du système
marques déposées de leurs détenteurs d’exploitation ou des paramètres. Toute
respectifs. tentative de personnalisation du système
d’exploitation peut entraîner des dysfonc-
Conditions
tionnements de votre terminal.
Afin d’améliorer sa conception, ses fonc-
tions opérationnelles et/ou sa fiabilité,
MVG Industries se réserve le droit Conventions utilisées
d’apporter des modifications aux pro- dans ce manuel
duits décrit dans ce document sans pré-
avis. Avant de mettre votre terminal en service,
familiarisez-vous avec les symboles utilisés
dans ce mode d’emploi.
SYMBOLE DESCRIPTION
CONTACT
Remarques, conseils d’utilisation
ou informations complémentaires.
Téléphone : +33 (0)2 98 15 13 34
Fax : +33 (0)2 98 05 53 87 Situation susceptible d’endommager
Web : www.neptulink.com votre terminal.
Email : contact@neptulink.com
support@neptulink.com
22FR
Table des matières
CARACTERISTIQUES TECHNIQUES 24
EMBALLAGE 25
CONTENU DE L’EMBALLAGE 25
DESCRIPTION DU TERMINAL 25
• Vue de l‘interface, trappes en position 25
• Vue de l‘interface, trappes enlevées 25
PREREQUIS 26
• Configuration SIM requise 26
MISE EN ROUTE 26
• Insérer la carte SIM 26
• Retirer la carte SIM 27
• Branchements électriques 27
• Alimentation classique 28
• Alimentation PoE 28
• Couper l’alimentation du terminal 29
• Configuration du terminal 29
• Configuration 4G 30
• Débloquer la carte SIM 31
• Configuration avancée 32
CONFIGURATION Wi-Fi 32
• Se connecter à un réseau Wi-Fi 32
• Se déconnecter d’un réseau Wi-Fi 33
• Editer une connexion Wi-Fi 33
• Supprimer une connexion Wi-Fi 33
CONFIGURATION POINT D’ACCES Wi-Fi 34
• Se connecter au point d’accès 34
• Editer le point d’accès 34
MISE A JOUR DU TERMINAL 35
• Mise à jour manuelle 35
• Mise à jour à distance 35
CONFIGURATION RESEAU 36
• Changement de l’adresse IP 36
• Paramétrage du serveur DHCP 36
CONFIGURATION DU MODEM 37
• Changement de configuration du modem 37
AUTRES 37
• Redémarrer le terminal 37
• Reset paramètres usine 37
• Changement du paramètre de la langue 37
DEPANNAGE ET FAQ 38
ANNEXE 39
CONFIGURER VOTRE ORDINATEUR POUR LE DHCP 39
CONTACTER LE SUPPORT TECHNIQUE 40
23Caractéristiques techniques
ÉMETTEUR - RÉCEPTEUR
• LTE avec diversité MIMO : • UMTS (WCDMA), HSPA, HSPA+,
Bande 1 (2100 MHz) DC-HSPA+ avec diversité :
Bande 2 (1900 MHz) Bande 1 (2100 MHz)
Bande 3 (1800 MHz) Bande 2 (1900 MHz)
Bande 4 (AWS) Bande 3 (1800 MHz)
Bande 5 (850 MHz) Bande 4 (AWS)
Bande 7 (2600 MHz) Bande 5 (850 MHz)
Bandes de fréquences Bande 12 (700a) Bande 8 (900 MHz)
Bande 13 (700c)
Bande 20 (800DD)
Bande 25 (1900+)
Bande 26 (850+)
Bande 29 (700d)
Bande 41 (TD2500)
Distance de l’émetteur1 Jusqu’à 20 MN
Gain d’antenne 2 dBi (± 1dB)
Poids du système 3,5 Kg
Dimensions du terminal 750 x 225 x 83 mm
Type de SIM (Dual SIM) Mini SIM (Micro SIM et Nano SIM acceptées avec un adaptateur Mini SIM)
CARACTÉRISTIQUES D’ALIMENTATION
- Par câble : 12 VDC jusqu’à 24 VCD
Alimentation électrique
- Par PoE passif : 24 VDC
- Au démarrage : 15 W
Consommation électrique
- En fonctionnement : 12 W (max)
CONDITIONS AMBIANTES
Température de fonctionnement -20°C à +60°C
Température de stockage -40°C à +85°C
Indice de protection IP66
INTERFACES
Transmission de données Port Ethernet et Wi-Fi 2,4 GHz 802.11b/g/n
Code PIN et configuration APN Via l’interface Web
(1) La distance réelle dépend de votre opérateur de télécommunications
24FR
VUE DE L’INTERFACE,
Emballage TRAPPES EN POSITION
Contenu de l’emballage
L’emballage contient les éléments suivants :
• Terminal 4G.
• Borniers 2 et 9 points.
• Guide utilisateur.
Si l’un de ces éléments est incorrect, absent
ou endommagé, contactez MVG Industries
ou votre revendeur.
Conservez le carton, au cas où vous devriez
renvoyer le produit pour réparation.
Certains accessoires, autres que ceux
fournis, peuvent ne pas être compatibles
avec votre terminal.
Description VUE DE L’INTERFACE,
du terminal TRAPPES ENLEVÉES
Pour un fonctionnement optimal, le système
doit être positionné verticalement dans la
position illustrée (évent en partie infé-
rieure).
Evitez tout contact du radôme de
l’appareil avec du frein-filet ou du Tef-Gel.
25Prérequis
Il vous appartient de vérifier la couverture
Vous devez préparer les éléments suivants réseau et de voir auprès des différents
avant d’installer votre terminal : opérateurs les offres qu’ils sont en me-
sure de vous proposer.
• Accès Internet actif fourni par un opérateur
téléphonique (forfait data 3G/4G). N’alimentez pas le terminal si vous vous
trouvez à moins de 20 cm du dispositif.
• Paramètres de configuration de la ou des
cartes SIM (voir ci-après).
• Ordinateur configuré pour le DHCP (Dynamic INSÉRER LA CARTE SIM
Host Configuration Protocol, voir annexe).
Suivez les étapes ci-dessous pour insérer
l’une ou l’autre des cartes SIM dans votre
CONFIGURATION SIM REQUISE
terminal.
En fonction de la configuration de votre
Ce terminal est conçu pour recevoir
carte ou de vos cartes SIM, vous aurez
une ou deux cartes mini SIM.
besoin d’un ou de plusieurs paramètres de
L’utilisation de cartes SIM incompatibles
configuration pour connecter votre terminal
risque d’endommager le terminal ou la
à Internet : carte.
• Paramètre APN (Access Point Name).
➊ Mettez le système hors tension.
• Code PIN (Personal Identification Number).
Votre opérateur téléphonique devrait avoir ➋ Pour accéder aux lecteurs de cartes SIM,
fourni toutes les informations nécessaires à dévissez la trappe centrale.
votre connexion à Internet. Si vous ne trouvez
➌ Insérez la carte SIM dans son emplace-
pas ces informations, demandez-les auprès de
ment. La puce doit être orientée de telle
votre opérateur.
sorte que son bord tronqué soit vers le
terminal comme illustré sur la figure sui-
Mise en route vante. Dans le cas où une seule carte est
La configuration de votre terminal comporte utilisée, insérez là dans le lecteur repéré
cinq étapes : « 1 ».
➊ Insertion de la ou des cartes SIM.
➋ Connexion du terminal.
➌ Installation du terminal sur son support.
➍ Configuration du terminal.
➎ Connexion à Internet.
Avant de commencer, demandez à votre
opérateur téléphonique les paramètres de
configuration de votre carte SIM.
➍ Revissez la trappe.
➎ Remettez le système sous tension.
26FR
Insertion d’une deuxième carte SIM : BRANCHEMENTS ÉLECTRIQUES
Le terminal peut être alimenté de deux fa-
çons :
• Alimentation par la prise d’alimentation en
DC 12 V jusqu’à 24 V.
• Alimentation en Power over Ethernet (PoE)
en DC 24 V via un injecteur passif.
N’alimentez pas le terminal si vous vous
trouvez à moins de 20 cm du dispositif.
Si vous disposez de l’option
d’alimentation par PoE, ne branchez pas
simultanément le PoE et la prise
d’alimentation classique.
Dans le cas d’une alimentation par PoE
RETIRER LA CARTE SIM passif, ne connectez/déconnectez pas le
câble d’alimentation du terminal lorsque
Suivez les étapes ci-dessous pour retirer l’injecteur est sous tension.
l’une ou l’autre des cartes SIM de votre
terminal. Avant toute mise en place des borniers et
branchement, le ou les câbles utilisés devront
➊ Mettez le système hors tension. être passés dans le ou les presse-étoupes de
la trappe (un câble par presse-étoupe).
➋ Dévissez la trappe centrale.
Dans le cas d’une alimentation par PoE, seul
➌ Poussez la carte SIM vers l’intérieur, puis re- un presse-étoupe sera utilisé. Un bouchon
lâchez-la et retirez-la de son emplacement. (avec écrou) devra être mis en place dans le
trou libre de la trappe pour assurer
➍ Revissez la trappe. l’étanchéité de l’appareil.
➎ Remettez le système sous tension.
Ne retirez jamais une carte SIM lorsque
le terminal est sous tension.
Vous risqueriez d’endommager la carte
SIM et/ou le terminal.
Des ferrites anti-IEM (interférences électro-
magnétiques) doivent être mises en place
sur chaque câble, à la sortie de l'appareil.
Impédance typique sur chaque câble :
3 k à 100 MHz
1,5 k à 25 MHz
(par ex. : 12 ferrites réf. 7427007 de Würth
Elektronik).
27ALIMENTATION CLASSIQUE ALIMENTATION PoE
Branchez les 2 fils électriques sur le bornier Suivez les étapes ci-dessous pour effectuer
2 points comme illustré ci-dessous : les branchements réseau et électrique du
terminal en configuration alimentation PoE.
➊ Passez le câble dans le passe-câble.
➋ Préparez les fils du câble et vissez-les sur
le bornier 9 contacts en respectant les
codes couleur illustrés ci-dessous.
Respectez impérativement les polarités
des fils électriques sous risque
d’endommager le terminal.
Les dégâts résultant d’une mauvaise
utilisation ne sont pas couverts par la
garantie.
Vérifiez que l’extrémité du câble
d’alimentation est munie de connec-
teurs compatibles avec votre installation
électrique.
Suivez les étapes ci-dessous pour effectuer les
branchements réseau et électrique du terminal
en configuration alimentation classique.
➊ Passez le câble dans le passe-câble.
N’utilisez pas de prises ou de cordons ➌ Connectez l’extrémité du câble au port
d’alimentation endommagés.
Power + Data (« PD ») de votre injecteur
Ne tordez pas ou n’endommagez pas le PoE. Mettez en place le bornier 9 contacts
cordon d’alimentation. dans l’embase compatible. Vissez les deux
vis de maintien présentes aux extrémités du
➋ Préparez les fils du câble et vissez-les bornier.
sur le bornier 2 contacts en respectant les
polarités illustrées ci-dessus.
➌ Mettez en place le bornier 2 contacts
dans l’embase compatible. Vissez les
deux vis de maintien présentes aux ex-
trémités du bornier.
Le terminal doit impérativement être
alimenté avec des tensions d’alimentation
comprises entre 12-24 VDC.
28FR
CONFIGURATION DU TERMINAL
Assurez-vous que le bornier pour la
connexion de type Ethernet soit entière- Suivez les instructions suivantes pour con-
ment vissé. figurer une connectivité 4G et la tester.
Ne tordez pas ou n’endommagez pas le
cordon Ethernet. Votre ordinateur doit être configuré pour
le DHCP. Pour obtenir des instructions sur
N’utilisez pas de prises ou de cordons
la configuration DHCP, reportez-vous à la
Ethernet endommagés. documentation de votre ordinateur ou à
l’annexe « Configurer votre ordinateur
Le câble d’alimentation classique ne doit pour le DHCP ».
pas être branché.
➍ Connectez le port Data de votre injecteur ➊ Allumez votre ordinateur (si ce n’est pas
PoE au port Ethernet de votre ordinateur ou déjà fait).
de votre routeur. Le terminal assigne automatiquement une
adresse IP à votre ordinateur.
➎ Mettez votre injecteur PoE sous tension.
COUPER L’ALIMENTATION DU TERMINAL ➋ Saisissez l’adresse http://192.168.1.1
dans le champ d’adresse d’un navigateur
Pour couper l’alimentation du terminal tel que Microsoft Internet Explorer,
• Configuration classique : débranchez le Google Chrome ou Mozilla Firefox.
cordon d’alimentation en dévissant les vis du
bornier à 2 contacts.
• Configuration PoE : mettez hors tension
votre injecteur PoE en débranchant son
➌ Cette fenêtre de connexion s’affiche :
cordon d’alimentation.
Saisissez admin comme nom d’utilisateur et
admin comme mot de passe, le tout en mi-
nuscule.
Cliquez ensuite sur le bouton Login pour ac-
céder à l’interface d’administration du termi-
nal.
Vous pouvez configurer votre terminal pour
vous connecter à Internet via une liaison 4G ou
Wi-Fi.
29CONFIGURATION 4G
➍ Depuis le bandeau supérieur, cliquez sur
l’onglet Network/Interfaces.
➎ Cliquez sur le bouton Edit de l’interface
NeptuLink pour accéder au panneau de con-
figuration 4G.
➐ Cliquez sur le bouton Save & Apply pour
sauvegarder et appliquer les paramètres.
➑ Tester votre connexion Internet.
Depuis l’onglet General vous pouvez basculer Cliquez sur l’onglet Status / Overview et véri-
sur l’une ou l’autre des deux cartes SIM à partir fiez que le statut de la connexion apparaît
de la liste déroulante SIM Selection. comme illustré ci-dessous :
Votre terminal est maintenant configuré de
sorte qu’il permette un accès à Internet à votre
ordinateur. Votre terminal établit automatique-
ment une connexion à Internet lorsque
➏ Pour chacune des cartes SIM saisissez l’ordinateur en a besoin.
l’APN de votre opérateur téléphonique ainsi Pour accéder à Internet depuis un ordinateur
que le code PIN de votre carte SIM dans les connecté à votre terminal, exécutez un naviga-
onglets correspondants (onglets SIM 1 & SIM teur Internet tel que Microsoft Edge ou Google
2). Chrome. Le navigateur devrait afficher une
page Web.
Si vous entrez un code PIN erroné à trois
reprises, la carte SIM est verrouillée.
Le cas échéant, contactez votre opérateur
pour obtenir le code PUK (PIN Unblocking
Key).
30FR
DEBLOQUER LA CARTE SIM
Suivez les étapes suivantes pour déblo-
quer votre carte SIM après 3 codes PIN
erronés.
Pour débloquer votre carte SIM vous
aurez besoin du code PUK fourni par
votre opérateur de téléphonie mobile.
➊ Cliquez sur le lien « Click here to un-
block your SIM card » depuis le panneau
principal.
➋ La fenêtre de déblocage s’affiche :
Saisissez le code PUK dans le champ « PUK
Code »
Pour faire apparaitre le code en clair,
cliquez sur le bouton
➌ Entrez le nouveau code PIN pour la carte
SIM.
➍ Confirmez en entrant une seconde fois le
nouveau code PIN.
➎ Cliquez sur le bouton Save & Apply pour
procéder au déblocage de votre carte SIM.
31CONFIGURATION AVANCÉE Configuration Wi-Fi
Cliquez sur l’onglet Advanced Settings pour
accéder aux paramètres avancés (refaire les SE CONNECTER À UN RESEAU Wi-Fi
étapes ➍ et ➎ si besoin pour revenir à Suivez les étapes suivantes pour vous con-
l’interface Common Configuration). necter à un réseau Wi-Fi.
Se déconnecter de la 4G si elle est active
(onglet Network / Interfaces et bouton
Disconnect pour la 4g-NeptuLink)
➊ Depuis le bandeau supérieur, cliquez sur
l’onglet Network / Wi-Fi Network.
➋ Cliquez sur le bouton Scan pour détecter
Enable Roaming2 : l’activation de cette option les réseaux Wi-Fi à proximité. La liste des
vous permet de paramétrer le terminal pour uti- réseaux accessibles apparaît.
liser les connexions de données lorsque vous
changez de pays. Ce processus peut prendre plusieurs
secondes.
En fonction de l’offre à laquelle vous
avez souscrit, l’envoi ou la réception de ➌ Pour rejoindre un réseau, cliquez sur le bou-
données en dehors de la zone de ton Join Network correspondant au réseau
couverture de votre opérateur peut auquel vous souhaitez accéder.
occasionner des frais supplémentaires.
Pour en savoir plus, contactez votre ➍ Une fenêtre de paramétrage s’affiche :
opérateur.
Enable PIN Protection : permet d’activer ou
de désactiver la protection par code PIN. Si la
case est cochée, il sera nécessaire de rentrer le
code PIN de votre carte SIM.
(2) Roaming (itinérance) : ce service permet de vous
connecter en toute transparence à un réseau mobile dans Saisissez la clé de connexion au réseau Wi-Fi
un pays étranger lorsque vous voyagez à l’extérieur de la
dans le champ Passphrase.
zone de couverture de votre opérateur.
Pour faire apparaitre la clé en clair,
cliquez sur le bouton
La saisie d’un mauvais mot de passe
nécessite de recommencer l’opération.
La saisie d’un mauvais mot de passe
entraîne la réinitialisation du point
d’accès du terminal.
32FR
➎ Cliquez ensuite sur le bouton Submit. ➊ Depuis le bandeau supérieur, cliquez sur
Une fenêtre d’information sur la connexion l’onglet Network / Wi-Fi Network.
au réseau apparaît.
➋ Cliquez sur le bouton Disable pour vous
déconnecter du réseau Wi-Fi comme illustré ci-
après.
➌ Une fenêtre de confirmation s’affiche.
Cliquez sur le bouton OK pour confirmer.
ÉDITER UNE CONNEXION Wi-Fi
Suivez les étapes suivantes pour éditer une
➏ Cliquez sur le bouton Save & Apply connexion Wi-Fi existante.
pour sauvegarder et appliquer les paramètres. ➊ Depuis le bandeau supérieur, cliquez sur
➐ Testez votre connexion à Internet. l’onglet Network / Wi-Fi Network.
Cliquez sur l’onglet Status / Overview et véri- ➋ Cliquez sur le bouton Edit pour afficher les
fiez que le statut Active Connection apparaît paramètres de la connexion au réseau Wi-Fi.
comme illustré ci-dessous :
➌ Modifiez les paramètres requis puis cli-
quez sur le bouton Save & Apply pour
sauvegarder et appliquer les nouveaux
paramètres.
Votre terminal est maintenant configuré de SUPPRIMER UNE CONNEXION Wi-Fi
sorte qu’il permette un accès à Internet à votre Suivez les étapes suivantes pour supprimer
ordinateur. une connexion Wi-Fi existante.
Pour accéder à Internet depuis un ordinateur ➊ Depuis le bandeau supérieur, cliquez sur
connecté à votre terminal, exécutez votre l’onglet Network / Wi-Fi Network.
navigateur Internet tel que Microsoft Edge ou
Google Chrome. Le navigateur devrait afficher ➋ Cliquez sur le bouton Remove pour sup-
une page Web. primer la connexion au réseau Wi-Fi.
SE DÉCONNECTER D’UN RESEAU Wi-Fi
➌ Une fenêtre de confirmation s’affiche.
Cliquez sur le bouton OK pour confirmer.
Suivez les étapes suivantes pour vous dé-
connecter manuellement d’un réseau Wi-Fi. La suppression de la connexion Wi-Fi
entraîne la réinitialisation du point
d’accès du terminal.
La déconnexion est automatique dès lors
que le réseau Wi-Fi n’est plus à portée.
33Configuration Point ÉDITER LE POINT D’ACCÈS
d’Accès Wi-Fi Suivez les étapes suivantes pour éditer le
point d’accès Wi-Fi.
SE CONNECTER AU POINT D’ACCÈS
Suivez les étapes suivantes pour vous Se déconnecter de la 4G si active
(onglet Network / Interfaces et bouton
connecter au point d’accès Wi-Fi.
Disconnect pour la 4g-NeptuLink).
➊ Depuis le bandeau supérieur, cliquez sur
l’onglet Network / Wi-Fi Network.
➋ Cliquez sur le bouton Edit pour afficher
les paramètres du point d’accès Wi-Fi.
➌ Une fenêtre de paramétrage s’affiche :
➊ Activez la connexion Wi-Fi sur votre périphé-
rique.
➋ Cliquez sur le nom de réseau NeptuLink-4G.
L’accès au réseau peut exiger un mot de
passe.
Une fois la connexion établie, vous pouvez
accéder à Internet sans recourir à l’utilisation
du câble Ethernet.
Vous pouvez tout aussi bien accéder à
l’interface web de configuration de
votre terminal depuis un smartphone.
Depuis cette fenêtre vous pouvez modifier :
• Le canal d’émission.
Le canal d’émission par défaut est le
canal 6.
34FR
• La puissance d’émission.
MISE À JOUR À DISTANCE
Veuillez-vous conformer à la réglemen-
Suivez les étapes suivantes pour mettre à
tation en vigueur dans votre pays. jour votre terminal à distance.
➊ Depuis le bandeau supérieur, cliquez sur
• L’identifiant du point d’accès (SSID).
l’onglet System / Firmware Upgrade.
• Les paramètres de sécurité réseau.
➋ Cliquez sur le bouton Check pour vérifier si
➍ Cliquez sur le bouton Save & Apply pour une nouvelle version du logiciel est dispo-
sauvegarder et appliquer les nouveaux nible.
paramètres.
Ce processus peut prendre plusieurs
➎ Redémarrez le terminal. secondes.
Mise à jour du terminal ➌ Le résultat de la requête peut varier selon
le cas :
MISE À JOUR MANUELLE
Dans le cas d’un message indiquant :
Suivez les étapes suivantes pour mettre à
jour votre terminal manuellement. • « Not connected » signifie que votre termi-
nal n’est pas connecté à Internet et par
➊ Depuis le bandeau supérieur, cliquez sur conséquent ne peut pas vérifier la disponibi-
l’onglet System / Flash Firmware. lité d’une mise à jour.
➋ Cliquez sur le bouton Parcourir puis sélec- • « No new firmware version available »
tionnez le fichier de mise à jour. signifie que le terminal dispose déjà de la
mise à jour la plus récente.
➌ Cliquez sur le bouton Flash image pour
• Si une mise à jour est disponible un bandeau
débuter l’opération.
présentant les informations sur la nouvelle
➍ Une fenêtre de confirmation s’affiche. version s’affiche dans la partie inférieure de
Cliquez sur le bouton Proceed pour débuter l’interface.
l’opération de mise à jour.
➍ Cliquez sur le bouton Perform upgrade
pour débuter l’opération.
➎ Une fenêtre de confirmation s’affiche.
Cliquez sur le bouton OK pour débuter
l’opération de mise à jour.
35Configuration réseau PARAMETRAGE DU SERVEUR DHCP
Cette section est destinée aux personnes
Suivez les étapes suivantes pour changer
avec un minimum de connaissances dans les paramètres du serveur DHCP.
le domaine de la configuration réseau.
➊ Suivez les étapes 1 et 2 de la section
En cas de mauvaise configuration, procé-
dez à un reset du terminal « RESET « CHANGEMENT DE L’ADRESSE IP ».
PARAMÈTRES USINE ».
➋ Une section en bas de l’onglet General
CHANGEMENT DE L’ADRESSE IP vous permet :
Suivez les étapes suivantes pour changer • Activer/désactiver le serveur DHCP
l’adresse IP de votre terminal.
• Changer la plage d’adresse IP
➊ Depuis le bandeau supérieur, cliquez sur • Définir la durée du bail
l’onglet Network / Interfaces.
➋ Cliquez sur le bouton Edit pour éditer
l’interface LAN.
➌ Cliquez sur le bouton Save & Apply pour
sauvegarder et appliquer les paramètres.
➌ Depuis l’onglet General vous pouvez
changer les paramètres réseaux du termi-
nal (adresse IP, masque sous-réseau…).
➍ Cliquez sur le bouton Save & Apply pour
sauvegarder et appliquer les paramètres.
36FR
Configuration du modem Autres
CHANGEMENT DE CONFIGURATION REDÉMARRER LE TERMINAL
DU MODEM
➊ Depuis le bandeau supérieur, cliquez sur
l’onglet System / Reboot.
Dans certains cas spécifiques, il peut être
nécessaire de modifier la configuration du ➋ Cliquez sur le bouton Perform Reboot.
modem afin de l’adapter au réseau de
votre opérateur téléphonique. ➌ Une fenêtre de dialogue s’affiche. Cliquez
sur le bouton OK pour procéder au redé-
Suivez les étapes suivantes pour changer la marrage du terminal.
configuration du modem de votre terminal.
Ce processus peut prendre 1 à 2 minutes.
➊ Depuis le bandeau supérieur, cliquez sur
l’onglet System / 4G Modem.
➋ Sélectionnez le firmware que vous voulez
utiliser à partir de la liste déroulante Avai- RESET PARAMÈTRES USINE
lable Firmware. ➊ Depuis le bandeau supérieur, cliquez sur
➌ Sélectionnez ensuite l’une des configura- l’onglet System / Reset.
tions disponibles pour ce firmware depuis ➋ Cliquez sur le bouton Perform Reset.
la liste déroulante Available Configuration.
➌ Une fenêtre de dialogue s’affiche. Cliquez
sur le bouton OK pour procéder à la recon-
figuration usine du terminal.
CHANGEMENT DU PARAMETRE DE LA
LANGUE
➊ Depuis le bandeau supérieur, cliquez sur
➍ Cliquez sur le bouton Apply Configuration
l’onglet System / Language.
pour débuter la reconfiguration du modem.
➎ Une fenêtre de confirmation s’affiche. Cli- ➋ Sélectionnez une langue dans la liste.
quez sur le bouton OK pour débuter le ➌ Cliquez sur le bouton Save & Apply pour
processus.
sauvegarder.
Ce processus peut prendre plusieurs Le changement sera effectif lorsque vous
secondes. rafraîchirez la page depuis votre navigateur
Internet.
37Dépannage et FAQ
En cas de problème avec votre terminal, recherchez la solution ci-dessous. Si vous ne parvenez
pas à trouver la solution, veuillez contacter le service support ou votre revendeur.
DESCRIPTION DU PROBLÈME CAUSE POSSIBLE SOLUTION ÉVENTUELLE
Vous êtes dans une zone trop éloignée Vérifiez votre couverture réseau.
d’une station de base du réseau mobile Pour émettre et recevoir des données,
Mauvaise qualité de réception
de votre opérateur pour recevoir un vous devez être dans une zone couverte
signal de qualité. par le réseau de l’opérateur.
Dysfonctionnement ou endommagement
Contactez votre opérateur mobile.
de la carte SIM.
Erreur de carte SIM
Insérez correctement la carte SIM
Carte SIM mal insérée. en suivant les étapes suivantes
« Insérer la carte SIM ».
Contactez votre opérateur pour obtenir un
Carte SIM bloquée Vous avez entré un code PIN erroné. code PUK permettant de déverrouiller la
carte SIM.
Vérifiez votre couverture réseau.
Vous n’êtes pas dans une zone de Vous devez voir des barrettes de récep-
couverture de services 3G/4G. tion affichées sur l’interface de configura-
tion de votre terminal avec les mentions
3G ou 4G.
Connexion à Internet impos- Signal de réception faible. Rapprochez-vous des côtes.
sible ou lente
Vérifiez auprès de votre opérateur le
Vous avez épuisé votre volume volume de données consommé.
de données Internet. Au-delà du volume, votre débit peut être
réduit.
Vérifiez le cordon d’alimentation.
Impossible d’accéder à Connexion du terminal.
l’interface d’administration Le terminal n’est pas alimenté.
du terminal Dans le cas d’une alimentation par PoE,
vérifiez que l’injecteur est bien alimenté.
Vous avez entré des paramètres de Contactez votre opérateur pour obtenir
carte SIM erronés. les paramètres de la carte SIM.
Le statut de la connexion
Appuyez sur le bouton « Connect » de
affiche « Not Connected » Vous avez changé les paramètres l’interface NeptuLink ou débranchez puis
de carte SIM. rebranchez le cordon d’alimentation du
terminal.
Le statut de la connexion Vous n’êtes pas dans une zone de
affiche « Getting Carrier » Vérifiez votre couverture réseau.
couverture de services 3G/4G.
continuellement.
38You can also read