TX3 Series TX3 Nano - Configuration Manual - Mircom
←
→
Page content transcription
If your browser does not render page correctly, please read the page content below
TX3 Series

                                              TX3 Nano

                                       Configuration
                                         Manual

Version 2.4   TX3 Nano Configuration Manual              1
LT-1194       Copyright March 2018
Copyright March 2018 Mircom Inc.
                                               All rights reserved.
          TX3 Nano Configuration Manual Version 2.4
          Microsoft, MS-DOS, Windows, and Windows 2000/NT/XP/Vista/7/8/10 are either registered
          trademarks or trademarks of Microsoft Corporation in the United States and/or other countries.
                                                        Mircom
                                                 25 Interchange Way
                                                  Vaughan, Ontario
                                                       L4K 5W3
                                                    905.660.4655
                                                  Fax:905.660.4113

2         TX3 Nano Configuration Manual                                                          Version 2.4
LT-1194   Copyright March 2018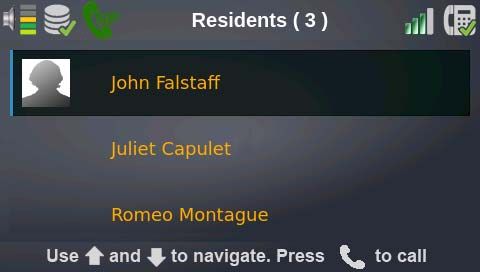
Contents
1      Introduction 6
1.1    TX3 Nano Features 6
1.2    Networking 7
1.3    ADC and NSL 8
1.4    Types of Calls 8
1.5    Administrator’s Responsibilities 11
1.6    TX3 Nano Products 12
1.7    Additional Documentation 12

2      Nano Settings 13
2.1    Log into the Configurator 13
2.2    Change the Language of the Configurator 15
2.3    Enter the OnSIP Administrative Account 15
2.4    Configure User Privileges 15
2.5    Log Out 16
2.6    Change the Device Settings 16
2.7    Inputs and Outputs 23
2.8    Access Point 27
2.9    Correlations 28
2.10   Configuring other TX3 Nanos 31

3      Residents 34
3.1    View Residents 34
3.2    Import Residents from a TX3 Telephone Entry Panel 35
3.3    Add Residents 36
3.4    Delete Residents 38
3.5    Edit Residents 38
3.6    Set up an OnSIP Account 39

4      Schedules and Holidays 41
4.1    Create Schedules and Holidays 41
4.2    Delete a Schedule or Holiday 44
4.3    Edit a Schedule or Holiday 44
4.4    Hide a Schedule or Holiday 44
4.5    View the Calendar 45

5      Events 46
5.1    View Events 46
5.2    Export Events 47

6      Using the TX3 Nano 49
6.1    Overview 49
6.2    The TX3 Nano Buttons 49
6.3    The TX3 Nano Display 50

7      Access Criteria 52
7.1    Lock and Unlock the Door 52

       TX3 Nano Configuration Manual                          3
       Copyright 2018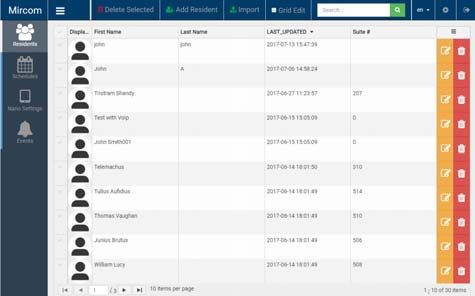
7.2   Timers 53
    7.3   Call Restrictions 53
    7.4   System Status 53

    8     Specifications 55

    9     Warranty and Warning Information 57

4         TX3 Nano Configuration Manual
          Copyright 2018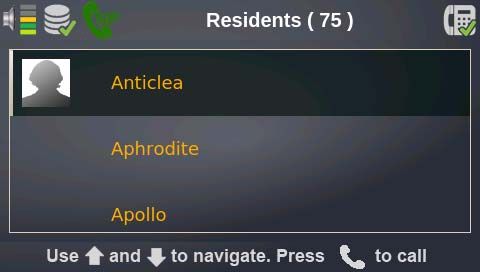
Figures
Figure 1.    TX3 Nano on an IP Network 7
Figure 2.    PSTN Call 8
Figure 3.    Cellular Call 9
Figure 4.    VOIP Call with OnSIP and MiEntry 10
Figure 5.    VOIP Call with local Kamailio server 10
Figure 6.    Login page 14
Figure 7.    TX3 Nano Configurator 14
Figure 8.    Nano Settings 17
Figure 9.    List of discovered TX3 Nanos 17
Figure 10.   Resident Groups 19
Figure 11.   Subgroups 20
Figure 12.   Residents 20
Figure 13.   SIP Account Details 22
Figure 14.   Input & Outputs 25
Figure 15.   Access Point 27
Figure 16.   Correlations 29
Figure 17.   List of discovered TX3 Nanos 31
Figure 18.   Discovered 32
Figure 19.   Residents 34
Figure 20.   Add Resident 36
Figure 21.   Add Residents - second window 37
Figure 22.   Sample Email from OnSIP 39
Figure 23.   OnSIP Password Page 39
Figure 24.   Sample Confirmation Email 40
Figure 25.   Schedules 42
Figure 26.   Add Schedule 42
Figure 27.   Events 46
Figure 28.   Export menu 47
Figure 29.   Front of the TX3 Nano 49
Figure 30.   The TX3 Nano Display 50

             TX3 Nano Configuration Manual             5
             Copyright 2018
1          Introduction

        This manual provides information about the configuration of the TX3 Nano, and
        must be read in its entirety before beginning any configuration work.

        Note:            Mircom periodically updates panel firmware and Configurator
                         Software to add features and correct any minor inconsistencies.
                         For information about the latest firmware or software visit the
                         Mircom website at www.mircom.com.

        For warranty and special notices see the Warranty and Special Notices chapter on
        page 57.

        This chapter explains

        •       TX3 Nano Features
        •       Networking
        •       ADC and NSL
        •       Types of Calls
        •       Administrator’s Responsibilities
        •       TX3 Nano Products
        •       Additional Documentation

1.1   TX3 Nano Features
        Mircom’s TX3 Nano is an IP networkable audio and video entry panel
        providing multiple options to communicate with the resident or concierge in a
        multi-unit dwelling establishment.

        Features of the TX3 Nano include:

        •       High quality intercom and paging device
        •       Programmable scrolling 4.3” color LCD display
        •       Speaker and microphone for two way audio
        •       Ability to make calls over PSTN and cellular network
        •       Ability to make one-way video calls over VOIP
        •       Color camera with IR LED for night vision

6       TX3 Nano Configuration Manual
        Copyright 2018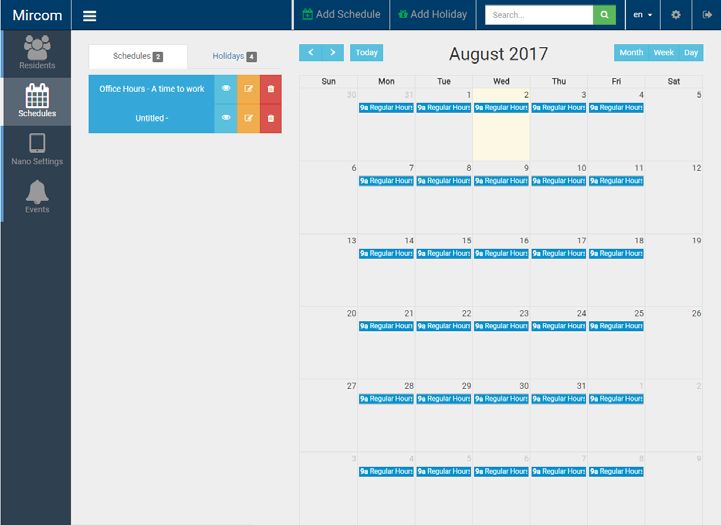
Introduction

        •      Touch buttons for scrolling the directory and making calls
        •      Storage of up to 1000 names
        •      Hands-free full duplex communication
        •      Dials up to 20 digit telephone numbers
        •      System can be configured over an IP network using a Web-based
               configurator

1.2   Networking
        The TX3 Nano can be connected to an existing TX3 network, as shown in
        Figure 1. The TX3 Nano supports IPv4 addresses. The TX3 Nano and other TX3
        devices can communicate with each other through correlations.

               Figure 1. TX3 Nano on an IP Network

        TX3 Nano Configuration Manual                                                 7
        Copyright 2018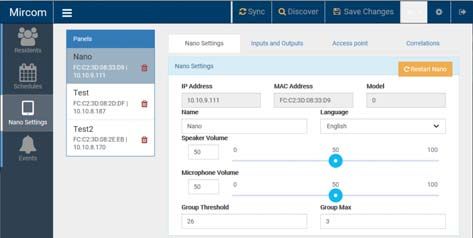
Introduction

1.3     ADC and NSL
           The TX3 Nano supports 1 ADC or 1 NSL telephone line.

           An ADC connection requires a dedicated subscriber telephone line service
           connected to an outside telephone line. This connection lets the visitor call the
           tenant and access their voice mail.

           An NSL connection uses the existing building telephone lines for
           communication and does not require a separate telephone line. This system may
           consist of one or more TX3 Nanos connected to TX3-NSL-8M NSL Units,
           typically located in the electrical/telephone room of a building. The NSL units
           intercept all telephone lines into the building’s suites and communicate directly
           to the resident phone using the TX3 Nano.

           Note:            Non-configurable PBX systems are not supported. For more
                            information, contact technical support at Mircom.

1.4     Types of Calls
           In all cases, the TX3 Nano can accept DTMF tones, which allow the resident to
           open the door for the visitor, or to disconnect the call without opening the door.

1.4.1   PSTN Call
           The TX3 Nano makes calls over the PSTN (Public Switched Telephone
           Network), as shown in Figure 2.

                   Figure 2. PSTN Call

8          TX3 Nano Configuration Manual
           Copyright 2018
Introduction

1.4.2   Cellular Call
            The cellular-enabled models of the TX3 Nano (for example TX3-NANO-S4-
            CA) make calls over the cellular network. In this situation, the TX3 Nano acts like
            a cell phone.

                    Figure 3. Cellular Call

1.4.3   VOIP Call
            A VOIP call allows both audio and video calls from the TX3 Nano to a SIP
            (Session Initiation Protocol) client. Both the called party and the TX3 Nano must
            be registered with a SIP server. Video is one direction only: from the TX3 Nano
            to the SIP client.

            There are two options for managing SIP services:

            •       Remote SIP server provided by a third party (for example OnSIP)
            •       Local SIP server (for example Kamailio)

            TX3 Nano Configuration Manual                                                     9
            Copyright 2018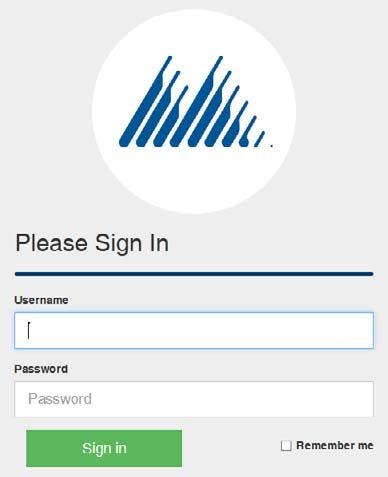
Introduction

                                                Cell phone with
                                                MiEntry app

                          OnSIP Server            Internet

                                                       Wireless router

             TX3 Nano

                                Cell phone with
                                MiEntry app
            Figure 4. VOIP Call with OnSIP and MiEntry

                           Local Kamailio
                           server

                                                      Wireless router

            TX3 Nano

                              Cell phone with
                              MiEntry app            TX3 InSuite
            Figure 5. VOIP Call with local Kamailio server

10   TX3 Nano Configuration Manual
     Copyright 2018
Introduction
The TX3 Nano has been tested with the following SIP clients:
• TX3 InSuite
• Mircom’s MiEntry app for iOS and Android
• microSIP for Windows (http://www.microsip.org/)
• Kamailio (http://www.kamailio.org/)
1.4.4 Configure a TX3 Nano for VOIP
To configure a TX3 Nano for VOIP, you must:
• Configure theTX3 Nano with its SIP account details (section 2.6.9 on page
22).
• Configure the residents with their SIP account details (section 3.3 on page
36).
1.5 Administrator’s Responsibilities
Warning! In order to keep the TX3 system secure,
follow these precautions:
Change the default password on the TX3 Nano.
Perform a virus scan on all picture files before importing
them into the TX3 Nano.
Secure the TCP/IP network to prevent unauthorized access
to the TX3 Nano.
The software lets you configure and monitor activities of all TX3 Nano units
connected to the TX3 network. The administrator is responsible for the
configuration of the TX3 system, TX3 Nano, Configurator and all of the related
components.
The administrator accesses the administrator mode from the Configurator and
has full rights to every function within the software. The administrator performs
many of the administrative tasks required for installing and managing the
software, including assigning permissions for each level of user. TX3 Nano
personalization depends on preferences defined by the building management.
Additional responsibilities may be provided by the building manager.
The administrator is responsible for:
• adding new tenants
• system configuration
• monitoring the operational health of the system
• assigning user privileges
TX3 Nano Configuration Manual 11
Copyright 2018Introduction
1.6 TX3 Nano Products
• TX3-NANO-S4: TX3 Nano Voice/Telephone Entry Communicator
(Surface Mount)
• TX3-NANO-S4-CA: TX3 Nano Voice/Telephone Entry Communicator
(Surface Mount with AT&T Cellular)
• TX3-NANO-S4-CV: TX3 Nano Voice/Telephone Entry Communicator
(Surface Mount with Verizon Cellular)
• TX3-NANO-S4-CT: TX3 Nano Voice/Telephone Entry Communicator
(Surface Mount with Telus Cellular)
• TX3-NANO-S4-CR: TX3 Nano Voice/Telephone Entry Communicator
(Surface Mount with Rogers Cellular)
1.7 Additional Documentation
These documents are available on http://www.mircom.com.
• LT-6637 TX3 Nano Installation Manual
• LT-600212 TX3-NANO-BB Installation Instructions
• LT-969 TX3 Telephone Access System Installation and Operation
Manual
• LT-980 TX3-CX Card Access System Manual
• LT-995 TX3 Touch Screen Configuration and Administration Manual
• LT-6082 Unified Building Solution Administration Guide
12 TX3 Nano Configuration Manual
Copyright 20182 Nano Settings
This chapter describes the basic settings of the TX3 Nano.
This chapter explains
• Log into the Configurator
• Change the Language of the Configurator
• Enter the OnSIP Administrative Account
• Configure User Privileges
• Log Out
• Change the Device Settings
• Inputs and Outputs
• Access Point
• Correlations
• Configuring other TX3 Nanos
2.1 Log into the Configurator
You must configure the TX3 Nano with a Web browser. The TX3 Nano supports
Internet Explorer 11 or higher and Google Chrome.
Get the IP Address of the TX3 Nano
1. Connect the TX3 Nano’s RJ45 connector to a LAN.
2. Press and hold the Home button for 10 seconds.
The TX3 Nano’s IP address and MAC address appear on the display.
Connect to the TX3 Nano in a Web browser
1. On a computer on the same LAN as the TX3 Nano, open Google Chrome
or Internet Explorer 11 or higher, type the IP address of the TX3 Nano, and
then press enter.
TX3 Nano Configuration Manual 13
Copyright 2018Nano Settings
The login page appears.
Figure 6. Login page
2. Enter the username and password of the TX3 Nano. By default, the
username is admin and the password is admin.
The TX3 Nano Configurator appears.
Edit, Delete,
Preferences and
Residents Search options
Schedules
Nano Settings
Events
Left Pane
Figure 7. TX3 Nano Configurator
The Configurator has a pane on the left that lists the major functions of the
Configurator. The next 6 chapters describe these functions in detail.
• Residents - page 34
14 TX3 Nano Configuration Manual
Copyright 2018Nano Settings
• Schedules - page 41
• Nano Settings - this chapter
• Events - page 46
2.2 Change the Language of the Configurator
• Click the en in the upper right corner, and select the language that you want
to view the site in.
2.3 Enter the OnSIP Administrative Account
The TX3 Nano can use your OnSIP administrative account to quickly create SIP
addresses for the TX3 Nano and residents. The TX3 Nano is a SIP client and can
communicate with other SIP clients through a SIP server.
After you enter your OnSIP administrative account information, then the
Configurator can quickly create OnSIP accounts for the TX3 Nano and residents.
1. Click the Preferences button in the upper right corner of the window.
2. In the OnSIP Admin Account section, enter the username and password
for your OnSIP administrative account.
3. Click Save Changes.
2.4 Configure User Privileges
The system administrator can assign a user privilege level to a user, add or
remove users, and reset their passwords.
The user levels consist of the following:
Operator. An operator has read access only. An operator can monitor live events
and accept access point requests.
User. A user has all of the rights of the operator plus the ability to read and write
residents.
Advanced User. An advanced user has all of the rights of user plus the ability to
read and write schedules and holidays.
Manager. A manager has all of the rights of an advanced user plus user
management privileges.
TX3 Nano Configuration Manual 15
Copyright 2018Nano Settings
Administrator. The system administrator can access and configure all panels
and devices connected to the panels.
Note: When logging in to a particular user level, only information relevant
to your assigned role is available.
Assign a user
1. Click the Preferences button in the upper right corner of the window.
2. In the Users section, enter a User name and Password for the user.
3. Select a user level from the User Level menu.
4. Click Save Changes.
2.5 Log Out
Logging out takes you to the login page. If other people are using the computer,
you should log out when you are finished.
Log out
• To log out, click the icon in the upper right corner.
2.6 Change the Device Settings
1. Click Nano Setting in the left pane.
The Nano Settings window appears.
16 TX3 Nano Configuration Manual
Copyright 2018Nano Settings
Nano Settings Inputs and Access Correlations tab
tab Outputs tab point tab
Edit, Delete,
Preferences and
Residents Search options
Schedules
Nano Settings
Events
Left Pane List of discovered
TX3 Nanos
Figure 8. Nano Settings
2.6.1 List of Discovered TX3 Nanos
The list of discovered TX3 Nanos in the upper left corner of the Nano Settings
window shows all the discovered TX3 Nanos on the network. The selected
(darker) TX3 Nano is the TX3 Nano that you are currently configuring. See
section 2.10 on page 31 for information on configuring other TX3 Nanos.
Selected TX3 Nano (the TX3
Nano that you are currently
configuring)
Other discovered
TX3 Nanos
Figure 9. List of discovered TX3 Nanos
2.6.2 Nano Settings
The Nano Settings section lists the selected TX3 Nano’s IP address, MAC
address, model, name, and language. You can change only the last 2 items: name
and language.
Language refers to the language on the TX3 Nano’s screen and the language of
the audio notifications. To change the language of the Configurator, see section
2.2 on page 15.
TX3 Nano Configuration Manual 17
Copyright 2018Nano Settings
Name a TX3 Nano
1. Type a name for the TX3 Nano in the Name field.
2. Click Save Changes at the top of the window.
Change the language on a TX3 Nano
1. Select a language in the Language menu.
2. Click Save Changes at the top of the window.
2.6.3 Restart
Restart the TX3 Nano
1. Click the Restart Nano button.
2.6.4 Volume
Change the speaker or microphone volume
1. In the Nano Settings section, provide information for each of the
following:
Speaker Volume. Specify the TX3 Nano speaker call volume.
Microphone Volume. Specify the TX3 Nano microphone call sensitivity.
2. Click Save Changes at the top of the window.
2.6.5 Grouping
You can group residents alphabetically by first name in the Nano display. This
feature lets visitors navigate quickly through a long list of residents.
Group residents
1. In the Nano Settings section, provide information for each of the
following:
Group Threshold. Specify the number of residents that the TX3 Nano
should have before it creates resident groups. For example, if there are 10
residents, then the TX3 Nano will create resident groups only if the
Group Threshold is 10 or lower.
18 TX3 Nano Configuration Manual
Copyright 2018Nano Settings
Group Max. Specify the maximum number of residents in a group. If
there are more residents whose first names begin with the same letter than
the Group Max, then the TX3 Nano will make subgroups within the
resident group.
Grouping Example
In this example, the Group Max is four. There are 75 residents in total and the
Group Threshold is 10, which means that groups are created.
There are seven residents whose first names begin with A:
• Anticlea
• Aphrodite
• Apollo
• Ares
• Artemis
• Athena
• Atreus
This example shows how to call Apollo when the residents are in subgroups.
The TX3 Nano groups the resident by the first letter of their first names as shown
in Figure 10.
Figure 10. Resident Groups
1. Select A - Resident Group and press the Call button.
TX3 Nano Configuration Manual 19
Copyright 2018Nano Settings
The TX3 Nano shows the subgroups. Because the Group Max is four but
there are seven residents in the A group, the first four residents are in the
subgroup Anticlea - Ares, and the next three residents are in the subgroup
Artemis - Atreus.
Figure 11. Subgroups
2. Select Anticlea - Ares and press the Call button.
The TX3 Nano shows the residents starting from Anticlea.
Figure 12. Residents
• To call Apollo, select Apollo and press the Call button.
• To navigate back to the main list of resident groups, press the Home button
to go to the top of the list of residents, then press the Home button again to
go up one level to the list of subgroups (Figure 11) Then press the Home
button a third time to up another level to the list of groups (Figure 10).
2.6.6 Calls
Configuring calls lets you specify the call duration, number of rings, call
scheduling, and volume.
20 TX3 Nano Configuration Manual
Copyright 2018Nano Settings
Configure calls
1. In the Calls section, provide information for each of the following:
Maximum Talk Time. Specify the maximum time in seconds the visitor
may communicate with the resident on a single call. After this time, the
TX3 Nano disconnects the call.
Outbound Calling Priority. This refers to which calling method the TX3
Nano uses first. If the TX3 Nano is connected to both the PSTN and a
cellular network, then the TX3 Nano calls either through the PSTN first, or
through the cellular network first. If the call fails or is busy, then the TX3
Nano calls through the other method.
2. Click Save Changes at the top of the window.
2.6.7 Resident Access Schedules
1. In the Resident Access Schedules section, provide information for each of
the following:
Allow calls. Use this selection to allow calls to the residents based on the
selected schedule.
• If Always is selected, then visitors can always make calls to
residents.
• If Never is selected, then visitors can never make calls to residents.
• If a schedule is selected, then visitors can make calls to residents
only when the schedule is active.
Allow unlock. Use this selection to allow the residents to use their phone
to unlock the door during a set schedule.
• If Always is selected, then residents can always use their phones to
unlock the door.
• If Never is selected, then residents can never use their phones to
unlock the door.
• If a schedule is selected, then residents can use their phones to
unlock the door only when the schedule is active.
For example, if Allow calls is Always and Allow unlock is set to a
schedule, then visitors can always call residents, but residents can unlock
the door only when the schedule is active. If Allow calls is set to a schedule
and Allow unlock is Never, then visitors can call residents only when the
schedule is active, but residents cannot unlock the door.
2. Click Save Changes at the top of the window.
TX3 Nano Configuration Manual 21
Copyright 2018Nano Settings
2.6.8 Keypad
This feature lets you specify how the resident unlocks the door for the visitor.
Configure how the resident unlocks the door
1. In the Keypad section, provide information for each the following:
Open Door by Pressing. Specify which key on the resident’s phone
unlocks the door. By default this is 9.
Note: Do not select 4 (this is used to refuse entry or disconnect).
Unlock Door for. Specify the time in seconds to keep the door unlocked.
NSL Call Wait Key. For NSL lines only, specify the key to press on the
resident’s phone to connect to the lobby phone while on an outside call. By
default this is 2. Do not select 4; this is used to refuse entry or disconnect.
2. Click Save Changes at the top of the window.
2.6.9 SIP Account Details
Figure 13. SIP Account Details
In the SIP Account Details section, enter the SIP account details for this TX3
Nano. The TX3 Nano is a SIP client and can communicate with other SIP clients
through a SIP server.
You need:
• The IP address or domain name of the SIP server.
• The SIP username, SIP password, and Auth username of the TX3 Nano.
22 TX3 Nano Configuration Manual
Copyright 2018Nano Settings
Configure the SIP account details
1. In the SIP Account Details section, provide information for each the
following:
Add OnSIP Account. If you have configured the TX3 Nano with an
OnSIP administrative account (section 2.3 on page 15), click Add OnSIP
Account to quickly create an OnSIP account for this TX3 Nano. The
Configurator enters the TX3 Nano’s new OnSIP account details in the
fields.
If you do not have an OnSIP administrative account, then provide the
following information:
Username. The SIP username of the TX3 Nano.
Domain. The IP address or domain name of the SIP server.
Auth username. The authentication username of the TX3 Nano.
Password. The SIP password for the TX3 Nano.
Display name. This name appears on the resident’s device when the TX3
Nano calls the resident.
Outbound proxy. The SIP server’s proxy server, if required.
STUN server. Leave this blank unless your SIP service requires you to
change it.
Application layer gateway. Leave this as default (ALG) unless your SIP
service requires to you change it.
Transport. Leave this as default (UDP) unless your SIP service requires
to you change it.
2. Click Save Changes at the top of the window.
See section 3.3 on page 36 for information on configuring the residents’ SIP
accounts.
2.7 Inputs and Outputs
The default configurations for the 2 inputs are described below.
2.7.1 Input 1
By default, Input 1 is configured as a Door contact. Input 1 connects to the door
sense switch. When this input is active it means the door is open and when
inactive the door is closed.
TX3 Nano Configuration Manual 23
Copyright 2018Nano Settings
When access is granted, activation of the door sense switch locks the main door
and resets the Unlock door timer. This function is typically used to prevent
‘tailgating’. Input 1 also, when configured with a correlation, activates a general
purpose output to perform any required function.
In addition, this input:
• senses if the door ever opened after it was unlocked as a result of access
being granted. If the door did not open even though the door was unlocked
for the programmed time duration, it is reported to the Configurator if the
Report door not open option is enabled (see section 2.8 on page
27).
• senses a forced entry. If the door is locked and the door contact input
becomes active, the forced entry alarm activates. This can be changed by
selecting Disable forced entry alarm (see section 2.8 on page
27).
• senses if the door is held open. This happens when the door is unlocked and
the door contact becomes active but does not get deactivated before the
Unlock door timer expires. At this time the door held open warning
timer starts. If the door is still open when this timer expires, a Door held
open trouble is reported to the Configurator.
When the door held open warning timer expires, the door held open alarm
timer starts. When the door held open alarm timer expires, a Door held
open alarm is reported to the Configurator.
If the door closes while the door held open warning timer or the door held
open alarm timer are active, the warning or alarm is cancelled, and the
Door open trouble restored or Door open alarm restored event is
reported to the Configurator.
See section 2.8 on page 27 for information on configuring timers.
2.7.2 Input 2
By default, Input 2 is configured as General purpose.
2.7.3 Configure the Inputs
Configure inputs
1. Click Nano Setting in the left pane.
24 TX3 Nano Configuration Manual
Copyright 2018Nano Settings
2. Click the Inputs & Outputs tab at the top of the window.
Figure 14. Input & Outputs
3. Select an input and provide information for the following parameters:
Label. Type a name for this input.
Assigned to. Select a function for this input:
Door contact
General purpose
See section 2.7.1 on page 23 for information about door contact.
Active state. Active state is the state in which the input is considered
active. Select one of the following:
Close
Open
There are some restrictions in configuring the active state depending on
what kind of supervision is required.
If the input is not supervised the input is either ‘open’ or ‘closed’. If the
input is supervised for ‘open’ the active state cannot be ‘open’.
If the input is supervised for both ‘open’ and ‘short’ the active state cannot
be ‘open’.
Circuit supervision. Circuit supervision specifies the circuit
type and indicates whether the input is supervised. Select one of the
following:
None
TX3 Nano Configuration Manual 25
Copyright 2018Nano Settings
Open circuit
Short circuit
Open and short circuit
For more information on active state and supervision, see LT-6637 “TX3
Nano Installation Manual”.
Delay. This specifies the amount of time in seconds before the input
generates an active event.
4. Click Save Changes at the top of the window.
2.7.4 Output
By default, the output is configured as a Lock. When access is granted, this
output unlocks the door. This output is deactivated when the Unlock door
for timer expires, or the door contact input becomes active.
Configure the output
1. Click Nano Settings in the left pane.
2. Click the Inputs & Outputs tab at the top of the window.
3. Select Output1 and provide the following information:
Label. Type a name for this output.
Assigned to. Select a function for this input:
Lock. When access is granted at the designated reader, the output
unlocks the door.
General purpose. The output assigned this function can perform any
required function, such as turning on a light.
Active state. Active state is the state in which the output is
considered active. Select one of the following:
Energized. When the device is energized it is considered to be active.
De-energized. When the device is de-energized it is considered to be
active.
4. Click Save Changes at the top of the window.
26 TX3 Nano Configuration Manual
Copyright 2018Nano Settings
2.8 Access Point
These options control how the TX3 Nano locks and unlocks the door for
residents.
See section 7 on page 52 for more information on how the TX3 Nano controls
access.
Configure the access point
1. Select the Access point tab.
Figure 15. Access Point
2. In the Name section, type a name for the access point.
3. In the Timers section, provide information for each the following:
Auto Unlock Door. Select a schedule. During this schedule, the door is
unlocked.
Door Held Open Warning. Specify the amount of time in seconds for the
door to stay open until a warning is issued.
Door Held Open Alarm. Specify the amount of time in seconds for the
door to stay open until an alarm is issued.
4. In the Advanced section provide information for each the following:
TX3 Nano Configuration Manual 27
Copyright 2018Nano Settings
Disable Forced Entry Alarm. If you select Yes, the forced entry alarm
does not activate even if the door is opened without permission. Instead,
access is granted. This is usually used on access points where there is no
request to exit (RTE) device.
Report Door not Open. Select Yes to enable the panel to log and report
Door not open events to the Configurator when access is granted but the
door remains closed.
Auto Relock. Select Yes to lock the door as soon as the door closes.
Selecting No locks the door, but only after the expiration of the Unlock
door for timer.
5. Click Save Changes at the top of the window.
2.9 Correlations
Correlations establish specific relationships between inputs (events) and outputs
(actions) on different panels across the TX3 network. Use correlations to specify
the relationships between events, actions and schedules.
For example, you can configure the TX3 Nano so that when access is granted, an
output on another TX3 panel is activated.
The TX3 Nano allows a maximum of 128 correlations.
Note: All inputs, outputs and schedules must be defined before applying
correlations.
28 TX3 Nano Configuration Manual
Copyright 2018Nano Settings
Create a correlation
1. Select the Correlations tab.
Figure 16. Correlations
2. Click Add Correlation at the top of the window.
3. Enter the following parameters:
When. This parameter defines the input event. Select one of the following:
Access is granted. Resident grants access using their telephone
keypad.
Access is denied. Resident denies access.
Forced entry alarm. A door is forced open.
Door held open alarm. A door did not close and the door held open
alarm was issued.
Input activated. Select an input as defined in section 2.7 on page 23.
Call Started. A call to a resident is placed from the lobby.
Call finished. A call to a resident ends.
Call is connected. A call is established.
On panel. Select the panel that the action should occur on.
TX3 Nano Configuration Manual 29
Copyright 2018Nano Settings
Action. Action specifies the type of action to occur for a specific input.
Select one of the following:
Turn ON output. The output becomes active.
Turn OFF output. The output becomes inactive.
Turn ON high security. Only credentials with the high security
privilege can open the door (card access panels only).
Turn OFF high security. All credentials can open the door (card
access panels only).
Panel label. If the selected panel is not a TX3 Nano, enter a name for the
panel.
Output. Select the output on the selected panel that should be turned on or
off if you selected Turn ON output or Turn OFF output above.
RS485. If the selected panel is not a TX3 Nano, enter its RS-485 address.
Panel IP Address. If the selected panel is not a TX3 Nano, enter its IP
address. If the selected panel is connected over RS-485 instead of IP, enter
the IP address of the Master Node (the IP-connected panel that it is
connected to).
For. Select the duration of the action up to a maximum of 600 minutes.
Active. Select No to turn the correlation off, or select Yes to turn it on.
During schedule. If Always is selected, then the correlation is always
active. If a schedule is selected, then the correlation is active when the
selected schedule is active. See section 4 on page 41.
4. Click Save Changes at the top of the window.
Edit a correlation
1. Select the correlation on the left.
2. Provide the information as you would when creating a correlation.
3. Click Save Changes at the top of the window.
Delete a correlation
• Click the trash icon beside the correlation.
Copy a correlation
• Click the copy icon beside the correlation.
30 TX3 Nano Configuration Manual
Copyright 2018Nano Settings
2.10 Configuring other TX3 Nanos
After you have configured one TX3 Nano, you can find other TX3 Nanos on the
network and configure them.
The list of discovered TX3 Nanos in the upper left corner of the Nano Settings
window shows all the TX3 Nanos on the network that you can configure. The
selected (darker) TX3 Nano is the TX3 Nano that you are currently configuring.
Selected TX3 Nano (the TX3
Nano that you are currently
configuring)
Other discovered
TX3 Nanos
Figure 17. List of discovered TX3 Nanos
2.10.1 Discovery
This feature finds other TX3 Nanos on the same network and adds them to the list
in the Panels section. All TX3 Nanos in this list are synchronized when you
click the Sync button (section 2.10.2 on page 33). If you discover a TX3 Nano
that you do not want to synchronize, you can remove it.
Discover other TX3 Nanos on the network
1. Click Nano Setting in the left pane.
2. Click Discover at the top of the window.
TX3 Nano Configuration Manual 31
Copyright 2018Nano Settings
Other TX3 Nanos on the network appear.
Figure 18. Discovered
3. Type a name for each TX3 Nano, and click the plus sign to add it.
Remove a TX3 Nano from the list of discovered TX3 Nanos
• Click the trash icon beside the TX3 Nano that you want to remove.
The TX3 Nano disappears from the list.
Note: A TX3 Nano removed from this list continues to function, but is no
longer synchronized. You can configure it by logging into it as
described in section 2.1 on page 13.
Rediscover the IP address of a TX3 Nano
If the IP address of a TX3 Nano changes, then a broken link icon
appears beside it.
• Click the broken link icon to update the TX3 Nano with the right IP
address.
Configure another TX3 Nano
• Select a different TX3 Nano in the list of discovered TX3 Nanos and
configure its settings, inputs and outputs, access point, and correlations.
Note: This feature lets you configure more than one TX3 Nano from the
same Configurator. You do not need to log into each TX3 Nano
separately in order to configure it.
32 TX3 Nano Configuration Manual
Copyright 2018Nano Settings
2.10.2 Synchronization
When you synchronize TX3 Nanos, schedules and residents are copied from the
selected TX3 Nano to the other discovered TX3 Nanos.
The information on the Nano Settings page (including inputs, outputs, access
point, and correlations) is specific to each TX3 Nano and is not changed when
you synchronize. Events (section 5 on page 46) are specific to each TX3 Nano
and are not changed when you synchronize.
Synchronize the settings of all TX3 Nanos
1. In the list of discovered TX3 Nanos, select the TX3 Nano that has the
schedules and residents that you want to copy to the other TX3 Nanos.
2. Click the Sync button at the top of the window.
Attention: The Sync button copies schedules and residents from the selected
TX3 Nano to the other discovered TX3 Nanos. Any previous
schedules and residents in the other TX3 Nanos are deleted.
Synchronization Example
Consider an installation with 3 unconfigured TX3 Nanos on the same network.
1. Log into the Configuration page of the first TX3 Nano and add residents
and schedules.
2. Configure the inputs and outputs of the first TX3 Nano.
3. On the Settings page of the first TX3 Nano, discover the other 2 TX3
Nanos (as described in section 2.10.1 on page 31).
4. Select the first TX3 Nano in the Panels section, then click Sync.
The residents and schedules are copied from the selected TX3 Nano to the
other 2 TX3 Nanos.
5. Select the second TX3 Nano and configure its inputs and outputs.
6. Select the third TX3 Nano and configure its inputs and outputs.
Now all 3 TX3 Nanos have differently configured inputs and outputs but
the same residents and schedules. If you synchronize again, the residents
and schedules will be updated for all 3 TX3 Nanos, but the inputs and
outputs will not change.
TX3 Nano Configuration Manual 33
Copyright 20183 Residents
This chapter explains
• View Residents
• Import Residents from a TX3 Telephone Entry Panel
• Add Residents
• Delete Residents
• Edit Residents
• Set up an OnSIP Account
3.1 View Residents
See residents
• Select Residents.
The list of residents appears.
Figure 19. Residents
34 TX3 Nano Configuration Manual
Copyright 2018Residents
Sort the residents
• Click the column header to sort the list by that column in either ascending
or descending order.
Find a resident
• Type the resident’s name in the Search box.
3.2 Import Residents from a TX3 Telephone Entry
Panel
Create a backup of the TX3 Telephone Entry System
1. Start the TX3 Configurator and open the job file that has the resident
database.
2. Click File > Backup.
3. Select Backup current job only, then click Browse and specify
where you want to store the backup job file.
4. Click Backup Now.
5. Transfer the backup file to a computer that is on the same LAN as the TX3
Nano. The file has a .t3 extension.
Import the job file to a TX3 Nano
1. On the TX3 Nano Configurator, Click the Import button at the top
of the window.
2. Select the .t3 file, and then click Open.
3. Select the residents that you want to import. If you want to import all the
residents, select the checkmark at the top left of the list.
4. Click Add Residents.
The TX3 Nano imports the resident database from the backup job
file.
TX3 Nano Configuration Manual 35
Copyright 2018Residents
3.3 Add Residents
Add a resident
1. Click the Add Resident button at the top of the window.
Figure 20. Add Resident
2. Click Upload Display Picture to add a photograph of the resident.
3. Provide the information shown in Figure 20.
36 TX3 Nano Configuration Manual
Copyright 2018Residents
4. Click Next.
Figure 21. Add Residents - second window
5. Provide the following information in the right pane:
Location. Enter the resident’s address.
Add OnSIP Account. If you have configured an OnSIP administrative
account (see section 2.3 on page 15), click Add OnSIP Account to
create an OnSIP account for this resident. OnSIP sends a notification email
to the resident, and the Configurator enters the resident’s new OnSIP
account in the SIP Username field.
See section 3.6 on page 39 for information on how the resident sets up an
OnSIP account.
Type. Select Phone Number, SIP Username, or NSL.
Phone Number. If you selected Phone Number, enter the phone
number for the resident.
SIP Username. If you selected SIP Username, enter the SIP
username for the resident.
NSL Relay Code. If you selected NSL, enter the NSL unit relay code
associated with the resident.
Ring Pattern. If you selected NSL, select the resident’s phone ring
pattern from the list.
TX3 Nano Configuration Manual 37
Copyright 2018Residents
Maximum # of Rings. If you selected NSL, specify the numbers of
rings of each call before the TX3 Nano reports no answer and
disconnects the call. For ADC lines, this setting is not used and the
number of rings is determined by the central office.
Priority. Click the up arrow or down arrow to move the number up or
down in the priority. This indicates which number the TX3 Nano dials
first. Each resident can have up to 3 numbers. If the call fails or is busy, the
TX3 Nano dials the next number in the list.
Label. Select Home, Mobile, Work, or Other.
6. Click Save Changes at the top of the window.
3.4 Delete Residents
Delete a resident
1. In the list of residents, click the trash icon beside the resident that
you want to delete.
2. Click OK.
Or
1. Select the checkmarks to the left of the residents that you want to delete.
2. Click the Delete Selected button at the top of the window.
3.5 Edit Residents
Edit a resident
1. In the list of residents, click the edit icon beside the resident that you
want to edit.
2. Make changes to the information as described in section 3.3 above.
3. Click Save Changes at the top of the window.
3.5.1 Grid Edit
The grid edit feature lets you quickly edit residents’ names and suites without
editing each resident individually.
38 TX3 Nano Configuration Manual
Copyright 2018Residents
Use Grid Edit
1. In the list of residents, select the Grid Edit checkbox at the top of the
window.
2. Click a resident’s name.
3. Edit the field, then use the Tab key to move to the next field.
4. When you are finished editing, unselect Grid Edit at the top of the
window.
3.6 Set up an OnSIP Account
This section describes how a resident sets up an OnSIP account.
3.6.1 Change the password
When the administrator adds an OnSIP account to a resident, OnSIP sends an
email to the resident.
Figure 22. Sample Email from OnSIP
The link directs the resident to the OnSIP site where the resident can reset her
password.
Figure 23. OnSIP Password Page
TX3 Nano Configuration Manual 39
Copyright 2018Residents
After the resident resets the password, OnSIP sends a confirmation email to the
resident.
Figure 24. Sample Confirmation Email
The resident now has the two pieces of information she needs to configure the
MiEntry app or another SIP client to receive calls from the TX3 Nano:
• User name. The first part of the SIP username (before the @), for example
jsmith
• Domain. The last part of the SIP username (after the @), for example
mircom.onsip.com
• SIP password
40 TX3 Nano Configuration Manual
Copyright 20184 Schedules and Holidays
This chapter explains
• Create Schedules and Holidays
• Delete a Schedule or Holiday
• Edit a Schedule or Holiday
• Hide a Schedule or Holiday
• View the Calendar
4.1 Create Schedules and Holidays
You can create a timetable to establish when certain functions are allowed to
occur, such as when calls to residents are allowed or when residents can grant
access to a visitor.
The procedures for creating a schedule or holiday are the same.
Create a schedule or holiday
1. Click Schedules.
TX3 Nano Configuration Manual 41
Copyright 2018Schedules and Holidays
The Schedules window appears.
Figure 25. Schedules
2. Click Add Schedule or Add Holiday at the top of the screen.
Figure 26. Add Schedule
3. Provide the following information:
Title. Type a name for the schedule or holiday.
Description. Type a more detailed description.
Color. Select a color that represents the schedule or holiday in the
calendar.
42 TX3 Nano Configuration Manual
Copyright 2018Schedules and Holidays
Holidays. For a schedule, select specific holidays or select them all.
• Exclude. If Exclude is selected, then the schedule is not active
during the selected holidays.
• Include. If Include is selected, then the schedule is active during
the selected holidays.
Periods. A period is a period of time that the schedule or holiday is active
for. A schedule or holiday can have more than one period.
Click Add Period and provide the following information:
• Name. Type a name for the period.
• Recurring. A period can recur - that is, you can define times when
the period is in effect, and when it is not in effect.
Select No if the period occurs only once (it is a single continuous
period of time). Select Weekly or Yearly if the period recurs
every week or every year.
• Event from. If you selected No, enter the start and end times and
dates for the period. If you selected Weekly, enter the times of day
when the period recurs. If you selected Yearly, enter the times and
dates when the period recurs.
• Repeat on. If you selected Weekly, select the days of the week
when the period recurs.
• Starts on. If you selected Weekly, enter the day when the
recurrences start. If you selected Yearly, enter the year when the
recurrences start.
• Ends. Enter the week or year when the recurrences end, or select
Never.
Note: Starts on and Ends define the start and end of all the recurrences of
the period.
4. Click Add Schedule or Add Holiday at the top of the window.
Note: If your schedule starts before midnight on one day and ends the next
day, you must define two periods (one for each day). For example,
if you have a schedule that goes from 10:00 PM on Tuesday to 2:00
AM on Wednesday, you need one period for Tuesday and a second
period for Wednesday. The Tuesday period starts at 10:00 PM and
ends at 11:59 PM; the Wednesday period starts at 12:00 AM and
ends at 2:00 AM.
TX3 Nano Configuration Manual 43
Copyright 2018Schedules and Holidays
4.1.1 Example Period
This example describes how to create a period that is in effect every weekday
from 9:00 am to 5:00 pm, and that starts on July 1 2018 and ends on December 31
2018.
• Recurring. Select Weekly.
• Event from. Select 9:00 to 17:00.
• Repeat on. Select the checkboxes to the left of M, T, W, T, and F.
• Starts on. Select July 1 2018.
• Ends. Select On, then select December 31 2018.
4.2 Delete a Schedule or Holiday
Delete a schedule or holiday
1. Click the trash icon beside the schedule or holiday that you want to
delete.
2. Click OK.
4.3 Edit a Schedule or Holiday
Edit a schedule or holiday
1. Click the edit icon beside the schedule or holiday that you want to
edit.
2. Make changes to the information as described in section 4.1 on page 41.
3. Click Save Changes.
4.4 Hide a Schedule or Holiday
Hide a schedule or holiday
• Click the eye icon beside the schedule or holiday that you want to
hide in the calendar.
Show a hidden schedule or holiday
• Click the eye icon beside the schedule or holiday that you want to
show in the calendar.
44 TX3 Nano Configuration Manual
Copyright 2018Schedules and Holidays
4.5 View the Calendar
The Schedules window shows a calendar of all schedules and holidays.
See all the schedules
• Click the Schedules tab.
See all the holidays
• Click the Holidays tab.
View the calendar by month, week, or day
• Click month, week, or day at the top of the calendar.
• Click the back and forward arrows to view the previous or next month,
week, or day.
See today’s schedules and holidays
• Click today at the top of the calendar.
TX3 Nano Configuration Manual 45
Copyright 20185 Events
This chapter explains
• View Events
• Export Events
5.1 View Events
The Events section displays all events received by the TX3 Nano.
See events
• Select Events.
The list of events appears.
Figure 27. Events
The view has the following columns:
• Event Type.
• Panel ID. Panel this event applies to.
• Time Stamp. Time stamp of the event.
• Description. Description of the event.
The list of events displays 20 events on each page. Click the arrow buttons at the
bottom of the page to go to the next and previous pages.
46 TX3 Nano Configuration Manual
Copyright 2018Events
5.1.1 Sort and find events
To sort the events
• Click the column header to sort the list by that column in either ascending
or descending order.
Find an event
• Use the four filters at the top of the window to search for:
• Event types
• Residents
• Levels (critical, trouble, warning, info, debug, trace)
• Panels
5.2 Export Events
To export the events as a CSV (comma-separated values) or PDF file
1. Click the button at the top of the leftmost column.
2. In the menu that appears, select the following information.
Figure 28. Export menu
Columns. Select or deselect the columns that you want to include in the
export.
Export all data as csv. Click this option to export all the data as a CSV
file, including the columns that are unselected.
TX3 Nano Configuration Manual 47
Copyright 2018Events
Export visible data as csv. Click this option to export only the columns
that you selected as a CSV file.
Export all data as pdf. Click this option to export all the data as a PDF
file, including the columns that are unselected.
Export visible data as pdf. Click this option to export only the columns
that you selected as a PDF file.
3. Open the CSV file in a spreadsheet program like Microsoft Excel, and
open the PDF file in Adobe Acrobat Reader.
48 TX3 Nano Configuration Manual
Copyright 20186 Using the TX3 Nano
This chapter explains
• Overview
• The TX3 Nano Buttons
• The TX3 Nano Display
6.1 Overview
Camera Speaker
Display
Home Call, Hang Up
Scroll up and Back Scroll down and Select
Figure 29. Front of the TX3 Nano
6.2 The TX3 Nano Buttons
• Scroll Up and Scroll Down: Press to scroll the list of residents up or down.
Press and hold to scroll quickly.
• Call, Hang Up and Select: Press to call the select resident. Press again to
disconnect the call.
Press this button to select a group or subgroup of residents.
TX3 Nano Configuration Manual 49
Copyright 2018Using the TX3 Nano
• Home and Back: Press to move to the top of the list of residents.
When in a group or subgroup, press again to go up one level.
Press and hold this button for 10 seconds to see the TX3 Nano’s IP address,
MAC address, and firmware version number.
6.3 The TX3 Nano Display
Status Bar
List of Names
Figure 30. The TX3 Nano Display
6.3.1 Icons in the Status Bar
Volume indicator
The TX3 Nano is configured with a list of residents (see section 3
on page 34)
The TX3 Nano does not have a list of residents
The TX3 Nano is registered with a SIP server
The TX3 Nano is attempting to register with the SIP server, but it
can still make SIP calls
The TX3 Nano is not registered with the SIP server, but it can still
make SIP calls
50 TX3 Nano Configuration Manual
Copyright 2018Using the TX3 Nano
The TX3 Nano’s SIP account details are not complete (see section
2.6.9 on page 22), and it cannot make SIP calls
Cellular network signal strength indicator (cellular models only)
A phone line is connected to the TX3 Nano
A phone line is not connected to the TX3 Nano
TX3 Nano Configuration Manual 51
Copyright 20187 Access Criteria
This chapter describes how the TX3 Nano controls access.
To prevent unauthorized access, there are various configurable features for
determining the conditions and type of access.
The Configurator lets you define and configure the various modes of operation
for managing access, defining inputs and assigning outputs. In order to
effectively use the Configurator, you must understand these configurable
features.
This chapter explains
• Lock and Unlock the Door
• Timers
• Call Restrictions
• System Status
7.1 Lock and Unlock the Door
The following operation applies only if the output is configured as Lock.
The door unlocks when:
• A valid DTMF digit is received from the resident’s phone while the PSTN
or GSM call is in progress
• A valid SIP message is received with a DTMF digit while a VOIP call is in
progress
When the door is unlocked, the Unlock Door for timer starts (see section
2.6.8 on page 22).
The door is also unlocked when the Auto Unlock Door schedule is active
(see section 2.8 on page 27).
The door is relocked when:
• The Unlock Door for timer ends
• The door sense input becomes active
52 TX3 Nano Configuration Manual
Copyright 2018Access Criteria
7.2 Timers
7.2.1 Maximum talk timer
The maximum talk timer starts when the communication between the TX3 Nano
and the tenant is established. When 10 seconds are left in the timer a warning beep
is send to the tenant to indicate the system is about to hang up. When the timer
ends, the TX3 Nano hangs up. The maximum talk timer can be programmed for
30 to 300 seconds (5 minutes). See section 2.6.6 on page 20.
7.2.2 Door held open warning timer
The door held open warning timer starts when access is granted. If this timer
expires but the door has not closed, a Door held open warning is issued to the
Configurator and the common trouble status becomes active. If the door closes
before the door held open warning timer expires, the timer resets and no warning
report is sent to the Configurator. The door held open warning timer is
programmable from 10 to 900 seconds (15 minutes). The default is 30 seconds.
See section 2.8 on page 27.
7.2.3 Door held open alarm timer
The door held open alarm timer starts when the door held open warning timer
expires and the door remains open. When this timer expires and the door is still
open, a Door held open alarm is sent to the Configurator and the common alarm
status becomes active. The door held open alarm timer is programmable from 10
to 900 seconds (15 minutes). The default is 60 seconds. See section 2.8 on page
27.
7.3 Call Restrictions
Calls to the resident from the TX3 Nano can be restricted by a schedule (see
section 2.6.7 on page 21).
7.4 System Status
The controller monitors inputs for trouble and alarm conditions.
7.4.1 Common trouble
The common trouble indicator is active when any of the following inputs receive
a trouble condition:
• Any supervised input
TX3 Nano Configuration Manual 53
Copyright 2018Access Criteria
• Door held open warning
The common trouble status clears only if all the above inputs are back in normal
state.
7.4.2 Common alarm
The common alarm status is active when any of the following inputs receive an
alarm condition:
• forced entry alarm
• door held open alarm
The common alarm status clears only if all the above inputs are back in normal
state.
7.4.3 Tamper alarm
The TX3 Nano has a tamper feature. If it is powered on and not mounted on the
mounting plate, a tone sounds. The tone stops sounding when it is mounted. The
TX3 Nano does not operate until the tamper alarm is restored.
54 TX3 Nano Configuration Manual
Copyright 20188 Specifications
Dimensions
219 mm x 147 mm x 47 mm (8 19/32” x 5 3/4” x 1 27/32”)
Weight
TX3-NANO-S4: 0.88 kg (1.95 lbs)
TX3-NANO-S4-CA, TX3-NANO-S4-CV, TX3-NANO-S4-CT, TX3-NANO-S4-CR:
0.9 kg (2 lbs)
Power over Ethernet
IEEE 802.3af/at
Auxiliary Power input
12-48 VDC / 15 W
Output
1 Form C dry contact relay with these contact ratings:
• 30 VDC/2 A
or
• 125 VAC/0.5 A
Display
colour TFT, 4.3”, 480x272, high brightness (800 nits)
Camera
5 megapixel with autofocus and IR LED for night vision
Speaker
1 W nominal, 2 W maximum
Audio Codec
G.711 μ-law
Video Codecs
H.263
H.263+
H.264
MPEG-4
TX3 Nano Configuration Manual 55
Copyright 2018Specifications
Operating Temperature
-30° C to 50° C (-22° F to 122° F)
Connections
2 inputs
1 output
1 phone line connection
1 auxiliary power input
1 Ethernet 10/100 PoE+ port
1 USB 2.0 port
1 slot for SIM card
56 TX3 Nano Configuration Manual
Copyright 20189 Warranty and Warning Information
WARNING!
Please read this document CAREFULLY, as it contains important warnings,
life-safety, and practical information about all products manufactured by the
Mircom Group of Companies, including Mircom and Secutron branded
products, which shall include without limitation all fire alarm, nurse call,
building automation and access control and card access products (hereinafter
individually or collectively, as applicable, referred to as “Mircom System”).
NOTE TO ALL READERS:
1. Nature of Warnings. The within warnings are communicated to the
reader out of an abundance of caution and create no legal obligation for
Mircom Group of Companies, whatsoever. Without limiting the
generality of the foregoing, this document shall NOT be construed as in
any way altering the rights and obligations of the parties, governed by the
legal documents that apply in any given circumstance.
2. Application. The warnings contained in this document apply to all
Mircom System and shall be read in conjunction with:
a. the product manual for the specific Mircom System that applies
in given circumstances;
b. legal documents that apply to the purchase and sale of a Mircom
System, which may include the company’s standard terms and
conditions and warranty statements;
c. other information about the Mircom System or the parties’ rights
and obligations as may be application to a given circumstance.
4. Security and Insurance. Regardless of its capabilities, no Mircom
System is a substitute for property or life insurance. Nor is the system a
substitute for property owners, renters, or other occupants to act prudently
to prevent or minimize the harmful effects of an emergency situation.
Building automation systems produced by the Mircom Group of
Companies are not to be used as a fire, alarm, or life-safety system.
TX3 Nano Configuration Manual 57
Copyright 2018Warranty and Warning Information
NOTE TO INSTALLERS:
All Mircom Systems have been carefully designed to be as effective as possible.
However, there are circumstances where they may not provide protection. Some
reasons for system failure include the following. As the only individual in
contact with system users, please bring each item in this warning to the attention
of the users of this Mircom System. Failure to properly inform system end-users
of the circumstances in which the system might fail may result in over-reliance
upon the system. As a result, it is imperative that you properly inform each
customer for whom you install the system of the possible forms of failure:
5. Inadequate Installation. All Mircom Systems must be installed in
accordance with all the applicable codes and standards in order to provide
adequate protection. National standards require an inspection and
approval to be conducted by the local authority having jurisdiction
following the initial installation of the system and following any changes
to the system. Such inspections ensure installation has been carried out
properly.
6. Inadequate Testing. Most problems that would prevent an alarm a
Mircom System from operating as intended can be discovered by regular
testing and maintenance. The complete system should be tested by the
local authority having jurisdiction immediately after a fire, storm,
earthquake, accident, or any kind of construction activity inside or outside
the premises. The testing should include all sensing devices, keypads,
consoles, alarm indicating devices and any other operational devices that
are part of the system.
NOTE TO USERS:
All Mircom Systems have been carefully designed to be as effective as possible.
However, there are circumstances where they may not provide protection. Some
reasons for system failure include the following. The end user can minimize the
occurrence of any of the following by proper training, testing and maintenance of
the Mircom Systems:
7. Inadequate Testing and Maintenance. It is imperative that the systems
be periodically tested and subjected to preventative maintenance. Best
practices and local authority having jurisdiction determine the frequency
and type of testing that is required at a minimum. Mircom System may not
function properly, and the occurrence of other system failures identified
below may not be minimized, if the periodic testing and maintenance of
Mircom Systems is not completed with diligence and as required.
8. Improper Operation. It is important that all system users be trained in the
correct operation of the alarm system and that they know how to respond
when the system indicates an alarm. A Mircom System may not function
as intended during an emergency situation where the user is unable to
58 TX3 Nano Configuration Manual
Copyright 2018You can also read