Lenovo Bootable Media Creator Installation and User Guide - Version 12.2.0 - Data Center ...
←
→
Page content transcription
If your browser does not render page correctly, please read the page content below
Lenovo Bootable Media Creator
Installation and User Guide

Version 12.2.0
Note

Before using this information and the product it supports, read the information in Appendix C “Notices” on
page 47.

(June 2021)
© Copyright Lenovo 2014, 2021.
Portions © Copyright IBM Corporation 2009, 2021
LIMITED AND RESTRICTED RIGHTS NOTICE: If data or software is delivered pursuant to a General Services
Administration (GSA) contract, use, reproduction, or disclosure is subject to restrictions set forth in Contract No. GS-35F-
05925.
Tables
1.   Acronyms . . . . . . . . . . . .      .   .   .   .   iii   6.   Supported bootable environment. . . . .    . . 7
2.   Supported Lenovo platforms . . . .    .   .   .   .    4    7.   Main menus of ThinkSystem and System x
3.   Supported IBM platforms . . . . . .   .   .   .   .    5         (for Lenovo or IBM) . . . . . . . . . .    .   25
4.   Supported Storage platforms . . . .   .   .   .   .    5    8.   Configuration settings . . . . . . . . .   .   34
5.   Operating systems supported by BoMC   .   .   .   .    6    9.   Return codes of commands . . . . . . .     .   42

© Copyright Lenovo 2014, 2021                                                                                        ii
iii Lenovo Bootable Media Creator Installation and User Guide
Contents

Tables . . . . . . . . . . . . . . . . . . ii                   Creating bootable media for Lenovo servers and
                                                                IBM servers . . . . . . . . . . . . . . . .            11
About this publication . . . . . . . . . . iii                  Creating bootable media for Storage systems . . .      15
Conventions and terminology . . . . . . . . . . iii             Updating existing bootable media. . . . . . . .        16
Publications and related information . . . . . . . . iv
Web resources . . . . . . . . . . . . . . . . iv                Chapter 5. Using bootable media . . . 23
                                                                Starting bootable media from GUI. . . . . . . .        23
Chapter 1. Technical overview . . . . . 1                       Starting bootable media from text user interface . .   24

Chapter 2. Hardware and software                                Chapter 6. Troubleshooting and
requirements . . . . . . . . . . . . . . . 3                    support . . . . . . . . . . . . . . . . . 27
Hardware requirements. . . . . . . . . .        .   .   .   3   Limitations and problems . . . . . . . . . . .         27
    Supported server models . . . . . . .       .   .   .   3   Workarounds . . . . . . . . . . . . . . . .            28
    EFI Boot . . . . . . . . . . . . . .        .   .   .   5   Lenovo XClarity Essentials Bootable Media
    IPv6 enablement. . . . . . . . . . .        .   .   .   5   Creator log file . . . . . . . . . . . . . . .         28
Software requirements . . . . . . . . . .       .   .   .   6
                                                                Appendix A. Accessibility features
    Supported operating systems . . . . .       .   .   .   6
                                                                for Lenovo XClarity Essentials Bootable
    Supported bootable media . . . . . .        .   .   .   6
                                                                Media Creator . . . . . . . . . . . . . 31
    Supported bootable environment . . . .      .   .   .   7
    Network requirements for acquiring update                   Appendix B. Lenovo XClarity
    packages . . . . . . . . . . . . .          . . . 7
                                                                Essentials Bootable Media Creator
Chapter 3. Downloading and                                      commands . . . . . . . . . . . . . . . 33
updating Lenovo XClarity Essentials                             How to read syntax diagrams . . . . . . . . .          33
Bootable Media Creator . . . . . . . . . 9                      Configuration file . . . . . . . . . . . . . .         33
Downloading Lenovo XClarity Essentials Bootable                 How to create bootable media using the CLI -
Media Creator . . . . . . . . . . . . . . . . 9                 lnvgy_utl_lxce_bomc_v.r.m_distribution . . . . .       35
Updating Lenovo XClarity Essentials Bootable
Media Creator . . . . . . . . . . . . . . . . 9                 Appendix C. Notices. . . . . . . . . . 47
                                                                Trademarks . . . . . . . . . . . . . . . .             48
Chapter 4. Creating and updating                                Important notes . . . . . . . . . . . . . . .          48
bootable media . . . . . . . . . . . . 11
                                                                Index . . . . . . . . . . . . . . . . . . 49

© Copyright Lenovo 2014, 2021                                                                                           i
ii Lenovo Bootable Media Creator Installation and User Guide
About this publication
This publication provides information about how to download and use Lenovo XClarity® Essentials Bootable
Media Creator (hereinafter referred to as BoMC), including creating and using BoMC to update, diagnose,
manage, troubleshoot, and support systems.

Conventions and terminology
Paragraphs that start with a Note, Important, or Attention in bold have specific meanings to highlight key
information:

Note: These notices provide important tips, guidance, or advice.

Important: These notices provide information or advice that might help you avoid inconvenient or difficult
situations.

Attention: These notices indicate possible damage to programs, devices, or data. An attention notice
appears before the instruction or situation in which damage can occur.

In this book, when you are instructed to enter a command, type the command and press Enter.

The following table provides a description of commonly used acronyms in the Lenovo Bootable Media
Creator Users Guide and graphical user interface.

Table 1. Acronyms

 Acronym                          Definition
 AMM                              Advanced Management Module

 BIOS                             Basic Input Output System

 BMC                              Base Management Controller

 CLI                              Command Line Interface
 DHCP                             Dynamic Host Configuration Protocol

 DSA                              Dynamic System Analysis

 EFI                              Extensible Firmware Interface
 FTP                              File Transfer Protocol
 GUI                              Graphical User Interface

 HBA                              Host Bus Adapter

 HTTP                             Hypertext Transfer Protocol

 IMM                              Integrated Management Module

 IPv6                             Internet Protocol version 6
 ISO                              International Organization for Standardization

 NFS                              Network File System

 PXE                              Preboot Execute Environment
 RSA                              Remote Supervisor Adapter

© Copyright Lenovo 2014, 2021                                                                                iii
Table 1. Acronyms (continued)

 Acronym                                 Definition
 SOL                                     Serial Over LAN
 SSL                                     Secured Socket Layer

 TFTP                                    Trivial File Transport Protocol

 uEFI                                    Unified Extensible Firmware Interface
 USB                                     Unified Serial Bus
 UXSP                                    UpdateXpress System Pack

 VLAN                                    Virtual Local Area Network

Publications and related information
To view a PDF file, you need Adobe Acrobat Reader, which can be downloaded for free from the Web site at:
http://www.adobe.com/products/acrobat/readstep.html

Publications
Lenovo Bootable Media Creator (BoMC) User Guide

Use this Web site to download the most up-to-date version of Lenovo Bootable Media Creator Installation
and User Guide.

Web resources
The following Web sites provide tool and information resources for Bootable Media Creator.

Web sites
• Bootable Media Creator (BoMC) for Lenovo x86 servers
     Use this Web site to download the Lenovo XClarity Essentials Bootable Media Creator tool and
     documentation.
• Lenovo XClarity Essential website
     Use this Web site to download tools that support ThinkSystem, System x, and BladeCenter products.

These Web sites provide information about product compatability and support, warranties and licenses, and
various technical resources:
• Lenovo BladeCenter Support products and services
• Lenovo Server Proven
• Lenovo Server and Storage Resource Library

Forums
Use these Web sites to learn about various forums that are available to discuss technology-related and
product-related issues pertaining to ThinkSystem, System x, and BladeCenter hardware and software
products. These Web sites include links for obtaining the forums using Rich Site Summary (RSS) feeds.
• ThinkSystem Forum Web site
• System x Forum Web site
• BladeCenter Forum website

iv    Lenovo Bootable Media Creator Installation and User Guide
Chapter 1. Technical overview Users can use Lenovo XClarity Essentials Bootable Media Creator (hereinafter referred to as BoMC) to create bootable media suitable for firmware updates, VPD updates, inventory and FFDC collection, advanced system configuration, FoD Keys management, and diagnostics on supported ThinkSystem, System x, BladeCenter systems, and storage platform. Using BoMC, users can create a single bootable image on supported media (such as CD, DVD, ISO image, USB flash drive, or set of PXE files) that bundles multiple ThinkSystem, System x, and BladeCenter systems updates from UpdateXpress System Packs containing firmware update packages. From V11.4.0, BoMC supports users to update firmware on supported storage platforms through bootable ISO. From V11.5.1, BoMC supports users to create a full (all-in-one) bootable image for full management function, including firmware update, VPD update, inventory and FFDC collection, advanced system configuration, FoD Keys management, diagnostics, RAID configuration, and secure erase. Important: Device drivers are not included in the bootable image and must be updated separately. BoMC can acquire the latest bootable environment, UpdateXpress System Pack, individual updates, and other required components from the local system. You can also download these components from the Lenovo Web site. You can use an HTTP proxy server when connecting to the Lenovo Web site. The server shall support SSL. You can run only one instance of Bootable Media Creator on a system at a time, whether it is started from the graphical or command-line interface. You must have administrator or root-equivalent operating-system privileges to use Bootable Media Creator. © Copyright Lenovo 2014, 2021 1
2 Lenovo Bootable Media Creator Installation and User Guide
Chapter 2. Hardware and software requirements
Lenovo XClarity Essentials Bootable Media Creator has specific requirements for hardware and software.
These requirements include support for operating systems and hardware running Bootable Media Creator,
and support for certain hardware for creating and using bootable media. This section provides information
about the hardware and software requirements of BoMC.

Hardware requirements
To successfully run BoMC, the system installed with BoMC should meet the following hardware
requirements.

• The system running BoMC should have 1.5 GB or more of available disk space.

   Note: The required disk space depends on the size of bootable media that you want to create. You must
   have at least four times the disk space used by the working directory, which includes the bootable
   environment, update packages, and tools. For example, if the size of the bootable ISO image and the
   working directory you create is 600 MB, the required free disk space is: 4 * 600 MB = 2.4 GB.
• The Intel or AMD x86 processor-based systems booted by the created bootable media should have 1.5
  GB or more of available memory.
• For PXE media, you must have at least four times the memory of the created PXE image. For example, if
  the created PXE image is 600 MB, the required memory is 4 * 600 MB = 2.4 GB to boot the PXE image.

Supported server models
You can use Bootable Media Creator to create bootable media that supports various ThinkSystem,
BladeCenter, Flex System, and System x servers.

© Copyright Lenovo 2014, 2021                                                                               3
Table 2. Supported Lenovo platforms

        Series                                                  Server models
                          •   DX1100U Gateway (7D49)                   •   SR630 V2 (7Z70, 7Z71)
                          •   DX1100U Performance/Capacity (7D4A)      •   *SR635 (7Y98, 7Y99)
                          •   DXN2000 Storage (7D5W)                   •   SR645 (7D2X, 7D2Y)
                          •   Microsoft Azure Edge Device (7D6Q)       •   SR650 (7X05, 7X06)
                          •   SD530 (7X21)                             •   SR650 V2 (7Z72, 7Z73)
                          •   SD630 V2 (7D1K)                          •   *SR655 (7Y00, 7Z01)
                          •   SD650 DWC (7X58)                         •   SR665 (7D2V, 7D2W)
                          •   SD650 V2 (7D1M)                          •   SR670 (7Y36, 7Y37, 7Y38)
                          •   SD670 V2 (7D1N)                          •   SR670 V2 (7Z22, 7Z23)
                          •   SE350 (7D1X, 7Z46)                       •   SR850 (7X18, 7X19)
 ThinkSystem              •   SN550 (7X16)                             •   SR850 V2 (7D31, 7D32, 7D33)
                          •   SN550 V2 (7Z69)                          •   SR850P (7D2H, 7D2F, 7D2G)
                          •   SN850 (7X15)                             •   SR860 (7X69, 7X70)
                          •   SR150/SR158 (7Y54, 7Y55)                 •   SR860 V2 (7Z59, 7Z60, 7D42)
                          •   SR250/SR258 (7Y51, 7Y52, 7Y53, 7Y72,     •   SR950 (7X11, 7X12, 7X13)
                              7Y73)                                    •   ST250/ST258 (7Y45, 7Y46, 7Y47)
                          •   SR530 (7X07, 7X08)                       •   ST550 (7X09, 7X10)
                          •   SR550 (7X03, 7X04)                       •   ST558 (7Y15, 7Y16)
                          •   SR570 (7Y02, 7Y03)                       •   ST650 V2/ST658 V2 (7Z74, 7Z75, 7Z76)
                          •   SR590 (7X98, 7X99)
                          •   SR630 (7X01, 7X02)

                          • ThinkAgile VX Series (7D1Y, 7D28, 7D2Z,    • ThinkAgile HX Series (7D0W, 7D0Y, 7D0Z,
                            7D43, 7Y12, 7Y13, 7Y14, 7Y92, 7Y93,          7D11, 7D1Z, 7D20, 7D29, 7D2T, 7D46,
                            7Y94, 7Z12, 7Z13, 7Z58, 7Z62, 7Z63)          7D4R, 7D52, 7D5U, 7X82, 7X83, 7X84,
 Solutions
                          • ThinkAgile MX Certified (7D1B, 7D1H,         7Y88, 7Y89, 7Y90, 7Y95, 7Y96, 7Z03,
                            7D2E, 7D5R, 7D5S, 7D5T, 7Z20)                7Z04, 7Z05, 7Z06, 7Z07, 7Z08, 7Z09,
                                                                         7Z82, 7Z84, 7Z85)

                          • SR590/SR588 (7D4M)
 ThinkServer              • SR860P (7D5D)
                          • WH5900 Appliance (7D5V)

 Note: The server models starting with an asterisk (*) are AMD one socket processor-based servers, whose full media
 only support partial functions in Menu. For more information, refer to Table 7 “Main menus of ThinkSystem and
 System x (for Lenovo or IBM)” on page 25.

4   Lenovo Bootable Media Creator Installation and User Guide
Table 3. Supported IBM platforms
Series Server models
• dx360 M4 (7912, 7913) • x3250 M6 (3633, 3943)
• dx360 M4 Water Cooled server (7918, • x3300 M4 (7382)
7919) • x3400 M2 (7836, 7837)
• dx360 M2 server (6391, 7621, 7323) • x3400 M3 (7378, 7379)
• HS22 (7809, 7870, 1936, 1911) • x3500 M2 (7839)
• HS22V (7871, 1949) • x3500 M2 (7380)
• HS23 (1929, 7875) • x3500 M4 (7383)
• HS23E (8038, 8039) • x3500 M5 (5464)
• HX Series (8693, 8695) • x3530 M4 (7160)
• *HX5 (1909, 1910, 7872, 7873) • x3550 M2 (4198, 7946)
• nx360 M4 (5455) • x3550 M3 (7944, 4254)
• nx360 M5 (5465) • x3550 M4 (7914)
• nx360 M5 DWC (5467) • x3350 M5 (5463, 8869)
• Smart Analytics System (7949) • x3620 M3 (7376)
• x220 Compute Node (7906, 7916) • x3630 M3 (7377)
System x
• x240 (7162, 2588) • x3630 M4 (7158)
• x240 Compute Node (8738, 8737, 7863, • x3650 M2 (7947, 4199)
8956) • x3650 M3 (7945, 5454, 4255)
• x240 M5 (2591, 9532) • x3650 M4 (7915)
• *x280/X480/X880 X6 (4259, 7903) • x3650 M4 BD (5460, 5466)
• x440 Compute Node (7917) • x3650 M5 (5462, 8871)
• *x880 X6 (7196, 4258) • x3690 X5 (7147, 7149, 7192, 7148)
• x3100 M4 (2582) • x3750 M4 (8733, 8718, 8722, 8752, 8753)
• x3100 M5 (5457) • x3755 M3 (7164)
• x3200 M2 (4367, 4368) • *x3850 X5/X3950 X5
• x3200 M3 (7327, 7328) (7143,7145,7146,7191)
• x3250 M2 (4194, 4190, 7657, 4191) • *x3850 X6/X3950 X6 (6241)
• x3250 M3 (4261, 4251, 4252) • x3850/X3950 X6 (3839,3837)
• x3250 M4 (2583) • x440 M5 (2590,7167)
• x3250 M5 (5458)
Note: The server models starting with an asterisk (*) support both single node and multiple node.
Table 4. Supported Storage platforms
Series Server models
Storage • D1212/D1224 (4587) • D3284 (6413)
EFI Boot
BoMC supports creating EFI bootable media. uEFI supports the Legacy mode and the EFI mode. The boot
modes in the uEFI settings should be set to UEFI Only or UEFI and Legacy.
For Lenovo system, the bootable media created by BoMC V11.5.1 or later versions supports both the EFI
mode and the Legacy mode. For IBM system, all created bootable media supports the EFI mode, and only
PXE bootable media supports the Legacy mode. For more information, refer to Supported boot modes of
bootable media.
IPv6 enablement
From V9.20, BoMC supports IPv6 addressing. This section provides information about enabling IPv6
compatibility.
SOL connections
To use BoMC on a SOL connection in an IPv6 network, all of the following requirements should be met:
Chapter 2. Hardware and software requirements 5• The network connectivity between the SOL console and the target server uses IPv6.
• Network connectivity for a file transfer in the unattended mode has been set up before establishing
the SOL connection.
Acquisition
• BoMC can perform acquisition over a direct LAN connection by using IPv6.
• BoMC can acquire and update the support list through a proxy server with IPv6. The network
connection between the proxy server and the target server is not restricted by IPv6.
Connection test
• You can test the connectivity from the HTTP Proxy page of the BoMC by inputting an IPv6 address
enclosed in brackets: [2002:325b:1000::97d:5a20].
• The IPv6 protocol stack is preinstalled on the system running BoMC.
Software requirements
To successfully run BoMC, the system installed with BoMC should meet the following software
requirements.
Supported operating systems
Lenovo XClarity Essentials Bootable Media Creator supports the following operating systems, which include
32-bit and 64-bit versions.
Table 5. Operating systems supported by BoMC
Operating systems Editions
• Microsoft Windows 7
• Microsoft Windows 8
• Microsoft Windows 10
• Microsoft Windows 2008 R2
Windows
• Microsoft Windows Server 2012
• Microsoft Windows Server 2012 R2
• Microsoft Windows Server 2016
• Microsoft Windows Server 2019
RedHat
• Red Hat Enterprise Linux 7 Server (x64) Editions (up to SP9)
• Red Hat Enterprise Linux 8 Server (x64) Editions (up to SP3)
Linux
SUSE
• SUSE Linux Enterprise Server 12 (x64) (up to SP5)
• SUSE Linux Enterprise Server 15 (x64) (up to SP2)
Notes:
• Because there is no executable file for the Windows 64-bit operating system, you can run the executable file for the
Windows 32-bit operating system through Windows on Windows (WOW).
• You cannot run Bootable Media Creator on Windows Preinstallation Environment (WinPE).
Supported bootable media
Lenovo XClarity Essentials Bootable Media Creator creates bootable images on several forms of media,
including CD, DVD, ISO image, PXE files, and USB flash drive.
Supported PXE servers
You can create bootable Preboot Execution Environment (PXE) files for the following PXE servers:
6 Lenovo Bootable Media Creator Installation and User Guide• Altiris PXE server (Windows only)
• Dynamic Host Configuration Protocol (DHCP) server (Linux only)
• Trivial File Transport Protocol (TFTP) server (Linux only)
Supported USB flash drives
You can create bootable media on the following USB flash drives:
• Lexar USB flash drives, including the JumpDrive Lightning series
• SanDisk USB flash drives, including the Cruzer Micro series
Important: If the capacity of USB flash drive is larger than 32GB, only 32GB is formatted and used by the
bootable media. You need to manually format the extra space if you want to use it for other tasks.
Supported bootable environment
Lenovo XClarity Essentials Bootable Media Creator requires a compatible bootable environment for creating
bootable media. Each bootable environment version listed in the following table is aligned with a version
number in the bootable environment zip file.
Table 6. Supported bootable environment
BoMC version Recommended Bootable Environment Version
Earlier versions of BoMC 9.50 140
Between 9.50 and 9.63 141
BoMC 10.0, 10.1, 10.2, and 10.3 7.42
BoMC 11.0, 11.1.0 7.42 and 1.0.0-1.0.0
BoMC 11.2.0, 11.3.0, 11.4.0, 11.5.0 7.42, 1.0.0-1.0.1 and later versions
BoMC 11.5.1, 11.6.0 7.50, 1.0.0–1.3.6 and later versions
BoMC 11.7.0 7.50, 1.0.0–1.3.9 and later versions
BoMC 11.8.0 7.50, 1.0.0–1.4.3 and later versions
BoMC 11.9.0 7.50, 1.0.0–1.4.4 and later versions
BoMC 12.0.0 7.50, 1.0.0–1.4.5 and later versions
BoMC 12.1.0 7.50, 1.0.0–1.4.7 and later versions
BoMC 12.1.2, 12.2.0 7.50, 1.0.0–2.0.0 and later versions
Note: If you create media from a local repository and specify the --toolzip or -t option, BoMC reports the
following warning message: The bootable environment is not the supported version. It may cause failure to
create media. Are you sure you want to continue? (y or n)
Network requirements for acquiring update packages
BoMC supports to acquire the updates for the Lenovo system and the IBM system.
• To acquire the updates for the Lenovo system from Lenovo Web site, ensure that the firewall allows the
following DNS and ports. Users can also obtain the URL from https://support.lenovo.com/services/
ContentService/SearchDrivers.
Chapter 2. Hardware and software requirements 7DNS Port Protocol
support.lenovo.com 443 and 80 HTTP and HTTPS
download.lenovo.com 443 and 80 HTTPS
• To acquire the updates for the IBM system from IBM Web site, ensure that the firewall allows the following
DNS and ports. Users can also obtain the URL from https://www-03.ibm.com/services/projects/ecc/
serviceProviderIBM.gzip.
DNS IP address Port Protocol
www.ibm.com / / /
www-03.ibm.com 204.146.30.17 443 and 80 HTTP and HTTPS
eccgw01.boulder.ibm.com 207.25.252.197 443 HTTPS
Notes: To use a proxy to acquire updates, ensure that the proxy meets the following requirements:
• The proxy is accessible to one of the following DNS: www.ibm.com, www-03.ibm.com, eccgw01.boulder.
ibm.com, support.lenovo.com, and download.lenovo.com.
• The proxy is set to “Use basic authentication”.
• The proxy is a non-terminating and forwarding proxy.
8 Lenovo Bootable Media Creator Installation and User GuideChapter 3. Downloading and updating Lenovo XClarity
Essentials Bootable Media Creator
This section provides information about downloading and updating BoMC.
Downloading Lenovo XClarity Essentials Bootable Media Creator
Bootable Media Creator is a self-extracting application that does not require installation and is ready to be
used after downloading. The files are extracted automatically to a random, temporary directory each time
Bootable Media Creator runs.
You can download Bootable Media Creator from the Web site at:
http://datacentersupport.lenovo.com/us/en/documents/LNVO-BOMC
Attention: For security reasons, store the Bootable Media Creator application, including its extractions, and
all the sensitive logs to a safe place where only authorized users can access.
Updating Lenovo XClarity Essentials Bootable Media Creator
You can download the latest version of BoMC from Lenovo Web site to your local system by using BoMC.
Complete the following procedure to update Bootable Media Creator:
Step 1. To start the Bootable Media Creator wizard, enter the applicable command name for your
operating system with no options on the command line, or double-click BoMC executable file in the
file explorer of your operating system.
Bootable Media Creator command names vary in different operating systems from which you are
running the command. The following table lists the name of the command for each supported
operating system. xxx_xx.x.x indicates the version of BoMC. For more information about the
supported operating systems, see “Supported operating systems” on page 6.
Operating system Command name
Microsoft Windows lnvgy_utl_lxce_bomcxxx_xx.x.x_windows_i386.exe
Red Hat Enterprise Linux 7.X AMD64/EM64T and lnvgy_utl_lxce_bomcxxx_xx.x.x_rhel_x86-64.bin
above
SUSE Linux Enterprise Server 12.X AMD64/EM64T lnvgy_utl_lxce_bomcxxx_xx.x.x_sles_x86-64.bin
and above
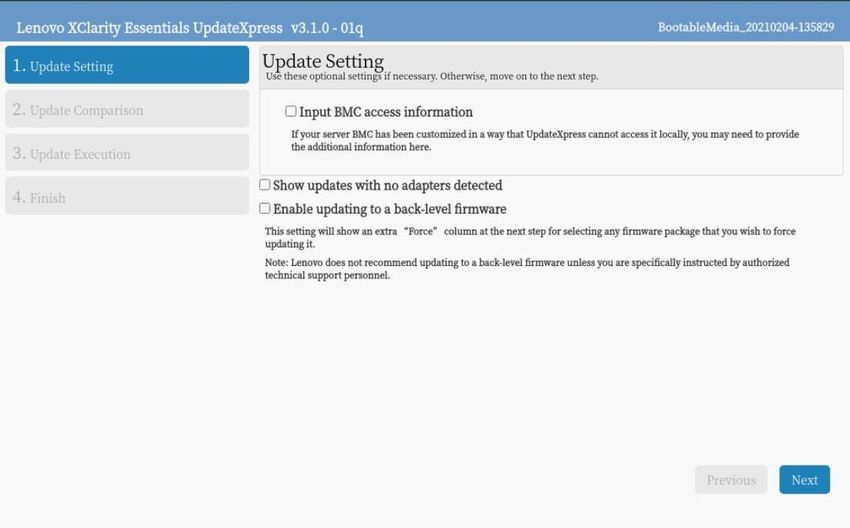
Step 2. To check the Web for the latest version of BoMC and download the latest version, click Check for
the latest version of this tool, and save the file in the directory where the command is running.
Step 3. Click Next.
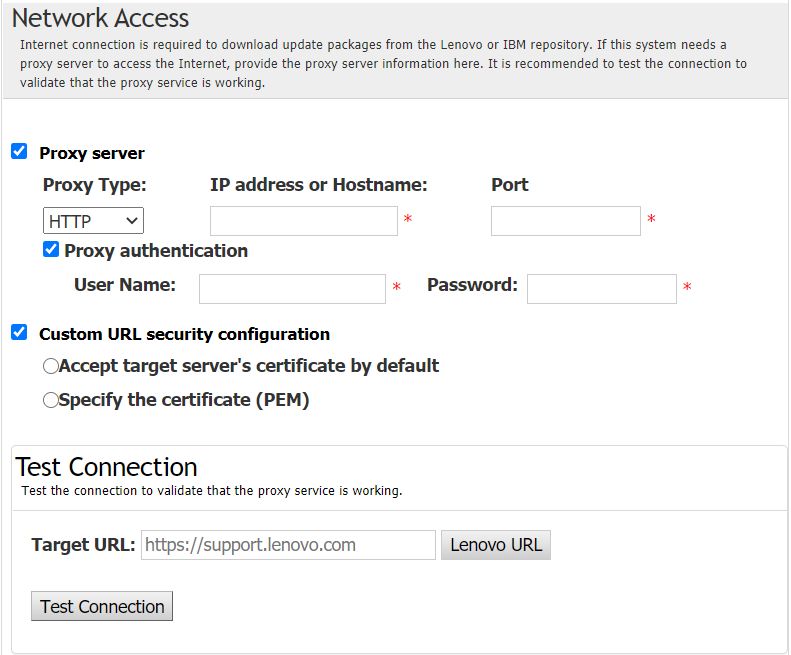
Step 4. On the Network Access page, if you have no special requirement for security access, click Test
Connection to check the network connection of the Target URL, and click Next.
If you have more security concerns, before clicking Test Connection, configure Proxy server and/
or Custom URL security configuration depending on your security requirements as follows:
– Proxy server
1. Select Proxy Server if you require an HTTP/HTTPS proxy to connect to the Web, and
complete the following fields:
© Copyright Lenovo 2014, 2021 9Proxy Type The proxy type of the proxy server.
IP address or Hostname The host name, IP address, or domain name of the proxy
server.
Port The port number of the proxy server.
2. Select Proxy authentication if credentials must be specified to authenticate to the proxy
server, and complete the following fields:
User Name The user name for authenticating to the proxy server.
Password The password for the specified user name.
– Custom URL security configuration
Select Custom URL security configuration if you require a reverse proxy, and select one of the
following options:
– Accept target server’s certificate by default
– Specify the certificate (PEM)
Step 5. Select one of the following options:
If the latest version is not available, click Next to continue creating bootable media, or click Cancel
to close the wizard.
If the latest version is available, click Download Now to download the latest version.
10 Lenovo Bootable Media Creator Installation and User GuideChapter 4. Creating and updating bootable media
You can use Lenovo XClarity Essentials Bootable Media Creator to create and update bootable images on
various media. The topics in this section describe how to create and update bootable images for each type
of media.
Creating bootable media for Lenovo servers and IBM servers
You can create one of the following bootable images for both Lenovo servers and IBM servers at the same
time, including the ThinkSystem and System x servers:
• Bootable ISO image
• Bootable USB storage drive
• Bootable CD/DVD
• Bootable PXE file
Complete the following procedure to create bootable media.
Step 1. On a command line, enter the command name without options to start the Bootable Media Creator
wizard.
Note: The command name varies in different operating systems where the commands are running.
The following table lists the command name for each supported operating system. For more
information about the supported operating systems, see “Supported operating systems” on page
6.
Operating system Command name
Microsoft Windows lnvgy_utl_lxce_bomcxxx_xx.x.x_windows_i386.exe
Red Hat Enterprise Linux 7.X AMD64/EM64T and lnvgy_utl_lxce_bomcxxx_xx.x.x_rhel_x86-64.bin
above
SUSE Linux Enterprise Server 12.X AMD64/EM64T lnvgy_utl_lxce_bomcxxx_xx.x.x_sles_x86-64.bin
and above
Step 2. On the Welcome page, input the description in the Descriptive name field. The descriptive text is
displayed on the screen when you use the bootable media.
Step 3. Click Next.
Step 4. On the Targeted System page, select one or more machine types to be supported by the bootable
media, click Next, and do one of the following based on your needs:
• To update the system support list for all functions, click Update List.
• To roll back to the original system support lists bundled with each function, click Rollback.
• To add or delete machine types for Lenovo systems, click + or -.
Notes:
• If you select the machine types in the Lenovo Platforms table or the IBM Platforms table, you
cannot select the machine types in the Storage Platforms table.
• If you select the machine types in the Lenovo Platforms table and the IBM Platforms table at the
same time, you can only select “Full” in next step.
© Copyright Lenovo 2014, 2021 11• If a function is not supported by a system, selection of the unsupported function is disabled in
this system.
Step 5. On the Media Purpose page, complete the following fields, and click Next:
Updates
Select this option to bundle LXCE UpdateXpress and firmware updates for the targeted
systems on the bootable media.
• The firmware is updated in LXCE UpdateXpress.
• This function updates only firmware. Device drivers must be updated separately.
• If both Lenovo and IBM systems are selected, the update function is not supported.
Full
Select this option to integrate all functions in one image, including firmware updates, VPD
updates, inventory and FFDC collection, advanced system configuration, diagnostics, RAID
configuration, secure erase, and so on.
To generate the RAID configuration, select Look in a local directory for the RAID
configuration file (*.ini), then the RAID configuration file will be generated in the specified
path.
Step 6. On the Acquire Location page, complete the following fields, and then click Next:
Check the Lenovo Web site
Before creating the bootable media, select this radio button to acquire the latest updates from
the Lenovo Web site.
UpdateXpress System Pack (UXSPs)
It is the preferred method to obtain updates.
Select this radio button to acquire complete UpdateXpress System Packs. Each
UpdateXpress System Pack contains an integration-tested bundle of online, firmware
updates for each ThinkSystem, System x, and BladeCenter system.
Latest available individual updates
Select this option to acquire individual updates.
Look in a local directory
Select this option to acquire updates, tools, and boot environment from the local system. Input
the fully qualified path and file name in the given field, or click the Browse to select the file.
Step 7. On the Network Access page, if you have no special requirement for security access, click Test
Connection to check the network connection of the Target URL, and click Next.
If you have more security concerns, before clicking Test Connection, configure Proxy server and/
or Custom URL security configuration depending on your security requirements as follows:
– Proxy server
1. Select Proxy Server if you require an HTTP/HTTPS proxy to connect to the Web, and
complete the following fields:
Proxy Type The proxy type of the proxy server.
IP address or Hostname The host name, IP address, or domain name of the proxy
server.
Port The port number of the proxy server.
12 Lenovo Bootable Media Creator Installation and User Guide2. Select Proxy authentication if credentials must be specified to authenticate to the proxy
server, and complete the following fields:
User Name The user name for authenticating to the proxy server.
Password The password for the specified user name.
– Custom URL security configuration
Select Custom URL security configuration if you require a reverse proxy, and select one of the
following options:
– Accept target server’s certificate by default
– Specify the certificate (PEM)
Step 8. Click Next to go to the Target Directory page.
Step 9. On the Target Directory page, specify the directory where you want to store the downloaded files.
Step 10. On the Media Format page, specify the format to use for the bootable media.
To create an ISO image:
1. For Device type, select CD/DVD.
2. Select Write to image file and then type the fully qualified path and file name for the ISO
image in the given field.
To create a CD or DVD:
1. For Device type, select CD/DVD.
2. Select Write directly to device to write the bootable medium to the specified CD or DVD
drive.
Chapter 4. Creating and updating bootable media 133. For Disk, select the letter associated with the CD or DVD drive for Windows (such as E:) or the
device name for Linux (such as /dev/hdb).
To create a USB flash drive:
1. For Device type, select USB.
2. Select Write directly to device to write the bootable medium to the specified USB flash drive.
3. For Disk, select the letter associated with the USB flash drive for Windows (such as E:) or the
device name for Linux (such as /dev/sdb).
To create PXE files:
1. For Device type, select PXE.
2. For PXE TFTP server address, specify the IP address of the TFTP server to use for PXE boot.
3. For Directory to write PXE files to, select the fully qualified path or click Browse to select the
path where you want to write the PXE files in the given field.
Step 11. Click Next. If you selected only UXSPI functions on the Media Purpose page, the Unattended Mode
Configuration page is displayed. Complete the following applicable fields:
Reboot BMC after updating BMC firmware automatically
Do not use unattended mode
Select this radio button to disable unattended mode.
Use unattended mode
Select this radio button to enable unattended updates. If you select this option, you must
complete the following additional fields:
Upload log files to:
Use this list to choose where to place the log files when unattended updates are
complete. Your choices are:
• TFTP Server
• FTP Server
• NFS Share
• Samba Server
• USB Drive
• SFTP Server
Notes:
1. To upload log files to a TFTP, FTP, Samba or SFTP server, or to an NFS share, the
directory where the files are to be uploaded must already exist (it will not be created
as part of the upload process), and it must allow anonymous access.
2. To upload the unattended log package to the specified location, you must ensure that
you can perform the following actions, if you are using the Rhel6.4 x86-64 operating
system environment:
• For Samba shares: mount -t cifs //$address/$directory $mount_point -o user=
anonymous, password=anonymous
• For NFS shares: mount -t nfs $address:$directory $mount_point
• For FTP and TFTP uploads, ensure that the local file can be uploaded to the
address and directory specified in the F T P or T F T P command.
3. Considering the security, users should input the credential of the FTP/Samba/SFTP
server in the unattended mode.
Server Address
14 Lenovo Bootable Media Creator Installation and User GuideThe address of the server where the log files will be loaded.
Save to directory
The directory where the logs are saved.
Shutdowm bootable environment after updating firmware automatically.
Step 12. On the Confirm Choices page, review the configuration information you provided for creating the
bootable media.
Step 13. Optional: Click Save to save this configuration information to a file, which you can import into this
tool to recreate this bootable media at a later time.
Step 14. On the Update Selection page, select the packages to be updated.
Step 15. Click Next.
The Creation Progress page is displayed. Bootable Media Creator acquires UpdateXpress System
Pack updates, Update tool and Maintenance Mode OS, additionally acquires Dynamic System
Analysisand Advance System Utility if System X server and FULL function are selected on the
Media Purpose page, and then creates the bootable media. A progress bar indicates that the
acquisition and creation are in progress and shows the percentage of progress.
To create a new USBKey, you can select an existing USBKey, and click Create Again. The same
USBKey will be created.
Step 16. When the bootable media is finished, copy and save the commands generated, and click Next.
Step 17. Click Finish.
Creating bootable media for Storage systems
You can create a bootable ISO image for Storage systems.
Complete the following procedure to create bootable media.
Note: You can also run the command bomc.exe --function=jbod --iso bootable.iso -l workingdir to create
the bootable media for Storage systems.
Step 1. On a command line, enter the command name with no option to start the Bootable Media Creator
wizard.
The command name varies and is based on the operating system from which you are running the
command. The following table lists the name of the command for each supported operating
system. For more information about the supported operating systems, see “Supported operating
systems” on page 6.
Operating system Command name
Microsoft Windows lnvgy_utl_lxce_bomcxxx_xx.x.x_windows_i386.exe
Red Hat Enterprise Linux 7.X AMD64/EM64T and lnvgy_utl_lxce_bomcxxx_xx.x.x_rhel_x86-64.bin
above
SUSE Linux Enterprise Server 12.X AMD64/EM64T lnvgy_utl_lxce_bomcxxx_xx.x.x_sles_x86-64.bin
and above
Step 2. On the Welcome page, type a description in the Descriptive name field. The descriptive text is
displayed on the screen when you use the bootable media.
Step 3. Click Next.
Step 4. On the Targeted System page, select one or more machine types to be supported by the bootable
media, and then click Next.
Chapter 4. Creating and updating bootable media 15Notes:
• If you select the machine types in the Lenovo Platforms table or the IBM Platforms table, you
cannot select the machine types in the Storage Platforms table.
• If a function is not supported by a system, selection of the unsupported function is disabled for
that system.
Step 5. On the Acquire Location page, complete these fields, and then click Next:
Look in a local directory
Select this option to find boot environment from the local system. Type the fully qualified path
and file name in the given field, or click Browse to select the file.
Note: The jbod update utility must be put into the local directory manually. Boot environment can
be downloaded from the Web, if it is not found in the local directory.
Step 6. Click Next to go to the Media Format page.
Step 7. On the Media Format page, select Write to image file, and specify the fully qualified path and file
name for the ISO image in the given field.
Step 8. Click Next. On the Confirm Choices page, review the configuration information you provided for
creating the bootable media.
Step 9. Optional: Click Save to save this configuration information to a file, which you can import into this
tool to recreate this bootable media at a later time.
Step 10. Click Next.
The Creation Progress page is displayed. Bootable Media Creator downloads the related files for
Storage systems, and then creates the bootable media. A progress bar indicates that the
acquisition and creation are in progress and shows the percentage of progress.
Step 11. When the bootable media is finished, click Next.
Step 12. Click Finish.
Updating existing bootable media
You can update bootable images on writable media using the image configuration file created by Lenovo
XClarity Essentials Bootable Media Creator.
Complete the following procedure to update existing bootable media.
Step 1. On a command line, enter the command name with no options to start the Bootable Media Creator
wizard. The command name varies and is based on the operating system from which you are
running the command. The following table lists the name of the command for each supported
operating system. For more information about the supported operating systems, see “Supported
operating systems” on page 6.
Operating system Command name
Microsoft Windows lnvgy_utl_lxce_bomcxxx_xx.x.x_windows_i386.exe
Red Hat Enterprise Linux 7.X AMD64/EM64T and lnvgy_utl_lxce_bomcxxx_xx.x.x_rhel_x86-64.bin
above
SUSE Linux Enterprise Server 12.X AMD64/EM64T lnvgy_utl_lxce_bomcxxx_xx.x.x_sles_x86-64.bin
and above
Step 2. On the Welcome page, type a description in the Descriptive name field. The descriptive text is
displayed on the screen when you use the bootable media.
16 Lenovo Bootable Media Creator Installation and User GuideStep 3. Click Load in a previously saved configuration to load settings that are defined in a specific
configuration file.
Step 4. Click Next.
Step 5. Type the fully qualified path and file name for the configuration file, and then click Next.
Step 6. On the Targeted System page, select one or more machine types to be supported by the bootable
media, click Next, and do one of the following based on your needs:
• To update the system support list for all functions, click Update List.
• To roll back to the original system support lists bundled with each function, click Rollback.
• To add or delete machine types for Lenovo systems, click + or -.
Notes:
• If you select the machine types in the Lenovo Platforms table or the IBM Platforms table, you
cannot select the machine types in the Storage Platforms table.
• If you select the machine types in the Lenovo Platforms table and the IBM Platforms table at the
same time, you can only select “Full” in next step.
• If a function is not supported by a system, selection of the unsupported function is disabled in
this system.
Step 7. On the Media Purpose page, complete these fields and then click Next:
Updates
Select this option bundle LXCE UpdateXpress and firmware updates for the targeted systems
on the bootable media.
• The firmware is updated in LXCE UpdateXpress.
• This function updates only firmware. Device drivers must be updated separately.
• If both Lenovo and IBM systems are selected, update function is not supported.
Full
Select this option to integrate all functions in one image, including firmware updates, VPD
updates, inventory and FFDC collection, advanced system configuration, diagnostics, RAID
configuration, and so on.
To generate the RAID configuration, select Look in a local directory for the RAID
configuration file (*.ini), then the RAID configuration file will be generated in the specified
path.
Step 8. On the Acquire Location page, complete these fields, and then click Next:
Check the Lenovo Web site
Select this radio button to acquire the latest updates from the Lenovo Web site before creating
the bootable media.
UpdateXpress System Pack (UXSPs)
This is preferred method to obtain updates.
Select this radio button to acquire complete UpdateXpress System Packs. Each
UpdateXpress System Pack contains an integration-tested bundle of online, firmware
updates for each ThinkSystem, System x, and BladeCenter system.
Latest available individual updates
Select this option to acquire individual updates.
Look in a local directory
Chapter 4. Creating and updating bootable media 17Select this option to acquire updates, tools, and boot environment from the local system. Type
the fully qualified path and file name in the given field, or click the Browse to select the file.
Step 9. On the Network Access page, if you have no special requirement for security access, click Test
Connection to check the network connection of the Target URL, and click Next.
If you have more security concerns, before clicking Test Connection, configure Proxy server and/
or Custom URL security configuration depending on your security requirements as follows:
– Proxy server
1. Select Proxy Server if you require an HTTP/HTTPS proxy to connect to the Web, and
complete the following fields:
Proxy Type The proxy type of the proxy server.
IP address or Hostname The host name, IP address, or domain name of the proxy
server.
Port The port number of the proxy server.
2. Select Proxy authentication if credentials must be specified to authenticate to the proxy
server, and complete the following fields:
User Name The user name for authenticating to the proxy server.
Password The password for the specified user name.
– Custom URL security configuration
Select Custom URL security configuration if you require a reverse proxy, and select one of the
following options:
– Accept target server’s certificate by default
– Specify the certificate (PEM)
18 Lenovo Bootable Media Creator Installation and User GuideStep 10. On the Target Directory page, specify the directory where you want to store the downloaded files.
Step 11. Click Next. On the Media Format page, specify the format to use for the bootable media.
To create an ISO image:
1. For Device type, select CD/DVD.
2. Select Write to image file and then type the fully qualified path and file name for the ISO
image in the given field.
To create a CD or DVD:
1. For Device type, select CD/DVD.
2. Select Write directly to device to write the bootable medium to the specified CD or DVD
drive.
3. For Disk, select the letter associated with the CD or DVD drive for Windows (such as E:) or the
device name for Linux (such as /dev/hdb).
To create a USB flash drive:
1. For Device type, select USB.
2. Select Write directly to device to write the bootable medium to the specified USB flash drive.
3. For Disk, select the letter associated with the USB flash drive for Windows (such as E:) or the
device name for Linux (such as /dev/sdb).
To create PXE files:
1. For Device type, select PXE.
2. For PXE TFTP server address, specify the IP address of the TFTP server to use for PXE boot.
Chapter 4. Creating and updating bootable media 193. For Directory to write PXE files to, select the fully qualified path or click Browse to select the
path where you want to write the PXE files in the given field.
Step 12. Click Next. If you selected Update functions on the Media Purpose page, the Unattended Mode
Configuration page is displayed. Complete the following applicable fields:
Reboot BMC after updating BMC firmware automatically
Do not use unattended mode
Select this radio button to disable unattended mode.
Use unattended mode
Select this radio button to enable unattended updates. If you select this option you must
complete the following additional fields:
Upload log files to:
Use this list to choose where to place the log files when unattended updates are
complete. Your choices are:
• TFTP Server
• FTP Server
• NFS Share
• Samba Server
• USB Drive
• SFTP Server
Notes:
1. To upload log files to a TFTP, FTP, Samba, or SFTP server, or to an NFS share, the
directory where the files are to be uploaded must already exist (it will not be created
as part of the upload process), and it must allow anonymous access.
2. To upload the unattended log package to the specified location, you must ensure that
you can perform the following actions, if you are using the Rhel6.4 x86-64 operating
system environment:
• For Samba shares: mount -t cifs //$address/$directory $mount_point -o user=
anonymous, password=anonymous
• For NFS shares: mount -t nfs $address:$directory $mount_point
• For FTP and TFTP uploads, ensure that the local file can be uploaded to the
address and directory specified in the F T P or T F T P command.
3. Considering the security, users should input the credential of the FTP/Samba/SFTP
server in the unattended mode.
Server Address
The address of the server where the log files will be loaded.
Save to directory
The directory where the logs are saved.
Shutdowm bootable environment after updating firmware automatically.
Step 13. On the Confirm Choices page, review the configuration information you provided for creating the
bootable media.
Step 14. Optional: Click Save to save this configuration information to a file, which you can import into this
tool to recreate this bootable media at a later time.
Step 15. On the Update Selection page, select the packages to be updated.
Step 16. Click Next.
20 Lenovo Bootable Media Creator Installation and User GuideThe Creation Progress page is displayed. Bootable Media Creator acquires UpdateXpress System
Pack updates, Update tool and Maintenance Mode OS, additionally acquires Dynamic System
Analysisand Advance System Utility if System X server and FULL function are selected on the
Media Purpose page, and then creates the bootable media. A progress bar indicates that the
acquisition and creation are in progress and shows the percentage of progress.
To create a new USBKey, you can select an existing USBKey, and click Create Again. The same
USBKey will be created.
Step 17. When the bootable media is finished, click Next.
Note: You can also copy and run the commands generated in Step 15.
Step 18. Click Finish.
Chapter 4. Creating and updating bootable media 2122 Lenovo Bootable Media Creator Installation and User Guide
Chapter 5. Using bootable media
The Menu program runs when the bootable media is started. The graphical version of the Menu program
runs in the interactive mode or the unattended mode. Users can select the function to be used in interactive
mode.
Before starting bootable media, when you select to use the ISO boot media or the PXE boot media, do one of
the following based on the boot media you selected:
• To use the ISO boot media, burn the ISO image onto a CD or DVD, or mount the ISO image to a server by
using the virtual media function in CMM, BMC, or other equivalent functions.
• To use the PXE boot media, complete the following steps:
1. Copy the files in the PXE directory (including grub.cfg, img3a, img2a, LiveOS/squashfs.img,
pxelinux.0, bsb1.lss, bsb.msg, and tc.zip) to the content directory on the TFTP server.
2. Configure the PXE boot server to use pxelinux.0 as the boot file.
3. Check if the PXE boot server and TFTP boot server are running.
Notes:
• If the media to be started is not the first or second media in the boot order list, press F12 to select the
media.
• To perform updates through BoMC, Lan-over-USB should be enabled; otherwise, BoMC will
automatically enable Lan-over-USB, and then compare the installed firmware with the firmware repository
on disk.
Starting bootable media from GUI
The bootable media created with Update function is started from GUI.
To start the bootable media from GUI for Lenovo Server, follow the instructions on the Lenovo XClarity
Essentials UpdateXpress wizard.
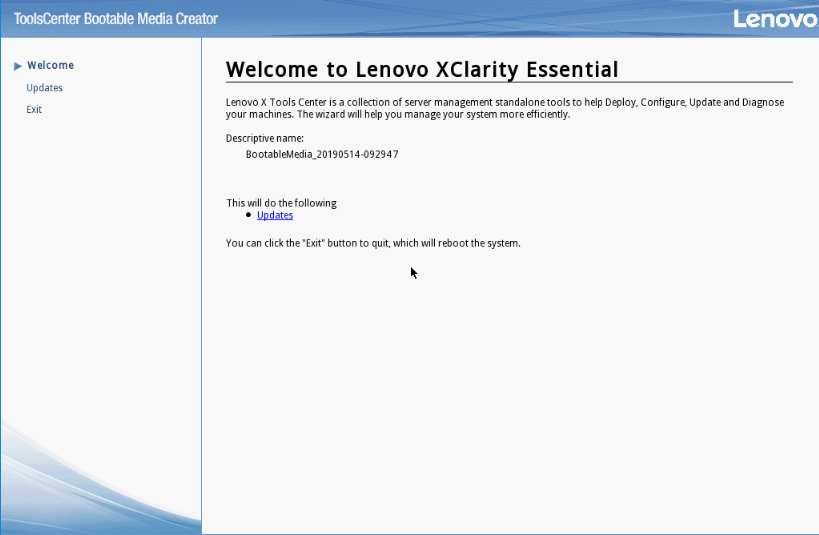
© Copyright Lenovo 2014, 2021 23To start the bootable media from GUI for IBM Server, click Updates on the ToolsCenter Bootable Media
Creator wizard.
Starting bootable media from text user interface
The bootable media created with Full function is started from text user interface.
Procedures
Step 1. Select the suitable menu from the menu list for your target system.
Following is the main menus of the ThinkSystem server and the System x server:
24 Lenovo Bootable Media Creator Installation and User GuideTable 7. Main menus of ThinkSystem and System x (for Lenovo or IBM)
Server type Main menu
ThinkSystem
System x (for Lenovo)
System x (for IBM)
Note: For AMD one socket processor-based servers, only [1] Update Firmware, [8] Secure Erase, and
[10] Save BoMC Logs in BOMC MENU are available.
Step 2. Select the function to be used.
Chapter 5. Using bootable media 2526 Lenovo Bootable Media Creator Installation and User Guide
Chapter 6. Troubleshooting and support
Use this section to troubleshoot and resolve problems with Lenovo XClarity Essentials Bootable Media
Creator.

For solutions to problems that other customers have encountered, see the System x Forum Web site at:
https://forums.lenovo.com/t5/System-x-X6-M5-M4/bd-p/sx01_eg

Limitations and problems
The following known limitations and problems are applicable to Lenovo XClarity Essentials Bootable Media
Creator.

BoMC does not support to save log to USB drives with NTFS format and only support FAT32 format.
   Before saving log to USB drive, please format it to FAT32 format first.
BoMC does not support to use GPT (GUID Partition Table) USB drives to create bootable USB drives.
   Before creating a bootable USB drive, change the partition table from GPT to MBR.
BoMC does not support to display “installed version” of LXPM on ThinkSystem SR635 and
ThinkSystem SR655.
    In the “Installed Version” column, “Undetected” is displayed for LXPM. To update LXPM, select LXPM,
    click Next, and follow the wizard to complete the update process.
BoMC does not support to display “installed version” of all options on ThinkSystem SR635 and
ThinkSystem SR655.
    In the “Installed Version” column, “Adapter Discovered” is displayed for options detected on the server,
    and “Undetected Device” is displayed for options undetected on the server. To update the firmware,
    select the option, click Next, and follow the wizard to complete the update process.
All BoMC paths must use standard English-language alphanumeric characters
     All BoMC paths must use standard English-language alphanumeric characters and must not include
     spaces, special characters, or non-English language characters.
Only TFTP server running on Linux OS is supported when creating a PXE directory with BoMC.
    If you are creating a PXE directory with BoMC, only a TFTP server running on a supported version of
    Linux OS can be used.

BoMC does not support /dev/sda for the --unattended option
   BoMC does not support the use of /dev/sda for the --unattended option for the usb protocol.

The description about FOD key might be incomplete when the description is too long.
    If you use BoMC V11.5.1 or later versions to create full bootable media, and select Manage FoD Keys
    to display active FOD, the description about FOD key might be truncated when it's over 50 characters.

VPD information is incomplete
   When you select Update VPD to change VPD information, only three types of VPD information are listed
   on the screen. You can use OneCLI tools or go to your BMC Web to obtain the VPD information not
   displayed on the screen.

Considering the security, when creating media, the SFTP/FTP/SMB credential for the unattended
mode will neither be saved in the configuration file nor be loaded in the GUI mode.
   When users save the configurations on BoMC GUI during creating the media, the SFTP/FTP/SMB
   credential specified in the unattended mode for firmware update will not be saved in the configuration

© Copyright Lenovo 2014, 2021                                                                               27
file. In the next time, to create a media with a configuration file in the GUI mode by clicking the button on
the GUI, users should explicitly specify the SFTP/FTP/SMB credential first.
Workarounds
The following workarounds are applicable to Lenovo XClarity Essentials Bootable Media Creator.
The IBM system might get stuck with the BoMC screen displaying “Collecting service data” after the
firmware update is completed.
Use the earlier version of BoMC (v11.6.0) to update the firmware.
By default, the secure erase feature is not supported by the on-board SATA disks on ThinkSystem
SR635 and ThinkSystem SR655.
The status of on-board SATA disks is “frozen” by default on ThinkSystem SR635 and ThinkSystem
SR655, so they cannot be directly erased. To perform secure erase on the on-board SATA disks, users
should change the settings of TPM physical presence jumper first, and then BoMC will try to set the on-
board SATA disks to “unfrozen” status by changing the UEFI/XCC settings. After booting the server to
Maintenance OS next time, the status change will take effect. For more information about the system
board jumpers, go to ThinkSystem Documentation, search your server model, and then click Server
components ➙ System board jumpers.
The keyboard does not work when confirming to exit bootable media
After booting a system with bootable media created using Bootable Media Creator, when you select to
exit the program, you are prompted to confirm the exit action. The keyboard cannot be used to confirm
the exit action.
Use the mouse to confirm the exit action.
cygwin1.dll conflict
Bootable Media Creator ships the cygwin1.dll (version 1.5.24, renamed to cygwinz.dll), which is required
by the mkisofs.exe and cdrecord.exe utilities. The cygwin DLL does not support multiple versions running
at the same time. You must exit all other applications that depend on cygwin1.dll before running
Bootable Media Creator on a Microsoft Windows system.
USB flash drives that are used by Linux are not recognized by Windows
To enable Microsoft Windows to recognize the USB flash drive for Bootable Media Creator on a
Windows system, format the USB flash drive on a Linux system to FAT32 file format using the m k d o s f s
utility. For example: mkdosfs -I -F 32 /dev/sdb).
Failure when burning created ISO files to CD/DVD, or created CD/DVD fails to boot
If you are unable to burn created ISO files to CD or DVD media, or if the CD or DVD you have created
fails to boot, try using an alternative media writing software or use a different brand and type of media.
IBM BladeCenter HS22 fails to boot from the SanDisk 4 GB bootable USB key
When using the SanDisk 4 GB bootable USB key created by Bootable Media Creator to boot a
BladeCenter HS22 (machine type 7870), the system might boot directly into the OS environment
installed on the hard disk drive but not boot into the USB key.
Update the uEFI firmware or use a Lexar USB key or a bootable CD.
Lenovo XClarity Essentials Bootable Media Creator log file
Each log record includes: the version, command line arguments, program runtime data, and detailed trouble
shooting information. New log information is appended to the bomc103.log file.
The Bootable Media Creator log file, bomc103.log, is located in the following directories:
• Windows: %SystemDrive%\Lenovo_Support\
28 Lenovo Bootable Media Creator Installation and User Guide• Linux: /var/log/Lenovo_Support/
Chapter 6. Troubleshooting and support 2930 Lenovo Bootable Media Creator Installation and User Guide
Appendix A. Accessibility features for Lenovo XClarity
Essentials Bootable Media Creator
Accessibility features help users who have a disability, such as restricted mobility or limited vision, to use
information technology products successfully.

Accessibility features
The following list includes the major accessibility features in Lenovo XClarity Essentials Bootable Media
Creator:
• Can be operated using only the keyboard
• Communicates all information independent of color
• Supports the attachment of alternate output devices
• Provides online documentation in an accessible format
• (Microsoft® Windows® systems only) Supports interfaces commonly used by screen readers and screen
  magnifiers

The Bootable Media Creator topic collection in the bootable media for Lenovo x86 Servers information
center, and its related publications, are accessibility-enabled.

Keyboard navigation
This product uses standard Microsoft Windows navigation keys.

Lenovo and accessibility
See the Lenovo Accessibility Web site at http://www.lenovo.com/lenovo/us/en/accessibility.html for more
information about the commitment that Lenovo has to accessibility.

© Copyright Lenovo 2014, 2021                                                                                    31
32 Lenovo Bootable Media Creator Installation and User Guide
Appendix B. Lenovo XClarity Essentials Bootable Media
Creator commands
Lenovo XClarity Essentials Bootable Media Creator uses a single command with varying options to create
bootable media.

How to read syntax diagrams
Review the following conventions to understand how to read the syntax diagrams that are used in the
command descriptions.

The syntax diagram consists of options and option arguments.
• Options consist of a hyphen and single letter or two hyphens and multiple letters. For example: -h or
  --help. Options can be followed by one or more option arguments.
• Option arguments are placed after the option. For example: [--cd=volume] In this example volume is the
  option argument.

Consider these conventions when reading syntax diagrams:
• Options that are enclosed in brackets ([]) are optional. Do not include these brackets in the command.
• Options that are enclosed in braces ({}) are required. Do not include these braces in the command.
• Options that are not enclosed in either brackets or braces are required.
• The names of options are case sensitive and must be typed exactly as shown. Options preceded by two
  dashes (--) must be specified in their entirety.
• The names of option arguments that require substitution by actual values are italicized.
• The pipe (|) character signifies that you choose one option or the other. For example, [a | b] indicates that
  you can choose either a or b, but not both. Similarly, {a | b} indicates that you must choose either a or b.
• An ellipsis (...) signifies that you can repeat the option argument on the command line.

Configuration file
Each time you create bootable media, configuration information is saved in a file named bomc.config, which
is stored in a working directory and on bootable media.

• When you boot a system using bootable media, the tools that are bundled on the bootable media check
  the configuration file to read the user-specified command line (CL) options, such as: --timeout, and
  --latest .
• You can create bootable media using the configuration file by copying the configuration file to the working
  directory, modifying the settings, and then running the bomc.exe --configfile=working_directory\bomc.
  config command.
• For security purposes, the proxy user ID and password are not saved in the configuration file.

The configuration file uses the Java property file format name=value. The default values specified in this file
are listed in the following table.

© Copyright Lenovo 2014, 2021                                                                                     33
You can also read