Administration User Guide - ACT Online Prep - www.act.org
←
→
Page content transcription
If your browser does not render page correctly, please read the page content below
ACT Online Prep

Administration User Guide
Updated December 2019

                        www.act.org
How to Contact ACT
      If you have questions, please contact ACT Customer Care at
      onlineprep.act.org/contact-support or call us at 319.337.1429.

© 2019 by ACT, Inc. All rights reserved.  MA20001.CJ0258
Contents
Introduction          1                               District Admin Dashboard Menu       14
                                                      Administrative Dashboard Menu 15
Your Access to ACT Online
Prep 3                                                State Test Coordinator
Ordering Student Licenses             3               View 16
Account Activation and Roles              3           Your Landing Page—Administrative
Views According to Role 4                               Dashboard 16

Availability 4
                                                      Creating Students,
General Account Features                      5       Instructors, and Admins                  17
                                                      Important Note on User Passwords     17
Logging In 5
                                                      Important Note on Email Addresses     17
Using the User Menu       5
                                                      Creating Accounts Individually—Student and
Instructor View                   8                     Instructor 18

Your Landing Page—Administrative                      Creating Accounts Individually—Admin 20
  Dashboard 8                                         Creating Accounts in Bulk—Student and
User Menu Dashboard           8                         Instructor 21

Administrative Dashboard Menu 9                       Creating Accounts for Students without an
                                                        Email Address 23
School Test Coordinator                               Distributing Login Credentials to
View 10                                                  Students 24

User Menu Dashboards          10                      Managing Existing User Accounts 25

Your Landing Page—School Admin
  Dashboard 11
                                                      Creating Groups            26
                                                      Creating Groups Individually 26
School Admin Dashboard Menu   11
                                                      Creating Groups in Bulk 29
Administrative Dashboard Menu 12
Discussion Groups and Flashcard Sets 12
                                                      Creating Assignments for
District Test Coordinator                             Students 32
View 13                                               Creating a New Assignment 32
                                                      Managing an Existing Assignment 34
User Menu Dashboards          13
                                                      Reviewing Performance Data on
Your Landing Page—District Admin
                                                        Assignments 36
  Dashboard 14

                                                  i
Contents

Student Reports              38             Writing Tests 61

Individual Student Reports   39             Lessons   62
Real-Time Reports 43                        Flashcards 63
                                            Game Center 64
Group, School, and District                 Discussions 64
Reports 45                                  Search 64
Group Reports 45
School Reports 50                           Frequently Asked
District Reports 52
                                            Questions 65

Student Experience                55        Appendix A: Email
Study Plan Navigation Menu 57
                                            Template 67
My Stats 58
                                            Appendix B: Study Plan
Practice Questions 58
                                            Course Outline 68
Practice Tests 59

                                       ii
Introduction
ACT Online Prep is a web-based test preparation program provided by ACT. It is designed to be
easy for students to access and use. ACT Online Prep provides students with an interactive test
preparation experience that is available anytime via the internet.

The program includes two full-length ACT practice tests, four short subject tests (English,
math, reading, and science), two sample Writing prompts, lessons, practice questions,
flashcards, and games based on flashcard content. Lessons provide comprehensive review
of English, math, reading, and science content covered in the ACT test. Additional lessons
include information on the ACT test, test-taking strategies, preparing for test day, and what
to expect on test day. There are over 2,400 practice questions with feedback and solutions.
Student-reported confidence levels, bookmarks, and notes allow students to mark content for
further review.

The course was reorganized in August 2019 after feedback showed that users found it
overwhelming to work through the content one subject at a time. These changes were designed
to improve the student experience and create a prescribed path for students to follow.

ACT Online Prep course content is now organized into 16 Study Plan Steps, starting with the
most-tested (foundational) materials on the ACT and ending with the least-tested (advanced)
materials on the ACT. Each Study Plan Step includes lessons and practice question sets for
each of the four subject areas: English, math, reading, and science.

After an introduction to the platform and course, students take the four short subject tests to
calculate a Composite score. Based on both the Composite score and the student’s available
time to study (1 week, 2 weeks, 1 month, 2 months, or 4 months), students are provided a Study
Schedule and guided to do either a quick review or an in-depth study of the tasks associated
with each step.

This user guide is intended to help staff at the school, district, and state levels navigate through
the ACT Online Prep platform. Depending on your level of access to the platform, this guide
will help you to:
•   Add students

•   Add instructors

•   Add school test coordinators and/or school supervisors

•   Add groups

•   Assign tasks to students

                                                  1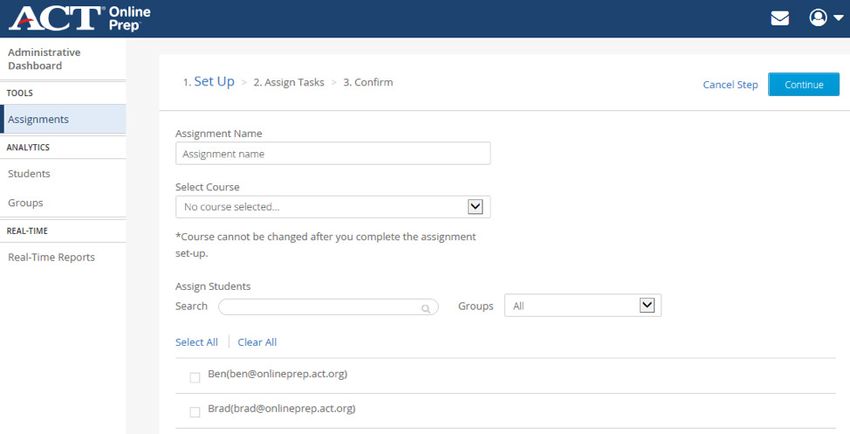
Introduction

•   View the activity or performance statistics of an individual student

•   View performance statistics for a group of students

•   View performance statistics for a student population at a school, district, or state

•   Export student or group performance data

•   Export school, district, or state performance data

The following sections will walk you through how to use ACT Online Prep as a teacher, school
test coordinator, district test coordinator, or state coordinator.

As part of your administrative access, you will be able to monitor student usage of test
preparation materials and their progress through the course. A student’s strengths and
weaknesses can be identified by viewing either their individual answers or their overall scores
from short tests and full-length practice exams alongside the questions’ difficulty ratings.
Student-marked confidence levels can also provide insight into a student’s particular areas of
concern.

You should also visit the ACT Online Prep for Schools Resources page (https://www.act.
org/content/act/en/products-and-services/the-act/test-preparation/act-online-prep-
schools/resources.html) to access support materials, including this user guide, the Teacher
Implementation Guide, and short training videos by topic.

                                                  2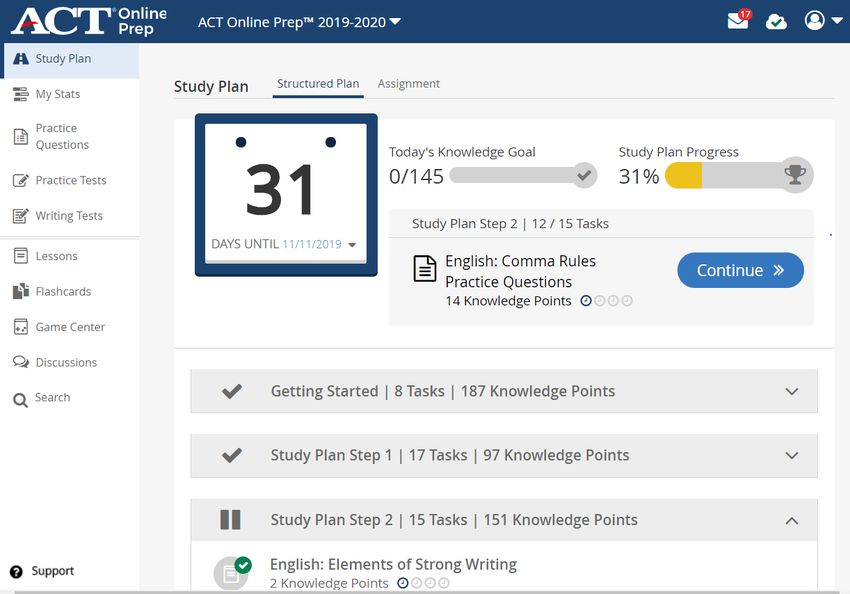
Your Access to ACT
Online Prep
Access to ACT Online Prep is initiated when a school, district, or state purchases student
licenses from ACT.

Ordering Student Licenses
Schools and districts can order student licenses by downloading the ACT Online
Prep order form (http://www.act.org/content/dam/act/unsecured/documents/
ACTOnlinePrepOrderForm.pdf), then emailing the completed document to
customerservice@onlineprep.act.org.

Student License Count
After purchase, each school is given a “license count,” i.e., a fixed number of ACT Online Prep
licenses that can be distributed to students at the school. The total license count is determined
according to the information either provided on the order form (for school and district
purchases) or collected from the state department of education (for statewide purchases). A
count of student licenses that have been redeemed can be viewed by a State or District Test
Coordinator from the Contracts section of their Admin dashboard (see “Contracts and License
Tracking,” page 11, for further information).

Account Activation and Roles
The person identified on the order form as “site administrator” for a school is granted access
to ACT Online Prep as the main contact for the organization and assigned the School Test
Coordinator role. An email containing a link and instructions for account activation is sent to
the site administrator once ACT has processed the order.

Note: Activation emails are sent from onlineprep.act.org. To ensure that you receive all important
email messages regarding ACT Online Prep, please check your spam or junk folders and whitelist
the following sites and IP addresses:
      @onlineprep.act.org		 169.45.68.80/28
      @act.org			169.45.87.192/27
      					169.46.66.80/28
      					169.63.216.192/27

                                                3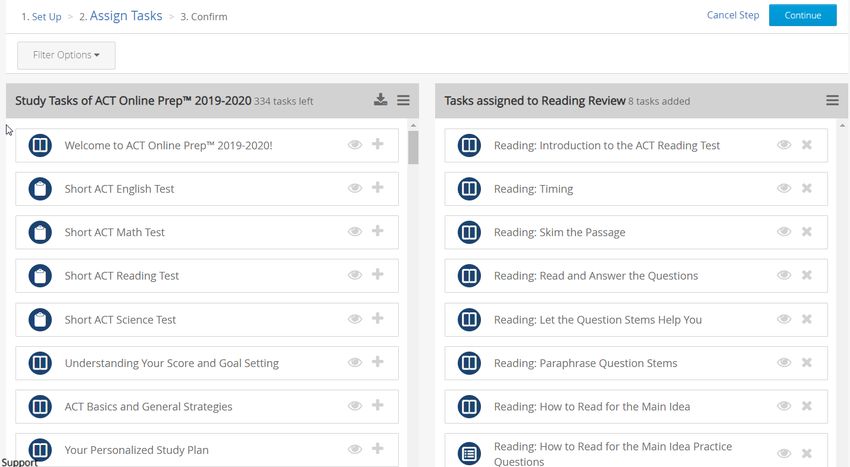
Your Access to ACT Online Prep

Teachers in a school setting must have an account with the Instructor role set up by a School
or District Test Coordinator before they can access ACT Online Prep. This process is covered in
“Creating Students, Instructors, and Admins,” page 17.

District and state officials may also be given access to ACT Online Prep as part of a state or
district’s agreement with ACT. They are assigned the District Test Coordinator or State Test
Coordinator role.

Views According to Role
Your “view” within the ACT Online Prep platform—i.e., the tasks you are able to perform and
the reports you are able to review—will vary depending on your assigned user role. This is
illustrated in the table below:

                                                         School Test   District Test State Test
                                          Instructor     Coordinator   Coordinator Coordinators

 Create Student Accounts                                        X           X

 Create Instructor Accounts                                     X           X

 Create School Test Coordinator/
                                                                X           X
 Supervisor Accounts

 Create Groups                                                  X           X

 Assign Tasks to Students                       X*              X

 Impersonate Students                           X*              X           X              X

 View/Export Student Level
                                                X*              X           X              X
 Progress

 View/Export Group Reports                      X*              X           X              X

 View/Export School Level
                                                                X           X              X
 Reports

 View/Export District Level
                                                                            X              X
 Reports

 View/Export State Level Reports                                                           X

* Applies only to groups to which the instructor is assigned.

Availability
Regardless of your role, access to the platform is provided on a 24-hour basis, from any
computer with online access and a supported browser (Chrome, Safari, Firefox, Internet
Explorer 10+).

                                                     4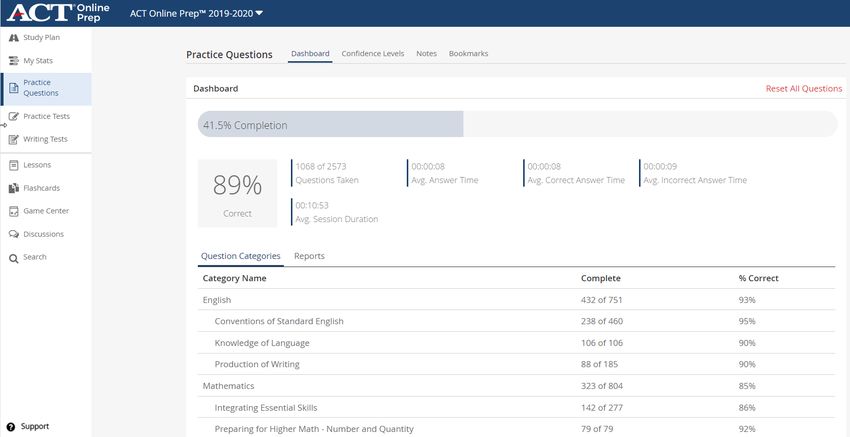
General Account
Features
Logging In
Visit https://onlineprep.act.org/login to log into the ACT Online Prep platform. Your account
username is the email address associated with ACT Online Prep. If you’ve forgotten your
password, select the Reset Password link on the login screen, enter your email address, and
follow the instructions within the email sent by noreply@onlineprep.act.org.

Note: If you do not see this email, please check your spam or junk folders.

If your access was established using a non-active (mock/faux) email address, please see your
site administrator to have your password reset.

Using the User Menu
All users see the following header at the top of their screens when they log in:

The “person” icon        on the right side of this header provides access to your user menu. This
menu contains links to your personal User Portal, your dashboards (according to role), and the
means to sign out of ACT Online Prep. Here are example user menus for an Instructor (left) and
a School Test Coordinator (right):

                                                  5
General Account Features

User Portal
The user portal is comprised of three sections:

•   My Courses allows students to see summary information on their progress.

•   User Profile allows users to update their name or email address and to change their
    password.

    Note: To change your account password, enter your current and new passwords into the
    appropriate required (red-starred) fields and select the Save button.

•   Account Details allows users to view their account information such as account creation
    date, last activity date, associated school account, and group(s) in which the account has
    membership.

                                                  6
General Account Features
Dashboards
All users interact with ACT Online Prep by means of three types of role-based dashboards:
1. The School or District Admin dashboard is used by School and District Test Coordinators to
create and manage accounts (student, instructor, and/or admin) and groups of accounts, as
well as view contract information.
2. The Administrative dashboard is broken into three sections:
a. TOOLS: Instructors and School Test Coordinators can create assignments—selected
lessons, practice questions, and/or tests—for student(s) or group(s).
b. ANALYTICS: Non-student users can view reports for students, groups, schools, and/or
districts based on their assigned access role.
Note: All reporting data under ANALYTICS is updated twice daily; a timestamp in the
upper-right portion of this screen displays the date and time of last update.
c. REAL-TIME: Non-student users can view real-time reports of students’ current
assignment or test performance data.
3. The Student dashboard is used by students to interact with the platform, navigate through
the course content, and monitor their progress.
7Instructor View
A user with the Instructor role has access to detailed profile data and performance statistics
about each student associated with a group in which the instructor is also a member.
Note: Instructors will not be able to see any data until students, instructors, and groups are
set up in the program by the School or District Test Coordinator. Instructors are also unable
to alter which student or instructor accounts belong in their group(s). See “Creating Students,
Instructors, and Admins,” page 17, and”Creating Groups,” page 26, for information about
these processes.
Your Landing Page—Administrative Dashboard
When you log in as an Instructor, your landing page is the Student Analytics screen from the
Administrative Dashboard (found under your user menu ). Using the navigation pane
on the left, you can view information on any students in the group(s) to which you are also
assigned. Detailed information on all available reports can be found starting on page 38.
User Menu Dashboard
The user menu for the Instructor view offers the following option:
Dashboard Role Function
Administrative Instructor • Create assignments; access student and
Dashboard group reports views
8Instructor View
Administrative Dashboard Menu
Selecting… Allows you to…
Assignments • Create assignments composed of
selected tasks (lessons, practice
questions, and/or tests) for students and/
or groups in which the instructor is also
a member; and monitor progress on
those assignments.
Students • View all students in groups in which the
instructor is also a member. View and
export individual student usage data.
Groups • View and export data at the group level
for groups in which the instructor is also
a member.
Real-Time • View and export real-time student
performance data on the short subject
tests, practice exams, and quizzes
for students of groups in which the
instructor is also a member. Monitor
student performance on assignments.
Note: All reporting data under ANALYTICS is updated twice daily; a timestamp in the upper-
right portion of this screen displays the date and time of last update.
9School Test Coordinator
View
A user with the School Test Coordinator role can perform account administrative tasks, such
as individually creating or bulk uploading new accounts, performing maintenance on other
accounts in the system, and assigning students and/or instructors to groups.
Note: Instructors and students cannot access ACT Online Prep until they have been loaded onto
the platform.
Although it is not mandatory to assign students to groups, you will get most benefit out of the
product if you do so; it’s through group assignments that you are able to create links between
student and instructor accounts. It is a good idea to assign each student to at least one group
(e.g., “Mr. Smith’s Home Room”), though assigning to multiple groups also has benefits,
especially for single-subject teachers (e.g., “11th Grade English Honors”).
If a user with the School Test Coordinator role is also assigned the School Supervisor role, their
user menu will allow access to Instructor role functions, including views of student-level and
aggregate school data, via the Administrative dashboard.
Note: The School Supervisor role is co-assigned to the site administrator’s School Test
Coordinator account by default. However, additional admin accounts may be created with only
one of these two roles assigned. See “Creating Accounts Individually—Admin,” page 20, for
more information on the assignment of these roles.
User Menu Dashboards
The user menu for the School Test Coordinator view offers the following options:
Dashboard Role Function
School Admin School Test Coordinator • Manage user accounts and groups;
impersonate a student
Administrative School Supervisor • Create assignments; access student,
Dashboard group, and school reports views
10School Test Coordinator View
Your Landing Page—School Admin Dashboard
When you log in as the School Test Coordinator, your landing page is the School Admin
dashboard. Using the navigation pane on the left, you can review your contracts and manage
groups, students, instructors, and other school test coordinators.
School Admin Dashboard Menu
The various administrative functions of the School Admin dashboard menu are shown below:
Selecting… Allows you to…
Contracts • Track licenses
Groups • Create groups and assign instructor(s)
and student(s) individually or in bulk via
spreadsheet upload (*.csv)
• Manage existing groups
Instructors • Create and manage instructor accounts
individually or in bulk via spreadsheet
upload (*.csv)
Students • Create student accounts individually or in
bulk via spreadsheet upload (*.csv)
• Manage existing student accounts
• Impersonate a student
Admins • Create accounts with the role of school
test coordinator and/or school supervisor
Contracts and License Tracking
The Contracts tab includes information on both active and expired contracts associated
with the school. For each contract, the number of available seats, used seats, users uploaded,
users activated (logged in), and users active (have performed a task) is indicated. The first
and last user activation dates indicate the date range in which a student can be loaded under
the contract. The start and end date indicate the contract duration, and the admin access
expiration date is the last date school staff will have access to the ACT Online Prep platform
under an active contract.
11School Test Coordinator View
Notes:
• Student licenses are redeemed when students are loaded onto the platform.
• As long as the option to “exclude from the contract seat count” is selected during instructor
account creation, instructor accounts will not count toward the number of licenses.
• While creating accounts, if you see an error message related to the number of student licenses
redeemed, please contact customerservice@onlineprep.act.org for support.
Administrative Dashboard Menu
Selecting… Allows you to…
Assignments • Create assignments composed of
selected tasks (lessons, practice
questions, and/or tests) for students
and/or groups; and monitor progress on
those assignments.
Students • View all students loaded onto the
platform within the school. View and
export individual student usage data.
Groups • View and export data at the group level.
Schools • View and export data at the school level.
Real-Time • View and export real-time student
performance data on the short subject
tests, practice exams, and quizzes.
Monitor student performance on
assignments.
Note: All reporting data under ANALYTICS is updated twice daily; a timestamp in the upper-
right portion of this screen displays the date and time of last update.
Discussion Groups and Flashcard Sets
As the School Test Coordinator, you may be asked by a student to approve or review the
creation of discussion groups or flashcard sets among student users. This process involves
tabs of student activity. You can get a specific sense of discussion groups or flashcard sets by
using the Impersonate option. If you have concerns about your students’ use of discussions or
flashcards, visit onlineprep.act.org/contact-support for help on controlling these features of
the platform for your school.
12District Test
Coordinator View
On a level of access above the school, District Test Coordinators have access to ACT Online
Prep data for all students and schools in their districts. Using the District Admin dashboard,
District Test Coordinators may load/create students, instructors, and groups for all schools
within their districts.
Note: You will not see any data within the various reports until School or District Test
Coordinator enters the organizations’ data into the system.
If a user with the District Test Coordinator role is also assigned the District Supervisor role,
their user menu will allow access to Student Reports, Group Reports, School Reports, District
Reports, and Real-Time Reports via the Administrative Dashboard.
Note: District Test Coordinator accounts are typically also assigned the District Supervisor role
by default.
User Menu Dashboards
The user menu for the District Test Coordinator view offers the following options:
Dashboard Role Function
District Admin District Test • Access all schools within the district
Coordinator
• Manage groups within each school
• Load instructor(s) and student(s) within each
school; impersonate a student
• Create additional accounts with the role of school
test coordinator and/or school supervisor
Administrative District • Access student, group, school, district, and real-
Dashboard Supervisor time reports views
13District Test Coordinator View
Your Landing Page—District Admin Dashboard
When you log in as the District Test Coordinator, you land on the District Admin dashboard
screen (found under your user menu ), which contains a list of all schools within your
district. Hovering your cursor (mouse) over the name of any high school will enable the
appearance of the Manage symbol. Selecting the Manage symbol (or the school name),
and using the options from the navigation pane on the left, will allow you to review contracts
and manage groups, students, instructors, and other school test coordinators for the selected
school.
District Admin Dashboard Menu
The various administrative functions of the District Admin dashboard menu are shown below:
Selecting… Allows you to…
Contracts • Track licenses (see “Contracts and License
Tracking,” page 11)
Groups • Create groups and assign instructor(s)
and student(s) individually or in bulk via
spreadsheet upload (*.csv)
• Manage existing groups
Instructors • Create and manage instructor accounts
individually or in bulk via spreadsheet
upload (*.csv)
Students • Create student accounts individually or in
bulk via spreadsheet upload (*.csv)
• Manage existing student accounts
• Impersonate a student
Admins • Create accounts with the role of school
test coordinator and/or school supervisor
14District Test Coordinator View
Administrative Dashboard Menu
The various administrative functions of the District Admin dashboard menu are shown below:
Selecting … Allows you to …
Student View all students loaded onto the
Reports platform within the district. View and
export individual student usage data.
Group Reports View and export data at the group level.
School Reports View and export data at the school level.
District Reports View and export data about your
district(s).
Note: You can also drill down to Group Report
and School Report views in the District
Reports option.
Real-Time View and export real-time student
Reports performance data on the short subject
tests, practice exams, and quizzes.
Monitor student performance on
assignments.
Note: All reporting data under ANALYTICS is updated twice daily; a timestamp in the upper-
right portion of this screen displays the date and time of last update.
15State Test Coordinator
View
When ACT Online Prep is purchased through a statewide agreement, State Test Coordinators
are given reporting access to ACT Online Prep data for all districts, schools, groups, and
students within their state. Though only Instructor and School Test Coordinator accounts can
create assignments, they may review information on existing assignments under Real-Time
Reports. Detailed information for each type of report is covered in “Group, School, and District
Reports,” page 45.
Note: State Test Coordinators do not have the option to load/create students, instructors,
or groups. State Test Coordinators will not be able to see any reporting data until students,
instructors, and groups are set up in the program by the School or District Test Coordinator.
Your Landing Page—Administrative Dashboard
When you log in as a State Test Coordinator, your landing page is the District Reports screen
from the Administrative Dashboard (found under your user menu ). Using the navigation
pane on the left, you can view information on any students, groups, schools, and/or districts in
your state.
Selecting … Allows you to …
Student View all students loaded onto the platform
Reports within the state. View and export individual
student usage data.
Group Reports View and export data at the group level.
School Reports View and export data at the school level.
District Reports View and export data about the district(s) in
your state.
Note: You can also drill down to Group Report and
School Report views in the District Reports option.
Real-Time View and export real-time student
Reports performance data on the short subject tests
and practice exams.
Note: All reporting data under ANALYTICS is updated twice daily; a timestamp in the upper-
right portion of this screen displays the date and time of last update.
16Creating Students,
Instructors, and Admins
School or District Test Coordinators can create user accounts for students, instructors, and
admins via their corresponding Admin dashboard. Student and instructor accounts can
be created individually (by entering the information on screen) or in bulk (by uploading
spreadsheet data saved in a .csv file). Admin accounts, i.e., accounts with the role of school test
coordinator and/or school supervisor, can only be created individually.
Note: Students and Instructors will not be able to access the platform until after they have been loaded.
To create an account, you will need the following information for each user:
• Name (first and last) (required)
• Email address (required)
• Password (optional)
When accounts are created, users receive an email that prompts him or her to activate his or
her account via a web link. To ensure that this email is received, users should be advised to
whitelist @onlineprep.com.
Note: For students without an email address, or with an email address that the student or
implementing organization wishes to keep confidential, see “Creating Accounts for Students
without an Email Address,” page 23.
Important Note on User Passwords
When creating accounts, you can either create passwords for users or leave the password
field blank. If you leave the password field blank, users will be prompted to create their own
passwords during the account activation process. If you create user passwords, it is your
responsibility to distribute login credentials to each user. For instances where a generic (mock/
faux) email address is used, the password field is required and will need to be provided to the
user.
Important Note on Email Addresses
The email address entered at account creation will serve as the student’s (instructor’s)
username when logging into the platform. Therefore, email addresses must be unique to each
user account, regardless of whether a real or faux/mock email address is used.
17Creating Students, Instructors, and Admins
Creating Accounts Individually—Student and Instructor
The same steps apply whether you are creating a student or an instructor account:
1. From the Admin dashboard menu on the left side of the screen:
• Select Students to create a student account, or
• Select Instructors to create an instructor account
2. On the Students (Instructors) screen, select the New Students (New Instructors) button,
then choose Add a Student (Add an Instructor) from the drop-down menu.
Note: Alternatively, if you haven’t yet created any student (instructor) accounts for your
school, you can select the “Create one!” link.
3. Complete the fields to define the user properties by typing in the user’s name, email
address, and password (optional).
Note: The contract selection for this account will automatically default to the current active
contract. If more than one contract is active, a drop-down menu will be available to select the
appropriate contract to be used.
18Creating Students, Instructors, and Admins
4. Check the box related to the type of account you are creating:
• If you are creating a student account, ensure that the Course for ACT Online Prep box is
checked.
• If you are creating an instructor account, ensure that the “exclude from the contract seat
count” box is checked, then assign role(s) as applicable.
Note: If left unchecked, the instructor account you create will be counted toward the
number of available licenses for the school.
5. Select the Create button to create the account and return to the Students (Instructors)
screen. The new user will now receive an activation email at the address you supplied.
19Creating Students, Instructors, and Admins
Creating Accounts Individually—Admin
Complete the following steps to create an admin account with the role of school test
coordinator and/or school supervisor:
1. From the Admin dashboard menu on the left side of the screen, select Admins.
2. On the Admins screen, select the New Admin button.
3. Complete the fields to define the user properties by typing in the user’s name, email
address, and password (optional).
4. Check the box in front of each role you wish the admin user to have.
Note: The school test coordinator role allows the user to create accounts and groups. The
school supervisor role allows the user to run reports and create assignments. You may assign
one or both to an admin account. (See “School Test Coordinator View,” page 10, for more
information on these roles.)
5. Select the Create button to create the account and return to the Admins screen. The new
user will now receive an activation email at the address you supplied.
20Creating Students, Instructors, and Admins
Creating Accounts in Bulk—Student and Instructor
To create student or instructor user accounts in bulk, with data from an Excel spreadsheet,
take the following steps:
Note: If you wish to create student or instructor accounts in bulk while also adding them to
groups, follow the steps for “Creating Groups in Bulk,” page 29.
1. From the School Admin dashboard menu on the left side of the screen:
• Select Students to create student accounts, or
• Select Instructors to create instructor accounts
2. On the Students (Instructors) screen, select the New Students (New Instructors) button,
then choose Upload Multiple from the drop-down menu.
3. Follow the instructions on the screen to create a .csv file containing the appropriate data
and formatting.
a. Locate the following information for each student (instructor):
Field Required Notes
email Yes Real or mock/faux email address
name Yes First and last name
password Optional If a real email address is used: Leave blank. The user will
receive an email with instructions for creating a password.
If a mock/faux email address is used: This field is
required. The admin must create and distribute the
login credentials.
b. Create a spreadsheet in Excel with three column headers: email, name, and password. All
three headings are required, in this order and in lowercase letters, even if you are
leaving some information blank. It should look like this:
21Creating Students, Instructors, and Admins
c. Fill in each student’s (instructor’s) information below the headers (top row).
Note: If you are using real email addresses, leave the password fields blank. Remember, if
you are using mock/faux email addresses, the password field must be populated.
4. Save the spreadsheet to your desktop in a “CSV UTF-8 (Comma delimited) (*.csv)” format.
Notes:
• A maximum of 999 rows may be loaded in each .csv file. If you have more than 999 users,
you will need to create more than one file.
• By default, Excel saves spreadsheets in a .xls or .xlsx format. Make sure you save your data
in the correct format.
• CSV stands for Comma-Separated Values, meaning that the content of each data field is
separated by a comma.
5. Back on the Upload Multiple screen, check the box related to the type of accounts you are
creating:
• If you are creating student accounts, ensure that the Course for ACT Online Prep box is
checked.
• If you are creating instructor accounts, ensure that the “exclude from the contract seat
count” box is checked.
Note: If left unchecked, the instructor account you create will be counted toward the
number of available licenses for the school.
Note: The contract selection for these accounts will automatically default to the current active
contract. If more than one contract is active, a drop-down menu will be available to select the
appropriate contract to be used.
22Creating Students, Instructors, and Admins
6. Using the Browse button, search your desktop to locate the .csv file you created, select the
file, then choose the Upload button to import the file.
7. A status message appears. When the file has finished uploading, the new accounts are listed
on the Students (Instructors) screen.
New users, where a real email address was used, will receive an activation email. Login
credentials will need to be provided to users where a mock/faux email address and password
were included in the .csv file.
Creating Accounts for Students without an Email Address
The “Generate ACT Student Accounts” option within the platform allows you to create
accounts for users without supplying a genuine email address. It generates a mock/faux name
(“ACT Online Prep User”), a mock/faux @onlineprep.act.org email account (account login
username), and a password for the user.
If this option is used, the student will not have the ability to change their email address,
and their name will show as “ACT Online Prep User”; however, School and District Test
Coordinators are able to edit the student name after the account is created.
Note: The email address entered at account creation will serve as the student’s username when
logging into the platform. Therefore, email addresses must be unique to each user account,
regardless of whether a real or faux/mock email address is used.
To use this option, take the following steps:
8. From the School Admin dashboard menu, select Students.
9. On the Students screen, select the New Students button, then choose Generate ACT
Student Accounts from the drop-down menu.
23Creating Students, Instructors, and Admins
10. On the Generate Account screen, follow the instructions presented to complete the prefix,
count (i.e., number of generic student accounts to generate), and password fields, then
select the Generate button.
Distributing Login Credentials to Students
If a mock/faux email address was used to generate a student account, those login credentials
will need to be provided to the user.
To obtain and distribute student login credentials:
1. Navigate to the Students screen and select Download Student CSV.
2. Open or save the spreadsheet file when prompted.
3. Edit the spreadsheet:
a. Delete columns C through G, while keeping columns A (name) and B (email).
b. In column A (name), replace any names entered as “ACT Online Prep User” with the
actual names of the students to whom the login information will be given.
c. Label the empty column C (password), then insert the password you just used to create
the student accounts into the column C fields.
4. Provide the credentials to the student accordingly.
• If your school is not part of a state contract: Distribute the login credentials as you see fit.
A copy of the state contract template is included at the end of this guide as a potential
reference (see “Appendix A: Email Template,” page 67).
• If your school is part of a state contract:
a. Locate the Accessing Online Prep: ACT Student template (Word document) on your ACT
documents and training website.
b. Within the document, on the mailings tab, use the mail merge option to insert the
spreadsheet data into the template fields.
c. Once you have merged the information, print and distribute the completed
document(s) to the student(s).
24Creating Students, Instructors, and Admins
Managing Existing User Accounts
After accounts have been created, School and District Test Coordinators have the ability
to both view and edit student, instructor, and admin (School Test Coordinator) account
information. In addition to general maintenance, this can be useful if someone forgets their
password or needs to change the group(s) they are assigned to.
The Students, Instructors, and Admins screens display a list of the corresponding types of
users that have been created for your school. Selecting the row for a particular account will
provide additional details about the user account, as well as allow you to:
• View and edit the user’s name, email address, and password.
• Manage the groups to which a student or instructor is assigned.
• Assign a student or instructor to a new contract.
25Creating Groups
School or District Test Coordinators can create groups via their corresponding Admin
dashboard. Groups can be created individually (by entering the information on screen) or
in bulk (by uploading spreadsheet data saved in a .csv file). Each student or instructor can
be associated with multiple groups. Common uses for groups are to separate by grade level,
homerooms, classroom assignments, or subject. For each group you will need to assign:
• A group name
• One or more students
• One or more instructors (preferred, but not required)
Note: An instructor will not be able to access a student’s information unless he or she is assigned
to the same group as that student.
Creating Groups Individually
To create one group:
1. From the School Admin or District Admin dashboard menu, select Groups.
2. Select the New Group button, and then choose New Group from the drop-down menu.
Note: Alternatively, you can use the “Create one!” link that is available when there are no
existing groups for your school.
26Creating Groups
3. On the Assign Name screen, type a unique name for the group and, if desired, enter a study
plan date in the “Preset Study Plan Completion Date (Optional)” field, then select Next.
Notes:
• Study plan dates will carry over from the group to the associated student accounts, serving
as a countdown on the calendar of his or her Study Plan screens.
• Group names are case sensitive (e.g. “Juniors 2020” and “juniors 2020” are two different
group names).
4. On the All Available Instructors tab of the Instructor Management screen, check the box
next to the name(s) of the instructor(s) to assign, then select the Add to Group button.
Note: You can also use the checkbox below the All Available Instructors tab heading to select or
unselect all listed instructors.
Note: If you wish to add an instructor not currently on the All Available Instructors tab, select
the New Instructors button, then select either Add Instructor or Upload Multiple from the
drop-down menu and follow the subsequent instructions (see “Creating Accounts in Bulk—
Student and Instructor,” page 21). Once the new instructor has been added to the tab, you
will need to complete step 4 to add the new instructor to the group.
The assigned instructors now appear on the Instructors in Group tab. On this tab, you can
check the box next to an instructor’s name and use the Remove from Group button to
remove that instructor from the group, if needed.
27Creating Groups
5. When you are done assigning instructors to the new group—or if you want to skip instructor
assignment now and add them later—select the Next button.
6. On the All Available Students tab of the Student Management screen, check the box next to
the name(s) of the student(s) to assign, then select the Add to Group button.
Note: You can also use the checkbox below the All Available Students tab heading to select or
unselect all listed students.
Note: If you wish to add a student not currently on the All Available Students tab, select the
New Students button, then select either Add Student or Upload Multiple from the drop-
down menu and follow the subsequent instructions (see “Creating Accounts in Bulk—Student
and Instructor,” page 21). Once the new student has been added to the tab, you will need to
complete step 6 to add the new student to the group.
The assigned students now appear on the Students in Group tab. On this tab, you can check
the box next to a student’s name and use the Remove from Group button to remove that
student from the group, if needed.
7. When you are done, select the Finish button to return to the updated Groups screen.
Note: Before selecting the Finish button, you can change the information for the group by
using the “Back to” options at the top of each screen. When done, use the Next buttons to
return to the screen with the Finish button.
IMPORTANT: The group will not be created in the system until you select the Finish
button.
28Creating Groups
Creating Groups in Bulk
Depending on the data you include in your spreadsheet, this option can be used to:
• Create new groups
• Upload new students/instructors
• Assign students/instructors to groups
• Import new students/instructors directly into existing groups
• Add existing users to existing groups
• Convert a student account into an instructor account, and vice versa
IMPORTANT: This bulk upload process cannot be used to change an existing user’s name,
email address, or password. The import will fail if the name or email address of an
existing user does not match the platform’s current information for that user.
To create groups in bulk, take the following steps:
1. From the School Admin or District Admin dashboard menu, select Groups.
2. Select the New Group button, and then choose Upload Multiple from the drop-down
menu.
29Creating Groups
3. Follow the instructions on the screen to create a .csv file containing the appropriate data
and formatting:
a. Locate the following information for each user:
Field Required Notes
group_name Optional If left blank, the user will be imported but not
added to a group.
name Yes First and last name
email Yes Real or mock/faux email address
password Optional If a real email address is used: Leave blank. The
user will receive an email with instructions for
creating a password.
If a mock/faux email address is used: This field is
required. The admin must create and distribute the
login information.
user_type Yes Must be eIther “student” or “instructor” (all
lowercase letters).
b. Create a spreadsheet in Excel with five column headers: group_name, name, email,
password, and user_type. All five headers are required, in this order and in lowercase
letters with underscores, even if you are leaving some information blank. It should
look like this:
c. Fill in each user’s information below the headers (top row).
Notes:
• If an existing group name is entered into column A, users will be added to that existing
group once the spreadsheet is uploaded. If the group does not exist, it will be created and
users will be assigned to it once the spreadsheet is uploaded.
• Group names are case sensitive (e.g. “Juniors 2020” and “juniors 2020” are two different
group names).
• If you are using real email addresses, leave the password fields blank. Remember, if
you are using mock/faux email addresses, the password fields for those users must be
populated.
30Creating Groups
d. Save the spreadsheet to your desktop in a “CSV UTF-8 (Comma delimited) (*.csv)” format.
Notes:
• A maximum of 999 rows may be loaded in each .csv file. If you have more than 999
users, you will need to create more than one file.
• By default, Excel saves spreadsheets in a .xls or .xlsx format. Make sure you save your
data in the correct format.
• CSV stands for Comma-Separated Values, meaning that the contents of each data
field is separated by a comma.
5. Back on the Upload Multiple screen, ensure that the Course for ACT Online Prep box is
checked.
Note: The contract selection for these accounts will automatically default to the current active
contract. If more than one contract is active, a drop-down menu will be available to select the
appropriate contract to be used.
6. Using the Browse button, search your desktop to locate the .csv file you created, select the
file, then choose the Upload button to import the file.
7. A status message appears and you are returned to the Groups screen.
New users, where a real email address was used, will receive an activation email. Login
credentials will need to be provided to users where a mock/faux email address and password
were included in the .csv file.
31Creating Assignments
for Students
Instructors and School Test Coordinators have the ability to create assignments for students
within their assigned school(s) or group(s), respectively. An assignment is a selection of tasks,
with each task being comprised of a lesson, a practice question set, and/or a test. Students or
groups can be added to an assignment either when an assignment is created or by editing an
existing assignment.
Creating a New Assignment
1. From the Administrative dashboard menu on the left side of the screen, select
Assignments.
2. On the Assignments screen, select the Create button.
Note: On the Assignments screen, you will see a list of any previously created assignments.
If you wish to instead edit or delete an existing assignment, see “Managing an Existing
Assignment” for instructions.
32Creating Assignments for Students
3. Complete the fields on the Set Up screen, then assign individual students or entire groups to
the assignment.
4. Select Continue.
5. Choose which tasks to associate with the assignment by selecting the plus (‘+’) sign next to
each task, or dragging and dropping the task title to the New Assignment field.
Note: The list of available tasks to choose from can be filtered by using the Filter Options tab
above the list.
Hint: Use the Filter Options to sort tasks by Math, ELA,
content type, or task length to complete. Specific subject
tasks can also be found using the open search query text
box.
33Creating Assignments for Students
6. When you have finished choosing tasks, select the Continue button. A summary page will
appear.
7. Review the assignment information for accuracy:
• Select Students to review and edit the list of students set up to receive the assignment.
• Select Tasks to review and edit the tasks that make up the assignment.
• Once you have verified that everything is correct, select the Assign button and return to
the Assignments screen.
Note: Each student included on the assignment will receive a notification within the platform
that they have a task to complete.
Managing an Existing Assignment
Instructors and School Test Coordinators can also access existing assignments by selecting
Assignments from the Administrative Dashboard.
Note: Users can only view, change, and/or delete assignments that they have created.
To view summary information for an assignment, select Assignments from the Administrative
Dashboard, then select the assignment name from the displayed list. From this screen, you can
also change or delete the assignment.
34Creating Assignments for Students
To change the assignment: Select the Edit button. You will go through the same screens that
you used when you initially created the assignment (Set Up, Assign Tasks, and Confirm) in
order to:
• Add or remove students(s), group(s), and/or instructor(s) associated with the assignment
• Add or remove tasks associated with the assignment
Note: The course selection (“ACT Online Prep”) cannot be changed once an assignment is created.
To delete the assignment: Select the Delete button, then OK on the pop-up confirmation
window. You will be returned to your updated list of assignments.
35Creating Assignments for Students
Reviewing Performance Data on Assignments
Instructors and School Test Coordinators may view reporting data for the assignments they
have created.
To view, select Assignments from your Administrative dashboard, select the specific
assignment from the list, then:
• Select Student Reports to see the list of students associated with that assignment along
with summary progress data.
• Select Task Details to see a list of all tasks within that assignment.
Note: Performance data on assignments is also included in Real-Time Reports, which can be
viewed by School, District, and State Test Coordinators, as well as Instructors in the same group
as the student (see “Real-Time Reports,” page 43 for more information).
36Creating Assignments for Students
Impersonating a Student
Test Coordinators and Instructors can also view the completed tasks of an individual student
by using the Impersonate feature.
1. From the Administrative dashboard menu on the left side of the screen, select Students.
2. Select the individual student’s name from the list to view the individual student report.
3. At the top of the student report screen, select the Impersonate button to see the activities
of a student more directly by viewing what the student views in the program.
4. Select OK in the dialogue box to confirm that you want to be logged in as the student. Or,
select Cancel to return to the detail report screen.
5. On the screen explaining the Impersonation Mode, select the Continue button to proceed.
IMPORTANT: After selecting the Impersonate button, you are logged in as the student.
While impersonating a student, be cautious not to provide responses to any tasks or
assignments.
You are taken to the Student dashboard, as shown below. A black banner is displayed
showing the name of the student that you are impersonating.
6. When you are finished impersonating a student account, select the X to the left of the
black banner message. This will return you to your own account.
37Student Reports
Using the Administrative Dashboard, Instructors, School, District and State Test Coordinators
can view reporting data on students within their respective domains.
Note: Instructors may only run Student Reports for students in groups in which the instructor is
also a member.
From the Administrative dashboard, under Analytics, select Students. A list of students is
displayed, based on the user’s access role. This information is provided for each student:
• Name: The student’s first and last name
• ID: The ID automatically assigned when the student is loaded to the platform
• Last Active: The date the student was last active in the system
• Progress: The student’s percentage of total progress through ACT Online Prep material
• Average Practice ACT Test Score: The student’s Composite score; if only one practice exam
has been taken, the score for that exam is displayed
• Avg. Session Time: The average time a student spends in the program each time he or she
logs in
38Student Reports
From the drop-down menu in the center of the page, you can select either All Courses, or a
particular course year of ACT Online Prep (e.g., ACT Online Prep 2019–2020, etc.).
Note: Student accounts that were created after 8/8/2019 will only have activity in and access to
the ACT Online Prep 2019–2020 course.
Use the Search and column sort ( ) options to display the information you want to see in the
list.
Use the Export button to export the student data to a .csv spreadsheet file. You have the
option here to export selected students or all students. For proper formatting of the data, we
recommend using Microsoft Excel to open the file.
Note: All reporting data under ANALYTICS is updated twice daily; a timestamp in the upper-
right portion of this screen displays the date and time of last update.
Individual Student Reports
On the Students dashboard screen, select a student from the list to see a detailed report for the
student.
Overview Section
At the top of the screen is an overview section, as shown below.
39Student Reports
From this screen you may select the Impersonate button to view the course from the student’s
perspective.
IMPORTANT: After selecting the Impersonate button, you are logged in as the student.
While impersonating a student, be cautious not to provide responses to any tasks or
assignments.
Displayed at the top of the screen is the student name, student ID number, school name, any
groups in which the student is a member, and the course(s) to which the student has access.
The Student Overall Session Summary section displays:
• Last Active: The most recent date the student was active in the course
• Total Time Spent: The amount of time the student has spent logged in
• Avg. Progress: The percentage of total progress through ACT Online Prep material
• Avg. Practice%: The percentage of practice questions answered correctly
• Avg. Exam%: The percentage of ACT Practice Exam questions answered correctly
• Avg. Session Time: The average time a student spends in the program each time he or she
logs in
Note: If the student has been active in two courses, the data shown has been averaged between
them.
The Courses Breakdown Summary section displays, for each course the student has been part
of:
• Last Active: The most recent date the student was active in the course
• Student Status: The student’s percentile ranking among all ACT Online Prep users
• Progress: The percentage of total progress through ACT Online Prep material
• Avg. Practice%: The percentage of practice questions answered correctly
• Avg: Exam%: The percentage of ACT Practice Exam questions answered correctly
Note: Student accounts that were created after 8/8/2019 will only have activity in and access to
the ACT Online Prep 2019–2020 course.
40Student Reports
Select the Analyze button for a deeper dive into the selected course.
The same background information on the student is displayed at the top of the screen. A
graphical overview of the student’s use of the selected ACT Online Prep course features their
overall progress through the course, status relative to other students using the course, and
average practice ACT Composite score. If the student has only taken one ACT Practice Exam,
then the score for that exam is displayed.
Also provided are their most recent scores for the four short subject tests, scores for the ACT
Practice Exams by subject area, the last date student has been active in the selected course, and
the total time the student has spent in the selected course.
Strengths and Weaknesses Section
Scroll down to see a specific breakdown of student progress in the four subjects (English, math,
reading, and science) and categories, as shown below:
Note: Students see this same information while logged into their own accounts.
41Student Reports
The system provides ratings performance on subjects and categories as the student completes
testing content in ACT Online Prep. These strengths and weaknesses are determined by
the platform’s adaptive engine, and are not fixed; ratings update based on the platform’s
measurements of the student’s skill level, the student’s proficiency in the specific category, as
well as the difficulty of the items they are answering. The possible ratings are shown below:
• N/A
• Beginner
• Basic
• Intermediate
• Proficient
• Advanced
• Expert
Exporting the Report
At the top of screen, select the Export button to create a .pdf file of the Overview and
Strengths and Weaknesses data. It does not include the data found under the Details tabs.
Details Section
At the bottom of the screen, a details section provides statistics related to specific activities of
the student’s account. By default, you see the Lessons tab, as shown below.
Note: Students see this same information while logged into their own accounts.
Other tabs include Flashcards, Practice, and Exams.
• The Lessons and Flashcards tabs display the “Confidence Levels” the student has marked
for specific sections of material.
• The Practice and Exams tabs display statistics for the amount of test questions the student
has answered, how much time they have spent on the platform, and the percentage of
questions they have correctly answered.
42You can also read