Disaster Recovery to the Oracle Public Cloud - Production on Premises, DR in the Cloud
←
→
Page content transcription
If your browser does not render page correctly, please read the page content below
Disaster Recovery to the Oracle Public Cloud
Production on Premises, DR in the Cloud
ORACLE WHITE PAPER   | AUGUST 2015
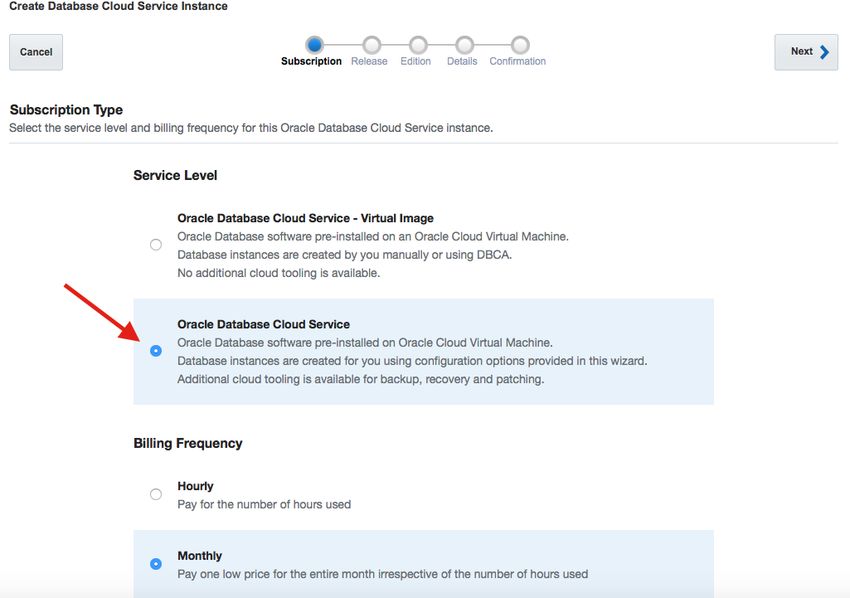
Table of Contents

Introduction                                                            1

Disaster Recovery to the Cloud with Data Guard and Active Data Guard    2

Enabling DR on the Oracle Public Cloud                                  2

Service Level Requirements                                              3

Security Requirements                                                   4

Database, Operating Environment and Prerequisites                       5

Deployment Process                                                      6

   1. Subscribe to Oracle Database Cloud Service                        6

   2. Create an Oracle Instance                                         6

   3. Configure Network                                                 9

       3.1 Cloud Network Configuration                                  9

       3.2 Oracle Net Encryption Configuration                         13

       3.3 On-Premises Network Configuration                           13

   4. Encrypt Primary Database (Optional)                              14

   5. Instantiate Data Guard Standby                                   14

       5.1 From On-Premises Production Database                        15

       5.2 From Oracle Database Backup Cloud Service                   15

   6. Perform Data Guard Health Check                                  16

   7. Enable Run Time Monitoring                                       17

   8. Enable Redo Transport Compression (Optional)                     18

DR Operations                                                          18

   1. Validate DR Readiness                                            19
2. Using Standby Database to reduce downtime during Planned Maintenance   19

   3. Failover/Switchover to the Cloud                                       19

   4. Switch back to On-Premises                                             20

   5. Connecting the Application Tier                                        20

Conclusion                                                                   21

Appendices                                                                   22

   Appendix A – Data Guard Run-Time Monitoring Queries                       22

   Appendix B – (Active) Data Guard Configuration                            25

   Appendix C – Creating Standby Database using RMAN DUPLICATE               35

   Appendix D – Data Guard Broker                                            37

   Appendix E – Health Check Queries                                         39

   Appendix F – Converting Standby Database to a Snapshot Standby            42

   Appendix G – Configuring Client Failover                                  43

   Appendix H – Creating and Dispersing Wallets                              44

   Appendix I – Standby Instantiation From Database Backup Cloud Service     46
Introduction
Oracle’s Maximum Availability Architecture (Oracle MAA) is the best practices blueprint for data
protection and availability for Oracle databases deployed on private, public or hybrid clouds. Data
Guard and Active Data Guard provide disaster recovery (DR) for databases with recovery time
objectives (RTOs) that cannot be met by restoring from backup. Customers use these solutions to
deploy one or more synchronized replicas (standby databases) of a production database (the primary
database) in physically separate locations to provide high availability, comprehensive data protection,
and disaster recovery for mission critical data.

An effective disaster recovery plan can be costly due to the need to establish, equip and manage a
remote data center. The Oracle Public Cloud offers a great alternative for hosting standby databases
for customers who do not have a DR site or who prefer not to deal with the cost or complexity of
managing a remote data center. Existing production databases remain on-premises and standby
databases used for DR are deployed on the Oracle Public Cloud. This mode of deployment is
commonly referred to as a hybrid cloud implementation.

Customers may choose to deploy either a Data Guard or an Active Data Guard standby on the cloud
depending upon their requirements. While there are some unique considerations to a hybrid cloud DR
configuration, it follows the same Oracle MAA best practices as with any Data Guard deployment. This
Oracle MAA blueprint details Oracle MAA Best Practices and provides a procedural overview for
deploying DR on the Oracle Public Cloud using Database as a Service. This paper is intended for a
technical audience having knowledge of Oracle Database, Data Guard or Active Data Guard, and
Oracle Database backup and recovery. This paper also assumes a basic understanding of Oracle
Public Cloud 1.

1 https://cloud.oracle.com/home

1 | DISASTER RECOVERY ON THE ORACLE PUBLIC CLOUD - PRODUCTION ON PREMISES, DR IN THE CLOUD
Disaster Recovery to the Cloud with Data Guard and Active Data Guard
The Oracle Public Cloud 2 offers an extensive set of cloud services tailored to specific customer requirements:
Platform as a Service (PaaS), Infrastructure as a Service (IaaS), and Software as a Service (SaaS). Disaster
Recovery (DR) for on-premises systems is deployed using the Oracle Database Cloud Service 3 (PaaS).

There are two options for DR to the cloud using Oracle Database Cloud Services:
     » Data Guard utilizing Enterprise Edition Service or High Performance Service.
     » Active Data Guard utilizing the Extreme Performance Service or Exadata Service.
Data Guard is included in Oracle Database Enterprise Edition (no separate license is required for on-premises
systems) and is supported by all editions of Oracle Database Cloud Services (Enterprise, High Performance and
Extreme Performance).

Active Data Guard extends Data Guard capabilities by providing advanced features for data protection and
availability as well as offloading read-only workload and backups from a production database. Active Data Guard is
included in the Extreme Performance Database Cloud Service and Exadata Service. When used in a hybrid
configuration, Active Data Guard must also be licensed for the on-premises system. Refer to Oracle software license
documentation 4 for more information on capabilities licensed with Active Data Guard.

Unless otherwise noted, the procedure explained in this paper applies equally to Data Guard and Active Data. For
more information on Data Guard and Active Data Guard please refer to the Data Guard home page on the Oracle
Technology Network and the Active Data Guard white paper 5.

Note: Data Guard may also be deployed using the Oracle Database Cloud Service - Virtual Image service level.
The Virtual Image service level while suited for dev or test instances is not recommended for DR for on-premises
production databases due to the reduced level of automation and tooling included with this basic service.

Enabling DR on the Oracle Public Cloud
Enabling DR on the cloud requires instantiation of a Data Guard standby database in the Oracle Database Cloud
Service. Once instantiated, Data Guard maintains synchronization between the primary database on premises and
the standby database in the cloud.

The Oracle Public Cloud provides all backend infrastructure and capabilities required for disaster recovery should
the customer’s on-premises database become unavailable for any reason. This includes:

1.     Ability to monitor the standby database and alert on major issues. See Appendix A.

2.     Ability to activate the standby to validate DR readiness and then convert it back to a synchronized standby.

3.     Utilization of the same Oracle MAA best practices as on-premises deployment. Use of additional Oracle MAA
       best practices specific to hybrid cloud deployments that are specified in this paper.

2 https://www.oracle.com/cloud/cloud-summary.html
3 https://cloud.oracle.com/database
4 https://docs.oracle.com/database/121/DBLIC/options.htm#DBLIC141
5 http://www.oracle.com/technetwork/database/availability/active-data-guard-wp-12c-1896127.pdf

2 | DISASTER RECOVERY ON THE ORACLE PUBLIC CLOUD - PRODUCTION ON PREMISES, DR IN THE CLOUD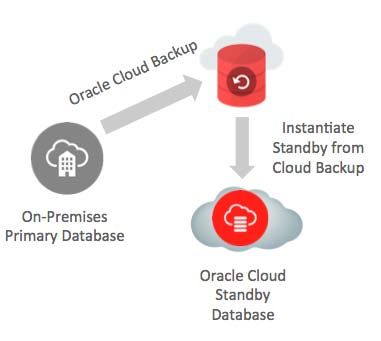
4.     Ability to switchover (planned event) or failover (unplanned event) production to the standby database in the
       cloud during planned maintenance or unplanned outages. Once the failed on-premises database is repaired,
       the ability to automatically resynchronize it with the new production database in the cloud and then switch
       production back to the on-premises database.

5.     Ability to failover database connections from an on-premises application tier to a new primary database in the
       Oracle Cloud following a Data Guard switchover or failover.

6.     Ability to failover both the application (subject to currently available public cloud services) and database tiers to
       the Oracle Public Cloud to enable production applications to fully run in the Oracle Cloud when there is a
       complete site outage.

7.     Flexibility for a standby database in the Oracle Public Cloud to support additional use cases beyond disaster
       recovery, including: offloading read-only production workloads to the cloud, development and test, source for
       thin-provisioned database clones, and offloading backups to the cloud, as shown in Figure 1.

Figure 1: Hybrid Cloud: Disaster Recovery

Service Level Requirements
Hybrid cloud deployments are by definition user-managed environments. The administrator must determine service
level expectations for availability, data protection, and performance that are practical for a given configuration and
application. Service Levels must be established for each of three dimensions relevant to disaster recovery that are
applicable to any Data Guard configuration:
     » Availability: Recovery Time Objective (RTO) describes the maximum acceptable downtime should an outage
       occur. This includes time required to detect the outage and to failover both the database and application
       connections so that service is resumed.

     » Data Protection: Recovery Point Objective (RPO) describes the maximum amount of data loss that can be
       tolerated. Achieving a desired RPO depends upon:
         » Available bandwidth relative to network volume.

3 | DISASTER RECOVERY ON THE ORACLE PUBLIC CLOUD - PRODUCTION ON PREMISES, DR IN THE CLOUD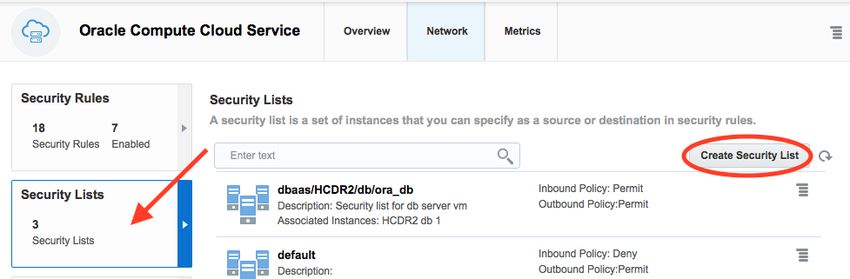
» The ability of the network to provide reliable, uninterrupted transmission.
         » The Data Guard transport method used: either asynchronous for near-zero data loss protection, or
           synchronous for zero data loss protection.

   » Performance: Database response time may be different after failover if less capacity – compute, memory, I/O,
     etc, are provisioned at the standby system than in the on-premises production system. This occurs when
     administrators purposefully under-configure standby resources to reduce cost; accepting reduced service level
     while in DR mode. MAA best practices recommend configuring symmetrical capacity at both primary and
     standby so there is no change in response time after failover. Rapid provisioning available with the cloud can
     enable a middle ground where there is less capacity deployed steady-state, but the new primary is rapidly
     scaled-up should a failover be required.

Note: Independent of the service levels related to DR, all standby database instances created in the Oracle cloud
conform to the service descriptions defined by the applicable Database Cloud Service 6.

Security Requirements
Oracle MAA best practice recommends using Oracle Transparent Data Encryption (TDE) to encrypt primary and
standby databases at rest. Conversion to TDE enables automatic encryption at rest for all DATA/INDEX tablespaces
and encryption-in-flight of user data redo changes during replication to the cloud. Oracle Net encryption is also
required for encryption-in-flight for other redo changes that are not encrypted by TDE (e.g. data from unencrypted
tablespaces such as SYSTEM and SYSAUX).

While strongly recommended for enhanced security and required for production databases initially deployed on the
Oracle Cloud, using TDE to encrypt data at rest is not mandatory for hybrid cloud deployments used for disaster
recovery. However, Oracle Net encryption is still required for encryption-in-flight of all redo during replication. This
provides customers with on-premises production databases in a hybrid cloud configuration the option of deciding
whether or not to use TDE depending upon their requirements.

Note: Data Guard and Active Data Guard use redo-based replication – a process that transmits redo generated by a
primary database and applies those changes to a standby database using continuous media recovery. This means
that primary and standby databases are block for block identical copies of each other. Using TDE to encrypt a
standby database on the cloud also requires that the on-premises primary database be encrypted with TDE.

Using TDE to protect data is an important part of improving the security of the system. Users should however be
aware of certain considerations when using any encryption solution, including:
   » Additional CPU overhead: Encryption requires additional CPU cycles to calculate encrypted and decrypted
     values. TDE, however, is optimized to minimize the overhead by taking advantage of database caching
     capabilities and leveraging hardware acceleration for AES on Intel and SPARC CPUs. Most TDE users see
     little performance impact on their production systems after enabling TDE. If performance overhead is a
     concern, please refer to the Oracle Database Advanced Security Guide 7.
   » Lower data compression: Encrypted data compresses poorly because it must reveal no information about the
     original plain text data. Thus, any compression applied to TDE encrypted data will have low compression ratios.

6 http://www.oracle.com/us/corporate/contracts/paas-iaas-public-cloud-2140609.pdf
7 https://docs.oracle.com/database/121/ASOAG/asotrans_faq.htm#ASOAG10544

4 | DISASTER RECOVERY ON THE ORACLE PUBLIC CLOUD - PRODUCTION ON PREMISES, DR IN THE CLOUD
Hence, when TDE encryption is used, it is not recommended to use with redo transport compression. However,
      when TDE is used in conjunction with Oracle database compression technologies such as Advanced
      Compression or Hybrid Columnar Compression, compression is performed before the encryption occurs, and
      the benefits of compression and encryption are both achieved.
   » Key management: Encryption is only as strong as the key used to encrypt. Furthermore, the loss of the
     encryption key is tantamount to losing all data protected by that key. If encryption is enabled on a few
     databases, keeping track of the key and its lifecycle is relatively easy. As the number of encrypted databases
     grows, managing keys becomes an increasingly difficult problem. For users with large number of encrypted
     databases, it is recommended that Oracle Key Vault 8 on-premise be used to store and manage TDE master
     keys.

Database, Operating Environment and Prerequisites

Prerequisites for hybrid cloud DR configurations are described in the support matrix in Table 1.

                                         On-Premises                                     Database Cloud Service

Operating System        Linux, Windows or Solaris X86 (My Oracle    Oracle Enterprise Linux (64-bit)
                        Support Note 413484.1 for Data Guard cross-
                        platform compatibility)

Oracle Database*        Oracle Database Enterprise Edition 11.2.0.4        Data Guard:
                        (64-bit)                                           Database as a Service (or) Virtual Image: Enterprise,
                        (or)                                               High Performance and Extreme Performance editions
                        Oracle Database Enterprise Edition 12.1.0.2        Active Data Guard:
                        (64-bit)                                           Database as a Service (or) Virtual Image: Extreme
                                                                           Performance Edition
                                                                           (or) Exadata Service

RAC                     RAC or non-RAC                                     RAC** or non-RAC 9

Physical Vs Virtual     Physical or Virtual                                Virtual

Database Size           Any size                                           DBaaS: 2.3TB with backups ***
                                                                           DBaaS: 5TB without backups ***
                                                                           Exadata Service: Any size

Encryption              Optional. If you want the standby in the cloud     Optional. If the primary is encrypted, standby is also
                        to be encrypted at rest, then the primary must     encrypted.
                        be encrypted using TDE.

Table 1: Support Matrix

* Oracle Database version on primary and standby databases must match except when using standby first patching
or database rolling upgrades where a standby database may be at a higher version than the primary database.

** Subject to availability. Please refer to Oracle Database Cloud Service documentation for the latest information.

*** Subject to change. Please refer to Oracle Database Cloud Service documentation for the latest information.

8 http://www.oracle.com/us/products/database/security/key-vault/overview/index.html
9 https://cloud.oracle.com/database

5 | DISASTER RECOVERY ON THE ORACLE PUBLIC CLOUD - PRODUCTION ON PREMISES, DR IN THE CLOUD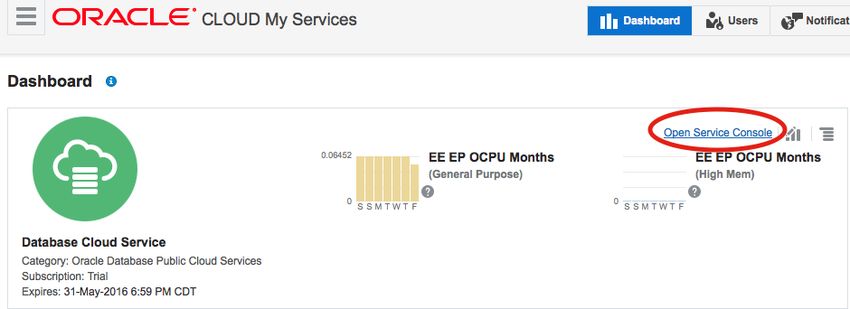
The public network is the currently available method for initial data transfer (using RMAN DUPLICATE from the on-
premise primary or a backup), and for Data Guard redo transport. Options for private connectivity with high
bandwidth network or a Virtual Private Network (VPN) were not available at the time this paper was published;
please refer to Database Cloud Service documentation for the latest information.

Deployment Process
Deployment of DR on the cloud involves the following 8 steps.
      1.    Subscribe to Oracle Database Cloud Service
      2.    Create an Oracle instance
      3.    Configure Network
      4.    Encrypt Primary Database (Optional)
      5.    Instantiate Data Guard Standby
      6.    Perform Data Guard health check
      7.    Enable Runtime Monitoring
      8.    Enable Redo Transport Compression (Optional)

1. Subscribe to Oracle Database Cloud Service
The first step for enabling DR to the cloud is to subscribe to the Oracle Database Cloud Service 10. This is usually
offered as pre-paid subscription where you can subscribe for specific durations. Please refer to the DBaaS cloud
documentation for subscription, activation and service creation details 11.

2. Create an Oracle Instance
After activating the service you can create a database instance. Steps provided in this section are for reference
purposes only.

   » Sign in to https://cloud.oracle.com . From My Services page, choose the appropriate Data Center / Region.
     Click on the Open Service Console for the “Database Cloud Service”, see figure 2.

Figure 2: Dashboard

10 http://docs.oracle.com/cloud/latest/dbcs_dbaas/index.html
11 http://docs.oracle.com/cloud/latest/dbcs_dbaas/CSDBI/GUID-1A380E9C-6DE2-4042-8A31-B43A0081B194.htm#CSDBI3312

6 | DISASTER RECOVERY ON THE ORACLE PUBLIC CLOUD - PRODUCTION ON PREMISES, DR IN THE CLOUD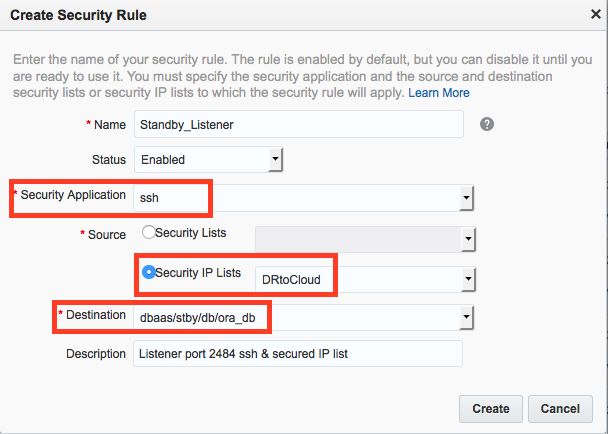
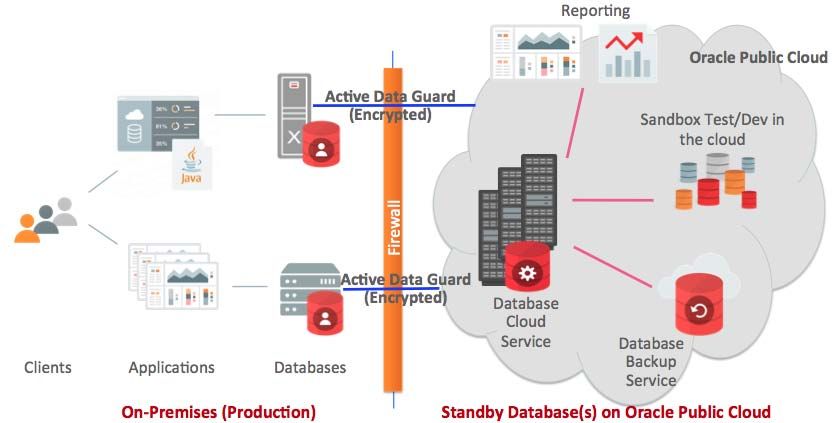
» The next page displays all the configured database services. Click “Create Service”. Choose Oracle Database
Cloud Service – Figure 3. This is the recommended level of service for DR for production databases.
Note: The Database Cloud Service - Virtual Image service level may also be selected but is only recommended for
dev and test databases.
Figure 3: Subscription
» Click Next after choosing your desired service.
» In the “Release” screen, choose either 11.2.0.4 or 12.1.0.2 depending on your primary site’s instance. Click
Next.
» In the “Edition” screen, choose Enterprise Edition – Extreme Performance. Click Next.
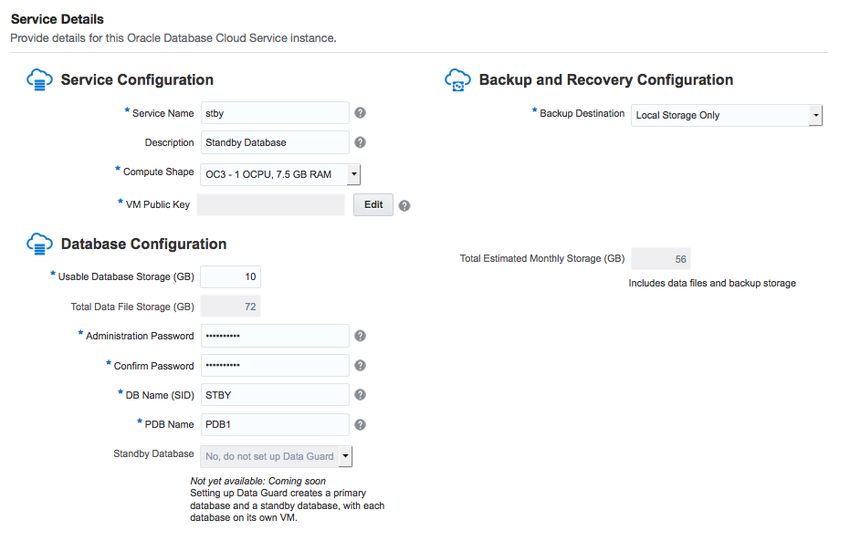
» In the “Service Details” screen, provide service name, choose compute shape, provide VM Public Key (you can
generate using ssh-keygen utility, for example). See Figure 4.
7 | DISASTER RECOVERY ON THE ORACLE PUBLIC CLOUD - PRODUCTION ON PREMISES, DR IN THE CLOUDFigure 4: Service Details
Note: In order to retain the auto-generated scripts and configuration in the cloud VM, it is recommended to provide
the service name and SID to be the standby DB names that you want in your configuration. In this example, we are
using STBY as the service name & SID.
» Click Next.
» The details are then validated and a confirmation screen is shown. Once confirmed, it takes some time to
create the service. Once the service is provisioned, proceed with the next steps.
» Once the service is created, click on the service name from the dashboard. See Figure 5.
Figure 5: Service Information
» A detail screen is shown with information about the service – such as public IP address, SQL port # etc. – See
Figure 6.
8 | DISASTER RECOVERY ON THE ORACLE PUBLIC CLOUD - PRODUCTION ON PREMISES, DR IN THE CLOUDFigure 6: Instance Details Note: If Database Cloud Service- Virtual Image service level is chosen, you will still have to choose the software release (11g or 12c), Software Edition (Enterprise – Extreme Performance) , Service name & public key. A service will be created with just Oracle binaries with the chosen release installed. No database will be created for you and no other tooling will be available for monitoring and backups. 3. Configure Network This section provides steps required for configuring the network on public cloud and on-premises. 3.1 Clo u d Network Co nfig uratio n It is critical to secure the port connectivity in the cloud. To enable SSH tunneling and also to make sure only specific on-premises IP addresses can access the listener port in the cloud, the following steps are done. All these are configured from the cloud Dashboard (services) Oracle Compute Cloud Service Network tab. By default, cloud security rule for port 1521 is disabled. Also, this default pre-configured port in the cloud VM has open access from public internet. The first step is to delete the default 1521 listener. Click on “Security Rules” and will list a bunch of rules. Search for the listener, for example, ‘ora_p2_dblistener’. A listener will be listed for each service, as shown in Figure 7. Click the bars and click Delete. This will delete this listener. Figure 7: View Security Rules 9 | DISASTER RECOVERY ON THE ORACLE PUBLIC CLOUD - PRODUCTION ON PREMISES, DR IN THE CLOUD
Next step is to create Security IP list. Click on “Security Lists” and click “Create Security List” as shown in Figure 8. Figure 9: Create Security IP List Give a name for the IP list and add the list of on-premises IP addresses that are allowed to access the port in the cloud VM. You can optionally provide subnet information. Clicking the (?) provides additional information. Refer to Figure 9. Click Create. Figure 9: Security Access List Create a protocol (Security Application) with a listener port. You can use either 1521 or define any other port number for security reasons. We recommend creating a non-1521 port. Under Cloud Compute Services Networks tab, click on Security Applications and "Create Security Application", See Figure 10. 10 | DISASTER RECOVERY ON THE ORACLE PUBLIC CLOUD - PRODUCTION ON PREMISES, DR IN THE CLOUD
Figure 10: Choose Security Applications (Protocols)

Provide name, port type (TCP), port # and a description. For example, port # 2484 is provided in Figure 11. If port
1521 is preferred, input that port number.

Note: When choosing an alternate port number, choose a number larger than 1024 as most port numbers in the 1-
1024 range are used for other purposes.

Figure 11: Create Security Application (Protocol)

Once this is done, enable that port by creating a Security Rule. See Figure 12.

11 | DISASTER RECOVERY ON THE ORACLE PUBLIC CLOUD - PRODUCTION ON PREMISES, DR IN THE CLOUD
Figure 12: Create Security Rule

Create a Security Rule. Provide a rule name, choose “ssh” from the Security Applications drop-down, choose the
status “Enabled”, choose the Security IP lists that we defined earlier (for example, DRtoCloud) from the drop-down
and destination as the standby database. See Figure 13. Click Create.

Do not select the default “public-internet” from the Security IP lists – as that will enable access from all IP addresses
to the cloud database listener. Using public-internet is not recommended from the security perspective,.

Figure 13: Create Security rule
Verify the new port is enabled. You can then configure listener.ora for the standby to use the port 2484 or any port
number you configured, see Figure 14.

Figure 14: Verification of new port

12 | DISASTER RECOVERY ON THE ORACLE PUBLIC CLOUD - PRODUCTION ON PREMISES, DR IN THE CLOUD
With this step, a secured port is created and opened for SQL*Net access from on-premises primary database.

3.2 Ora c le Ne t En cryp tio n Config uration
     » Oracle Net encryption must be enabled by setting the following in the sqlnet.ora on the primary (On Premises)
       and standby (On Cloud) database servers located in $ORACLE_HOME/network/admin.

            SQLNET.ENCRYPTION_SERVER = requested (for on-premises)
            SQLNET.ENCRYPTION_SERVER = required (for Cloud)
            SQLNET.ENCRYPTION_TYPES_SERVER = (RC4_256, AES256) (both)
            SQLNET.ENCRYPTION_CLIENT = requested (both)
            SQLNET.ENCRYPTION_TYPES_CLIENT = (RC4_256, AES256) (both)

     » For the procedure to create and disperse wallets, refer to Appendix H.

3.3 On-Pre mis e s Network Config uration
In a Data Guard configuration, information is transmitted in both directions between primary and standby databases.
This requires basic configuration, network tuning and opening of ports (also addressed in the preceding section on
network setup) at both primary and standby databases.

On-Premises Prerequisites

Before instantiating the standby database the following prerequisites must be met.

1.     Name resolution to the Oracle Cloud VM needs to be configured. This can be done either through a static file
       like /etc/hosts, or configuring the on-premises DNS to properly resolve the public IP address of the Oracle cloud
       instance. Also, the on-premises Firewall will need to have Access Control Lists properly configured to allow
       SSH and Oracle Net to be accessed from the on-premises system to the Oracle Cloud VM.

2.     Since Data Guard in DR or other situations require access from the cloud standby instance to the on-premises
       database. Primary database listener port is to be opened with restricted access from the cloud IP addresses
       using features like iptables etc. Since every corporation has different network security policies, we expect
       network administrator to perform operations similar to the cloud-side network configuration shown in earlier
       sections.

3.     Prompt-less SSH from the Oracle Cloud VM to the On-Premises machine. This is configured from on-premises
       to the Cloud during the provisioning process but should be configured for the Cloud to on-premises also. See
       ‘Appendix B - Configure SSH’ for additional details.

4.     Configuration of the OnPrem firewall to allow inbound ssh connectivity from the Oracle Cloud VM to the
       OnPrem machine will be needed. The primary database intended for Data Guard replication must be running in
       archivelog mode. Refer to details in ‘Appendix B - Archivelog mode’ for placing a database in archivelog mode.

5.     Standby Redo Logs (SRLs) must be configured to enable real-time apply of redo. Real-time apply means redo
       changes are applied to the standby database as they are received without waiting for a primary database log
       switch. Configure SRLs at the primary database prior to instantiating the standby database to reduce the
       number of manual steps required during instantiation. See ‘Appendix B - Create Standby Redo Logs’ for
       additional details.

13 | DISASTER RECOVERY ON THE ORACLE PUBLIC CLOUD - PRODUCTION ON PREMISES, DR IN THE CLOUD
6. The Oracle Home for the on-premises system must be the same Oracle patchset and it is recommended to be
on the same Oracle version and patches as the standby database on the cloud. Compare the output of
‘$ORACLE_HOME/OPatch/opatch lspatches’ between the two sites. If not already installed, the
master note of OPatch can be found here. Note that certain patches on the cloud VM could be specific to the
cloud, which are in addition to PSUs.
Note: Refer to the My Oracle Support Note 1265700.1 on Data Guard Standby-First patch apply for applying
Exadata bundle patches when using the Exadata Cloud service.
7. The steps outlined in this document assume that the on-premises primary database is not already part of an
existing Data Guard broker configuration. If there is an existing broker configuration for the on-premises
database it is assumed that the administrator has prior knowledge of the broker and knows how to add the new
standby database to an existing broker configuration. Refer to Appendix D for setting up Data Guard Broker.
A value other than ‘NOCONFIG’ for the following query implies an existing broker configuration.
SQL> select decode(count(1),0,'NOCONFIG') from v$DG_BROKER_CONFIG;
8. Use the default listener named LISTENER. The steps outlined in this document assume the default listener
name LISTENER is used. To verify run the following command from the on-premises machine. The expected
result is shown.
$ lsnrctl show current_listener | grep ‘Current Listener’
Current Listener is LISTENER
9. Verify the listener port by running the following command from the on-premises machine. The expected result
is shown.
$ lsnrctl stat | grep 'Connecting to'
Connecting to (ADDRESS=(PROTOCOL=tcp)(HOST=)(PORT=(1521)))
4. Encrypt Primary Database (Optional)
Data Guard primary and standby databases are physical replicas of each other. If a standby database in the cloud is
to be encrypted at rest, then the on-premises primary must be encrypted first. Oracle MAA Best Practices provide
guidance for converting to TDE with minimal downtime for Oracle Database 11.2 12 or for Oracle Database 12c 13.
5. Instantiate Data Guard Standby
As illustrated earlier, a default database instance is automatically created when you initially subscribe for Oracle
Database Cloud Service. This default database cannot be used as a Data Guard standby database and hence
needs to be deleted manually.
Note: This manual step will be eliminated in future version of database cloud service
12 http://www.oracle.com/technetwork/database/availability/tde-conversion-11g-2531187.pdf
13 http://www.oracle.com/technetwork/database/availability/tde-conversion-12c-2537297.pdf
14 | DISASTER RECOVERY ON THE ORACLE PUBLIC CLOUD - PRODUCTION ON PREMISES, DR IN THE CLOUDThe two options instantiating a Data Guard standby are:
» Instantiate from on-premises production.
» Instantiate from Oracle Database Backup Cloud Service
5.1 Fro m On-Prem is e s Pro du ctio n Data b a s e
In this mode of standby creation, the production database running on-premises is used for instantiating the standby
database in the cloud. This involves creating the standby database from production and setting up Data Guard
Broker. Appendices B, C & D list detailed steps for instantiating the standby from an active on-premises primary
database. See Figure 14.
Figure 14: Instantiation using RMAN duplicate an On-Premises Primary
5.2 Fro m Ora cle Data b a s e Ba cku p Clo u d S ervic e
On-premises production database backups stored in Oracle Database Backup Cloud Service (ODBCS) 14 can also
be used to create a standby instance. See Figure 15. Using RMAN restore and recovery commands, Standby
database is instantiated. Restore from the backup requires the same Password or TDE key.
Figure 15: Instantiation using Oracle Database Backup Cloud Service
Refer to Appendix I for the steps to create a standby database from the Database Backup Service.
14 https://cloud.oracle.com/database_backup
15 | DISASTER RECOVERY ON THE ORACLE PUBLIC CLOUD - PRODUCTION ON PREMISES, DR IN THE CLOUD6. Perform Data Guard Health Check
After the standby is instantiated, a health check should be performed to ensure the Data Guard databases (primary
and standby) are compliant with Oracle MAA best practices. It is also advisable to perform the health check on a
monthly basis as well as before and after database maintenance. There are several methods for checking the health
of a Data Guard configuration:
Oracle MAA Scorecard
Oracle provides several automated health check tools that can be downloaded from My Oracle Support specific for
the type of hardware platform:
» ORAchk applicable to generic platform (suitable for Database Cloud Service) 15
» exachk applicable to Exadata Database Machine (suitable for Exadata Cloud Service) 16
» ODAchk applicable to the Oracle Database Appliance (relevant only to on-premises databases in a
hybrid cloud configuration) 17
Each of the automated checks include an Oracle MAA Scorecard that reports on a number of key Data Guard
configuration best practices in addition to many other checks.
Oracle strongly recommends the use of these automated tools for comprehensive health check of not only the Data
Guard configuration but the system as a whole. The health checks are regularly updated with current information.
Be sure to download the latest version of the health checks applicable to your platform.
Data Guard Specific Queries (Applicable from Oracle Database 11g onward)
A set of Data Guard specific queries are provided in Appendix E along with sample output that can be used to
validate the health of the Data Guard configuration.
Data Guard VALIDATE DATABASE (Applicable from Oracle Database 12c onward)
The Data Guard Broker VALIDATE DATABASE command is highly recommended for the most comprehensive Data
Guard specific health check. VALIDATE DATABASE performs an extensive configuration check and validates the
configuration’s readiness for switchover or failover.
Example:
DGMGRL> validate database stby;
Database Role: Physical standby database
Primary Database: pri
Ready for Switchover: Yes
Ready for Failover: Yes (Primary Running)
15 https://support.oracle.com/CSP/main/article?cmd=show&type=NOT&id=1268927.2
16 https://support.oracle.com/CSP/main/article?cmd=show&type=NOT&id=1070954.1
17 https://support.oracle.com/CSP/main/article?cmd=show&type=NOT&id=1485630.1
16 | DISASTER RECOVERY ON THE ORACLE PUBLIC CLOUD - PRODUCTION ON PREMISES, DR IN THE CLOUDSee the Data Guard broker documentation for more information on the extensive checks performed by the
VALIDATE DATABASE command 18.
7. Enable Run Time Monitoring
There are two options for monitoring the run-time status of a Data Guard configuration: command line queries or
Enterprise Manager Cloud Control.
Option #1: Command Line Monitoring
Monitoring and alerting is required to ensure that the hybrid DR configuration is able to meet service levels
established by the administrator for data protection (RPO) and availability (RTO).
See Appendix A for a series of queries that monitor key aspects of the run time health of a Data Guard
configuration:
» Transport Lag
» Apply Lag
» Primary/Standby connection status
The administrator will need to create scripts to automate the monitoring of the configuration such that alerts are sent
when values exceed service level thresholds. This manual effort is not required if using Enterprise Manager 12c.
Option #2: Enterprise Manager 12c
Oracle Enterprise Manager 12c streamlines and automates complex management tasks across the complete cloud
lifecycle. On-premises administrators can monitor and manage public cloud services, and vice versa.
By deploying Management Agents onto the Oracle Cloud virtual hosts serving Oracle Cloud services, you are able
to manage Oracle Cloud targets just as you would any other targets. The communication between Management
Agents and on-premise Oracle management service instances is secure from external interference (requires
Enterprise Manager Cloud Control 12c Release 1 (12.1.0.5) or higher). Support is provided for managing Oracle
Database and Fusion Middleware PaaS targets, as well as JVMD support for monitoring JVMs on Oracle Cloud
virtual hosts.
Oracle Cloud Management includes the following features:
» Automated agent deployment and configuration
» Database and Java PaaS instances monitoring
» Incident management including notifications and ticketing integration
» Configuration management including Search and Inventory, comparison between on-premise and cloud
instances, configuration history, and compliance
» Cloning between on-premise and Oracle Cloud
» One-off patching of Oracle Cloud database instances
Enterprise Manager provides a simple interface to monitor and manage a Data Guard environment, including:
18 http://docs.oracle.com/database/121/DGBKR/dbresource.htm#DGBKR3855
17 | DISASTER RECOVERY ON THE ORACLE PUBLIC CLOUD - PRODUCTION ON PREMISES, DR IN THE CLOUD» Data Guard status
» Transport Lag
» Apply Lag
» Estimated Database Role Transition Time
» Primary or standby is or is not accessible
Alerts can be customized to notify of any event or when any of the above metrics exceed desired thresholds.
Refer to the Enterprise Manager Cloud Control Administrator’s Guide for guidance on how to enable Hybrid Cloud
Management 19.
Note: Support for managing a hybrid cloud DR configuration using Enterprise Management Cloud Control had not
been certified as of the date this paper was published. Download the current version of this paper to see if this
limitation has been lifted or see Enterprise Manager documentation for latest information.
8. Enable Redo Transport Compression (Optional)
Customers who have licensed Oracle Advanced Compression for their on-premises systems may use redo transport
compression if available network bandwidth is less than the uncompressed redo volume. Redo transport
compression is only recommended for environments that have ample CPU headroom on the primary but low
network bandwidth between primary and standby.
Customers who wish to use redo transport compression but who are concerned for the impact to primary database
performance have the additional option of using Oracle 12c Active Data Guard Far Sync to offload compression
overhead to a Far Sync instance deployed on premises. See the Oracle MAA Best Practice Paper, “Oracle Active
Data Guard Far Sync - Zero Data Loss at Any Distance”, 20 for additional information.
Note: Redo Transport Compression will produce minimal benefit for TDE encrypted databases since encrypted redo
cannot be compressed.
DR Operations
Once the DR to cloud is successfully established, you can verify the standby for DR readiness as well as perform
maintenance tasks as listed below:
1. Validate DR Readiness
2. Using Standby Database to reduce downtime during planned maintenance
3. Failover/Switchover to the cloud
4. Failback/Switchback to on-premises
5. Connecting to the Application Tier
19 http://docs.oracle.com/cd/E24628_01/doc.121/e24473/part_hybrid_cloud.htm
20 http://www.oracle.com/technetwork/database/availability/farsync-2267608.pdf
18 | DISASTER RECOVERY ON THE ORACLE PUBLIC CLOUD - PRODUCTION ON PREMISES, DR IN THE CLOUD1. Validate DR Readiness It is recommended that customers periodically place the standby in read/write mode (SNAPSHOT STANDBY) to validate its readiness to support production when needed. The snapshot standby is also used for testing applications which require read-write access to the Oracle Database. A Snapshot Standby continues to receive redo from the primary database where it is archived for later use, thus providing data protection at all times. Recovery time (RTO), however, will be extended by the amount of time required to convert the Snapshot Standby back to its customary standby database role if there is an outage of the primary database while testing is in progress. Note that additional storage is required for the fast recovery area when a standby is in snapshot mode (to hold archived redo received from the primary production database for later use and current redo and flashback logs generated by the snapshot standby). Steps for converting a standby to a snapshot standby and back are listed in Appendix F. Please refer to Oracle documentation for additional details on Data Guard Snapshot Standby 21. Optionally you may perform an actual switchover or failover operation; for more details see Failover/Switchover to the Cloud. 2. Using Standby Database to reduce downtime during Planned Maintenance There are several options for utilizing a standby database on the cloud for reducing planned downtime of the primary production database: Standby-first Patch Apply: Many patches may be applied first to a physical standby for thorough validation. Customers who wish to minimize downtime will frequently patch the standby first, then switch production to the standby database, and then patch the original primary. Data Guard physical replication is supported between primary and standby running at mixed patch versions for patches that are standby-first eligible (documented in the patch read-me). The customer may also choose to run for a period of time with mixed patch versions between primary and standby to enable fast fallback to the unpatched version should there be any unanticipated problems with the patch. See My Oracle Support Note 1265700.1, “Oracle Patch Assurance - Data Guard Standby-First Patch Apply” 22 for more details on patches eligible for the standby-first process. Database Rolling Upgrade: Another beneficial use case for standby in the Oracle cloud is for database rolling upgrade to reduce downtime when upgrading to new database patch-sets and full Oracle releases. The transient logical process is used in Oracle 11g and Oracle 12c to temporarily convert a physical standby database to a logical standby, upgrade the logical standby to the new version, validate and when ready execute a Data Guard switchover. After the switchover completes, the original primary database is converted to a synchronized physical standby also operating at the new release. Refer to Oracle 11g Database Rolling Upgrades Made Easy 23 or Oracle 12c DBMS_Rolling 24 for more information. 3. Failover/Switchover to the Cloud At any time you can manually execute a Data Guard switchover (planned event) or failover (unplanned event). Customers may also choose to automate Data Guard failover by configuring Fast-Start failover. Switchover and failover reverse the roles of the databases in a Data Guard configuration – the standby in the cloud becomes primary and the original on-premises primary becomes a standby database. Refer to the Data Guard 21 http://docs.oracle.com/database/121/SBYDB/manage_ps.htm#BACIEJJI 22 https://support.oracle.com/epmos/faces/DocumentDisplay?id=1265700.1 23 http://www.oracle.com/technetwork/database/features/availability/maa-wp-11g-upgrades-made-easy-131972.pdf 24 http://docs.oracle.com/database/121/SBYDB/dbms_rolling_upgrades.htm#CJACBBBC 19 | DISASTER RECOVERY ON THE ORACLE PUBLIC CLOUD - PRODUCTION ON PREMISES, DR IN THE CLOUD
documentation 25 for background information on Data Guard role transitions (note that you will not execute role
transitions from the SQL command line as described in this documentation, you will use the Data Guard broker as
described below). For failover of the application tier, please refer to the “Connecting the Application Tier” section of
this paper.

Switchovers are always a planned event that guarantees no data is lost. To execute a switchover perform the
following in Data Guard Broker

           DGMGRL> validate database stby;

           Database Role:                     Physical standby database
           Primary Database:                  pri
           Ready for Switchover: Yes
           Ready for Failover:                         Yes (Primary Running)

           DGMGRL> switchover to ;

A failover is an unplanned event that assumes the primary database is lost. The standby database is converted to a
primary database immediately; after all available redo from the primary has been applied. After a failover the old
primary database must be reinstated as a physical standby which is made simpler with flashback database and Data
Guard broker enabled. To execute a failover and reinstatement execute the following in Data Guard Broker.

           DGMGRL> failover to stby;
           Performing failover NOW, please wait...
           Failover succeeded, new primary is "stby"
Execute startup mount on one instance of the old primary before reinstating.
           SQL> shutdown abort
           SQL> startup mount
           DGMGRL> reinstate database pri
           Reinstating database "pri", please wait...
For more information on role transitions using the Data Guard Broker see the broker documentation for Oracle
Database 11g 26 or 12c 27.

4. Switch back to On-Premises
The same role transition procedure mentioned in the failover/switchover process is applied again when you are
ready to move production back to the on-premises database.

5. Connecting the Application Tier
It is important to understand the implications of network latency between an on-premises application tier and a
remote database residing in the Oracle Cloud in a hybrid cloud DR configuration. This is especially relevant when
there has been a switchover/failover of production to the cloud standby while the application tier remains on
premises, or when an on-premises application tier makes remote read-only connections to an Active Data Guard
standby on the cloud. Some applications are especially chatty with the database and thus vulnerable to substantial

25 http://docs.oracle.com/cd/E11882_01/server.112/e41134/role_management.htm#SBYDB00600
26 http://docs.oracle.com/cd/E11882_01/server.112/e40771/toc.htm
27 http://docs.oracle.com/database/121/DGBKR/toc.htm

20 | DISASTER RECOVERY ON THE ORACLE PUBLIC CLOUD - PRODUCTION ON PREMISES, DR IN THE CLOUD
performance overhead when making a remote connection. Other applications, WebLogic-based applications for
example, store their metadata in the database itself.
Ideally, the application tier is able to tolerate the latency of a remote connection. During steady state operation the
application tier will access services running on the on-premises primary database. Following a switch-over or
failover to the cloud, application connections are automatically redirected to the new primary database. Automating
the failover of the application tier is done as follows:
» The application tier is pre-configured to automatically connect to whichever database offers the desired
database service.
» Role-specific database services are preconfigured so that the appropriate services start automatically and are
only ever available on the database that is functioning in the primary role.
» Oracle Fast Application Notification (FAN) or alternatively careful configuration of tcp time-outs, enables clients
connected to the failed database to quickly drop their connection when there is an outage and automatically
reconnect to the new primary database on the cloud.
Additional information for configuring automatic failover of an application tier to a new primary database is provided
in Appendix G.
If the application tier is not able to tolerate the latency of a remote connection or if the entire primary site is
unavailable, then failover/switchover of both application and database tiers to the Oracle Cloud will be required.
Current options for deploying the application tier in Oracle public cloud include:
» Java Cloud Service
» Business Intelligence Cloud Service
» Dedicated Compute
Details for configuring full site failover for both application and database tier are beyond the scope of the current
version of this technical white paper and will be included in a future update.
Conclusion
Disaster recovery in a hybrid cloud configuration consists of an on-premises production database and a DR copy on
the Oracle Public Cloud synchronized by Oracle Data Guard or Active Data Guard. Disaster Recovery on the Oracle
Public Cloud eliminates the costs and complexity of owning and managing a remote facility as well as the capital
expense of standby systems and software.
The use of Data Guard or Active Data Guard for disaster recovery eliminates the downtime and potential risk of
relying upon a remote backup to restore service; production is quickly failed over to an already running,
synchronized copy of your production database on the Oracle Public Cloud. The standby database on the cloud not
only provides disaster recovery, it can also be used to seed clone databases for development and test as well as
offloading read-only workloads from on-premises production databases.
21 | DISASTER RECOVERY ON THE ORACLE PUBLIC CLOUD - PRODUCTION ON PREMISES, DR IN THE CLOUDAppendices
Appendix A – Data Guard Run-Time Monitoring Queries
As of the release of this document monitoring the standby database in a Hybrid Data Guard configuration must be
done with queries and scripts. There are a few basic recommendations for monitoring which include:
1) Validate redo transport is functioning and there is no transport lag- This means redo is being shipped to
the standby in a timely manner.
2) Validate redo apply is functioning and there is no apply lag- This means redo is being applied in a timely
manner as it is received.
Each of these things can be monitored via Data Guard broker or SQL*Plus queries.
Monitoring with Data Guard Broker
Monitoring with Data Guard should focus on Database Status of the show database
command. A Database Status of SUCCESS implies there are no issues.
DGMGRL> show database stby;
Database - stby
Role: PHYSICAL STANDBY
Intended State: APPLY-ON
Transport Lag: 0 seconds (computed 1 second ago)
Apply Lag: 0 seconds (computed 1 second ago)
Average Apply Rate: 20.00 KByte/s
Real Time Query: ON
Instance(s):
stby1
stby2 (apply instance)
Database Status:
SUCCESS
When there are issues with transport or apply functionality the status will read WARNING or ERROR.
Setting the ApplyLagThreshold and TransportLagThreshold properties on the standby database enables monitoring
lag in the same method (Database Status). Each of these properties is expressed in seconds. By setting these
properties to a non-zero value, when the value is exceeded the Database Status will be changed to WARNING.
Monitoring with SQL*Plus
To Validate Redo Transport and Redo Apply
The basics of Data Guard are that redo is transported from the primary and then applied on the standby. The
queries below can be used to validate these functions are working properly.
PRIMARY DATABASE QUERY: Current state of Data Guard Transport:
22 | DISASTER RECOVERY ON THE ORACLE PUBLIC CLOUD - PRODUCTION ON PREMISES, DR IN THE CLOUDTo validate that the primary database is shipping redo to the standby execute the following query on the primary database. A STATUS of VALID is expected. ERROR will be populated with additional information if the STATUS does not equal VALID. gv$archive_dest_status should be used in case of a RAC primary database in order to validate each primary instance. SQL> select sysdate,status,error from v$archive_dest_status where type='PHYSICAL'; SYSDATE STATUS ERROR -------------------- --------- ---------- 13-mar-2015 10:42:10 VALID STANDBY DATABASE QUERY: Current State of the Standby Apply A standby can be receiving redo without applying it. Therefore, the query above is just once piece of the validation. To validate that redo apply is running on the standby database execute the following query. A RECOVERY_MODE of ‘MANAGED REAL TIME APPLY’ implies that redo is applied as it is received. GAP_STATUS indicates whether there is a gap in redo transport from the primary. SQL> select sysdate,database_mode,recovery_mode, gap_status from v$archive_dest_status where type='PHYSICAL'; SYSDATE DATABASE_MODE RECOVERY_MODE GAP_STATUS -------------------- --------------- ----------------------- ---------- 13-mar-2015 10:43:44 OPEN_READ-ONLY MANAGED REAL TIME APPLY NO GAP Data Guard Performance (Standby Lag) Redo that has been successfully written but not applied to the standby is called an apply lag. An apply lag indicates there are insufficient resources at the standby, often due to I/O or CPU contention. Apply lag does not indicate potential data loss exposure since the redo is present at the standby it can be applied prior to failover. However, when there is a transport lag, meaning redo is not being received and written to the standby redo logs in a timely fashion, there is a potential to lose the unwritten data should the primary be lost. Network latency is often the cause of transport lag but can also be the result of insufficient resources at the standby. The following queries will help identify the presence and size of either lag. STANDBY DATABASE QUERY: Monitor for Apply and Transport Time Lags Run the following query to identify an apply or transport lag. A VALUE of ‘+00 00:00:00’ indicates no lag. SQL> select name,value,time_computed,datum_time from v$dataguard_stats where name like '%lag%'; NAME VALUE TIME_COMPUTED DATUM_TIME ------------- -------------------- ------------------------------ ------------- ------- transport lag +00 00:00:00 06/18/2015 09:26:29 06/18/2015 09:26:27 apply lag +00 00:00:00 06/18/2015 09:26:29 06/18/2015 09:26:27 STANDBY DATABASE QUERY: Monitor the Size of a Transport Lag. 23 | DISASTER RECOVERY ON THE ORACLE PUBLIC CLOUD - PRODUCTION ON PREMISES, DR IN THE CLOUD
The following query can be used to determine how far behind in blocks the standby is from the primary when a
transport lag is present.

SQL> select t.thread#,t.LAST_REDO_SEQUENCE#,t.LAST_REDO_BLOCK, s.thread#,
s.sequence#, s.block# from v$thread t, gv$managed_standby s where
s.process='LNS' and t.LAST_REDO_SEQUENCE#=s.sequence#;

   THREAD# LAST_REDO_SEQUENCE# LAST_REDO_BLOCK    THREAD# SEQUENCE#      BLOCK#
---------- ------------------- --------------- ---------- ---------- ----------
         1                 453             482          1        453       482
         2                 406             786          2        406       786

STANDBY DATABASE QUERY: Monitor Standby Apply Process
SQL> select sysdate,process,status,thread#,sequence#,block# from
v$managed_standby where status!='IDLE';

SYSDATE                         PROCESS        STATUS          THREAD# SEQUENCE#      BLOCK#
--------------------            ---------      ------------ ---------- ---------- ----------
13-mar-2015 10:58:31            ARCH           CLOSING               2        403          1
13-mar-2015 10:58:31            ARCH           CONNECTED             0          0          0
13-mar-2015 10:58:31            ARCH           CLOSING               1        449          1
13-mar-2015 10:58:31            ARCH           CLOSING               2        402       4096
13-mar-2015 10:58:31            MRP0           APPLYING_LOG          2        404       1614

STANDBY DATABASE QUERY: Monitor Recovery (advanced monitoring)

The following query can be used to gather valuable information about the apply process such as apply rates and
apply lag. gv$recovery progress keeps a history of each recovery invocation for the life of the instance(until instance
is restarted), this query select only metrics for the most recent invocation.
SQL> select start_time, item, units, sofar from gv$recovery_progress where
START_TIME in (select max(START_TIME) from v$recovery_progress);

START_TIM    ITEM                                         UNITS                                 SOFAR
---------    --------------------------------             -------------------------------- ----------
18-JUN-15    Active Apply Rate                            KB/sec                                   23
18-JUN-15    Average Apply Rate                           KB/sec                                    1
18-JUN-15    Maximum Apply Rate                           KB/sec                                   24
18-JUN-15    Redo Applied                                 Megabytes                                 0
18-JUN-15    Last Applied Redo                            SCN+Time                                  0
18-JUN-15    Active Time                                  Seconds                                  42
18-JUN-15    Elapsed Time                                 Seconds                                 576
18-JUN-15    Standby Apply Lag                            Seconds                                   1

24 | DISASTER RECOVERY ON THE ORACLE PUBLIC CLOUD - PRODUCTION ON PREMISES, DR IN THE CLOUD
Appendix B – (Active) Data Guard Configuration
Configure SSH
Prompt-less ssh should be configured in both directions. Generate an ssh key for the cloud environment to the on
premises environment.
NOTE: this is already configured from on premises->cloud
In the Oracle Public Cloud environment generate the ssh key and copy the file to the cloud
$ ssh-keygen
$ scp ~/.ssh/id_rsa.pub oracle@:~/.ssh/id_rsa.pub_cloud
In the On-Premises primary database envrionment copy the generated key to the authorized_users file for prompt-
less ssh connectivity.
$ cat ~/.ssh/id_rsa.pub_cloud >> ~/.ssh/authorized_users
$ chmod 700 ~/.ssh/authorized_users
Oracle Restart Installation
The Oracle Grid infrastructure has become an integral part of the application failover features for Oracle Data
Guard. By default the Grid Infrastructure is not installed with an Oracle Database Service in a standalone
configuration and should be done manually following the appropriate documentation for 12.1 or 11.2. The rest of the
steps for configuration assume Oracle restart has been installed and configured.
Note: The installation software for Oracle Grid infrastructure is not present on the cloud service and must be
downloaded from OTN to the on-premises site and scp’d manually for installation.
Add swap space
The installer expects that swap space equals the amount of memory for systems with less than 16GB memory. The
default configuration for an OPC VM has only 4GB of swap so additional swap should be configured with a swap file.
These steps should be done via the root user.
1. Determine how much memory and swap is installed on the OPC VM(both values are in kB). In this
example there is 4GB of swap and about 7.4GB memory.
# egrep MemTotal /proc/meminfo
MemTotal: 7710316 kB
# swapon -s
Filename Type Size Used Priority
/dev/xvdb3 partition 4194300 11772 -1
2. Make sure there is sufficient space for the new file, in this example the extra swap file will be about 3.4GB
# df -k /
Filesystem 1K-blocks Used Available Use% Mounted on
25 | DISASTER RECOVERY ON THE ORACLE PUBLIC CLOUD - PRODUCTION ON PREMISES, DR IN THE CLOUD/dev/xvdb2 16313216 7229436 8255384 47% /
3. Create an empty file equal to or greater than the size of the difference between allocated swap space and
memory to be used for swap
# dd if=/dev/zero of=/extraswap bs=1M count=3400
4. Backup /etc/fstab
cp /etc/fstab /etc/fstab.mybackup
5. Edit /etc/fstab with a new line for swap
/extraswap swap swap defaults 0 0
6. Add the new swap file to swap
# swapon -a
7. Check that the new swap is available
# swapon -s
Filename Type Size Used Priority
/dev/xvdb3 partition 4194300 11772 -1
/extraswap file 3481600 0 -2
Run the Installer
Use the appropriate 12.1 or 11.2 documentation for installation steps.
In order to run the installer on the OPC VM through the ssh connection, X11 forwarding must be enabled. Logged in
as root via the opc user, set the following in /etc/ssh/sshd_config:
» X11forwarding yes
» X11DisplayOffset 10
» X11UseLocalhost yes
As root, restart the ssh deamon:
$ service sshd stop
$ service sshd start
When connecting to the OPC VM used the following options to identify the connection as trusted:
$ ssh -o ServerAliveInterval=100 -Y oracle@
When installing Oracle Restart:
» Select the installation option ‘Install Oracle Grid Infrastructure Software Only’
» Install the software in /u01/app//grid
» Ignore the warning for NTP, as this is not a RAC configuration.
26 | DISASTER RECOVERY ON THE ORACLE PUBLIC CLOUD - PRODUCTION ON PREMISES, DR IN THE CLOUDYou can also read