Using Avaya one-X Mobile Preferred for IP Office on Android - Release 9.0 September 2013
←
→
Page content transcription
If your browser does not render page correctly, please read the page content below
Using Avaya one-X® Mobile Preferred for
IP Office on Android

                                    Release 9.0
                                September 2013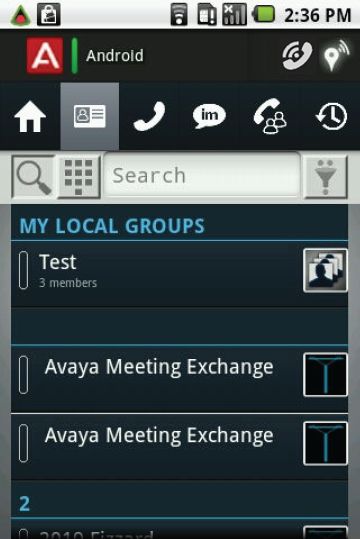
© 2013 Avaya Inc.                                                          BINDING CONTRACT BETWEEN YOU AND AVAYA INC. OR THE
                                                                           APPLICABLE AVAYA AFFILIATE (“AVAYA”).
All Rights Reserved.
                                                                           Avaya grants you a license within the scope of the license types
Notice                                                                     described below, for which the scope of the license is detailed below.
                                                                           Where the order documentation does not expressly identify a license
While reasonable efforts have been made to ensure that the                 type, the applicable license will be a Designated System License. The
information in this document is complete and accurate at the time of       applicable number of licenses and units of capacity for which the
printing, Avaya assumes no liability for any errors. Avaya reserves the    license is granted will be one (1), unless a different number of licenses
right to make changes and corrections to the information in this           or units of capacity is specified in the documentation or other materials
document without the obligation to notify any person or organization of    available to you. “Designated Processor” means a single stand-alone
such changes.                                                              computing device. “Server” means a Designated Processor that hosts
                                                                           a software application to be accessed by multiple users.
Documentation disclaimer
“Documentation” means information published by Avaya in varying            Licence types
mediums which may include product information, operating instructions      Designated System(s) License (DS). End User may install and use
and performance specifications that Avaya generally makes available        each copy of the Software only on a number of Designated Processors
to users of its products. Documentation does not include marketing         up to the number indicated in the order. Avaya may require the
materials. Avaya shall not be responsible for any modifications,           Designated Processor(s) to be identified in the order by type, serial
additions, or deletions to the original published version of               number, feature key, location or other specific designation, or to be
documentation unless such modifications, additions, or deletions were      provided by End User to Avaya through electronic means established
performed by Avaya. End User agrees to indemnify and hold harmless         by Avaya specifically for this purpose.
Avaya, Avaya's agents, servants and employees against all claims,
lawsuits, demands and judgments arising out of, or in connection with,     Concurrent User License (CU). End User may install and use the
subsequent modifications, additions or deletions to this documentation,    Software on multiple Designated Processors or one or more Servers,
to the extent made by End User.                                            so long as only the licensed number of Units are accessing and using
                                                                           the Software at any given time. A “Unit” means the unit on which Avaya,
Link disclaimer                                                            at its sole discretion, bases the pricing of its licenses and can be,
Avaya is not responsible for the contents or reliability of any linked     without limitation, an agent, port or user, an e-mail or voice mail account
websites referenced within this site or documentation provided by          in the name of a person or corporate function (e.g., webmaster or
Avaya. Avaya is not responsible for the accuracy of any information,       helpdesk), or a directory entry in the administrative database utilized
statement or content provided on these sites and does not necessarily      by the Software that permits one user to interface with the Software.
endorse the products, services, or information described or offered        Units may be linked to a specific, identified Server.
within them. Avaya does not guarantee that these links will work all the
time and has no control over the availability of the linked pages.         Database License (DL). End User may install and use each copy of the
                                                                           Software on one Server or on multiple Servers provided that each of
Warranty                                                                   the Servers on which the Software is installed communicates with no
                                                                           more than a single instance of the same database.
Avaya provides a limited warranty on its hardware and Software
(“Product(s)”). Refer to your sales agreement to establish the terms of    CPU License (CP). End User may install and use each copy of the
the limited warranty. In addition, Avaya’s standard warranty language,     Software on a number of Servers up to the number indicated in the
as well as information regarding support for this Product while under      order provided that the performance capacity of the Server(s) does not
warranty is available to Avaya customers and other parties through the     exceed the performance capacity specified for the Software. End User
Avaya Support website: http://support.avaya.com. Please note that if       may not re-install or operate the Software on Server(s) with a larger
you acquired the Product(s) from an authorized Avaya Channel Partner       performance capacity without Avaya’s prior consent and payment of an
outside of the United States and Canada, the warranty is provided to       upgrade fee.
you by said Avaya Channel Partner and not by Avaya. “Software”
means computer programs in object code, provided by Avaya or an            Named User License (NU). You may: (i) install and use the Software
Avaya Channel Partner, whether as stand-alone products or pre-             on a single Designated Processor or Server per authorized Named
installed on hardware products, and any upgrades, updates, bug fixes,      User (defined below); or (ii) install and use the Software on a Server so
or modified versions.                                                      long as only authorized Named Users access and use the Software.
                                                                           “Named User”, means a user or device that has been expressly
Licenses                                                                   authorized by Avaya to access and use the Software. At Avaya’s sole
                                                                           discretion, a “Named User” may be, without limitation, designated by
THE SOFTWARE LICENSE TERMS AVAILABLE ON THE AVAYA                          name, corporate function (e.g., webmaster or helpdesk), an e-mail or
WEBSITE, HTTP://SUPPORT.AVAYA.COM/LICENSEINFO ARE                          voice mail account in the name of a person or corporate function, or a
APPLICABLE TO ANYONE WHO DOWNLOADS, USES AND/OR                            directory entry in the administrative database utilized by the Software
INSTALLS AVAYA SOFTWARE, PURCHASED FROM AVAYA INC.,                        that permits one user to interface with the Software.
ANY AVAYA AFFILIATE, OR AN AUTHORIZED AVAYA CHANNEL
PARTNER (AS APPLICABLE) UNDER A COMMERCIAL                                 Shrinkwrap License (SR). You may install and use the Software in
AGREEMENT WITH AVAYA OR AN AUTHORIZED AVAYA                                accordance with the terms and conditions of the applicable license
CHANNEL PARTNER. UNLESS OTHERWISE AGREED TO BY                             agreements, such as “shrinkwrap” or “clickthrough” license
AVAYA IN WRITING, AVAYA DOES NOT EXTEND THIS LICENSE IF                    accompanying or applicable to the Software (“Shrinkwrap License”).
THE SOFTWARE WAS OBTAINED FROM ANYONE OTHER THAN
AVAYA, AN AVAYA AFFILIATE OR AN AVAYA AUTHORIZED                           Heritage Nortel Software
AVAYA CHANNEL PARTNER; AVAYA RESERVES THE RIGHT TO
TAKE LEGAL ACTION AGAINST YOU AND ANYONE ELSE USING                        “Heritage Nortel Software” means the software that was acquired by
OR SELLING THE SOFTWARE WITHOUT A LICENSE. BY                              Avaya as part of its purchase of the Nortel Enterprise Solutions
INSTALLING, DOWNLOADING OR USING THE SOFTWARE, OR                          Business in December 2009. The Heritage Nortel Software currently
AUTHORIZING OTHERS TO DO SO, YOU, ON BEHALF OF                             available for license from Avaya is the software contained within the list
YOURSELF AND THE ENTITY FOR WHOM YOU ARE INSTALLING,                       of Heritage Nortel Products located at http://support.avaya.com/
DOWNLOADING OR USING THE SOFTWARE (HEREINAFTER                             LicenseInfo under the link “Heritage Nortel Products”. For Heritage
REFERRED TO INTERCHANGEABLY AS “YOU” AND “END USER”),                      Nortel Software, Avaya grants Customer a license to use Heritage
AGREE TO THESE TERMS AND CONDITIONS AND CREATE A                           Nortel Software provided hereunder solely to the extent of the
                                                                           authorized activation or authorized usage level, solely for the purpose

2    Using Avaya one-X® Mobile Preferred for IP Office on Android                                                              September 2013
                                                       Comments? infodev@avaya.com
specified in the Documentation, and solely as embedded in, for                All non-Avaya trademarks are the property of their respective owners.
execution on, or (in the event the applicable Documentation permits           Linux® is the registered trademark of Linus Torvalds in the U.S. and
installation on non-Avaya equipment) for communication with Avaya             other countries.
equipment. Charges for Heritage Nortel Software may be based on
extent of activation or use authorized as specified in an order or invoice.   Downloading Documentation

Copyright                                                                     For the most current versions of Documentation, see the Avaya
                                                                              Support website: http://support.avaya.com.
Except where expressly stated otherwise, no use should be made of
materials on this site, the Documentation, Software, or hardware              Contact Avaya Support
provided by Avaya. All content on this site, the documentation and the
Product provided by Avaya including the selection, arrangement and            See the Avaya Support website: http://support.avaya.com for product
design of the content is owned either by Avaya or its licensors and is        notices and articles, or to report a problem with your Avaya product.
protected by copyright and other intellectual property laws including the     For a list of support telephone numbers and contact addresses, go to
sui generis rights relating to the protection of databases. You may not       the Avaya Support website: http://support.avaya.com, scroll to the
modify, copy, reproduce, republish, upload, post, transmit or distribute      bottom of the page, and select Contact Avaya Support.
in any way any content, in whole or in part, including any code and
software unless expressly authorized by Avaya. Unauthorized
reproduction, transmission, dissemination, storage, and or use without
the express written consent of Avaya can be a criminal, as well as a
civil offense under the applicable law.

Third Party Components
“Third Party Components” mean certain software programs or portions
thereof included in the Software that may contain software (including
open source software) distributed under third party agreements (“Third
Party Components”), which contain terms regarding the rights to use
certain portions of the Software (“Third Party Terms”). Information
regarding distributed Linux OS source code (for those Products that
have distributed Linux OS source code) and identifying the copyright
holders of the Third Party Components and the Third Party Terms that
apply is available in the Documentation or on Avaya’s website at: http://
support.avaya.com/Copyright. You agree to the Third Party Terms for
any such Third Party Components.

Note to Service Provider
The Product may use Third Party Components that have Third Party
Terms that do not allow hosting and may need to be independently
licensed for such purpose.

Preventing Toll Fraud
“Toll Fraud” is the unauthorized use of your telecommunications
system by an unauthorized party (for example, a person who is not a
corporate employee, agent, subcontractor, or is not working on your
company's behalf). Be aware that there can be a risk of Toll Fraud
associated with your system and that, if Toll Fraud occurs, it can result
in substantial additional charges for your telecommunications services.

Avaya Toll Fraud intervention
If you suspect that you are being victimized by Toll Fraud and you need
technical assistance or support, call Technical Service Center Toll
Fraud Intervention Hotline at +1-800-643-2353 for the United States
and Canada. For additional support telephone numbers, see the Avaya
Support website: http://support.avaya.com. Suspected security
vulnerabilities with Avaya products should be reported to Avaya by
sending mail to: securityalerts@avaya.com.

Trademarks
The trademarks, logos and service marks (“Marks”) displayed in this
site, the Documentation and Product(s) provided by Avaya are the
registered or unregistered Marks of Avaya, its affiliates, or other third
parties. Users are not permitted to use such Marks without prior written
consent from Avaya or such third party which may own the Mark.
Nothing contained in this site, the Documentation and Product(s)
should be construed as granting, by implication, estoppel, or otherwise,
any license or right in and to the Marks without the express written
permission of Avaya or the applicable third party.

Avaya is a registered trademark of Avaya Inc.

Using Avaya one-X® Mobile Preferred for IP Office on Android                                                             September 2013          3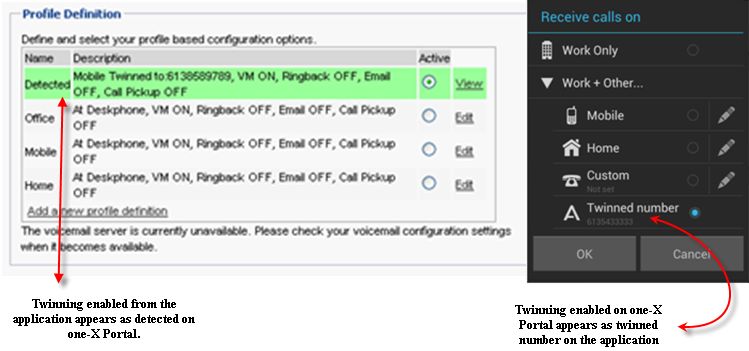
4   Using Avaya one-X® Mobile Preferred for IP Office on Android       September 2013
                                         Comments? infodev@avaya.com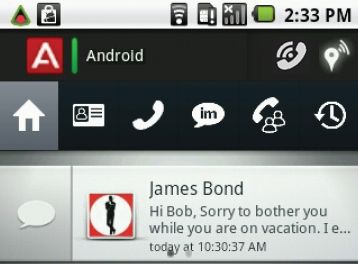
Contents

Chapter 1: About Avaya one-X® Mobile Preferred for IP Office..................................... 7
       Overview...................................................................................................................................................
                                                                                                                                                              7
       User interface............................................................................................................................................
                                                                                                                                                              8
            The Home screen.............................................................................................................................      13
            The Contacts screen........................................................................................................................       14
            The Instant Messages screen..........................................................................................................             19
            The Conference screen....................................................................................................................         20
            The Call Log screen.........................................................................................................................      22
Chapter 2: Getting started.................................................................................................. 25
   Application installation............................................................................................................................... 25
         Installing the application on an Android device................................................................................ 25
   Configure the application.......................................................................................................................... 26
         Configuring the connection to IP Office............................................................................................ 26
         Configure call control........................................................................................................................ 27
         Configuring enterprise dialing........................................................................................................... 29
         Configuring the notify me feature..................................................................................................... 31
         Setting preferences for notifications................................................................................................. 31
         Configuring GPS information............................................................................................................ 32
         Deleting GPS locations.................................................................................................................... 33
         Enabling or disabling mobile twinning.............................................................................................. 34
         Configuring DND settings................................................................................................................. 36
         Advanced field descriptions.............................................................................................................. 36
   Enable the widget...................................................................................................................................... 37
   Self-administration on Avaya one-X® Portal............................................................................................. 38
Chapter 3: Managing Status Information.......................................................................... 39
   Managing status information..................................................................................................................... 39
         Setting your status............................................................................................................................ 41
         Using the notify me feature.............................................................................................................. 42
         Viewing calendar information........................................................................................................... 42
         Viewing the phone status................................................................................................................. 43
Chapter 4: Handling Calls.................................................................................................. 45
   Making calls.............................................................................................................................................. 45
         Setting your call facility..................................................................................................................... 45
         Initiating a call from the Dialpad....................................................................................................... 47
         Initiating a call from the contacts list................................................................................................. 48
         Initiating a call from an instant message.......................................................................................... 49
         Initiating a call from the call log........................................................................................................ 49
         Using the integrated dialer............................................................................................................... 49
         Initiating an e-mail from the Contacts list......................................................................................... 50
         Making a selection............................................................................................................................ 50
   Transferring 3rd-party calls....................................................................................................................... 51
   Handling user call transfers....................................................................................................................... 51
Chapter 5: Making conference calls.................................................................................. 53
   Managing your conference bridge............................................................................................................ 53

Using Avaya one-X® Mobile Preferred for IP Office on Android                                                                              September 2013             5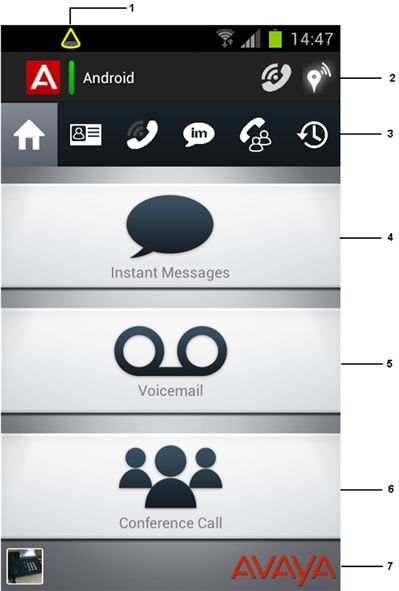
Adding conference participants........................................................................................................         54
               Starting a conference.......................................................................................................................   55
               Joining a conference in progress.....................................................................................................          57
               Locking and unlocking a conference................................................................................................             57
               Muting participants........................................................................................................................... 57
               Assigning aliases..............................................................................................................................58
               Disconnecting participants...............................................................................................................      59
Chapter 6: Using the Events history................................................................................. 61
    About Events history................................................................................................................................. 61
    Filtering the Events................................................................................................................................... 62
    Clearing the Events history....................................................................................................................... 62
    Configuring notification settings for missed calls...................................................................................... 63
Chapter 7: Using VoIP........................................................................................................ 65
    The VoIP feature....................................................................................................................................... 65
           About the VoIP feature..................................................................................................................... 65
           Prerequisites and supported devices............................................................................................... 65
           Status indicators for VoIP................................................................................................................. 66
           Error messages for VoIP.................................................................................................................. 67
           VoIP interaction with cellular calls.................................................................................................... 67
           Receiving VoIP Calls........................................................................................................................ 68
           Making VoIP Calls............................................................................................................................ 69
           Interacting with VoIP Calls............................................................................................................... 69
           Configuring Codec preferences........................................................................................................ 71
           Enabling or disabling notification for VoIP registration..................................................................... 71
           Configuring bluetooth headset support for VoIP calls...................................................................... 72
Chapter 8: Using instant messaging................................................................................. 73
    Sending an instant message..................................................................................................................... 73
           Receiving instant messages............................................................................................................. 73
    Selecting a view........................................................................................................................................ 74
    Deleting instant messages........................................................................................................................ 74
Chapter 9: Managing voice mails...................................................................................... 77
    Managing voicemail.................................................................................................................................. 77
    Listening to voice mail messages............................................................................................................. 77
           Listening to incoming messages...................................................................................................... 77
    Returning a call......................................................................................................................................... 78
    Marking voice mail messages as unheard................................................................................................ 78
    Moving voice mail messages.................................................................................................................... 78
    Deleting voice mail messages................................................................................................................... 79
    Sending a voice mail message via email.................................................................................................. 79
Chapter 10: Managing geo-presence information........................................................... 81
    Viewing the geo-presence of a contact..................................................................................................... 81
    Viewing requests for your geo-presence.................................................................................................. 82
    Communications options........................................................................................................................... 82
Chapter 11: Troubleshooting............................................................................................. 83
    Uploading logs.......................................................................................................................................... 83
    Submitting a problem................................................................................................................................ 83
Index..................................................................................................................................... 85

6    Using Avaya one-X® Mobile Preferred for IP Office on Android                                                                            September 2013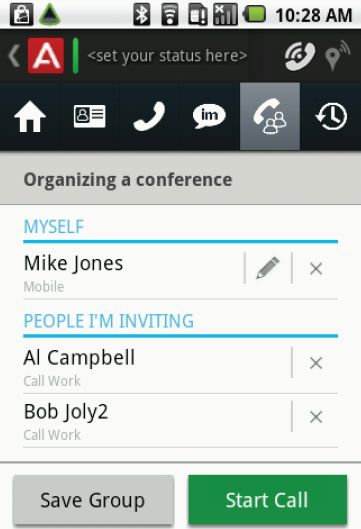
Chapter 1: About Avaya one-X® Mobile
           Preferred for IP Office

Overview
           Avaya one-X® Mobile is an application that mobile phone users can use to connect to the IP
           Office communications server. Only IP Office release 8.0+ supports one-X Mobile Preferred.

           Designed for a mobile workforce, the Avaya one-X® Mobile application provides rich unified
           communications (UC) capabilities that help users conduct business while on the move. Avaya
           one-X® Mobile release 9.0 features include:
               • Support for Voice Over Internet Protocol (VoIP) calls through built-in VoIP client.
               • Mobile twinning with option for the user to enable or disable twinning, and set the twinning
                 number from the application.
               • Facility for the user to monitor and transfer calls.
               • Visual voicemail with the ability to play voice mail messages, pick-up incoming voice mail
                 messages, view the current presence of the voice mail sender, return calls and forward
                 voicemails through e-mail.
               • Provision to swipe through unread messages from the home screen.
               • Support for the IP Office call transfer feature for supervised and unsupervised
                 transfers.
               • Presence information for the user and for the enterprise contacts.
               • Addition of an Events tab on the home screen for displaying details of voice calls and
                 voicemails.
               • Geo-location presence and tracking using the on-board GPS of the mobile phone.
               • Instant messaging with contacts defined on the IP Office server, as well as with external
                 contacts.
               • Rich conference controls with click-to-conference for users, entry and exit notifications,
                 and the ability to view and manage conference participants.
               • Integration with Microsoft Outlook Calendar to provide information about the availability
                 of users.

Using Avaya one-X® Mobile Preferred for IP Office on Android                            September 2013     7
About Avaya one-X® Mobile Preferred for IP Office

               • Real-time notifications of communications arriving on the server, such as new voicemail
                 or instant messages, changes in the availability of contacts, and conference participants
                 dialing into the conference bridge of the user.
               • Support for enterprise dialing and dial plans, which allow mobile users to place calls using
                 the enterprise telephony system.
               • Provision to change between the 3rd-party call control (3PCC) mode and the Voice over
                 IP (VoIP) mode. See Configuring the call control on page 27.
               • Facility to transfer calls when Avaya one-X® Mobile is used as 3rd-party call controller
                 (3PCC).
           Supported platforms
           The one-X Mobile Preferred application is supported on Android mobile phones with OS 2.1
           and later. However, VoIP feature is supported on Android 4.x.

User interface
           The following sections describe the icons, menus, and controls available on the Avaya one-
           X® Mobile application.
           Layout
           The following graphic shows the layout of the Avaya one-X® Mobile interface with the Home
           screen selected.

8   Using Avaya one-X® Mobile Preferred for IP Office on Android                            September 2013
                                         Comments? infodev@avaya.com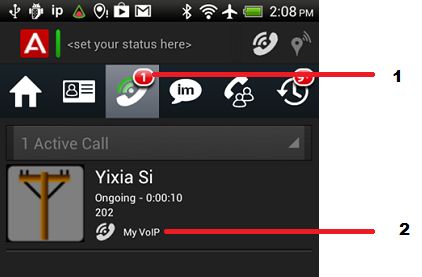
User interface

                  No.                                      Description
            1                Connection and event status.
                             If this icon is not visible, ensure that you enable the Show Notifications
                             checkbox in your Android device settings under Settings > Applications
                             > Avaya Mobility App.
            2                Status bar.
            3                Navigation bar.
            4                Instant Message status.
                             Indicates the total number of Instant Message events.
            5                Voicemail status.
                             Indicates the total number of Voicemail events.
            6                Conference status.
                             Indicates the total number of Conference events.

Using Avaya one-X® Mobile Preferred for IP Office on Android                                September 2013     9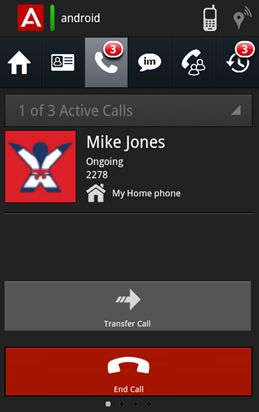
About Avaya one-X® Mobile Preferred for IP Office

                  No.                                      Description
            7                User avatar.
                             Tap the avatar to access the following options:
                             • Remove
                             • Take picture
                             • Pick from gallery
                             • Import from Facebook

           The status bar:
           The Status bar is available on all screens in the Avaya one-X® Mobile interface. It contains
           information about your availability, and provides controls for setting your location and enabling
           or disabling GPS location information. The Status bar also indicates the status of your
           connection to the IP Office server.

                                                      Status message.
                                                      Indicates your current status. Select from a list
                                                      of defaults, or manually edit the status by tapping
                                                      on the text element. The default text reads .

                                                      Select colors to represent your status:
                                                      • Green: Available
                                                      • Yellow: Away
                                                      • Red: Busy or Do Not Disturb

                                                      Location icon.
                                                      Indicates the configuration for your current call
                                                      facility. Press this icon to edit the configuration.
                                                      For more information, see Setting your
                                                      location on page 45.
                                                      Location precision icon.

10   Using Avaya one-X® Mobile Preferred for IP Office on Android                                   September 2013
                                         Comments? infodev@avaya.com
User interface
Indicates your current 'precision' with respect to
your geo-presence. The four precision levels
are:
• City
• Neighborhood
• Street
• Maximum
Long-press this icon to access delete options for
All devices and This device.
Connection error icon.
If this icon appears on the status bar, you are not
connected to the network. Press the
Connection error icon to view details.
The status bar appears on all screens. However, when you long-press a contact on the
Contacts screen, the status bar changes into a selection bar. The selection bar lets you easily
add users to conferences and contact groups. You can also send the selected contacts a group
email or instant message.
The following table explains the items on the selection bar:
Conference icon.
Press this button to invite all selected contacts to a conference.
Options menu icon.
Press this button to view the options available for the selected contacts.
The options are:
• Conference
• Send IM
• Email
• Save to group
• Locate
The navigation bar:
The navigation bar allows you to view each of the screens. A red circle over the menu icon on
the navigation bar indicates the number of new events, such as new voicemail messages, new
instant messages, or new participants in your conference room.
Using Avaya one-X® Mobile Preferred for IP Office on Android September 2013 11About Avaya one-X® Mobile Preferred for IP Office
Icons:
The following icons are used on all of the screens to indicate status and event information on
the Avaya one-X® Mobile interface and the mobile device.
Home screen icon.
Press this button to navigate to the Home screen.
Contacts screen icon.
Press this button to navigate to the Contacts screen.
Active Calls screen icon.
Press this button to navigate to the Active Calls screen.
Instant Message icon.
Press this button to navigate to the Instant Message screen.
Conference icon.
Press this button to navigate to the Conference screen.
Call Log icon.
Press this button to navigate to the Call Log screen.
Notification icon.
This icon appears above the navigation bar buttons to indicate new events
for that feature.
The connection icon displays at the top of the screen, and is visible when the Avaya one-
X® Mobile application is active on the device.
If this icon is not visible, ensure that you enable the Show Notifications check box in your
Android device settings under Settings > Applications > Avaya Mobility App.
A green triangle indicates that the application is connected to IP Office.
A red dot in centre of the triangle indicates a new event.
12 Using Avaya one-X® Mobile Preferred for IP Office on Android September 2013
Comments? infodev@avaya.comUser interface
A yellow triangle indicates that the application is partially connected.
A red triangle indicates that the application is disconnected.
Menu options and controls
On Android devices, use the following methods to access the menu options in the Avaya one-
X® Mobile application:
• Press: Press an item to select it.
• Long-press (press and hold): Long-pressing a contact name or item provides a menu
specific to the selected item.
• Menu key: Pressing the Menu key on the mobile device will show options for the screen
that you are currently viewing. The options apply to the screen, rather than to an individual
contact or message on that screen.
The Home screen
Use the Home screen to view a snapshot of your communications.
In the area below the Status bar, the Home screen displays an icon for each type of
communication: Instant Messages, Voicemail, and Conference Call. The application
updates the icons regularly to display information about new messages or calls.
When you receive a new instant message, the Home screen displays a notification. If you
receive more than one message from multiple contacts, the application displays small dots on
the icon bar for that message type. These dots allow you to swipe through each message.
Using Avaya one-X® Mobile Preferred for IP Office on Android September 2013 13About Avaya one-X® Mobile Preferred for IP Office
Notifications also occur on the Home screen for incoming voicemail messages. You can
choose to listen to the message as the application records the message, or you can answer
the call.
If you choose to answer the call, the call rings at the location that you have specified as your
current location in the Avaya one-X® Mobile application.
If another user dials into your conference bridge, the Home screen displays a button so that
you can join the conference with one click.
The Contacts screen
The Contacts screen lists the contacts that you configure using the People directory on the
Android device, or that your administrator configures on the IP Office call server.
You can create custom local groups by long-pressing a contact from the contact list and then
selecting More > Save to Group. In the following screenshot, a local group called “Test” has
been created:
14 Using Avaya one-X® Mobile Preferred for IP Office on Android September 2013
Comments? infodev@avaya.comUser interface
If you press the Filter button next to the Search field, you can perform a more advanced
selection of contacts by filtering the following groups.
Using Avaya one-X® Mobile Preferred for IP Office on Android September 2013 15About Avaya one-X® Mobile Preferred for IP Office
• Team: Includes roster contacts, including IP Office colleagues as well as gTalk users
added in Avaya one-X® Portal.
The Team group also has an expanded view to list all XMPP groups containing at least
one user. Due to the fact that a given roster contact can belong to multiple groups, the
contact counts for the XMPP groups may be greater than the contact count shown for the
Team group.
Note also that the Team group includes a Hide Offline option. Enabling this option hides
Team contacts that are not offline so that the roster displays only online contacts.
• Corporate directory: Includes corporate directory contacts.
• Personal Directory: Includes contacts added to your Personal directory. The Personal
Directory group appears only if you have added at least one contact to the Personal
Directory using Avaya one-X® Portal.
• My Local Groups: Includes locally defined groups.
• My contacts: Includes personal directory contacts, such as gTalk users.
Note that some users may appear in more than one group (gTalk users, for example).
On the contact list, the color-coded bar to the left of the contact’s name indicates the presence
status of the contact. If the bar is grey, the contact is offline. If the contact has entered a status
message, the message is shown below the contact’s name. If the color-coded bar is hollow, it
indicates that the contact is external to IP Office and the presence information is not available
for that contact.
16 Using Avaya one-X® Mobile Preferred for IP Office on Android September 2013
Comments? infodev@avaya.comUser interface
When you tap a contact, the following options become available for that contact:
• Call Work
• Select
• Send IM
• Notify Me
• Add to conference
• Details
Note:
For contacts with a hollow bar, the Notify Me option is replaced by Email as the presence
of these contacts are not available.
Long-pressing the names of contacts lets you select multiple contacts to add to a conference
call using the Options menu icon. For more information, see Making a selection on
page 50. You can also press the Menu key on the mobile device and choose either Select
All or Refresh Contacts.
The following image shows the contact details screen that appears when you select Details.
Depending on the contact's presence information you can choose to have IP Office alert you
when the contact's presence changes.
Using Avaya one-X® Mobile Preferred for IP Office on Android September 2013 17About Avaya one-X® Mobile Preferred for IP Office
It is also worth noting that the Details screen indicates whether GPS information is available
for a contact. If a contact is publishing GPS information, you can view their geo-presence by
clicking the Observer Location button.
For more information, see Making calls on page 45.
Icons:
Dialpad button.
Press the Dialpad button to launch the dialpad.
For information about making calls using the dialpad, see Using the
integrated dialer on page 49.
Search button.
Press the Search button to enter search mode. This mode includes the
auto-complete feature.
Filter button.
Press the Filter button to perform a more advanced selection of contacts
by group.
18 Using Avaya one-X® Mobile Preferred for IP Office on Android September 2013
Comments? infodev@avaya.comUser interface
Note that some users may appear in more than one group (gTalk users,
for example).
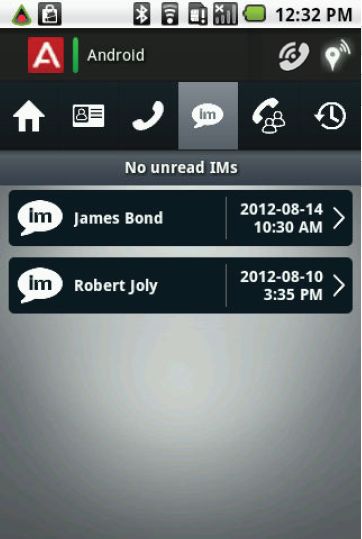
The Instant Messages screen
The Instant Messages screen displays the IMs that you have received.
To view the options for the Instant Messages screen, press the menu key on the mobile phone:
• Disable History: By default, the application displays read and unread instant messages.
Toggle the display to view new or unread messages.
• Clear history: Use this option to delete instant messages that you have read.
Using Avaya one-X® Mobile Preferred for IP Office on Android September 2013 19About Avaya one-X® Mobile Preferred for IP Office
When you open an instant message, the application displays information about the sender.
The following table describes the icons that appear at the top of the screen. All options here
relate to the user that sent the message:
No. Description
1 Observation
Tap to observe the presence of the user.
2 Outlook Meeting
Tap to view the Outlook Meeting information of the user, if available.
3 Location information
Tap to view the location information about the user.
4 Notify Me
Tap to follow the user and determine when the user becomes available.
5 On the Phone
This icon indicates whether the user is on a phone call.
6 Add to Conference
Tap to add the user to a conference call.
7 Call
Tap to call the user.
The Avaya one-X® Mobile application stores up to 1MB of instant messages. The number of
instant messages that you can store depends on the number of characters that each message
contains. Depending on the length of the message, you can store up to 10,000 messages or
even more messages. When you reach the storage limit, the application automatically deletes
the oldest messages.
For more information, see Sending an instant message on page 73.
The Conference screen
The Conference screen displays the participants of the conference, including you, invited
participants, and those who have dialed into your conference bridge.
20 Using Avaya one-X® Mobile Preferred for IP Office on Android September 2013
Comments? infodev@avaya.comUser interface
The application displays the phone number or the alias of each participant. You can save the
conference participants to a group using the Save Group button.
To view the options for the Conference screen, press the menu key on the mobile phone. The
available option is Join Conference.
To view options for a participant, press the name of a participant:
• Disconnect: Use this option to disconnect the participant.
• Mute: Use this option to mute the participant.
• Assign alias: Use this option to enter a name instead of the phone number, which the
screen displays by default. The application retains the alias that you create for future
conferences. You can toggle the display between the alias and the phone number of the
participant. Only you can see the aliases that you assign.
Icons:
Using Avaya one-X® Mobile Preferred for IP Office on Android September 2013 21About Avaya one-X® Mobile Preferred for IP Office
Tap this option to select the call facility
of the participant.
Tap this option to remove the
participant from the conference.
Indicates the current speaker.
Indicates that the participant is not
speaking.
Indicates that the participant is on
mute.
Indicates that the conference is
locked.
Tap this option to unlock the
conference.
Indicates that the conference is
unlocked.
Tap this option to lock the conference.
If you have concerns about conference capacities or other features, note that IP Office hosts
the conference bridge and not the mobile phone.
For more information, see Managing your conference bridge on page 53.
The Call Log screen
The Call Log screen provides a list of all calls, including missed, incoming, and outgoing calls.
You can clear the call logs if required. You can clear individual call logs or all call logs at once.
From the Call Log screen you can also initiate calls, invite participants to your conference
bridge, and add contacts to your directory.
The application organizes the logs by date, with the most recent call log appearing first. You
can filter the logs according to your preference. Each call log is saved for up to a week, unless
manually cleared.
To view additional options for a contact, you can click on that name in the Call Log screen.
The options differ for unknown contacts and known contacts.
Known contacts in the Call Log screen have an avatar. The following options are available for
known contacts in the Call Log screen:
• Call
• Notify me
22 Using Avaya one-X® Mobile Preferred for IP Office on Android September 2013
Comments? infodev@avaya.comUser interface
• Send IM
• Email
• Add to conference
• Details
The following options are available for unknown contacts in the Call Log screen:
• Call
• Add to conference
• Create contact
• Add to contact
Icons:
Incoming call.
Using Avaya one-X® Mobile Preferred for IP Office on Android September 2013 23About Avaya one-X® Mobile Preferred for IP Office
Outgoing call.
Missed call.
Voicemail (heard).
Voicemail (unheard).
Avatar for external contacts.
24 Using Avaya one-X® Mobile Preferred for IP Office on Android September 2013
Comments? infodev@avaya.comChapter 2: Getting started
Application installation
one-X Mobile Preferred for IP Office is available for Android mobile phones with OS 2.1 and
later.
You can install the application by gaining access to the Install option in the application store.
Alternatively, you can perform a provisioned installation, whereby you receive an email with
the installation and the configuration links. To perform a provisioned installation, note the
following:
• Provisioned installations configure most of the application settings.
• You must use the mobile phone to activate the email link.
Installing the application on an Android device
Use the following procedure to download and install Avaya one-X Mobile Preferred for IP Office
on an Android device.
Note:
The Avaya one-X® Mobile application is supported on Android OS 2.1 and later. However,
you can use the VoIP feature on your Avaya one-X® Mobile only if you have Android 4.x
operating system on your mobile device. Avaya one-X® Mobile is not supported on devices
running a custom ROM.
Procedure
1. On your mobile phone, open the Play Store application.
2. Search for Avaya one-X Mobile Preferred for IP Office and select the
application.
Note:
When you search for the application, the system displays several options for the
Avaya one-X® Mobile family of products. Verify that you select the correct
application prior to the installation.
Using Avaya one-X® Mobile Preferred for IP Office on Android September 2013 25Getting started
3. Tap Install.
4. To accept the permissions for the Avaya one-X® Mobile application, tap Ok.
5. Sign in to your Google Checkout account if this is the first time that you are
downloading from Android Market.
6. In the Play Store application, select My apps and select the Avaya one-X® Mobile
application.
7. Tap Install.
Configure the application
You must be familiar with the interface and the operations that you can perform on your mobile
phone. You must be able to scroll, highlight, and type text using the on-screen keyboard. For
more information on how to perform these tasks, see the user guide provided with your mobile
phone.
The following sections describe the settings that you must configure before you use Avaya
one-X® Mobile.
Configuring the connection to IP Office
Before you begin
To configure the connection between the Avaya one-X® Mobile application and the IP Office
server, you must first obtain the following information from your system administrator:
• The name of the Avaya one-X® Portal server.
• Your username and password credentials, which are the same credentials used to access
Avaya one-X® Portal.
Note:
You do not have to configure these settings when you perform a provisioned installation.
Procedure
1. The first time that you launch the Avaya one-X® Mobile application, the Settings
menu displays automatically. Configure the following settings:
• Press Server ID and enter the host name or IP address of the Avaya one-X®
Portal server. Press OK.
• Press Username and enter your user ID. Press OK.
26 Using Avaya one-X® Mobile Preferred for IP Office on Android September 2013
Comments? infodev@avaya.comConfigure the application
• Press Password and enter your password. Press OK.
Note:
If you need to edit these settings at a later time, you can return to this menu
by navigating to the Home screen and pressing Menu > Settings on the
mobile device.
2. Avaya one-X® Mobile connects to the IP Office server automatically.
When the application successfully connects to IP Office, the triangular status icon
changes from red to green.
Configure call control
With IP Office Release 9.0, you can use the one-X Mobile Preferred application to change
between the two call control options: 3rd-party call control and Voice over IP.
By default, Avaya one-X® Mobile operates in the 3PCC mode.
3rd-party call control (3PCC)
The Avaya one-X® Mobile application operates, by default, in the 3PCC mode. When IP Office
initiates a 3rd-party call from the mobility client, IP Office initiates a 3rd-party call to the mobile
phone of the caller and then dials the destination.
In countries where incoming voice calls incur a toll charge, the 3PCC solution does not
eliminate the fee for the mobile users, as they still have to pay the cellular charges for incoming
calls. In order to reduce toll charges, the mobility client provides users the option to work in the
VoIP mode.
Voice over IP (VoIP)
Configuring the Avaya one-X® Mobile application to work in the VoIP mode provides users the
option to make calls over Wi-Fi or 3G or 4G data networks. These options eliminate cellular
voice charges. Changing to the VoIP mode helps mobile users reduce costs, especially on
international calls.
In the VoIP mode, the mobility client has its own extension and performs all call control
functions including mid-call features. The mobile user can choose the callback mode when Wi-
Fi access is unavailable or when the data connection is not providing adequate voice
quality.
For information on enabling the VoIP mode, see Enabling VoIP on page 28.
Using Avaya one-X® Mobile Preferred for IP Office on Android September 2013 27Getting started
Note:
If the system displays a SIP registration error when you register for the VoIP mode, you can
tap Retry. Alternatively, you can tap OK or Cancel, depending on the type of error, to end
SIP registration and continue to operate in the 3PCC mode.
Enabling VoIP
Use the following procedure to enable Voice over IP (VoIP) mode on one-X Mobile Preferred
for IP Office. The application operates in the 3PCC mode by default.
Note:
The VoIP feature is available only to users having Power User license.
Procedure
1. Navigate to Menu > Settings > Voice over IP > VoIP operation mode.
2. Select one of the options:
• Wi-Fi Only: Select this option to enable VoIP whenever your mobile device is
connected over a Wi-Fi network.
• Always: Select this option to enable VoIP for all data connection types that
are active.
• Never: - Select this option to disable VoIP mode.
3. Tap the Call Facility icon.
4. Select VoIP.
5. Select one of the call back options. This is the number where you receive a call back
if a VoIP call cannot connect for any reason.
6. Tap OK.
The Phone icon on the Home screen turns to green when the client is registered to
IP Office.
Configuring user call monitoring
You can use one-X Mobile Preferred for IP Office on your Android phone to interact with all
incoming and outgoing calls. Using the User call monitoring feature, you can interact with the
following types of calls:
28 Using Avaya one-X® Mobile Preferred for IP Office on Android September 2013
Comments? infodev@avaya.comConfigure the application
• Calls made or received through deskphone, softphone, or Flare
• Calls established using the one-X Mobile Preferred for IP Office application or Avaya one-
X® Portal .
• Calls answered on mobile through mobile twinning.
Procedure
1. On your mobile device, tap Menu > Settings > Call Monitoring Mode.
2. Select one of the options:
• VoIP calls only: Select this option to enable User call monitoring only for VoIP
calls.
• All my calls: Select this option to enable User call monitoring for all your
calls.
All my calls is selected by default.
Next steps
For more on Use call monitoring, see Handling user call transfers on page 51.
Configuring enterprise dialing
The enterprise dialing feature determines whether Avaya one-X® Mobile integrates with the
native dialing application on the mobile phone. If you allow Avaya one-X® Mobile to integrate
with the native dialing application on the mobile phone, Avaya one-X® Mobile intercepts and
routes calls using the enterprise server rather than through the cellular network.
In addition, enterprise dialing hides the mobile identity of the caller, which allows you to protect
your privacy if you are using your personal mobile phone for business purposes.
For added flexibility, you can also configure a dial plan so that the application routes enterprise
calls according to the rules that you specify. Configure dial plan rules to manipulate called
numbers before the application transfers them to the PBX.
Note:
• Avaya one-X® Mobile must be connected for the dial plan function to work.
• You can configure dial plans only within the application and not within the settings of
the mobile phone.
• The contacts in the mobile phone are not merged with the contacts in the Avaya one-
X® Mobile application.
Using Avaya one-X® Mobile Preferred for IP Office on Android September 2013 29Getting started
Procedure
1. On the mobile phone, navigate to the Home screen and press the menu key.
2. Tap Settings.
3. Tap Enterprise Dialing, and tap Mode.
4. Tap one of the following options:
• Off: No integration.
• On: Use integration.
• Prompt: Prompt to use which dialer each time.
• Dial Plan: Use the enterprise dial plan.
5. To configure the rules for enterprise dialing, return to the Settings menu.
6. Tap Dial Plan.
Avaya one-X® Mobile intercepts and routes only those calls that match the dial plan
rules.
7. Press the menu key on the mobile phone and tap Add new rule to reveal an inactive
rule.
8. Tap the inactive rule and configure the following options:
• Active: Select the check box to enable the rule.
• Prefix: Tap and type the prefix for calls that you want Avaya one-X® Mobile to
intercept and route.
• Suffix length: Tap and select the number of characters that follow the
prefix.
• Characters to absorb: Tap and select the number of characters.
• Characters to insert: Tap and type the characters to insert before the
prefix.
• Dial plan mode intercept: If you choose Prompt or Dial Plan as the
enterprise dialing mode, the application enables this option automatically.
9. To return to the Dial Plan screen, press the back button on the mobile phone.
The screen displays that Rule 1 is now active.
10. To add another rule, press the menu key on the mobile phone and tap Add new
rule.
You can also edit, delete, reorder, and reconfigure existing rules.
Example
You might like to manipulate all long-distance calls but not local calls before the application
routes the call through the call server. If the area code is 613, your dial plans would consist of
the following:
30 Using Avaya one-X® Mobile Preferred for IP Office on Android September 2013
Comments? infodev@avaya.comConfigure the application
1. 1613+ - prefix 1613, suffix 7, rule is not active.
2. 1+ - prefix 1, suffix 10, rule is active.
The above two rules will manipulate all "1+" calls except 1613+ calls.
Configuring the notify me feature
If someone in your contacts list is unavailable, you can use the ‘Notify Me’ feature option to
monitor the availability of that contact. When you set the ‘Notify Me’ feature option for a
contact, Avaya one-X® Mobile notifies you when the presence status of the contact changes.
For information on using the notify me feature for a contact, see Using the notify me feature on
page 42.
About this task
Use the following procedure to configure the ‘Notify Me’ feature option.
Procedure
1. On the mobile phone, navigate to the Home screen and press the menu key.
2. Tap Settings.
3. Tap ‘Notify Me’ feature.
4. Tap Mode .
5. Select one of the following options:
• Continuous: To receive notifications as the availability of the contact changes.
You continue to receive updates until you disable the option for that contact.
• One time: To receive a notification as the availability of the contact changes.
You do not receive updates after the first notification.
Setting preferences for notifications
The Avaya one-X® Mobile application notifies you according to your preferences. For example,
the Avaya one-X® Mobile application notifies you when you receive new voice mails or instant
messages, or when users join your conference. You can also receive notifications when your
connection to IP Office changes.
About this task
Use the following procedure to configure your notification preferences.
Using Avaya one-X® Mobile Preferred for IP Office on Android September 2013 31You can also read