PREVIEW - Salesforce External Identity Implementation Guide
←
→
Page content transcription
If your browser does not render page correctly, please read the page content below
Salesforce External Identity
Implementation Guide
  Salesforce, Winter ’19

                                         PREVIEW

Note: This release is in preview. Features described in this document don’t become generally available
 until the latest general availability date that Salesforce announces for this release. Before then, and          @salesforcedocs
where features are noted as beta, pilot, or developer preview, we can’t guarantee general availability     Last updated: August 27, 2018
within any particular time frame or at all. Make your purchase decisions only on the basis of generally
                                                                      available products and features.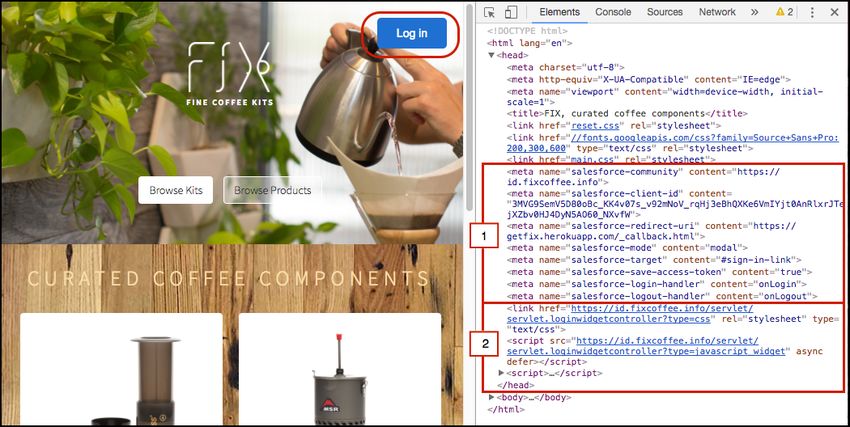
© Copyright 2000–2018 salesforce.com, inc. All rights reserved. Salesforce is a registered trademark of salesforce.com, inc.,

       as are other names and marks. Other marks appearing herein may be trademarks of their respective owners.
CONTENTS

EXTERNAL IDENTITY FOR CUSTOMERS AND PARTNERS GUIDE . . . . . . . . . 1

HOW CAN I USE SALESFORCE IDENTITY FOR EXTERNAL USERS? . . . . . . . . 2
Acquire and Engage New Users . . . . . . . . . . . . . . . . . . . . . . . . . . . . . . . . . . . . . . . . . . . 2
Deliver a Consistent Experience with a Single Identity Across All Channels . . . . . . . . . . . . . . . . 3
Secure and Manage Your Customer and Partner Ecosystems . . . . . . . . . . . . . . . . . . . . . . . . 3
Integrate and Customize to Your Business Needs . . . . . . . . . . . . . . . . . . . . . . . . . . . . . . . . 4
Extend External Identity to Your Website . . . . . . . . . . . . . . . . . . . . . . . . . . . . . . . . . . . . . . . 4
What Is Salesforce Identity for External Users? . . . . . . . . . . . . . . . . . . . . . . . . . . . . . . . . . . . 4
External Identity Licenses . . . . . . . . . . . . . . . . . . . . . . . . . . . . . . . . . . . . . . . . . . . . . . . . . 4
     What Features Are Available with the External Identity License . . . . . . . . . . . . . . . . . . . . 5
External Identity and Communities . . . . . . . . . . . . . . . . . . . . . . . . . . . . . . . . . . . . . . . . . . 6
Learn More with Trailhead . . . . . . . . . . . . . . . . . . . . . . . . . . . . . . . . . . . . . . . . . . . . . . . . 7

CREATE A TYPICAL EXTERNAL IDENTITY IMPLEMENTATION . . . . . . . . . . . . 8
Checklist for Implementing External Identity . . . . . . . . . . . . . . . . . . . . . . . . . . . . . . . . . . . . 8
Prepare Your Org . . . . . . . . . . . . . . . . . . . . . . . . . . . . . . . . . . . . . . . . . . . . . . . . . . . . . . 9
     Create a Developer Org . . . . . . . . . . . . . . . . . . . . . . . . . . . . . . . . . . . . . . . . . . . . . 10
     Set Up My Domain . . . . . . . . . . . . . . . . . . . . . . . . . . . . . . . . . . . . . . . . . . . . . . . . . 10
     Control Authorization with Custom Profiles and Roles . . . . . . . . . . . . . . . . . . . . . . . . . 10
     Create an Account for CRM Integration . . . . . . . . . . . . . . . . . . . . . . . . . . . . . . . . . . . 11
Create a Branded Login Page . . . . . . . . . . . . . . . . . . . . . . . . . . . . . . . . . . . . . . . . . . . . . 12
     Create Your Initial Community from a Template . . . . . . . . . . . . . . . . . . . . . . . . . . . . . 12
     Configure Your Community . . . . . . . . . . . . . . . . . . . . . . . . . . . . . . . . . . . . . . . . . . . 14
     Make More Login Customizations with Community Builder . . . . . . . . . . . . . . . . . . . . . . 16
     Choose a Login Page Type . . . . . . . . . . . . . . . . . . . . . . . . . . . . . . . . . . . . . . . . . . . 19
     Activate Your Community . . . . . . . . . . . . . . . . . . . . . . . . . . . . . . . . . . . . . . . . . . . . 19
Enable Self-Registration . . . . . . . . . . . . . . . . . . . . . . . . . . . . . . . . . . . . . . . . . . . . . . . . 20
     Add a Branded Self-Registration Page . . . . . . . . . . . . . . . . . . . . . . . . . . . . . . . . . . . 20
     Add Fields to Collect Additional Information . . . . . . . . . . . . . . . . . . . . . . . . . . . . . . . . 21
     Add a Password Field to Enable Login Directly During Registration . . . . . . . . . . . . . . . . 23
Enable Self-Registration for B2C Users (Optional) . . . . . . . . . . . . . . . . . . . . . . . . . . . . . . . . 24
     Enable Person Accounts . . . . . . . . . . . . . . . . . . . . . . . . . . . . . . . . . . . . . . . . . . . . 25
     Configure Self-Registration for Person Accounts . . . . . . . . . . . . . . . . . . . . . . . . . . . . . 25

SET UP SSO FOR YOUR USERS . . . . . . . . . . . . . . . . . . . . . . . . . . . . . . . . . . . . . 27
Social Sign-On . . . . . . . . . . . . . . . . . . . . . . . . . . . . . . . . . . . . . . . . . . . . . . . . . . . . . . . 27
Create an Auth. Provider . . . . . . . . . . . . . . . . . . . . . . . . . . . . . . . . . . . . . . . . . . . . . . . . 28
Customize Your Registration Handler . . . . . . . . . . . . . . . . . . . . . . . . . . . . . . . . . . . . . . . 28
Contents

           Enable Your Auth. Provider in Your Community . . . . . . . . . . . . . . . . . . . . . . . . . . . . . . . . . 29
           Accept User Identity with SAML and Just-In-Time Provisioning . . . . . . . . . . . . . . . . . . . . . . . 29

           SET UP SSO FOR YOUR APPS . . . . . . . . . . . . . . . . . . . . . . . . . . . . . . . . . . . . . . 30
           Set Up SSO and Access for Mobile Apps . . . . . . . . . . . . . . . . . . . . . . . . . . . . . . . . . . . . . 30
                Create a Connected App for Your Mobile App . . . . . . . . . . . . . . . . . . . . . . . . . . . . . . 30
                Install the Salesforce Mobile SDK . . . . . . . . . . . . . . . . . . . . . . . . . . . . . . . . . . . . . . . 31
                Create a Mobile App . . . . . . . . . . . . . . . . . . . . . . . . . . . . . . . . . . . . . . . . . . . . . . . 31
                Configure the Mobile App to Point to Your Community . . . . . . . . . . . . . . . . . . . . . . . . . 31
                More About Single Sign-On for Your Mobile App . . . . . . . . . . . . . . . . . . . . . . . . . . . . 32
           Set Up SSO and Access for Your Web App . . . . . . . . . . . . . . . . . . . . . . . . . . . . . . . . . . . . 32
                Create a Connected App for Your Web App . . . . . . . . . . . . . . . . . . . . . . . . . . . . . . . 33
                Create a Sample Service Provider on Heroku . . . . . . . . . . . . . . . . . . . . . . . . . . . . . . . 33
                Configure Salesforce Identity to Provide Identity for Your App . . . . . . . . . . . . . . . . . . . . 34
                Authorize Your Web App . . . . . . . . . . . . . . . . . . . . . . . . . . . . . . . . . . . . . . . . . . . . 34
                Configure Your App to Trust Salesforce Identity . . . . . . . . . . . . . . . . . . . . . . . . . . . . . 34
                Personalize Your App with Custom Attributes . . . . . . . . . . . . . . . . . . . . . . . . . . . . . . 35
                More About Single Sign-On for Your Web App . . . . . . . . . . . . . . . . . . . . . . . . . . . . . . 35

           CUSTOM LOGIN PAGES: USE CODE FOR FULL CONTROL . . . . . . . . . . . . . 36
           Create a Custom Login Page . . . . . . . . . . . . . . . . . . . . . . . . . . . . . . . . . . . . . . . . . . . . . 36
           Create a Custom Login Page from a Github Project . . . . . . . . . . . . . . . . . . . . . . . . . . . . . . 39

           DYNAMIC URLS: DETERMINE YOUR BRAND AT RUN TIME . . . . . . . . . . . . . 41
           Dynamic Branding for Multiple Brands . . . . . . . . . . . . . . . . . . . . . . . . . . . . . . . . . . . . . . . 41
           Dynamic Branding Using Login & Registration Page . . . . . . . . . . . . . . . . . . . . . . . . . . . . . 43
               Set Up Dynamic URLs . . . . . . . . . . . . . . . . . . . . . . . . . . . . . . . . . . . . . . . . . . . . . . 44
           Dynamic Branding Using Custom Login Pages . . . . . . . . . . . . . . . . . . . . . . . . . . . . . . . . . 45
               Extend an Endpoint with the Experience ID . . . . . . . . . . . . . . . . . . . . . . . . . . . . . . . . 46

           PASSWORDLESS LOGIN: SIMPLIFY THE LOGIN PROCESS . . . . . . . . . . . . . 47
           View Your Users’ Identity Verification History . . . . . . . . . . . . . . . . . . . . . . . . . . . . . . . . . . . 49
           Create a Passwordless Login Page with Code . . . . . . . . . . . . . . . . . . . . . . . . . . . . . . . . . 50
                Passwordless Login Coding Considerations . . . . . . . . . . . . . . . . . . . . . . . . . . . . . . . 52

           EMBEDDED LOGIN: ALLOW VISITORS TO LOG IN TO YOUR WEB
           PAGES . . . . . . . . . . . . . . . . . . . . . . . . . . . . . . . . . . . . . . . . . . . . . . . . . . . . . . . . . . 54
           Embedded Login in Action . . . . . . . . . . . . . . . . . . . . . . . . . . . . . . . . . . . . . . . . . . . . . . . 55
           How to Implement Embedded Login . . . . . . . . . . . . . . . . . . . . . . . . . . . . . . . . . . . . . . . . 58
           Implement Embedded Login . . . . . . . . . . . . . . . . . . . . . . . . . . . . . . . . . . . . . . . . . . . . . 59
                Step 1: Enable Resource Sharing Across Domains . . . . . . . . . . . . . . . . . . . . . . . . . . . 60
                Step 2: Create the Embedded Login Connected App . . . . . . . . . . . . . . . . . . . . . . . . . . 61
                Step 3: Enable Embedded Login on a Web Page . . . . . . . . . . . . . . . . . . . . . . . . . . . . 63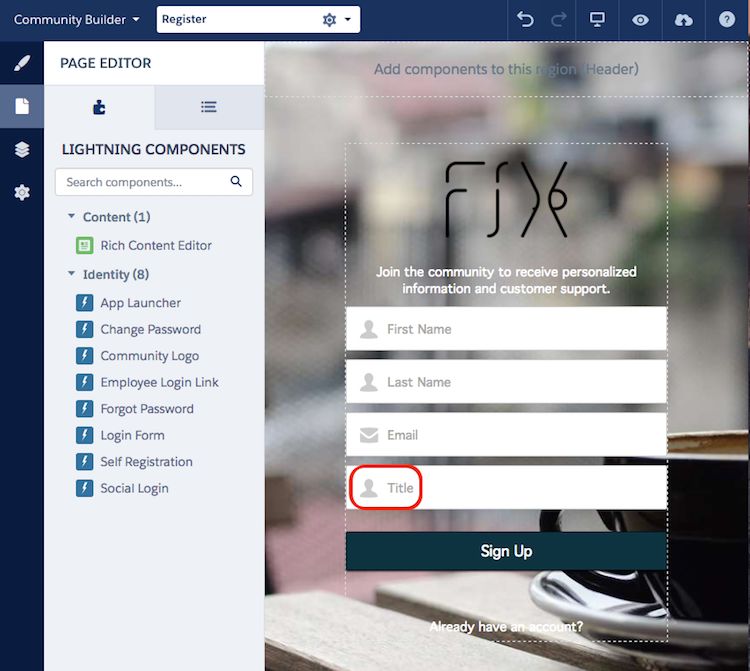
Contents

               Step 4: Write Login and Logout Functions . . . . . . . . . . . . . . . . . . . . . . . . . . . . . . . . . 67
               Step 5: Handle the Embedded Login Callback . . . . . . . . . . . . . . . . . . . . . . . . . . . . . . 68
           Embedded Login Advanced Authentication Features . . . . . . . . . . . . . . . . . . . . . . . . . . . . . 73
           Embedded Login Considerations . . . . . . . . . . . . . . . . . . . . . . . . . . . . . . . . . . . . . . . . . . 75
           Embedded Login Meta Tag Reference . . . . . . . . . . . . . . . . . . . . . . . . . . . . . . . . . . . . . . . 76

           MANAGE COMMUNITIES FOR EXTERNAL IDENTITY . . . . . . . . . . . . . . . . . . . 80
           Extend External Identity Sessions (Beta) . . . . . . . . . . . . . . . . . . . . . . . . . . . . . . . . . . . . . . 80
           Create Lightweight Users Contactless Users (Beta) . . . . . . . . . . . . . . . . . . . . . . . . . . . . . . . 81
           Upgrade Users Without Contacts to a Community License (Beta) . . . . . . . . . . . . . . . . . . . . . 82

           EXTERNAL IDENTITY ON GITHUB AND TRAILBLAZER COMMUNITY . . . . 84

           INDEX      . . . . . . . . . . . . . . . . . . . . . . . . . . . . . . . . . . . . . . . . . . . . . . . . . . . . . . . . . . . 85

EXTERNAL IDENTITY FOR CUSTOMERS AND PARTNERS
GUIDE

Salesforce Identity for Customers and Partners improves your engagement with your external users. With little effort on your part, you
can provide your external users a login page that reflects your brand. You can further customize the login process with the provided
tools. This product is similar to Salesforce Identity but intended for your external users, whereas Salesforce Identity maintains the identity
of your internal users.
Learn how to set up and manage a community for your external users. For brevity, Salesforce Identity for Customers and Partners is
referred to as external identity.

                                                                      1
HOW CAN I USE SALESFORCE IDENTITY FOR EXTERNAL
USERS?

Salesforce Identity for Customers and Partners offers a broad set of capabilities for connecting with your customers and partners, as well
as extensive customization and integration options. Here are some common use cases and features.

    Acquire and Engage New Users
    Your business is growing, and you need to onboard customers and partners quickly. Salesforce Identity can help enable and scale
    your customer and partner acquisition processes with self-registration, social sign-on, and CRM integration.
    Deliver a Consistent Experience with a Single Identity Across All Channels
    Salesforce Identity lets you engage with your users everywhere. Get a single, 360-degree view of your users while delivering a
    consistent, streamlined end-user experience for your brand.
    Secure and Manage Your Customer and Partner Ecosystems
    By centralizing management of your users, Salesforce Identity makes life easy for your admins. They have a single place to manage
    Identity users and create reports and dashboards on their access.
    Integrate and Customize to Your Business Needs
    Salesforce Identity is integrated into the Salesforce Platform and is fully customizable, extensible, and scalable for any business.
    Extend External Identity to Your Website
    Salesforce Identity Embedded Login makes it easy to incorporate authentication into websites. Creating authenticated sessions
    between your community and website visitors extends your reach with your customers. For example, you can require that your users
    log in before they access your website. Or when customers change billing information on the website, Salesforce can update their
    contact information. As you collect information about a user, you can tailor the experience accordingly.
    What Is Salesforce Identity for External Users?
    Salesforce Identity is an Identity and Access Management (IAM) service that connects users to your apps, services, and devices. It
    provides a centralized point of management for your admins and provides a single, trusted identity for your end users. Traditionally,
    IAM services have focused on employee-facing use cases. Today, companies are using identity as a way to better connect with their
    customers and partners. We call this external identity.
    External Identity Licenses
    External Identity is a type of Salesforce license that enables you to deliver identity services, such as single sign-on (SSO) and social
    sign-on. External Identity is a standalone license and purchased in blocks of active users. These users are typically consumers of your
    business, such as purchasers, patients, partners, and dealers.
    External Identity and Communities
    Communities are branded spaces for employees, customers, and partners to connect. You can customize and create communities
    to deliver specific business apps and services, including identity services.
    Learn More with Trailhead
    For a fun way to get a better understanding of external identity, take advantage of Trailhead. You can find identity modules in the
    Secure Identity and Access Management trail.

Acquire and Engage New Users
Your business is growing, and you need to onboard customers and partners quickly. Salesforce Identity can help enable and scale your
customer and partner acquisition processes with self-registration, social sign-on, and CRM integration.

                                                                     2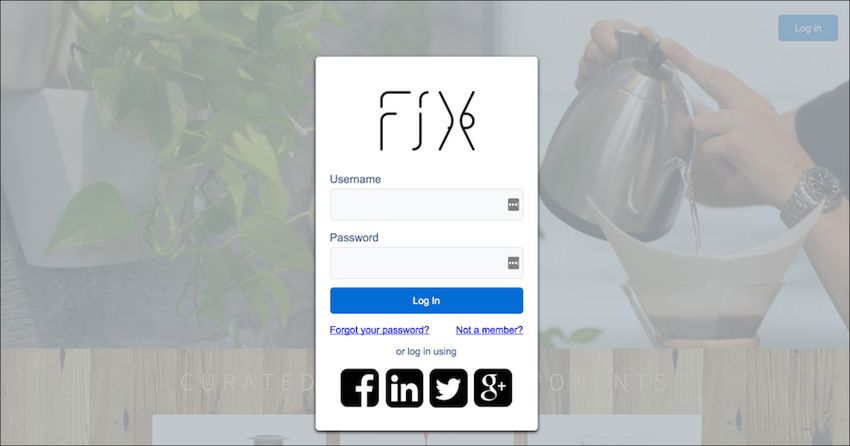
How Can I Use Salesforce Identity for External Users?                                Deliver a Consistent Experience with a Single Identity Across
                                                                                                                                     All Channels

      Self-Registration
          External users can create user accounts quickly and easily with fully branded and customizable registration processes.
      Social Sign-On
         Customers and prospects can bring their own identity from social networks and public providers, such as Facebook, Google, Amazon,
         and PayPal.
      CRM and Back-Office Integration
        You can easily integrate your customers with your Salesforce org. When you run registration on your customer platform, identity
        data is no longer stuck in an IT system. Enrich your CRM data, create leads, link to your back-office customer records, and drive
        approval processes by implementing an external identity solution.

      Deliver a Consistent Experience with a Single Identity Across All
      Channels
      Salesforce Identity lets you engage with your users everywhere. Get a single, 360-degree view of your users while delivering a consistent,
      streamlined end-user experience for your brand.
      Single Sign-On (SSO)
         Save your users’ time by letting them log in once to seamlessly access your apps. Uses secure industry standards like SAML, OpenID,
         and OAuth.
      Mobile Identity
        Deliver mobile apps to your customers with automatic SSO, authorization, and mobile-specific policies. Salesforce gives you a robust,
        open-source mobile SDK to easily create your mobile apps.
      Cloud Directory Services
         Adapt your business with customizable fields, automatable workflows, batch processing, and delegated administration through
         cloud Cloud directory services.

      Secure and Manage Your Customer and Partner Ecosystems
      By centralizing management of your users, Salesforce Identity makes life easy for your admins. They have a single place to manage
      Identity users and create reports and dashboards on their access.
      Authorization and Policy Management
         Deliver the right experience to your users at the right time and for the right reasons. Built-in access management, authorization, and
         robust policies make it easy for you to effective identity management.
      Multifactor Authentication
         Add an extra layer of security when logging in or accessing critical resources using secure, mobile two-factor authentication.
      Provisioning and Unprovisioning Apps
         Provide access and personalization to your apps with a customizable push-provisioning engine for just-in-time provisioning and
         single sign-on.
      Reporting and Dashboards
         Gain visibility into usage, adoption, and security with drag-and-drop customizable reports and dashboards.

                                                                          3
How Can I Use Salesforce Identity for External Users?                                                Integrate and Customize to Your Business Needs

      Integrate and Customize to Your Business Needs
      Salesforce Identity is integrated into the Salesforce Platform and is fully customizable, extensible, and scalable for any business.
      Fully Branded
          Extend your company’s brand securely with drag-and-drop branding for login, self-registration, and federation services. Control and
          customize branding at run time depending on certain conditions, like who the user is or from where the user is logging in.
      Workflows and Business Processes
        Scale your administration and integration efforts with visually designed workflow processes.
      Open APIs and Open Standards
         Take advantage of the full suite of development tools that Salesforce Identity offers. It provides APIs for everything you need and
         supports major open identity standards, including SAML, OAuth 2.0, OpenID Connect, and SCIM.

      Extend External Identity to Your Website
      Salesforce Identity Embedded Login makes it easy to incorporate authentication into websites. Creating authenticated sessions between
      your community and website visitors extends your reach with your customers. For example, you can require that your users log in before
      they access your website. Or when customers change billing information on the website, Salesforce can update their contact information.
      As you collect information about a user, you can tailor the experience accordingly.
      Your web developers aren’t required to know anything about authentication services to add login capabilities to their web pages. They
      can rely on Embedded Login to take care of the process of authenticating users. Web developers just add a few HTML meta tags to a
      web page and a JavaScript function to determine what happens when a user successfully logs in. When your website visitors access the
      page, they enter their credentials in a login form generated by Embedded Login.

      What Is Salesforce Identity for External Users?
      Salesforce Identity is an Identity and Access Management (IAM) service that connects users to your apps, services, and devices. It provides
      a centralized point of management for your admins and provides a single, trusted identity for your end users. Traditionally, IAM services
      have focused on employee-facing use cases. Today, companies are using identity as a way to better connect with their customers and
      partners. We call this external identity.
      When used for external identities, Salesforce Identity transforms CRM contacts into real digital identities that can self-register, log in,
      update their profile, and securely access web and mobile apps with a single identity. Plus, it’s customized to your specific business process
      and brand using the power of the Salesforce Platform.
      By delivering identity services directly from the same platform you use for sales, service, and marketing, you can recognize users across
      all your digital channels and create a consistent experience for customers and partners across all lines of business. The information and
      insight gathered converge with your existing CRM data and processes, thus building a single view of all your relationships.
      Using Salesforce Identity, you build deeper, richer relationships with customers and partners by creating and maintaining a single identity
      for interaction across all channels.

      External Identity Licenses
      External Identity is a type of Salesforce license that enables you to deliver identity services, such as single sign-on (SSO) and social sign-on.
      External Identity is a standalone license and purchased in blocks of active users. These users are typically consumers of your business,
      such as purchasers, patients, partners, and dealers.

                                                                             4
How Can I Use Salesforce Identity for External Users? What Features Are Available with the External Identity License
With an External Identity license, you can access several standard objects and 10 custom objects to deliver powerful self-service applications.
The license includes extra data storage and API requests. Make sure that your org has sufficient resources before rolling out your external
identity system. For more information, contact your Salesforce representative.
External Identity works with Community licenses. It’s also included for free with all paid community user licenses in Enterprise, Performance,
and Unlimited Editions. Each Developer Edition org includes 10 External Identity user licenses. You can upgrade the External Identity
license to a Community license to benefit from Community features, including Cases, Contracts, Notes, Orders, and Tasks.
These licenses are also available for managing user identities.
Identity Only
Enables use cases similar to External Identity for your internal employees.
Identity Connect
An on-premises component that synchronizes users with Microsoft Active Directory (AD). While not commonly used in external
scenarios, occasionally companies store their external users in AD.
Customer Community Plus or Partner Community
For customers who want to implement delegated administration. Admins with either a Customer Community Plus or Partner
Community license can manage their users with external identity licenses.
Note: External Identity Allocations
We recommend that the number of External Identity license users in your external identity community not exceed ten million
unique users per month. If you require additional user licenses beyond this limit, contact your Salesforce account executive.
Exceeding this limit can result in an extra charge and decrease expected functionality.
What Features Are Available with the External Identity License
The Salesforce External Identity license lets you deliver identity services, such as single sign-on (SSO), to your customers and partners.
You can purchase this standalone license for blocks of users who are typically consumers of your business, such as purchasers,
patients, partners, and dealers.
What Features Are Available with the External Identity License
The Salesforce External Identity license lets you deliver identity services, such as single sign-on
EDITIONS
(SSO), to your customers and partners. You can purchase this standalone license for blocks of users
who are typically consumers of your business, such as purchasers, patients, partners, and dealers. Available in: Salesforce
With the External Identity license, you can store and manage customers and partners and Classic
authenticate them through username and password, SSO, or authentication providers. You can set
up authentication providers to allow users to log in with their credentials from their social accounts, External Identity licenses are
such as Facebook, Twitter, and LinkedIn. External Identity supports self-registration to easily provision available in: Enterprise,
new users. Performance, Unlimited,
and Developer Editions
You can upgrade this External Identity license to a Customer Community or Partner Community
license to benefit from Community features.
USER PERMISSIONS
Feature External Identity
To assign and manage
Accounts external identity users:
Read and Edit • Manage Users
To enable Communities:
• Customize Application
5How Can I Use Salesforce Identity for External Users? External Identity and Communities
Feature External Identity
Assets
Read, Create, Edit
Chatter
Contacts
Read, Create, Edit
Identity
Cases
Products
Orders
Files
Chatter Answers
Ideas
Knowledge
Tasks
Custom Objects
Ten custom objects per profile, but custom objects in managed
packages don’t count toward this limit
Notes and Attachments
Additional Storage 150 MB (25,000 active users)
2 GB (250,000 active users)
10 GB (1,000,000 active users)
60 GB (5,000,000 active users)
We recommend that the number of External Identity license users in your external identity community not exceed ten million unique
users per month. If you require additional user licenses beyond this limit, contact your Salesforce account executive. Exceeding this limit
can result in an extra charge and decrease expected functionality.
External Identity and Communities
Communities are branded spaces for employees, customers, and partners to connect. You can customize and create communities to
deliver specific business apps and services, including identity services.
Salesforce External Identity uses communities for its deployment. Deploying external identity as a community gives you the ability to
configure identity for your external users so they can easily recognize your brand. They can also have the same experience regardless of
6How Can I Use Salesforce Identity for External Users? Learn More with Trailhead
which app they’re accessing or whether they’re using their desktop or mobile device. You can act as both a service provider and identity
provider for all your apps without your customers realizing that the service runs on Salesforce. Similar to My Domain, a community can
have a unique subdomain name, for example, https://mycompanyname.force.com. Or, the community can be configured
with your custom SSL domain, such as https://community.mycompanyname.com.
Don’t confuse community user licenses with underlying community capabilities. Salesforce provides community licenses for use cases
like customer self-service, but there is no correlation between a community and a community license.
For more information, see Salesforce Communities Overview in the Salesforce Help.
Learn More with Trailhead
For a fun way to get a better understanding of external identity, take advantage of Trailhead. You can find identity modules in the Secure
Identity and Access Management trail.
Identity Basics
Get an overview of the features in Salesforce Identity, and see how external identity fits into its feature set. Familiarize yourself with
key identity terms, like single sign-on, social sign-on, identity providers, and service providers. Get familiar with the identity protocols,
Security Assertion Markup Language, OAuth 2.0, and OpenID Connect.
External Identity for Customers
Walk through the entire process of setting up external identity on a trial developer org.
7CREATE A TYPICAL EXTERNAL IDENTITY IMPLEMENTATION
Let’s walk through the process of creating a typical external identity implementation. Because Salesforce Identity integrates with the
customer and partner business processes that you run on Salesforce, you perform a few administrative tasks to set up a typical deployment.
Want to learn by doing? You can create a typical external identity implementation in Trailhead, External Identity for Customers.
Or you can watch How to Get Started Basic Developer Edition Org for Identity. Then follow the tasks in this section.
Checklist for Implementing External Identity
To implement external identity, make sure that your org is set up with the required features. Use this checklist as a reference as you
implement external identity in your production org.
Prepare Your Org
Because Salesforce External Identity integrates with the customer and partner business processes that you run on Salesforce, you
perform a few basic administrative tasks to set up a typical deployment.
Create a Branded Login Page
Salesforce External Identity makes it simple to deploy a custom identity experience. A custom experience is important. You want
your customers and partners to experience your brand consistently, whether they’re visiting your website for the first time or signing
in to your community. The community comes with a default login page that gives users access. You customize this login page to
reflect your brand.
Enable Self-Registration
You can invite visitors to join your community by having them self-register. You can add self-registration directly from Community
Workspaces.
Enable Self-Registration for B2C Users (Optional)
Previously, you enabled self-registration for users in a simple business-to-business (B2B) data model. Each contact was associated
with a default account called Customers. You can modify this process to support multiple accounts or even support a
business-to-consumer (B2C) data model.
Checklist for Implementing External Identity
To implement external identity, make sure that your org is set up with the required features. Use this checklist as a reference as you
implement external identity in your production org.
1. Set up My Domain.
My Domain is required for many Salesforce features, so it’s likely that you’ve already enabled it.
2. Create an external identity profile.
Clone the External Identity user profile, and enter a name that reflects your community, for example, customers.
3. Create a role structure.
Communities requires a role hierarchy to better manage your community. Choose an internal user to play the community manager
role.
4. Create an account.
8Create a Typical External Identity Implementation Prepare Your Org
Connect external users to an account in your Salesforce org. When external users register for your community, they’re assigned to
this account.
5. Enable Communities.
Before you create your first community, enable Communities in your org.
6. Create a community with the Aloha template.
The Aloha template is designed for managing external users.
7. Brand your login page.
On the Workspaces Administration Login & Registration page, customize the default login page to reflect your brand. Add your logo,
your colors, and more.
8. Set up self-registration.
Allow guests to join your community by self-registering.
After you set up your basic external identity implementation, you can take advantage of the product’s features. Enhance your community
to drive customer engagement and leverage your partner relationships.
• Create a dynamic login experience.
With dynamic branding, you can control and customize branding at run time depending on the circumstances, such as who the
user is or where the user is logging in from.
• Choose a login page type.
Instead of using the default login page, choose one based on how you want users to log in.
• Add login capabilities to pages on your website.
Add Embedded Login metadata tags to any web page to give website access only to authenticated visitors.
• Manage communities for external identity.
Manage users with an External Identity license to make it easy for your external users to stay in your community longer—and to
make it easy for you to create lightweight external communities by creating users without contacts (contactless users).
Prepare Your Org
Because Salesforce External Identity integrates with the customer and partner business processes that you run on Salesforce, you perform
a few basic administrative tasks to set up a typical deployment.
Create a Developer Org
A developer org has all the features and licenses you need to get started with Salesforce Identity for Customers and Partners. You
can use an existing org, trial org, or sandbox for external identity, but a developer org is a great way to get familiar with the product.
Set Up My Domain
Add a subdomain to your Salesforce org with My Domain. With a subdomain, you can highlight your company and gain more control
over the login and authentication processes. Check if your org already has a subdomain by looking at its URL. If the URL contains
your subdomain name, like https://somethingcool.my.salesforce.com, you’re all set. If the URL contains an
instance name, like https://na30.salesforce.com, set up My Domain.
9Create a Typical External Identity Implementation Create a Developer Org
Control Authorization with Custom Profiles and Roles
One important facet of identity and access management is the ability to control who has access to what. To get started, you set up
two basic ways to control authorization: profiles and roles.
Create an Account for CRM Integration
One of the great things about Salesforce Identity for external users is that it’s already integrated with your customer success platform.
By driving identity on the same platform that you use for managing your customers and partners, you simplify your integration
requirements while providing your users a better experience.
Create a Developer Org
A developer org has all the features and licenses you need to get started with Salesforce Identity for Customers and Partners. You can
use an existing org, trial org, or sandbox for external identity, but a developer org is a great way to get familiar with the product.
1. Go to https://developer.salesforce.com/signup.
2. Enter your contact information.
3. Enter a unique username.
4. Submit the form, and wait for your welcome email.
5. In the welcome email, click the link to set your password.
That’s it—you now have your own developer org.
Set Up My Domain
Add a subdomain to your Salesforce org with My Domain. With a subdomain, you can highlight your company and gain more control
over the login and authentication processes. Check if your org already has a subdomain by looking at its URL. If the URL contains your
subdomain name, like https://somethingcool.my.salesforce.com, you’re all set. If the URL contains an instance name,
like https://na30.salesforce.com, set up My Domain.
1. In your developer org, from Setup, enter My Domain in the Quick Find box, then select My Domain.
2. Enter the subdomain name you want to use within the Salesforce URL. For example, a company called Universal Containers uses
the subdomain universalcontainers. The the company’s login URL would be
https://universalcontainers.my.salesforce.com.
3. Click Check Availability. If the name is already taken, choose a different one.
4. Click Register Domain. Salesforce updates its domain registries with your new subdomain. When complete, you receive an email
message with a subject like, “Your Developer Edition domain ready for testing.” It takes just a few minutes.
5. After you receive the email, click the link to go to your subdomain. You’re automatically signed in to the domain.
6. Return to Setup, and on the My Domain page, click Deploy to Users.
This step is often missed. So make sure that you deploy to users before you continue.
Control Authorization with Custom Profiles and Roles
One important facet of identity and access management is the ability to control who has access to what. To get started, you set up two
basic ways to control authorization: profiles and roles.
A profile defines how users access objects and data. Clone and customize the external identity profile to meet your org requirements.
A role allows you to control which users can view and edit data. Users can view and edit all data owned by or shared with users below
them.
10Create a Typical External Identity Implementation Create an Account for CRM Integration
1. In your developer org, from Setup, enter Profiles in the Quick Find box, then select Profiles.
a. Next to External Identity User, click Clone.
b. Enter a name for the profile. Let’s call it Customers.
c. Click Save.
2. Customize your profile.
a. Click Edit.
b. Search for API Enabled, and then select the checkbox next to this permission.
API Enabled gives users API access to your org’s data through any back-end mechanism.
c. Click Save.
3. Create a role structure.
Beyond the permissions offered by profiles and permission sets, Salesforce lets you specify sharing settings to determine the access
that users have to your Salesforce org’s data. A user role hierarchy is one option for controlling sharing. You can combine it with
sharing settings to segment data visibility.
a. From Setup, enter Role in the Quick Find box, then select Roles.
b. From the dropdown list, select Product-based Sample, then select Set Up Roles.
c. Under CEO, click Add Role.
d. For the role label, enter Customer Manager.
e. Click Save.
4. Add the external identity role to your user.
a. From Setup, enter Users in the Quick Find box, then select Users.
b. Find your username, and click Edit.
c. From the Role picklist, select Customer Manager.
d. Click Save.
You’ve now learned the basics of authorizing users. For more information about configuring authorization, check out the Data Security
Trailhead module. For more information about creating users and securing access, see the User Management Trailhead module.
Create an Account for CRM Integration
One of the great things about Salesforce Identity for external users is that it’s already integrated with your customer success platform.
By driving identity on the same platform that you use for managing your customers and partners, you simplify your integration requirements
while providing your users a better experience.
External users are tied into the CRM data model within Salesforce. So when your external users register or update their profile, you get
a consistent view of the external user within your Sales and Service processes.
1. In your developer org, switch to Sales.
2. Click the Accounts tab.
3. Create an account called Customers.
4. Click Save.
11Create a Typical External Identity Implementation Create a Branded Login Page
You’ve now completed all the prerequisites for creating an external identity community. To learn more, check out the Accounts and
Contacts Trailhead module.
Create a Branded Login Page
Salesforce External Identity makes it simple to deploy a custom identity experience. A custom experience is important. You want your
customers and partners to experience your brand consistently, whether they’re visiting your website for the first time or signing in to
your community. The community comes with a default login page that gives users access. You customize this login page to reflect your
brand.
To learn how login page branding works, watch the How to Set Up a Community for Identity and Deploy a Branded Login Page video.
Then follow these steps to create your own external identity community.
Create Your Initial Community from a Template
After you enable Salesforce Communities for your org, you can create your external identity community using one of the templates
that Salesforce provides. Behind the scenes, Salesforce creates default pages to handle the entire login experience, which includes
login, self-registration, reset password, forgotten and reset passwords, and identity verification.
Configure Your Community
Set your community’s profile so that external users see only what you want them to see. You can configure all the pages that make
up your community’s login experience.
Make More Login Customizations with Community Builder
Using Community Builder is one way to easily customize your login pages. Community Builder pages are available after you publish
your community.
Choose a Login Page Type
External Identity includes the Default Page login page type, to set up the login process for your external users in minutes. It has a
standard user login form, plus pages to handle passwords and register new members. You can also use the Community Builder login
pages that come with Communities Workspaces, or you can create your own login pages in Visualforce.
Activate Your Community
To complete your external identity community setup, you must activate it.
Create Your Initial Community from a Template
After you enable Salesforce Communities for your org, you can create your external identity community using one of the templates that
Salesforce provides. Behind the scenes, Salesforce creates default pages to handle the entire login experience, which includes login,
self-registration, reset password, forgotten and reset passwords, and identity verification.
When you enable Communities for your org, you provide a community domain. The community domain collects all your communities
under one URL. Typically, your community domain is your company domain.
1. In your developer org, from Setup, enter Communities in the Quick Find box, then select Communities Settings.
2. Select Enable communities.
3. Enter a memorable domain name.
Keep in mind that customers and partners interact with this domain name. After you choose this name, you can’t change it. Later
on, you can add a custom SSL domain to have more control over your community branding.
4. Select Check Availability.
5. Click Save, and then click OK.
12Create a Typical External Identity Implementation Create Your Initial Community from a Template
The Communities feature is now enabled for your org. Next, create your external identity community.
6. Click New Community.
You’re shown a series of community templates.
7. Choose the Aloha template, and click Get Started.
The Aloha template is designed with external identity in mind. For more information, see the Getting Started with the Aloha Community
Template for Salesforce Identity Guide.
8. Give your community a name and URL. For this example, enter Customers in both fields.
9. Click Create.
After a bit of background work, your new community appears in Community Workspaces. Notice the Administration Workspace.
Administration is where you configure your community’s login experience.
13Create a Typical External Identity Implementation Configure Your Community
Configure Your Community
Set your community’s profile so that external users see only what you want them to see. You can configure all the pages that make up
your community’s login experience.
You can use the provided sample logos and backgrounds to brand your community by downloading this file:
https://www.salesforceidentity.info/ExternalIdentityAssets.zip. Or, you can use your own.
1. Authorize external users to control what they can access when they log in to your community.
a. From Community Workspaces, select Administration, then select Members.
b. From the search list, select All.
c. From the list of available profiles, locate the Customers profile that you created earlier, and click Add to add it to the selected
profiles.
d. Click Save.
Salesforce updates membership for your community and sends an email when it’s done. Now External Identity users with the
Customers profile are authorized to self-register and use single sign-on to access your community.
2. Customize your login page.
a. From Community Workspaces, select Administration, then select Login & Registration.
From Login & Registration, you customize the login page, which appears when users access your community website’s URL.
Follow these steps to customize the login page that comes with the Aloha template.
b. Next to Choose Logo Type, select File.
c. Next to Logo File, click Choose File.
d. Select a logo. For example, select fix-logo.png from the sample files you downloaded.
e. Change the background color of your login page.
f. Under Right Frame, you can enter a URL to display content on the right side of the login page. Leave it blank for now.
The content of the URL displays in an iframe on the right side of the login page. The left side contains the login form in which
users supply their username and password. The right side displays content of your choice. For example, you can use it to display
a branded image or topical announcements.
g. Brand the footer text. Call it Fix Coffee.
14Create a Typical External Identity Implementation Configure Your Community
h. Click Save.
3. Under Login, select Allow internal users to log in directly to the community.
This setting lets internal users use their internal username and password on the community login page. The internal users must be
members of the community to log in.
4. Notice that Default Page appears for the fields Page (1), Forgot Password, and Change Password (2). These default pages come with
the Aloha template.
Your Login & Registration page looks something like this.
5. Let’s see how your changes appear on a login page.
a. From Administration, select Settings. Copy the URL of your community.
b. Open a new incognito window, and paste the URL in the address bar.
Your page looks something like this.
15Create a Typical External Identity Implementation Make More Login Customizations with Community Builder
When external users—your customers and maybe your partners—navigate to your community URL, they’re greeted with this login
page.
SEE ALSO:
Set Up Dynamic URLs
Make More Login Customizations with Community Builder
Using Community Builder is one way to easily customize your login pages. Community Builder pages are available after you publish your
community.
Each Communities template comes with a set of default pages to handle the login experience. These steps take you through branding
your community using Community Builder. But it’s not the only way to brand your community. Depending on how you want your users
to log in, you can use different login pages.
1. From Setup, enter All Communities in the Quick Find box, select All Communities, and then click Builder next to your
community.
2. Get the Community Builder pages that come with the Aloha template. They’re available after you publish the community.
a. In the top right, click Publish.
If you see a notification to activate community, ignore it. You’ll activate the community later on.
b. Return to your Login & Registration page. In the top left, click , and select Administration.
16Create a Typical External Identity Implementation Make More Login Customizations with Community Builder
c. Select Login & Registration.
d. Under Login Page, select Community Builder Page, and then select login from the page picker.
e. Click Save.
f. Return to Community Builder. At the top of Workspaces, select Administration, then select .
3. At the top of Builder, click the dropdown next to Setup (1), then select Login (2).
17Create a Typical External Identity Implementation Make More Login Customizations with Community Builder
Your login page now appears in Community Builder. You can further brand it with Community Builder.
4. Select .
5. Under Background Image, select Clear and upload a new background image. If you don’t have a background image, upload
cupontablesmall.png from the sample files you downloaded.
6. Make other changes to brand your login page. You might want to choose Action Color to change the color of your login button.
7. When you’re done, click Publish.
In just a few steps, you made your external identity community your own. You can use dynamic branding to control branding based on
run-time circumstances, such as who’s logging in and from where.
SEE ALSO:
Implement Embedded Login
Dynamic URLs: Determine Your Brand at Run Time
18Create a Typical External Identity Implementation Choose a Login Page Type
Choose a Login Page Type
External Identity includes the Default Page login page type, to set up the login process for your
EDITIONS
external users in minutes. It has a standard user login form, plus pages to handle passwords and
register new members. You can also use the Community Builder login pages that come with Available in: Salesforce
Communities Workspaces, or you can create your own login pages in Visualforce. Classic and Lightning
You choose the login page type from the Login & Registration page of the Administration Workspace. Experience
Available in: Enterprise,
Performance, Unlimited,
and Developer Editions
USER PERMISSIONS
Note: You can use any login page type regardless of the template you used to create your To access Community
community. For instance, you can use the Default page, Community Builder page, or Visualforce Workspaces:
page for your Aloha template. Likewise, communities created with the Customer Service • Access Community
template can use the Default page, Community Builder page, or Visualforce page. Management OR
Each login page type has different advantages. Manage Communities
OR Create and Set Up
• Default page—The quickest way to add login capabilities to your community. You can Communities
incorporate your brand by making a few simple changes on the Login & Registration page. • AND is a member of the
• Community Builder page—The easiest way to customize your login page. Use Community community
Builder to change your login page. The Community Builder page ignores the branding options To create and edit
on the Login & Registration page. Visualforce pages:
• Visualforce page—The most flexible way to customize your login page. Use Apex controllers • Customize Application
and Visualforce to add more sophisticated customizations or to completely control the login To edit Apex classes:
experience. You can create your own controller, or you can start out by cloning the Default • Author Apex
page. Rename the new cloned page. Renaming or deleting the Default page can cause problems
AND
with the login flow.
Customize Application
1. From Community Workspaces, select Administration, and then select Login & Registration.
2. Under Login, select the login page type from the dropdown.
a.
If you created a Visualforce page to handle your login process, select Visualforce Page from the dropdown, and click to
get a list of available Visualforce pages.
b. Under Search Results, click the name of the Visualforce page that you created.
c. To revert to the default page, select Default Page.
3. Repeat step 2 for password and registration pages.
Activate Your Community
To complete your external identity community setup, you must activate it.
1. From Setup, enter All Communities in the Quick Find box, select All Communities, and click Workspaces next to your
community.
2. Select Administration and then select Settings.
3. Click Activate Community, and click OK.
19Create a Typical External Identity Implementation Enable Self-Registration
Salesforce sends you an email when the community is activated.
4. Verify that your community is activated.
a. Refresh your incognito window. Or, from Community Workspaces, select Administration, then select Settings, and copy the
URL of your community.
b. Open an incognito window, and paste the URL in the address bar.
The browser displays the login page for your community, which looks a lot like the login page you created with Community
Workspaces.
Enable Self-Registration
You can invite visitors to join your community by having them self-register. You can add self-registration directly from Community
Workspaces.
To learn how, you can watch the Enabling Self-Registration in a Community video. Then follow the steps.
Add a Branded Self-Registration Page
Community Builder comes with a self-registration page. To activate it, follow these steps.
Add Fields to Collect Additional Information
When users register, you often want to ask them for more than just basic information. You can easily add fields to the registration
page.
Add a Password Field to Enable Login Directly During Registration
You can add a password field to your self-registration page to require users to supply a password when they register.
Add a Branded Self-Registration Page
Community Builder comes with a self-registration page. To activate it, follow these steps.
1. From Community Workspaces, select Administration and then select Login & Registration.
2. Select Allow external users to self-register.
3. For Page, select Community Builder Page and you see that the Register page is already selected.
4. For Profile, select Customers. This setting gives new users your External Identity user profile.
5. For Account, select Customers. Recall that you already created this account as part of preparing your org.
When you’re done with the page, it looks like this.
20Create a Typical External Identity Implementation Add Fields to Collect Additional Information
6. While we’re here, let’s get the Community Builder pages for Forgot Password.
a. Under Password, for Forgot Password, select Community Builder Page and then select Forgot Password from the page
picker.
7. Click Save.
8. Return to the incognito browser, and reload the login page for your community. Click Sign Up to register a new user for your
community.
9. Check it out.
a. From Setup, enter Users in the Quick Find box and select Users. Notice that your new user appears in the list.
b. Select the App Launcher.
c. Under All Items, select Accounts, then select the Customers account. Your new user is listed as a contact on the account.
SEE ALSO:
Embedded Login Considerations
Add Fields to Collect Additional Information
When users register, you often want to ask them for more than just basic information. You can easily add fields to the registration page.
Tailoring your registration page involves navigating to a few different areas in the app. First watch the Enabling Self-Registration in a
Community video. Then follow these steps.
1. In Setup, enter Users in the Quick Find box.
2. Under Customize, select Users, and then select Field Sets.
3. Click New to create a field set. Name it Registration.
4. Under Where is this used, enter reg field set.
5. Click Save.
6. Drag Title (1) into the field set (2), and click Save(3).
21Create a Typical External Identity Implementation Add Fields to Collect Additional Information
7. Go back to Community Builder. From Setup, enter All Communities in the Quick Find box, then click Builder next to your
community.
8. From the dropdown menu at the top, select Register (1), click (2), and then select Self Registration (3).
9. On the right, scroll to Extra Fields Field Set Name (4) and enter Registration.
The page reloads and displays your title field.
22Create a Typical External Identity Implementation Add a Password Field to Enable Login Directly During
Registration
10. Click Publish.
Add a Password Field to Enable Login Directly During Registration
You can add a password field to your self-registration page to require users to supply a password when they register.
It’s not much effort to require a password because you’re already in Community Builder.
1. In Community Builder, select Include Password Field.
The self-registration page reloads and displays the password field.
23Create a Typical External Identity Implementation Enable Self-Registration for B2C Users (Optional)
2. Click Publish.
3. After you receive the confirmation email, go back to your browser and confirm that your self-registration page includes the password
field.
Enable Self-Registration for B2C Users (Optional)
Previously, you enabled self-registration for users in a simple business-to-business (B2B) data model. Each contact was associated with
a default account called Customers. You can modify this process to support multiple accounts or even support a business-to-consumer
(B2C) data model.
Salesforce supports a B2C model through person accounts. The best way to get started with person accounts is to review the Setting
Up Person Accounts Implementation Guide.
You can also watch the Setting up Person Accounts and Enabling Them for Self-Registration in a Community video. It walks you through
setting up and enabling person accounts for self-registration.
Enable Person Accounts
Person accounts store information about individual people by combining certain account and contact fields into one record.
24Create a Typical External Identity Implementation Enable Person Accounts
Configure Self-Registration for Person Accounts
You can use person accounts instead of business accounts for self-registration.
SEE ALSO:
Salesforce Help: What Is a Person Account?
Enable Person Accounts
Person accounts store information about individual people by combining certain account and
EDITIONS
contact fields into one record.
Important: After Person Accounts is enabled, it can’t be disabled. We recommend that you Business accounts available
create a sandbox to preview how Person Accounts affect your Salesforce org. in: both Salesforce Classic
and Lightning Experience
1. Make sure you meet the following prerequisites.
Business accounts available
• The account object has at least one record type. in: All Editions
• User profiles that have read permission on accounts have read permission on contacts.
Person accounts available
• The organization-wide default sharing is set so that either Contact is Controlled by Parent
in: Both Salesforce Classic
or both Account and Contact are Private.
and Lightning Experience
2. From Setup, enter Account Settings in the Quick Find box, and then select Allow Person accounts available
Customer Support to enable Person Accounts. in Professional, Enterprise,
We’ll verify your org meets the prerequisites, then send you an email with additional information. Performance, Unlimited,
If you don’t see a message verifying you meet the prerequisites, go back to step 1. and Developer Editions
3. Contact Salesforce Customer Support by logging a case to enable Person Accounts.
Refer to the email we sent about what to include in the case. USER PERMISSIONS
4. After Person Accounts is enabled, a person account record type is created. You can create To enable person accounts:
additional record types for person account if needed. • Customize Application
5. Assign the person account record type to user profiles.
Configure Self-Registration for Person Accounts
You can use person accounts instead of business accounts for self-registration.
1. Assign record types to your community’s security profile by updating your community’s public-access settings. This step ensures
that the security profile that controls anonymous access in your community has access to account record types.
a. From Setup, enter All Communities in the Quick Find box, then select All Communities and click Manage next to the
Customers community.
b. Select Administration, select Pages, then select Go to Lightning Platform.
c. Click Public Access Settings.
d. Under Record Type Settings, click Edit next to Accounts.
e. Select business and person record types and add them to Selected Record Types.
f. Click Save.
2. Update the self-registration setting on your login configuration page to use person accounts.
25Create a Typical External Identity Implementation Configure Self-Registration for Person Accounts
a. From Setup, enter All Communities in the Quick Find box, then select All Communities and click Workspaces next to
the Customers community.
b. Select Administration, and then select Login & Registration.
c. Scroll down to Registration and make sure that the default Account field is empty. By removing the default, new users are created
as person accounts.
d. Click Save.
You’re done. New users that register with your branded self-registration page are now B2C-style users using person accounts.
26SET UP SSO FOR YOUR USERS
While self-registration is a great way to get started, often users exist in your back-office systems or with social providers, such as Facebook,
LinkedIn, or Twitter. With Salesforce Identity, you can use these existing sources with single sign-on (SSO) and just-in-time (JIT) provisioning.
SSO and JIT provisioning let you create and update user accounts on the fly.
The following methods are available for SSO into Salesforce and communities.
Social sign-on
Salesforce users can authenticate and log in from different social identity providers, such as a Twitter and Facebook. They can also
log in through open federation standards like OpenID Connect.
Federated authentication
Use Security Assertion Markup Language (SAML) to send authentication and authorization data between affiliated but unrelated
web services.
Delegated authentication
Integrate Salesforce with various legacy authentication technologies.
Both federated authentication and social sign-on let you accept identities from existing identity providers and create users or link to and
update existing users. Social sign-on is a common and effective way to engage your customers without having them create accounts.
Social Sign-On
Salesforce Identity supports a variety of public authentication providers, such as LinkedIn, Google, Facebook, Twitter, and open-standard
OpenID Connect through the auth. providers framework. Using these providers, you can accept identity and link to existing Salesforce
users. You can also create and update users on the fly using identity information asserted by the provider.
Create an Auth. Provider
You choose which Auth. providers can access your Salesforce org from Setup. With a few clicks, you can add the option to log in
with one or more social accounts. Here’s how to set up Facebook as an Auth. provider.
Customize Your Registration Handler
The registration handler is an Apex class that handles the heavy lifting of creating users, updating users, and linking to existing users,
accounts, and contacts. You can also integrate more business processes, such as creating opportunities or calling out to back-office
customer systems.
Enable Your Auth. Provider in Your Community
You created an Auth. provider for Facebook and customized it with a registration handler. Now instruct the login page in your
community to display Facebook as an option on your external identity community’s login page.
Accept User Identity with SAML and Just-In-Time Provisioning
With Salesforce Identity, you can bring your own identity from standards-based systems using SAML. You can integrate with existing
SAML identity providers, letting users access your community based on your own authentication systems. And you can use SAML
with just-in-time (JIT) provisioning to create or update users ion the fly as part of the SSO process.
Social Sign-On
Salesforce Identity supports a variety of public authentication providers, such as LinkedIn, Google, Facebook, Twitter, and open-standard
OpenID Connect through the auth. providers framework. Using these providers, you can accept identity and link to existing Salesforce
users. You can also create and update users on the fly using identity information asserted by the provider.
27You can also read