Oracle Maximum Availability Architecture (MAA) GoldenGate Hub
←
→
Page content transcription
If your browser does not render page correctly, please read the page content below
Oracle Maximum Availability
Architecture (MAA)
GoldenGate Hub

Dec 4, 2020
Copyright © 2020, Oracle and/or its affiliates
Confidential: Public Document
DISCLAIMER
This document in any form, software or printed matter, contains proprietary
information that is the exclusive property of Oracle. Your access to and use of this
confidential material is subject to the terms and conditions of your Oracle software
license and service agreement, which has been executed and with which you agree to
comply. This document and information contained herein may not be disclosed,
copied, reproduced or distributed to anyone outside Oracle without prior written
consent of Oracle. This document is not part of your license agreement nor can it be
incorporated into any contractual agreement with Oracle or its subsidiaries or
affiliates.
This document is for informational purposes only and is intended solely to assist you
in planning for the implementation and upgrade of the product features described. It
is not a commitment to deliver any material, code, or functionality, and should not be
relied upon in making purchasing decisions. The development, release, and timing of
any features or functionality described in this document remains at the sole
discretion of Oracle.
Due to the nature of the product architecture, it may not be possible to safely include
all features described in this document without risking significant destabilization of
the code.

1   Technical Brief Oracle Maximum Availability Architecture (MAA) GoldenGate Hub
    Copyright © 2020, Oracle and/or its affiliates | Public Document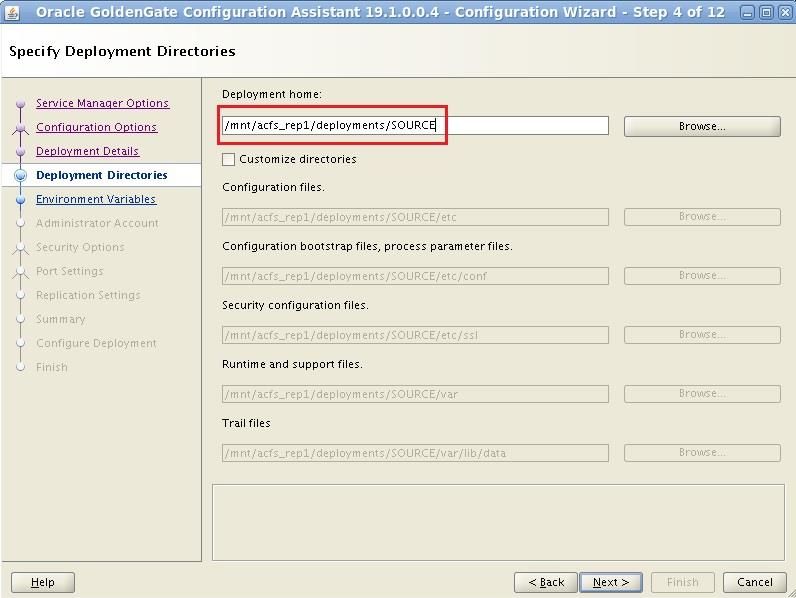
TABLE OF CONTENTS
Disclaimer                                                                                 1
Purpose Statement & Intended Audience                                                      3
Introduction                                                                               3
Configuration Overview                                                                     5
    Oracle GoldenGate                                                                      5
    GoldenGate Hub                                                                         6
    GoldenGate Hub MAA                                                                     6
    NGINX Reverse Proxy Server                                                             8
    Naming Conventions Used Throughout This Paper                                          8

Configuration Prerequisites                                                                9
    Database Patch Requirements                                                            9
    Database Configuration for GoldenGate                                                  9
    GoldenGate Database Administrator Account                                             10
    Create Database Role Based Service                                                     11
    Oracle Net Services Connectivity                                                       11

GoldenGate Hub Configuration                                                              12
    Step 1 - Install Oracle Grid Infrastructure 19c Software                              13
    Step 2 - Install Oracle Client Software                                               13
    Step 3 - Install GoldenGate Software                                                  14
    Step 4 - Install Oracle Standalone Agent Software                                     14
    Step 5 - Install NGINX Reverse Proxy Server                                           15
    Step 6 - Create Application Virtual IP Address                                        16
    Step 7 - Configure ACFS File System Replication                                       17
    Step 8 - Configure Initial GoldenGate Microservices Deployment                        25
    Step 9 - Create Additional GoldenGate Deployments                                     30
    Step 10 - Register GoldenGate Deployments with Grid Infrastructure Standalone Agent   31
    Step 11 - Configure NGINX Reverse Proxy                                               33

GoldenGate Configuration                                                                  36
    Creating the Oracle Net Services Client Configuration Files                           36
    GoldenGate Extract Process Recommendations                                            37
          Oracle Data Guard Data Loss Failover Considerations                             37
    GoldenGate Replicat Process Recommendations                                           39
    GoldenGate Distribution Path Recommendations                                          40
    Create Autostart Profiles                                                             41
    Monitoring GoldenGate Processes                                                       41

Managing Planned and Unplanned Outages for The Goldengate Hub                             43
    Planned Outages                                                                       43
    Unplanned Outages of the GoldenGate Hub                                               45

Conclusion                                                                                47
Appendix A: Example SSH Daemon Restart Action Script                                      48
Appendix B: acfs_primary CRS Action Script                                                50
Appendix C: acfs_standby CRS Action Script                                                57
Appendix D: Distribution Path Target Change Script                                        62
Appendix E: Example GoldenGate Deployment Creation Response Files                         64
Appendix F: Troubleshooting                                                               67
    Troubleshooting ACFS Replication                                                      67
    Troubleshooting GoldenGate                                                            72

2   Technical Brief Oracle Maximum Availability Architecture (MAA) GoldenGate Hub
    Copyright © 2020, Oracle and/or its affiliates | Public Document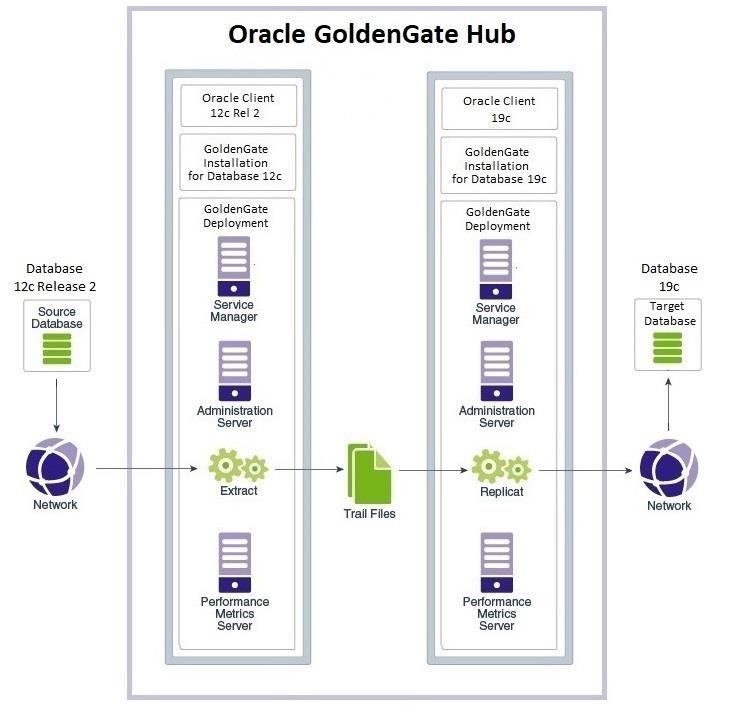
PURPOSE STATEMENT & INTENDED AUDIENCE
The intended audience for this document are individuals using Oracle GoldenGate or planning to use Oracle
GoldenGate. The document’s organization and content assumes familiarity with Oracle Database concepts but is
suitable for both individuals well versed in Oracle GoldenGate as well as those that are new to Oracle GoldenGate and
replication concepts.
The primary intent of this document is to provide education and guidance in regards to how best to configure a
GoldenGate hub to be highly available and tolerant to disasters. Configuring Oracle GoldenGate as a hub is an
architectural optimization to offload significant GoldenGate processing and management from the database servers.
Ensuring that the hub uses Oracle MAA high availability and disaster recovery best practices is a key prerequisite to an
MAA Platinum reference architecture. For more information about MAA platinum solution, see the Oracle Exadata MAA
- Platinum Tier Focused Presentation at https://www.oracle.com/a/tech/docs/exadata-maa-platinum-focused.pdf.
This paper does not apply to Oracle Cloud Infrastructure (OCI) Marketplace environment.
INTRODUCTION
To achieve the highest levels of availability, resulting in zero or near-zero downtime for both unplanned outages and
planned maintenance activities, customers frequently use the combination of Oracle Real Application Clusters (Oracle
RAC), Oracle Active Data Guard, and Oracle GoldenGate. Traditionally, Oracle GoldenGate is installed and run locally
on the database server that the GoldenGate processes connect to. When used with Oracle Grid Infrastructure
Standalone Agent (XAG), Oracle GoldenGate processes can be configured to seamlessly relocate or fail over between
Oracle RAC nodes and follow Oracle Active Data Guard switchover and failovers.
Using Oracle GoldenGate in a hub configuration moves the GoldenGate software and processes off of the database
server, and places them on a separate server located close on the network to the target database. Connectivity
between the GoldenGate processes and the databases they operate against is managed with Oracle Net Services.
The Oracle GoldenGate hub configuration provides the following advantages:
Cross-database versions support
Cross-platform or cross-endianness support. The source database can be a different platform from the GoldenGate
hub (e.g. IBM AIX source database host and Linux GoldenGate hub)
Offload Oracle GoldenGate software installation, configuration and life cycle management from source and target
database systems
Reduced Oracle GoldenGate resource impact on the source and target database systems
Support for multiple source and target databases replicating data concurrently
More than one hub may be used if necessary or for performance reasons (i.e. bi-directional replication between
databases in different continents)
3 Technical Brief Oracle Maximum Availability Architecture (MAA) GoldenGate Hub
Copyright © 2020, Oracle and/or its affiliates | Public Document
Configuring the hub with Maximum Availability Architecture principles in mind, it is possible to create a standby hub that
will become the primary hub in the event of a site failure.

4   Technical Brief Oracle Maximum Availability Architecture (MAA) GoldenGate Hub
    Copyright © 2020, Oracle and/or its affiliates | Public Document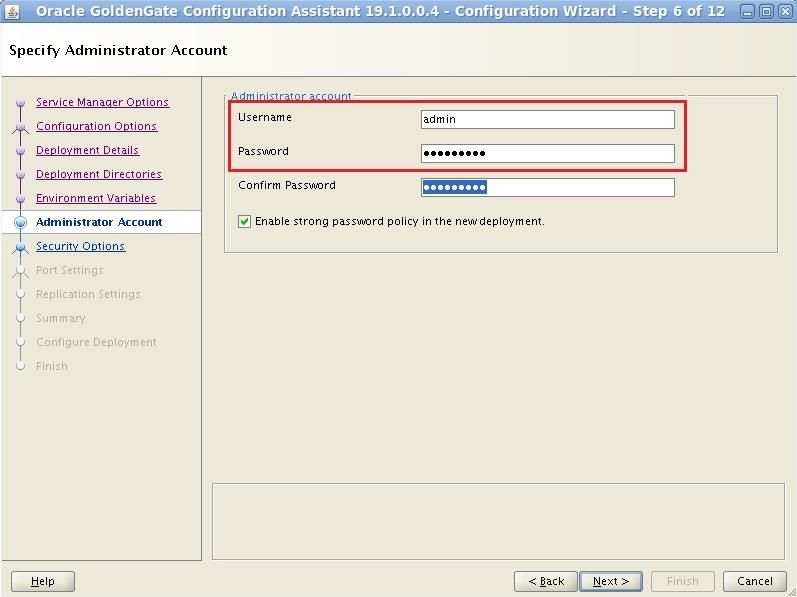
CONFIGURATION OVERVIEW
This section introduces the main components of the Oracle GoldenGate hub in an MAA configuration using the GoldenGate
Microservices Architecture.

Oracle GoldenGate
GoldenGate provides real-time, log-based change data capture and delivery between homogenous and heterogeneous systems. This
technology enables you to construct a cost-effective and low-impact real-time data integration and continuous availability solution.

GoldenGate replicates data from committed transactions with transaction integrity and minimal overhead on your existing infrastructure.
The architecture supports multiple data replication topologies such as one-to-many, many-to-many, cascading, and bidirectional. Its
wide variety of use cases includes real-time business intelligence; query offloading; zero-downtime upgrades and migrations; and
active-active databases for data distribution, data synchronization, and high availability.

GoldenGate Microservices Architecture was introduced in GoldenGate release 12.3, as a new administration architecture that provides
REST-enabled services as part of the GoldenGate environment. The REST-enabled services provide remote configuration,
administration, and monitoring through HTML5 web pages, command-line interfaces, and APIs. Figure 1 shows the GoldenGate
Microservices Architecture.

                                                        Figure 1: GoldenGate Microservices Architecture

5    Technical Brief Oracle Maximum Availability Architecture (MAA) GoldenGate Hub
     Copyright © 2020, Oracle and/or its affiliates | Public Document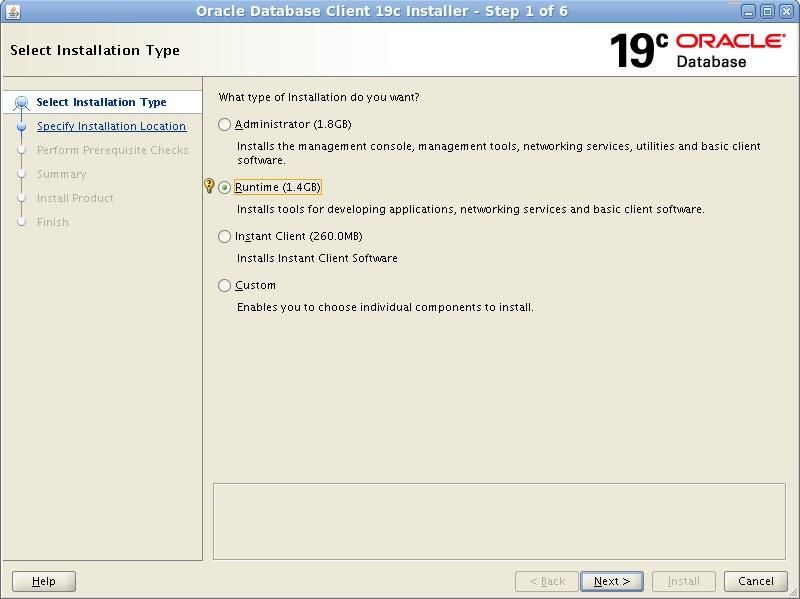
More information about GoldenGate Microservices Architecture can be found in the GoldenGate documentation at:

https://docs.oracle.com/en/middleware/goldengate/core/19.1/using/getting-started-oracle-goldengate.html#GUID-61088509-F951-4737-
AE06-29DAEAD01C0C

GoldenGate Hub
The GoldenGate Hub is an architectural concept that places the GoldenGate software on a different host than the databases being
operated against, as shown in Figure 2. The hub must be in close network proximity to the target database with the expectation that
network latency should never exceed 2-3ms, or typically less than 50 kilometers. One advantage of this architecture is that it isolates
most of the GoldenGate resource usage from the source and target database servers enabling more system resources for application
and database processing. Another advantage is that the GoldenGate configuration is simplified significantly by administering and
monitoring the entire GoldenGate infrastructure from a self contained single server, without the need of accessing separate GoldenGate
installations on each database server.

                                                              Figure 2: GoldenGate Hub architecture

GoldenGate Hub MAA

6   Technical Brief Oracle Maximum Availability Architecture (MAA) GoldenGate Hub
    Copyright © 2020, Oracle and/or its affiliates | Public Document
In order to provide maximum availability for local and complete disaster failures for the hub, there are additional Oracle software
configuration requirements that are shown below in Figure 3.
Figure 3: Oracle GoldenGate Hub with MAA
Figure 4 below shows how the GoldenGate hub changes after a data center failure in the environment.
Figure 4: GoldenGate Hub after environment failures
The key hub configuration pre-requisites are:
Primary and Standby hub servers and target database servers have round trip latency of less 4ms. With bi-directional replication,
or when there are multiple target databases in different data centers, it may be necessary to have additional hubs with distribution
paths sending trail files between them.
Linux x86-64 Operating System on the hub servers.
7 Technical Brief Oracle Maximum Availability Architecture (MAA) GoldenGate Hub
Copyright © 2020, Oracle and/or its affiliates | Public Document
Oracle Grid Infrastructure 19c version 19.7 or higher. When deploying a new GoldenGate hub, it’s recommended to use the latest
production Grid Infrastructure software.
Oracle Grid Infrastructure provides the necessary components needed to manage high availability for any business-critical
applications. Using Oracle Clusterware (a component of Oracle Grid Infrastructure) network, database and GoldenGate resources
can be managed to provide availability in the event of a failure. This minimum release is required to provide the features for
seamless integration of ACFS (ASM Cluster File System) Replication and GoldenGate.
Oracle ACFS to store critical GoldenGate deployment files.
Oracle ACFS Replication to replicate the critical GoldenGate files to the hub standby server. With ACFS Replication, changes to
the GoldenGate shared files, for example checkpoint and trail files, are automatically replicated to a standby file system.
Oracle Grid Infrastructure Standalone Agent (XAG) version 10.2 or higher.
The Oracle Grid Infrastructure Standalone Agent leverages the Oracle Grid Infrastructure components to provide integration
between GoldenGate and its dependent resources, such as the database, network and file system. The agent also integrates
GoldenGate with Oracle Data Guard so that GoldenGate is restarted on the new primary database following a role transition.
GoldenGate 19c version 19.1.0.0.4 Microservices or higher.
GoldenGate Microservices Architecture provides REST-enabled services as part of the GoldenGate environment. The REST-
enabled services provide remote configuration, administration, and monitoring through HTML5 web pages, command-line
interfaces, and APIs.
NGINX Reverse Proxy Server
The GoldenGate reverse proxy feature allows a single point of contact for all of the GoldenGate microservices associated with an
GoldenGate deployment. Without reverse proxy, the microservices are contacted using a URL consisting of a host name or IP address
and separate port numbers, one for each of the services. For example, to contact the Service Manager you could use
http://gghub.example.com:9100, then the Administration Server might be http://gghub.example.com:9101, the
administration server of deployment #2 could be https://gghub.example.com:9111, and so on.
With reverse proxy, port numbers are not required to connect to the microservices, as they are replaced with the deployment name.
Using the previous example, to connect to the Service Manager use the URL https://gghub.example.com, the Admin Server of
deployment #1 (named Source) would use https://gghub.example.com/SOURCE/adminsrvr, and the administration server of
deployment #2 (named Target) would be https://gghub.example.com/TARGET/adminsrvr.
Reverse proxy is recommended and used by default with GoldenGate from the Oracle Cloud Marketplace to ensure easy access to
microservices and provide enhanced security and manageability.
Configuration of the NGINX proxy server is covered later in this paper.
Naming Conventions Used Throughout This Paper
Throughout this paper, examples are provided for REST API endpoints to manage the GoldenGate configuration using two
deployments (SOURCE and TARGET). The REST API is used so that the commands can easily be integrated into an automated
configuration script. The script can be run locally or remotely from any server with access to the hub with curl and Python installed.
Alternatively, you can use the GoldenGate Admin Client commands to manage the hub. Admin Client is a standalone command-line
interface used to create and manage GoldenGate replication. Refer to the Command Line Interface Reference for GoldenGate for
Admin Client commands.
https://docs.oracle.com/en/middleware/goldengate/core/19.1/gclir/index.html
Here is an example of key arguments given in the GoldenGate REST APIs used throughout this brief:
8 Technical Brief Oracle Maximum Availability Architecture (MAA) GoldenGate Hub
Copyright © 2020, Oracle and/or its affiliates | Public Document$ curl -s –K access.cfg https:////adminsrvr/services/v2/credentials/goldengate -XGET | python -m json.tool
access.cfg: To prevent the GoldenGate administrator account name and password from being exposed on the command line, it is
recommended that you include the user name and password in a configuration file, which is read by curl, as shown here.
user = "oggadmin:password"
GG Hub: The hostname or IP address of the hub server. For example, gghub-server.
Deployment Name: This is the name of the GoldenGate deployment. For example, SOURCE or TARGET.
Example:
$ curl -s –K access.cfg
https://gghub.example.com/SOURCE/adminsrvr/services/v2/credentials/goldengate -XGET | python -m
json.tool
The example Extract name used in this paper is EXT1 and the Replicat is called REP1.
The REST calls can be made from either the hub, or any machine, that can access the GoldenGate hub through the HTTPS protocol.
CONFIGURATION PREREQUISITES
Database Patch Requirements
The minimum database version that is supported with GoldenGate is Oracle Database 11g Release 2 (11.2.0.4). It is a best practice to
apply the latest bundle patch and PSU (Patch Set Update) on both the source and target databases. The full recommended patch list
can be found in My Oracle Support note 2193391.1, which covers database versions 11.2.0.4 onwards.
It is recommended that you also apply patch 28849751 to the source database if network round trip latency between the source
database and hub is greater than 8ms, and if the latest database bundle patch or PS/CPU (Critical Patch Update) does not include it.
To check if your current database software includes patch 28849751 run the following command.
$ $ORACLE_HOME/OPatch/opatch lsinventory|grep 28849751
28803345, 28819640, 28849751, 28852691, 28856060, 28891984, 28951382
Database Configuration for GoldenGate
The source database prerequisites are described in the MAA technical brief “Oracle GoldenGate Performance Best Practices” at
https://www.oracle.com/technetwork/database/availability/maa-gg-performance-1969630.pdf. The key prerequisites are listed below.
Source Database Prerequisites
Enable ARCHIVELOG mode for the database.
Enable database force logging to ensure that all changes are found in the redo by the GoldenGate Extract process.
Enable database minimal supplemental logging. Additional schema level supplemental logging for replicated objects also required.
Configure the streams pool with the initialization parameter STREAMS_POOL_SIZE.
Enable GoldenGate replication by enabling the initialization parameter ENABLE_GOLDENGATE_REPLICATION.
Install the UTL_SPADV/UTL_RPADV package for integrated Extract performance analysis.
Target Database Prerequisites
Enable GoldenGate replication by enabling the initialization parameter ENABLE_GOLDENGATE_REPLICATION.
9 Technical Brief Oracle Maximum Availability Architecture (MAA) GoldenGate Hub
Copyright © 2020, Oracle and/or its affiliates | Public Document Configure the streams pool with the initialization parameter STREAMS_POOL_SIZE, if GoldenGate integrated parallel Replicat is
used (refer to the section GoldenGate Replicat Process Recommendations).
Install the UTL_SPADV/UTL_RPADV package for integrated Extract performance analysis.
GoldenGate Database Administrator Account
If the source database is currently part of a GoldenGate configuration the GoldenGate administrator account may already exist. If the
user already exists, you need to confirm the permissions are correctly granted, and if not grant them.
If no GoldenGate database administrator user account exists, the user must be created. The recommended source database username
is GGADMIN for single tenant and PDBs where not all PDBs are being replicated, and C##GGADMIN for a CDB database and PDBs
where a single PDB exists or all PDBs are being replicated. The target database recommended username is GGADMIN.
If a GoldenGate administrator user already exists, it should be used for the database GoldenGate configuration. Make sure the
permissions listed below are granted to the current GoldenGate administrator account.
Throughout this technical brief the database GoldenGate administrator account is named GGADMIN.
Use the following example to create a new GoldenGate administrator account for a single tenant source database, a subset of PDBs
that exist in the multitenant database, and for the target database.
SQL> create user ggadmin identified by
default tablespace users temporary tablespace temp;
SQL> grant connect, resource to ggadmin;
SQL> grant select any dictionary to ggadmin;
SQL> grant create view to ggadmin;
SQL> grant execute on dbms_lock to ggadmin;
SQL> exec dbms_goldengate_auth.GRANT_ADMIN_PRIVILEGE('ggadmin');
If you are replicating all PDBs within a multitenant source database, use the following example command to create the common user in
the CDB and all PDBs:
SQL> create user c##ggadmin identified by
default tablespace users temporary tablespace temp CONTAINER=ALL;
SQL> grant connect, resource to c##ggadmin CONTAINER=ALL;
SQL> grant select any dictionary to ggadmin CONTAINER=ALL;
SQL> grant create view to c##ggadmin CONTAINER=ALL;
SQL> grant execute on dbms_lock to c##ggadmin CONTAINER=ALL;
SQL> exec dbms_goldengate_auth.GRANT_ADMIN_PRIVILEGE('c##ggadmin',container=>'all');
NOTE: The default and temporary tablespace names MUST exist in the CDB and all PDBs.
If you are replicating a subset of the PDBs within a multitenant source database, use the following example command to create the user
in the CDB:
SQL> create user c##ggadmin identified by
default tablespace users temporary tablespace temp;
SQL> grant connect, resource to c##ggadmin;
SQL> grant select any dictionary to ggadmin;
SQL> grant create view to c##ggadmin;
SQL> grant execute on dbms_lock to c##ggadmin;
SQL> exec dbms_goldengate_auth.GRANT_ADMIN_PRIVILEGE('c##ggadmin',container=>'');
10 Technical Brief Oracle Maximum Availability Architecture (MAA) GoldenGate Hub
Copyright © 2020, Oracle and/or its affiliates | Public DocumentCreate Database Role Based Service
If the GoldenGate source and target databases are running the recommended configuration on an Oracle RAC cluster with Oracle Data
Guard, a role-based service needs to be created that will allow the GoldenGate Extract or Replicat processes to connect to the correct
Data Guard primary database instance. Run the following command on both the primary and standby Data Guard clusters to create the
role based service:
$ srvctl add service -db -service oggsource -role PRIMARY
-preferred ,
Example:
$ srvctl add service -db GGS2 -service oggsource -role PRIMARY -preferred GGS21,GGS22
NOTE: A database service is still required if not using Oracle Data Guard, simply omit the -role PRIMARY parameter.
The service should be started before GoldenGate is configured in a later step, using the following commands:
$ srvctl status service -d GGS2 -s oggsource
$ srvctl start service -d GGS2 -i GGS21 -s oggsource
NOTE: The role based service must be created on both the source and target database Data Guard primary and standby RAC clusters.
Oracle Net Services Connectivity
Oracle Net connectivity should be optimized to provide the best performance for the remote GoldenGate Extract running on the hub.
It is recommended that you set the source database listener to use a higher SDU size to improve performance with a remote
GoldenGate Extract. Please note that even though the listener is set at the maximum possible SDU size, the smallest size is used if
requested by the client. For example, if the listener sets SDU to 2MB but the client requests the default 8KB SDU, the connection to the
database uses an 8KB SDU size. The maximum value for the SDU size for Oracle Database 11g Release 2 is 64KB (65536 bytes), and
for later database releases the maximum value is 2MB (2097152 bytes).
It is recommended that you use Oracle Net Services or Secure Sockets Layer (SSL) encryption for connections to the source database.
Refer to the Oracle Database Security Guide for more information about SSL with Oracle Net.
https://docs.oracle.com/en/database/oracle/oracle-database/19/dbseg/configuring-secure-sockets-layer-authentication.html#GUID-
6AD89576-526F-4D6B-A539-ADF4B840819F
The following example sqlnet.ora and listener.ora files are configured with SSL and an increased SDU size for Oracle
Database 12g Release 1 and later:
sqlnet.ora
SQLNET.IGNORE_ANO_ENCRYPTION_FOR_TCPS = TRUE
SQLNET.WALLET_OVERRIDE = FALSE
SQLNET.EXPIRE_TIME = 10
WALLET_LOCATION = (SOURCE=(METHOD=FILE)(METHOD_DATA=(DIRECTORY=/u01/oracle/tcps_wallets)))
SSL_VERSION = 1.2
# Parameters required for Net encryption if not using SSL Authentication, replacing
# the above parameters:
# SQLNET.ENCRYPTION_SERVER = accepted
# SQLNET.ENCRYPTION_TYPES_SERVER= (AES256)
DEFAULT_SDU_SIZE = 2097152
11 Technical Brief Oracle Maximum Availability Architecture (MAA) GoldenGate Hub
Copyright © 2020, Oracle and/or its affiliates | Public Documentlistener.ora
GGSOURCE =
(DESCRIPTION_LIST =
(DESCRIPTION =
(SDU = 2097152)
(ADDRESS = (PROTOCOL = TCPS)(HOST = )(PORT = 2484))
)
)
SID_LIST_GGSOURCE =
(SID_LIST =
(SID_DESC =
(SDU = 2097152)
(SID_NAME = )
(ORACLE_HOME = )
)
)
If the source database is on Oracle RAC, configure the listener on all of the cluster nodes running instances for the database. This way,
if one instance goes down, the service can migrate to a surviving instance. Configure the SSL wallet on all Oracle RAC nodes.
To start, stop, and get the status of the listener, make sure the following environment variables are set and then issue the listed
commands:
export ORACLE_HOME=
export PATH=$PATH:$ORACLE_HOME/bin
export TNS_ADMIN=
To start the listener:
$ lsnrctl start GGSOURCE
To stop the listener:
$ lsnrctl stop GGSOURCE
To get the current status of the listener:
$ lsnrctl status GGSOURCE
GOLDENGATE HUB CONFIGURATION
The hub requires four software installations and configuration:
Oracle Grid Infrastructure 19c, version 19.7 or higher
Oracle Client Software to match source and target Oracle Database versions (minimum version is 11.2.0.4)
GoldenGate software to match source and target Oracle Database versions
NGINX reverse proxy server used by the GoldenGate Microservices deployment connectivity
The following sections provide details about the required software installations.
NOTE: All instructions must be carried out on both the primary and standby hub servers.
12 Technical Brief Oracle Maximum Availability Architecture (MAA) GoldenGate Hub
Copyright © 2020, Oracle and/or its affiliates | Public DocumentStep 1 - Install Oracle Grid Infrastructure 19c Software
After installing Oracle Grid Infrastructure 19c on both the primary and standby hub servers, download and apply the latest release
update. The minimum required release update version is 19.7.
You MUST apply patch 31697904 to the Oracle Grid Infrastructure software home to ensure that you have the latest ACFS replication
functionality to handle unplanned file system outages, which is required for the solution presented in this technical brief. This patch can
be downloaded from My Oracle Support.
Step 2 - Install Oracle Client Software
GoldenGate requires libraries that are installed as part of the Oracle Client Runtime installation. The client software version installed
must be the same release number as the database that GoldenGate will connect to. For example, if the source is Oracle Database 12c
Release 2, and the target is Oracle Database 19c, two different client software installations are required:one for Oracle Database 12c
and another for Oracle Database 19c. If the source and target database releases are the same, a single Oracle client software
installation is required.
If the source database is not running on the same operating system as the hub, install the GoldenGate software for the hub platform
operating system, which is Linux.
NOTE: The Oracle Client Software MUST be installed in matching ORACLE_HOME directories on both the primary and standby hub
servers. Do NOT use the Oracle instant client software because it does not contain all of the required libraries.
Download the Oracle client software from https://edelivery.oracle.com. On Oracle Software Delivery Cloud select the Release category
and search for ”Oracle Database Client”.
During installation, select the Runtime installation type, as shown in the example below.
13 Technical Brief Oracle Maximum Availability Architecture (MAA) GoldenGate Hub
Copyright © 2020, Oracle and/or its affiliates | Public DocumentFigure 4: Oracle Client Software Installation
Install the Oracle client software that matches both the source and target database releases into separate ORACLE_HOME directories.
Step 3 - Install GoldenGate Software
You must install the GoldenGate software release that supports the source and target Oracle Database releases. The GoldenGate
software compatibility matrix can be found at https://www.oracle.com/technetwork/middleware/ias/downloads/fusion-certification-
100350.html
Download the latest GoldenGate software from https://www.oracle.com/middleware/technologies/goldengate-downloads.html. It is
recommended that you install the latest available release of GoldenGate, which is currently 19c Release 1 (19.1.0.0.4). Using
GoldenGate 19c Release 1 allows the cross-endian extract where the operating system running GoldenGate Extract is a different
endianness from the source database platform.
If the source and target database releases are different, make sure you install the GoldenGate software twice, once for each database
release. Below, Figure 5 shows the software installer option for the database releases.
Figure 5. Select the GoldenGate release for your Oracle Database version
It is important that you install the GoldenGate software in separate directories, based on the database version they support.
NOTE: Make sure to place each GoldenGate software installation in the same directory path on each primary and standby Oracle RAC
nodes.
Step 4 - Install Oracle Standalone Agent Software
The following step-by-step procedure shows how to configure Oracle Clusterware to manage GoldenGate using the Oracle Grid
Infrastructure Standalone Agent (XAG). Using XAG automates the ACFS file system mounting, as well as the stopping and starting of
the GoldenGate deployment when relocating between Oracle RAC nodes and Data Guard primary databases.
Install the Oracle Grid Infrastructure Standalone Agent
14 Technical Brief Oracle Maximum Availability Architecture (MAA) GoldenGate Hub
Copyright © 2020, Oracle and/or its affiliates | Public DocumentDownload the latest XAG software from http://www.oracle.com/technetwork/database/database-
technologies/clusterware/downloads/xag-agents-downloads-3636484.html
When using GoldenGate Microservices Architecture, it is a requirement to use XAG version 10.2 or newer.
The XAG software must be installed in a directory that is outside of the Oracle Grid Infrastructure home directory to avoid conflicts
with software patching. XAG needs to be installed in the same directory path on all RAC nodes in the cluster where GoldenGate is
installed.
For example, as the oracle user:
$ ./xagsetup.sh --install --directory /u01/oracle/xag --all_nodes
Add the location of the installed XAG software to the PATH variable so it gets set automatically for the oracle user.
$ cat .bashrc
export PATH=/u01/oracle/xag/bin:$PATH
NOTE: It is important to make sure the XAG directory is specified BEFORE the Grid Infrastructure directory for the PATH variable to
ensure the correct agctl binary is found.
Step 5 - Install NGINX Reverse Proxy Server
The GoldenGate reverse proxy feature allows a single point of contact for all of the GoldenGate microservices associated with a
GoldenGate deployment. Without reverse proxy, the GoldenGate deployment microservices are contacted using a URL consisting of a
host name or IP address and separate port numbers, one for each of the services. For example, to contact the Service Manager you
could use http://gghub.example.com:9100, then the Administration Server is http://gghub.example.com:9101, the
administration server of deployment #2 may be https://gghub.example.com:9111, and so on.
With reverse proxy, port numbers are not required to connect to the microservices, because they are replaced with the deployment
name. Using the previous example, to connect to the Service Manager use the URL https://gghub.example.com, the Admin
Server of deployment #1 (named Source) would use https://gghub.example.com/SOURCE/adminsrvr, and the administration
server of deployment #2 (named Target) would be https://gghub.example.com/Target/adminsrvr.
Reverse proxy is recommended to ensure easy access to microservices and provide enhanced security and manageability.
The GoldenGate reverse proxy feature uses NGINX reverse proxy. The following instructions describe how to configure the reverse
proxy.
1. Check that NGINX is not already installed (as root).
$ sudo rpm -qa |grep nginx
If not installed, nothing is returned.
If NGINX is installed, the output is similar to the following.
nginx-mod-http-xslt-filter-1.12.2-2.el7.x86_64
nginx-mod-http-image-filter-1.12.2-2.el7.x86_64
nginx-filesystem-1.12.2-2.el7.noarch
nginx-mod-mail-1.12.2-2.el7.x86_64
nginx-mod-http-perl-1.12.2-2.el7.x86_64
nginx-1.12.2-2.el7.x86_64
nginx-all-modules-1.12.2-2.el7.noarch
nginx-mod-http-geoip-1.12.2-2.el7.x86_64
nginx-mod-stream-1.12.2-2.el7.x86_64
15 Technical Brief Oracle Maximum Availability Architecture (MAA) GoldenGate Hub
Copyright © 2020, Oracle and/or its affiliates | Public Document2. If NGINX is not already installed, install it. The following instructions assume the YUM (Yellowdog Updated Modified) is installed
and configured for easier package installation.
$ sudo yum install epel-release
$ sudo yum update
$ sudo yum install nginx
3. Start NGINX.
$ sudo systemctl start nginx
4. Verify that NGINX is running.
$ curl -I 127.0.0.1
HTTP/1.1 200 OK
Server: nginx/1.12.2
Date: Wed, 4 Apr 2019 21:48:43 GMT
Content-Type: text/html
Content-Length: 3700
Last-Modified: Wed, 4 Apr 2019 05:06:50 GMT
Connection: keep-alive
ETag: "5abdc5ea-e74"
Accept-Ranges: bytes
5. Enable NGINX to auto-start when the machine starts
To enable auto-starting of NGINX, run the following command as the root user:
# systemctl enable nginx
Complete documentation for NGINX installation can be found at https://docs.nginx.com/nginx/admin-guide/installing-nginx/installing-
nginx-open-source/.
Step 6 - Create Application Virtual IP Address
A dedicated application virtual IP address (VIP) is required on each hub cluster to ensure that the primary ACFS replication process
sends file system data to the correct hub standby node where the file system is currently mounted. This is accomplished by co-locating
the VIP and the ACFS CRS resources on the same node. The VIP is a cluster resource that Oracle Clusterware manages, and is
migrated to another cluster node in the event of a node failure.
There are two pieces of information needed before creating the application VIP:
The network number, which can be identified using the following command.
$ crsctl status resource -p -attr NAME,USR_ORA_SUBNET -w "TYPE = ora.network.type" |sort | uniq
NAME=ora.net1.network
USR_ORA_SUBNET=10.231.41.0
The net1 in NAME=ora.net1.network indicates this is network 1.
The IP address for the new Application VIP, provided by your system administrator. This IP address must be in the same subnet of
the cluster environment as determined above.
16 Technical Brief Oracle Maximum Availability Architecture (MAA) GoldenGate Hub
Copyright © 2020, Oracle and/or its affiliates | Public DocumentCreate the VIP CRS resource (as root), using the following example command.
# appvipcfg create -network=1 -ip=12.123.12.123 -vipname=gg_vip_prmy -user=oracle
Refer to the Oracle Clusterware Administration and Deployment Guide for further information on creating an Application VIP.
https://docs.oracle.com/en/database/oracle/oracle-database/19/cwadd/making-applications-highly-available-using-oracle-
clusterware.html#GUID-AFA2B0A1-479F-4DAB-A9D0-226C30260DD8
After the VIP is created, configure the ssh daemon to listen for incoming connections on the VIP address on the ACFS primary and
standby clusters by adding the VIP address to the /etc/ssh/sshd_config file and restarting the ssh daemon, as shown here.
Add the following to the /etc/ssh/sshd_config file:
ListenAddress
Restart the ssh daemon:
# /bin/systemctl restart sshd
Step 7 - Configure ACFS File System Replication
Configuring ACFS file system replication consjsts of the following substeps:
Create the file system on the primary and standby servers
Create the CRS dependency between ACFS and an application VIP
Create SSH daemon CRS resource
Enable ACFS replication
Create ACFS replication CRS action scripts
Test ACFS switchovers and failovers
A. Create the File System on the Primary and Standby Servers
A file system of the same size must be created on both the primary and standby clusters. The file systems should be sized to permit
storage of up to 12 hours of trail files to provide sufficient space for trail file generation should a problem occur with the target
environment that prevents it from receiving new trail files. The amount of space needed for 12 hours can only be determined by testing
trail file generation rates with real production data.
1. Create the same mount point on all the primary and standby RAC nodes where ACFS can be mounted.
Example (as root):
# mkdir /mnt/acfs_rep1
# chown -R oracle:dba /mnt/acfs_rep1
2. Using ASMCMD, create the file system volume (as oracle):
ASMCMD [+] > volcreate -G datac1 -s 1200G ACFS_REP1
ASMCMD [+] > volinfo --all
Diskgroup Name: DATAC1
Volume Name: ACFS_REP1
Volume Device: /dev/asm/acfs_rep1-89
State: ENABLED
Size (MB): 1228800
Resize Unit (MB): 64
17 Technical Brief Oracle Maximum Availability Architecture (MAA) GoldenGate Hub
Copyright © 2020, Oracle and/or its affiliates | Public DocumentRedundancy: MIRROR
Stripe Columns: 8
Stripe Width (K): 1024
3. Create the file system (as oracle):
$ /sbin/mkfs -t acfs /dev/asm/acfs_rep1-89
4. Register the file system with Oracle Grid Infrastructure (as root):
# srvctl add filesystem -device /dev/asm/acfs_rep1-89 -volume ACFS_REP1 -diskgroup DATAC1 -path
/mnt/acfs_rep1 -user oracle -node , -autostart NEVER
-mountowner oracle -mountgroup oinstall -mountperm 755
5. Test mounting and relocating the ACFS mount between RAC nodes (as oracle):
$ srvctl start filesystem -d /dev/asm/acfs_rep1-89
$ srvctl status filesystem -d /dev/asm/acfs_rep1-89
$ srvctl relocate filesystem -diskgroup DATAC1 -volume acfs_rep1
$ srvctl status filesystem -d /dev/asm/acfs_rep1-89
B. Create CRS Dependencies Between ACFS and an Application VIP
To ensure that the file system is mounted on the same Oracle RAC node as the VIP, add the VIP CRS resource as a dependency to
the ACFS resource, using the following example commands.
NOTE: Make sure the following commands are run on both the primary and standby hub clusters.
1. Stop the VIP resource (as oracle).
$ crsctl status resource gg_vip_prmy
2. Determine the current start and stop dependencies of the VIP resource (as oracle).
$ crsctl stat res gg_vip_prmy -f|grep _DEPENDENCIES
START_DEPENDENCIES=hard(ora.net1.network) pullup(ora.net1.network)
STOP_DEPENDENCIES=hard(intermediate:ora.net1.network)
3. Modify the start and stop dependencies of the VIP resource (as root).
# crsctl modify res gg_vip_prmy -attr
"START_DEPENDENCIES='hard(ora.net1.network,ora.datac1.acfs_rep1.acfs) pullup(ora.net1.network)
pullup:always(ora.datac1.acfs_rep1.acfs)'"
# crsctl modify res gg_vip_prmy -attr
"STOP_DEPENDENCIES='hard(intermediate:ora.net1.network,ora.datac1.acfs_rep1.acfs)'"
NOTE: Substitute acfs_rep1 for the correct ACFS volume name.
4. Restart the VIP (as oracle).
$ crsctl start resource gg_vip_prmy
CRS-2672: Attempting to start 'ora.datac1.acfs_rep1.acfs' on 'node1'
CRS-2676: Start of 'ora.datac1.acfs_rep1.acfs' on 'node1' succeeded
CRS-2672: Attempting to start 'gg_vip_prmy' on 'node1'
CRS-2676: Start of 'gg_vip_prmy' on 'node1' succeeded
18 Technical Brief Oracle Maximum Availability Architecture (MAA) GoldenGate Hub
Copyright © 2020, Oracle and/or its affiliates | Public Document$ crsctl status resource gg_vip_prmy
NAME=gg_vip_prmy
TYPE=app.appviptypex2.type
TARGET=ONLINE
STATE=ONLINE on node1
5. Test relocation of the VIP and ACFS mount.
$ crsctl relocate resource gg_vip_prmy -f
Or
$ srvctl relocate filesystem -diskgroup DATAC1 -volume acfs_rep1 –force
$ crsctl status resource gg_vip_prmy
NAME=gg_vip_prmy
TYPE=app.appviptypex2.type
TARGET=ONLINE
STATE=ONLINE on node2
$ srvctl status filesystem –diskgroup DATAC1 –volume acfs_rep1
ACFS file system /mnt/acfs_rep1 is mounted on nodes node2
C. Create SSH Daemon CRS Resource
ACFS replication uses secure shell (ssh) to communicate between the primary and standby file systems using the virtual IP addresses
that were previously created. When a server is rebooted, the ssh daemon is started before the VIP CRS resource, preventing access to
the cluster using VIP. The following instructions create an ssh restart CRS resource that will restart the ssh daemon after the virtual IP
resource is started.
1. Use the example CRS action script in Appendix B to restart the ssh damon. Place the script in the same location on all primary and
standby ACFS file system nodes.
2. As the root user, create the CRS resource using the following example command.
crsctl add resource sshd_restart \
-type cluster_resource \
-attr "ACL='owner:root:rwx,pgrp:root:rwx,other::r--,group:oinstall:r-x,user:oracle:rwx',
ACTION_SCRIPT=/u01/oracle/scripts/sshd_restart.scr,CHECK_INTERVAL=0,AUTO_START='always',
START_DEPENDENCIES='hard(gg_vip_prmy) pullup:always(gg_vip_prmy)
attraction(gg_vip_prmy)',STOP_DEPENDENCIES='hard(gg_vip_prmy)'"
3. Replace the gg_vip_prmy VIP name with the VIP name created in Step 6 - Create Application Virtual IP Address.
4. Test the CRS resource on the current primary and standby ACFS nodes using the following commands.
$ crsctl stat res sshd_restart
NAME=sshd_restart
TYPE=cluster_resource
TARGET=OFFLINE
STATE=OFFLINE
$ crsctl start res sshd_restart
CRS-2672: Attempting to start 'sshd_restart' on 'node1'
CRS-2676: Start of 'sshd_restart' on 'node1' succeeded
$ ls –lrt /tmp/sshd_restarted
19 Technical Brief Oracle Maximum Availability Architecture (MAA) GoldenGate Hub
Copyright © 2020, Oracle and/or its affiliates | Public Document-rw-r--r-- 1 root root 0 Jun 29 12:33 /tmp/sshd_restarted
$ crsctl stop res sshd_restart
CRS-2673: Attempting to stop 'sshd_restart' on 'node1'
CRS-2677: Stop of 'sshd_restart' on 'node1' succeeded
$ ls –lrt /tmp/sshd_restarted
ls: cannot access /tmp/sshd_restarted: No such file or directory
D. Enable ACFS Replication
Complete the following three steps to enable ACFS Replication.
1. Configure SSH Connectivity Between the Primary and Standby Hosts
ACFS snapshot-based replication uses ssh to transfer the snapshots from between the primary and standby hosts. The replication
process uses the root user on the primary node to connect to a minimally-privileged user on the standby node.
To configure the ssh connectivity between the primary and standby nodes follow the instructions provided in the Storage Administrators
Guide at
https://docs.oracle.com/en/database/oracle/oracle-database/20/acfsg/configure-acfs-replication.html#GUID-C1CB3914-E278-473A-
ACCC-FD1BA7CDC0B4
Be sure to complete the configuration between all primary and standby Oracle RAC nodes. Connectivity in the opposite direction should
also be configured ready for ACFS replication role reversal.
Once ssh configuration is completed, test connectivity between all primary to standby nodes, and in the reverse direction using both
ssh as the root user, and with the acfsutil command.
Example (as root):
# ssh oracle@snode1 uname –a
Linux snode1.example.com 4.1.12-124.26.12.el7uek.x86_64 #2 SMP Wed May 8 22:25:03 PDT 2019 x86_64
x86_64 x86_64 GNU/Linux
# ssh oracle@snode1.example.com uname –a
# ssh oracle@snode2 uname –a
# ssh oracle@snode2.example.com uname –a
# ssh oracle@clust2-vip1 uname –n
# ssh oracle@clust2-vip1.example.com uname –n
## Repeat the above ssh tests as oracle user that must also succeed.
# acfsutil repl info -c -u oracle snode1 snode2 clust2-vip1 /mnt/acfs_rep1
A valid 'ssh' connection was detected for standby node snode1 as user oracle.
A valid 'ssh' connection was detected for standby node snode2 as user oracle.
A valid 'ssh' connection was detected for standby node clust2-vip1 as user oracle.
NOTE: Make sure the connectivity is verified between all primary file system nodes to all standby nodes, as well as in the opposite
direction. Only continue when there are no errors with any of the connection tests.
2. Initialize Replication on the Standby and Primary File Systems
On the standby node where ACFS is currently mounted (as oracle):
$ /sbin/acfsutil repl init standby -u oracle /mnt/acfs_rep1
20 Technical Brief Oracle Maximum Availability Architecture (MAA) GoldenGate Hub
Copyright © 2020, Oracle and/or its affiliates | Public DocumentOn primary node where ACFS is currently mounted (as oracle):
$ /sbin/acfsutil repl init primary -C -p oracle@clust1-vip1 -s oracle@clust2-vip1 -m /mnt/acfs_rep1
/mnt/acfs_rep1
During the standby file system initialization, the primary file system contents are copied to the standby node. During this time, you can
monitor the initialization progress using the following command:
$ /sbin/acfsutil repl info -c -v /mnt/acfs_rep1 | grep Status
Status: Sending initial copy
When the status changes to ‘Send Completed’ it means the initial primary file system copy has finished and the primary file system is
now being replicated to the standby host.
Refer to the Oracle Storage Administrators Guide for more information about using acfsutil to initialize replication on the standby and
primary file systems.
https://docs.oracle.com/en/database/oracle/oracle-database/19/ostmg/acfs-commands-replication.html#GUID-E96CD9A2-00BD-4673-
8FCC-DBB28A9E2DCD
3. Verify and Monitor the Replicated File System
The status of ACFS Replication on both the primary and standby file systems can be obtained by running the following commands.
On the primary host:
$ acfsutil repl util verifystandby /mnt/acfs_rep1
verifystandby return code: 0
On the standby host:
$ acfsutil repl util verifyprimary /mnt/acfs_rep1
verifyprimary return code: 0
Both commands will return a value of 0 (zero) if there are no problems detected. If a non-zero value is returned, refer to Appendix A –
Troubleshooting Oracle ACFS Replication for monitoring, diagnosing, and resolving common issues with ACFS Replication before
continuing.
To monitor the current status of ACFS Replication, use the following example command on both the primary and standby hubs.
$ /sbin/acfsutil repl info -c -v /mnt/acfs_rep1
Site: Primary
Primary hostname: clust17-vip1
Primary path: /mnt/acfs_rep1
Primary status: Running
Background Resources: Active
Standby connect string: oracle@clust2-vip1
Standby path: /mnt/acfs_rep1
Replication interval: 0 days, 0 hours, 0 minutes, 0 seconds
Sending primary as of: Tue Aug 04 12:24:03 2020
Status: Sending incremental differences
Retries made: 0
Last send started at: Tue Aug 04 12:24:03 2020
Last send completed at: In progress
Next send starts at: Tue Aug 04 12:24:03 2020
Replicated tags:
21 Technical Brief Oracle Maximum Availability Architecture (MAA) GoldenGate Hub
Copyright © 2020, Oracle and/or its affiliates | Public DocumentData transfer compression: Off
ssh strict host key checking: On
Debug log level: 3
Replication ID: 0xadc39f3b
E. Create ACFS Replication CRS Action Scripts
To determine the health of the ACFS primary and standby file systems, CRS action scripts are used. At predefined intervals the action
action scripts report the health of the file systems into the CRS trace file crsd_scriptagent_oracle.trc, located in the Grid
Infrastructure trace file directory /u01/app/grid/diag/crs//crs/trace on each of the primary and standby file
system cluster nodes.
On both the primary and standby file system clusters there are two scripts required, one to monitor the local primary file system and
verify the remote standby file systems is available, and one to monitor the local standby file system and check remote primary file
systems’ availability. Example scripts are provided in Appendix B and Appendix C to implement the ACFS monitoring, but you must edit
them to suit your environment.
Below are descriptions of the two example CRS action scripts.
acfs_primary
The acfs_primary resource checks whether the current ACFS mount is a primary file system, and confirms that the standby file system
is accessible and receiving replicated data. The resource is used to automatically determine if GoldenGate can start processes on the
primary GoldenGate hub. If the standby file system is not accessible by the primary, the example script in Appendix B makes multiple
attempts to verify the standby file system, printing the following warning messages in the crsd_scriptagent_oracle.trc trace file:
2020-11-16 15:15:01.506:[acfs_primary]{1:40360:26097} [check] WARNING: STANDBY not accessible
(attempt 1 of 3))
2020-11-16 15:15:14.535:[acfs_primary]{1:40360:26097} [check] WARNING: STANDBY not accessible
(attempt 2 of 3))
2020-11-16 15:15:27.611:[acfs_primary]{1:40360:26097} [check] WARNING: STANDBY not accessible
(attempt 3 of 3))
2020-11-16 15:15:27.611:[acfs_primary]{1:40360:26097} [check] WARNING: Problem with STANDBY file
system (error: 222)
When the primary and standby file systems are online and available, the following messages are ouput into the trace file:
2020-11-04 21:35:48.588:[acfs_primary]{1:20735:25070} [check] SUCCESS: Remote STANDBY file system
/mnt/acfs_rep1 is ONLINE
2020-11-04 21:35:48.588:[acfs_primary]{1:20735:25070} [check] SUCCESS: PRIMARY file system
/mnt/acfs_rep1 is ONLINE
The acfs_primary resource runs on both the primary and standby hosts, but only returns success when the current file system is the
primary file system and the standby file system is accessible. The script must be placed in the same location on all primary and standby
file system nodes.
The following parameters use suggested default settings, which should be tested before changing their values.
MOUNT_POINT=/mnt/acfs_rep1 # The replicated ACFS mount point
ATTEMPTS=3 # Number of attempts to check the remote standby file system
INTERVAL=10 # Number of seconds between each attempt
22 Technical Brief Oracle Maximum Availability Architecture (MAA) GoldenGate Hub
Copyright © 2020, Oracle and/or its affiliates | Public DocumentUse the following command on one node of both the primary and standby clusters to register the ACFS action scripts for monitoring the
primary and standby file systems:
$ crsctl add resource acfs_primary -type cluster_resource \
-attr "ACTION_SCRIPT=/u01/oracle/scripts/acfs_primary.scr,CHECK_INTERVAL=60,
START_DEPENDENCIES='hard(ora.datac1.acfs_rep1.acfs) pullup:always(ora.datac1.acfs_rep1.acfs)',
STOP_DEPENDENCIES='hard(ora.datac1.acfs_rep1.acfs)',SCRIPT_TIMEOUT=80,OFFLINE_CHECK_INTERVAL=0,
RESTART_ATTEMPTS=0"
Start and check the status of the resources on both the primary and standby clusters:
$ crsctl start res acfs_primary
$ crsctl stat res acfs_primary
Refer to Appendix B for an example acfs_primary.scr action script.
acfs_standby
The acfs_standby resource checks that the local file system is a standby file system, and verifies the remote primary file system status.
If the primary file system fails verification multiple times (controlled by the action script variables), a warning is output to the CRS trace
file crsd_scriptagent_oracle.trc located in the Grid Infrastructure trace file directory
/u01/app/grid/diag/crs//crs/trace.
This resource runs on both the primary and standby hosts, but only returns success when the current file system is the standby file
system and the primary file system is accessible.
When the standby and remote primary file systems are online, the following is output to the CRS trace file:
2020-11-04 21:39:46.752:[acfs_standby]{1:21041:20211} [check] SUCCESS: STANDBY file system
/mnt/acfs_rep1 is ONLINE
2020-11-04 21:39:47.453:[acfs_standby]{1:21041:20211} [check] SUCCESS: Remote PRIMARY file system
/mnt/acfs_rep1 is ONLINE
When a problem is detected with the primary file system, the following messages are output to the trace file:
2020-11-04 21:50:55.967:[acfs_standby]{1:21041:20211} [check] WARNING: Remote PRIMARY file system
problem detected (attempt 1 of 3)
2020-11-04 21:51:08.989:[acfs_standby]{1:21041:20211} [check] WARNING: Remote PRIMARY file system
problem detected (attempt 2 of 3)
2020-11-04 21:51:22.061:[acfs_standby]{1:21041:20211} [check] WARNING: Remote PRIMARY file system
problem detected (attempt 3 of 3)
2020-11-04 21:51:22.061: [acfs_standby]{1:21041:20211} [check] WARNING: Problem with remote PRIMARY
file system (error: 222)
The following parameters use suggested default settings, which should be tested before changing their values.
MOUNT_POINT=/mnt/acfs_rep1 # This is the replicated ACFS mount point
ATTEMPTS=8 # Number of tries to check the remote primary file system
INTERVAL=10 # Number of seconds between each attempt
23 Technical Brief Oracle Maximum Availability Architecture (MAA) GoldenGate Hub
Copyright © 2020, Oracle and/or its affiliates | Public DocumentUse the following command on one node of both the primary and standby clusters to register the ACFS action scripts for monitoring the
standby file system:
$ crsctl add resource acfs_standby \
-type cluster_resource \
-attr "ACTION_SCRIPT=/u01/oracle/scripts/acfs_standby.scr,CHECK_INTERVAL=150,
CHECK_TIMEOUT=140,START_DEPENDENCIES='hard(ora.datac1.acfs_rep1.acfs,gg_vip_prmy)
pullup:always(ora.datac1.acfs_rep1.acfs,gg_vip_prmy)',OFFLINE_CHECK_INTERVAL=300,RESTART_ATTEMPTS=0
,INSTANCE_FAILOVER=0"
Start and check the status of the resources on both the primary and standby clusters:
$ crsctl start res acfs_standby
$ crsctl stat res acfs_standby
Refer to Appendix C for an example acfs_standby.scr action script.
NOTE: The status of the acfs_primary resources will only be ONLINE if the ACFS file system is the primary file system. When
starting the resourcs on a node which is not currently on the primary cluster an error will be reported because the resource fails due to
being the standby file system. This error can be ignored. The resource will be in OFFLINE status on the ACFS standby cluster. The
same is true for the acfs_standby resource when started on the primary file system cluster.
Refer to Managing Planned and Unplanned Outages for The Goldengate Hub for example use cases based on the CRS trace file
messages.
F. Test ACFS RAC Node Relocations
It is very important to test planned and unplanned ACFS RAC node relocations and server role transitions before configuring
GoldenGate.
To relocate ACFS between primary Oracle RAC nodes:
$ srvctl relocate filesystem -diskgroup DATAC1 -volume acfs_rep1 –force
After node relocation, verify that the file system is mounted on another node, along with the VIP, NGINX, sshd_restart, and the two
ACFS resources, acfs_primary and acfs_standby, using the following example commands.
$ srvctl status filesystem -diskgroup DATAC1 -volume acfs_rep1 #Use your diskgroup and volume names
$ crsctl stat res gg_vip_prmy # Substitute with your VIP name
$ crsctl stat res sshd_restart
$ crsctl stat res acfs_primary
$ crsctl stat res acfs_standby
To issue an ACFS switchover (role reversal) between the primary and standby clusters, run the following example command on the
current standby node:
# Determine which node is the standby file system node
$ crsctl stat res gg_vip_prmy # Substitute with your VIP name
$ acfsutil repl failover /mnt/acfs_rep1 # Substitute your ACFS mount point
The failover command will do a graceful zero data loss ACFS role reversal if the primary file system is currently available. If the primary
file system is not available, an ACFS failover is carried out which may result in file system data loss. This will not be a problem for
GoldenGate due to the recovery mechanisms built into the product.
24 Technical Brief Oracle Maximum Availability Architecture (MAA) GoldenGate Hub
Copyright © 2020, Oracle and/or its affiliates | Public DocumentG. ACFS Trace File Management
The ACFS Replication feature can create a large number of trace files located in the CRS trace file directory, which is by default
/u01/app/grid/diag/crs//crs/trace. It is recommended that you create a crontab task that removes the trace
files at regular intervals. Because some of the trace files are generated by the the root user, the crontab task must be run by the root
user.
For example, to remove the ACFS generated trace files that are older than 8 hours, you would run the following example crontab
entries every 12 hours:
0 0,12 * * * /usr/bin/find /u01/app/grid/diag/crs//crs/trace -maxdepth 1 -name
'sdcreate*' -mmin +480 -delete
0 0,12 * * * /usr/bin/find /u01/app/grid/diag/crs//crs/trace -maxdepth 1 -name
'sdapply*' -mmin +480 -delete
0 0,12 * * * /usr/bin/find /u01/app/grid/diag/crs//crs/trace -maxdepth 1 -name
'acfsutil*' -mmin +480 -delete
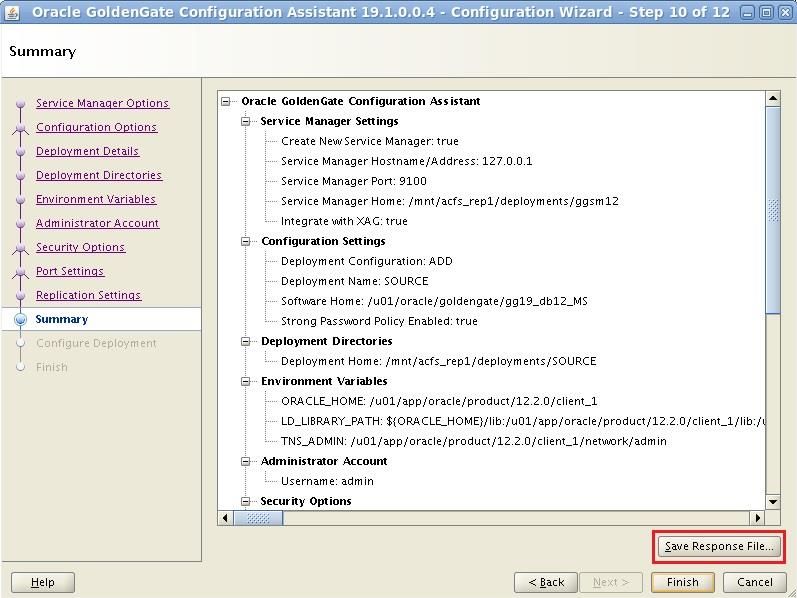
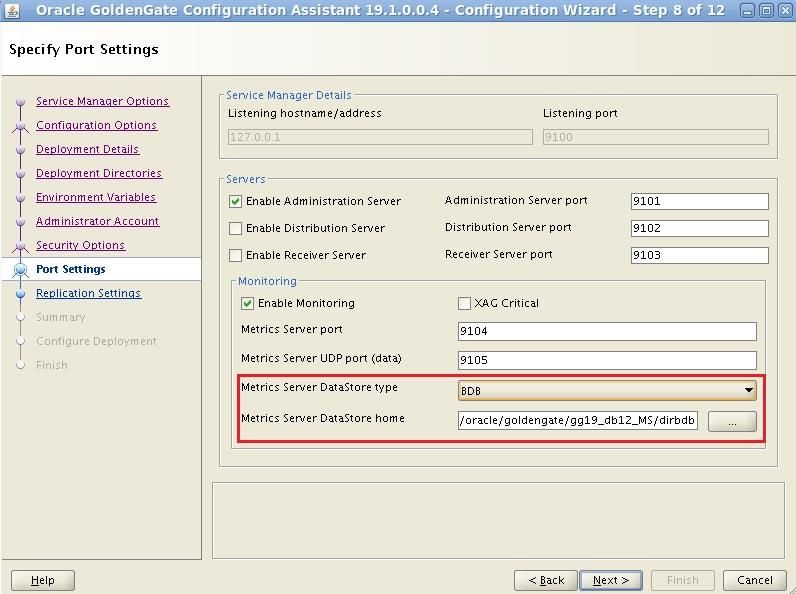
Step 8 - Configure Initial GoldenGate Microservices Deployment
A separate GoldenGate deployment is required for each database release that is being operated against, similar to the Oracle client
software and GoldenGate software installations. If both the source and target databases are the same release, only a single
deployment is required.
Each deployment is created with an Administration Server and (optionally) Performance Metrics Server. If the GoldenGate trail files
don’t need to be transferred to another hub or GoldenGate environment, there is no need to create a Distribution or Receiver Server
due to the fact that the trail files are stored on the same server as the Replicat process.
A GoldenGate Service Manager is created by the first deployment creation. Subsequent deployments are created using the existing
Service Manager if they are connecting to the same using the GoldenGate home directory.
There are two ways to create a GoldenGate deployment:
1. Using the GoldenGate Configuration Assistant (oggca.sh), a graphical tool for deployment creation
2. Using a response file in silent mode, containing all of the deployment creation parameter values
Both methods of deployment produce the same result, but when creating multiple deployments it is easier to use option #2 with a
response file. Appendix E contains an example response file with parameter changes needed for creating two deployments, one of
which is for the different source and target database releases, using GoldenGate 19c. There are no default response files contained in
the GoldenGate software installation, so the initial deployment must be created using oggca.sh, or the examples provided in Appendix
E.
For both deployment creation methods, use the following recommendations.
Service Manager Options
o Place the Service Manager deployment home on the ACFS mount point created above in Step 7. This is controlled
by the response file parameter SERVICEMANAGER_DEPLOYMENT_HOME.
o Select to ‘Integrate with XAG’. This is controlled by the response file parameter
INTEGRATE_SERVICEMANAGER_WITH_XAG.
o Set the listenering hostname/address to ‘localhost’ or to ‘::1’ for IPv6 configurations. This is controlled by response
file parameter HOST_SERVICEMANAGER. The localhost listening address must be used so that the Service Manager
will start on both the primary and standby GoldenGate hub clusters.
25 Technical Brief Oracle Maximum Availability Architecture (MAA) GoldenGate Hub
Copyright © 2020, Oracle and/or its affiliates | Public DocumentYou can also read