Ruby and Python Programming Topics for Mac - (Retired Document)
←
→
Page content transcription
If your browser does not render page correctly, please read the page content below
Ruby and Python
Programming Topics for
Mac
(Retired Document)
Contents

Introduction to Ruby and Python Programming Topics for OS X 5
Organization of This Document 5

Ruby and Python on OS X 6
What Are Ruby and Python? 6
    The Standard Ruby Package 7
    The Standard Python Package 7
    On-line Resources 8
Bridges for Cocoa Development 8
    RubyCocoa 8
    PyObjC 11
    The Advantages of PyObjC and RubyCocoa 13
Bridges for OSA Automation 14
    Scripting Bridge 14
    RubyOSA 15
    py-appscript 15
Multithreading With Ruby on OS X 16

Building a RubyCocoa Application: A Tutorial 17
Creating and Configuring a RubyCocoa Project 18
    Anatomy of a RubyCocoa Project 19
Defining Classes, Targets, and Actions 21
Creating the User Interface 24
Connecting the Outlet and Actions 28
Implementing the Custom Window Controller 30
Implementing a Custom Ruby Class 33

Using RubyOSA 34
Installing RubyOSA 34
The Basics 34
The OSA Class 37
Conversions and Conventions 40
Some Examples 40
Documenting Application Dictionaries 43

                      Retired Document | 2013-09-18 | Copyright © 2013 Apple Inc. All Rights Reserved.

                                                             2
Using Scripting Bridge in PyObjC and RubyCocoa Code 44
The Basics 45
The Scripting Bridge Classes 48
Getting Information About an Application’s Scripting Definition 49
Improving the Performance of Scripting Bridge Code 50
Some Examples 51

Generating Framework Metadata 54
The Location and Structure of Framework Metadata Files 54
Using the gen_bridge_metadata Tool 58
Creating the Exceptions File 59
Creating Your Own Bridge 60

Document Revision History 61

                       Retired Document | 2013-09-18 | Copyright © 2013 Apple Inc. All Rights Reserved.

                                                              3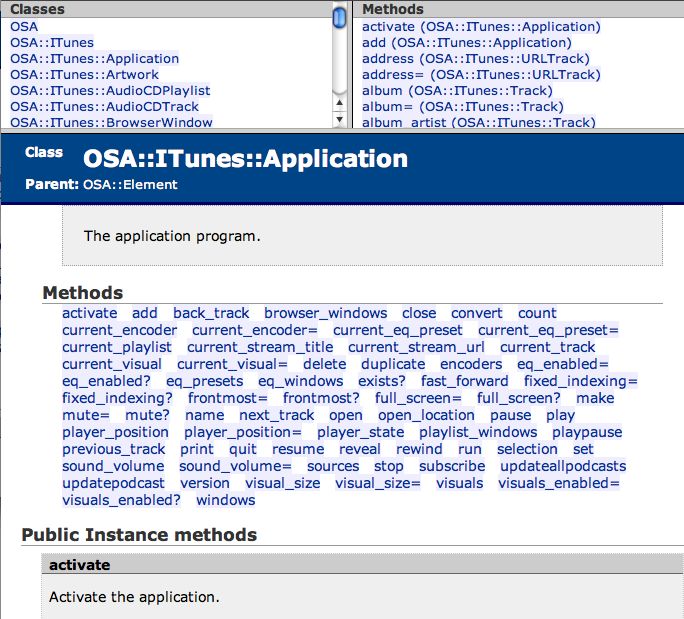
Figures, Tables, and Listings

Building a RubyCocoa Application: A Tutorial 17
Figure 1    The RSS Photo Viewer application 17
Figure 2    The initial project window for the RSS Photo Viewer project 19
Listing 1   The rb_main.rb script 19
Listing 2   The main.m file in a RubyCocoa project 20
Listing 3   Defining the outlet and actions of the RSSWindowController class 21
Listing 4   Implementing the action methods 31
Listing 5   Implementing the data-source and delegate methods 32
Listing 6   Implementation of the RSSPhoto class 33

Using RubyOSA 34
Figure 1    A page from the rdoc-osa documentation for iTunes 37
Table 1     Methods of the OSA class 38
Listing 1   The iTunes_inspect.rb script 35
Listing 2   The Finder_show_desktop.rb script 40
Listing 3   The iTunes_artwork.rb script 41
Listing 4   The get_selected_mail.rb script 41
Listing 5   The iChat_uptime.rb script 42

Using Scripting Bridge in PyObjC and RubyCocoa Code 44
Listing 1   The iTunes_inspect.rb script 45
Listing 2   Adding an object to a scriptable application in PyObjC code 48
Listing 3   The Finder_show_desktop.rb script 51
Listing 4   The get_selected_mail.rb script 52
Listing 5   The iChat_uptime.rb script 53

Generating Framework Metadata 54
Listing 1   Part of the constants section, AppKit.bridgesupport 55
Listing 2   Part of the enum section, AppKit.bridgesupport 55
Listing 3   Part of the function section, AppKit.bridgesupport 56
Listing 4   Part of the class and methods section, AppKit.bridgesupport 57
Listing 5   Part of the informal protocol section, AppKit.bridgesupport 58

                     Retired Document | 2013-09-18 | Copyright © 2013 Apple Inc. All Rights Reserved.

                                                            4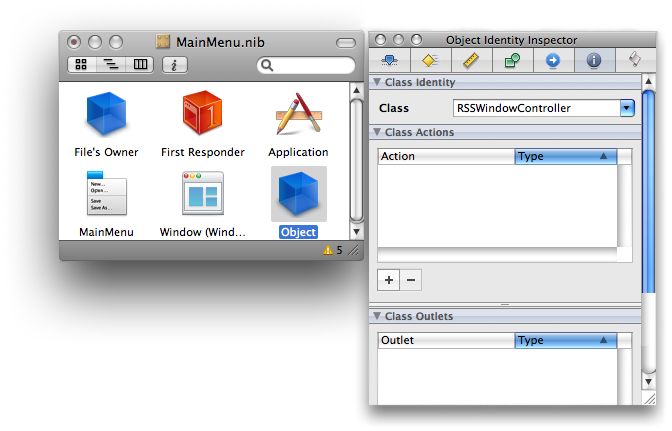
Introduction to Ruby and Python Programming
Topics for OS X

Important The current version of Ruby (2.0) is not supported as a Cocoa scripting language in OS X v10.9. The remainder
of the content in this document has not been reviewed for accuracy. Apple recommends Objective-C for the development
of Cocoa apps.

Ruby and Python are two popular scripting languages that, with OS X version 10.5, are becoming even more
significant alternatives for software development on OS X, especially with additional support for bridges
between the scripting languages and Cocoa and Open Scripting Architecture (OSA),

This collection of articles describes the Ruby and Python resources of OS X, and shows how to use some of
those programming resources. This document is intended for Python and Ruby developers who are new to
OS X as well as for experienced Cocoa and Carbon developers who are relatively new to the scripting languages.

Organization of This Document
These programming topics consist of the following articles:
 ●   Ruby and Python on OS X (page 6) gives an overview of the Ruby and Python resources on OS X, including
     the Cocoa and OSA bridges, and provides links to websites related to these scripting languages.
 ●   Building a RubyCocoa Application: A Tutorial (page 17) steps you through the creation of a simple
     RubyCocoa application.
 ●   Using Scripting Bridge in PyObjC and RubyCocoa Code (page 44) describes how to incorporate Scripting
     Bridge in your code to communicate with and control OSA-compliant applications.
 ●   Generating Framework Metadata (page 54) explains what framework metadata is and how to create these
     XML files used by the scripting bridges.

                         Retired Document | 2013-09-18 | Copyright © 2013 Apple Inc. All Rights Reserved.

                                                                5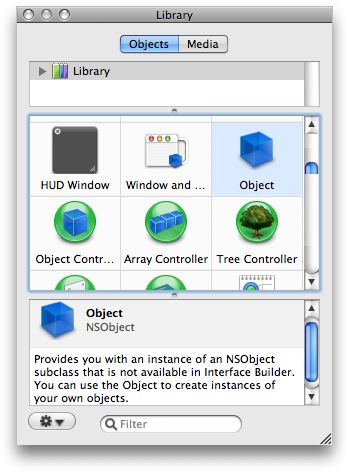
Ruby and Python on OS X

Ruby and Python, two immensely popular object-oriented scripting languages, have been installed as part of
OS X for many years now. But their relevance to software development, and especially application development,
assumes even greater importance in OS X v10.5. The following sections summarize the capabilities and
components of Ruby and Python and describe the bridges being developed and enhanced for OS X to support
Cocoa programming and AppleScript-command processing from those scripting languages.

What Are Ruby and Python?
Ruby and Python are interpreted object-oriented scripting languages. As interpreted languages, you can change
and run code immediately, without having to wait for the code to compile. Python and Ruby also have all the
features one would expect to find in dynamic object-oriented programming languages, such as inheritance,
encapsulation, introspection, and subclassing. The syntax of both languages is simple, compact, and consistent,
and supports both regular expressions and sophisticated string manipulations. Memory management is built
into both languages; garbage collectors automatically free memory occupied by unneeded objects. With both
Python and Ruby you can call operating system routines directly. They offer ways to extend their native
capabilities, including C-language interfaces.

Although their similarities are striking, these scripting languages do have some differences. While Python code
can contain both objects and built-in types, in Ruby everything is an object. There are no primitive or built-in
types, such as integers. Thus anything in Ruby code can accept messages. And you don’t have to declare
variables to be of specific object types. To distinguish variables as global, local, instance, and class, Ruby uses
naming conventions. Ruby also has mix-in by modules and blocks, language features absent in Python.

Beyond the similarities of languages and interpreters, Python and Ruby share other things in common. Both
have extensive standard libraries of classes and modules. Both scripting languages can be used in a wide variety
of software projects, including system programming (command-line utilities and daemons), user-interface
design, Internet and networking tasks, database programming, component integration, and, of course, rapid
prototyping. And both are the products of open-source projects supported by large and enthusiastic developer
communities.

                         Retired Document | 2013-09-18 | Copyright © 2013 Apple Inc. All Rights Reserved.

                                                                6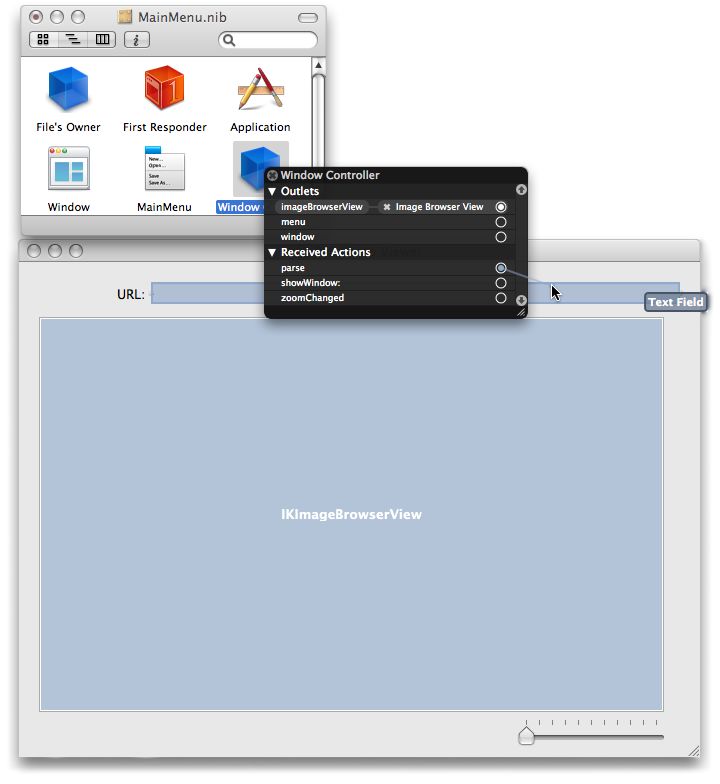
Ruby and Python on OS X
What Are Ruby and Python?

Both languages come with a basic set of command-line utilities. In addition to the interactive interpreter, irb,
Ruby includes ri and rdoc (for displaying and generating documentation, respectively), erb (for interpreting
files with embedded Ruby code), and testrb (for running test suites on Ruby code). In addition to the language
interpreter, python, Python includes pydoc for viewing documentation and pythonw for running Python
scripts that display a graphical user interface. All of these utilities are located in /usr/bin.

The Standard Ruby Package
On OS X Ruby includes more than the language interpreter and documentation and testing utilities. A standard
installation offers the following Ruby-related services, frameworks, and protocols:
 ●   RubyGems—A package manager for Ruby
 ●   rake—A make-like utility for Ruby scripts
 ●   Rails (or Ruby on Rails)—A framework for creating database-backed web applications with designs
     conforming to the Model-View-Controller pattern
     For more information on Ruby on Rails, go to http://developer.apple.com/tools/rubyonrails.html.
 ●   Mongrel—A fast HTTP library and server used for hosting Ruby web applications
 ●   Capistrano—A framework and utility for executing commands in parallel on multiple remote machines,
     via SSH, primarily to expedite the deployment of web applications
 ●   Ferret—A search engine
 ●   OpenID—A service that provides OpenID identification to Ruby programs
 ●   sqlite3-ruby—A module that enables Ruby scripts to interact with a SQLite3 database
 ●   libxml-ruby—A module for reading and writing XML documents using Ruby
 ●   dnssd—Ruby interface for DNS Service Discovery (that is, Bonjour)
 ●   net-ssh and net-sftp—Pure Ruby implementations of the SSH and SFTP client protocols

The Standard Python Package
The Python modules included in the standard package for OS X are the following:
 ●   altgraph — Python graph (network) package
 ●   bdist_mpkg — Builds OS X installer packages from distutils
 ●   macholib — Mach-O header analysis and editing
 ●   modulegraph — Python module dependency analysis tool
 ●   numpy (or NumPy) — Array processing for numbers, strings, records, and objects
 ●   py2app — Creates standalone Mac apps with Python

                            Retired Document | 2013-09-18 | Copyright © 2013 Apple Inc. All Rights Reserved.

                                                                   7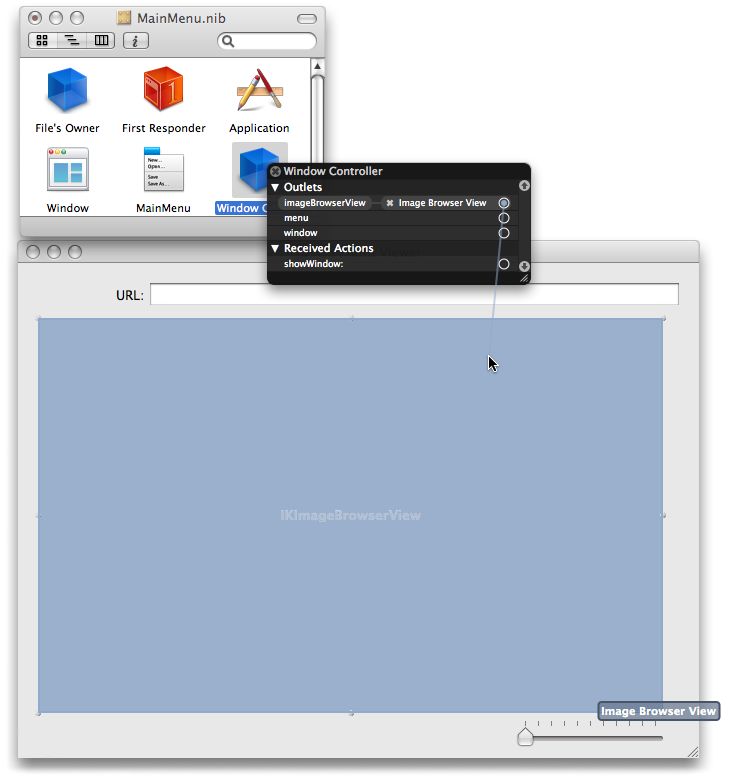
Ruby and Python on OS X
Bridges for Cocoa Development

 ●   setuptools — Downloads, builds, installs, upgrades, and uninstalls Python packages
 ●   xattr — A Python wrapper for Darwin’s extended filesystem attributes

Except for numpy and xattr, all of these modules are used by PyObjC.

On-line Resources
You can find out more about Python from the following websites:
 ●   Main Python website: http://www.python.org/
 ●   Documentation: http://docs.python.org/
 ●   Other developer resources: http://www.python.org/dev/

On-line resources for Ruby include the following websites:
 ●   Documentation, downloads, and other resources: http://www.ruby-lang.org/
 ●   Libraries: http://rubyforge.org/
 ●   why’s (poignant) guide to Ruby (http://poignantguide.net/ruby/), a whimsical, cartoon-illustrated introduction
     to Ruby

Bridges for Cocoa Development
Both Ruby and Python include bridges to the Objective-C runtime. Although these bridges are open-source
projects, some changes have been made to the implementation and tool support on OS X v10.5 and later
systems.

RubyCocoa
Because Ruby and Objective C share a common ancestor in Smalltalk, creating a bridge between them was
relatively straightforward. RubyCocoa is a bridge that makes it possible for Ruby scripts to access Objective-C
objects defined in frameworks and local project code. Consequently, one can do Cocoa programming in a
Ruby script. RubyCocoa works by creating—automatically and upon demand—Ruby proxy objects that are
bridged to Objective-C classes. It also forwards Ruby messages to the instances of these Objective-C classes.
You can have a Cocoa application project that mixes Ruby and Objective-C source files. RubyCocoa supports
all important features of Cocoa, such as key-value coding, key-value observing, Core Data, the document
architecture, notifications, and undo management.

                          Retired Document | 2013-09-18 | Copyright © 2013 Apple Inc. All Rights Reserved.

                                                                 8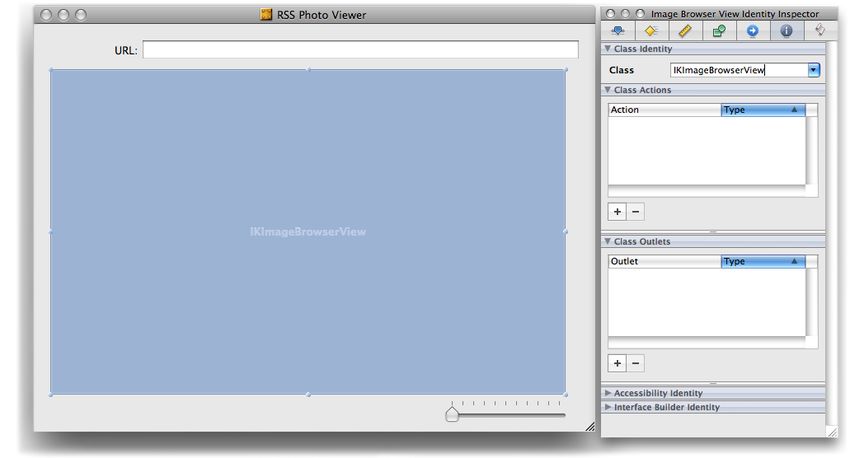
Ruby and Python on OS X
Bridges for Cocoa Development

    Note: For more information about RubyCocoa, go to rubycocoa.sourceforge.net. You can find
    RubyCocoa documentation and coding examples at http://rubycocoa.sourceforge.net/.

The following line of code creates a Ruby proxy class that wraps the Cocoa class NSButton:

  OSX::NSButton

A message sent to an instance of this class is forwarded to the Objective-C instance within the proxy object.
(If the object doesn’t respond to the message, then RubyCocoa raises a runtime error.) As illustration, consider
the following lines of Objective-C code:

  // the NSRect structure (rect) is specified earlier

  NSButton *button = [[NSButton alloc] initWithFrame:rect];

  [button setTarget:self];

  [button setAction:@selector(doGoodThings:)];

  [button setEnabled:YES];

  [view addSubview:button];

  [button release];

In RubyCocoa, the equivalent to these lines would be the following:

  button = NSButton.alloc.initWithFrame_(rect)

  button.setTarget_(self)

  button.setAction_(:doGoodThings)

  button.setEnabled_(true)

  view.addSubview_(button)

As you can see, RubyCocoa uses keypath-style dot notation is used to indicate (potentially nested) message
invocations, starting with the object or class initiating the invocations. Note that the release is omitted in
the RubyCocoa code snippet because the garbage collector takes care of object disposal.

The snippet of RubyCocoa code above uses the default messaging syntax, where underscores replace the
colons of the Objective-C keywords . But RubyCocoa supports a variant of the default syntax that omits the
final underscore. Thus, the two message syntaxes are:

  # Default calling syntax

  NSURL.alloc.initWithScheme_host_path_('http', 'localhost', 'sample')

                          Retired Document | 2013-09-18 | Copyright © 2013 Apple Inc. All Rights Reserved.

                                                                 9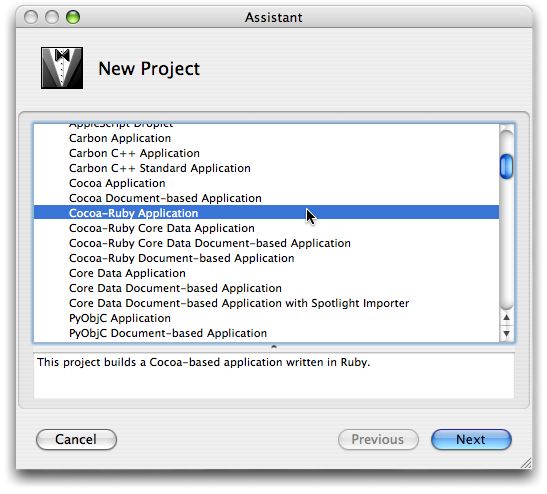
Ruby and Python on OS X
Bridges for Cocoa Development

     # Same, but no underscore for final keyword

     NSURL.alloc.initWithScheme_host_path('http', 'localhost', 'sample')

In a standard OS X installation, the second syntax is disabled. However, you can enable it by setting the
OSX.relaxed_syntax flag to true.

RubyCocoa takes care of object type conversions for you. When you pass parameters to a Ruby proxy object,
RubyCocoa automatically converts the more basic Ruby types to proxies representing their Objective-C
counterparts (for example, Ruby strings and NSString objects). It also converts objects returned from the
Objective-C side to Ruby objects that act as proxies to those Objective-C objects. On the Ruby side, these proxy
objects have more or less the same interfaces as their Ruby equivalents.

RubyCocoa adds several Xcode templates for building RubyCocoa applications of various types. The templates
make it unnecessary for developers to create applications by writing RubyCocoa code using a shell editor (for
example, Emacs or vi) and then manually constructing the various pieces of the application bundle. The Xcode
templates make sure the application project is properly set up for RubyCocoa and that the application executable
and its bundle are properly built. And they let you access the conveniences of a first-class integrated
development environment. You can also design your user interfaces using the Interface Builder application.
Currently there are four RubyCocoa application templates:
 ●    Cocoa-Ruby applications (single window)
 ●    Cocoa-Ruby document-based applications
 ●    Cocoa-Ruby Core Data applications
 ●    Cocoa-Ruby Core Data document-based applications

In addition to the project templates, RubyCocoa adds support for test units. In Xcode you can create a test-unit
file by choosing New File from the File menu and then selecting “Ruby test case class” under the Ruby category
in the New File Assistant. You can also set up a test-unit target by choosing “New Target” from the Project
menu and then selecting “Unit Test Target” option in the New Target Assistant.

Apple’s implementation of RubyCocoa adds some features and makes some performance improvements,
including the following:
 ●    Apple has added support for generating metadata about the C-language parts of a framework’s Objective-C
      API.
      RubyCocoa can extract most of the information it needs about object-oriented symbols (such as classes
      and methods) from frameworks at runtime. Unfortunately, there is no purely dynamic way to introspect
      framework data that is C-based, such as constants, enumerations, and functions. To resolve this problem
      (in a way that avoids generating static code at build time), RubyCocoa reads a per-framework metadata

                          Retired Document | 2013-09-18 | Copyright © 2013 Apple Inc. All Rights Reserved.

                                                                10
Ruby and Python on OS X
Bridges for Cocoa Development
file, which it loads at runtime. A command-line tool generates most of this metadata XML automatically
but the framework developer may have to specify certain items manually, such as pass-by-reference
parameters.. See Generating Framework Metadata (page 54) for more information on framework metadata
and instructions on how to create the metadata description.
● Apple has made many performance improvements, involving the following:
● RubyCocoa uses the libffi library for function calling and message dispatch.
Instead of a message-dispatch implementation based on objc_msgSend or NSInvocation,
RubyCocoa uses the libffi library from the GCC project. libffi makes it possible to call an arbitrary
C function in a processor-agnostic way. It provides more scalability and better performance than the
other alternatives. RubyCocoa also uses libffi when overriding or registering an Objective-C method
implemented in Ruby, and when converting Ruby closures to C function pointers.
● RubyCocoa efficiently copies objects as they cross the bridge either way.
● RubyCocoa efficiently looks up selectors and classes.
● Apple’s RubyCocoa accurately translates the Objective-C class hierarchy when it creates Ruby proxy objects,
taking into account those classes that can be toll-free bridged to the Core Foundation counterparts
PyObjC
PyObjC is a bridge that lets you write sophisticated Cocoa applications using the Python scripting language.
It enables Python objects to send messages to Objective-C objects and vice versa. With PyObjC you’re not
limited to the core Cocoa frameworks, Foundation and Application Kit. You can use any Objective-C framework
from Python, and your projects can be a mix of Objective-C, C, and C++ code. PyObjC also supports full
introspection of Objective-C classes and direct invocation of Objective-C APIs from the interactive interpreter.
Like RubyCocoa, PyObjC incorporates supports the full range of Cocoa features such as key-value coding,
key-value observing, Core Data, document-based applications, notifications, and undo management..
Note: The official PyObjC website is http://pyobjc.sourceforge.net/ and you can also get information
on the current version is at http://www.python.org/pypi/pyobjc/1.3.5. You can find documentation,
coding examples, downloadable installer packages, and other resources at (http://pyobjc.source-
forge.net/documentation/index.html).
PyObjC is useful for more than just Cocoa application (GUI) development. You can also use PyObjC for rapid
prototyping of projects, and for writing Foundation-based command-line tools, screen savers, preference
panes, and other forms of software.
Retired Document | 2013-09-18 | Copyright © 2013 Apple Inc. All Rights Reserved.
11Ruby and Python on OS X
Bridges for Cocoa Development
PyObjC leaves little that is unbridged between Objective-C and Python. Objective-C classes can inherit from
Python classes, and Python classes can inherit from Objective-C classes. You can declare categories on Objective-C
classes, with the method definition given in Python. Python classes can implement and define Objective-C
protocols, and it's possible to establish a binding between a Python object and an Objective-C object in Interface
Builder.
In PyObjC, Cocoa classes are treated as normal Python classes, but (for Python programmers) with a somewhat
different naming scheme for methods . The PyObjC equivalent of the RubyCocoa button code above is:
button = NSButton.alloc().initWithFrame_(rect)
button.setTarget_(self)
button.setAction_('doGoodThings:')
button.setEnabled_(True)
view.addSubView_(button)
PyObjC performs a simple translation from Objective-C selector names to Python method names (and vice
versa when new methods are defined), replacing all colons by underscores. This is the only messaging syntax
supported.
PyObjC automatically converts Python objects passed to the Objective-C runtime to the correct Objective-C
type, and also converts Objective-C objects passed back into Python. For example, Python strings are proxied
using an NSString subclass when they are passed to Objective-C code; likewise, an NSString object is proxied
using a Python unicode-subclass when the object passes into Python. Unlike RubyCocoa, predicates work
without further work on your part; in other words, if button.isEnabled: doSomething()) works as one
would expect.
PyObjC's support for pass-by-reference arguments is similar to that for RubyCocoa, and predates it by many
years. You can learn more about the exact semantics in the introductory documentation for PyObjC
(http://pyobjc.sourceforge.net/documentation/pyobjc-core/intro.html).
A change in the Leopard version of PyObjC is that it uses the same XML metadata description as does RubyCocoa
(see RubyCocoa (page 8) for an overview). Another change is that PyObjC now supports all Core
Foundation–based types as well, not only those that can be toll-free bridged to Cocoa classes.
The open-source version of PyObjC includes a number of Xcode templates that make it easy to create and
configure Cocoa-Python application projects. By using the templates, you can have the development
environment for your project set up for you; it eliminates the need to code using a shell editor or text processor
and then manually construct the various parts of the application bundle. You can compose your user interfaces
Retired Document | 2013-09-18 | Copyright © 2013 Apple Inc. All Rights Reserved.
12Ruby and Python on OS X
Bridges for Cocoa Development
using Interface Builder and then save them to a nib file. And you have access to a sophisticated integrated
development environment with features such as multiple build targets and symbol and documentation look-up.
Four PyObjC application templates are offered:
● Cocoa-Python applications (single window)
● Cocoa-Python document-based applications
● Cocoa-Python Core Data applications
● Cocoa-Python Core Data document-based applications
The Apple version of PyObjC for OS X version 10.5 includes two additional improvements:
● PyObjC uses the same the same XML metadata scheme as RubyCocoa to define the non-object-oriented
parts of a framework..
● PyObjC supports all Core Foundation opaque types and not only those that can be toll-free bridged to
Cocoa classes..
The Advantages of PyObjC and RubyCocoa
The RubyCocoa and Python bridges bring several advantages to Cocoa development, both for experienced
Ruby and Python “scripters” and for Objective-C developers. By letting you mix and match Objective-C, Ruby,
and Python, the bridges give you the option of choosing the best language tool for whatever programming
goal you have. At the same time, they give your code access to Cocoa technologies such as bindings and Core
Data. Moreover, your RubyCocoa and PyObjC projects can use the capable project management of Xcode and
the rapid interface development offered by Interface Builder.
By bridging the Ruby and Python languages to the Objective-C runtime, PyObjC and RubyCocoa open the
door to Cocoa application development for thousands of Python and Ruby scripters. But they also offer benefits
to experienced Objective-C developers. If you are such a developer, you can take advantage of both scripting
languages’ sophisticated regular-expression features for textual processing. You also have access to the extensive
libraries for both Python and Ruby. The interpretive nature of RubyCocoa and PyObjC means you can use them
for rapid application prototyping to help you locate design problems early in the development cycle. Using
the interpreter, you can inject code into your application on the fly and instantly inspect and manipulate objects
in your application.
The bridges’ conjunction of two object-oriented languages—Ruby and Python on one side and Objective-C
on the other—enables even more dynamism than any of the languages provides on its own. For example,
with PyObjC you can create Cocoa-compatible classes at runtime and even create new methods while your
application continues to execute.
Retired Document | 2013-09-18 | Copyright © 2013 Apple Inc. All Rights Reserved.
13Ruby and Python on OS X
Bridges for OSA Automation
A final advantage of RubyCocoa and PyObjC is that they are extensions of languages that run on a variety of
systems, including Linux and Windows. In other words, they are cross-platform. You could thus maintain a
cross-platform code base in Ruby or Python—your model objects, as it were—and use the bridged version of
the language to control the user interface and manage the application.
Bridges for OSA Automation
You have several options for writing Ruby or Python scripts that can communicate with scriptable applications,
enabling them to control those applications and exchange data with them. These technologies are bridges to
the Open Scripting Architecture (OSA) infrastructure, which uses Apple events for interprocess communication.
The native solution is Scripting Bridge, which is a bridge to the Objective-C runtime and thus can be used in
RubyCocoa or PyObjC scripts. You also use open-source Ruby and Python bridges to OSA, and thereby merge
the power of Ruby or Python with that of AppleScript and Apple event processing.
Scripting Bridge
Many applications installed on OS X are scriptable. Through the Scripting Bridge technology, RubyCocoa and
PyObjC scripts and programs can communicate with these applications, controlling them and exchanging data
with them. For example, using Scripting Bridge a RubyCocoa script could select and play music tracks in iTunes;
or it could search a mailbox (maintained by the Mail application) for messages with a certain phrase and put
those messages into a new TextEdit document.
Scriptable applications define a interface through which they can respond to Apple events, which are a part
of the Open Scripting Architecture (OSA). Apple events frequently originate in AppleScript scripts and make
use of the Apple Event Manager of OSA as the mechanism of delivery. Scripting Bridge is a framework that
implements an Objective-C bridge to OSA-compliant applications—that is to say, applications having a scripting
interface that follows the guidelines described in Technical Note T2106 and Cocoa Scripting Guide . It enables
programs written in Objective-C to use the OSA infrastructure to control and communicate with OSA-compliant
applications. With Scripting Bridge you can perform the same tasks in Objective-C that you can in AppleScript
scripts.
Scripting Bridge is dynamic. At runtime it retrieves the scripting definition of a given application and generates
Objective-C class implementations of the classes it finds in the scripting interface, including objects and methods
representing properties, elements, commands, and so on. These objects become part of the Objective-C
namespace that PyObjC and RubyCocoa scripts are bridged to, and through them these scripting languages
are bridged to OSA-compliant applications. As a result, you can control and obtain data from those applications
from RubyCocoa and PyObjC code. And you also have at your disposal all the rich features and capabilities of
the native languages, such as regular expressions, string manipulations, and easy access to the native libraries
and modules.
Retired Document | 2013-09-18 | Copyright © 2013 Apple Inc. All Rights Reserved.
14Ruby and Python on OS X
Bridges for OSA Automation
To find out how to use Scripting Bridge in RubyCocoa and PyObjC scripts, see Using Scripting Bridge in PyObjC
and RubyCocoa Code (page 44).
RubyOSA
RubyOSA is a open-source bridge that connects Ruby to the Apple Event Manager infrastructure, thereby
enabling you to do in Ruby what you can do in AppleScript. It works by retrieving the scriptable definition of
a given application (in its sdef file) and using that to populate a new namespace with classes, methods,
constants, enumerations, and all other symbols described by the definition.
Most Mac apps are scriptable, and they define their scriptable interface in the sdef XML format. RubyOSA
parses this file and creates Ruby proxy objects with it on the fly. RubyOSA does its work transparently for you
to build, send, and receive Apple events.
To give you an example of how simple and even elegant RubyOSA can be, consider the following code snippet,
which gets the name of the current iTunes track:
require 'rbosa'
puts OSA.app('iTunes').current_track_name
RubyOSA is an improved alternative to RubyAEOSA. The latter bridge is implemented as a set of Ruby bindings
to the Apple event C API, while RubyOSA is a higher level framework that completely hides the Apple event
infrastructure. It is simpler and more efficient than RubyAEOSA.
You can download RubyOSA from http://rubyosa.rubyforge.org/ or, if you already have RubyGems installed,
download and install it from the command line. To learn how, and for a practical look at RubyOSA, see Using
Scripting Bridge in PyObjC and RubyCocoa Code (page 44).
py-appscript
py-appscript is an Python-OSA bridge that lets you control scriptable applications from Python scripts. It uses
a high-level RPC mechanism for sending commands to applications via Apple events and converts data between
common Python and Apple event types. py-appscript features an object-oriented style syntax and a simple
embedded query language for identifying objects in an applicaitons object model.
You can download py-appscript from http://sourceforge.net/projects/appscript. The package includes installation
instructions, examples, and documentation.
Retired Document | 2013-09-18 | Copyright © 2013 Apple Inc. All Rights Reserved.
15Ruby and Python on OS X
Multithreading With Ruby on OS X
Multithreading With Ruby on OS X
Because Ruby in its latest stable version (the 1.8 branch) is not thread-safe, you cannot call the Ruby runtime
in a thread other than the main one. When Ruby is bridged to Objective-C this creates problems because
Objective-C isn’t able to call back to Ruby in a secondary thread. (If it did, an application would crash.) The
version of RubyCocoa on Leopard consequently routes calls from Objective-C to Ruby so that all are on the
main thread.
Ruby 1.8 also implements its threading model using the setjmp and longjmp primitives; this can sometimes
cause unexpected behavior when a Ruby thread calls a Cocoa object, especially autorelease pools. Consequently,
both the Ruby interpreter and the RubyCocoa bridge have been modified to properly handle these situations
by saving and restoring the appropriate context variables during Ruby thread switching.
Fortunately, the next stable release of Ruby (the 2.0 branch) will be thread-safe and will use native threads.
Unfortunately, this is not the version installed on Leopard.
Retired Document | 2013-09-18 | Copyright © 2013 Apple Inc. All Rights Reserved.
16Building a RubyCocoa Application: A Tutorial
This tutorial demonstrates how easy it is to create a RubyCocoa application using the developer applications
Xcode and Interface Builder. It walks you through the steps for constructing the RSS Photo Viewer application,
which is an example project installed in /Examples/Ruby/RubyCocoa. It assumes you have some
knowledge of Ruby but not of RubyCocoa, and it assumes that you might be fairly new to the OS X development
environment.
When it is built and run, the RSS Photo Viewer (shown in Figure 1) lets you view photos that are accessed
through a URL identifying an RSS feed. It enables you to scroll through the photos and zoom in on selected
ones.
Figure 1 The RSS Photo Viewer application
By completing this tutorial you will gain familiarity with the following RubyCocoa development tasks on OS
X:
Retired Document | 2013-09-18 | Copyright © 2013 Apple Inc. All Rights Reserved.
17Building a RubyCocoa Application: A Tutorial
Creating and Configuring a RubyCocoa Project
● Creating and setting up a RubyCocoa project
● Using Interface Builder to construct a user interface
● Defining a RubyCocoa class
● Defining and connecting outlets and actions
● Responding to delegation and data-source messages
● Implementing accessor methods
● Integrating a custom Ruby class
Creating and Configuring a RubyCocoa Project
There are several Xcode templates for RubyCocoa projects of various types: simple applications, document-based
applications, Core Data applications, and Core Data document-based applications. The RSS Photo Viewer uses
the simple RubyCocoa application template.
1. In Xcode, choose New Project from the File menu.
2. In the New Project assistant, select the Cocoa-Ruby Application template and click Next.
3. In the subsequent window, name the project folder “RSSPhotoViewer” and identify in a suitable location
in the file system. Click Next.
Retired Document | 2013-09-18 | Copyright © 2013 Apple Inc. All Rights Reserved.
18Building a RubyCocoa Application: A Tutorial
Creating and Configuring a RubyCocoa Project
Anatomy of a RubyCocoa Project
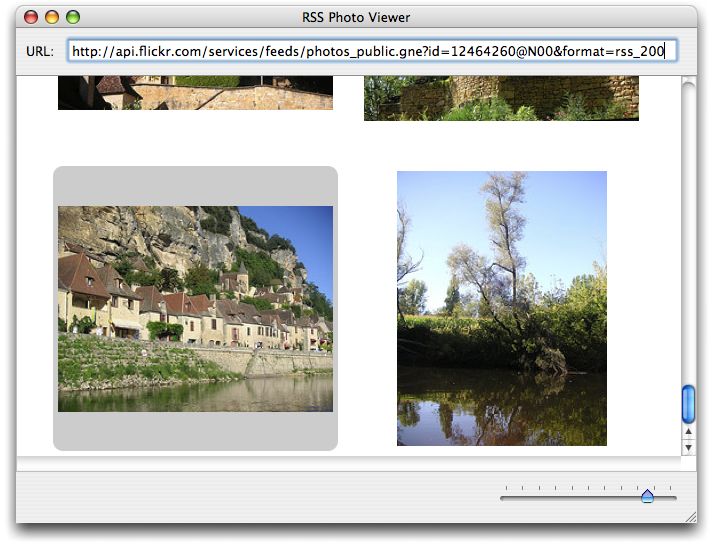
At first glance the project window looks like any other Cocoa project (see Figure 2). It has the necessary
frameworks (including the RubyCocoa framework, a nib file with the main menu, the information property list
(Info.plist), and the main.m file.
Figure 2 The initial project window for the RSS Photo Viewer project
However, it does have one file that you don’t find in regular Cocoa application projects: rb_main.rb. When
you build a RubyCocoa application, the Ruby scripts of the project are put in the Resources directory of the
application bundle. If the application is double-clicked, the rb_main.rb script gets those Ruby and RubyCocoa
files and loads them; if a RubyCocoa script is run from the command line (for debugging), however, the script
instead calls the NSApplicationMain function.
Next add one line to the rb_main.rb script, the “include OSX” statement, as shown in Listing 1. By including
the OSX module in the main scope, you are able to access RubyCocoa classes and methods directly—that is,
without having to use the OSX:: prefix.
Listing 1 The rb_main.rb script
require 'osx/cocoa'
# add the following line:
include OSX
Retired Document | 2013-09-18 | Copyright © 2013 Apple Inc. All Rights Reserved.
19Building a RubyCocoa Application: A Tutorial
Creating and Configuring a RubyCocoa Project
def rb_main_init
path = OSX::NSBundle.mainBundle.resourcePath.fileSystemRepresentation
rbfiles = Dir.entries(path).select {|x| /\.rb\z/ =~ x}
rbfiles -= [ File.basename(__FILE__) ]
rbfiles.each do |path|
require( File.basename(path) )
end
end
if $0 == __FILE__ then
rb_main_init
OSX::NSApplicationMain(0, nil)
end
But what invokes the rb_main.rb script to begin with? Cocoa applications by default look for the execution
entry point (that is, the function main) in main.m. However, this file in a RubyCocoa application project has
different content than it does in a regular Cocoa application. As shown in Listing 2, the main function in
RubyCocoa projects calls function RBApplicationMain, which takes as its first argument a string referencing
rb_main.rb, and runs the script.
Listing 2 The main.m file in a RubyCocoa project
#import
int
main(int argc, const char* argv[])
{
return RBApplicationMain("rb_main.rb", argc, argv);
}
Retired Document | 2013-09-18 | Copyright © 2013 Apple Inc. All Rights Reserved.
20Building a RubyCocoa Application: A Tutorial
Defining Classes, Targets, and Actions
Defining Classes, Targets, and Actions
The RSS Photo Viewer project has one significant source file, RSSWindowController.rb. This file contains
definitions of two custom classes, a RubyCocoa subclass of NSWindowController and a simple custom Ruby
subclass. We’ll start with the NSWindowController subclass and define the outlets and actions that are used
to control the user interface.
Note: An outlet is an archived connection between one object and another object (and is specified
as an instance variable of one object). An action is a method invoked in an object (usually a custom
object) called the target when another object such as a button or slider is manipulated; Interface
Builder also archives the connection between the target and the other object (called a control). For
more on these concepts, see “Communicating with Objects in Cocoa Fundamentals Guide “ in Cocoa
Fundamentals Guide .
To add a RubyCocoa source file to the project, complete the following steps in the Xcode project:
1. Choose New File from the File menu.
2. Select “Ruby NSWindowController subclass” in the New File assistant window. Click Next.
3. In the subsequent assistant window name the new file “RSSRubyController.rb” and click Next.
Xcode adds the file to the RSSPhotoViewer project.
The template file for the RubyCocoa subclass of NSWindowController includes some initial code: a require
‘osx/cocoa’ statement and an initial definition of the subclass. Change the name of this subclass from
“RSSRubyController” (the name of the file) to “RSSWindowController”:
class RSSWindowController < NSWindowController
end
Expand this initial class definition by typing the code shown in Listing 3.
Listing 3 Defining the outlet and actions of the RSSWindowController class
require 'osx/cocoa'
class RSSWindowController < NSWindowController
ib_outlet :imageBrowserView
# Actions
Retired Document | 2013-09-18 | Copyright © 2013 Apple Inc. All Rights Reserved.
21Building a RubyCocoa Application: A Tutorial
Defining Classes, Targets, and Actions
def zoomChanged(sender)
end
ib_action :zoomChanged
def parse(sender)
end
ib_action :parse
end
You just defined the outlet (imageBrowserView) and the two actions (zoomChanged and parse) that the
RSSWindowController class uses for communicating with objects in the user interface. (In Creating the User
Interface (page 24) you’ll connect the outlet and actions to their user-interface objects.) To define an outlet
use the ib_outlet method of the OSX module followed by the Ruby symbol “:imageBrowserView”. You define
an action by defining a method with a single argument named sender—the sender is the user-interface object
sending the action message—followed by the ib_action method and the symbolized method name. Leave
the action methods unimplemented for now; we’ll return to them in Implementing the Custom Window
Controller (page 30).
The next step is to import the RSSWindowController class, along with its action and outlet definitions, into
the application’s nib file.
1. Double-click the nib file MainMenu.nib in the Xcode project window to open it in Interface Builder.
2. Open the Library window (if it isn’t displayed) by selecting Library from the Tools menu.
Retired Document | 2013-09-18 | Copyright © 2013 Apple Inc. All Rights Reserved.
22Building a RubyCocoa Application: A Tutorial
Defining Classes, Targets, and Actions
3. Locate the generic Object in the object library (that is, the browser in the Library window), either by
browsing or search for it by typing “Object” in the window’s search field.
Drag this object into the nib file window, the window in this case with the title of MainMenu.nib.
The nib file window, which is sometimes called the nib document window, lets you examine the contents
of a nib file. The default mode shows the top-level objects of the nib file—that is, those objects that are
the top-level objects of an object graph (such as a window or menu) or that are standalone objects, such
as controllers, which own no subordinate objects.
4. With the generic object selected, open the Identity pane of the inspector by choosing Identity Inspector
from the Tools menu.
Retired Document | 2013-09-18 | Copyright © 2013 Apple Inc. All Rights Reserved.
23Building a RubyCocoa Application: A Tutorial
Creating the User Interface
5. In the Class field, type “RSSWindowController” and press Return.
Completing the above steps imports the class into Interface Builder and assigns it as the class of the proxy
object, which you can then use for target and action connections. This application is now “aware” of the
RSSWindowController class, and automatically notices any future changes to the class—for example,
additions of actions or removals of outlets.
Creating the User Interface
The user interface of the RSS Photo Viewer application is simple. It is a single-window application, and on that
window are only three objects:
● A labeled text field for specifying a URL
● A slider for zooming a selected image
● An Image Kit browser view for displaying the images
The Library window contains ready-made objects for the labeled text field and the slider. You drag these objects
from the Library onto the window (provided by default) and then resize them, reposition them, and configure
their other attributes. But before you do this, make sure the window is large enough to hold the objects. Using
the image in Figure 1 (page 17) as a guide, resize the window by dragging the tab on the lower-right corner
of the window.
Retired Document | 2013-09-18 | Copyright © 2013 Apple Inc. All Rights Reserved.
24Building a RubyCocoa Application: A Tutorial
Creating the User Interface
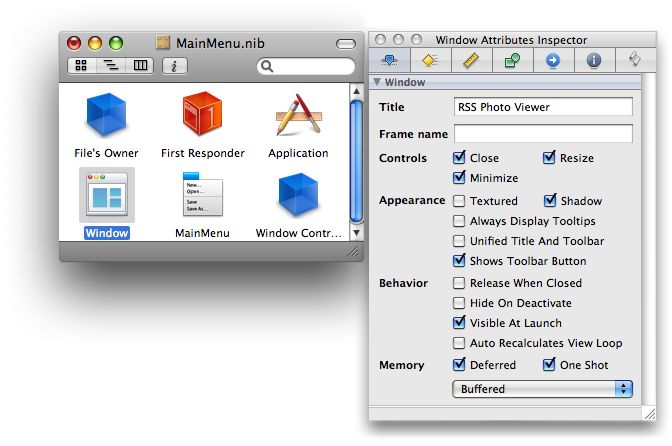
Now that your attention is on the window, give it a title. Select its icon in the nib file window (if it isn’t already
selected), and choose Attributes Inspector from the Tools menu to open the Attributes pane (or click the
button at the top of the inspector). Enter “RSS Photo Viewer” in the Title field.
Follow these steps to add and configure the URL text field:
1. In the object library find the Text Field object (you can search for it by typing “text field” in the Library
window’s search field).
2. Drag this object (not Text Field Cell) and drop it on the upper part of the window.
3. Resize the text field using the resize handles on the edges of the object. (Make sure you leave space for
the “URL” label”). Reposition it if necessary by dragging it over the window’s “surface.“
4. Locate the Label object in the object and drag it to a point left of the text field.
This object is a text field too, but it is preconfigured to be read-only and to have a gray background.
5. Double-click “Label” and type “URL:” in place of the selected text. Resize the label if necessary and position
it close to the text field.
You’ll notice as you move these objects around and resize them that blue lines appear. These are guide lines
showing you how to place objects in relation to each other as recommended in the OS X Human Interface
Guidelines .
Next find the horizontal slider in the object library and drag it to the lower part of the window. You will need
to configure this object, following these steps:
Retired Document | 2013-09-18 | Copyright © 2013 Apple Inc. All Rights Reserved.
25Building a RubyCocoa Application: A Tutorial
Creating the User Interface
1. Resize the object to about twice its default length.
2. Select the object and open the inspector to the Attributes pane (Tools > Attributes Inspector).)
3. Set the number of tick marks and the minimum, maximum, and current values as shown in this example:
Also make sure the Enabled and Continuous boxes in the Control slice are checked. Note that the inspector
here is showing you the attributes belonging to the various inheritance layers of the slider: as an NSSlider
object, as an NSControl object, and as an NSView object.
The final piece in the user interface of the RSS Photo Viewer application is the Image Kit image browser view
(an IKImageBrowserView object). Because this Objective-C framework does not yet include an Interface
Builder plug-in for its view objects, we will have to use the Custom View library object as a proxy, and then
assign the IKImageBrowserView class to this proxy. Interface Builder is aware of this class, however, because
the Application Kit framework has a dependency on the Quartz umbrella framework, which includes the Image
Kit framework. The steps for setting up the image browser view are the following:
Retired Document | 2013-09-18 | Copyright © 2013 Apple Inc. All Rights Reserved.
26Building a RubyCocoa Application: A Tutorial
Creating the User Interface
1. Find the Custom View object in the object library and drag it onto the window.
2. Resize the Custom View object to fill the space below the URL text field and above the slider.
Note the blue guide lines for placement and resizing boundaries.
3. With the Custom View selected, open the Identity pane of the inspector.
4. Type “IKImageBrowserView” in the Class field and press Return.
Save the nib file. The RSS Photo Viewer application’s user interface is now complete. The next step is to hook
up your outlet and action connections.
Retired Document | 2013-09-18 | Copyright © 2013 Apple Inc. All Rights Reserved.
27Building a RubyCocoa Application: A Tutorial
Connecting the Outlet and Actions
Connecting the Outlet and Actions
Before we leave Interface Builder and return to Xcode we need to connect the outlet and actions we defined
in Defining Classes, Targets, and Actions (page 21) to their targets. Let’s start with the outlet from the
RSSWindowController class to the IKImageBrowserView object.
1. Select the RSSWindowController object in the nib file window and right-click (or Control-click) the
mouse.
The connections panel appears for that object, showing its possible connections.
2. Click the mouse pointer in the circle next to the imageBrowserView outlet and drag a line to the
IKImageBrowserView object.
3. Release the mouse button.
Retired Document | 2013-09-18 | Copyright © 2013 Apple Inc. All Rights Reserved.
28Building a RubyCocoa Application: A Tutorial
Connecting the Outlet and Actions
Next connect the action parse from the URL text field to the target object (RSSWindowController).
1. Select the object in the nib file window representing RSSWindowController and right-click (or
Control-click) the mouse..
2. In the connections panel, drag a line from the circle next to parse in the Received Actions slice and drag
it to the URL field.
3. Release the mouse button.
Complete the same sequence of steps for the slider object and the zoomChanged action. Then save the nib
file and return to the Xcode project.
Retired Document | 2013-09-18 | Copyright © 2013 Apple Inc. All Rights Reserved.
29Building a RubyCocoa Application: A Tutorial
Implementing the Custom Window Controller
Implementing the Custom Window Controller
The implementation code of the RSS Photo Viewer application is centered around the programmatic interface
of the IKImageBrowserView class of the Image Kit framework. The RSSWindowController class implements
methods of informal protocols for data sources and delegates and calls IKImageBrowserView methods to
set up and control the image browser. The RSSPhoto class, which you’ll implement in Implementing a Custom
Ruby Class (page 33) is a simple Ruby class that conforms to informal-protocol methods for objects that
represent items in the image browser.
Note: The Image Kit framework was introduced in OS X version 10.5 (Leopard).
Now it’s time to write some code. We’ll start by completing the implementation of the RSSWindowController
class. Open RSSRubyController.rb in Xcode and add the following method:
def awakeFromNib
@cache = []
@imageBrowserView.setAnimates(true)
@imageBrowserView.setDataSource(self)
@imageBrowserView.setDelegate(self)
end
The Application Kit framework sends the awakeFromNib message to all interested objects when all nib-file
objects have been unarchived and loaded into memory. This method presents an opportunity for controller
objects to perform initializations involving objects unarchived from nib files (view objects). The awakeFromNib
method of RSSWindowController sets the animates property of the IKImageBrowserView object and
assigns itself as the delegate and data source of that object. It also initializes a @cache instance variable, a
Ruby Array object that contains the current collection of RSSPhoto objects (representing photos).
Next insert two more require statements after the require ‘osx/cocoa’ statement.
require 'rss'
require 'open-uri'
As you’ll soon see, the RSSWindowController class uses the open-uri library for accessing HTTP resources.
It also uses the RSS library for accessing information disseminated on the Internet through the RSS protocol.
Implement the zoomChanged and parse action methods as shown in Listing 4.:
Retired Document | 2013-09-18 | Copyright © 2013 Apple Inc. All Rights Reserved.
30Building a RubyCocoa Application: A Tutorial
Implementing the Custom Window Controller
Listing 4 Implementing the action methods
def zoomChanged(sender)
@imageBrowserView.setZoomValue(sender.floatValue)
end
def parse(sender)
begin
uri = URI.parse(sender.stringValue.to_s)
raise "Invalid URL" unless uri.respond_to?(:read)
@parser = RSS::Parser.parse(uri.read, false)
@cache.clear
@imageBrowserView.reloadData
rescue => e
NSRunAlertPanel("Can't parse URL", e.message, 'OK', nil, nil)
end
end
There are a few things to note about this code:
● The zoomChanged message is sent when the user moves the slider under the image browser; the
implementation here gets the new float value from the sender of the message (the slider) and sets the
zoom factor of the image browser to that value.
● In implementing its parse action method, the RSSWindowController class uses the parse method of
the open-uri library’s URI class to validate the URL fetched from the text field (via the sender.stringValue
call) and create a URI object from it. If the URL is not valid, it raises an exception.
● It then uses the parse method of the RSS library to parse the RSS stream referenced by the URI object
and store the individual RSS entries in a Parser object referenced by the @parser instance variable. It then
clears the local cache of photos and tells the image browser to reload its data.
● If any of the foregoing steps raises an exception, the parse method of the RSSWindowController class
handles it by displaying an alert panel using the Application Kit’s NSRunAlertPanel function.
When the IKImageBrowserView object receives a reloadDatamessage, it requests from its data source—in
this case, the RSSWindowController object—the images to display by sending it first a
numberOfItemsInImageBrowser. Depending on the number of items returned by this method (assuming
it’s a positive value), the IKImageBrowserView object then sends one or more imageBrowser:itemAtIndex:
messages to its data source. Listing 5 shows how RSSWindowController implements the methods invoked
by these messages.
Retired Document | 2013-09-18 | Copyright © 2013 Apple Inc. All Rights Reserved.
31Building a RubyCocoa Application: A Tutorial
Implementing the Custom Window Controller
Listing 5 Implementing the data-source and delegate methods
def numberOfItemsInImageBrowser(browser)
@parser ? @parser.items.length : 0
end
def imageBrowser_itemAtIndex(browser, index)
photo = @cache[index]
if photo.nil?
item = @parser.items[index]
url = item.description.scan(/img src="([^"]+)/).first.first
photo = RSSPhoto.new(url)
@cache[index] = photo
end
return photo
end
def imageBrowser_cellWasDoubleClickedAtIndex(browser, index)
NSWorkspace.sharedWorkspace.openURL(@cache[index].url)
end
Let’s examine the interesting aspects of this code, especially the RubyCocoa parts. The
imageBrowser_itemAtIndex and imageBrowser_cellWasDoubleClickedAtIndex methods illustrate
the RubyCocoa convention of replacing all keyword colons of Objective-C method signatures with underscores,
except for the final colon. The implementation of imageBrowser_itemAtIndex checks if the photo referenced
by the index value (of the browser) is in its cache of photos; it the photo doesn’t exist, it gets the corresponding
URL from the RSS Parser object and with that creates a RSSPhoto object, adds it to the cache, and returns it
to the image browser, which displays the photo. (You will implement the RSSPhoto class in the following
section, Implementing a Custom Ruby Class.)
Recall that in awakeFromNib you set the RSSWindowController object to be the delegate of the
IKImageBrowserView object. The image browser sends the imageBrowser_cellWasDoubleClicked
message to its delegate when a user clicks on an image. This implementation uses the NSWorkspace method
openURL: to open the image in the preferred application.
Retired Document | 2013-09-18 | Copyright © 2013 Apple Inc. All Rights Reserved.
32Building a RubyCocoa Application: A Tutorial
Implementing a Custom Ruby Class
Implementing a Custom Ruby Class
The RSSPhoto class is a simple Ruby subclass in that it implicitly inherits from the root Ruby class. Although it
doesn’t inherit from a Cocoa class, as does RSSWindowController, it does implement the required methods of
the IKImageBrowserItem Protocol informal protocol. By doing so, it represents an image that can be
displayed in the IKImageBrowserView object. .
Listing 6 shows the RubyCocoa code used in implementing the RSSPhoto class, which is included in the
RSSRubyController.rb file. The imageUID, imageRepesentationType, and imageRepresentation
method implementations are required by the IKImageBrowserItem protocol. The imageRepresentation
class provides the image browser with the NSImage object to display, using the initByReferencingURL:
initializer; note how this method uses Ruby syntax to lazily create the image object.
Listing 6 Implementation of the RSSPhoto class
class RSSPhoto
attr_reader :url
def initialize(url)
@urlString = url
@url = NSURL.alloc.initWithString(url)
end
# IKImageBrowserItem protocol conformance
def imageUID
@urlString
end
def imageRepresentationType
:IKImageBrowserNSImageRepresentationType
end
def imageRepresentation
@image ||= NSImage.alloc.initByReferencingURL(@url)
end
end
Retired Document | 2013-09-18 | Copyright © 2013 Apple Inc. All Rights Reserved.
33Using RubyOSA
RubyOSA is a bridge that lets developers control scriptable applications, including the Finder, using the Ruby
scripting language. An application is called scriptable when it makes its operations and data available in
response to messages called Apple events. RubyOSA provides a bridge between Ruby and the Open Scripting
Architecture (OSA), an infrastructure for interprocess communication that uses Apple events as its mechanism
for event dispatching and data transport. (AppleScript is the original OSA scripting language, and is still quite
popular.)
A scriptable application specifies the set of scripting terms it understands and its scriptable interface in an XML
dictionary called an sdef file (“sdef” for scriptable definition). At runtime RubyOSA parses the scriptable
definition of a given application and populates a new namespace with classes, methods, constants, enumerations,
and all other symbols described by the definition. It also dynamically creates Ruby proxy objects to represent
these symbols and uses OSA mechanisms to build and send Apple events to applications and receive their
responses.
RubyOSA has some obvious advantages, especially for Ruby programmers. With it you can control applications
on OS X and get requested objects back from them. You can do anything with these object that you can do
in regular Ruby code, such as string manipulations and regular expressions. Your code also has access to all
installed Ruby modules and libraries. Finally, you can combine RubyOSA and RubyCocoa in the same script to
apply the technologies of the OS X frameworks to the access to scriptable applications that OSA makes possible.
Installing RubyOSA
You can download the latest version of RubyOSA from its open-source repository and install it on your system
by running the following command in a Terminal shell:
sudo gem install rubyosa
The Basics
The essential idea behind using RubyOSA is to get a proxy instance of a scriptable application and then send
messages to it. The messages that you can send are described in the application’s scriptable definition, or
dictionary. Let’s start by looking at a simple example (Listing 1).
Retired Document | 2013-09-18 | Copyright © 2013 Apple Inc. All Rights Reserved.
34You can also read