APPENDIX A Distributing Applications Through the App Store
←
→
Page content transcription
If your browser does not render page correctly, please read the page content below
27_9780672335761_AppANEW.qxd   12/16/11     12:49 PM     Page 1

                     APPENDIX A
                     Distributing Applications
                     Through the App Store

                     What You’ll Learn in This Hour:
                        .   The steps to prepare an app for submission
                        .   How to create an app profile in iTunesConnect
                        .   The process for building and submitting your app for approval
                        .   Additional ways to distribute your creation

                     You’ve done it! Your application is built, tested, and ready for prime time. Now you need to
                     decide how to deploy and market it. More than 100,000 applications are available for
                     download via Apple’s App Store. The trick to success is to stand out from the crowd. This
                     appendix provides step-by-step instructions on how to submit your application and exam-
                     ines how to most effectively get your application to those who need it.

                       Keep a close eye on how your app is managed in the App Store. If
                                                                                                     By the
                                                                                                       Way
                       Apple makes changes, such as requiring support for the latest OS,
                       ensure that you application supports the latest requirements.
                       (Otherwise, you risk your application being dropped from the App
                       Store.) Also, give Apple plenty of time to evaluate your updates.
                       Typically, Apple takes about a week to evaluate an update or new sub-
                       mission before posting it to the App Store. Apple does continue to
                       tweak and evaluate their process, but it is still far from perfect. Part of
                       the problem is the massive number of new applications posted to the
                       App Store each day. So, if Apple mandates specific changes, get to
                       them fast.
27_9780672335761_AppANEW.qxd   12/16/11      12:49 PM   Page 2

     2              APPENDIX A: Distributing Applications Through the App Store

                    Preparing an Application for the
                    App Store
                    You’re almost there: Your application has been developed and tested, and now you
                    want to share it. However, before you can sell on the App Store, you must complete a
                    few finishing touches.

                    Adding Application Artwork
                    Remember that admonition to never judge a book by its cover? Unfortunately, that
                    sage advice doesn’t apply to iOS applications. Artwork for your application is impor-
                    tant. People browsing the App Store are presented with thousands of applications.
                    You need to have artwork that stands out from the crowd.

                    In Hour 2, “Introduction to Xcode and the iOS Simulator,” you learned how to add
                    icons and launch images to your applications. In addition to these graphics, you
                    must create an App Store icon that will represent your app in iTunes. This icon is
                    512×512 pixels in size and must be stored in a file named iTunesArtwork (with no
                    extension). You upload this file during the application submission process, but you
                    should also include a copy in your project.

      By the         The three icons described are the required icons for most applications, but they
        Way
                     might not be everything you need.
                     You can also add icons to your app for documents it creates, spotlight search
                     results, and the options presented through the Settings app. Apple maintains a
                     developer document called iOS Human Interface Guidelines with a “Custom Icon
                     and Image Creation Guidelines” section that describes all icon possibilities that
                     can be part of an iOS project.

                    Defining Device Capability Requirements
                    iOS hardware devices are a moving target. For developers and consumers, this is a
                    good thing: We both get more toys to play with each year. The side effect, however, is
                    that not all iOS devices have exactly the same capabilities. There’s no point, for
                    example, in trying to run a camera application on the first-generation iPad or
                    attempting to use the gyroscope on the iPhone 3GS.

                    To help define where your application will run, you can edit a key in your project’s
                    plist file: required device capabilities (UIRequiredDeviceCapabilities). This is a
                    multivalue property that you can use to store values such as front-facing-camera,
                    camera-flash, gyroscope, sms, and so on. A full list of the device capabilities can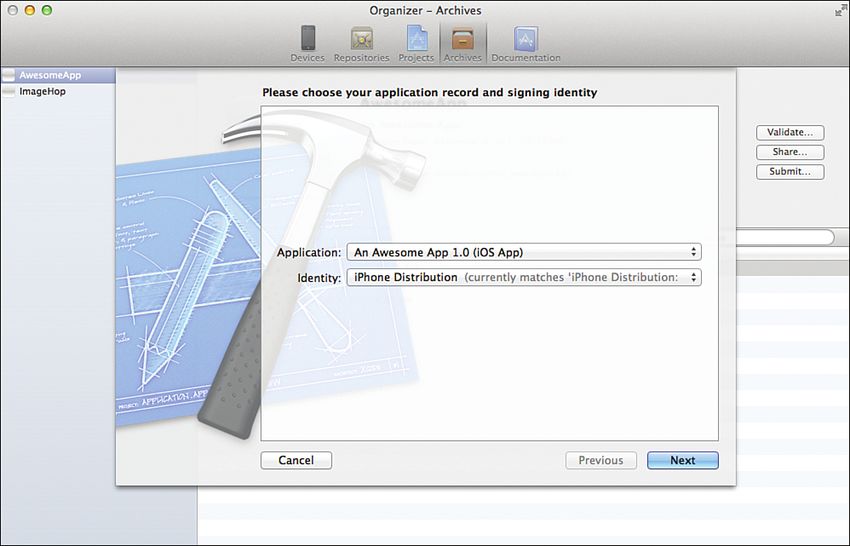
27_9780672335761_AppANEW.qxd     12/16/11     12:49 PM    Page 3

                                                    Preparing an Application for the App Store                      3

           be found in the developer document “Information Property List Key Reference,” in
           the section “UIRequiredDeviceCapabilities,” accessible through the Xcode documen-
           tation tools.

             Don’t Limit Your App Unless Absolutely Necessary
             Apple prefers (with good reason) that an app run on any device, regardless of
             capabilities. Only use this key if you cannot program around limitations in earlier
             devices.

           To define the capabilities required by your application, follow these steps:

             1. Open your project and select the top-level project group, followed by the target,
                 and then the Info tab within the Editor area.

             2. Click and expand the Required Device Capabilities key. By default, there is a
                 single required capability: the ARM processor.

             3. With the key expanded, click the + icon to the right of the key. A new row will
                 added.

             4. Double-click the value field of the item you added and type one of the capabil-
                 ity keywords, as shown in Figure A.1.

             5. Add additional items to the property for more device capability requirements.

                                                                                                    FIGURE A.1
                                                                                                    Define the
                                                                                                    hardware
                                                                                                    requirements of
                                                                                                    your application.
27_9780672335761_AppANEW.qxd        12/16/11    12:49 PM     Page 4

     4                  APPENDIX A: Distributing Applications Through the App Store

                        Our next steps take place outside of Xcode but are absolutely critical for a successful
                        app submission.

                        Creating an iPhone Distribution Certificate
                        The person responsible for submitting final applications to the iTunes store is called
                        the team agent. For the team agent to submit any solutions, he must have an
                        approved distribution certificate. This section discusses how to obtain this certificate.

                        If you followed the steps in Hour 1, “Preparing Your System and iDevice for
                        Development,” you should already have a personal development certificate loaded
                        on your machine. If you are part of a larger team, you need to generate a new cer-
                        tificate for the person who will submit the app to the App Store. Let’s see how this
                        process works.

                        From the Applications folder on your Mac, launch the Keychain Access utility. You
                        are going to request a certificate from a certificate authority (CA). To do this, you
                        must change some of the settings in the Keychain Access utility (see Figure A.2).
                        Open the application preferences, and then switch to the Certificates tab. Set Online
                        Certificate Status Protocol (OCSP) and Certificate Revocation List (CRL) to Off in the
                        Certificates section.

     FIGURE A.2
     Modifying the
     settings for the
     Keychain Access
     utility.

                        To request a new certificate, complete the following steps:

                          1. Choose Certificate Assistant, Request a Certificate from a Certificate Authority
                              from the Keychain Access menu.

                          2. Enter the team agent’s email address and the name of your company as it
                              appears in the iPhone Developer Program. You do not need a CA email
                              address.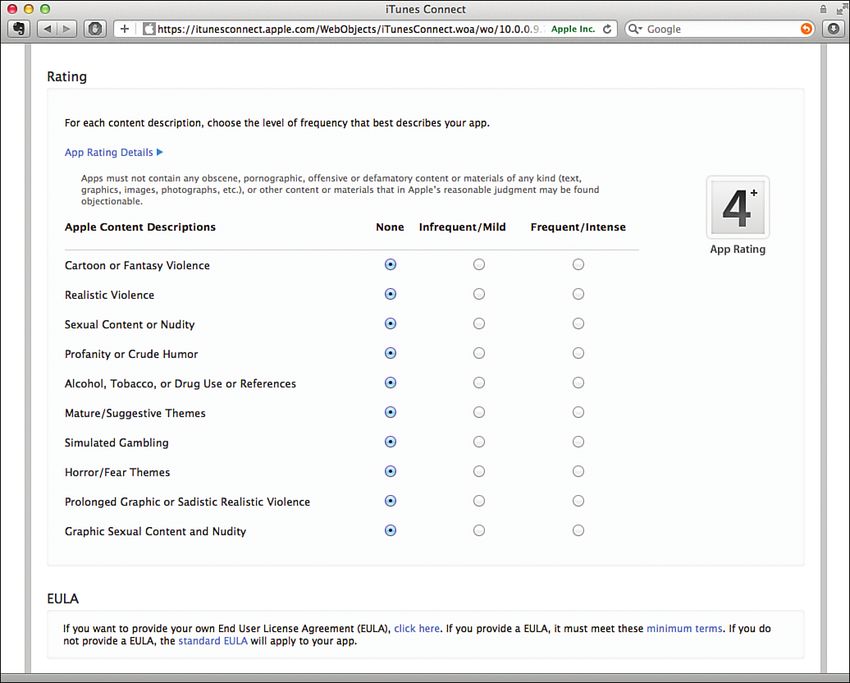
27_9780672335761_AppANEW.qxd     12/16/11     12:49 PM     Page 5

                                                    Preparing an Application for the App Store                        5

             3. Save the data to disk and select Let Me Specify Key Pair Information, as shown
                 in Figure A.3. Click Continue.

                                                                                                    FIGURE A.3
                                                                                                    Requesting a
                                                                                                    new certificate
                                                                                                    from a CA.

             4. Save the certificate as a CSR file to your desktop. Choose Key Size and
                 Algorithm. Select 2048 bits and RSA for the algorithm.

             5. Navigate to the Provisioning Portal (http://developer.apple.com/ios/manage/
                 overview/index.action). Click the Certificates category (left side) and then the
                 Distribution tab. All active certificates you have will be listed in the
                 Distribution window. To obtain a certificate, select Request Certificate and
                 upload the CSR file you just created.

             6. After your certificate has been approved, you can download a CER file to your
                 computer. The CER file is the distribution certificate associated with your com-
                 puter. Double-click the CER file to add it to your keychain.

           Save your distribution certificate somewhere safe. The certificate ties your develop-
           ment environment directly to your solutions. Without the distribution certificate, you
           cannot deploy your applications. Best practice is to burn the certificate to a CD and
           store that CD somewhere safe.

           Setting a Bundle Identifier
           When you distribute an app, you need to provide a unique identifier for it; this is
           known as the app ID or a bundle identifier. As you’ve been writing apps, you’ve
           been defining this as part of your project setup. It is the company identifier com-
           bined with the product name, as shown in Figure A.4.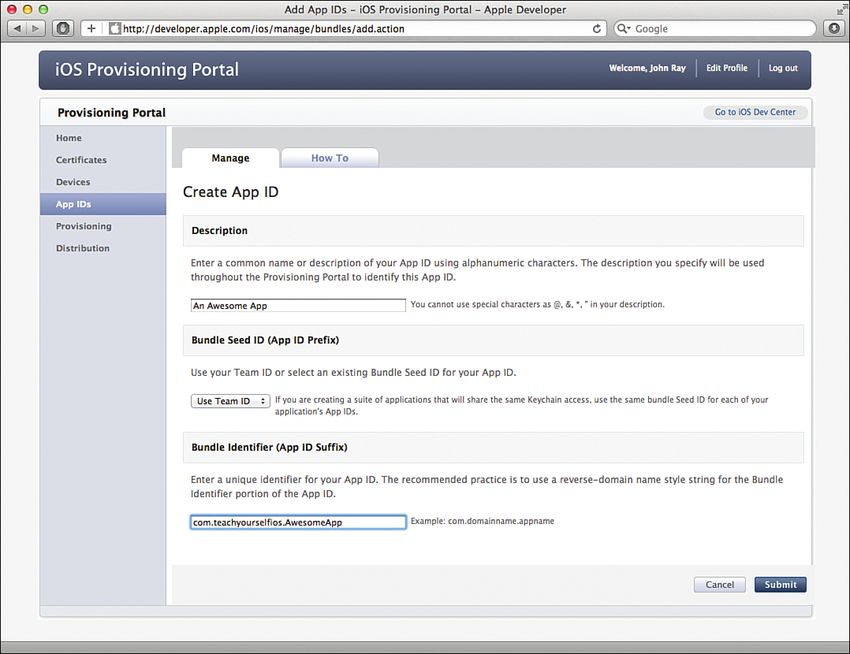
27_9780672335761_AppANEW.qxd      12/16/11     12:49 PM     Page 6

     6                 APPENDIX A: Distributing Applications Through the App Store

     FIGURE A.4
     The bundle
     identifier
     uniquely
     identifies your
     app.

                       To distribute your app, you need to add its bundle identifier within the developer
                       portal. To do this, just complete these steps:

                         1. Within the Provisioning Portal (on the left side), click the App IDs category.

                         2. Click New App ID to create a new identifier for this project you will be publish-
                             ing to the App Store.

                         3. On the App ID creation screen, shown in Figure A.5, provide a description for
                             the app ID.

                         4. Choose Use Team ID for the bundle seed ID.

                         5. Set a unique ID for the bundle identifier. This should be the same as the bun-
                             dle identifier for the app your created in Xcode.

                         6. Click Submit to create the new app ID.

      Did You           Developers who don’t mind their apps sharing data among themselves can take
        Know?
                        advantage of a “wildcard ID.” With a wildcard ID, you typically define your app ID
                        as com.domainname.*—in other words, an asterisk replaces your app name. You
                        can then use this app ID repeatedly with your App Store submissions.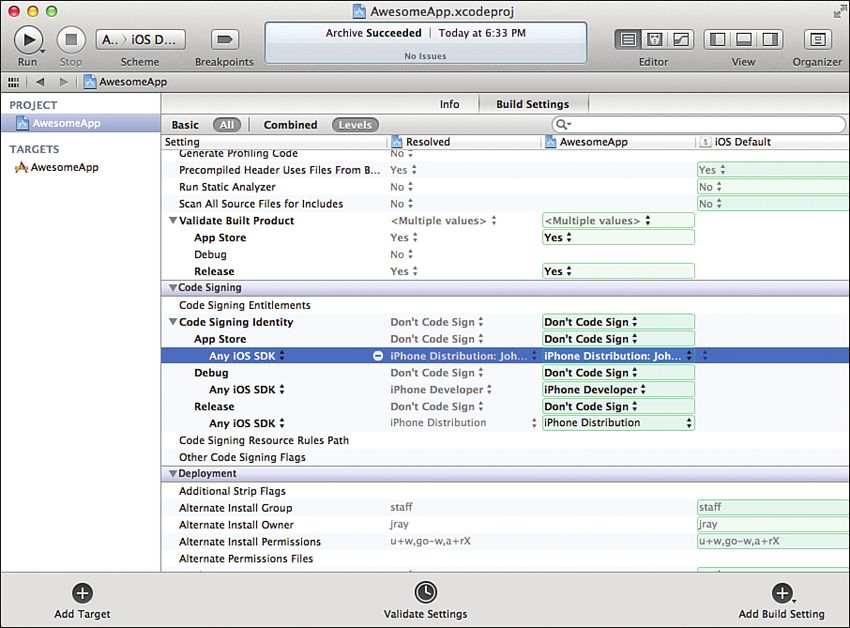
27_9780672335761_AppANEW.qxd     12/16/11    12:49 PM    Page 7

                                                   Preparing an Application for the App Store                         7

                                                                                                     FIGURE A.5
                                                                                                     Create a new
                                                                                                     app ID for the
                                                                                                     apps you are
                                                                                                     publishing.

           Creating a Distribution Provisioning Profile
           You next need to create a distribution provisioning profile, which will associate your
           distribution certificate, app ID, and distribution method within Xcode:

             1. In the Provisioning Portal, choose Provisioning, Distribution (http://developer.
                 apple.com/ios/manage/provisioningprofiles/viewDistributionProfiles.action).
                 Then click the New Profile button.

             2. Choose whether the application will be uploaded to the App Store or will be
                 deployed ad hoc, as shown in Figure A.6. We discuss ad hoc distribution a bit
                 later.

             3. Give your profile a meaningful name.

             4. Double-check that the certificate and app ID are correct, and then select
                 Submit. The profile is generated and, after a few moments, can be down-
                 loaded. The file you will download has the extension .mobileprovision.

             5. To install the profile, double-click or drag the .mobileprovision file onto Xcode.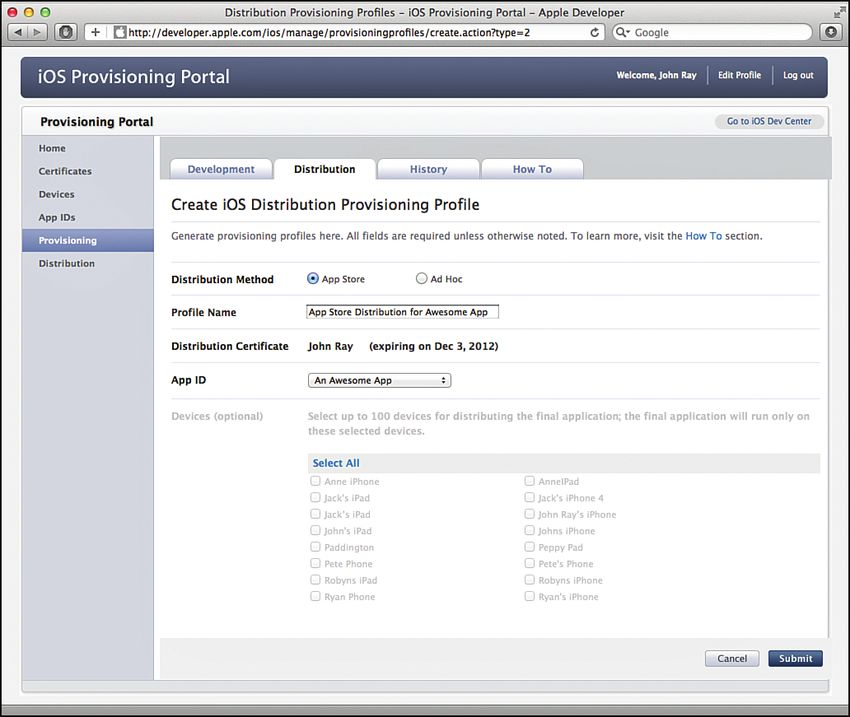
27_9780672335761_AppANEW.qxd       12/16/11     12:49 PM   Page 8

     8                  APPENDIX A: Distributing Applications Through the App Store

     FIGURE A.6
     Create a
     provisioning
     profile that
     describes how
     your app will be
     distributed.

                        Configuring a Project for Distribution
                        The final thing you need to do is to create a version of your application that you can
                        submit to the App Store. Follow these steps to prepare your app:

                          1. Open the project in Xcode. Select the top-level project group, and click the Info
                              tab. Expand the Configurations section (see Figure A.7).

                          2. Select the Release configuration option, click the + button in the lower-left cor-
                              ner, and choose to duplicate the Release configuration. Name the configura-
                              tion App Store.

                          3. Choose the Build Settings tab, and then choose Edit Active Target from the
                              Project menu.

                          4. Within the Code Signing section, shown in Figure A.8, expand the Code
                              Signing Identity group. In the App Store configuration you created, change the
                              value for the Any iOS Device key to the name of your distribution certificate.
                              Without a valid certificate, you cannot upload your applications to the App
                              Store.

                          5. Choose Product, New Scheme from the menu and create a new scheme for the
                              project named App Store.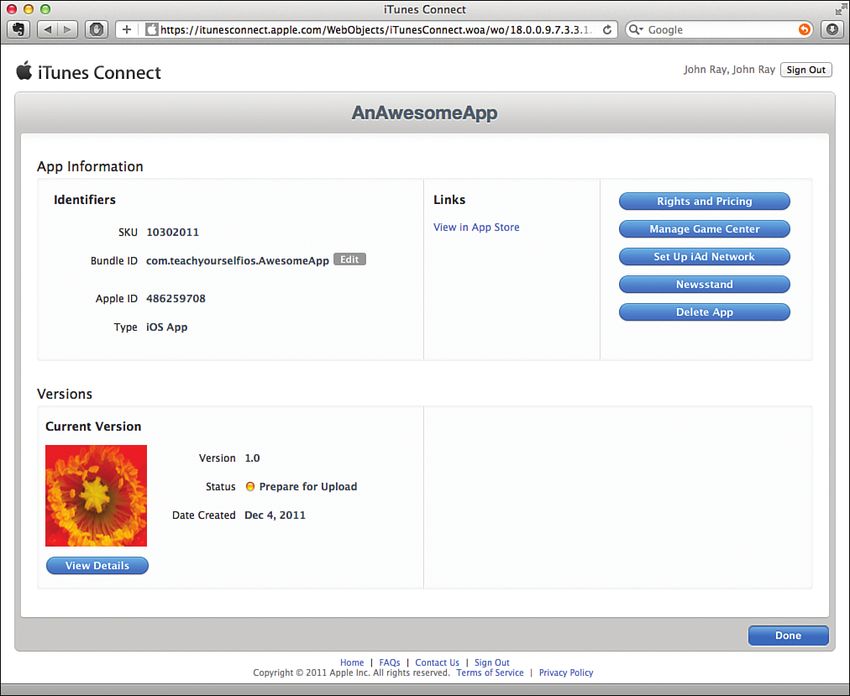
27_9780672335761_AppANEW.qxd   12/16/11   12:49 PM   Page 9

                                               Preparing an Application for the App Store                    9

                                                                                            FIGURE A.7
                                                                                            Create a new
                                                                                            distribution
                                                                                            configuration.

                                                                                            FIGURE A.8
                                                                                            Choose your
                                                                                            certificate.

             6. Now edit the scheme by picking Product, Edit Scheme from the menu. Choose
                the App Store scheme and iOS Device from the Scheme and Destination pop-
                up menus at the top of the window.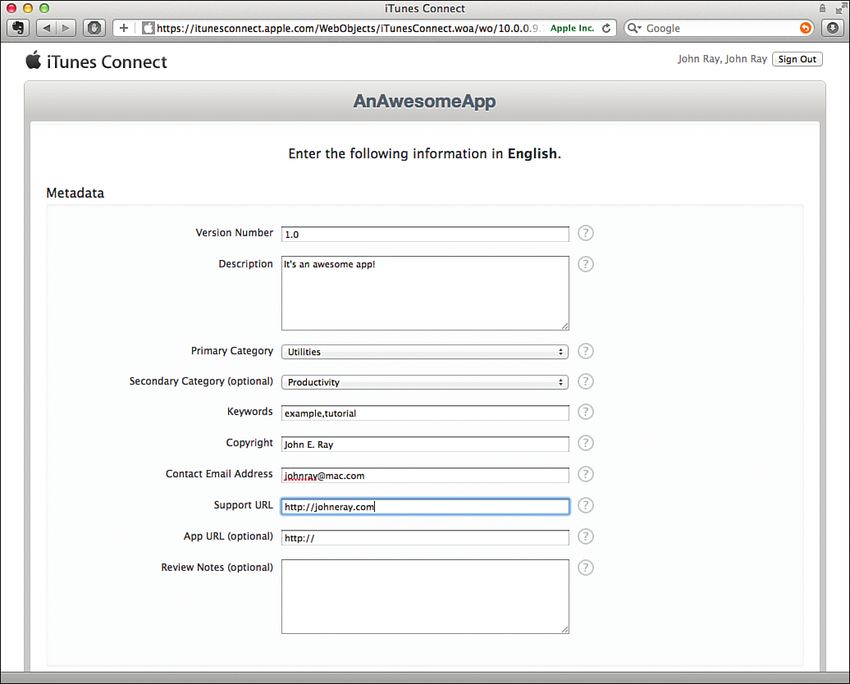
27_9780672335761_AppANEW.qxd 12/16/11 12:49 PM Page 10
10 APPENDIX A: Distributing Applications Through the App Store
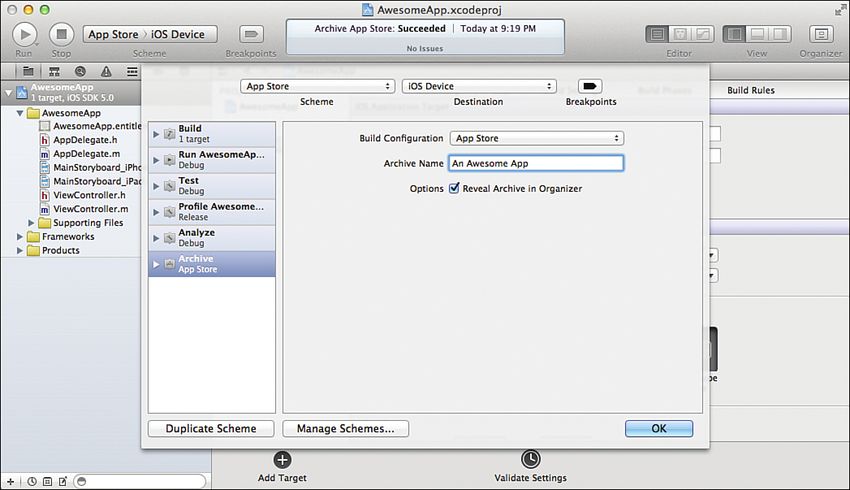
7. Select the Archive build type on the left, and set the build configuration to App
Store shown in Figure A.9. Be sure to set the archive name to the name of your
application.
FIGURE A.9
Configure your
new scheme.
8. Choose New File, iPhone OS, Code Signing, Entitlements.
9. Now you add an entitlement plist, a file that provides the code signing for the
app. Highlight your app’s target, and then choose Summary.
10. Scroll down the Summary section until you see the Entitlements section. Click
the Enable Entitlements check box. This adds a new file to your project with
the extension .entitlements.
11. The entitlements file has several properties that you shouldn’t change, and one
you need to add. Select the entitlements file in your project, to open it in the
editor.
12. Click in the Editor area, and then choose Add Item from the Editor menu.
Name the key get-task-allow, and then set the type to Boolean. Make sure
the value is NO, as shown in Figure A.10.
13. Now change the application’s scheme to App Store, iOS Device.
14. Choose Product, Archive from the menu. The application is now ready for sub-
mission to the App Store.27_9780672335761_AppANEW.qxd 12/16/11 12:49 PM Page 11
Submitting an Application for Approval 11
FIGURE A.10
The
entitlement’s
get-task-allow
property must be
added.
Submitting an Application for Approval
The App Store is a dazzling success. Now duplicated by RIM, Nokia, Google, and
Microsoft, the iTunes App Store boasts hundreds of thousands of unique applications,
billions (that’s with a b, not an m) of downloads, and an audience of more than 100
million users.
The success of the App Store is built on making the user experience easy. For many
people, the hardest part of running an application is installing it. With the App
Store, Apple has introduced a one-click installation process that makes it easy to
install any solution. This simplicity enables every developer to easily deploy a solu-
tion and know that it will be installed correctly. In addition, the customer can apply
updates to your application via a one-click download from the App Store app.
Apple is also upfront about the charges. Apple charges just one rate: 30% of the
price of your application (or nothing if the app is given away for free). So, if you are
selling an application for $2.99, 30% goes to Apple and 70% to you. In this case,
you get $2 for each sale.
At first it might seem that Apple is gouging you of your profits; but if you have
developed content for the Nintendo DS, Microsoft Xbox 360, or Sony PlayStation, you
know that Apple’s fee is reasonable. After all, it is Apple that is hosting the applica-
tions on its own server farms, managing the millions of accounts, and giving you
access to tools to effectively control how you sell your applications. Yes, the 30% cost
is very reasonable.27_9780672335761_AppANEW.qxd 12/16/11 12:49 PM Page 12
12 APPENDIX A: Distributing Applications Through the App Store
Preparing Your Application Profile
When you have your accounts set up, you will want to start uploading your applica-
tions to the store through the http://itunesconnect.apple.com website. Only a release
version of your application can be uploaded. In iTunes Connect, click the Manage
Your Applications link, and then start the process by clicking the Add New App link,
shown in Figure A.11.
FIGURE A.11
Upload an
application to
the App Store.
If this is the first app you’ve uploaded, you are prompted to select your language
and company name and verify that you aren’t exporting encryption software.
Answer the questions and click Continue, as shown in Figure A.12.
Enter the basics about your submission:
. Application name
. SKU number (a unique identifier that you create). A simple way to create an
SKU is to insert the date, such 07302012 for July 30, 2012. When you update
the application, just apply a new date.
. Bundle ID. The bundle ID that you created for your application.
. Bundle ID suffix. This is usually the name of the application, which is
appended to the bundle ID.
Click Continue when you have finished entering your information.27_9780672335761_AppANEW.qxd 12/16/11 12:49 PM Page 13
Submitting an Application for Approval 13
FIGURE A.12
Accurately
describe your
application
before
submitting it.
You are now prompted for rights and pricing information, where you can choose the
locations where your app will be sold, when it will go on sale, and what it will cost.
Make your selections, as shown in Figure A.13. Click Continue when ready.
FIGURE A.13
Manage when
your app goes
on sale and how
much it will cost.
Sell Abroad with App Localization
App localization is the process of adding support for multiple languages. We didn’t
have an opportunity to discuss this in this book, but Apple provides a great guide
in the developer document “Introduction to Internationalization Programming
Topics.” Apps that are available in multiple languages are more easily marketed
than those that are locked to a specific language or country.27_9780672335761_AppANEW.qxd 12/16/11 12:49 PM Page 14
14 APPENDIX A: Distributing Applications Through the App Store
On the final screen, you address all the application details. Start at the top of the
form, shown in Figure A.14, and provide the following information:
. Version number. You can use your own schema for version number.
. Description (limit 4,000 characters).
. Primary category. There are 20 primary categories, including Games,
Entertainment, Business, Books, and News. Some categories, such as Games,
have subcategories to help organize the content more effectively.
. Secondary category. You can choose a second category for your application.
. Keywords. Keywords are used to help return results when a customer is search-
ing for an application.
. Copyright (the person who owns the code).
. Contact email address.
. Support URL. The support URL links to the support site for the application.
. Application URL. The application URL links to the application’s website, if any.
. Review notes. If the app accesses any online services, this input area gives
you a place to provide testing accounts that Apple can use to validate your
software.
FIGURE A.14
Provide the
details for your
application
submission.27_9780672335761_AppANEW.qxd 12/16/11 12:49 PM Page 15
Submitting an Application for Approval 15
Next, you need to rate your application so that parental controls can be applied.
Scroll down the form to see the Rating settings (see Figure A.15). The age limit
changes depending on how you rate your application. Make sure you enter
information correctly. During an audit process, Apple reviews how you score your
application.
FIGURE A.15
All applications
must be scored
using the Rating
tool.
Scroll down a bit farther to reach the artwork submission area, shown in Figure A.16.
Click Choose File, and then Upload File for each file section within the Upload
screen. Click Save Changes when you have finished uploading all the application
resources.
You’ve just completed your application submission profile. You will see a summary
screen where you can double-check everything about your application before you
submit it for Apple’s approval. Review the information, and then click Done, as
shown in Figure A.17.
Review the information on the final screen, and then click the Ready for Upload but-
ton. You may be asked a question about export control, depending on your location.
Answer any final questions and click Done when finished. You are then taken back
to the main iTunes Connect page, where you can view the status of your application
submission. Because no application binary has been submitted yet, your application
status will indicate that an upload is pending.27_9780672335761_AppANEW.qxd 12/16/11 12:49 PM Page 16
16 APPENDIX A: Distributing Applications Through the App Store
FIGURE A.16
You can easily
add artwork for
your application.
FIGURE A.17
Your application
upload is
pending.
Uploading an Application Binary
After you’ve configured an application profile in iTunes Connect, you can return to
the comfort of Xcode to complete the upload. Open the application project in Xcode,
and then switch to the Organizer (Window, Organizer).27_9780672335761_AppANEW.qxd 12/16/11 12:49 PM Page 17
Submitting an Application for Approval 17
Click the Archives icon on the toolbar to show the applications that are ready to be
uploaded. From the list on the left, click your application name to show the different
binaries (listed by date) that you can upload.
Select the date that corresponds to the version you want to submit, and then click
the Submit button at the right of the window. You are prompted for your iTunes
Connect login information, as shown in Figure A.18.
FIGURE A.18
Enter your iTunes
Connect login
credentials.
After you enter your information and click OK, Xcode chugs away for a little while
and then shows a screen where you can choose your distribution signing identity
(you can choose Don’t Re-sign because you already picked the correct information
prior to building) and the application profiles awaiting upload. Choose the applica-
tion for which you entered information, and then click Next to submit it, as shown
in Figure A.19. Your application will be uploaded to Apple’s servers.
If you want to make sure that everything is in order with your application prior to
Did You
Know?
submitting, you can use the Validate Application button in the Organizer. The appli-
cation is also validated during submission, and Xcode displays any errors that
occur.
After submitting the app, you can track its progress via the Manage Your
Applications link within iTunes Connect (http://itunesconnect.apple.com/).27_9780672335761_AppANEW.qxd 12/16/11 12:49 PM Page 18
18 APPENDIX A: Distributing Applications Through the App Store
FIGURE A.19
Choose the
application
profile that you
entered in iTunes
Connect.
Exploring Other Distribution Methods
In addition to the App Store, Apple provides two other ways to distribute your appli-
cation: ad hoc deployment and enterprise delivery.
Ad Hoc Deployment
Sometimes you do not want to deploy an application immediately to the App Store.
Sometimes you just want to send it directly to some friends and coworkers to get
feedback.
Ad hoc deployment allows you to package a release version of your application into
a zip file and give it to whomever you want via email, website download, or USB
drive.
Packaging an application for ad hoc deployment is easy. After you have created a
release build of your application in Xcode, use Product, Archive to find the version
that you want to distribute within the Xcode organizer.
Select the build you want to distribute, and then click Share. You are prompted for
an ad hoc provisioning profile to associate with the build and then given the option
of emailing the application or saving it to disk.27_9780672335761_AppANEW.qxd 12/16/11 12:49 PM Page 19
Exploring Other Distribution Methods 19
The setup for an ad hoc version of the distribution provisioning profile is the same Did You
Know?
one for an app that will be deployed to the iTunes store. The only difference is that
you choose Ad Hoc as the distribution type.
To load the application, all your friend/coworker/tester needs to do is double-click the
file she receives to load it into iTunes and begin using it.
Regarding the ad hoc process, be aware of the following caveats:
. Apple states that you are limited to only 100 people per release version of an
app when you want to share the app ad hoc. Of course, there are ways around
this limitation. You can change the version number each time you want to cre-
ate an ad hoc deployment or even change the name of the application.
. This method should be used only for early releases and testing of your applica-
tion. The ad hoc deployment method can in no way reach the number of peo-
ple you can reach using the iTunes App Store (unless, of course, you have 40+
million user email addresses in your Contacts folder).
Enterprise Provisioning
Some of the most prolific users of iOS devices are enterprises. The BlackBerry handset
continues to lose market share to Apple as businesses around the world integrate the
iPhone into their messaging platforms. To take advantage of the enterprise deploy-
ment model
. You must have an Enterprise subscription to Apple’s Dev Center ($299/yr).
. Each custom application your company develops must be signed using your
own digital certificate.
. An enterprise provisioning profile must be created allowing authorized devices
to install applications with your certificate.
. You then deploy your applications to authorized desktops.
Authorized users can drag and drop a deployed application into their iTunes and
sync the next time they connect their device to their computer. The process is the
same for Mac, Windows XP, Vista, and Windows 7 versions of iTunes.You can also read