STINGRAY MUSIC MOBILE APP - USER GUIDE
←
→
Page content transcription
If your browser does not render page correctly, please read the page content below

STINGRAY MUSIC MOBILE APP
USER GUIDE
VERSION 1.0
QUICK START GUIDE
1 Download the Stingray Music mobile app from the
App Store or Google Play, and then launch it.
2 Sign up for a Stingray Music account or connect
with Facebook.
If the user already has a Stingray Music account,
sign in instead.
Follow the on-screen instructions.
3 On this screen, the user should tap “Yes, continue
with the free service” for complimentary access to
the app.
Or
The user may choose to subscribe to the premium
version.
In either case, the user should follow the
remaining on-screen instructions.
INITIAL – AT LAUNCH
Three (3) ways to connect to app:
1. Connect Using Facebook
At the title screen, tap “Connect using Facebook”.
User logs into their Facebook account; this will log
them into Stingray Music as well.
If the user does not have a Facebook account, it
is also possible to tap the “Create New Account”
button on the Facebook login screen.
2. Sign Up (New Users)
At the title screen, tap “Sign Up”.
Next, the user submits an email address that will
be associated with the Stingray Music account.
User must give the account a password that is at
least eight (8) characters long.
The email address/password combination is
needed to log into the application in the future.
When done, tap “Create Account.”
Follow the remaining on-screen instructions
3. Sign In (Returning Users)
If the user already has an active account, tap
“Sign In” on the title screen.
Enter Stingray Music credentials (email
address/password combination). The “Forgot
Password” option is also available on this page.
If “Forgot Password” is used, an email is sent to
the user with instructions to reset the password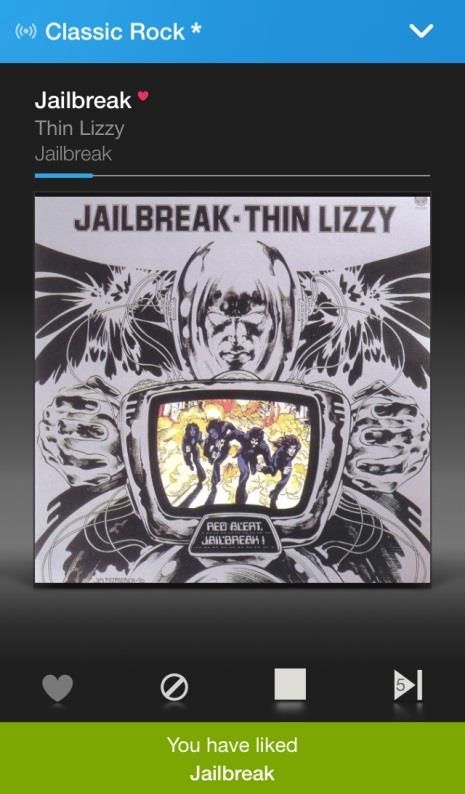
Two (2) ways to access the app’s music service:
1. Access the Complimentary Service Offered by TV Providers
Access to the app is free for those who already have a subscription to a TV provider that
carries Stingray Music channels.
Authentication Process
After the user creates an account, or after they sign in for the first time (with or without
Facebook), there are two ways to establish the link between the mobile app and their TV
provider:
1.1 By Way of Audio Signal – Procedure:
If the user is home, they will be able to authenticate the app over the airwaves using their TV
for free access, without having to enter any codes.
1 First, turn on the TV.
Second, launch the Stingray Music TV app.
2 On the mobile app’s title screen, sign up for a free
account or sign in.
New users need to agree to the Terms of Use and
Privacy Policy, and set communication settings.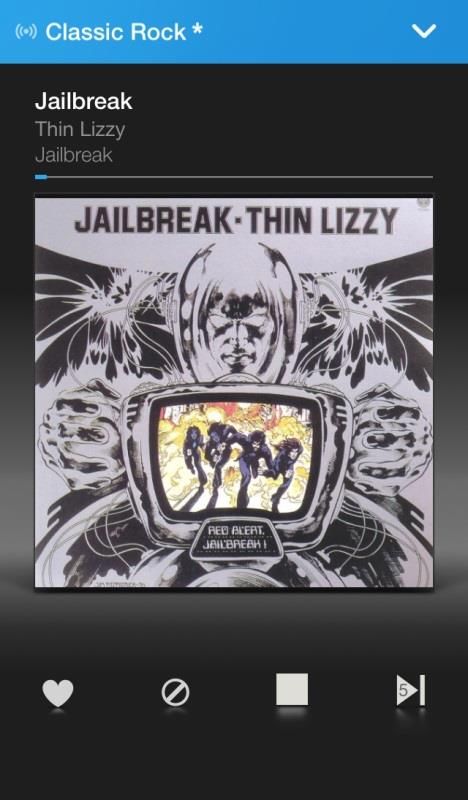
3 The user is then taken to the Authentication page.
Tap “Yes, continue with the free service”.
4 TV providers in the user’s region are presented in
grid form.
A complete list of TV providers that carry Stingray
Music is available by tapping “List all TV
providers” at the bottom of the screen.
5 “List All TV Providers” is sorted alphabetically.
The user can narrow the list down by tapping on
“Type to filter list” at the top of the screen, and
then entering the first letters of their provider’s
name. If the TV provider still cannot be found,
jump to “What if user’s provider isn’t on the ‘List
All TV Providers’ page?”.
6 After the user selects their TV provider, the app
will ask them to confirm that their TV is nearby. If
it is, they tap “Authenticate with your TV”.
If the user does not have immediate access their
TV, they may choose instead “Other available
options” (in this case, jump to “If Incapable Of
Reading Audio Signal – Remind Me Later – Grace
Period”)
7 Follow the directions displayed on this screen.
When ready, tap “Start Listening”.
8 The mobile device’s mic must be close the TV
speakers and aimed directly at them.
An image representing the user’s device is
displayed within a target. The more this target is
“filled in”, the more effectively the app will detect
the audio signal.
If there is no signal, ensure that the mic on mobile
device is enabled or jump to “If Incapable Of
Reading Audio Signal – Authenticate Later –
Grace Period”
9 If the device does not recognize the TV signal in
time, a timeout message will pop up along with
troubleshooting advice. The user may repeat the
“listening in” operation as many times as they
wish
10 If the TV’s audio signal is not recognized following
the first attempt, the user may already select
Remind Me Later, then select Authenticate Later
on the following screen – they will be given a
grace period of five (5) days to use the app while
they attempt to complete the authentication…
11 …… or, they may authenticate their credentials on
their TV provider’s website (if the provider has a
login page set up to this effect).
For more info on this step, jump to “b. Alternate
authentication method: by signing in on the
service provider’s login page”.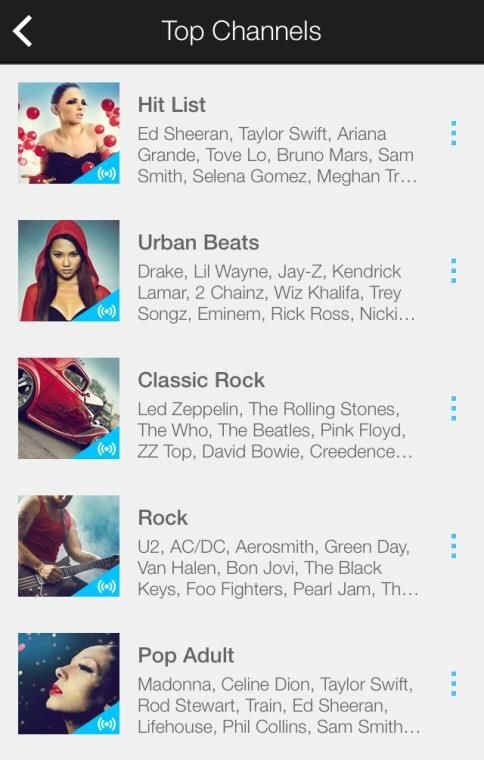
12 When the app authentication is completed with
the TV’s audio signal, the Stingray Music mobile
app is unlocked for 90 days.
End of Complimentary Service - Renewal
After 90 days the complimentary use period will expire, if it has been authenticated with the
TV’s audio signal. A message will appear shortly after to inform the user of the expiration of the
service, and they will no longer have access to the app until they renew their authentication.
When the user is informed that they need to renew their complimentary use period, one of the
response buttons in the message alert is ‘Extend Period’, allowing them to initiate the
authentication process by audio signal on-the-spot, without having to access their app’s
settings first.
To extend the complimentary service from the app’s settings:
After the complimentary use period runs out, tap Options ( icon found in the main
menus of Channels and My Music sections)
Choose Settings > Manage Account > Extend Period
User will go through the authentication process by way of their TV’s audio signal to extend
their complimentary service.
User may continue extending the complimentary service as many times as they wish, as
long as they have a subscription with their TV provider.
If the user doesn’t want to extend the complimentary use period by audio signal every 90 days,
they should use the alternate method. Jump to “b. Alternate authentication method: by signing
in on the service provider’s login page”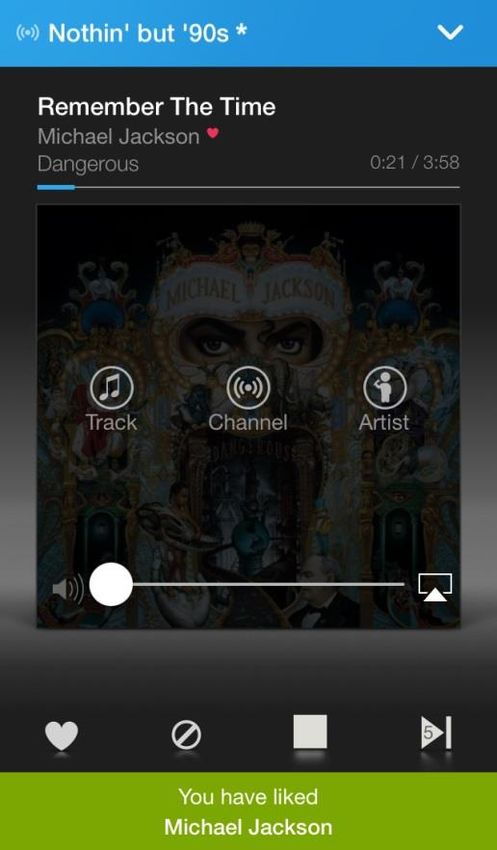
1.2 Alternate authentication method: signing in on the TV provider’s login page
If the TV provider has a login page set-up, the user may choose to authenticate by signing up
once.*
This is especially useful if:
Authentication by audio signal is not supported by the TV provider.
The device does not recognize the audio coming from the TV.
User doesn’t want to extend their complimentary use period by audio signal every 90
days.
User is not always near their TV when they wish to authenticate.
1 After the user signs up and chooses “Yes,
continue with the free service.”…
2 … they select their TV provider from the grid or
from a more comprehensive list (by tapping on
“List all TV Providers” at the bottom of this
screen).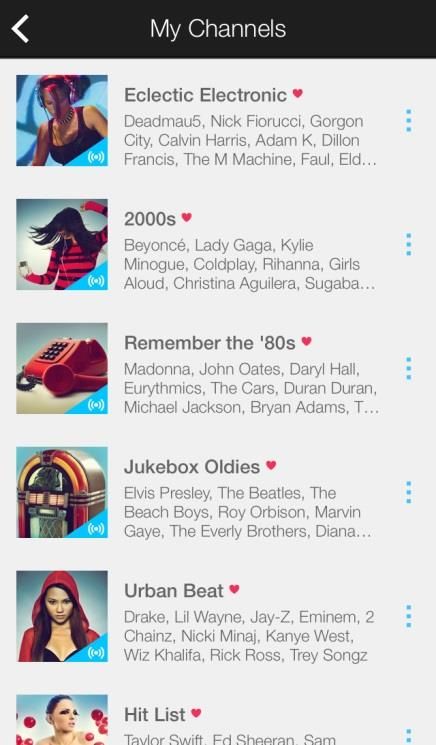
3 When asked “Is your TV nearby?” choose “Other
available options”.
4 Choose “Authenticate with [Provider name]”.
5 User is brought to their TV provider’s login page.
They sign in with credentials supplied to them by
their provider.
Note Regarding Manual Authentication:
Once authenticated on the TV provider’s login page (as opposed to authentication via the TV),
the user may continue using the Stingray Music mobile app for free without a time limit (no
authentication renewal required), for as long as they have a subscription with their TV provider.If Incapable Of Reading Audio Signal – Authenticate Later – Grace Period
When to use this:
User is not near their TV.
Device does not recognize the Stingray Music channel streaming from the TV.
In any of the above situations, the user may still access the app:
1 After the user opts for the free service and has
specified the TV provider, they are brought to this
page.
Tap “Other available options”.
2 Tap “Authenticate later” on this page.
In the case of a user’s unsuccessful attempts at
authenticating the mobile app via the TV’s audio
signal, the proper procedure would be to select
Remind me later when this option is given, then
Authenticate later.3 User is then given a grace period of Five (5) days.
They are given more time to authenticate the app
but still have access in the meantime.
End of Grace Period – What To Do
At the end of the 5-day grace period, the user can no longer use the app until the
authentication with their TV provider is completed, or until they decide to purchase a recurring
subscription (monthly or yearly).
To find out how many days remain:
These steps are for users whose service has an expiry date – users who:
Chose Authenticate Later (5-day grace period)
Authenticated their mobile app through their TV
1 In the main section of the app (in Channels or My
Music), tap Options ( ), on the top right corner
of the screen.
When the contextual menu appears, tap Settings.2 In Settings, tap on Manage Account at the top of
the page.
3 User is taken to their account page where the
number of remaining days is displayed.
What if the user’s TV provider isn’t on the “List All TV Providers” page?
1 Tap “My TV provider is not listed” at the bottom of
the All TV Providers list.2 The user enters the name of their TV provider and
submits the form by tapping “Continue”.
3 The image to the left shows an email that will be
sent to a customer service representative.
The user may add additional information before
tapping “Send”.
4 When the TV provider begins offering the Stingray
Music mobile app, a customer service
representative will inform the user.Basis vs. Premium
BASIC FEATURES PREMIUM
Play channels
Favourite channels
Play/ Stop music
Skip tracks
Like or Block tracks
Like or Block Artists
Custom Program
Consult listening history within channel
Multiple profiles
Display to external output (Apple TV or chromecast)
Note that the type of service and the variety of genres and channels offered, may differ
depending on the user’s TV provider.
Only the premium version provides unrestricted access to all the mobile app’s features.
The premium version allows users to skip, like and block tracks and artists from their custom
programs.Stingray Music for Mobile Devices – Two Main Sections*:
Note that the images of the following sections are taken from the premium version.
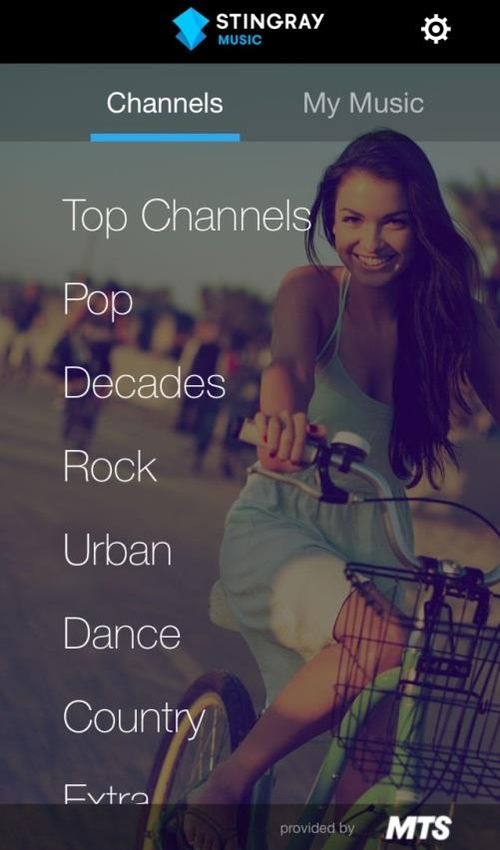
Channels
Streaming music channels classified by genre.
Each genre is a subsection (jump to the Channels
section).
My Music
Channels preferred by the user, as well as their
profile-specific listening histories, are compiled
here.
As a premium feature, in My Preferences the user
can also consult and modify all the music they
liked or blocked (jump to My Music).
The Channels and My Music sections are placed side by side on the main menu bar and are
accessed by swiping left or right, or by tapping on their names.
Once the user has accessed a section, its subsections appear immediately underneath.MAIN AREA
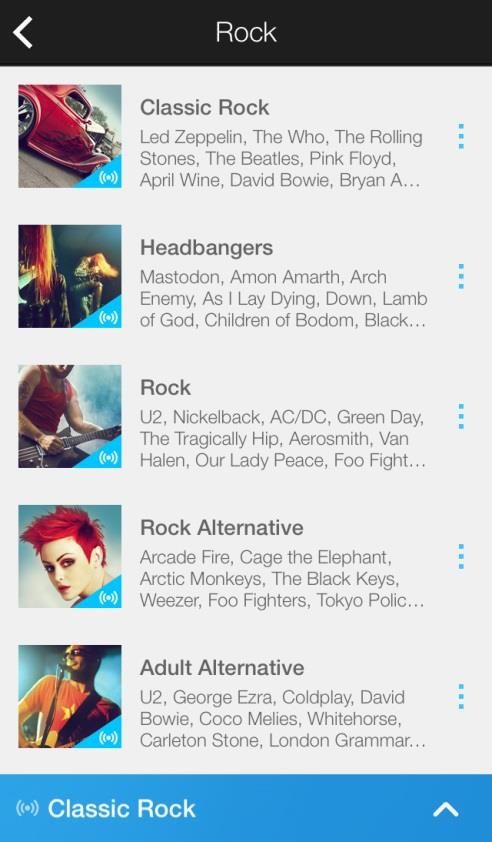
Channels
After signing up or signing in, the user is taken to Channels, the default section:
Top Channels, the first item listed, groups Stingray
Music’s most popular channels across all genres.
Names of music genres are displayed vertically by order
of popularity.
Tap on a music genre to browse its related channels.
Note
Whether the app is basic or premium, the available genres and channels may differ from one TV
provider to the other.My Music
My Music is the second section accessible from the app’s main menu bar (after Channels).
Tap on the subsections underneath My Music to access their content.
With a given profile, the user may:
Consult a list of all channels that were listened to and
that are linked to a specific profile*, as well as play them
from there. The user may also view the tracks that were
played on these channels (jump to My History)
Access their favourite channels and play them from
there (jump to My Channels)
(PREMIUM VERSION) In the My Preferences
subsection, for each channel the user may consult and
modify the lists of all liked and blocked tracks and artists
that are linked to a profile. (jump to My Preferences)
*Note
All music activity is linked to a particular profile.
If the user has multiple profiles and cannot find the listening history or favourite channels (as well as
liked and blocked tracks and artists in the premium version), chances are that they are linked to a
different profile. Jump to Profile Options for more info.
My History
Music channels that were previously listened to by a
particular profile are compiled in My History. They can be
played and saved as favourites from here as well.
My Channels
Channels that are saved as favourites are compiled in My
Channels for easy access. Note that previously listened to
channels that are not favourites are compiled in My History
(in the My Music section).My Preferences (PREMIUM Only)
In the premium version, all profile-related music activity
(tracks and artists that were liked and blocked from
anywhere within the app) are compiled in My Preferences.
*Reminder:
All music activity is linked to a particular profile.
If the user has multiple profiles and cannot find the listening history or favourite channels (as well as
liked and blocked tracks and artists in the premium version), chances are that they are linked to a
different profile. Jump to Profile Options for more info.
Playing Music from Any of the Main Sections
Whether playing music from a genre-specific channel or from a My Music subsection:
1 Music can be played from any subsection within
Channels and My Music.
A listed channel (as shown in the image to the left) can
be played by tapping on it.2 Vertical ellipses ( ) to the right of all listed channels
can be tapped to display a list of options, from which
Play Channel can be selected.
Other Sections from Which to Play a Channel:
In My History, within the My Music section, tap on a previously listened to channel.
Tap on a channel that was added to My Channels (also in the My Music section).During Playback of a Channel – The Cover View
When listening to a channel, the Cover View page will slide up from the bottom of the screen.
The Cover View displays:
The album cover art of the current track. When the track ends, the album cover art of the next
track will slide into view.
Menu options for the current channel, track and artist (accessible by tapping on the album
cover art).
Player controls for the current track: in addition to the Stop/Play button in the basic version, the
premium version includes Like, Block and Skip buttons.
To dismiss the Cover View page:
1 Tap on the blue bar that highlights the channel (see
image to the left) and the Cover View page will slide
down.
The Cover View can be minimized by touching
anywhere on the page before dragging it down.
Note that this cover view image is taken from the premium
version.2 To recall the Cover View page, tap on the minimized
blue bar.
The album art of the current track will slide back into
view.
Depending on the user’s version of the app (basic or premium), there are two (2) versions of
Cover View
Basic version: Play/Stop playback controls, channel options.
Premium version: Play/Stop and Skip controls; Like and Block buttons; track, artist and
channel options.Cover View for Premium Version
Current track/ artist/ album info, with a progress bar that
advances as the track progresses.
Like or Block the current track using the heart or
slashed circle icons. More about this in “Liking a track”
and “Blocking a track”. Using either of these icons will
activate the custom program on this and other related
channels.
Like or Block the current artist (by tapping on the album
cover art to reveal hidden icons, then by tapping on
Artist icon). More about this in “Liking an artist” and
“Blocking an artist”. Using either of these functions will
activate the custom program on this and other related
channels.
Add a channel to favourites (by tapping on album art
then on Channel icon). More about this in “Saving
channels as favourites for easier access”.
Skip the current track (up to 6 skips allowed per hour,
per channel).
Stop/ Play control. When the audio streaming is
stopped, the album art is replaced by an image that
represents the channel.
Player volume and AirPlay icon (Cast icon for Android
devices), revealed when tapping on the album cover art
Note:
Premium version only: when the custom program is active, resuming playback after a channel
has been stopped auto-generates a new music program.
To disable the channel’s custom program and return to the standard program, toggle the
Custom Program switch to “Off” in Channel Info (jump to Channel Info).
More on the differences between standard and custom programs (premium version only) in
“Channel Programming: From Standard to Custom.”Cover View for Basic Version
Current track/ artist/ album info, along with a progress
bar that advances as the track progresses.
Add a channel to favourites (by tapping on album cover
art, and then on the Channel icon).
Stop/ Play control. When the audio streaming is
stopped, the album cover art is replaced by an image
that represents the channel.
When Play is tapped on a channel, the scheduled
standard program is resumed.
Player volume and AirPlay icon (Cast icon for Android
devices), revealed when tapping on the album cover
art.
Note:
When listening to a channel in the basic version, tapping Stop only interrupts audio streaming;
the channel continues to broadcast its standard program.
Hence, the Play icon does not resume playback from where the user left off, but instead plays
what the channel has scheduled at that point in time.Cover View for Premium Version
Current track/ artist/ album info, with a progress bar that
fills up as the track progresses.
Like or Block the current track using the heart or
slashed circle icons. More about this in “Liking a track”
and “Blocking a track”. Using either of these icons will
activate the custom program on this and other related
channels.
Like or Block the current artist (by tapping on the album
cover art to reveal hidden icons, then by tapping on
Artist icon). More about this in “Liking an artist” and
“Blocking an artist”. Using either of these functions will
activate the custom program on this and other related
channels.
Add a channel to favourites (by tapping on album art
then on Channel icon). More about this in “Saving
channels as favourites for easier access”.
Skip the current track (up to 6 skips allowed per hour,
per channel).
Stop/ Play control. When stopped, the album art is
replaced by an image that represents the channel;
audio streaming is stopped
Player volume and AirPlay icon (Cast icon for Android
devices), revealed when tapping on the album cover art
Note:
When the custom program (premium version only) of a channel is active, resuming playback
after it had been stopped auto-generates a new music program.
To disable the channel’s custom program and return to the standard program, toggle the
Custom Program switch to “Off”, in Channel Info (jump to Channel Info).
More on the difference between standard and custom programming (premium version only) in
“Channel Programming: From Standard to Custom.”Channel Programming: From Standard to Custom
(PREMIUM version only)
As part of the premium version, user can further customize their music experience by:
Skipping tracks (up to 6 per hour, per channel).
Liking or blocking a particular track or artist.
Switching from the standard program to the custom program.
Consulting and modifying their profile-specific liked and blocked lists.
All channels initially play the standard program.
Standard Program:
Scheduled program made up of tracks selected by a music programmer.
Once a user likes or blocks a track or artist, the channel’s custom program is triggered (unless
related likes and blocks from other channels have already customized it).
Custom Program:
A channel with a custom program plays tracks and artists based on what the user has liked or
blocked so far with their current profile. The more tracks and artists are liked and blocked; the
better a channel gets at playing what the user enjoys listening to.
There are three (3) options for a user to disable the custom program of a channel and revert to the
standard program:
On the Custom Program page in Channel Info, toggle the Custom Program switch to the Off
Position (see Custom Program Page).
Create a new profile and use it as the current profile. All channels on this new profile will start
off as standard until likes and blocks customize it (for info on profile management, see Profiles
List)
Or
Reset the profile that is linked to those likes and blocks (see Profiles List).
Before Resetting a Profile…
Resetting a profile resets ALL preferences associated with it (listening histories, favourite
channels, as well as likes and blocks on all tracks and artists).
Once the profile is reset, all channels linked to it will revert to the standard program.PREMIUM version: Channel Info
Because all channels pull their tracks and artists from the same Stingray Music catalog, a track or
artist that has been liked on one channel will be also liked on other channels where it is featured. The
same goes for blocked content.
For Instance:
Taylor Swift is in Hit List (pop), but she is also in Hot Country (country music).
If Taylor Swift is blocked in Hit List, the user will not hear any of her tracks in Hot Country’s
custom program either.
PROGRAM CUSTOMIZATION (PREMIUM version only)
In the premium version, the user may customize what they hear on any given channel by liking or
blocking tracks and artist with the use of icons found on the Cover View page (or by tapping the
vertical ellipses to the right of all listed tracks and artists anywhere in the app):
: User can like tracks and artists to increase their play frequency (rotation) on all related
channels.
Or
: User can block tracks and artists from all related channels.
When Adding or Blocking Tracks and Artists
Blocked tracks and artists have a slashed circle icon ( ) next to their name.
Liked tracks and artists have a heart icon ( ) next to their name.
At least one Like or Block is needed for a channel to start playing a custom program.
To revert a channel to the standard program, toggle off its Custom Program switch in Channel
Info. See Custom Program Page.How to Like a Track (PREMIUM version only)
From the Cover View page
1 From a channel’s Cover View page, the user likes the
track they are currently listening to, and would like to
hear it more often on all related channels.
The user will then tap on the Like icon ( ),
underneath the album art, among the player controls.
2 The album cover art can also be tapped to reveal extra
icons.
Among them is Like this Track. Tapping it also gives the
user the option to Like the current track.3 Once a track is liked (added to My Tracks), it is marked
by a red heart icon next to its title and a confirmation will
briefly appear at the bottom of the screen.
Note
If this is the first Like (or Block) on that channel, its program will change from standard to
custom.
If this is not the first Like (or Block) on that channel, customization continues with the addition
of one more liked track.
Rotation of a liked track is increased in the channel’s custom program.
If the liked track is featured on other channels, their custom program will also be triggered.
Liked tracks are compiled in a list called My Tracks that can be viewed from the Custom
Program page of the relevant channels, or from My Preferences (in My Music).
From the Channel Info
1 User likes a track that they find listed on one of the
pages within Channel Info. The track does not need to
be currently playing.
The user taps on that track, from which a list of track
options appears.2 User chooses Like this Track.
3 Once a track is liked (added to My Tracks), it is marked
by a red heart icon next to its title and a confirmation will
briefly appear at the bottom of the screen.
Note
Even if a track is not currently playing when it is liked, the custom programs of all channels that
feature it will be triggered (or are further customized).
User may also go to their blocked tracks list, in the Customized Program page or My
Preferences (in My Music), and move any item to My Tracks. See below, Liking a Previously-
Blocked Track.
Listed tracks can be found in Top Tracks and the Standard Program subsections within
Channel Info, as well as in View Played Tracks of My History within My Music.Liking a Previously-Blocked Track
1 From the Blocked Tracks list (in the Custom Program
page in Channel Info), the user decides to Like a track
they have previously blocked.
2 User chooses and taps a blocked track. From the list of
track options, the user selects Like this Track.
The track can also be removed from blocked lists
without being liked by selecting Remove from Blocked
Tracks.3 The blocked list will automatically be updated and a
confirmation will briefly appear at the bottom of the
screen.
Note
User may also go to the channel-wide list of blocked tracks in My Music’s My Preferences subsection
and move any item to My TracksHow to Block a Track (PREMIUM version only)
From the Cover View page
1 From a channel’s Cover View page, the user does not
like the track they’re currently listening to and wants to
block it from their custom program.
To block the track, the user taps on the icon
underneath the album art, among the player controls.
2 The album cover art can also be tapped to reveal extra
icons.
Among them is Block Track. Tapping it also gives the
user the option to block the current track3 Once blocked, the music player automatically skips to
the next track (provided the skip limit hasn’t already
been reached on that channel).
A confirmation will briefly appear at the bottom of the
screen.
Note
Blocked tracks appear are marked by a slashed circle icon:
The blocked track is also removed from the custom program of all channels where it is
featured.
If this is the first Block (or Like) on that channel, the program changes from standard to
custom.
If this is not the first Block (or Like), customization will continue with the addition of more
blocked track.From Channel Info
1 User does not like a track they see listed in Channel Info
and wants to remove it from the custom program. The
track does not need to be currently playing.
The user taps on that track, from which a list of track
options appears
2 User chooses BlockTrack.3 Once a track is blocked, a slashed circle icon ( )
appears next to its title and a confirmation will briefly
appear at the bottom of the screen.
Note
If the track is playing when it is blocked, it will also be skipped (provided that the skip limit
hasn’t already been reached on that channel).
Listed tracks can be found in Top Tracks and the Standard Program pages within Channel
Info, as well as in View Played Tracks in My History, within My Music.
User may also go to the My Tracks list in the Custom Program page of Channel Info and move
any item to the Blocked Tracks list. See below, Blocking a Previously-Liked Track.
The user may also go to My Tracks, a channel-wide list of tracks, in My Music’s My
Preferences, and move any item to the channel-wide list of Blocked Tracks.Blocking a Previously Liked Track
1 From the My Tracks list in the Custom Program page
(within Channel Info), the user decides to block a track
they’ve previously liked.
2 User chooses and taps on the liked track. From the list
of track options, user selects Block Track
The track can also be removed from My Music lists
without being blocked by selecting Remove from My
Tracks3 The list of liked tracks is automatically updated, and a
confirmation will briefly appear at the bottom of the
screen.
Note
If the track is playing when it is blocked, it will also be skipped (provided that the skip limit
hasn’t already been reached on that channel).
To view and modify a channel-wide listing of liked and blocked tracks, the user may go to the
My Music section, and then to My Preferences. All liked and blocked artists and tracks can be
accessed from there.Liking an Artist (PREMIUM version only)
From the Cover View page
1 From a channel’s Cover View page, the user hears the
track of an artist they like and would like to increase the
rotation of more tracks from that artist in all channels
where it is featured.
The user taps on the album cover art : Track, Channel
and Artist icons are revealed.
2 The user taps on the Artist icon, from which a list of
options appears.
User chooses Like this Artist.3 Once added to My Artists, the artist’s name is marked by
a red heart icon, and a confirmation will briefly appear at
the bottom of the screen.
Note
If this is the first Like (or Block) on that channel, its program changes from standard to custom.
If this is not the first Like (or Block) on that channel, customization will continue with the
addition of one more liked artist.
Rotation of a liked artist is increased in that channel’s custom program.
If the liked artist also appears in other channels that have their Custom Program switch
toggled to the default On position, the rotation of the artist’s tracks will increase there as well.
Liked tracks are compiled in a list called My Tracks, which can be viewed from the Custom
Program page (in Channel Info) of relevant channels; or from the My Preferences subsection
(in My Music), which contains channel-wide listings of liked and blocked tracks and artists.From the Channel Info
1 User likes an artist they see listed on the Artists page
within Channel Info.
The artist’s track does not need to be currently playing.
The user taps on the chosen artist, from which a list of
artist options appears.
2 User chooses Like this Artist3 Once added to My Artists, the artist’s name is marked by
a red heart icon, and a confirmation will briefly appear at
the bottom of the screen.
Note
The user may also go to their blocked artists list on the Custom Program page (in Channel
Info) or in My Preferences’ channel-wide list of blocked artists (within My Music section) and
move any performer to My Artists.
If the liked artist is also featured on other channels that have the Custom Program switch
toggled to the default On position, the rotation of their tracks will increase there as well.
Liking a Previously-Blocked Artist
1 From the Blocked Artists list in the Custom Program
page (within Channel Info), the user decides to Like an
artist whom they have previously blocked.2 User taps on the chosen artist. From the list of options,
user selects Like this Artist.
The artist can also be removed from blocked lists
without being liked by selecting Remove from Blocked
Artists.
3 The list of blocked artists is automatically updated, and
a confirmation will briefly appear at the bottom of the
screen.
Note
The user may also go to the channel-wide list of blocked artists in My Preferences (within My Music
section) and move any item to My Artists.Blocking an Artist (PREMIUM version only)
From the Cover View page
1 From the Cover View page, the user does not like the
artist they’re currently listening to and wants their tracks
blocked from all custom programs.
The user will then tap on the album cover art: Track,
Channel and Artist icons are revealed
2 User taps on the Artist icon, from which a list of options
appears.
Block Artist is chosen.3 Once the currently-playing artist is blocked, the music
player automatically skips to the next track by a different
artist, (provided the skip limit hasn’t already been
reached on that channel).
A confirmation will also briefly appear at the bottom of
the screen.
Note
Wherever blocked artists are featured (e.g. within Channel Info, My Preferences), they are
marked by a slashed-circle icon that confirms they are blocked:
All tracks from this blocked artist are also removed from the custom program of all channels
that feature them.
If this is the first Block (or Like) on that channel, its program will changes from standard to
custom.
If this is not the first Block (or Like) on the channel, customization will continue with the
addition of one more blocked artist.
Blocked artists are compiled in a list called My Blocked Artists which can be viewed from the
Customized Program page of relevant channels; or from My Preferences (in My Music
section), which contains channel-wide liked and blocked lists.From the Channel Info 1 2
3
Note
If the artist is playing when it is blocked, the music player will skip to the next track from
another artist, (provided that the skip limit hasn’t already been reached on that channel).
All tracks performed by the blocked artist are removed from the custom programs of all
channels that feature them.
The custom program is triggered on all channels that feature this blocked artist, unless their
customized program switch was previously toggled manually to the OFF position, or the
custom program was already triggered.
The user may also go to the My Artists list on the Custom Program page in Channel Info and
move any item to the Blocked Artists list.
The user may also go to the channel-wide list of liked artists in My Preferences (from My Music
section) and move any item to Blocked Artists.Blocking a Previously-Liked Artist
1 From the My Artists list in the Custom Program page
within Channel Info, the user decides to Block an artist
whom they have previously liked.
2 User taps on the chosen artist from which a list of option
appears.
Block Artist is chosen.
The artist can also be removed from the My Artists list
without being blocked by selecting Remove from My
Artists.3 The list of liked artists is automatically updated and a
confirmation will briefly appear at the bottom of the
screen.
If the music is playing when it is blocked, the music
player will skip to the next track from another artist,
(provided the skip limit hasn’t already been reached on
that channel).
Note
The user may also go to the channel-wide list of liked artists in My Preferences (from My Music
section) and move any item to Blocked Artists.
Channel Info
How to access the Channel Info subsection from any listing
1 Vertical ellipses ( ) are placed to the right of all listed
channels (see image to the left).
Tap on ( ) to view that channel’s options.2 From the list of options, tap View Channel Info.
How to access the Channel Info from Cover View
1 Tap on a channel name in the listings to play it and to
see its Cover View page.
Tap on the cover album art to reveal additional Track,
Channel and Artist icons.
Tap on the Channel icon…
Note that this image of the Cover View page is taken from
the premium version.2 … from the list of options and tap View Channel Info.
Channel Info – Contents
Every channel has its info subsection, it is made up of six (6) pages in the premium version and of five
(5) pages in the basic version. This subsection includes a description, top tracks, artists, custom
program (premium only), standard program and music programmer.
The pages of the information subsection are accessed by either swiping laterally or by tapping on their
names.
Channel info provides additional information such as:
Description A short description of the channel.
Top Tracks The channel’s most popular tracks. Users with the premium
version have the additional options of liking and blocking
tracks in this listing.
Artists A list of the channel’s featured artists. The premium version
offers the additional option of liking and blocking artists in this
listing.
Customized Program Premium Feature – Programming.
(PREMIUM version only) Toggle the custom program (once it has become active), as
well as browse and/or modify related liked and blocked lists.
This page does not appear in the basic version of the app.
More info in Custom Program Page.
Standard Program A list of tracks that were played on this channel’s standard
program in the past 24 hours. The premium version offers
the additional option of liking and blocking artists in this
listing.To view tracks that were previously heard when tuned to this
channel (custom and standard programs), users of both the
premium and basic versions should access My History, in My
Music. More about this in My History.
Music Programmer A short bio of the channel’s music programmer.
Custom Program Page within Channel Info (PREMIUM VERSION ONLY)
When a channel’s custom program is triggered (toggled On), a filled-in asterisk icon marks its name
wherever it appears.
To toggle Off a channel’s custom program and revert to the
standard program:
In Channel Info, swipe left until arriving at the Custom
Program page (see image to the left).
Tap on the Custom Program switch to toggle the setting
to “Off”.
When the Custom Program is toggled Off, the asterisk
icon next to the channel name is dimmed.
The Custom Program switch is used to toggle between
standard and custom programs.
When a channel’s custom program is toggled back On, a
new music program is generated based on its likes and
blocks.
The lower half of this page shows the total number of likes
and blocks for tracks and artists on this channel. These likes
and blocks shape this channel’s custom program.
Saving Channels as Favourites for Easier Access (BASIC & PREMIUM)
From the Cover View1 From the Cover View page, tap on the album art.
Track, Channel and Artist icons are revealed.
Tap on the Channel icon.
Note that this image of the Cover View page is taken from
the Premium version.
2 The user taps on the Channel icon from which a list of
options appears.
Add to My Channels is chosen.
Favourite channels are marked by a red heart icon next
to their name and are compiled in My Channels, located
in My Music.
From channel listings1 To save a channel as a favourite from listings such as the
one pictured to the left:
Tap on the vertical ellipsis ( ) to the right of a chosen
channel.
2 A list of options appears for that channel.
Add to My Channels is chosen.
Favourite channels are marked by a red heart icon next
to their name and are compiled in My Channels, located
in My Music
Note
Once saved as a favorite, the option that allowed the user to add the channel to My Channels
changes from “Add to my channels” to “Remove from my Channels”.
Wherever a channel is displayed, it can be saved as a favourite:
In all musical genres within the Channels section.
In any given Channel Info subsection, by tapping on the vertical ellipsis ( ) to the right of the
channel name at the top of that screen.
On the Cover View page of a channel that is currently playing (as previously detailed).
In My History from the My Music section, if the channel was previously listened to.Accessing Favourite Channels (BASIC & PREMIUM)
1 In the main area of the app, swipe screen laterally until
My Music appears in the section header (as seen in the
image to the left).
Tap on My Channels, where the favourites of a user’s
given profile* are compiled.
Note that this image was taken from the Premium version.
There is no My Preferences section in the basic version.
2 Once in My Channels, the user can tap directly on a
favourite channel to play it from there.
Additionally, the vertical ellipses ( ) to the right of all
favourite channel may be tapped for more options.
Channels may be removed from favourites from here,
from the areas they were initially saved as favourites, or
from anywhere else they are displayed.
Note
Channels that are not favourites can still be accessed from My History, also found in My Music
*Reminder: All music activity is linked to a specific profile.
If the user has multiple profiles and cannot find the listening history or favourite channels (as
well as liked and blocked tracks and artists in the premium version), chances are that they are
linked to a different profile. Jump to Profile Options for more info.
OPTIONS (GEAR ICON)
The Options menu is represented by gear icon ( ) and is located at the top right corner of the
screen in any of the app’s main sections (Channels and My Music).
Tap on the to reveal a contextual menu with various options:
Settings
End-User License Agreement
Privacy Policy
About
Contact Us
The Settings Page
On the Settings page, the user can make adjustments
to their:
Account
Wi-Fi
Profile(s)
Automatic playback
Communication PreferencesManage Account
Tap Manage Account to consult the remaining time left
on accounts with expiry dates, such as:
Accounts of users who chose Authenticate Later at
Sign Up or initial Sign In, and are given a grace
period of five (5) days
Accounts of users who authenticate the app with
their TV and have to repeat the process every 90
days
On the image to the left, since the user previously chose
Authenticate later, only the buttons relevant to their
situation appear at the bottom of the screen.
The top of the screen indicates how many remaining
days the user has left to use the app before they need
authenticate again or renew the complimentary service
with their TV provider.
Note:
On this page, the buttons at the bottom of the screen will vary for relevance depending on the user’s
service.
Account Page
Authenticate Button
The Authenticate button is there for users who
were given a 5-day grace period (they selected a
TV provider but chose to authenticate later when
they signed up).
The user may authenticate anytime during the
grace period, even after it expires.
The Authenticate buttons will also appear when the
90 days free service period expires (for users who
authenticated the app with their TV’s audio signal).
Change my TV provider Button
Used when?
If the user needs to switch to a different TV
provider.
Log Out Button When logged out of their account, the user is
returned to the title screen with sign up, sign in and
connect with Facebook options.
In parentheses is the email address used to create
the Stingray Music account.
*Reminder:
All music activity is linked to a particular profile.
If the user has multiple profiles and cannot find the listening history or favourite channels (as well as
liked and blocked tracks and artists in the premium version), chances are that they are linked to a
different profile. Jump to Profile Options for more info.
WiFi Only toggle switch
Used When?
If the user’s device is also capable of using a
mobile data service to go online, toggling On the
WiFi Only switch ensures that available WiFi
networks will be used instead.
If the device falls out of WiFi range, the user must
toggle this switch to the Off position; in turn, their
device will switch to cellular data (if device is
capable of using cellular data, like a mobile
phone).
Profile Options
Current Profile
On the Settings page, this lets the user know
which profile is currently in use*.
Tapping the Current Profile field takes the user to
the Profiles list.
*Reminder:
All music activity is linked to a particular profile.
If the user has multiple profiles and cannot find the listening history or favourite channels (as well as
liked and blocked tracks and artists in the premium version), chances are that they are linked to a
different profile. Continue reading for more information.Profiles List
A user is allowed up to eight (8) profiles on one
account. This enables multiple users, who might
share the same device, to each have their
favourites and listening histories.
Multiple profiles can be used by a single user to
create different themes.
The check mark next to a profile name indicates
which one is currently in use. The current profile
name will also appear on the Settings screen.
Note:
The “Create New Profile” option is hidden when the user has created the maximum number of profiles
(eight).
Creating a profile Tap “Create New Profile”. A new profile will appear
underneath the most recent one.
A selected profile has a check mark to the left of its
name. Up to eight (8) profiles may be created.
Renaming a profile Tapping on the vertical ellipsis to the right of
the chosen profile brings up its profile options.
Tap Rename Profile and a keyboard will appear
on-screen. Tap OK to confirm the new profile
name.
Resetting a profile Tapping the vertical ellipsis to the right of the
chosen profile brings up its profile options.
Tap Reset Profile, and all of the user’s likes,
blocks, favourite channels and listening histories
will be deleted.
Before Resetting a ProfileOnce reset, the operation cannot be undone. All likes,
blocks, favourite channels and listening histories linked
to that profile will be deleted.
Deleting a profile Tapping on the vertical ellipsis to the right of
the chosen profile brings up its profile options.
Tap Delete Profile, and that profile as well as its
stored contents will be deleted from the Profiles
list.
Before Deleting a Profile
Once deleted, the operation cannot be undone.
If the active profile was selected for deletion (provided
there’s more than one existing profile), another profile
will be automatically activated.
While it can be reset, it is impossible to delete the only
profile in a profile list. The user would have to create a
new one to delete the former (the remaining profile will
become the active one).
Autoplay on Startup
Activate this option on a current profile, and the next
time the user returns to this profile (e.g. when the app is
launched or when switching from another profile), the
last listened to channel will play automatically.
Communication – Manage My Communication Preferences
The user can change their consent to receive further
marketing content from Stingray. Tapping this field
redirects user to a webpage where they set their
communication preferences.
Legal Documents
The End-User License Agreement and Privacy Policy can be found in the contextual Options menu
that appears when tapping on the gear icon ( ).End-User License Agreement
By using the app, users are automatically bound to certain legal regulations.
Privacy Policy
Users can consult this legal document regarding their privacy vis-à-vis their usage of the Stingray
Music mobile app.
ABOUT
Accessible from the contextual Options menu, the About
box has useful information for contacting customer
service.
Contents:
Company logo & tagline
Name of mobile app
Copyright info
Version number of the app
Device IDContact Us
For whom?
Users who wish to contact us by email (by tapping on
the email address at the top of the page, a new
contact us form opens up)
Three (3) addresses are listed for those who wish to
contact us by regular mail
For privacy concerns, tapping the email address at
the bottom of the page opens up the default email
app on the device
Extra notes for using Contact Us by email form
Tap Select Support Category – users are asked to
select the topic of the email.
The form cannot be sent without it.
Entering a name is required in order to successfully
send the form.
For users who are signed in, the contact email is
automatically entered.
Otherwise, a contact email address is required
before the form can be sent.
Something must be written in the comments field in
order for the support staff at Stingray Music to
receive the form.You can also read