Shared: Users Setup Guide for Concur Standard Edition Last Revised: April 5, 2021
←
→
Page content transcription
If your browser does not render page correctly, please read the page content below
Shared: Users
Setup Guide for Concur Standard Edition
Last Revised: April 5, 2021
Applies to these SAP Concur solutions:
Expense
Professional/Premium edition
Standard edition
Travel
Professional/Premium edition
Standard edition
Invoice
Professional/Premium edition
Standard edition
Request
Professional/Premium edition
Standard edition
Section 1: Overview

Table of Contents
Section 1: Overview ....................................................................................................4
      ADP Clients Only...................................................................................................... 5
      QuickBooks Clients Only ........................................................................................... 5
      Clients Connected to Financial Systems ...................................................................... 5

Section 2: Configure Individual Users .........................................................................5
      Access the Users Page .............................................................................................. 5
      Add a User .............................................................................................................. 6
      Search for a User................................................................................................... 14
      Update an Existing User.......................................................................................... 15
      Mark a User Inactive .............................................................................................. 15
      Edit the Invite Email............................................................................................... 16

Section 3: Configure Company Car Registration ........................................................19
      Register or Remove a Company Car for a User .......................................................... 19

Section 4: Configure Personal Car Registration .........................................................21
      Register a Personal Car for a User............................................................................ 22
      Correct the Business Distance for a Registered Car .................................................... 23

Section 5: Import Users ............................................................................................ 24
      Download the Spreadsheet ..................................................................................... 24
         Edit Multiple Users ........................................................................................... 25
      Populate the Spreadsheet ....................................................................................... 25
          Gathering User Information .............................................................................. 26
          User Import Fields ........................................................................................... 26
          Final File Review.............................................................................................. 36
      Upload the User Data Spreadsheet ........................................................................... 36
      View the Field Validation and Import Results ............................................................. 38
      Update an Existing User's Employee ID .................................................................... 39

Section 6: Special Cases ............................................................................................ 40
      About the Use of the Concur-Only System Record Roles ............................................. 40
      When a Payee is Terminated During the Reimbursement Process ................................. 40

Appendix       41
      Country Codes (as of March 2019) ........................................................................... 41
Section 1: Overview
Revision History
Date Notes/Comments/Changes
April 5, 2021 Updated to reflect new features and page design changes to Users, Add
User, and Edit User pages.
March 22, 2021 Updated the "Company Card" page name to "Payment Types".
March 11, 2021 Updated to reflect that the new Add User and Edit User pages are now the
default pages.
February 11, 2021 Added information about the new Add User and Edit User pages.
July 31, 2020 Added Thai to the Locales for Supported Languages table.
July 24, 2020 Updated several screen shots to reflect page name changes from Users to
Create User and Edit User.
July 7, 2020 Changed one instance of “Manage Custom Fields” to “Custom Fields”.
June 25, 2020 Updated to reflect the redesigned Users page changes. The previous version
of the guide has been renamed “Legacy” and is still available. When this UI
becomes the only UI the legacy document will be retired.
April 27, 2020 Renamed the Authorization Request check box to Request on the guide’s title
page; cover date not updated
January 15, 2020 Updated the copyright; updated China terminology to Hong Kong, China,
Taiwan, China, and Macau, China
September 21, 2019 Updated content for the Edit the Invite Email section.
August 17, 2019 Added a Bulk Edit for Multiple Users section in the Download a Spreadsheet
chapter.
Added a note to the XML Profile Synchronization ID field indicating it is now
only for updates and not for the removal of existing data.
Updated the description of the Employee ID and ERP Vendor name fields to
reflect UI changes.
June 8, 2019 Updated text and images throughout to reflect UI name change from "Cost
Tracking" to "Custom Fields".
May 30, 2019 Updated text to reflect UI name change from "payment request" to "invoice".
May 11, 2019 Added the following note to the Amadeus User field: "Although still
displayed, this field is no longer active, and any values it contains will be
ignored by the system."
Added the following note to the Password field: "The password field will
remain available in the downloadable Excel template, but will only be read
during an initial import of the file, or when creating a new user in the
system. Subsequent uses of the field will be ignored by the system."
April 17, 2019 Added the Indonesia country code to the Locale field description in the User
Import Fields table.
March 28, 2019 Clarified the definition of Country Code and updated the list in the appendix.
2 Shared: Users Setup Guide for Concur Standard Edition
Last Revised: April 5, 2021
© 2004–2020 SAP Concur All rights reserved.Section 1: Overview
Date Notes/Comments/Changes
March 5, 2019 Corrected the two-character ISO country code for the United Kingdom from
"UK" to "GB" in three places.
February 12, 2019 Updated the copyright; no other changes; cover date not updated
July 26, 2018 Updated the Travel Only Administrator user role description.
May 31, 2018 Updated the Can Administer user role description.
May 18, 2018 Added a procedure: Update an Existing User's Employee ID.
May 12, 2018 Updated information about Budget roles, and removed information about
QuickBooks Connector, as content is now consolidated in the Shared:
QuickBooks Connector Setup Guide.
Added the Is Data Retention Admin permission for Travel.
April 16, 2018 Changed the check boxes on the front cover; no other changes; cover date
not updated
March 17, 2018 Added information about Budget roles.
February 26, 2018 Added a note about LoginID: The LoginID must be unique across all Concur
products. In addition, once a LoginID is used, it cannot be used again.
Added a note about custom fields. It is a best practice to not allow personal,
sensitive, or uniquely identifying information in custom fields.
November 4, 2017 Updated guide to include new Product Settings page, which replaces the
Setup Wizard.
October 18, 2017 Updated the QuickBooks Connector and QuickBooks Financial Integration
Clients Only section.
October 14, 2017 Added information about the new Receipt User role for Invoice.
July 29, 2017 Added information about the Invoice User Country list for Invoice.
July 8, 2017 Added information about new Central Receiver role for Invoice.
June 3, 2017 Added information the following:
• The Invoice Payment Manager role
• The All option for policy groups
March 18, 2017 Updated with menu option name change to access Setup Wizard.
February 17, 2017 Removed note about the Import Users button for QuickBooks connected
companies.
January 20, 2016 Updated some user import field descriptions.
December 15, 2016 Changed copyright; no other content changes.
December 8, 2016 Updated the guide content to new corporate style; no content changes.
November 21, 2016 Added information about the Invoice Processor role.
November 15, 2016 Added note about the Import Users button for QuickBooks connected
companies. Removed the Concurforce check box from the cover.
Older revision history has been removed.Section 1: Overview
Users
Section 1: Overview
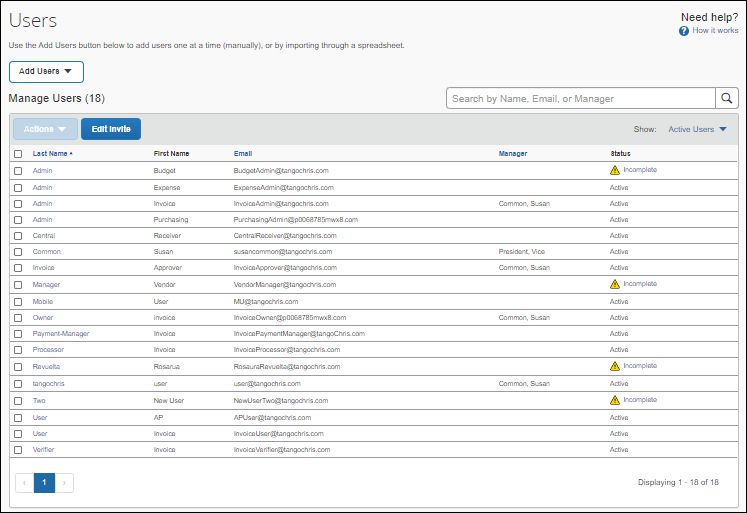
The Users page allows an administrator to add users, search for users, update user
information, send invites to users, activate users, and view lists of users.
Every person at your company who needs to enter or approve expense reports,
invoices, authorization requests, administer the site, or configure the site must be
added as a user.
The administrator can add new users manually or by importing a user spreadsheet.
The administrator can also edit multiple users by downloading the user spreadsheet,
making changes to existing users' information, and importing the updated
spreadsheet.
NOTE: The Import Users spreadsheet supports a maximum of 1000 users.
The administrator can also edit a default email invitation and send the email
invitation from the Users page.
If you use the approval routing that includes report or invoice amount limits, you can
set the limit amounts for your approvers on their user page. The limit amount that
you set is the maximum amount that the user can approve. If you use this workflow
and do not give an approver a limit, every report or invoice the user approves must
go to an approver with the appropriate limit approval.
4 Shared: Users Setup Guide for Concur Standard Edition
Last Revised: April 5, 2021
© 2004–2020 SAP Concur All rights reserved.Section 2: Configure Individual Users
ADP Clients Only
This step provides a way for you to enter the required information to reimburse the
user with ADP.
QuickBooks Clients Only
This step provides a way to capture the QuickBooks Vendor ID associated with an
employee (QuickBooks requires this field when creating bills for amounts
reimbursable to employees) and to reimburse them for expenses they enter in SAP
Concur solutions.
Clients Connected to Financial Systems
If you have connected SAP Concur solutions to your financial system, some fields on
this page might display different labels or pre-populated values based on your
connected financial system.
For more information, refer to the SAP Concur setup guide for your financial
system.
Section 2: Configure Individual Users
This section describes how you manage users on the Users page.
Access the Users Page
To access the Users page:
1. Click Administration > Expense Settings or Expense & Invoice Settings
or Invoice Settings.
2. In the Product list click, Expense, Invoice or Request.Section 2: Configure Individual Users
3. In the Access To Concur section, click User Accounts.
The Users page appears.
Add a User
To add a new user manually:
1. On the Users page, click Add Users > Manually.
6 Shared: Users Setup Guide for Concur Standard Edition
Last Revised: April 5, 2021
© 2004–2020 SAP Concur All rights reserved.Section 2: Configure Individual Users
The Add User page appears.
NOTE: The sections and fields that appear on the Ad User page depend on
your company’s configuration. The product tabs that appear in the
Products section depend on the SAP Concur products your company
uses.Section 2: Configure Individual Users
2. Fill in the appropriate fields on the Add User page. Fields on the page with a
red asterisk (*) by their name are required.
3. Click Save.
The fields that appear on the Users page differ depending on your configuration.
For example, accounting-specific fields tied to the accounting solution you selected
on the Accounting page in Product Settings will appear on the Users page.
In addition, if you added any custom fields on the Custom Fields > Add New Field
page in Product Settings, depending on how the visibility of the custom fields is
configured, they might appear on the Users page.
The following table lists fields that might appear on the Users page. Some of the
fields in the following table might not appear on your version of the Users page and
your Users page might have custom fields not listed in this table.
Field Name Description/Action
Automatically send invite Select this check box to send an invite message to the user's
email on save email address when you save the user. You can edit the
content of the invite message by clicking Edit Invite on the
main User Accounts page.
Login (email address) Enter the user's login name. It must be formatted as an
email address.
NOTE: The email address in this field must be unique across
all SAP Concur entities. If a Login (email address) is
currently in use in any SAP Concur entity, it cannot be
assigned to another user. If you attempt to save a new user
with a Login that is already in use, an error message
appears when you click Save and the user cannot be saved.
Password Enter the user’s initial password. The user is prompted to
change their password the first time they log in. If you are
editing an existing user, you can leave the Password field
blank to keep their existing password.
Retype Password Re-enter the user’s password. If you are editing an existing
user, you can leave the Retype Password field blank to
keep their existing password.
First Name Enter the first name of the employee.
Last Name Enter the last name of the employee.
Middle Name Enter the middle name of the employee.
8 Shared: Users Setup Guide for Concur Standard Edition
Last Revised: April 5, 2021
© 2004–2020 SAP Concur All rights reserved.Section 2: Configure Individual Users
Field Name Description/Action
Employee ID Enter the identifier that you use for the employee in your
(Non ERP-connected clients financial system. Examples include vendor name, employee
only) number, or payroll number.
NOTE: If the system is connected to an ERP, this field is
replaced with the Name field.
Name Enter the vendor name of the employee in your ERP system.
(ERP-connected clients only) NOTE: The name of this field changes to reflect the name of
the configured ERP system.
Email Enter the user's email address.
Country/Region of Residence Select the country the user is located in.
State/Province Select the user’s state or province.
Cash Advance Account Code Enter the account code for the account to which cash
advances to this user should be distributed.
Locale Select the user’s language locale.
Active Select (enable) the check box if this is an active user. If this
check box is cleared (disabled), the user cannot log in to this
SAP Concur implementation.
Exempt from Expense Type Select (enable) the check box if this user should not be held
Limit rules? to the expense type amount limits defined on the Expense
Limits page.
Reimbursement Method Select the method used to reimburse this employee.
Depending on the method selected, additional fields may
appear.
Employee Administration This field allows you to select the country from which the
Country employee is administered. The policies that apply for that
(This field only appears if specific country apply to the employee. For example, if you
there is more than one have employees in Japan but would like the United States
country implemented) policies to apply to them, select United States in this field.
Expense Policy Group If policy groups exist, each employee must be assigned a
(This field only appears if policy group or a country-specific default configuration policy
policy groups have been group. The expense types and limits of the group will apply
created) to this employee.
Invoice Policy Group If policy groups exist, each employee must be assigned a
(This field only appears if policy group, the default configuration policy group, or all
policy groups have been policy groups. The expense types and limits of the group will
created) apply to this employee.
NOTE: If the admin selects the All option, the user will be
able to select the relevant policy group for the invoice they
are creating.
Invoice User Country If more than one country pack has been activated by
Concur, admins can select one or all countries to which the
user belongs. If only one country is available, the Invoice
User Country list will not be visible.
For more information, refer to the Country Packs With
VAT Client Fact Sheet.Section 2: Configure Individual Users
Field Name Description/Action
Reimbursement Currency Select the user’s reimbursement currency.
(Expense) Manager Select the user who approves this employee's expense
NOTE: Expense appears in reports. All users with the Can Approve Expense Reports
the field label when Expense check box selected appear in this list.
is integrated with Request.
Request Manager Select the user who approves this employee's authorization
requests. All users with the Can Approve Requests check
box selected appear in this list.
Second Approver Select the user who approves this employee's expense
reports after their manager approves them.
NOTE: This field appears only when the second approver
workflow is selected.
ADP Company Code (ADP The company code used by ADP.
clients only)
ADP Deduction Code (ADP The deduction code used by ADP.
clients only)
ADP Employee ID (ADP clients The employee ID used by ADP.
only)
Expense Audit Required (only Select the appropriate value:
available if Audit Service has • Audit always required. This employee’s reports are
been purchased) always selected for audit.
• Audit never required. This employee’s reports are never
selected for audit.
• Audit required conditionally. This employee’s reports are
selected for audit only if expense transactions on the
report meet at least one of the selection criteria
configured on the Compliance Controls page of
Product Settings.
Cognos Reporting Access Select the user's role for the Cognos Reporting. The
available roles are:
• Cognos Consumer: Can use Analysis/Intelligence to
view data for reports. The Consumer license type has the
most restricted access to the Analysis/Intelligence
features.
• Cognos Business Author: Can use
Analysis/Intelligence to view data for reports. The
Business license type restricts the Analysis/Intelligence
features to which they have access.
• Cognos Professional Author: Can use
Analysis/Intelligence to view data for reports. The
Professional license grants access to all
Analysis/Intelligence features.
10 Shared: Users Setup Guide for Concur Standard Edition
Last Revised: April 5, 2021
© 2004–2020 SAP Concur All rights reserved.Section 2: Configure Individual Users
Field Name Description/Action
Can Administer This user performs the configuration of Concur, maintains
(includes Request) user information, is responsible for the final approval and
processing of expense reports, exporting financial data and
running reports. When this check box is selected (enabled),
the user gets access to Product Settings and the
Administration menu.
This user can also access the Manage User Apps page to
restrict the User applications in the SAP Concur App Center
for their company's users, and enable Enterprise partner
applications within the SAP Concur App Center
For more information, refer to the Shared: App Center
Administrator User Guide.
If the company has Request, the user with this role also
performs the configuration of Request.
Can Submit Expense Reports This user can create and submit expense reports in Concur.
When this check box is selected, the user gets access to the
New Expense Report button.
Can Approve Expense Reports This user has the responsibility of approving expense
reports. When this check box is selected, the user's name
appears in the (Expense) Manager list of the Users page,
and appears in the list of approvers that the user sees when
they do not have a manager defined.
Can Limit Approve Reports This check box appears if you use the Approval Routing that
includes limit approval. This user can approve reports whose
total is equal to or lesser than the amount entered.
Can Process Expense Reports This user can process expense reports in Concur. When this
(includes Requests) box is selected, the user is provided access to the Processor
role by the admin without having full administrative rights.
If the company has Request, the user can also process
requests.
Can Submit Requests This user can create and submit requests in Concur. When
this check box is selected, the user gets access to the New
Authorization Request button.
Can Approve Requests This user has the responsibility of approving authorization
requests. When this check box is selected, the user's name
appears in the Request Manager list of the Users page, and
appears in the list of approvers that the user sees when they
do not have a manager defined.
Budget Administrator This user configures the Fiscal Calendar, Budget Categories,
Budget Tracking Fields, Budget Items, and Budget Settings.
The Budget Administrator can see the budget amounts as
configured in the Budget Items, but not the budget actuals
as is shown in the dashboards. Budget Administrators have
access to all budget items within an entity.
NOTE: Applicable to Invoice, Expense, and Request.Section 2: Configure Individual Users
Field Name Description/Action
Budget Owner This user owns the budget and can view budgets in the
dashboards. The Budget Owner does not have access to the
budget configuration information.
NOTE: Applicable to Invoice, Expense, and Request.
Budget Approver/Manager This user approves invoices, purchase requests, and expense
reports and can view budgets in the budget dashboards. The
Budget Approver/Manager does not have access to the
budget configuration information.
NOTE: Applicable to Invoice, Expense, and Request.
Budget Viewer This user views budgets in the dashboards. Can be one or
several budget viewers. The Budget Viewer does not have
access to the budget configuration information.
NOTE: Applicable to Invoice, Expense, and Request.
Is Invoice Admin? This user performs the configuration of Concur, maintains
user information, is responsible for the final approval and
processing of invoices, and running reports. When this check
box is selected, the user will get access to Product Settings
and the Administration menu.
NOTE: Existing Invoice Admins will have the Is Invoice
Payment Manager? check box selected (enabled) by
default and will be able to perform payment manager tasks.
Is Invoice AP User? This user can create, assign, and unassign invoices. They
can also delete an invoice and restore the invoice from the
deleted state.
Is Invoice Owner? This user can create and submit invoices in Concur. When
this check box is selected, the user will see the Create New
Invoice button.
Is Invoice Approver? This user has the responsibility of approving invoices. When
this check box is selected, the user's name will appear in the
Manager list of the Users page, and will appear in the list of
approvers that the user sees when they do not have a
manager defined.
Is Invoice Verifier? The Invoice Verifier can work with all options in the Invoice
Processing feature. Specifically, this role may access
additional options on the Email tab, plus both the
Document Separation and Verification tabs to work with
emailed batches containing invoice attachments.
Invoice Approver In the list, select who should approve the invoices that this
user creates and submits.
Is Purchase Request User? Users with this role can create purchase requests (the
"Requester").
Is Purchase Request Users with this role can approve purchase requests that the
Approver? purchase request user has created.
Is Central Receiver? Users with this role can add, edit, and delete receipts and
receipt images. However, they cannot transmit or process
purchase orders or invoices.
12 Shared: Users Setup Guide for Concur Standard Edition
Last Revised: April 5, 2021
© 2004–2020 SAP Concur All rights reserved.Section 2: Configure Individual Users
Field Name Description/Action
Authorized Limit Approval? Users who have authorized limit approval can only approve
purchase requests up to a certain amount specified in the
field next to the currency list.
NOTE: The client admin must have selected the Is Invoice
Approver role to set an authorized limit approval for the
user.
Is Purchasing Admin? Users with this role can process purchase requests (for
example, clear exceptions and send back untransmitted
purchase requests) and purchase orders (for example,
correct vendor and send back both untransmitted and
transmitted purchase requests).
Is Invoice Vendor Manager? Users with this role can set up and manage vendors.
Is Invoice Payment Manager? Users with this role can perform payment manager tasks,
such as view and manage batches of invoices, and run,
search for, and download imports and extracts.
Is Invoice Processor? Users with this role can, among other things, approve,
delete, and reassign invoices, and clear exceptions and
change the approval status of invoices.
Purchase Request Approver In the list, select who should approve the purchase requests
that this user creates and submits.
Travel and Expense This user performs the configuration of Concur Travel and
Administrator (only appears if Expense, maintains user information, is responsible for the
you have purchased Concur final approval and processing of expense reports, exporting
Travel) financial data, and running reports. When this check box is
selected, the user gets access to the Expense Settings,
Travel Settings and Administration menus.
Travel Only Administrator This user performs the configuration of Concur Travel and
(only appears if you have maintains user information. When this check box is selected,
purchased Concur Travel) the user gets access to the Travel Setup menu.
This user can also access the Manage User Apps page to
restrict the User applications in the SAP Concur App Center
for their company's users, and enable Enterprise partner
applications within the SAP Concur App Center
For more information, refer to the Shared: App Center
Administrator User Guide.
Guest booking Allows user to make bookings for non-profiled travelers,
such as recruits.
Report user Grants access to reports.
Is Data Retention Admin Grants access to Administration > Company > Data
Retention for companies that use Travel. Only SAP Concur
can select this check box. It displays only to SAP Concur and
to users for whom the check box is selected.Section 2: Configure Individual Users
Search for a User
To search for a user:
1. In the search field on the Users page, enter the user's first name, last name,
email address, or manager’s first or last name.
By default, only active users are searched. You can include inactive users in
your search by selecting All Users or Inactive Users from the Show menu.
2. Click the magnifying glass or Enter key to display the search results.
NOTE: You can search using only part of a search term. Wildcards are not
required when searching on part of a name or emal address.
14 Shared: Users Setup Guide for Concur Standard Edition
Last Revised: April 5, 2021
© 2004–2020 SAP Concur All rights reserved.Section 2: Configure Individual Users
Update an Existing User
To update an existing user:
1. On the Users page, click user’s last name.
The Edit User page appears.
2. On the Edit User page, update the user’s information as needed.
NOTE: The sections and fields that appear on the Edit User page depend on
your company’s configuration. The product tabs that appear in the
Products section depend on the SAP Concur products your company
uses.
3. Click Save.
For information about editing multiple users at once, refer to the Import Users
chapter of this setup guide.
Mark a User Inactive
Users cannot be deleted but can be marked inactive. Inactive users cannot sign in to
SAP Concur solutions.
To mark a user inactive:
1. On the Users page, click the user’s last name to open the Edit User page.
2. Clear (disable) the Active check box.Section 2: Configure Individual Users
3. Click Save.
Edit the Invite Email
The email invitation is a welcome message that can be sent to users to let them
know an SAP Concur account has been created for. The email invitation includes
default text welcoming the user and a link for users to sign in to their SAP Concur
products.
NOTE: The first time they sign in to an SAP Concur product, the user is prompted to
reset their password.
The body text of the email invitation can be customized. For example, you might
want to include information about who users should contact if they have questions
about their SAP Concur products.
16 Shared: Users Setup Guide for Concur Standard Edition
Last Revised: April 5, 2021
© 2004–2020 SAP Concur All rights reserved.Section 2: Configure Individual Users
The body text of the email invitation is limited to 2000 characters. The character
count below the Your current message field reflects the number of characters
currently used by the message vs. the 2000 character limit.
The total character count includes hidden html tags for line breaks, paragraph
breaks, and HTML tags that apply formatting to text such as bold, underline,
highlighting, and text size. For example, if you apply an underline to a line of text,
the (hidden) and HTML tags are added at the beginning and end of the
line which adds seven characters to the character count.
NOTE: Some HTML tags impact how screen readers interpret text. For example,
applying the italic (I) style to text in the message adds the HTML tag
which prompts screen readers to emphasize the text verbally.
To edit the invite message:
1. On the Users page, click Edit Invite.Section 2: Configure Individual Users
The Edit your invite message window appears.
2. In the Your current message field, update the email text as needed.
3. (Optional) To send the updated email invite to all active users when you save
the message, select the Automatically send invite email to all existing
users on Save.
4. Click Save.
If you selected Automatically send invite email to all existing users on
Save, the following message appears after you click Save:
5. Click OK to return to the Users page.
18 Shared: Users Setup Guide for Concur Standard Edition
Last Revised: April 5, 2021
© 2004–2020 SAP Concur All rights reserved.Section 3: Configure Company Car Registration
Section 3: Configure Company Car Registration
NOTE: This feature is only available to clients using the Expense product.
On the Users page, you can register a company car for a user and correct the initial
distance for a registered car.
Register or Remove a Company Car for a User
To register a company car for a user:
1. On the Edit Users page for the desired user, in the Product section, on the
Expense tab, click Manage Company Vehicle Registration.
2. Click New.Section 3: Configure Company Car Registration
The Register a New Car page appears.
3. Fill in the fields.
Field Description
Vehicle ID The identifier for the vehicle. The user will
select this value when creating a mileage
expense.
Vehicle Type Select the vehicle type.
Is Preferred Select (enable) this check box to set this
car to the preferred car to use. The
preferred car will be used as the default
car whenever the user enters a mileage
expense.
4. Click Save.
To remove a company car for a user:
On the Edit Users page for the desired user, in the Product section, on the
Expense tab, click Manage Company Vehicle Registration.
5. Click the row for the car you want to remove.
20 Shared: Users Setup Guide for Concur Standard Edition
Last Revised: April 5, 2021
© 2004–2020 SAP Concur All rights reserved.Section 4: Configure Personal Car Registration
6. Click Remove.
The following confirmation message appears:
7. Click OK, and then click Done.
Section 4: Configure Personal Car Registration
NOTE: This feature is only available to clients using the Expense product and is not
applicable to all countries.
On the Users page, you can register a personal car for a user and correct the initial
distance for a registered car.Section 4: Configure Personal Car Registration
Register a Personal Car for a User
To register a personal car for a user:
1. On the Edit Users page for the desired user, click Personal Car.
NOTE: The Personal Car button does not appear when creating a new user.
Save the new user and then reopen the page.
2. Click New.
3. Fill in the fields.
Field Description
Vehicle ID The identifier for the vehicle. The user will select this value
when creating a mileage expense.
Vehicle Type Select the vehicle type.
Is Preferred Select (enable) this check box to set this car to the
preferred car to use. The preferred car will be used as the
default car whenever the user enters a mileage expense.
22 Shared: Users Setup Guide for Concur Standard Edition
Last Revised: April 5, 2021
© 2004–2020 SAP Concur All rights reserved.Section 4: Configure Personal Car Registration
4. Click Save. The vehicle appears on the Personal Car Registration page and
the Accumulated Distance to Date (this period) and Initial Distance
fields appear on the page
5. Click Done.
Correct the Business Distance for a Registered Car
To correct the business distance for a registered car:
1. On the Users page, double click the user whose information you want to
correct. The Users page appears.
2. Click Personal Car.
3. Select a car from the Vehicle ID list.
The Edit Car page appears.
4. In the Business Distance field, enter the desired the value.Section 5: Import Users
5. Click Save.
The Final Confirmation message appears.
6. Confirm the information is correct and then click OK.
The information in the Accumulated Distance to Date (this period) and
Initial Distance fields is updated to reflect the change.
Section 5: Import Users
The User Import process has four steps:
1. Download the spreadsheet.
2. Populate the spreadsheet.
3. Import the spreadsheet.
4. View the field validation and import results.
Download the Spreadsheet
The administrator can download and use a template spreadsheet (.xls) to import or
update multiple users. If no users have been added when the template is
downloaded, the template will contain one entry for the company admin who is
24 Shared: Users Setup Guide for Concur Standard Edition
Last Revised: April 5, 2021
© 2004–2020 SAP Concur All rights reserved.Section 5: Import Users
added when an SAP Concur entity is created. If additional users have already been
entered into the system manually or by performing a user import, the template will
export all existing, active users (up to 1,000 users).
NOTE: Inactive users are not included in the downloaded spreadsheet.
To download the spreadsheet:
1. On the Users page, click Import Users. The Import Users page appears.
2. On the Import Users page, click Download.
3. Save the spreadsheet to your local machine.
NOTE: The steps for saving the downloaded file differ depending on which
web browser you are using.
Edit Multiple Users
The downloaded spreadsheet includes all existing active users (up to 1,000 users)
and required field data from the Users page. The columns in the spreadsheet differ
depending on your configuration and might include custom fields. The downloaded
spreadsheet does not include passwords, credit card, or banking information. Once
the spreadsheet is populated with new or updated data, the spreadsheet can be
imported into SAP Concur solutions.
NOTE: If an existing user is removed from the spreadsheet, the user data will remain
unchanged in the system. If a data field is blank for an existing user, the data
field will remain unchanged for the user.
Populate the Spreadsheet
The import spreadsheet contains columns that correspond to fields in the User
Information and User Permissions sections of the Users page. Columns with a
bold blue heading are required fields. The values in the spreadsheet header rows
(rows 1 and 2) must not be edited or deleted. Do not change the name of the
spreadsheet tab.Section 5: Import Users
NOTE: You can import a maximum of 1,000 records per imported file. If you have
over 1,000 records to import, you must create multiple spreadsheets and
import them individually.
Gathering User Information
The import spreadsheet’s required fields are the basic information that SAP Concur
products require to create a user account.
Although existing passwords, credit card, and banking information is not including in
the downloaded template, the administrator can add or change passwords, bank
account, and credit card information as part of the import process.
NOTE: The User Import allows 1,000 records per file. If you have over 1,000 records
to import, you must create multiple spreadsheets and import them
individually.
The user information is generally gathered from the company’s HR or Payroll system.
Enter the data into the provided template spreadsheet fields, in the formats listed in
the table below.
The administrator can create new users and update existing users. SAP Concur
products use the Employee ID value to determine whether the user is a new user or
an existing user. If there is an existing user with this Employee ID, the user's data is
updated with the data provided in the spreadsheet. When updating an existing user,
a user's information is only updated if a value is provided in the spreadsheet field.
The import process does not update a user's information for fields that are blank in
the spreadsheet. If no user has the supplied Employee ID, SAP Concur adds them as
a new user.
User Import Fields
The fields that appear in the user import template vary depending on your
configuration. The columns in the spreadsheet correspond to the fields that appear
on the Users page.
NOTE: The User Import allows 1,000 records per file. If you have over 1,000 records
to import, you must create multiple spreadsheets and import them
individually.
NOTE: There is a known issue with Internet Explorer when large files are imported.
When importing files that contain over 500 records, the interface may become
unresponsive. Clients that are experiencing this issue should use a different
browser to import the file.
26 Shared: Users Setup Guide for Concur Standard Edition
Last Revised: April 5, 2021
© 2004–2020 SAP Concur All rights reserved.Section 5: Import Users
Field Required? Description
Employee Administration Y Valid two-character ISO country code for the
Country/Region (only country the user resides in. This field assigns
displays when there is more the country from which the user is
than one country administered. Depending on the country code
implemented) selected, the policies applying for the specific
country apply to the employee.
Format: XX (two-character ISO country code)
Example: CA, IE, UK, US
Canada represents as CA
Ireland represents as IE
United Kingdom represents as UK
United States represents as US
Refer to the Appendix in this guide for a
full list of Country Codes.
Expense Policy Group N This field allows you to assign a policy group to
each employee that will determine the expense
types and limits that will apply to this
employee. Populate this field using the Group
Code for the policy group as displayed on the
Policy Groups > Expense page.
If you do not populate this information, the
employee will be assigned to the country-
specific default configuration policy based on
their Employee Administration Country.
Invoice Policy Group N This field allows you to assign a policy group to
each employee that will determine the expense
types and limits that will apply to this
employee. Populate this field using the Group
Code for the policy group as displayed on the
Policy Groups > Invoice page.
If you do not populate this information, the
employee will be assigned to the default
configuration policy.
Employee First Name Y The user’s first name. If implementing Travel
ensure this name is the same as the photo ID
an employee would use through security
checkpoints because the Employee Name prints
on the Travel itinerary.
Employee Last Name Y The user’s last name.
Middle Name N The user’s middle name.
Employee ID Y The unique identifier for the user. If you use
ERP to reimburse your employees, this field
contains the ERP Vendor Name of the user.
NOTE: You cannot use this field in this import
to update the employee ID for an existing user.
Instead, use the Employee ID field available in
the Users page to update existing users.Section 5: Import Users
Field Required? Description
Login ID Y* Use for the initial import into the system of any
new user's login ID, which is usually the same
as the user’s email address.
Format: Must contain "@"
* NOTE: The administrator cannot use this field
to update login IDs for existing users and so is
not a Required field under that condition.
Instead, use the New Login ID field in this
import to update existing users.
Password Yes, for new The user's password. If the user exists, entering
users. No, a value in this field for the import does not
for existing update the user’s password.
users. NOTE: The password field will remain available
in the downloadable Excel template, but will
only be read during an initial import of the file,
or when creating a new user in the system.
Subsequent uses of the field will be ignored by
the system.
Email Address Y The user’s email address. Concur recommends
using the user’s corporate email address.
Format: Must contain "@"
Country of Residence Y The two-character ISO country code for the
country the user resides in.
Format: XX (two-character ISO country code)
Example: CA, UK, US
Canada is represented as CA.
United Kingdom is represented as GB.
United States is represented as US.
State/Province N The user’s two-character ISO country code and
two-character state or province.
Format: XX-XX ([country code]-
[state/province])
Example: US-WA, CA-BC
Washington, US is represented as US-WA.
British Colombia, CA is represented as CA-BC.
Locale Y This indicates the language and notational
convention (e.g., date, number, and currency
formats) for this user. Its format is two
lowercase letters to indicate the language
followed by the two-letter ISO Country Code to
indicate the country for notational convention.
Available language codes:
de_AT German (Austria)
28 Shared: Users Setup Guide for Concur Standard Edition
Last Revised: April 5, 2021
© 2004–2020 SAP Concur All rights reserved.Section 5: Import Users
Field Required? Description
de_CH German (Switzerland)
de_DE German (Germany)
de_LU German (Luxembourg)
en_AU English (Australia)
en_CA English (Canada)
en_GB English (United Kingdom)
en_IE English (Ireland)
en_IN English (India)
en_NZ English (New Zealand)
en_US English (United States)
en_ZA English (South Africa)
es_AR Spanish (Argentina)
es_BO Spanish (Bolivia)
es_CL Spanish (Chile)
es_CO Spanish (Colombia)
es_CR Spanish (Costa Rica)
es_DO Spanish (Dominican Republic)
es_EC Spanish (Ecuador)
es_ES Spanish (Spain)
es_GT Spanish (Guatemala)
es_HN Spanish (Honduras)
es_MX Spanish (Mexico)
es_NI Spanish (Nicaragua)
es_PA Spanish (Panama)
es_PE Spanish (Peru)
es_PR Spanish (Puerto Rico)
es_PY Spanish (Paraguay)
es_SV Spanish (El Salvador)
es_UY Spanish (Uruguay)
es_VE Spanish (Venezuela)
fr_BE French (Belgium)
fr_CA French (Canada)
fr_CH French (Switzerland)
fr_FR French (France)
fr_LU French (Luxembourg)
id_ID Indonesian (Indonesia)
it_CH Italian (Switzerland)
it_IT Italian (Italy)
ja_JP Japanese (Japan)
nl_BE Dutch (Belgium)
nl_NL Dutch (Netherlands)
sv_SE Swedish (Sweden)
th_TH Thai (Thailand)
zh_CN Chinese (China)
zh_HK Chinese (Hong Kong, China)
zh_TW Chinese (Taiwan, China)
Reimbursement Currency Y The user’s three-character reimbursement
currency code.
Format: XXX
Example: United States Dollar is represented as
USD. Canadian Dollar is represented as CAD.
Invoice User Country N This indicates the client’s country with pre-
configured Invoice features.Section 5: Import Users
Field Required? Description
Custom 1-20 Code Varies The custom fields on the Users page. These
NOTE: These only appear if only appear if you selected fields on the
you selected fields on the Custom Fields page of Product Settings. These
Custom Fields page of fields are only required if you set them as
Product Settings. The required in Product Settings. The values
column name shows the entered must be the field codes, not the names
data field name. of the fields.
NOTE: Best practice is to not allow personal,
sensitive, or uniquely identifying information in
custom fields.
Active Y Is user active?
Format: Y/N
Submits Expense Reports N Can this user access Expense?
Format: Y/N/Blank
Approves Expense Reports N Is this user an expense approver?
Format: Y/N/Blank
Processes Expense Reports N Is this user an expense report processor?
Format: Y/N/Blank
Books Travel N Can this user book travel?
Format: Y/N/Blank
Submits Requests N Can this user access Request?
Format: Y/N/Blank
Approves Requests N Is this user a request approver?
Format: Y/N/Blank
Request Approver N The employee ID value of the user that can
Employee ID approve this user’s requests.
Request Approver N This field is not currently used.
Employee ID 2
Expense Approver N The employee ID value of the user that can
Employee ID approve this user’s expense reports.
Expense Approver N The employee ID value of the second report
Employee ID 2 approver.
NOTE: This is used only when the second
approver workflow is selected.
Is Invoice Owner? N This user can create and submit invoices.
Is Invoice Approver? N This user has the responsibility of approving
invoices. The user's name will appear in the
Manager list of the Users page, and will
appear in the list of approvers that the user
sees when they do not have a manager defined.
30 Shared: Users Setup Guide for Concur Standard Edition
Last Revised: April 5, 2021
© 2004–2020 SAP Concur All rights reserved.Section 5: Import Users
Field Required? Description
Is Invoice AP User? N This user can create, assign, and unassign
invoices. He/she can also delete an invoice and
restore the invoice from the deleted state.
Invoice Approver Employee N The employee ID value of the user that can
ID approve this user’s invoices.
Invoice_PMT_Manager N This user is responsible for payment manager
tasks, such as view and manage batches of
invoices, and run, search for, and download
imports and extracts.
Credit Card Name On Card N The name on the user's company card.
Credit Card Payment Type N The payment type name for the credit card, as
Name entered in the What do you want to name
this card program? field on the Payment
Types page of Product Settings.
Card Account Number N The company card number.
Format: No dashes or spaces.
Card Effective Date N The date that the card was assigned to the user
in Concur. Concur will only display card
transactions to the user if they occur after the
card effective date.
Format: dd/mm/yyyy
Card Clearing Account Code N The clearing account code for company card.
Card Type N The type of credit card.
Expiration Date N The card expiration date, as it appears on the
card. When the card does not specify a day
value, use the last day of the month.
Format: dd/mm/yyyy
Billing Address N The card’s billing address line one.
Billing City N The card’s billing address city.
Billing State N The card’s billing address state.
Billing Postal Code N The card’s billing address postal code.
Billing Country Code N The card’s billing address country code.
Bank Routing Number N The bank number for user's bank account.
Format: No spaces or dashes. For US
employees, must be 9 digits.
Bank Account Number N The user's bank account number.
Format: No spaces or dashes.Section 5: Import Users
Field Required? Description
Bank Account Type N The type of bank account.
CH: Checking
SA: Savings
Format: CH/SA
NOTE: This column only appears for US
accounts.
Bank Account Currency N The three character currency code for the bank
Code account.
Format: XXX
Example: USD, CAD
Bank Account Is Active N Is the bank account active?
Format: Y/N
Bank Account Country Code N The two-letter, ISO Country Code where the
employee’s bank is located.
Format: XX
Example: Canada is represented as CA. United
Kingdom is represented as GB. United States is
represented as US.
Bank Account Branch Name Not required The name of the user’s bank.
for CA and Format: 48 characters maximum.
US;
Required for
UK and
SEPA
countries.
Bank Account Branch Not required The branch identifier for the bank that the
Location for CA and account was opened at. Can be a town,
US; neighborhood, or other identifier.
Required for Format: 30 characters maximum.
UK and
SEPA
countries.
Bank Account Name on Not required The name that appears on the account.
Account for CA and Typically, the employees name.
US; Format: 48 characters maximum.
Required for
UK and
SEPA
countries.
BankAccountAddress1 Not required The postal address provided to the bank for this
for CA and bank account.
US; Format: 48 characters maximum.
Required for
UK and
SEPA
countries.
32 Shared: Users Setup Guide for Concur Standard Edition
Last Revised: April 5, 2021
© 2004–2020 SAP Concur All rights reserved.Section 5: Import Users
Field Required? Description
BankAccountAddress2 Not required The postal address provided to the bank for this
for CA and bank account.
US; Format: 48 characters maximum.
Required for
UK and
SEPA
countries.
Bank Account City Not required The postal address provided to the bank for this
for CA and bank account.
US; Format: 24 characters maximum.
Required for
UK and
SEPA
countries.
Bank Account Region Not required The postal address provided to the bank for this
for CA and bank account.
US; Format: 24 characters maximum.
Required for
UK and
SEPA
countries.
Bank Account Postal Code Not required The postal address provided to the bank for this
for CA and bank account.
US; Format: 20 characters maximum.
Required for
UK and
SEPA
countries.
Is Purchase Request User? N Users with this role can create purchase
requests (the "Requester").
Format: Y/N/Blank
Is Purchase Request N Users with this role can approve purchase
Approver? requests that the purchase request user has
created.
Format: Y/N/Blank
Purchase Request Approver N The employee ID of the purchase request
Employee ID approver.
ADP Employee File Number N The identifier for the employee within ADP. This
field is required if the ADP reimbursement type
is used.
ADP Company Code N The company code for the employee within
ADP. This field is required if the ADP
reimbursement type is used.
ADP Deduction Code N The deduction code for the employee within
ADP. This field is required if the ADP
reimbursement type is used.
SyncAccountToTravel N This field is not currently used.Section 5: Import Users
Field Required? Description
Prefix Name N If provided, must contain one of these exact
values (Lord, Lady, Sir, Mr., Miss, Ms., Mrs.,
Dr., Rev.)
Suffix Name N If provided, must contain one of these exact
values (Jr., Sr., I, II, III, IV, V)
Nickname N Informal, non-birth name employee is known
as.
Gender N M = Male
F = Female
Birth Date N Must match format "YYYYMMDD".
Job Title N The employee’s job title.
Work Phone Number N The employee’s work phone number.
Work Phone Extension N The employee’s work phone extension.
Fax Number N The employee’s fax number.
Cell Phone Number N The employee’s cell phone number.
Home Phone Number N The employee’s home phone number.
Pager Number N The employee’s pager number.
Travel Name Remark N Value used by TMCs to capture certain
reportable items for individual travelers, such
as department codes. You should only provide
this information if your TMC has requested that
you do so.
Rule Class N The employee’s travel class name. If no value is
provided, the user is assigned to the default
travel class.
GDS Profile Name N The name of the profile in the GDS system.
This value associates a Concur Travel profile to
the GDS profile.
Org Unit N Value must exactly match an Org Unit value set
up for the company.
Home Street N The employee’s home address.
Home City N The employee’s home address.
Home State N The employee’s home address.
Home Postal Code N The employee’s home address.
Home Country N The employee’s home address.
Work Street N The employee’s work address.
Work City N The employee’s work address.
34 Shared: Users Setup Guide for Concur Standard Edition
Last Revised: April 5, 2021
© 2004–2020 SAP Concur All rights reserved.Section 5: Import Users
Field Required? Description
Work State N The employee’s work address.
Work Postal Code N The employee’s work address.
Work Country N The employee’s work address.
Email 2 N Alternate email for the employee.
Email 3 N Alternate email for the employee.
XML Profile Synch ID N The unique, client-assigned Travel user
identifier that allows the user profile to be
synchronized with other vendors.
IMPORTANT: The following characters cannot be
used as a value for this record:
%['#!*&()~`{-^}\|/?>Section 5: Import Users
Field Required? Description
New Login ID Y* Use to change an existing user's login ID in the
system, which is usually the same as the user’s
email address.
Format: Must contain "@"
* NOTE: The administrator should not use this
field to import the login ID for a new employee.
Instead, use the Login ID field in this import to
import this value for a new user.
NOTE: The LoginID must be unique across all
Concur products. If a LoginID is currently in use
in any Concur product, it cannot be assigned
again unless the original occurrence is changed.
For example, assume that a LoginID was
assigned in error. That LoginID can only be
used again if an admin (either manually or via
import) renames the original occurrence,
allowing the LoginID to be used again.
Is Central Receiver? N This field specifies the central receiver who can
add, edit, and delete receipts and receipt
images.
Final File Review
Before you import the user spreadsheet, verify that the spreadsheet is formatted
correctly.
All cells in the Excel spreadsheet must have a designation of Text or Number before
being uploaded. Always verify the cell formatting when done. If you use the Replace
feature in Excel, be aware that it may not maintain the required cell formatting.
Testing has shown that cells formatted as text become general format after using
Replace. If the cells are not formatted as text, the import fails. If necessary, select
the appropriate cells and change the formatting.
Upload the User Data Spreadsheet
The spreadsheet is imported from the Import Users window. If an existing user is
removed from the spreadsheet, the user data will remain unchanged in the system.
If a data field is blank for an existing user, the data field will remain unchanged for
the user.
NOTE: The User Import allows 1,000 records per file. If you have over 1,000 records
to import, you must create multiple spreadsheets and import them
individually.
NOTE: There is a known issue with Internet Explorer when large files are imported.
When importing files that contain over 500 records, the interface may become
unresponsive. Clients who are experiencing this issue should use a different
browser to import the file.
36 Shared: Users Setup Guide for Concur Standard Edition
Last Revised: April 5, 2021
© 2004–2020 SAP Concur All rights reserved.Section 5: Import Users
To import the spreadsheet:
1. On the Users page, click Import Users.
2. In the Import Users window, click Browse.
3. Navigate to the user import file you populated, select the file, and then click
Open.
4. In the Import Users window, click Import.
The Import Users Result window appears.You can also read