Aviation Environmental Design Tool (AEDT) - Supplemental Manual Quick Start Tutorial
←
→
Page content transcription
If your browser does not render page correctly, please read the page content below

Aviation Environmental
Design Tool (AEDT)
Supplemental Manual
Quick Start Tutorial

March 2021
AEDT Supplemental Manual
Quick Start Tutorial

 Purpose
 The Federal Aviation Administration Office of Environment and Energy (FAA-AEE) recognizes that the
 environmental consequences stemming from the operation of commercial aviation – primarily noise,
 emissions, and fuel consumption – are highly interdependent and occur simultaneously throughout all
 phases of flight. The Aviation Environmental Design Tool (AEDT) is a software system that is designed
 to model aviation related operations in space and time to compute noise, emissions, and fuel
 consumption.

 This Quick Start Tutorial was created to be used in conjunction with the AEDT User Manual, providing
 detailed instructions on building simple noise and emissions studies in AEDT and importing studies
 created using either the FAA’s Integrated Noise Model (INM) or the Emissions and Dispersion Modeling
 System (EDMS).

 This document consists of the following sections:

 Section 1. Introduction

 Section 2. Getting Started

 This section describes starting the AEDT application and the AEDT user interface organization.

 Section 3. Quick Start Tutorial

 The purpose of this section is to introduce the basic features required to run the AEDT application to
 generate noise and emissions results. AEDT has many additional features and settings that support a wide
 variety of analyses which are covered in detail in the AEDT User Manual.

 This section covers the following:

 • Creating a new study

 • Adding an existing airport
 • Viewing an airport layout

 • Creating flight tracks
 • Viewing the airport weather data

 • Adding receptors and receptor sets
 • Adding aircraft operations
 • Creating annualizations

 Page 1
AEDT Supplemental Manual
Quick Start Tutorial

 • Defining and running metric results
 • Viewing noise, emissions and fuel burn output

Section 4. EDMS Study Import

AEDT supports the conversion of EDMS studies into an AEDT study database to support users who wish to
model studies created in EDMS using the latest noise and emissions modeling algorithms.

This section provides instruction on how to import an EDMS study into AEDT. This section covers the
following:

 • How to import an EDMS study
 • How to resolve common errors and warnings when translating from EDMS to ASIF XML
 • How to resolve common errors and warning when importing an ASIF XML file into AEDT
 • How to reimport a corrected ASIF file
 • Additional tips on comparing results between EDMS and AEDT

Section 5. INM Study Import

AEDT supports the conversion of INM studies into an AEDT study database to support users who wish to
model studies created in INM using the latest noise and emissions modeling algorithms.

This section provides instruction on how to import an INM study into AEDT. This section covers the
following:

 • How to import an INM study
 • How to resolve common errors and warnings when translating from INM to ASIF
 • How to resolve common errors and warning when importing an ASIF XML file into AEDT
 • How to reimport a corrected ASIF file
 • Additional tips on comparing results between INM and AEDT

 Page 2
AEDT Supplemental Manual
Quick Start Tutorial

Table of Contents
Table of Figures ..................................................................................................................................................6
 Introduction ..............................................................................................................................................10
 1.1 Overview ................................................................................................................................10
 1.2 Technical Assistance...............................................................................................................11
 Getting Started .........................................................................................................................................12
 2.1 What is an AEDT Study? .........................................................................................................12
 2.2 Installing AEDT .......................................................................................................................12
 2.3 Starting the AEDT Application ................................................................................................12
 2.4 AEDT User Interface Organization .........................................................................................13
 2.4.1 AEDT User Interface – Work Areas ........................................................................................14
 2.4.2 AEDT User Interface – Tabs ....................................................................................................14
 Quick Start Tutorial...................................................................................................................................16
 3.1 Create a New Study................................................................................................................16
 3.2 Add an Airport ........................................................................................................................18
 3.3 View the Airport Layout .........................................................................................................19
 Airport layouts ........................................................................................................................19
 View the airport layout on the map .........................................................................................................21
 3.4 Create Flight Tracks ................................................................................................................21
 Create a vector-type departure track.......................................................................................................21
 Create a point-type arrival track ..............................................................................................................24
 3.5 View Airport Weather ............................................................................................................26
 3.6 Add Receptors & Receptor Sets .............................................................................................27
 Create a grid receptor ..............................................................................................................................27
 Create a point receptor ............................................................................................................................29
 Create a receptor set ................................................................................................................................30
 View receptor set on map ........................................................................................................................31
 3.7 Set the Default Operation Time .............................................................................................31
 3.8 Add Aircraft Operations .........................................................................................................32

 Page 3
AEDT Supplemental Manual
Quick Start Tutorial

 Add an arrival operation...........................................................................................................................32
 Add a departure operation.......................................................................................................................36
 3.9 Create Annualizations ............................................................................................................36
 Create a “Baseline” annualization ............................................................................................................36
 Create an “Alternative” annualization .....................................................................................................38
 Annualization Example .............................................................................................................................39
 3.10 Define Metric Results .............................................................................................................40
 Create a “Baseline” metric result .............................................................................................................40
 Create an “Alternative” metric result.......................................................................................................42
 3.11 Run Metric Results .................................................................................................................43
 3.12 View Output ...........................................................................................................................44
 Noise Contour Layer .................................................................................................................................44
 Reports .....................................................................................................................................................45
 Noise Report .............................................................................................................................................45
 Emissions and Fuel Burn Report ...............................................................................................................45
 Importing EDMS Studies into AEDT ..........................................................................................................46
 4.1 AEDT Standard Input File .......................................................................................................47
 4.2 Before You Import..................................................................................................................47
 4.3 Import an EDMS study through the AEDT Application ..........................................................47
 4.4 Resolving EDMS to ASIF Import Errors...................................................................................51
 4.4.1 EDMS to ASIF XML Conversion Errors ....................................................................................52
 4.4.2 Resolving Data Integrity Errors (ASIF XML Validation)...........................................................55
 4.5 Importing an EDMS study using an external tool (EDMS2ASIF) ............................................69
 4.5.1 Creating an ASIF XML from an EDMS study ...........................................................................69
 4.5.2 Re-importing the ASIF file ......................................................................................................70
 4.6 Comparing EDMS Results in AEDT .........................................................................................71
 4.6.1 Emissions Methodology Differences......................................................................................71
 4.6.2 Aircraft Performance Input Differences.................................................................................72
 4.6.3 Aircraft Performance Computation Differences ....................................................................74

 Page 4

AEDT Supplemental Manual
Quick Start Tutorial

 4.6.4 EDMS vs AEDT Database Differences.....................................................................................74
 Importing an INM study ...........................................................................................................................76
 5.1 AEDT Standard Input File .......................................................................................................76
 5.2 Before You Import..................................................................................................................76
 5.3 Importing an INM Study in the AEDT Application..................................................................76
 5.4 Resolving Import Errors .........................................................................................................81
 5.4.1 INM to ASIF XML Conversion Errors.......................................................................................81
 5.4.2 Resolving Data Integrity Errors (ASIF XML Validation)...........................................................85
 5.5 Importing an INM study using an external tool (INM2ASIF) ..................................................96
 5.5.1 Creating an ASIF XML from an INM study..............................................................................96
 5.5.2 Re-importing the ASIF file ......................................................................................................97
 5.6 Comparing INM Results in AEDT ............................................................................................97
 5.6.1 Single-Airport Weather ..........................................................................................................97
 5.6.2 Bank Angle .............................................................................................................................97
 5.6.3 Atmospheric Absorption ........................................................................................................98

 Page 5
AEDT Supplemental Manual
Quick Start Tutorial

Table of Figures
Figure 1. Accelerated Display Warning ............................................................................................................12

Figure 2. AEDT User Interface Overview ..........................................................................................................13

Figure 3. Create New Study Dialog ...................................................................................................................17

Figure 4. Metric Results Tab .............................................................................................................................18

Figure 5. Add Existing Airport Dialog ................................................................................................................19

Figure 6. Airport Layout Details Pane ...............................................................................................................20

Figure 7. Airport Layout Map View ..................................................................................................................21

Figure 8. Airports Designer Tab ........................................................................................................................22

Figure 9. Create Vector Track Pane ..................................................................................................................22

Figure 10. Vector Track Details .........................................................................................................................23

Figure 11. Finished Departure Vector Track .....................................................................................................24

Figure 12. Map of Runway End.........................................................................................................................25

Figure 13. Arrival Point Track ...........................................................................................................................26

Figure 14. Definitions Tab – Airport Weather ..................................................................................................27

Figure 15. Definitions Tab – Receptors ............................................................................................................27

Figure 16. Receptor Details – Grid....................................................................................................................29

Figure 17. Receptor Details – Point ..................................................................................................................30

Figure 18. Receptor Set Details ........................................................................................................................31

Figure 19. Map View of Receptor Set ...............................................................................................................31

Figure 20. Default Operation Time in Study Preferences.................................................................................31

Figure 21. Create Aircraft Operations ..............................................................................................................32

Figure 22. Create Aircraft Operations – Choose Equipment ............................................................................33

 Page 6
AEDT Supplemental Manual
Quick Start Tutorial

Figure 23. Create Aircraft Operations – Assign Operation Time ......................................................................34

Figure 24. Create Aircraft Operations – Choose Flight Profile .........................................................................34

Figure 25. Create Aircraft Operations – Choose Track .....................................................................................35

Figure 26. Create Aircraft Operations – Summary ...........................................................................................35

Figure 27. Create Annualization Wizard – First Step ........................................................................................37

Figure 28. Create Annualization Wizard – Add New Operation Group Text Box .............................................37

Figure 29. Create Annualization Wizard – Create Aircraft Operation Groups, Drag & Drop ...........................37

Figure 30. Create Annualization Wizard – Create Aircraft Operation Groups .................................................38

Figure 31. Create Annualization Wizard – Build Annualization........................................................................38

Figure 32. Create Annualization Wizard – Build Annualization........................................................................39

Figure 33. Define Metric Results Wizard – Set Processing Options .................................................................41

Figure 34. Copy Metric Result ..........................................................................................................................42

Figure 35. Metric Results Pane and Details Pane .............................................................................................43

Figure 36. Metric Results Pane .........................................................................................................................43

Figure 37. Task Completed Message ................................................................................................................44

Figure 38. Contour Layers on Map ...................................................................................................................44

Figure 39. Noise Contour Layer Attributes .......................................................................................................45

Figure 40. Metric Results Tab – Reports...........................................................................................................45

Figure 41. Emissions Report (Segment)............................................................................................................46

Figure 42. Choose study location .....................................................................................................................48

Figure 43. EDMS to ASIF Error warning ............................................................................................................48

Figure 44. Review study content, Bad data integrity error ..............................................................................48

Figure 45. Review study content, ASIF Raw tab ...............................................................................................49

 Page 7
AEDT Supplemental Manual
Quick Start Tutorial

Figure 46. Review study content, Details tab ...................................................................................................49

Figure 47. Review data conflicts .......................................................................................................................50

Figure 48. Complete study import....................................................................................................................51

Figure 49. ASIF XML ..........................................................................................................................................56

Figure 50. XML study ........................................................................................................................................57

Figure 51. XML userDefinedAirportSet.............................................................................................................58

Figure 52. XML element scenarioAirportLayoutType .......................................................................................58

Figure 53. XML element scenario .....................................................................................................................61

Figure 54. XML element case ...........................................................................................................................63

Figure 55. reference -> case and scenario........................................................................................................64

Figure 56. XML element track ..........................................................................................................................66

Figure 57. element operation. 1 -> 2 -> 3 .........................................................................................................67

Figure 58. element operation. 4 -> 5 ................................................................................................................68

Figure 59. EDMS to ASIF Converter ..................................................................................................................70

Figure 60. Choose study location .....................................................................................................................77

Figure 61. INM to ASIF Error & Warning ..........................................................................................................77

Figure 62. Review study content – Bad data integrity .....................................................................................78

Figure 63. Review study content – ASIF Raw tab .............................................................................................78

Figure 64. Review study content – Details tab .................................................................................................79

Figure 65. Review data conflicts .......................................................................................................................80

Figure 66. Complete study import....................................................................................................................80

Figure 67. ASIF element – AsifXml ....................................................................................................................86

Figure 68. ASIF element – study .......................................................................................................................87

 Page 8
AEDT Supplemental Manual
Quick Start Tutorial

Figure 69. ASIF element – userDefinedAirportSet ...........................................................................................88

Figure 70. ASIF element – scenario ..................................................................................................................89

Figure 71. ASIF element – case .........................................................................................................................90

Figure 72. reference -> case and scenario........................................................................................................91

Figure 73. ASIF element – track ........................................................................................................................93

Figure 74. ASIF element – operation. 1 -> 2 -> 3 ..............................................................................................94

Figure 75. ASIF element – operation. 4 -> 5 .....................................................................................................95

Figure 76. INM to ASIF Converter .....................................................................................................................96

 Page 9
AEDT Supplemental Manual
Quick Start Tutorial

 Introduction
1.1 Overview
This Quick Start Tutorial was created as an extension of the AEDT User Manual for the purpose of:

 • Providing detailed instructions on creating a simple noise and emissions studies in AEDT.

 • Providing instructions on how to import EDMS studies, including tips on resolving import errors.

 • Providing instructions on how to import INM studies, including tips on resolving import errors.

Each section encompasses all of the necessary information to complete the desired task. This document does
not need to be read in its entirety to successfully create or import a study; however, it is recommended to
review Section 2 prior to using the information in Sections 3 through 5.

This document references portions of the AEDT User Manual, available on the AEDT Support website. This
document not contain guidance or policy for regulatory analyses. Guidance documents as well as additional
documentation such as the AEDT Technical Manual, AEDT Supplemental Manual: ASIF Reference, and
detailed information on select features can be found on the FAA office of environment and energy (AEE)
website (https://www.faa.gov/about/office_org/headquarters_offices/apl/research/) and also available on
the AEDT Support website (https://aedt.faa.gov/).

The following symbols will appear throughout the document to highlight important information:

 Observe warnings to avoid errors in execution and ensure that the intended execution occurs.

 Notes contain helpful information and tips regarding the functionality of the tool.

 Page 10
AEDT Supplemental Manual
Quick Start Tutorial

1.2 Technical Assistance
The AEDT Support website, https://aedt.faa.gov/, is the technical support hub for AEDT. Support requests,
feedback on issues or bugs, and feature requests should be submitted through this website. The latest AEDT
installers and support resources such as documentation and frequently asked questions (FAQ) are also
available on the AEDT Support website. Register on the website to purchase products, request support, or
submit feedback on AEDT. Additional options for support include:

 • E-mail: aedt-support@dot.gov
 • Phone: 617-494-2603

Please include the AEDT Administrative File when requesting technical support. Please refer to Section 4.12.2
of the AEDT User Manual for instructions on generating the Administrative File.

 Page 11
AEDT Supplemental Manual
Quick Start Tutorial

 Getting Started

2.1 What is an AEDT Study?
An AEDT study is a collection of user inputs, system data, user settings and computed results. This data is
contained in a single SQL Server database with a user specified name.

The study database contains all of the tables required by AEDT. FLEET and AIRPORT system data are added
to the study database when the study is created. A study database does not contain external files such as
terrain or high-fidelity weather data files.

2.2 Installing AEDT
If AEDT is not already installed, follow the instructions provided with the AEDT Installation Manual to
install the application and Microsoft SQL Server software, before proceeding. AEDT installer is available for
download on the AEDT Support website (Section 1.2).

 AEDT requires administrative privileges for both 1) installation and 2) execution of
 the software.

2.3 Starting the AEDT Application
1. On the Desktop, right-click on the AEDT shortcut and click Run as administrator.

 AEDT can also be accessed by navigating to the AEDT application folder (e.g., C:\Program
 Files\FAA\AEDT) and right-clicking on the executable named AEDT.exe and selecting Run as
 administrator.

2. If accelerated display is unavailable on the host platform where AEDT is launched, the following
 warning message will be displayed (Figure 1).
 • Check the Do not show this message again checkbox to disable this warning message.
 • Click Close to close the dialog.

 Figure 1. Accelerated Display Warning

 Page 12
AEDT Supplemental Manual
Quick Start Tutorial

When the accelerated display is disabled, rendering map layers (e.g. receptor set layers) may require
additional processing time. In some cases, map features may not be highlighted when selected on the map
using the Identify tool or through the layer attributes pane.

2.4 AEDT User Interface Organization
The AEDT User Interface is described below (Figure 2):

 Application Button & Quick Access Toolbar

 Ribbon Tabs

 Ribbon

 Ribbon Groups

 Left Center Right
 Work Area Work Area Work Area

 Status Bar

 Figure 2. AEDT User Interface Overview

 Page 13
AEDT Supplemental Manual
Quick Start Tutorial

2.4.1 AEDT User Interface – Work Areas

The work areas in the AEDT interface are divided into three sections. While the divisions are consistent
between tabs, the content changes as appropriate for each tab.

 1. Left Work Area
 The left work area contains a list of data available for use in the currently selected tab.

 2. Center Work Area
 The center work area contains map, detail, or report content, depending on the selected tab and view.

 3. Right Work Area
 The right work area provides appropriate tools to manage the content in the center work area.

2.4.2 AEDT User Interface – Tabs

AEDT features are organized by tabs as follows:

 1. Study tab

 The Study tab includes the following menu options:

 • Open: opens the Open Study dialog.
 • Migrate: opens the Migrate Studies dialog.
 • Import: opens the Import Study dialog.
 • Partial Import: opens the Import Partial ASIF dialog.
 • New: opens the Create New Study dialog.
 • Delete: opens the Delete Study dialog.
 • Close: closes the currently open study.
 • Recent: lists recently opened studies.
 • Tasks: displays active and completed tasks.
 • Log: displays AEDT log messages.
 • Preferences: contains system and study settings.
 • Study Maintenance: contains study maintenance options.
 • Help: displays AEDT version and support information.
 • Exit: exits the AEDT application.

 2. Metric Results tab
 The Metric Results tab supports construction and processing of metric result definitions, generation
 of reports, and generating and viewing result layers.

 Page 14
AEDT Supplemental Manual
Quick Start Tutorial

 3. Operations tab
 The Operations tab supports managing aircraft operations, non-aircraft operations, runup
 operations, helitaxi operations, and annualizations.

 4. Equipment tab
 The Equipment tab supports managing aircraft equipment, non-aircraft equipment, and equipment
 groups.

 5. Airports tab
 The Airports tab supports adding airports, viewing airport layouts and editing its components, adding
 new components in airport layout designer, and creating operation configurations.

 6. Definitions tab
 The Definitions tab supports setting up study data elements including metrics, receptors, receptor
 sets, operational profiles, and weather and terrain settings. It also supports integration of emissions
 results from the EPA’s Motor Vehicle Emission Simulator (MOVES).

 7. Environmental Justice tab
 The Environmental Justice tab provides access to the environmental justice (EJ) model which uses the
 U.S. Census, American Community Survey (ACS) 1 to identify and analyze potential minority and/or
 low-income populations and populations with limited English proficiency.

1
 For more information on the ACS, please visit: https://www.census.gov/programs-surveys/acs/.
For more specific information on the ACS data structure, see for example
http://www2.census.gov/geo/tiger/TIGER_DP/2013ACS/Metadata/

 Page 15
AEDT Supplemental Manual Quick Start Tutorial Quick Start Tutorial The goal of this quick tutorial is to lead you through each step required to generate and view noise and emissions output in AEDT for a single aircraft through a simple example. This example is not intended to represent a real analysis. 3.1 Create a New Study Begin by creating a new AEDT study: 1. Click the Study tab then click New to display the Create New Study dialog. 2. Enter the name “NoiseAndEmissionsStudy”. 3. Enter the description “A simple noise and emissions study”. Note that the study description is optional. 4. Enter the name of the desired SQL Server instance in the Select database server field. To change the SQL Server login credentials: a. Click the Credentials arrow button. b. Select desired authentication mode from the Authentication drop-down menu. Windows Authentication: The User name is pre-populated. SQL Server Authentication: Enter the User name and Password. c. Click Test Connection to verify that the connection to the database is successful. 5. Click New to create a new study (Figure 3). Study name must be at least five characters long and must not contain periods (.) or spaces. Page 16
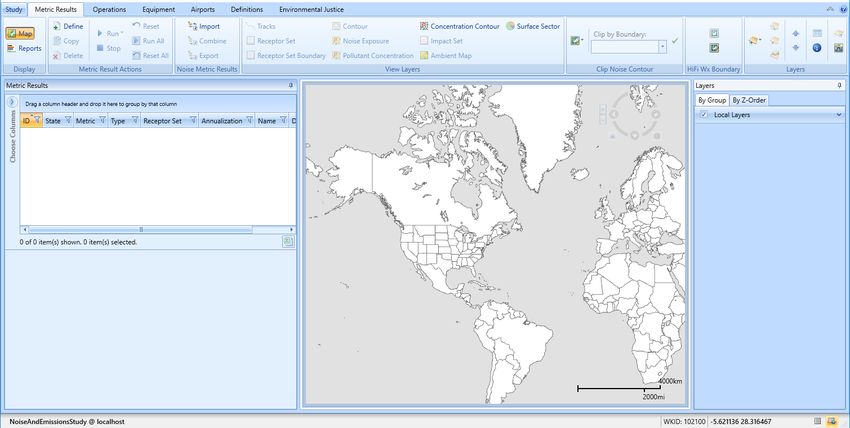
AEDT Supplemental Manual
Quick Start Tutorial

 Figure 3. Create New Study Dialog

AEDT will automatically create a new database named “NoiseAndEmissionsStudy” on the specified SQL
Server instance. This new study database contains all the necessary tables used by AEDT.

 • Fleet data tables (those tables with the prefix “FLT_”) in the new study database are automatically
 populated with data from the FLEET system database.

 • Airport data tables (those tables with the prefix “APT_” or “AIRPORT_”) in the new study database
 are not initially populated. The airport related tables are populated when an airport is added from
 the AEDT Airports tab.

Upon creating the new study, the Metric Results tab will display the Map view (Figure 4).

 Page 17
AEDT Supplemental Manual
Quick Start Tutorial

 Figure 4. Metric Results Tab

3.2 Add an Airport
 1. Click Add, then click Existing Airport.
 2. In the Add Existing Airport dialog (Figure 5):
 a. Filter the airports clicking on the filter icon next to the “Preferred Code” column.

 b. Type in “KSFO” under the first “Contains” dropdown list.
 c. Click the Filter button.
 d. Close the Filter dialog.
 3. Click Add to add the selected airport to the study.
 4. “All selected airports were successfully added to the study” confirmation message will be displayed.
 Click OK.
 5. Once you click OK, you will be returned to the Map view under the Airports tab.

 Page 18
AEDT Supplemental Manual
Quick Start Tutorial

 Figure 5. Add Existing Airport Dialog

3.3 View the Airport Layout
Airport layouts

Once the existing airport has been added, default Airport Layout(s) will be listed under the airport (Figure
6). An airport layout represents the runway configurations of the airport at a specific point in time. If the
airport had runway changes in the past, multiple airport layouts will be listed under the airport.

In a typical noise and emissions study, an airport layout contains runways and tracks. In an emissions
dispersion study, an airport layout may also contain other ground elements such as gates, taxiways, and
taxipaths.

 Page 19
AEDT Supplemental Manual
Quick Start Tutorial

 Figure 6. Airport Layout Details Pane

Note that multiple airport layouts are defined for the KSFO airport (Figure 6). This indicates that the airport
had runway changes over the years (i.e. runways 01L – 19R and 10R – 28L were extended). The “Default
Layout 0” has the most current runway configurations.

 • Select the KSFO Default Layout 0 and note the effective and expiration dates. Then view the
 runway details in the bottom pane.
 • Select the KSFO Default Layout 1 and note the effective and expiration dates. Then view the
 runway details in the bottom pane.

In this tutorial, we will only use the “KSFO Default Layout 0”.

If your analysis does not need the history of airport layouts and just needs the most current runway
information, delete the older airport layouts. Right-click on the airport layout name and click Delete.

 Page 20
AEDT Supplemental Manual
Quick Start Tutorial

View the airport layout on the map

Right-click on the KSFO Default Layout 0 from Airports pane and click View Layout. The selected airport
layout (i.e. runways) will be visible on the map (Figure 7).

 Figure 7. Airport Layout Map View

3.4 Create Flight Tracks
Flight tracks trace the path of the flight trajectory on the horizontal plane. Flight tracks are defined as
either as vector-type tracks (consisting of one or more straight or curved segments), or point-type tracks
(consisting of an array of x,y points). We will be creating a departure vector track and an arrival point-type
track. AEDT automatically extends departure and arrival tracks during flight performance processing, so
that the entirety of the vertical profile can be computed. Refer to the AEDT User Manual, Section 8.3.6, for
more information.

Create a vector-type departure track

In this step, you will create a vector-type departure track with three segments that starts from the runway
end 01L.

 1. Select the Designer tab (Figure 8). AEDT will load all of the airport layout features.

 Page 21
AEDT Supplemental Manual
Quick Start Tutorial

 Figure 8. Airports Designer Tab

 2. In the Vector Tracks ribbon group, click Add Departure Track button.
 3. The Create Vector Track pane will show in the lower right-hand corner. Note that the fields marked
 with a red (*) are required (Figure 9).

 Figure 9. Create Vector Track Pane

 4. Enter the name “DepVector_01L”.
 5. On the Map display, click on the runway end “01L”. AEDT will automatically populate the Runway
 End/Helipad in the Create Vector Track pane.
 6. From the Segment Type dropdown list, select Straight, then enter 2 nautical miles for distance.
 Click Add to create the first track segment (segment number 0).
 • The straight track segment is displayed on the map.
 • As new segments are added, the map displays them.
 7. For the second segment, select Turn from the Segment Type dropdown list. Enter 2 nmi for Radius,
 “90” degrees for Angle. Click Add to create segment number 1.
 8. For the thrid segment, select Straight vector track segment. Enter 2 nautical miles. Click Add to
 create segment number 2.
 9. Click Save.

 Page 22
AEDT Supplemental Manual
Quick Start Tutorial

 10. AEDT will add this new track to the list of Airport Layout components in the lower left-corner
 (Figure 10).

 Figure 10. Vector Track Details

 Page 23
AEDT Supplemental Manual
Quick Start Tutorial

 Figure 11. Finished Departure Vector Track

Create a point-type arrival track

In this step, you will create a point-type arrival track that starts out in the airspace and ends in the runway
end 19L.

 Note that you may need to zoom in using your mouse in order to end the track at the target
 runway end (Figure 12).

 1. In the Point Track ribbon group, click Add Dep/App Track (Figure 8). A pencil icon replaces the
 mouse cursor.

 Page 24
AEDT Supplemental Manual
Quick Start Tutorial

 2. On the Map, click on a point away from the target runway end (19L) to set the beginning of your
 arrival track.
 3. Click on desired points between your starting point and the target runway end in order to create a
 track node.
 4. When you are finished defining the track, double-click on the runway end 19L.
 5. If you make a mistake, click the Undo button in the Actions ribbon group.
 6. Click Save Design.
 7. The new Arrival point track has been saved to the layout and added to the list of Layout
 components. Notice that the track is defined by the latitude and longitude of the points (Figure
 13).

 Figure 12. Map of Runway End

 Page 25
AEDT Supplemental Manual
Quick Start Tutorial

 Figure 13. Arrival Point Track

3.5 View Airport Weather
 After adding an existing airport, verify the airport weather data in Definitions tab (Figure 14).

 1. Click the Definitions tab, then select Weather.
 2. From the left-pane, click Airport weather.
 3. Select the desired airport from the Airport dropdown list.
 4. Select the desired year from the Select year dropdown list.
 5. View the airport weather data.

 Page 26
AEDT Supplemental Manual
Quick Start Tutorial

 Figure 14. Definitions Tab – Airport Weather

3.6 Add Receptors & Receptor Sets
 Receptors define locations where noise or pollutant concentration levels are calculated. A receptor set is
 a container for one or more receptors. Receptor(s) must be added to a Receptor Set in order to be used
 when defining a metric result.

 Receptors and Receptor Sets are not required for flight performance, fuel burn or emissions specific
 metric results. They are required for noise or pollutant concentration metric results.

 There are two receptor types in AEDT – Point and Grid. We will create both a Point and a Grid receptor in
 this section.

 Figure 15. Definitions Tab – Receptors

Create a grid receptor

To create a grid receptor:

 Page 27
AEDT Supplemental Manual
Quick Start Tutorial

 1. Click the Definitions tab, then click Receptors (Figure 15).
 2. Click the New button in the Actions ribbon group. The Receptor Details window will appear (Figure
 16).
 3. The grid type is set to Point by default. Select Grid from the Type dropdown list.

 In AEDT, the location of a grid type receptor is specified by the lower left (southwest) corner of the
 grid, which can be defined by specifying the latitude and longitude of the point or as an offset from
 a location (typically the airport origin).

 4. Enter the Name “ContourGrid”.
 5. Enter the “33” for the X and Y counts. This represents the number of receptor points in the regular
 grid.
 6. Enter “0.5” for the X and Y spacing. These values represent the spacing between receptor points.
 Both numbers must be equal in order to generate contours in AEDT.
 7. Click “Match Grid Center to Projection Origin” button. This will automatically set the X and Y offset
 to be “-8”. These values indicate the nautical mile offset from the Grid origin.
 8. The default values in the Location Info section are set to the airport origin.
 9. By default, the Restrict by Boundary is unchecked (not used).
 10. Click Save.
 11. AEDT will display the new receptor on the left hand pane.

 Page 28
AEDT Supplemental Manual
Quick Start Tutorial

 Figure 16. Receptor Details – Grid

For more information about the Restrict by Boundary functionality, see Section 9.3.2.1 of the AEDT User
Manual.

Create a point receptor

You will create a single receptor point that can be used in noise and emissions concentrations modeling.
You may want to utilize this functionality when analyzing noise at locations points such as schools or
hospitals.

To create a Point Receptor (Figure 17):

 1. Click the New button in the Actions ribbon group. The Receptor Details window will appear.
 2. The grid type is set to Point by default.

 Page 29
AEDT Supplemental Manual
Quick Start Tutorial

 Figure 17. Receptor Details – Point

 3. Select “English” as units.
 4. Leave the Location Info to the default airport origin.
 5. Leave the “Height above terrain” set to zero.
 6. Click Save.

Create a receptor set

To create a Receptor Set (Figure 18):

 1. From the Definitions tab, then select Receptor Sets.
 2. Enter “ContourReceptorSet” for the Receptor Set name.
 3. Enter “Receptor Set with a Grid Receptor” for the description.
 4. From Available receptors, select the “ContourGrid” receptor and click the Arrow button to move it
 to the Assigned receptors.
 5. Click Save.

 Page 30
AEDT Supplemental Manual
Quick Start Tutorial

 Figure 18. Receptor Set Details

For more information about the Dynamic Grid functionality, see in Section 9.4.1 of the AEDT User Manual.

View receptor set on map

Once the Receptor Set is created, it can be viewed by clicking Map from the Display ribbon group and then
clicking Receptor Set from the View ribbon group (Figure 19).

 Figure 19. Map View of Receptor Set

3.7 Set the Default Operation Time
Before adding aircraft operations, assign the default operation date/time in the Study Preferences screen.
This setting is used to set the default operation time in the Create Aircraft/Non-Aircraft/Runup/Helitaxi
Operations wizard

 1. Click the Study tab, then select Preferences, Study.
 2. In the Default operation time, select “8/20/2018 11:00 AM”.
 3. Click Save to apply changes.

 Figure 20. Default Operation Time in Study Preferences

 Page 31
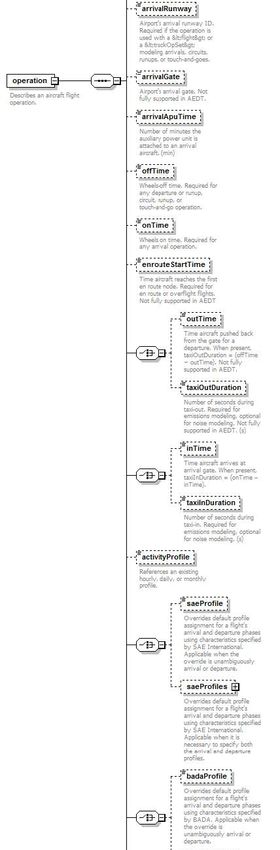
AEDT Supplemental Manual
Quick Start Tutorial

3.8 Add Aircraft Operations
AEDT can model several types of Aircraft and Non-Aircraft operations. For our study, we will be creating a
single airplane arrival operation and a single airplane departure operations. For additional information on
other types of operations, please refer to Section 6 of the AEDT User Manual.

Add an arrival operation

To add an arrival aircraft operation (Figure 21):

 1. Click the Operations tab and then select Aircraft in the Display ribbon group.
 2. Click New in the Aircraft Actions ribbon group to open the Create Aircraft Operations wizard.
 3. Leave the Operation type as Arrival.
 4. Select the “KSFO Default Layout 0” from the airport layout list.
 5. Leave the Operation count to 1. This represents a single, day time arrival operation of the
 aircraft, flight profile, and track combination.
 6. Click Next.

 Figure 21. Create Aircraft Operations

 7. In the Choose Equipment step, click on the filter icon of the first ID column (ANP ID), and enter
 “737700”.
 8. Click on the filter icon of the Code column (Engine Code), and enter “3CM030”.
 9. Of the filtered rows, select the record where the Airframe Model is “Boeing 737-700 Series”. Click
 Next (Figure 22).

 Page 32
AEDT Supplemental Manual
Quick Start Tutorial

 Figure 22. Create Aircraft Operations – Choose Equipment

 10. In the Choose Gate step, click Next to skip this step (you are not assiging a gate in this example).
 For more information on how to define Gates, see Section 6.2.1.3 of the AEDT User Manual.
 11. In the Choose GSE/APU step, click Next to skip this step (you are not assiging GSE/APU in this
 example). For more information on how to define GSE or APU’s, see Section 6.2.1.4 of the AEDT
 User Manual.

 Page 33
AEDT Supplemental Manual
Quick Start Tutorial

 12. In the Assign Operation Time step, the operation time is set to “8/20/2018 11:00 AM” which
 matches the assigned date which was specified in Section 3.7 (Figure 23). Click Next.

 The effective and expiration date range of the selected airport layout is displayed. The operation
 time must fall between this date range.

 Operation time is critical for noise metrics and annualization. For example, DNL noise applies a
 10 decibel penalty for night time operations.

 Figure 23. Create Aircraft Operations – Assign Operation Time

 13. In the Choose Flight Profile step, select the STANDARD arrival profile for the 737700 (there is only
 one) and click Next.

 Figure 24. Create Aircraft Operations – Choose Flight Profile

 Page 34
AEDT Supplemental Manual
Quick Start Tutorial

 14. In the Choose Track step, select the track named “New Arr” and click Next.

 Figure 25. Create Aircraft Operations – Choose Track

 15. In the Summary step, a summary of the inputs will appear at the top of the window (Figure 26).
 Click Create. Click Yes when prompted for confirmation.

 Figure 26. Create Aircraft Operations – Summary

 Page 35
AEDT Supplemental Manual
Quick Start Tutorial

Add a departure operation

Create a departure operation by copying the arrival operation that you just created. The Create Aircraft
Operations wizard will filter available flight profiles, tracks and other data that are specific to the specified
operation type.

 1. Right-click on the new arrival operation and click Copy to open the Create Aircraft Operations
 wizard.
 2. In the first step, change the operation type to Departure. For the airport layout, select the “KSFO
 Default Layout 0”. Then click Next.
 3. In the Choose Equipment step, click Next since the aircraft 737700 is already selected.
 4. In the Choose Gate step, click Next to skip this step.
 5. In the Choose GSE/APU step, click Next to skip this step.
 6. In the Assign Operation Time step, accept the default operation time and click Next.
 7. In the Choose Flight Profile step, select the STANDARD departure profile where the stage length is
 1 and click Next.
 8. In the Choose Track step, select the track named “DepVector_01L” and click Next.
 9. In the Summary step, click Create. Click Yes when prompted for confirmation.

3.9 Create Annualizations
In AEDT, an annualization is a hierarchical grouping of operations associated with the following
parameters:

 • Time period to be analyzed
 • Operations included in the time period
 • Weighted groupings of the included operations
 • Modeling options for the included operations

Annualization provides a convenient way to adjust contributions of individual operation groups by scaling
operations up or down using weightings and to model alternative scenarios from a baseline scenario.

Create a “Baseline” annualization

To create an annualization:

 1. Go to the Operations tab, then select Annualizations.
 2. Click New in the Annualization Actions ribbon group to open the Create Annualizations wizard.
 3. In the first step, check Add new aircraft operation group(s), then click Next (Figure 27).

 Page 36
AEDT Supplemental Manual
Quick Start Tutorial

 Figure 27. Create Annualization Wizard – First Step

 4. The Create Aircraft Operation Groups step is where you can include the aircraft operations you
 previously created that you would like to model. You can create several annualizations by
 creating new groups and including only the aircraft operations of interest within the specified
 time period.
 5. In the Add new operation group text box, enter “737700” and click Add (Figure 28).

 Figure 28. Create Annualization Wizard – Add New Operation Group Text Box

 6. Select the two operations under the Available Operations (left-pane); then drag them to the
 right-pane and drop them under the 737700 operation group.

 Figure 29. Create Annualization Wizard – Create Aircraft Operation Groups, Drag & Drop

 Page 37
AEDT Supplemental Manual
Quick Start Tutorial

 Figure 30. Create Annualization Wizard – Create Aircraft Operation Groups

 7. Click Next.
 8. In the Build Annualization step, drag the “737700” group from Defined operation groups to the
 right-pane and drop it under the Root.
 9. Double-click on the word “Root” to edit and type in “Baseline”.
 10. Leave the annualization weights to 1.
 11. Make sure that the First day and Last day are both set to the default operation date, and that the
 Duration is 24 hours (Figure 31). If the two dates are different, it means that the operation time of
 one of the aircraft oprerations were not assigned correctly.

 Figure 31. Create Annualization Wizard – Build Annualization

 12. Click Next.
 13. In the Set Processing Options step, click Create.

Create an “Alternative” annualization

Create a second annualization – this time adjusting the annualization weights in order to see the changes
in noise results.

 1. Click New in the Annualization Actions ribbon group to open the Create Annualizations wizard.
 2. In the first step, check Assign existing operation group(s).
 3. Select the “737700” group and click on the arrow to move to the Assigned operation groups. Click
 Next.

 Page 38
AEDT Supplemental Manual
Quick Start Tutorial

 4. In the Build Annualization step, drag the “737700” group from Defined operation groups to
 Assigned Annualization.
 5. Double-click on the word “Root” to edit and type in “Alternative”.
 6. Click on the “1” next to the word “Alternative” to edit. Enter number “2” (Figure 32).

 Figure 32. Create Annualization Wizard – Build Annualization

 7. Click Next, then click Create.

This will create an annualization that has the effect of doubling the operation counts that were specified
when the operations were created.

Annualization Example

Assume you have grouped all of your airport operations into an arrival group and a departure group. These
groups are part of your baseline scenario, which is utilized 75% of the year. Suppose you would like to
compare your baseline operating configuration against an alternative. The alternative operating
configuration contains the same operation groups as the baseline and is utilized 25% of the year. However,
the alternative scenario allows for twice as many arrivals as the baseline.

For this example, you would:

 1. Create two operation groups: one for all arrivals and one for all departures.
 2. Add both operation groups to an annualization named “Baseline”.
 3. Set the “Baseline” weighting to 0.75.
 4. Create a second annualization named “Alternative”.
 5. Add both operation groups to the annualization. Set the weighting of the arrival group to “2”.
 6. Set the “Alternative” weighting to 0.25.
 7. Define two identical metric results, one for each annualization.
 8. Run metric results and compare noise results.

Please see Section 6.7 of the AEDT User Manual for more information on Annualization.

 Page 39
AEDT Supplemental Manual
Quick Start Tutorial

3.10 Define Metric Results
An AEDT Metric Result contains all of the information required for an analyst to generate results in AEDT.
Examples of metric result input include: aircraft operations data, flight performance modeling options,
result storage options and noise and emissions metric selections.

Create a “Baseline” metric result

To create a metric result for a simple noise and emissions analysis:

 1. Go to the Metric Results tab.
 2. Click Define in the Metric Result Actions ribbon group to open the Define Metric Results wizard.
 3. Move the “DNL”metric from the Available Metrics to the Selected Metrics by using the Arrow
 button. Click Next.
 4. Select the “ContourReceptorSet” from the Available receptor set, then click the Arrow button to
 move it to the right-hand pane. Click Next.
 5. Select the “Baseline” annualization. Click Next.
 6. The Set Processing Options step is where you specify data storage options and many types of
 modeling options such as performance modeling details, weather usage, and terrain usage.
 Additional information on these options can be found in the AEDT User Manual.
 • Under Result Storage Options, Emissions, select Segment. Selecting Segment will save
 segment-level emissions results to the study database and allow you to view these in the
 Emissions Report.
 • Under Emissions/Performance Modeling Options, under Weather Fidelity, select “Use
 airport weather” and “2011-2020 average”. When this option is selected, average annual
 airport weather (specified in the Definitions tab, Weather, Airport weather) is used. If any
 component of airport weather data is missing (e.g., pressure), AEDT will substitute the
 missing data with ISA weather.
 • Under the Metric Result Options, under Name, enter “DNL Baseline”.
 • Leave other options as is (Figure 33).

 Page 40
You can also read