QUICK START GUIDE Compliance Manager for HIPAA Instructions to Perform a HIPAA Compliance Assessment
←
→
Page content transcription
If your browser does not render page correctly, please read the page content below

QUICK START GUIDE
Compliance Manager for HIPAA
Instructions to Perform a HIPAA Compliance Assessment

                                                        8/5/2021 12:43 PM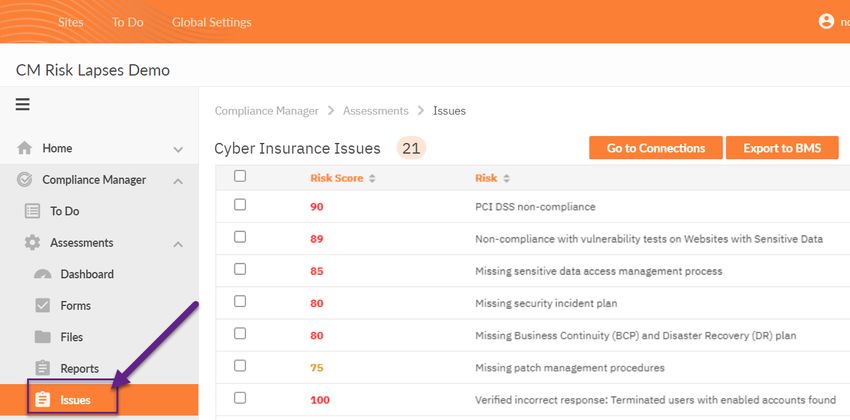
Compliance Manager                                  HIPAA Assessment — Quick Start Guide

Contents
  Performing a HIPAA Compliance Assessment                                             4

     Compliance Manager for HIPAA Assessment Overview                                  4
     Using the Security Exception Worksheet to Address Compliance Lapses and
     False Positives                                                                   4
        Network Prerequisites for Assessment Scans                                     5
     Pre-scan Network Configuration Checklist                                          6
        Checklist for Domain Environments                                              6
        Checklist for Workgroup Environments                                           8
     Step 1 — Create a New Site                                                       10
     Step 2 — Use the To Do List to Complete Tasks                                    16
        Re-run or Modify To Do Items                                                  16
        Assessment Progress Bar                                                       18
     Step 3 — Set Up the HIPAA Assessment Project                                     19
     Step 4 — Install and Configure the Compliance Manager Server                     26
           Configure Scan Settings for Active Directory Domain                        27
           Configure Scan Settings for Workgroup                                      35
     Step 5 — Start Assessment and Perform Pre-Scan Analysis                          42
     Step 6 — Collect HIPAA Compliance Assessment Data                                53
           Obtain HIPAA Policies and Procedures Document                              57
     Step 7 — Collect Secondary Assessment Data                                       60
     Step 8 — Document Security Exceptions                                            65
     Step 9 — Generate HIPAA Compliance Assessment Reports                            67
        Optional Task: Export Issues to Kaseya BMS                                    68
           Step 1 — Gather Credentials and Set Up Kaseya BMS                          68
           Step 2 — Set Up a Connection to your Kaseya BMS                            69
           Step 3 — Map your Compliance Manager’s Site to a Kaseya BMS                74
           Step 4 — Export Issues to Kaseya BMS                                       75
     Step 10 — Complete and Archive your HIPAA Assessment                             77
        Archiving Assessments                                                         77

© 2021 RapidFire Tools, Inc. All rights reserved.

                                                                                       2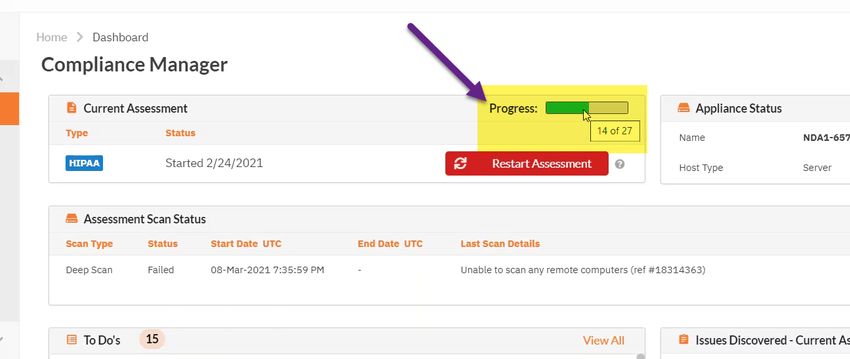
HIPAA Assessment — Quick Start Guide                               Compliance Manager

    Step 11 — Start a New HIPAA Assessment after Completing a Previous
    Assessment                                                                               78

  HIPAA Assessment Reports                                                                  79

    Compliance Reports                                                                       79
    Supporting Documentation                                                                 82

  Appendices                                                                                85

    Pre-Scan Network Configuration Checklist                                                 86
     Checklist for Domain Environments                                                       86
     Checklist for Workgroup Environments                                                    88
    Compliance Manager Cyber Insurance Add On                                                91
    HIPAA To Do Task Complete List                                                           97

                                               © 2021 RapidFire Tools, Inc. All rights reserved.

                                                                                              3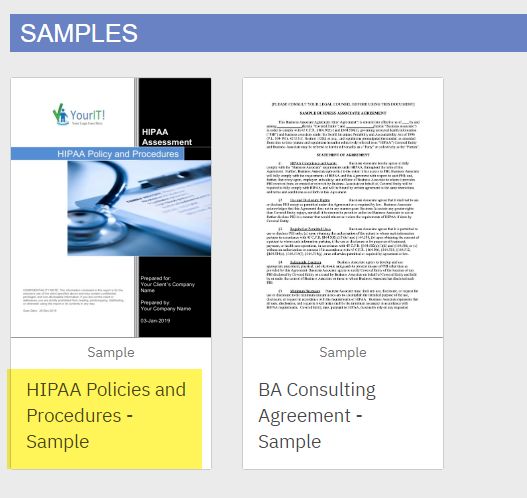
Compliance Manager                                  HIPAA Assessment — Quick Start Guide

Performing a HIPAA Compliance Assessment

Compliance Manager for HIPAA Assessment Overview
 Compliance Manager for HIPAA combines 1) automated data collection with 2) a
 structured framework for collecting supplemental assessment information through
 surveys and worksheets. To perform a HIPAA Compliance Assessment, you will:

     l   Access and log in to the RapidFire Tools Portal
     l   Create a site and set up a project
     l   Install the Compliance Manager server on the target network
     l   Collect data from the target network using the Portal's guided To Do List
     l   Generate HIPAA Compliance Assessment reports and documentation

Using the Security Exception Worksheet to Address
Compliance Lapses and False Positives
 Sometimes you may get stuck in an assessment. This might happen for several reasons:

     l   You cannot resolve every single compliance issue identified in the assessment
     l   Your scan results differ from what you know is the reality on the target network
     l   You do not have enough information to enter accurate responses for every form
         question

 If you encounter any of the above, you can always move ahead and complete your
 assessment using the Security Exception Worksheet. This worksheet becomes
 available near the end of your To Do list. It allows you to document explanations on
 suspect items. Your explanation can include why various discovered items are not true
 issues and indicate possible false positives. Additionally, you can explain why a certain
 compliance requirement should not apply to you – or an alternative way in which you have
 met the requirement.

 These exceptions can be documented on an item by item level (for example: at the
 granularity at users, ports, applications, etc.). The Security Exception Worksheet does
 not alleviate the need for safeguards but allows for description of alternative means of
 mitigating the identified security risk.

  © 2021 RapidFire Tools, Inc. All rights reserved.

                                                                                            4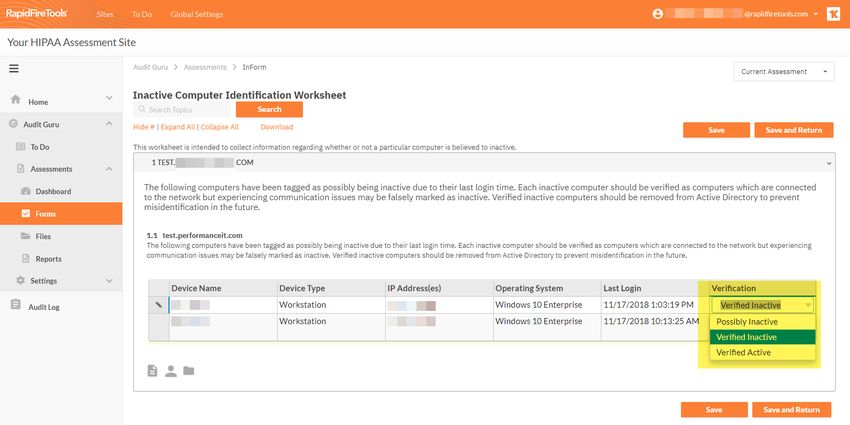
HIPAA Assessment — Quick Start Guide                                 Compliance Manager

               Network Prerequisites for Assessment Scans
                  For a successful network scan:

  1. ENSURE ALL NETWORK ENDPOINTS ARE TURNED ON THROUGHOUT THE DURATION OF
     THE SCAN. This includes PCs and servers. The scan can last several hours.

  2. CONFIGURE THE TARGET NETWORK TO ALLOW FOR SUCCESSFUL SCANS ON ALL
     NETWORK ENDPOINTS. See "Pre-scan Network Configuration Checklist" on the
     facing page for configuration guidance for both Windows Active Directory and
     Workgroup environments.
  3. GATHER THE INFORMATION BELOW TO CONFIGURE YOUR SCANS FOR THE CLIENT
     SITE. Work with the project Technician and/or your IT admin on site to collect the
     following:
        l   Admin network credentials that have rights to use WMI, ADMIN$, and File
            and Printer Sharing on the target network.
        l   Internal IP range information to be used when performing internal scans.

             Note: Compliance Manager will automatically suggest an IP range to
             scan on the network. However, you may wish to override this or exclude
             certain IP addresses.

        l   External IP addresses for the organisation to be used when setting up
            External Vulnerability Scans.
        l   RapidFire Tools Portal User Credentials
        l   For Windows Active Directory environments, you will need admin credentials
            to connect to the Domain Controller, as well as the name/IP address of the
            domain controller.
        l   For Windows Workgroup network environments, a list of the Computers to
            be included in the Assessment and the Local Admin Credentials for each
            computer.

                                                 © 2021 RapidFire Tools, Inc. All rights reserved.

                                                                                                5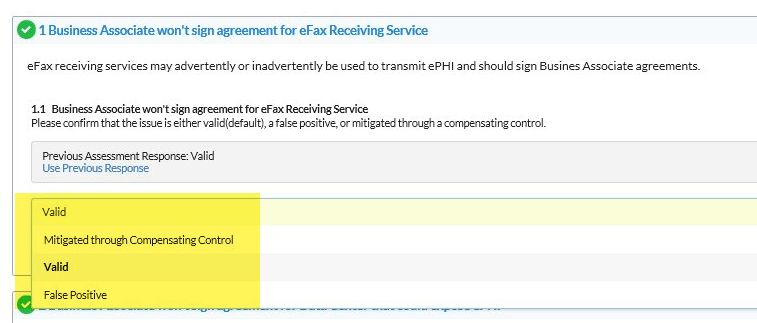
Compliance Manager                                        HIPAA Assessment — Quick Start Guide

Pre-scan Network Configuration Checklist
  RapidFire Tools products can gather a great deal of information from the target network
  with little advance preparation – and with very little footprint! However, if you are having
  trouble with scans, or you have the ability to configure the target network in advance, we
  recommend the settings below.

  These checklists detail the recommended network configurations for both Windows
  Domain and Workgroup environments.

   Note: You must have .NET 3.5 installed on machines in order to use all data collector
   and server/appliance tools.

Checklist for Domain Environments
  Share this checklist with your IT Administrator and ask them to configure your network's
  Domain Controller as follows:

   Complete           Domain Configuration

                      GPO Configuration for Windows Firewall (Inbound Rules)

                      Allow Windows Management Instrumentation (WMI) service to operate through
                      Windows Firewall

                      This includes the following rules:

                          l   Windows Management Instrumentation (ASync-In)
                          l   Windows Management Instrumentation (WMI-In)
                          l   Windows Management Instrumentation (DCOM-In)

                      Allow File and printer sharing to operate through Windows Firewall

                      This includes the following rules:

                          l   File and Printer Sharing (NB-Name-In)
                          l   File and Printer Sharing (SMB-In)
                          l   File and Printer Sharing (NB-Session-In)

                      Enable Remote Registry “read only” access on computers targeted for scanning.

  © 2021 RapidFire Tools, Inc. All rights reserved.

                                                                                                      6
HIPAA Assessment — Quick Start Guide                                    Compliance Manager

 Complete     Domain Configuration

                Note: Remote Registry access should be restricted for use by the user access
                account credentials to be used during network and local computer scan.

              Enable the Internet Control Message Protocol (ICMP) to allow authorized ICMP echo
              request messages and ICMP echo reply messages to be sent and received by
              Windows computers and network devices.

              Windows firewall rules on Windows computers may need to be created/enabled to
              allow a computer:

                  l   operating a Kaseya-RapidFire Tools product network data collector to issue
                      ICMP echo request messages to be sent to Windows computers and network
                      devices
                  l   to send ICMP echo reply messages in response to an ICMP echo request

                Note: ICMP requests are used to detect active Windows computers and network
                devices to scan.

              GPO Configuration for Windows Services

              Windows Management Instrumentation (WMI)
              • Startup Type: Automatic

              Windows Update Service
              • Startup Type: Automatic

              Remote Registry
              • Startup Type: Automatic

              Remote Procedure Call
              • Startup Type: Automatic

              Network Shares

              • Admin$ must be present and accessible using supplied credentials (usually a local
              admin or user in the local Computer's Administrative Security group)

                                                    © 2021 RapidFire Tools, Inc. All rights reserved.

                                                                                                    7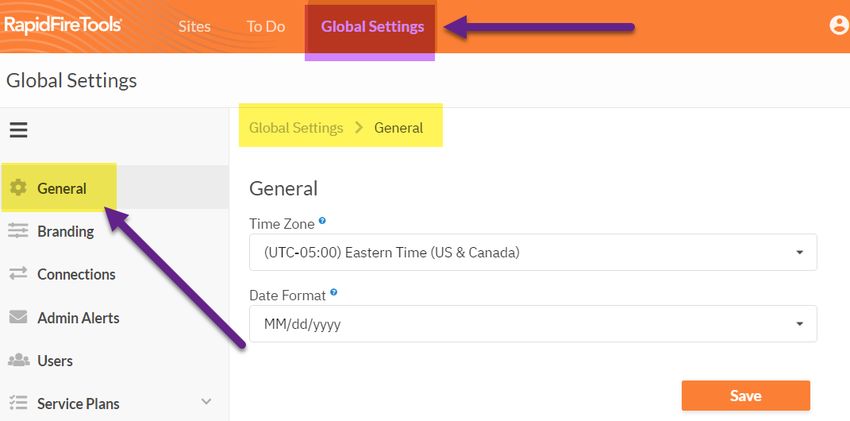
Compliance Manager                                        HIPAA Assessment — Quick Start Guide

   Complete           Domain Configuration

                      3rd Party Firewalls

                      • Ensure that 3rd party Firewalls are configured similarly to Windows Firewall rules
                      described within this checklist.

                        Note: This is a requirment for both Active Directory and Workgroup Networks.

Checklist for Workgroup Environments
 Before you perform a workgroup assessment, run the following PowerShell commands
 on the target network and the machine that will perform the scan. These three
 configurations should help you avoid most issues in a workgroup environment. Each
 command is followed by an explanation and link to Microsoft documentation.

    1. reg add
       HKLM\SOFTWARE\Microsoft\Windows\CurrentVersion\Policies\syst
       em /v LocalAccountTokenFilterPolicy /t REG_DWORD /d 1 /f

        By default, UAC only allows remote administration tasks to be performed by the
        Built-in Administrator account. To work around this, this command sets the
        LocalAccountTokenFilterPolicy registry key to 1. This allows any local admin to
        perform remote administrative tasks (i.e. access to system shares C$, Admin$,
        etc.).

        https://support.microsoft.com/en-us/help/951016/description-of-user-account-
        control-and-remote-restrictions-in-windows
    2. netsh advfirewall firewall set rule group="windows
       management instrumentation (wmi)" new enable=yes

        This command creates an Inbound firewall rule to allow access to the WMI service
        and namespaces.

        https://docs.microsoft.com/en-us/windows/win32/wmisdk/connecting-to-wmi-
        remotely-starting-with-vista
    3. netsh advfirewall firewall set rule group="File and Printer
       Sharing" new enable=Yes

  © 2021 RapidFire Tools, Inc. All rights reserved.

                                                                                                             8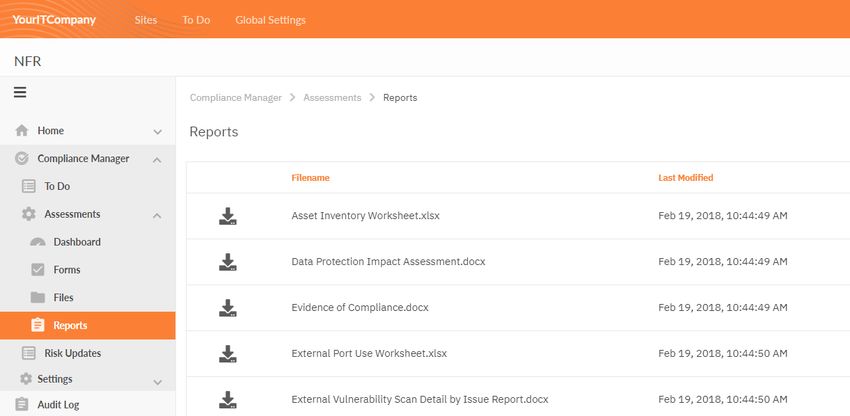
HIPAA Assessment — Quick Start Guide                                       Compliance Manager

     This command creates an Inbound firewall rule which enables File and Printer
     Sharing on the machine. File and printer sharing is required in order to access the
     Admin$ share on remote machines.

     https://answers.microsoft.com/en-us/windows/forum/all/turning-on-file-and-printer-
     sharing-windows-10/bb3066eb-f589-4021-8f71-617e70854354

You can also share this checklist with your IT Administrator and ask them to configure
each computer in your workgroup as follows:

 Complete?        Workgroup Configuration

                  Network Settings

                  • Admin$ must be present on the computers you wish to scan, and be
                  accessible with the login credentials you provide for the scan

                  • File and printer sharing must be enabled on the computers you wish to scan

                  • Ensure the Windows Services below are running and allowed to communicate
                  through Windows Firewall:
                  • Windows Management Instrumentation (WMI)
                  • Windows Update Service
                  • Remote Registry
                  • Remote Desktop
                  • Remote Procedure Call

                  • Workgroup computer administrator user account credentials.

                    Note: Before configuring scan settings for workgroups, prepare a list of the
                    workgroup computer(s) adminstrator user account credentials for entry into the
                    scan settings wizard.

                  Enable the Internet Control Message Protocol (ICMP) to allow authorized ICMP
                  echo request messages and ICMP echo reply messages to be sent and received by
                  Windows computers and network devices.

                  Windows firewall rules on Windows computers may need to be created/enabled to
                  allow a computer:

                                                      © 2021 RapidFire Tools, Inc. All rights reserved.

                                                                                                     9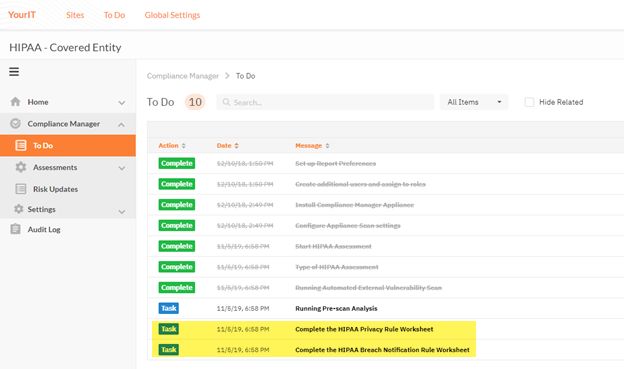
Compliance Manager                                       HIPAA Assessment — Quick Start Guide

   Complete?           Workgroup Configuration

                           l   operating a Kaseya-RapidFire Tools product network data collector to issue
                               ICMP echo request messages to be sent to Windows computers and
                               network devices
                           l   to send ICMP echo reply messages in response to an ICMP echo request

                         Note: ICMP requests are used to detect active Windows computers and
                         network devices to scan.

 To complete a HIPAA Compliance Assessment, follow these steps:

Step 1 — Create a New Site
   Tip: We recommend you get started by making a "practice site" and running your first
   assessment in-house. Use this to familiarise yourself with Compliance Manager and
   the installation and configuration process.

 The first step in performing a HIPAA Compliance Assessment is creating a "Site". Sites
 help you organise your assessments. This task is performed by the Site Administrator. To
 create a site:

    1. Access the RapidFire Tools Portal at https://www.youritportal.com and log in with
       your credentials.

    2. From the Sites page, click Add Site.

  © 2021 RapidFire Tools, Inc. All rights reserved.

                                                                                                            10
HIPAA Assessment — Quick Start Guide Compliance Manager
3. Enter a Site Name. This can be the name of the client for whom the assessment is
being performed, for example.
4. Under Site Type, select Compliance Manager and your assessment type.
l If you wish to perform a GDPR assessment, select GDPR.
l If you wish to perform a HIPAA assessment, select HIPAA.
l If you wish to perform a Cyber Insurance assessment, select Cyber
Insurance.
l If you wish to perform a NIST CSF assessment, select NIST.
l If you wish to perform a CMMC/NIST 800-171 assessment, select
CMMC/NIST 800-171.
© 2021 RapidFire Tools, Inc. All rights reserved.
11Compliance Manager HIPAA Assessment — Quick Start Guide
Note: • If you are a direct-to-customer or SMB user, you will not need to
provision a license for your Site. Click Confirm and proceed to "The Site Home
page will appear. Click the Compliance Manager tab." on page 14.
• If you are an MSP user, you will need to select a license to use with each of
your Sites. This license determines how many endpoints you can manage at the
Site. Proceed to "Click Next. " below.
5. Click Next.
6. Select a subscription option (MSP only). You can choose to:
a. Use an Existing License you have purchased previously. Select the existing
license from the drop-down menu and click Next.
© 2021 RapidFire Tools, Inc. All rights reserved.
12HIPAA Assessment — Quick Start Guide Compliance Manager
b. Create a New Subscription. Select the subscription option from the drop-
down menu and click Next.
Note: You have 10 FREE Site licenses as part of your initial Compliance
Manager subscription. Each of these licenses can cover a site with up to
© 2021 RapidFire Tools, Inc. All rights reserved.
13Compliance Manager HIPAA Assessment — Quick Start Guide
250 computers. Select one of these free licenses for use with your first 10
new Sites. We suggest that you use 1 of the 10 licenses for your own
internal use, such as familiarizing yourself with the product and
assessment processes.
If you wish to purchase additional licenses or upgrade to a higher license
(500 and above), you will be billed extra. Contact your Sales
Representative for more details.
7. The Site Home page will appear. Click the Compliance Manager tab.
© 2021 RapidFire Tools, Inc. All rights reserved.
14HIPAA Assessment — Quick Start Guide Compliance Manager
The Site To Do page will appear.
© 2021 RapidFire Tools, Inc. All rights reserved.
15Compliance Manager HIPAA Assessment — Quick Start Guide
Step 2 — Use the To Do List to Complete Tasks
The To Do List will guide you through the HIPAA Compliance Assessment process. It
presents the tasks you need to complete for the assessment. To use the To Do List:
1. From the [Your Site] > Compliance Manager tab, click To Do.
The Site's To Do list will appear.
2. Click on a To Do item to open more detailed information and instructions about each
step in the assessment process.
Tip: The Tasks steps in this quick start guide walk you through each To Do task.
Note that the tasks may appear in a different order depending on which tasks
you complete first.
Re-run or Modify To Do Items
Some to do items can be re-run or modified after they have been completed.
l Automated Scans can be re-run directly from the To Do item. Re-running a scan will
reset whatever forms were generated from that can. Any data entered into those
forms during the current assessment will be lost. The worksheets will reappear as
© 2021 RapidFire Tools, Inc. All rights reserved.
16HIPAA Assessment — Quick Start Guide Compliance Manager
new To Do items.
l Worksheets and forms can be modified directly from the To Do item.
To re-run or modify a To Do item:
1. Open a completed To Do item from the To Do list.
2. Depending on the type of To Do item (scan or worksheet), select Re-run or Modify:
l If the To Do item is an automated scan, click Re-run.
l If the To Do item is a Worksheet or Survey, click Modify.
3. A list of related To Do items that will be reset will appear. Confirm that you wish to
proceed.
© 2021 RapidFire Tools, Inc. All rights reserved.
17Compliance Manager HIPAA Assessment — Quick Start Guide
Note: For example, if you reset an automated scan, 1) any worksheets that
contain data from that scan will also be reset and 2) any data previously entered
in that form during the current assessment will be lost.
4. Once you reset or modify the To Do item, the regenerated item will appear in the To
Do list.
Assessment Progress Bar
From the Site Dashboard, you can view a progress bar for your assessment. This
progress bar is advanced when you complete assessment tasks.
If you hover over the progress, you can see the number of To Do items remaining in the
assessment. This number is based on the total steps in the assessment, rather than the
© 2021 RapidFire Tools, Inc. All rights reserved.
18HIPAA Assessment — Quick Start Guide Compliance Manager
current To Do list. Once all To Do items are completed, the Progress Bar will be removed
from the Current Assessment panel in the Compliance Manager Dashboard.
Step 3 — Set Up the HIPAA Assessment Project
I. Task Set Up Report Preferences.
Compliance Manager generates assessment reports and proof of compliance
documents to help you complete your HIPAA Compliance Assessment. You can
also customize these reports to align with your company or organisation branding
guidelines and information. This task is performed by an Administrator.
To configure Report Preferences:
1. From your Site Home Page, go to Compliance Manager > Settings.
Next, click Report Preferences to access the customization settings. This
includes company information, images, and design elements for this site's
reports.
© 2021 RapidFire Tools, Inc. All rights reserved.
19Compliance Manager HIPAA Assessment — Quick Start Guide
2. Customize your reports. This includes company information, images, and
design elements for this site's reports.
3. Select the correct paper size in your report preferences. If you are in the USA,
select Letter (8.5"x11") size.
© 2021 RapidFire Tools, Inc. All rights reserved.
20HIPAA Assessment — Quick Start Guide Compliance Manager
4. Once you finish configuring Report Preferences, return to the item in the To
Do list and click Mark Complete. Do this each time you complete a task in the
To Do list.
II. Recommended: Set Time Zone.
You can set your time zone from Global Settings > General. Set your time zone to
schedule automated scans at your preferred local time. To configure time zones:
© 2021 RapidFire Tools, Inc. All rights reserved.
21Compliance Manager HIPAA Assessment — Quick Start Guide
1. Go to Global Settings > General.
2. Select your time zone from the drop down menu.
3. Click Save.
Note that the time zone setting is relatively narrow in scope. For example, To Do
task creation time is shown based on your browser's local time, not the time zone
setting in Global Settings. The time zone setting effects a few items, including:
l start time for scans when using the limit scan start time feature for a site
l last modified date of risk update reports
l last sync date and time for Kaseya BMS billing integration
III. Task Create additional users and assign to roles.
Your HIPAA Compliance Assessment has several roles: these include Site
Administrator, Technician, Internal Auditor, and (optional) Subject Matter
Expert (SME). Each role performs different tasks within the assessment.
Tip: Before you begin the assessment, you will need to assign users to each
role except the optional SME role. This allows users to be assigned assessment
tasks within their To Do list and email notifications.
This task is performed by the Site Administrator. To assign users to project roles:
© 2021 RapidFire Tools, Inc. All rights reserved.
22HIPAA Assessment — Quick Start Guide Compliance Manager
1. From the Home page for your Site, click Users.
2. Click Add User.
i. Add Existing Users(s) by searching for their user name within the drop-
down menu.
© 2021 RapidFire Tools, Inc. All rights reserved.
23Compliance Manager HIPAA Assessment — Quick Start Guide
ii. Alternatively, you can create a New User account to provide individuals
access to the Portal and assessment process. You will need to enter an
email address, first and last name, and password for each user. The
email address you enter is where the user will receive To Do
Notifications from Compliance Manager.
Important: Send new users their login credentials after you add
them to the site.
iii. Click Add to add the user to the site.
Next you will associate these new users with your HIPAA Compliance
Assessment Site. To do this:
3. From the Home tab side menu, click Roles.
4. Next to each role, click Add User to assign users to the Technician, Internal
Auditor, and (optional) Subject Matter Expert (SME) roles. The users
assigned to these roles will receive assessment task notifications for that role.
© 2021 RapidFire Tools, Inc. All rights reserved.
24HIPAA Assessment — Quick Start Guide Compliance Manager
5. Select each user you wish to assign to the role. Then click Add.
Note: Before you can assign a user a Role, you must first create that user
and/or associate them with your Site.
Important: Do not assign the SME role to users with other role
assignments. Doing so will limit their access to the portal.
6. When you have finished adding users to your site and assigning roles, click
Mark Complete on the task To Do page.
Important: Be sure to send the users their login credentials in order to access
the RapidFire Tools Portal and begin working on assessment tasks.
© 2021 RapidFire Tools, Inc. All rights reserved.
25Compliance Manager HIPAA Assessment — Quick Start Guide
Step 4 — Install and Configure the Compliance Manager
Server
I. Task Install Compliance Manager Server .
Install the Compliance Manager Server on the target network. This task is
performed by the Technician. The Server collects data and performs automated
scans within the assessment environment.
Click Download Server Installer to visit https://www.rapidfiretools.com/cm. Refer
to the separate Compliance Manager Server Installation Guide for more detailed
instructions.
© 2021 RapidFire Tools, Inc. All rights reserved.
26HIPAA Assessment — Quick Start Guide Compliance Manager
Important: You can only install one RapidFire Tools server/appliance on a PC
or endpoint at a time. If you need to install multiple server(s)/appliance(s), install
each one on a separate endpoint on the network.
Note: Once you install the Server, this To Do item will automatically be marked
complete. This may take several minutes.
II. Task Configure Server Scan settings.
Before you configure scan settings, first determine if the target network is an Active
Directory Domain OR a Workgroup. Then refer to the instructions below.
l Look here to "Configure Scan Settings for Active Directory Domain" below
l Look here to "Configure Scan Settings for Workgroup" on page 35
Tip: For best results, be sure to follow "Pre-Scan Network Configuration
Checklist" on page 86
Configure Scan Settings for Active Directory Domain
Set the Scan Settings from the [Your Site] > Compliance Manager > Settings >
Scan Settings page. Complete all required prompts. This task is performed by the
Technician.
Follow the steps below to configure the Scan Settings for the Compliance Manager
Server:
© 2021 RapidFire Tools, Inc. All rights reserved.
27Compliance Manager HIPAA Assessment — Quick Start Guide
1. Select the Scan Type: Active Directory Domain. Click Next Page.
2. The Merge Options page will appear. Configure how you wish to treat
computers that are not associated with Active Directory. You can choose to:
a. Treat them as part of the primary domain
b. Treat them as part of a specific workgroup by entering a workgroup
name
Tip: Use this feature to tell Compliance Manager how to handle computers
that are not connected to the domain. This will help those computers
appear where you want them when you generate reports at the end of the
assessment.
Select a merge option and click Next Page.
3. Enter a username and password with administrative rights to connect to the
local Domain Controller and Active Directory.
© 2021 RapidFire Tools, Inc. All rights reserved.
28HIPAA Assessment — Quick Start Guide Compliance Manager
Note: Be sure to enter the Fully Qualified Domain Name (FQDN) name
before the username. Example: corp.myco.com\username.
4. Also enter the name or IP address of the Domain Controller. Click Next Page
to test a connection to the local Domain Controller and Active Directory to
verify your credentials.
5. The Local Domains window will appear. If you wish to scan only specific
domains or OUs, select those here. Click Next Page.
© 2021 RapidFire Tools, Inc. All rights reserved.
29Compliance Manager HIPAA Assessment — Quick Start Guide
6. The Additional Credentials screen will appear. Enter any additional
credentials to be used during the scan. Click Next.
© 2021 RapidFire Tools, Inc. All rights reserved.
30HIPAA Assessment — Quick Start Guide Compliance Manager
7. The IP Ranges screen will then appear. The Compliance Manager server will
automatically suggest an IP Range for the scan. If you do not wish to scan the
default IP Range, select it and click Clear All Entries. Use this screen to enter
additional IP Addresses or IP Ranges and click Add.
© 2021 RapidFire Tools, Inc. All rights reserved.
31Compliance Manager HIPAA Assessment — Quick Start Guide
From this screen you can also:
l Click Reset to Auto-detected to reset to the automatically suggested
IP Range.
l Exclude IPs or IP ranges from the scan.
Note: Key network component IP addresses should be excluded in
order to prevent scans being performed from impacting the
performance of a device when it is being scanned. For example, a
company might want to exclude the IP Address range for their voice
over IP telephone system if they are performing a scan during
business hours.
Click Next Page once you have configured the IP ranges for the scan.
© 2021 RapidFire Tools, Inc. All rights reserved.
32HIPAA Assessment — Quick Start Guide Compliance Manager
8. The SNMP Information window will appear. Enter any additional SNMP
community strings used on the network. Click Next Page.
9. Enter the IP addresses for the external vulnerability scan. Click Next Page.
Important: You must ensure that no other Network Detective or
Compliance Manager products are being used to perform an External
Vulnerability Scan on the same external IP Address range at the same
time. Allow at least several hours between repeat external vulnerability
scans. Scheduling external scans at the same time will result in reports
with missing or incomplete data.
Note: IP ranges for the external vulnerability scan are not supported at this
time. Please enter individual IPs for the external scan.
© 2021 RapidFire Tools, Inc. All rights reserved.
33Compliance Manager HIPAA Assessment — Quick Start Guide
10. Your scan settings will then be complete. Return to the To Do list and continue
assessment tasks.
Note: Stepping through the prompts creates the Scan Settings. Once the
settings are saved, the Start HIPAA Compliance Assessment To Do item is what
is used to trigger the scans.
When you have finished entering the scan settings, return to the To Do item and
click Mark Complete.
© 2021 RapidFire Tools, Inc. All rights reserved.
34HIPAA Assessment — Quick Start Guide Compliance Manager
Configure Scan Settings for Workgroup
Set the Scan Settings from the [Your Site] > Compliance Manager > Settings >
Scan Settings page. Complete all required prompts. This task is performed by the
Technician.
Follow the steps below to configure the Scan Settings for the Compliance Manager
Server:
1. From the Scan Settings screen, select the Scan Type: Workgroup. Click
Next Page.
2. The Merge Options page will appear. Configure how you wish to treat
computers that are not associated with Active Directory. You can choose to:
© 2021 RapidFire Tools, Inc. All rights reserved.
35Compliance Manager HIPAA Assessment — Quick Start Guide
a. Treat them as part of the primary domain
b. Treat them as part of a specific workgroup by entering a workgroup
name
Select a merge option and click Next Page.
3. Enter scan credentials with administrative rights to connect to the local
computers in the workgroup.
Note: For Workgroups, you have two options for how to enter the
username. First, you can enter the characters ".\" (without quotation
marks) immediately before the username, as in the image below.
© 2021 RapidFire Tools, Inc. All rights reserved.
36HIPAA Assessment — Quick Start Guide Compliance Manager
Second, you can optionally use the following format:
"computername\localuseraccountname." For example, "WGWINX\user."
If you have trouble connecting when using one username format, use the
other format presented here.
Click Next Page to test the connection and verify your credentials.
4. The Additional Credentials screen will appear. Enter any additional
credentials to be used during the scan. Click Next.
Important: If each workgroup PC has its own unique Admin username
and password credentials, you will need to enter each set of credentials
here in order to scan these PCs.
© 2021 RapidFire Tools, Inc. All rights reserved.
37Compliance Manager HIPAA Assessment — Quick Start Guide
5. The IP Ranges screen will then appear. The Compliance Manager server will
automatically suggest an IP Range for the scan. If you do not wish to scan the
default IP Range, select it and click Clear All Entries. Use this screen to enter
additional IP Addresses or IP Ranges and click Add.
© 2021 RapidFire Tools, Inc. All rights reserved.
38HIPAA Assessment — Quick Start Guide Compliance Manager
From this screen you can also:
l Click Reset to Auto-detected to reset to the automatically suggested
IP Range.
l Exclude IPs or IP ranges from the scan.
Note: Key network component IP addresses should be excluded in
order to prevent scans being performed from impacting the
performance of a device when it is being scanned. For example, a
company might want to exclude the IP Address range for their voice
over IP telephone system if they are performing a scan during
business hours.
Click Next Page once you have configured the IP ranges for the scan.
© 2021 RapidFire Tools, Inc. All rights reserved.
39Compliance Manager HIPAA Assessment — Quick Start Guide
6. The SNMP Information window will appear. Enter any additional SNMP
community strings used on the network. Click Next Page.
7. Enter the IP addresses for the external vulnerability scan. Click Next Page.
Important: You must ensure that no other Network Detective or
Compliance Manager products are being used to perform an External
Vulnerability Scan on the same external IP Address range at the same
time. Allow at least several hours between repeat external vulnerability
scans. Scheduling external scans at the same time will result in reports
with missing or incomplete data.
Note: IP ranges for the external vulnerability scan are not supported at this
time. Please enter individual IPs for the external scan.
© 2021 RapidFire Tools, Inc. All rights reserved.
40HIPAA Assessment — Quick Start Guide Compliance Manager
8. Your scan settings will then be complete. Return to the To Do list and continue
assessment tasks.
Note: Stepping through the prompts creates the Scan Settings. Once the
settings are saved, the Start HIPAA Compliance Assessment To Do item is what
is used to trigger the scans.
When you have finished entering the scan settings, return to the To Do item and
click Mark Complete.
© 2021 RapidFire Tools, Inc. All rights reserved.
41Compliance Manager HIPAA Assessment — Quick Start Guide
Step 5 — Start Assessment and Perform Pre-Scan Analysis
Note: The order of To Do tasks may appear differently in your assessment, depending
on the order in which you or other users complete To Do tasks.
I. Task Start HIPAA Compliance Assessment.
To begin performing the HIPAA Compliance Assessment, click on the Start
HIPAA Assessment task from the To Do list:
When you are ready to perform your first initial HIPAA Compliance Assessment,
click Start Assessment.
© 2021 RapidFire Tools, Inc. All rights reserved.
42HIPAA Assessment — Quick Start Guide Compliance Manager
Note: Completing this task will create several new assessment tasks in the To
Do list. The task Type of HIPAA Assessment will be added, where you can
choose whether to add additional worksheets for an expanded
HIPAA assessment. Two scans that will begin automatically: the Pre-Scan and
the External Vulnerability Scan. The scans will be marked complete
automatically when they finish.
II. Task Type of HIPAA Assessment
In this step, you optionally can choose to add additional worksheets to your
assessment to identify additional issues.
To add these additional worksheets:
1. Open the “Type of HIPAA Assessment” To Do item.
2. In the “Type of Assessment” To Do item details page, select Yes to expand
the assessment to include an assessment of compliance with the Privacy Rule
and the Breach Notification Rule.
© 2021 RapidFire Tools, Inc. All rights reserved.
43Compliance Manager HIPAA Assessment — Quick Start Guide
The “Complete Privacy Rule Worksheet” To Do item and the “Complete
Breach Notification Rule Worksheet” To Do item will be added to the To Do
list.
Note: If you do not wish to add these worksheets and want a more
streamlined assessment process, click No and continue with the
assessment.
III. Task (Optional) Complete the HIPAA Privacy Rule Worksheet
The HIPAA Privacy Rule Worksheet assess how well a Site's policies and
procedures adhere to the HIPAA privacy standards. To complete this worksheet:
© 2021 RapidFire Tools, Inc. All rights reserved.
44HIPAA Assessment — Quick Start Guide Compliance Manager
1. Select the “Complete the HIPAA Privacy Rule Worksheet” To Do item
2. Select the “Go to Form: HIPAA Private Rule Worksheet” to open the HIPAA
Privacy Rule Worksheet
The HIPAA Privacy Rule Worksheet will be opened.
© 2021 RapidFire Tools, Inc. All rights reserved.
45Compliance Manager HIPAA Assessment — Quick Start Guide
3. Use the “Invite Others” feature to invite other Site users assigned the Role of
Subject Matter Experts to input information or upload documents into the
HIPAA Private Rule Worksheet.
4. Answer the questions posed in the HIPAA Privacy Rule Worksheet.
© 2021 RapidFire Tools, Inc. All rights reserved.
46HIPAA Assessment — Quick Start Guide Compliance Manager
5. After answering all of the questions in the HIPAA Privacy Rule Worksheet,
select the Save and Return button to return to the “Complete HIPAA Privacy
Rule Worksheet” To Do item’s details page.
IV. Task (Optional) Complete the HIPAA Breach Notification Worksheet
The HIPAA Breach Notification Rule Worksheet assess how well a Site's policies
and procedures adhere to the HIPAA breach notification standards. To complete
this worksheet:
1. Select the “Complete the HIPAA Breach Notification Rule Worksheet” To Do
item
© 2021 RapidFire Tools, Inc. All rights reserved.
47Compliance Manager HIPAA Assessment — Quick Start Guide
2. Select the "Go to Form: HIPAA Breach Notification Rule Worksheet" to open
the HIPAA Breach Notification Rule Worksheet
3. The HIPAA Breach Notification Rule worksheet is opened.
© 2021 RapidFire Tools, Inc. All rights reserved.
48HIPAA Assessment — Quick Start Guide Compliance Manager
4. Use the “Invite Others” feature to invite other Site users assigned the Role of
Subject Matter Experts to input information or upload documents into the
HIPAA Breach Notification Rule Worksheet.
5. Answer the questions posed in the HIPAA Breach Notification Rule
Worksheet
6. After answering all of the questions in the HIPAA Breach Notification Rule
Worksheet, select the “Save and Return” button to return to the “Complete the
HIPAA Breach Notification Rule Worksheet” To Do item’s details page.
© 2021 RapidFire Tools, Inc. All rights reserved.
49Compliance Manager HIPAA Assessment — Quick Start Guide
7. Select the “Mark Complete” button to complete the “Complete the HIPAA
Breach Notification Rule Worksheet” To Do item.
V. Task (Automated) Running the Automated External Vulnerability Scan.
The assessment includes an external vulnerability scan of your publicly facing IP
addresses.
Once the scan is complete, this To Do item will automatically be marked as
complete.
Note: New worksheets will appear once the External Vulnerability scan
completes.
VI. Task Running Pre-Scan Analysis.
© 2021 RapidFire Tools, Inc. All rights reserved.
50HIPAA Assessment — Quick Start Guide Compliance Manager
In this task, the Compliance Manager server will begin an automated pre-scan
analysis of the target network.
This will verify the credentials and attempt to detect issues to ensure you have the
most accurate automated scans.
When the automated scan is completed, and any issues are identified, you may
follow the recommended corrective actions and re-run this analysis.
VII. Task Review Pre-Scan Analysis Results and Recommendations.
Use the Pre-Scan Analysis Results and Recommendations to address any
identified network configuration issues before continuing the assessment.
The results from the pre-scan analysis will appear on the task details page.
Note: A 100% successful scan may not be possible in some cases due to
network restrictions. Before opening ports or allowing protocols, please consult
with your network and system administrator.
Below the Results Summary, refer to the Recommendations for specific
suggestions for mitigating the issues that were identified.
© 2021 RapidFire Tools, Inc. All rights reserved.
51Compliance Manager HIPAA Assessment — Quick Start Guide
Once you finish making any changes, click Rerun Pre-scan Analysis to check for
any remaining issues.
When you have reviewed the pre-scan analysis and are finished making any
recommended changes to the target network, click Mark Complete.
© 2021 RapidFire Tools, Inc. All rights reserved.
52HIPAA Assessment — Quick Start Guide Compliance Manager
Step 6 — Collect HIPAA Compliance Assessment Data
I. Task (Automated) Running the Automated Scan of the Internal Network.
The Compliance Manager server performs the Internal Network Scan on the
target network. The Internal Scan begins automatically once you complete the pre-
scan analysis and review the results.
Once the scan is complete, this To Do item will automatically be marked as
complete.
Important: At least 1 computer must be successfully scanned in order for this
To Do item to be automatically marked complete.
II. Task Running Local Scan of Remote Computers.
Once the Internal Network Scan is successfully completed, a scan of remote
computers on the target network will automatically begin.
© 2021 RapidFire Tools, Inc. All rights reserved.
53Compliance Manager HIPAA Assessment — Quick Start Guide
This scan gathers more detailed data from individual endpoints on the target
network.
Important: At least 1 computer must be successfully scanned in order for this
To Do item to be automatically marked complete.
l You will receive a separate To Do item if there is an error during the local scan
of Remote Computers.
l You can then click Go to Scan Settings to change your scan configuration.
l You can also click Initiate Rescan once you fix any issues and wish to restart
the scan.
III. Task Run Local Data Collector.
In this task, you can perform manual scans on computers that could not be scanned
automatically. You will also receive a list of known computers on the target network
that could not be scanned. From this to do item, you can:
A. Upload scans for computers that are connected to the network but cannot be
scanned
B. Upload scans for computers that are not available on the network being
© 2021 RapidFire Tools, Inc. All rights reserved.
54HIPAA Assessment — Quick Start Guide Compliance Manager
scanned, but that should be accounted for in the assessment process
Tip: You will also be notified if all computers are scanned successfully. You can
then just click Mark Complete and move on with your assessment.
To perform the scan manually, first download the Local Computer Data Collector
from https://www.rapidfiretools.com/cm. Run the Data Collector directly on the
computer(s) and then upload the scan(s). Then click Upload Local Scan, and
select the files or .zip files. When you are finished, click Mark Complete.
IV. Task Complete HIPAA On-Site Survey.
Use the HIPAA On-Site Survey to survey the site environment for any security
issues. The worksheet is best done on-site, as it requires identifying risks that may
exist outside the computer network.
© 2021 RapidFire Tools, Inc. All rights reserved.
55Compliance Manager HIPAA Assessment — Quick Start Guide
1. Click the Go To Form button to open the worksheet.
2. As you walk through the site environment, check to see if any of the following
security issues are present. Use your notes to respond to each question in the
worksheet.
3. When are finished, Save, and return to the To Do item and click Mark
Complete.
V. Task Complete the HIPAA Policy and Procedures Verification Worksheet.
Your subscription to Compliance Manager includes a set of Policies and
Procedures for HIPAA. This is intended as a starting point for your organisation to
implement HIPAA-compliant practices.
In the HIPAA Policy and Procedures Verification Worksheet, you will answer
questions related to your organisation's implementation of these practices.
© 2021 RapidFire Tools, Inc. All rights reserved.
56HIPAA Assessment — Quick Start Guide Compliance Manager
Obtain HIPAA Policies and Procedures Document
You can access a sample HIPAA Policies and Procedures document with your
subscription. To do this:
1. From within the portal, click on user options and navigate to Compliance
Manager Help & Resources > HIPAA Resources.
2. From the HIPAA Resources page, scroll down to the HIPAA Policies and
© 2021 RapidFire Tools, Inc. All rights reserved.
57Compliance Manager HIPAA Assessment — Quick Start Guide
Procedures. Click to download as a Word doc.
VI. Task Complete External Port Use Worksheet.
Note: The External Port Use Worksheet will become available 1) once the
External Vulnerability Scan is complete, and 2) one or more external ports
are found to be open.
An attacker can exploit unnecessary open ports to gain access to the network. This
worksheet details ports that were found to be open during the external vulnerability
scan. Use this worksheet to document the business justification for each open port.
Also indicate whether the port uses a secure protocol.
© 2021 RapidFire Tools, Inc. All rights reserved.
58HIPAA Assessment — Quick Start Guide Compliance Manager
When you are finished, Save, and return to the To Do Item and click Mark
Complete.
© 2021 RapidFire Tools, Inc. All rights reserved.
59Compliance Manager HIPAA Assessment — Quick Start Guide
Step 7 — Collect Secondary Assessment Data
I. Task Complete the Inactive Computer Identification Worksheet.
Inactive computers on the target network represent a potential security risk. The
Inactive Computer Identification Worksheet contains a list of computers that
have not been logged into for a long period of time. This list of computers is
identified during the network scan phase of the automated data collection.
In this worksheet, document the usage status of each computer (for example:
Verified Active, Possibly Active, or Verified Inactive).
II. Task Complete the Computer Identification Worksheet.
The Computer Identification Worksheet contains a list of the computers that
have been identified during the network scan phase of the automated data
collection. The computers identified are operating within a particular domain or
workgroup. The list also includes non-domain devices. In this worksheet, you
identify each computer that stores ePHI, does not store ePHI, or accesses ePHI.
© 2021 RapidFire Tools, Inc. All rights reserved.
60HIPAA Assessment — Quick Start Guide Compliance Manager
III. Task Complete the Network Share Identification Worksheet.
The Network Share Identification Worksheet presents a list of network share
locations within the network. Because network shares can be accessed by multiple
users, you should inventory them and determine whether they contain ePHI.
Document whether the network share has ePHI, does not contain ePHI, or
document that you do not know if the share contains ePHI or not.
IV. Task Complete User Identification Worksheet.
The User Identification Worksheet enables you to identify each user and document
if they are authorized to access electronic Protected Health Information (ePHI). This
worksheet contains a list of users that have been identified as having ePHI access
rights during the network scan phase of the automated data collection.
In this worksheet, you document the type of user account (for example: Employee –
ePHI Authorization, Employee - no ePHI Authorization, Vendor – ePHI
Authorization, Vendor – no ePHI Authorization, Former Employee, Former Vendor,
Service Account, etc.).
Note: In addition to other scan procedures that identify Windows admin
accounts, a user will also be marked as a "Privileged (Administrator) Account" if
they are associated with any group or organizational unit that contains the word
"admin."
© 2021 RapidFire Tools, Inc. All rights reserved.
61Compliance Manager HIPAA Assessment — Quick Start Guide
V. Task Complete ePHI Scan System Selection Worksheet.
In this worksheet, select each system that you wish to scan for ePHI (Electronic
Protected Health Information) as defined by HIPAA. This scan is CPU intensive and
may require a significant amount of time to complete. It is best to coordinate the
scan with office downtime or a non-critical period. If you cannot run the scan on all
computers, we recommended that you run the scan on a random sampling of
systems during each assessment.
Select Yes under “Include in Scan?” for each system you want to include in the
ePHI
Note: You must select at least one computer to proceed.
VI. Task Running ePHI (HIPAA Deep) Scan.
When this To Do item appears, an automatic scan of the selected systems will be
initiated looking for EPHI. Once the scan is complete, this To Do item will
automatically be marked as complete.
© 2021 RapidFire Tools, Inc. All rights reserved.
62HIPAA Assessment — Quick Start Guide Compliance Manager
VII. Task Unable to scan all selected systems
Tip: If all systems were scanned successfully, this To Do item will appear as
"Able to scan all selected systems."
In this step, you will see a list of any computers that were unable to be scanned for
Personal Data. You can then:
A. Initiate Rescan to try the scan again. Before you initiate the rescan, check
your scan settings or reconfigure your network to ensure a successful scan.
B. Upload Local Scan(s) using the Local Data Collector on each machine that
could not be scanned. Run the Local Data Collector directly on the computer
selecting Deep Scan. You can access the data collector at
https://www.rapidfiretools.com/cm.
VIII. Task Complete the ePHI Validation Worksheet.
The ePHI (Electronic Protected Health Information) Validation Worksheet details
computers that were discovered to contain ePHI during the most recent scan. Use
this worksheet to verify the existence of ePHI and flag "false positives."
© 2021 RapidFire Tools, Inc. All rights reserved.
63Compliance Manager HIPAA Assessment — Quick Start Guide
Next to each instance of ePHI discovered, select "Yes" or "No" from the Verified
column to indicate whether the information is Personal Data, or a false positive.
© 2021 RapidFire Tools, Inc. All rights reserved.
64HIPAA Assessment — Quick Start Guide Compliance Manager
Step 8 — Document Security Exceptions
Task Complete the Security Exception Worksheet.
The Security Exception Worksheet allows you to document any compensating controls
used to mitigate the risks uncovered during the assessment.
Tip: Use the Security Exception Worksheet to handle "false positives" or explain
why certain issues have been resolved. Your entries will affect the overall risk score
and other areas in your assessment documentation.
To use the Security Exception Worksheet:
1. For each issue in the form, select one of the available options.
© 2021 RapidFire Tools, Inc. All rights reserved.
65Compliance Manager HIPAA Assessment — Quick Start Guide
A. Mitigated through Compensating Control
i. Choose this option to enter a blanket response as to why all instances of
the issue have been mitigated. For example, why do you not need
signed agreements with your business associates that transmit ePHI?
ii. When you indicate that an issue has been mitigated, enter an Optional
Response explaining how the issue has been resolved or why it's not
relevant. These notes will appear in your final assessment
documentation.
B. Review Individual Entries
i. You can also choose to review each issue separately. This is useful if
you need to explain why some of your PCs are detected as not having
anti-virus or account lockout enabled, for example. When you choose to
review individual entries, you can likewise indicate whether each entry is
mitigated, valid, or a false positive.
C. Valid: Indicates that the issue is valid and has not been addressed.
D. False Positive: Indicates that the issue is NOT valid and does not need to be
addressed. Choose this option if you have trouble with the results from an
automated scan, for example.
© 2021 RapidFire Tools, Inc. All rights reserved.
66HIPAA Assessment — Quick Start Guide Compliance Manager
Step 9 — Generate HIPAA Compliance Assessment Reports
Task Review Final Reports.
After documenting the compensating controls, the assessment reports and supporting
documentation will become available for review.
Note: It may take several minutes for the reports to appear once you reach this step.
To review the reports and findings:
1. From your Site, go to Compliance Manager > Assessments.
2. Click Reports from the left menu to access a list of generated reports.
3. The Reports page will appear. Click the download icon next to the report that you
wish to download and view.
© 2021 RapidFire Tools, Inc. All rights reserved.
67Compliance Manager HIPAA Assessment — Quick Start Guide
4. Once you have reviewed the reports, click Mark Complete on the task details page.
Optional Task: Export Issues to Kaseya BMS
Once you generate assessment reports and review them, you can view specific issues
identified in the assessment — organized by risk score — from the Issues tab. These
issues supplement the detailed data in your reports with immediate action items — and
likewise allow you to export these issues as tickets to Kaseya BMS.
To do this:
Step 1 — Gather Credentials and Set Up Kaseya BMS
Before you begin, you will need:
© 2021 RapidFire Tools, Inc. All rights reserved.
68HIPAA Assessment — Quick Start Guide Compliance Manager
l Valid Login Credentials for RapidFire Tools Portal
l A RapidFire Tools Portal Compliance Manager "Site" for which you wish to export
tickets
l Valid Login Credentials and details for Kaseya BMS (refer to the table below)
PSA System PSA Prerequisites
l Kaseya Username
l Kaseya Password
l Kaseya Tenant (i.e. company name)
l Kaseya API URL,
example: "https://bms.kaseya.com" (you
should receive the exact URL in an email
from Kaseya)
Step 2 — Set Up a Connection to your Kaseya BMS
Follow these steps to set up a Connection to Kaseya BMS.
1. Visit https://www.youritportal.com and log into the RapidFire Tools Portal.
© 2021 RapidFire Tools, Inc. All rights reserved.
69Compliance Manager HIPAA Assessment — Quick Start Guide
Note: In order to configure the Settings in the Portal, you must have the All or
Admin global access level.
2. Click Global Settings.
3. Click Connections.
4. Click Add to create a new Ticketing System/PSA Connection.
© 2021 RapidFire Tools, Inc. All rights reserved.
70HIPAA Assessment — Quick Start Guide Compliance Manager
5. In the Setup New Connection window, select Connection Type and choose
Kaseya BMS.
Note: Compliance Manager can only be integrated with Kaseya BMS at this
time.
6. Then enter the information required to set up the Connection.
This information will include:
l Username and Password
l API URL
l Tenant name (Company name)
© 2021 RapidFire Tools, Inc. All rights reserved.
71Compliance Manager HIPAA Assessment — Quick Start Guide
7. Click Test Login button to test your Connection login. After a successful test login,
the second Add Connection Ticket Details window will be displayed.
8. Continue creating your Connection by entering in the necessary Ticket Details.
© 2021 RapidFire Tools, Inc. All rights reserved.
72HIPAA Assessment — Quick Start Guide Compliance Manager
Click Test Ticket. The Add Connection Settings Confirmation window will be
displayed after the Test Ticket process is successful.
9. In the Add Connection Confirm Settings window presented, enter a Connection
Name.
10. Review the Connection’s configuration details and click Save.
© 2021 RapidFire Tools, Inc. All rights reserved.
73Compliance Manager HIPAA Assessment — Quick Start Guide
The new Connection created will be listed in the Portal’s Connection list.
Step 3 — Map your Compliance Manager’s Site to a Kaseya BMS
Follow these steps to map a Kaseya BMS Connection to the RapidFire Tools Portal Site
associated with your Compliance Manager assessment.
1. From the Global Settings > Connections menu, scroll down and click Add under
Site Mappings. The Map Site to Connection window will be displayed.
© 2021 RapidFire Tools, Inc. All rights reserved.
74You can also read