USB Wintech USB Wintech Alti Wintech HR Wintech Ultimate - Mavic
←
→
Page content transcription
If your browser does not render page correctly, please read the page content below
USB
Wintech USB
Wintech Alti
Wintech HR
Wintech Ultimate

                   Mavic ® avril 2009
WINTECH USB Ultimate 2010- User Guide                                                             USE

The Mavic team has put all its passion, experience and skill into the design and manufacture of   11. SLEEP MODE
your computer. It will be an important tool for you in the improvement of your performance.       12. TRIP RESET
Thank you for putting your trust in Mavic products.                                               13. USE OF LAP TIME (CR)
                                                                                                  14. ELEVATION SET UP AND DATA REVIEW MENU
                                                                                                      14.1.   Entering the Elevation set up and data review menu
INSIDE                                                                                                14.2.   Recall of Home Altitude (Wintech USB Alti and Wintech USB Ultimate only)
                                                                                                      14.3.   Setting up the current elevation (Wintech USB Alti and Wintech USB Ultimate only)
                                                                                                      14.4.   Trip Altitude and Heart Rate data review (Wintech USB Alti, Wintech USB HR and
1. PRODUCT DESCRIPTION
                                                                                                              Wintech USB Ultimate only)
                                                                                                      14.5.   Lap time data review
INSTALLATION
                                                                                                      14.6.   Odometers review
                                                                                                  15.	VERTICAL SPEED EXPLAINED (Wintech USB Alti and Wintech USB Ultimate only)
2.   INSTALLING THE COMPUTER MOUNT
                                                                                                  16. PC PLUG
3.   FITTING / REMOVING THE COMPUTER
                                                                                                  17. MAINTENANCE AND RECOMMENDATION OF USE
4.   INSTALLING THE SPEED SENSORS
                                                                                                  18. WINTECH DEVICES TECHNICAL SPECIFICATIONS
     4.1.    E-Skewer
                                                                                                  19. warranty
     4.2.    E-Bolt
     4.3.    Fork Sensor
                                                                                                  WINTECH MANAGER SOFTWARE
5.   INSTALLING THE WHEEL MAGNET
6.   INSTALLING THE BATTERIES
                                                                                                  20. ENTERING WINTECH MANAGER
                                                                                                  21. DATA TRANSFER
BASIC NAVIGATION
                                                                                                  22. TRIPS
                                                                                                  23. REPORTS
7.   DESCRIPTION OF THE DISPLAY
                                                                                                  24. COMPUTER SETTINGS AND USER ACCOUNT MANAGEMENT
8.   FUNCTION DISPLAY DEFAULT SEQUENCE
                                                                                                      24.1.   Create a new user or edit an already existing user
9.   DEFAULT BUTTON FUNCTION MATRIX
                                                                                                      24.2.   Screen customization
                                                                                                  25. BIKE SETTINGS
SETTINGS
                                                                                                  26. LINKS
                                                                                                  27. WINTECH MANAGER TECHNICAL SPECIFICATION
10. ENTERING THE SET UP MENU
     10.1.	Heart rate alarm and workzone (Wintech USB HR and Wintech USB Ultimate only)
     10.2.   Digital pairing
     10.3.   Elevation set up (Wintech USB Alti and Wintech USB Ultimate only)
     10.4.   Wheel circumferences and distance unit set up
     10.5.   Clock set up
     10.6.   Odometers set up

1
1. PRODUCT DESCRIPTION                                                                          INSTALLATION
Main Unit Box
                                                                                              2. INSTALLING THE COMPUTER MOUNT
a. Computer
b. Cardio Belt                                              b
                                                                                              2.1 Install the mount on the handlebar,
c. 	Wintech Manager software                                                                      to the right of the stem. To fix it to an
     CD                                                                                            oversize, 25.4 diameter handlebar,
d. Memo stick                                                                                      use the 25.4 adapter.
                                                                                              2.2 The mount can be installed in a variety                                 2.1
Sensor Box                                                                                         of positions: with the computer forward
                                       f                               g                           of, or above the handlebar stem.
E-Skewer
e. E-Skewer sensor                                                                            2.3. When setting it, the computer support
f.  Computer mount                                                                                  needs to turn freely on the mount
g. 25,4mm handlebar reducer                                                                         arm. Loosen the screw using a cross-
h. Wheel magnet                                                                                     slot screwdriver
                                                                                   a                                                                                             2.2
                                                                                              2.4. Once you have chosen the right
E-Bolt                                                                     h                        position, tighten the mount screw with
i.  E-Bolt sensor                                                                                   a cross-slot screwdriver and secure
                                       e                    j
f.  Computer mount                                                                      k           the computer support screw again.
g. 25,4mm handlebar reducer
h. Wheel magnet                                                                                                                                                      2.3               2.4
j.  Adjustment magnets

Fork Sensor
k. Fork sensor                                          i
f.  Computer mount
g. 25,4mm handlbar reducer
                                               l
h. Wheel magnet
l.  Zip ties (x3)                                                                      (x3)

                                           c                                   d              3. FITTING/REMOVING THE COMPUTER
                                                                                              3.1. Slide the computer onto the mount from the front until it locks into place with an audible
                                                                                                    click.
                                                                                              3.2. To remove the computer from its mount, press and hold the tab located under the computer
                                                                                                    mount and slide the computer toward the front of the bicycle.

                                                     wintech manager

                                                                                                         3.1                                         3.2     2

    After installation and before you use your computer for the first time, you MUST
    perform the digital pairing operation described in section 10.2. of this guide.
    If you don’t, there will be no communication between the computer and the                                                                                    1
    different sensors and your system will not work.

2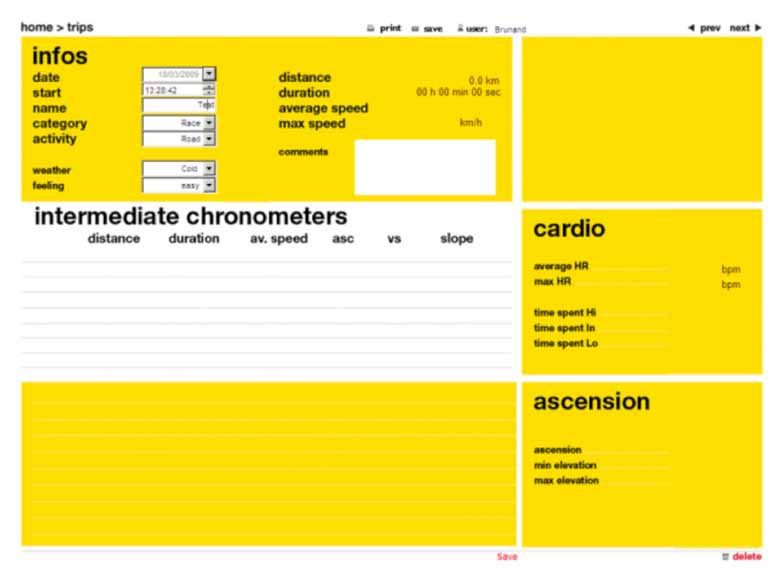
4. INSTALLING THE SPEED SENSORS                                               4.2. E-Bolt

4.1 E-Skewer                                                                  The speed sensor is integrated into a fixing nut compatible with
                                                                              all quick-releases on the market.
Fit the quick-release lever to the hub,                                       To install it, unscrew the fixing nut on your quick-release.
with the lever to the left (to the right   4.1                                Insert the quick release from the left-hand side of your bike and
when using disc brakes).                                                      tighten the electronic fixing nut from the right-hand side.
                                                                              Adjust the tightness of the nut according to the
Position of the locking lever                                                 recommendation described in section 4.1 of this user
Adjust the tension on the adjusting                                           guide.                                                              4.2

nut so that sufficient force is applied
when the locking lever is moved to                                            4.2.1 Road bike
the “CLOSE” position (consult your                                            Once sufficiently tightened, position the sensor towards the
retailer).                                                                    rear before closing the quick-release.
If the quick release lever can be                                             4.2.2. Mountain bike.
moved too easily to the CLOSE                                                 Once sufficiently tightened,
                                                                                                 OPEN      position the  sensor
                                                                                                                      OPEN    OKtowards the top
position, there will be insufficient                                          before closing the quick-release.                                   4.2.1
force holding the wheel. If this is the
case, place the quick release lever in
the OPEN position again and tighten                                                                                              OK
the adjusting nut to increase the force.
                                                                                                  OPEN                 OPEN

Then, push again the quick release
lever to the CLOSE position.                                                               OPEN
                                                                                                   OPEN
                                                                                                                OPEN
                                                                                                                       OPEN
                                                                                                                              OK OK
If too much force is needed to                   OPEN   OPEN         OK         IMPORTANT:
move the quick release lever to                                                 At this point, your computer is not yet ready to work.
the CLOSE position, place the lever                                             You still need to set the necessary programs, and
in the OPEN position again, and                                                 then perform the pairing operation of your device.
                                                                                                                                                  4.2.2

unscrew the adjustment nut to reduce                                 CLOSE

the force. Then, push again the quick
release lever to the CLOSE position.
Once the adjustment nut has been
set, the end of the quick release shaft                            CLOSE      4.3 Fork Sensor
must not be sunk more than
2 mm in from the outside edge of the                                  CLOSE   To install the Fork sensor, the wheel magnet must be installed
adjustment nut.                                            CLOSE
                                                                              first. Read section 5 of this user guide first.
Make sure the wheel is securely
                       CLOSE

                                                                              Adjust the position of the speed sensor so the center of the
tightened: raise the front wheel off                                          magnet is aligned with one of the arrows on the sensor. The
the ground and strike the top of                                              distance between the magnet and the sensor must be between
the wheel sharply in a downward                                               5 - 10 mm. 5.4 Tighten the wire tires and cut them flush.
direction. The wheel must remain
                                                                                                                                                          4.3
firmly in place.

    IMPORTANT:
    At this point, your computer
    is not yet ready to work. You
    still need to set the necessary                                             IMPORTANT:
    programs, and then perform                                                  At this point, your computer is not yet ready to work.
    the pairing operation of your                                               You still need to set the necessary programs, and
    device.                                                                     then perform the pairing operation of your device.

3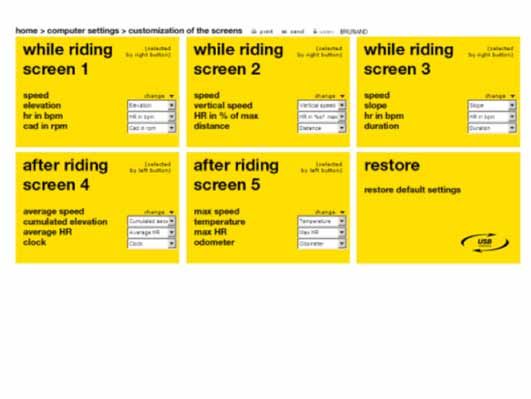
5. INSTALLING THE WHEEL MAGNET                                                                      BASIC NAVIGATION
5.1 Position the magnet on a spoke so that it
     passes opposite either of the lever marks       5.1
     and at a maximum distance of 5 mm.                                                           7. DESCRIPTION OF THE DISPLAY
     The magnet must be facing outward from
     the wheel.                                                                                   BK 1, 2 or H Number of bike used
5.2 If you use the E-Bolt sensor, on a                                                           AV            Average speed (up to 99,9 km/h or 62 Mi/h)
     mountain bike, it might be necessary to                                                      MAX           Maximum speed (up to 99,9 km/h or 62 Mi/h)
     use the adjustment magnets to reduce
     the distance between the sensor and                                                          KM / Mi       Distances in kilometres or miles
     the magnet.The magnet must be facing            5.2
                                                                                                    	Trend indicator: if the current speed exceeds the average speed, the up arrow
     outward from the wheel.
                                                                                                      is displayed. If the current speed is below the average speed, the down arrow is
5.3 Must be cut for use on bladed Zicral                                                             displayed.
     spokes.                                                                                          If the current speed equals the average speed, no arrow is displayed.
                                                                                                       	Altimeter indication line
                                                                                            5.3          (Wintech USB Alti and Wintech USB Ultimate only)
6. INSTALLING THE BATTERIES                                                                       VS 	Vertical speed (up to 2500m/h or 8202,5 ft/h).
                                                                                                       In meters per hour (m/h) or feet per hour (ft/h)
Power supply for the computer:
                                                                                                  ASC           Altitude gain
1 CR2430 battery.
Power supply for the speed sensor:                                 6.1       6.2
                                                                                                       	Temperature indicator
1 CR2032 battery.                                                                                        (from -15°C / 5°F to 50°C/122°F)
Power supply for the cardio belt (Wintech
USB HR and Wintech USB Ultimate only):                                                                          Slope indicator (from -25 to +25 %)
1 CR2032 battery.                                                                                 m/h ft/h      Vertical speed in meter or feet
Only use this type of battery.
                                                                                                    	Heart rate indication line - up to 240 bpm
Installing the batteries in the computer, speed                    6.3                                (Wintech USB HR and Wintech USB Ultimate
and cadence sensors:                                                                                  only)
6.1. R
      emove the battery cover by turning it a
     quarter turn counterclockwise, using a                                                       AV            Average heart rate
     coin or a battery.                                                                           Max           Maximum heart rate
6.2. Insert the battery into its recess, keeping
      the + side uppermost.                                                                            	Heart rate displayed as a percentage of maximum
6.3. Refit the battery cover and close it by                                                            heart rate
      turning it a quarter turn clockwise.
                                                                                                    	Sound alarm. Displayed only when alarm is turned on
Do not to use excessive force, or you will damage the unit.
Check the condition of the seal on the battery cover each time you change the battery. Replace
the battery cover if the seal is damaged.                                                         CAD           Pedaling cadence (optional – up to 180)
Always perform the above operations in a dry place.                                               DST           Trip distance (up to 1999.99)
Changing the computer’s batteries has the effect of zeroing the following parameters:
– total distance;                                                                                 CR 1 to 9     Lap time
– measurement unit (M or KM);
– wheel circumference;                                                                            ATM           Stopwatch (up to 19 h 59 min 59 s)
– time.                                                                                           ODO           Distance totalizer (up to 99.999)

    After installation, or after changing batteries (in sensors or computers), it is imperative
    to repeat the digital pairing operation described in section 10.2 of this notice.

Battery life: 12 to 24 months depending on use.
4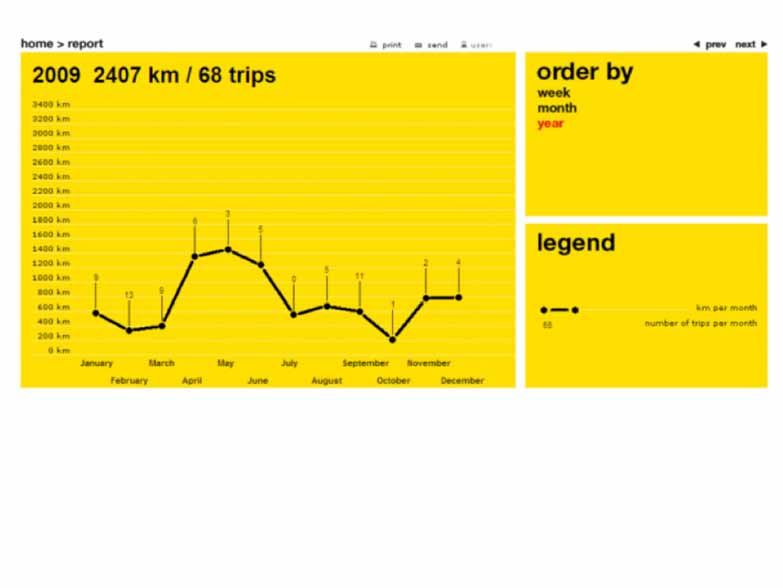
8. FUNCTION DISPLAY DEFAULT SEQUENCE                                                               9. Default button function matrix
8.1 B
     riefly press right button (BPR) to scroll down the “while riding” displays                                       Left Button                                                        Right Button
    (live information)                                                                             From          Short press      Long press > 2s              From         Short press   Long press > 2s       Long press > 6s
Screen 1 – Current speed                                                                           Screen 1      To screen 4                                   Screen 1     To screen 2
		           – Number of bike used                                                                 Screen 2      To screen 5                                   Screen 2     To screen 3
		           – Distance unit (KM or Mi)                                                                                           Elevation set up
                                                                                                                                                                                          Start/stop CR
                                                                                                                                                                                                                Parameters set up
                                                                                                   Screen 3      To screen 4                                   Screen 3     To screen 1   (intermediate
		           – Current elevation (Wintech                                                                                        + data review
                                                                                                                                                                                          chrono)
                                                                                                                                                                                                                zone
                USB Alti and Wintech USB                                                           Screen 4      To screen 5                                   Screen 4     To screen 2
                Ultimate only)                                                                     Screen 5      To screen 4                                   Screen 5     To screen 3
		– Current heart rate (Wintech
                USB HR and Wintech USB          Screen 1         Screen 2               Screen 3
                Ultimate only)
		– Current pedalling cadence                                                                      SETTINGS
                (optional)
Screen 2 – Current speed                        8.1

		           – Number of bike used                                                                 10. ENTERING THE SET UP MENU
		           – Distance unit (KM or Mi)
		           – Vertical speed (Wintech USB Alti and Wintech USB Ultimate only)                     From any screen, press and hold the right button (BPR) for 6 seconds to enter the set up menu.
		– Heart rate as a percentage of maximum heart rate
                (Wintech USB HR and Wintech USB Ultimate only)                                     The set up menu is sequentially organized in sub-menus, in the following order:
		           – Trip distance                                                                          1.       HR alarm and working zone (Wintech USB Alti and Wintech USB Ultimate only)
Screen 3 – Current speed                                                                              2.       Digital pairing of bike sensor
		           – Number of bike used                                                                    3.	Home elevation, altitude and temperature unit (Wintech USB HR and Wintech
		           – Distance unit (KM or Mi)                                                                        USB Ultimate only)
		           – Slope % (Wintech USB Alti and Wintech USB Ultimate only)                               4.       Wheel circumference and distance unit
		           – Current heart rate (Wintech USB HR and Wintech USB Ultimate only)                      5.       Clock
		           – Stopwatch (ATM)                                                                        6.       Odometers
                                                                                                   To move from one sub-menu to the next one, briefly press the left button (BPL).
8.2 B
     riefly press left button (BPL) to scroll down the “after riding” displays                    After the odo sub-menu, pressing again briefly the left button, exit the set up menu and return to
    (statistic information)                                                                        the previous active screen.
Screen 4 – Average speed
		           – Number of bike used                                                                 When on one of the sub-menu, briefly press the right button to enter this sub-menu.
		           – Distance unit (KM or Mi)                                                            In set up mode, when there is no operation for 2min, the computer automatically exits the set up
		– Cumulated altitude gain (Wintech USB                                                         menu and return to the previous active screen.
               Alti and Wintech USB Ultimate only)
		– Average heart rate (Wintech USB HR
               and Wintech USB Ultimate only)
		           – Clock                                                                                 any
Screen 5 – Max speed                                       8.2   Screen 4           Screen 5        screen
		           – Number of bike used
		           – Distance unit (KM or Mi)                                                                       6 sec.            1 click          1 click              1 click             1 click           1 click          1 click
		           – Temperature (Wintech USB Alti and Wintech USB Ultimate only)                                                                                                                                                  EXIT
		           – Max heart rate (Wintech USB HR and Wintech USB Ultimate only)                                  1 click            1 click             1 click              1 click          1 click           1 click
		           – Total cumulated distance (odometer) of the active bike (BK1, BK2 or BKH).             10
                                                                                                               enter              enter               enter                enter            enter             enter

8.3 Active display when the computer is connected with USB to a laptop
     or desktop. None of the buttons (BPR and BPL) are active.
                                                                                                     Those set up operations have to be performed each time the battery is removed or
    You can customize the 5 default screens above by using the                                       changed.
    Wintech Manager software included on the CD delivered with your                                  Those set up operation can be performed more easily and more rapidly using the
                                                                                  8.3
    computer.                                                                                        Wintech Manager software delivered with your computer.
                                                                                        Screen 6
5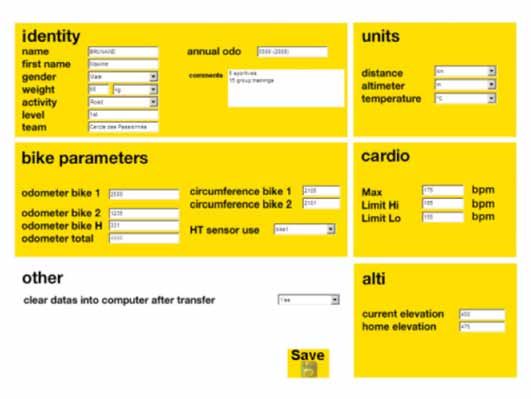
10.1. H
       eart rate alarm and workzone                                                                       10.2. Digital pairing
       (Wintech USB HR and Wintech USB Ultimate only)

Press and hold the right button for 6
seconds.                                                                                                     The digital pairing operations MUST be performed to ensure a reliable and efficient
                                                                                                    10.1
Briefly press again the right button                                                                         communication between the Wintech computer and all its speed, cadence and
(BPR) to enter the different stages of                                                                       Heart Rate sensors.
the heart rate section:                     any
                                                                                                             If you don’t, the Wintech computer won’t read any data coming from the sensors.
                                           screen
10.1.1. Sound Alarm.
Briefly press the left button (BPL) to              6 sec.             1 click
turn on or off the alarm.                                                                                  10.2.1 First fit the cardio belt to
Briefly press the right button (BPR) to                                                                    the body.
validate your choice and move to the                                                                       To do so, moisten the sensor zones          10.2.1

next stages of the heart rate settings                                                                     situated on the back of the belt.
(Heart rate limits).                                                                                       Open the belt at one of its
                                                                                                           extremities. Position the belt on
10.1.2. Cardiac limits.                                                                                    the torso, just under the pectoral
The first figure to set up is your                  1 click            1 click                             muscles. The Mavic logo should
maximum heart rate (FC Max):                                                                               be positioned at the centre of your
As a result from the last button                                                                           chest.
operation, the first digit of the                                                                          Then close the belt, making sure the
maximum heart rate flashes.                select             select                                       sensor zones are flat against the
Briefly press the left button (BPL)                                                                        skin. If necessary, adjust the
to set the first digit.                                                                                    tightness of the elastic strap.
Briefly press the right button (BPR) to
validate the first digit and move to the                                                                   WARNINGS: Persons who have a
next one.                                                                                                  pacemaker, defibrillator, or other
Repeat those 2 operations to set the                                                                       implanted electronic device use
                                                    1 click            1 click
2nd and 3rd digit of your maximum                                                                          the heart rate monitor at their
heart rate (MAX).                                                                                          own risk. Before starting the initial use of the heart rate monitor, we recommend an
When validating the 3rd digit of                                                                           exercise test under a doctor’s supervision. this will ensure the safety and reliability of
the maximum heart rate by briefly          select             select                                       the pacemaker and the heart rate monitor when used simultaneously. Exercise may
pressing the right button (BPR), you                                                                       include some risk, especially for those who have been sedentary. We strongly advise
move to the set up of your lower HR                                                                        consulting your doctor prior to beginning a regular exercise program.
limit (Lo). Set this figure up using the
same method as for the maximum
Heart Rate. Then, you can proceed                                                                          10.2.2. Enter the pairing menu:
to the upper limit (Hi) using the same                                                                     From any active display, press and hold the right button (BPR) for 6 seconds.
method.
                                                    1 click            1 click            1 click          On Wintech USB HR and Wintech USB Ultimate, briefly press the left button (BPL) once to
                                                                                                           move to the Pair section.
When validating the 3rd digit of the                                                                       Briefly press the right button (BPR) to start the pairing operations.
upper limit (Hi) by briefly pressing the                                                                   The heart pictogram will light up. As soon as the heart rate is displayed, the pairing of the HR
right button (BPR), you exit the set up    select             select             select
                                                                                                           belt is done.
menu and return to last active display.                                                                    Briefly press the right button (BPR): the figure after BK is flashing, indicating the speed sensor
In order to learn these values                                                                             your are about to pair.
(maximum heart rate, lower and                                                                             Briefly press the left button (BPL) to successively select BK 1, BK 2 or BK H according to the
upper limits), Mavic recommends                                                                            sensor you wish to pair.
that you should take an effort test in a                                                                   Briefly press the right button (BPR) to validate your sensor choice: the sensor number, speed
specialized center.                                 1 click            1 click            1 click          and cadence figure flashes.
Otherwise you can use the following                                                        EXIT            Turn the front wheel until the speed is displayed. If you are using the pedalling cadence option,
approximate values:                                                                                        turn the cranks also. When both speed and cadence are displayed, press the right button to
FC Max = 220 – age                                                                                         validate.
Upper limit: 85% of FC Max
                                           select             select             select
                                                                                                           If the computer receives a signal but the speed is zero, the display OK appears.
Lower limit: 70% of FC Max
6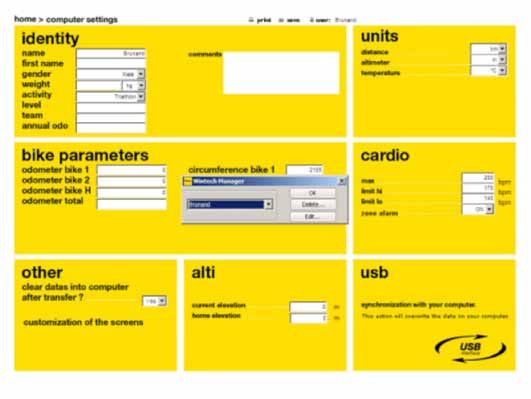
To pair a 2nd bike sensor or the home 10.3. Elevation set up
trainer sensor, proceed again to (Wintech USB Alti and Wintech USB Ultimate only)
the operations described above,
selecting the correct bike number The elevation set up menu is divided in 3 parts:
and corresponding sensor. any 1 click – Elevation unit set up
screen
Heart Rate belt and cadence sensor – Home altitude set up
does not need to be paired again – Temperature unit set up
when pairing a new sensor. 6 sec. 1 click 1 click
10.3.1. Enter the Elevation set
Digital pairing operations must be up menu: any
performed after changing a battery. From any active display, press and screen
– If you change the computer battery, hold the right button (BPR) for 6
all sensors (speed, cadence and 1 click seconds.
heart rate belt) must be paired – On Wintech USB Ultimate, briefly 6 sec. 1 click
again. press the left button (BPL) twice 2 click (Ultimate)
– If you change the battery of to move to the Elevation set up 10.3.1 1 click (Alti) 10.3.2
only one of the sensors (speed, 1 click 1 click section.
cadence or heart rate belt), only – On Wintech USB Alti, briefly
the pairing of this sensor needs to press the left button (BPL) once
be performed again. to move to the Elevation set up
select
After each pairing operation, ATM, section.
DST, AV, MAX, VS, Hi/Lo elevation Briefly press the right button (BPR)
will be reset to 0. to start the Elevation settings
operations.
1 click 1 click 1 click
Automatic detection of the speed
sensor (Mavic patent pending) 10.3.2. Choose the elevation
10.3.3
All paired sensor will automatically unit (meter or feet).
be recognised when in use: the As a result from the last brief press select select select
BK display will flash, indicating it is on the right button (BPR), the
acquiring a new speed sensor signal. logo appears, and “m” flashes.
When it is done, the BK display stops 1 click Briefly press the left button to
EXIT
flashing and the recognised sensor change from meters (m) to feet (ft).
numbers appears next to it. Briefly press the right button to
validate your choice and move to
This operation takes about 15 the next Elevation setting.
seconds. 1 click 1 click 1 click
EXIT
Choosing the elevation unit
Specific wheel circumferences (m or ft) automatically updates
and odometers are linked to each Cadence Option the temperature (°C or °F) 10.3.4
select select select
speed sensor. The computer and distance unit (km or mi)
automatically adapts odometer and 1. Press according to the metric or imperial
wheel circumference according to 2. Shake measurement standard.
the detected speed sensor (see
part 10.4 and 10.6 of this user guide 10.3.3. Set up your home elevation.
Smart Cadence Option
to adjust wheel circumference As a result from the last brief press on the right button (BPR) to validate the elevation unit, you
10.2.2
and odometer of each sensor/bike enter the home elevation (Ho) screen set up. The first digit of the home elevation flashes.
number). Briefly press the left button (BPL) to set up the first digit of your home elevation. Validate by
briefly pressing the right button (BPR) and move to the next digit.
Repeat those steps to the 4th digit. Validating the 4th digit by a brief press on the right button
(BPR) will move you to the last Elevation setting.
7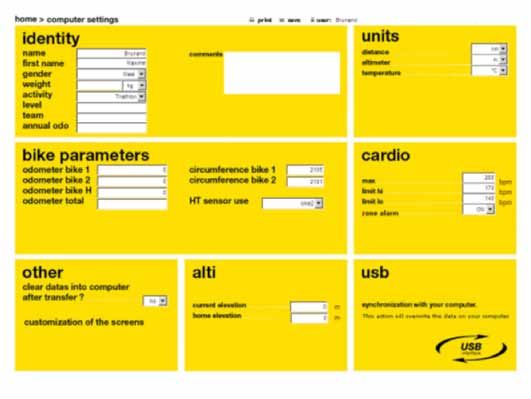
See part 14.2 of this user guide to learn how to use the Home Elevation. 10.4. Wheel circumferences and distance unit set up
The Home altitude is useful to easily and rapidly recalibrate your computer before Consult the table of
you start a new ride. The Home altitude shall be set up at your most frequent point approximate correspondences
10.4 Tyre Circumf. Tyre Circumf.
of departure. We recommend that you precisely know the elevation of this point. to check your wheel
26’’x1,5 2020 700Cx19 2100
circumference (see table
10.4.). For a more precise 26’’x1,75 2070 700Cx20 2110
10.3.4. Choose your temperature unit (Celsius or Fahrenheit). measurement, proceed as 26’’x1,9 2090 700Cx23 2130
As a result from the last brief press on the right button (BPR) to validate the home altitude, you follows: 26’’x2,0 2110 700Cx25 2140
enter the temperature unit set up: ° flashes. – Make a mark on the tire and 26’’x2,1 2130 700Cx28 2150
Briefly press the left button (BPL) to change from Celsius (C) to Fahrenheit (F). on the ground at the point of 26’’x2,2 2150 700Cx32 2170
Validate your choice by briefly pressing the right button (BPR) and exit the elevation menu. You contact between the tire and 26’’x2,3 2170 700Cx35 2200
will automatically return to the last active display. the ground.
650Cx19 1930
– Do one full turn of the wheel
and mark on the ground the 650Cx23 1990
Choosing the temperature unit (°C or °F) automatically updates the elevation (m or ft) and
distance unit (km or mi) according to the metric or imperial measurement standard. place where the mark on the
tire touches the ground.
– Measure the distance (D)
between these two points in
millimeters.
10.4.1. Enter the Wheel
circumferences set up
menu:
any
From any active display, press screen
and hold the right button
(BPR) for 6 seconds. 1 click
10.4.1 6 sec.
– On Wintech USB Ultimate,
briefly press the left button 3 click (Ultimate)
2 click (Alti, HR)
(BPL) 3 times to move to the 1 click (USB)
wheel circumferences and
distance unit set up section.
“Cir” appears on the screen.
– On Wintech USB Alti and
Wintech USB HR, briefly
press the left button (BPL)
twice to move to the wheel 1 click 1 click 1 click
circumferences and distance
unit set up section. “Cir”
10.4.2 10.4.3
appears on the screen.
– On Wintech USB, briefly select select select
press the left button (BPL)
once to move to the wheel
circumferences and distance
unit set up section. “Cir”
appears on the screen.
Briefly press the right button
(BPR) to start the wheel 1 click 1 click 1 click
circumferences and distance EXIT
unit settings operations. Cir
and BK appear on the screen 10.4.4
and the bike number flashes select select select
beside BK.
8
10.4.2. Choose the bike number you wish to set up the wheel circumference and                           10.5. Clock set up
distance unit for.
Briefly press the left button (BPL) to change from BK 1, to BK 2 to BK H (for home trainer).            Enter the Clock set up menu:
Briefly press the right button (BPR) to validate your selection and switch to the wheel                 From any active display, press and
circumference set up screen. The first wheel circumference of the selected bike flashes.                hold the right button (BPR) for 6
                                                                                                        seconds.
10.4.3. Set up the wheel circumference of the selected bike.                                            – On Wintech USB Ultimate, briefly
Briefly press the left button (BPL) to set up the first digit of the chosen bike wheel circumference.      press the left button (BPL) 4
                                                                                                                                                    any
                                                                                                                                                   screen
Briefly press the right button (BPR) to validate your choice and move to the next digit.                   times to move to the clock set
Repeat those steps to the 4th digit. Validating the 4th digit by a brief press on the right button         up section. The current clock is                 6 sec.                                  1 click
(BPR) will move you to the distance unit setting screen. The distance unit display flashes.                displayed on the screen.                                            4 click (Ultimate)
                                                                                                        – On Wintech USB Alti and                                             3 click (Alti, HR)
10.4.4. Select the distance unit of the selected bike.                                                     Wintech USB HR, briefly press                                         2 click (USB)
Briefly press the left button to select kilometres (KM) or Miles (Mi).                                     the left button (BPL) 3 times to
Briefly press the right button (BPR) to validate your selection and exit the wheel circumference           move to the clock set up section.
and distance unit set up menu. You will automatically return to the last active display.                   The current clock is displayed on
Choosing the distance unit (Km or Mi) automatically updates the elevation (m or ft) and                    the screen.
temperature unit (°C or °F) according to the metric or imperial measurement standard.                   – On Wintech USB, briefly press
                                                                                                           the left button (BPL) twice to
To set up the wheel circumference and distance unit for a 2nd bike sensor or the home trainer              move to the clock set up section.                1 click                 1 click
sensor, proceed again to the operations described above, selecting the correct bike number.                The current clock is displayed on
                                                                                                           the screen.
                                                                                                        Briefly press the right button
                                                                                                        (BPR) to start the clock settings         select              select
                                                                                                        operations. The first hour digit
                                                                                                        flashes.
                                                                                                        Briefly press the left button (BPL)
                                                                                                        to adjust the first hour digit. Briefly
                                                                                                        press the right button (BPR) to
                                                                                                        validate your choice and move to
                                                                                                        the next digit.                                     1 click                 1 click
                                                                                                        Repeat those steps to the 2nd                                                EXIT
                                                                                                        minute digit. Validating the 2nd
                                                                                                        minute digit by a brief press on the
                                                                                                        right button (BPR) will exit the set      select              select
                                                                                                                                                                                                         10.5

                                                                                                        up menu and switch back to the
                                                                                                        last active screen.

9
10.6. Odometers set up USE
10.6.1. Enter the
Odometers set up menu:
From any active display, press
11. SLEEP MODE
and hold the right button
When no speed, cadence and heart rate signals is detected and none of the buttons are
(BPR) for
pressed for 15 minutes, then the computer automatically switches to sleep mode, to save the
6 seconds.
battery.
– On Wintech USB Ultimate, any
screen
briefly press the left button
(BPL) 5 times to move to Your Wintech computer does not wake up automatically when riding.
the odometer section. “odo”
10.6.1 6 sec. 1 click Press any of the 2 buttons to wake the computer up.
appears on the screen. 5 click (Ultimate)
4 click (Alti, HR)
The last active display will be displayed.
– On Wintech USB Alti and 3 click (USB)
Wintech USB HR, briefly When the computer wakes up, the
press the left button (BPL) BK displays starts to flash. It means
4 times to move to the that the computer is looking for the
odometer section. “odo” speed sensor signals. When a signal or
appears on the screen. is recognized, the BK displays stops auto
– On Wintech USB, briefly flashing and is completed by the bike
press the left button (BPL) 1 click 1 click 1 click number of the recognized sensor (1,2
3 times to move to the or HT). The displayed data automatically
odometer section. “odo” switch to the corresponding sensor.
appears on the screen. 10.6.2 10.6.3
Briefly press the right button select select select
(BPR) to start the odometers 11
settings operations. The bike
number flashes.
10.6.2. Select the bike
number you wish to adjust
the odometer for.
1 click 1 click 1 click
Briefly press the left button EXIT
(BPL) to select the bike
number you wish to adjust the
odometer for. select select select
Briefly press the right button
(BPR) to validate the bike
number selection and switch
to the odometer set up
screen.
10.6.3. Adjust the odometer for the selected bike.
Briefly press the left button (BPL) to adjust the first digit.
Briefly press the right button (BPR) to validate your choice and move to the next digit.
Repeat those steps to the 5th odometer digit. Validating the 5th odometer digit by a brief press on
the right button (BPR) will exit the set up menu and switch back to the last active screen.
To set up the odometer for a 2nd bike sensor or the home trainer sensor, proceed again to the
operations described above, selecting the correct bike number.
1012. TRIP RESET 13. USE OF LAP TIME (CR)
12.1. To reset your last trip, press In the course of a session you can use up to 9 lap times in order to evaluate your performance
and hold the 2 buttons together for on specific hills or sections.
2 seconds. Remember, the lap time only starts during a session i.e. when the computer already indicates a
The reset data are: speed.
– Trip distance
– Average speed From any screen in the course of a session, press and hold the right button for 2 seconds to
– Maximum speed start the lap time. The “CR” symbol flashes. The lap time starts when you release the right button
– Vertical speed and indicates the number of the lap time.
– Cumulated vertical gain When a lap time has been started, the elapsed time of the current lap time replaces the “ATM”
– Lap time and their associated 2 sec.
data in screen 3.
data Clock, Odometers, Home
and Current altitude are not
12.1 To stop the current lap time, from any screen, press the right button for 2 seconds.
reset. The screen automatically switches to screen 3, displaying the “ATM” of the lap time you have
just stopped. Press any button, to return to the overall display of your session.
Wintech USB computers can store
up to 10 trips of 5 hours each in To start the next lap time, press the right button for another 2 seconds, and so on for the
its internal memory. Only the last 9 possible lap times.
one is displayed on the Wintech When all 9 lap times are used, “FULL” appears on the display if you try to start a new lap time.
computer itself. The computer automatically returns to screen 3 after 2 seconds.
When you reset the last To learn how to read the lap time data, go to section 14.4 of this user guide.
trip, it does not erase
the internal memory of
the Wintech computers.
Those 10 last trips are still
available for download at any
screen
the next PC connection. (1, 2, 3,
4, 5)
So, if you ride for several days without downloading your Wintech data to your PC, you will not
lose any of the 10 last trips, while still being able to reset the last trip before the next one. 2 sec. 2 sec. to CR9 After
Start CR1 Stop CR1 2 sec. auto
The 11th trip will replace the oldest of the 10 previous trips. 13
12.2. FULL 0 RESET
Once the daily trip has been reset, if you press and hold together the 2 buttons (BPR and BPL)
for 8 seconds, the reset of the whole system starts and all default settings will be restored.
All screen digits and logos will light up for 3 seconds. Then, the digits will count down from 9 to
0 and after 6 seconds, screen 1 will be displayed.
This operation erases your settings and replaces them with the default settings. It
also cancels the sensor pairing. So, before it works properly, you need to pair all the
sensors again, following the instruction described in section 10.2 of this user guide.
any
screen
3 sec. 3 sec. 3 sec.
auto auto auto
8 sec.
12.2
1114. ELEVATION SET UP AND DATA REVIEW MENU 14.2. Recall of Home Altitude
(Wintech USB Alti and Wintech USB Ultimate only)
14.1. Entering the Elevation set up and data review menu
This function will make adjusting the altitude before a ride simple and easy, thanks to the home
From any screen, press and hold the left button (BPL) for 2 seconds to enter the elevation set altitude set at chapter 10.3.3 of this user guide.
up and data review menu. Enter the elevation set up and data review menu:
The elevation set up and data review menu is sequentially organized in sub-menus, in the From any screen, press the left button for
following order: 2 seconds: “Ho” appears together with the
1. Recall of home altitude “Ho” (Wintech USB Alti and Wintech USB Ultimate only) logo.
2. Setting up the current altitude “Cu” (Wintech USB Alti and Wintech USB Ultimate only) Briefly press the right button (BPR) to
3. Lowest and highest trip elevation + time spent bellow, in and above the HRM target zone recall the home elevation. The figure any
“Info” (Wintech USB Alti, Wintech USB HR and Wintech USB Ultimate only) flashes. screen
4. Reading of lap time (“Cr”) Press the right button (BPR) again to
1 click
5. Reading of odometers per bike number (“odo”) validate and return to the last active
1 click
display. 2 sec. EXIT
To move from one sub-menu to the next one, briefly press the left button (BPL). 14.2
When on one of the sub-menu, briefly press the right button to enter this sub-menu.
In this mode, if there is no operation for 2min, the computer automatically exits the menu and
return to the previous active screen. 14.3. Setting up the current elevation
(Wintech USB Alti and Wintech USB Ultimate only)
When you occasionaly don’t start from the place which elevation is registered in your computer
(home elevation), you need to adjust the current altitude.
2 sec. 1 click 1 click 1 click 1 click 1 click
any Enter the elevation set up and data review section:
screen
From any screen, press the left button for 2 seconds: “Ho” appears together with the logo.
Briefly press the left button (BPL) once to switch to the Current elevation set up screen:
1 click 1 click 1 click 1 click 1 click
EXIT
“Cu” appears on the computer screen.
enter enter enter enter enter
Briefly press the right button (BPR) to enter the Current Altitude set up menu: the first digit of the
current altitude flashes.
Briefly press the left button (BPL) to adjust the first digit.
14.1
Briefly press the
right button (BPR)
to validate your
The onreading choice and move to
When one ofof
thealtitude
sub-menu,andbriefly
heart press
rate data, lap button
the right time and odometer
to enter per bike can
this sub-menu. the next digit.
be performed more easily and more rapidly using the Wintech Manager software
In this mode, if there is no operation for 2mn, the computer automatically exits the menu and Repeat those steps any
delivered
return with your
to the previous computer.
active screen. to the 4th current screen
altitude digit.
Briefly press the 2 sec. 1 click 1 click
right button (BPR)
to validate the 4 th
current altitude digit,
exit the elevation set
up and data review
menu and switch
back to the last
active screen.
1 click 1 click 1 click 1 click
EXIT
select select select select
14.3
1214.4. Trip Altitude and Heart Rate data review (Wintech USB Alti, Wintech USB HR and Wintech USB Ultimate only)
Enter the elevation set up and data review menu: From any screen, press the left button for 2 seconds.
– On Wintech USB Alti and Wintech USB Ultimate, briefly press the left button (BPL) twice to switch to the altitude and heart rate review data section: “Info” appears on the computer screen.
– On Wintech USB HR “Info” appears on the computer screen.
Briefly press the right button (BPR) to enter the altitude and heart rate review data section.
The review of trip altitude and heart rate data automatically starts in the following order:
– Highest trip elevation “Hi” (Wintech USB Alti and Wintech USB Ultimate only)
– Lowest trip elevation “Lo” (Wintech USB Alti and Wintech USB Ultimate only)
– Time spent bellow the HR target zone “Lo” (Wintech USB HR and Wintech USB Ultimate only)
– Time spent into the HR target zone “In” (Wintech USB HR and Wintech USB Ultimate only)
– Time spent above the HR target zone “Hi” (Wintech USB HR and Wintech USB Ultimate only)
Each piece of information is displayed for 3 seconds.
For Wintech USB HR, if no heart rate information has been recorded during the trip (when not wearing the HR belt for instance),
it is not possible to enter the Heart rate data review section when briefly pressing the right button on the “Info” screen.
For Wintech USB Ultimate, if no heart rate information has been recorded during the trip (when not wearing the HR belt for instance),
only elevation information will be displayed.
These data will cycle through until you press and hold the left button for 2 seconds. Then, the computer switches back to the last active screen.
If no button is pressed for 2 minutes, the computer automatically switches back to the last active screen.
Alti
after after after after after
Ultimate 2 click 3 sec 3 sec 3 sec 3 sec 3 sec
auto auto auto auto auto
any
screen
2 sec. HR
1 click
2 sec 2 sec 2 sec 2 sec 2 sec
EXIT EXIT EXIT EXIT EXIT
14.4
1314.5. Lap time data review
Enter the elevation set up and data review menu: From any screen, press the left button for 2 seconds.
– On Wintech USB Alti and Wintech USB Ultimate, briefly press the left button (BPL) 3 times to switch to the lap time data review section: “Cr” appears on the computer screen.
– On Wintech USB HR, briefly press the left button (BPL) once to switch to the lap time data review section: “Cr” appears on the computer screen.
– On Wintech USB “Cr” appears on the computer screen.
Briefly press the right button (BPR) to enter the lap time data review section.
The review of the first lap time automatically starts in the following order:
– Elapsed time in the first lap time
– Distance ridden during the lap time
– Average speed during the lap time
– Average vertical speed during the lap time (Wintech USB Alti and Wintech USB Ultimate only)
– Average slope in % during the lap time (Wintech USB Alti and Wintech USB Ultimate only)
If no lap time has been recorded during the trip, it is not possible to enter the lap time data review section
Each
whenpiece of information
briefly pressing is displayed
the for 3 seconds.
right button on the “Info” screen.
At any time of the sequence, briefly press the left button (BPL) to switch to the next lap time.
These data will cycle through until you press and hold the left button for 2 seconds. Then, the computer switches back to the last active screen.
If no button is pressed for 2 minutes, the computer automatically switches back to the last active screen.
next CR next CR next CR next CR next CR
3 click
Alti 1 click 1 click 1 click 1 click 1 click
Ultimate after after after after after
3 sec 3 sec 3 sec 3 sec 3 sec
auto auto auto auto auto
USB
any
screen
2 sec.
1 click
HR
1 click
2 sec 2 sec 2 sec 2 sec 2 sec
14.5 EXIT EXIT EXIT EXIT EXIT
1414.6. Odometers review
Proceed this way to read the different bike / speed sensor odometers data.
Enter the elevation set up and data review menu: From any screen, press the left button for 2 seconds.
– On Wintech USB Alti and Wintech USB Ultimate, briefly press the left button (BPL) 4 times to switch to the odometer review section: “odo” appears on the computer screen.
– On Wintech USB HR, briefly press the left button (BPL) twice to switch to the odometer review section: “odo” appears on the computer screen.
– On Wintech USB, briefly press the left button (BPL) once to switch to the odometer review section. “odo” appears on the computer screen.
Briefly press the right button (BPR) to enter the odometer review section.
The review of odometers from the different speed sensors automatically starts in the following order:
– Bike 1
– Bike 2
– Bike H
– Total
Each piece of information is displayed for 3 seconds.
These data will run around until you press and hold the left button for 2 seconds. Then, the computer switches back to the last active screen.
If no button is pressed for 2 minutes, the computer automatically switches back to the last active screen.
14.6
4 click
Alti
Ultimate
after after after after
3 sec 3 sec 3 sec 3 sec
auto auto auto auto
any
screen
USB
2 sec.
1 click 1 click
HR
2 sec 2 sec 2 sec 2 sec
2 click EXIT EXIT EXIT EXIT
1515. VERTICAL SPEED EXPLAINED 17. MAINTENANCE AND RECOMMENDATION OF USE
(Wintech USB Alti and Wintech USB Ultimate only)
– Changing the batteries: use CR 2032 batteries only for the speed sensor and cardio belt; and
The Vertical Speed (VS) function available on Screen 2 gives you the opportunity CR2430 batteries only for the computer.
to measure your performance on any ascension of a pass, or a steep climb. – Changing the computer battery automatically sets the following parameters at zero: odometer,
It expresses the vertical elevation achieved in one hour (in feet or meter); and measuring unit (M or KM), wheel circumference, time. Remember to repeat the pairing
depends on the cyclist speed and the slope of the climb. For your information, a operation each time you change batteries.
professional cyclist extremely well prepared will be able to reach vertical speed
values around 5900 ft/h / 1800 m/h. – Service life of batteries: 12 to 24 months depending on usage.
– Although the electronic systems are watertight, avoid subjecting them to high-pressure water
Your Wintech computer will provide you with an always positive vertical speed jets.
value, when climbing or going downhill. The display is limited at 2500 m/h or 8202,5 ft/h. – Although they resist solvents and oil-based products, avoid using this type of product in the
maintenance of the different components.
– Tip: use lukewarm water, with soap if necessary, and then wipe with a dry cloth.
– Do not leave the computer exposed to sunlight (e.g. behind a windscreen) when not in use.
16. PC PLUG – Do not disassemble any components or the guarantee will cease to be applicable.
– Cycling is a sport that can demand intense physical activity and present variable risks
The data recorded in your Wintech computer can be read and changed from your depending on routes and the environment. Use your road sense and keep an eye out for
PC by pluging directly the Wintech computer into the USB port of your PC. traffic. Remember to wear a helmet.
With the USB plug, connect your Wintech computer with to your PC to: – Product characteristics, shape and general presentation are subject to modification without
– Upload your personal settings into your Wintech computer: home elevation, prior warning.
wheel circumferences, clock, odometers.
– Download your recorded rides to analyze distance, elevation, heart rate and Lap
time data on graphs and charts.
To perform those operation, you need to install on your PC the Wintech Manager
software included on the CD delivered with your Wintech computer (see Wintech Instructions for Disposal of Waste Equipment by Users in Private Household:
Manager user guide for details on installation and use of the Wintech Manager This symbol on the product or on its packaging indicates that this product must not be disposed
software). of with your other household waste. Instead, it is your responsibility to dispose of your waste
equipment by handing it over to a designated collection point for the recycling of waste electrical
and electronic equipment. The separate collection and recycling of your waste equipment at
To plug your Wintech computer to your PC: the time of disposal will help to conserve natural resources and ensure that it is recycled in a
– Remove the computer from the handlebar mount manner that protects human health and the environment. For more information about where
– Remove the USB plug cap from the USB plug of the Wintech computer you can drop off your waste equipment for recycling, please contact your local city office, your
– Plug your Wintech computer directly to the USB port of your PC or using a USB extension household waste disposal service or the shop where you purchased the product.
wire.
– The screen of your Wintech computer will indicate PC. If not, the Wintech computer might not
be plugged correctly. Reverse it.
Once the Wintech manager software is installed, when the Wintech computer is connected to 18. TECHNICAL SPECIFICATIONS
the PC, the Wintech Manager software is automatically launched.
The “Download data” dialog box pops up: click on “download data” to download the Wintech – Transmission: the use of digitally coded radio wave technology (WIN®) to transmit data
computer’s data. A “Success” dialog box pops up when the download is complete. provides optimal reliability. However, disturbances may occur in the vicinity of electrical
apparatus, overhead power lines…
If the last trip has not been reset to 0, it will not be downloaded. To remove your Wintech – Normal operating temperature: from –10 to +50°C / 14°F to 122°F.
computer from your PC, simply unplug it. Make sure no download is in progress. – Speed: from 4.0 km/h to 99.9 km/h / from 2.5 mi/h to 62.0 mi/h
The clock of the Wintech computer is automatically updated with the clock of the PC. – Trip Distance: up to 1999,99 km or mi
– Odometer: up to 99999 km or mi
– Riding time: up to 19h59mn59sec
Read section 20 to 26 of this user guide to learn more about data download and the – Clock: 24h only
Wintech Manager software. – Cadence: from 10 to 180 RPM
– Heart rate: from 25 to 240 BPM (Wintech USB HR and Wintech USB Ultimate only)
16– Altimeter: from -500m to 5000m / -1640 ft to 16400 ft. Accuracy: +/- 5m / +/- 16 ft (Wintech This warranty does not cover products whose serial numbers or identification have been
USB Alti and Wintech USB Ultimate only) erased, damaged or modified.
– Vertical speed: from 0 to 2500 m/h (8200 ft/h). Accuracy: +/- 10m/h (32,8 ft). Calculated on the This warranty does not cover “Spécial Service Course Mavic®” (2) products.
elevation change within the last 30 seconds. (Wintech USB Alti and Wintech USB Ultimate
only) This warranty does not exclude rights specific to each country. Consumers may have other
– Average vertical speed calculation: (Elevation at stop point – elevation at start point)/ATM in rights depending on their place of residence.
minutes x 60. (Wintech USB Alti and Wintech USB Ultimate only) Certain juridictions make no provision for the exclusion or limitation of specific, incidental
– Cumulated altitude gain calculation: sum of all positive elevation change of the daily trip. or consequential damages, or limitations on the warranty period; the above exclusions and
(Wintech USB Alti and Wintech USB Ultimate only) limitations do not therefore apply to all. Local taxes, customs duties or freight charges may be
– Slope: from -25% to +25%. Accuracy: 1%. Calculated on the elevation change over the last applied. In the United States, additional rights that differ from one state to another may also be
100 meters. (Wintech USB Alti and Wintech USB Ultimate only) applied. Should part of this warranty be found to be inapplicable by virtue of administrative or
– Average slope % calculation: (Elevation at stop point – elevation at start point)/DST in meters legal proceedings, the other parts remain applicable.
x 100. (Wintech USB Alti and Wintech USB Ultimate only)
– Temperature: from -15°C to +50°C / From +5°F to +50°F. Accuracy: +/- 1°C (1°F). (Wintech CLAIMS UNDER WARRANTY - PROCEDURE
USB Alti and Wintech USB Ultimate only) Authorised retailers are at the users’ disposal to manage any warranty claims.
– Wheel circumference: from 1500mm to 2500mm. Step: 1 mm. The authorised retailer must obtain the consent of Mavic® After- Sales Service (or its
– Internal memory: up to 10 trips of 5 hours each representative in the country concerned (1)) prior to returning a product under warranty. The
entire product, accompanied by proof of the date of purchase (warranty card dated, signed and
stamped by the authorised retailer or other proof of the date of purchase) shall be sent by the
authorised retailer to Mavic® After-Sales Service (or its representative in the country concerned
(1)), which will undertake the operation.
19. MAVIC® 2-YEAR WARRANTY The new or repaired product shall be returned to the authorized retailer.
Mavic products purchased through an authorised retailer are warranted against defects in WARRANTY CARD
materials and workmanship for 2 years from date of purchase by the initial user, under the The warranty card printed on this document must be dated, signed and stamped by the
conditions defined below. authorised retailer and kept in a safe place indefinitely. It must be used for any claims.
In order to make a claim under this warranty, the consumer must keep proof of purchase, This device complies with Part 15 of the FCC Rules. Operation is subject to the following two
including the date and the name of the authorized dealer, and comply with the prescribed conditions: (1) this device may not cause harmful interference, and (2) this device must accept
procedure. any interference received, including interference that may cause undesired operation.
OBLIGATIONS (1) Up-to-date list available on request from: MAVIC, 74996 ANNECY CEDEX 9.
In the event of a defect on one of its products, Mavic’s sole obligation under this warranty is to (2) C
laims made by other means or without obtaining prior consent for return cannot be taken
repair or replace, at its discretion, the defective part or product. into consideration.
Moreover, in some countries, Mavic is obliged to ensure any legal warranty defined by law, WIN-Tech is protected by one or more of the following patents: US 6204775 and other patent
for the consumer’s protection. In this respect, in France, Mavic ensures legal warranty against pending.
hidden defects under the conditions and limits of article 1641 and following of the French “Code
Civil”.
LIMITS OF WARRANTY SALOMON S.A.S. — MAVIC®
This warranty does not cover normal wear and tear or damage resulting from shipment, Capital : 23 509 981, 50 euros
storage, accidents, negligence, shocks or crashes, failure to follow the user’s guide and/or Siège social : Lieu-dit «La Ravoire» Metz-Tessy (74)
recommendations for use, improper assembly or assembly with incompatible products, poor R.C.S. Annecy 325 820 751 - 00106 - A.P.E. 364 Z
maintenance, misuse, modification or alteration of the product.
Adresse postale :
The conditions of the Mavic warranty, including those applicable to product conformity, do not SALOMON S.A.S. - MAVIC DIVISION
apply to products purchased from outlets other than retailers authorized by Mavic. 74996 ANNECY • Cedex 9 - France
This warranty is not transferable and is only applicable to the initial purchaser. Tel. +33 (0)4 50 65 71 71 • Fax. +33 (0)4 50 65 71 72 • www.mavic.com
MAVIC® is a registered trademark of Salomon S.A.S.
This warranty does not cover parts that are subject to wear in normal use, such as the braking
surfaces of wheel rims (if a rim braking system is used), brake pads, bearings, pawls, rear Conformité / Conformity CE
derailleur jockey wheels, batteries... Le symbole CE est utilisé pour indiquer la conformité de ce produit
This warranty does not cover products repaired or serviced by anyone other than Mavic After- avec les directives 89/336/CEE et 99/5/CEE.
Sales Service personnel or Mavic’s representative in the country concerned (1). The CEE mark is used to mark conformity with the European Union
directives 89/336/CEE and 99/5/CEE.
17WINTECH MANAGER 20. ENTERING WINTECH MANAGER
Installation
The Wintech Manager software enables you to: Insert the Wintech Manager CD into the CD drive or your PC and simply follow the instructions.
– Display on a PC all data of each trip coming from the Wintech computer If the set up program does not automatically run, navigate the CD contents and double click on
– Organize these data into reports (weekly,monthly,yearly) the file “setup.exe”.
– Manage up to 3 user accounts When the installation is complete, shortcuts are added on the program list of the “Start” menu
– Export the data to share them and on your computer desktop.
– Set up your Wintech computer
To launch the software, double click on the “Wintech Manager” icon of your program list or
– Customize your Wintech computer’s screens
desktop:
– Get links to external information (website, instruction manual…)
– Print and e-mail this information
– Store your bike settings
The Wintech Manager software is compatible with all Wintech models equipped with an
integrated USB connection (Wintech USB, Wintech USB Alti, Wintech USB HR and Wintech
USB Ultimate).
Choose your language
to enter the software
The display of the software may vary according to the version of Wintech computer
that you are using:
– Elevation information is only available when using a Wintech USB Alti and
Wintech USB Ultimate.
– Heart rate information is only available when using a Wintech USB HR and
Wintech USB Ultimate.
The first time you launch the software, you will be prompted to create a user
account. See section 24.1 of this user guide.
When a user account has already been created, the software opens on the last
active user account. To change user account, see section 24.1 of this user guide.
1821. DATA TRANSFER
Shows downloaded trip details Shows downloaded trip reports, by week,
(see section 22. Trip of this user guide) month and year When the Wintech computer is plugged to the PC, the Wintech Manager software is
(see section 23. Reports of this user guide) automatically launched and the download dialog box opens.
Uploads settings to your Wintech computer Provides more information on your
Stores bike settings information Wintech computer Click “download data” to
(see section 24. Settings of this user guide) (see section 26. Links of this user guide) download the data of your
Wintech computer to your PC
The data are automatically downloaded and integrated to the last active user
account data.
If the last trip has not been reset to 0, it will not be downloaded.
If you wish to download the Wintech computer data to another user account:
1. Open the Wintech Manager software
2. S
elect the user account you wish to download the data to (see section 24.1 of
this user guide)
3. Plug your Wintech computer to your PC to download the data.
If no User has been created yet, select “new user” in the dialog box. The “create
new user” screen will be displayed (see section 24.1. of this user guide to create a
new user account).
As the Wintech computers saves the last 10 trips in its internal memory, all trips
that haven’t been downloaded yet will then be added to the Wintech manager
database.
The clock of the Wintech computer is automatically updated with the clock of the
PC each time the Wintech computer is pluged to the PC.
1922. TRIPS Adding a new trip manually
You can manually create a new trip by entering data manually (in case you rode without your
Navigation menu: click Home to go back to main menu Wintech computer for instance).
save
Go to previous or next trip.
If multiple trips are recorded
on the same day, use these Select a day. Select a start time.
buttons to go to the next or Manually enter all other information
previous trip of the day
Choose the date of the report you
wish to consult:
– Navigate through the months with
left and right arrows
– Bold days are the one with trip
recorded
– Encircled day is current day
Delete the current trip
Print the current screen Saves the trip as a .jpg file
save
Change user or edit user account
(see section 24.1. of this user guide)
Detail your trip (optional)
– Name your trip
– Category: choose Racing or Click “save” to save this new trip
Training
– Activity: choose Road, Mountain
Bike or Home Trainer
– Weather: choose Cold, Rainy,
Cloudy, Sunny or Hot
– Feeling: choose easy, good or hard
– Comments: ad personal comments
such as places of interest, peloton
or alone…
Click “save” to save your changes
save
This screen provides all the details about a specific trip:
– Distance, duration, average and maximum speed,
– Average and maximum cadence (if optional cadence sensor used during the trip),
– Average and maximum heart rate, time spent in workzone (for Wintech USB HR and Wintech
USB Ultimate only, and if heart rate belt used),
– Total vertical gain, minimum and maximum elevation, altigraph (distance and elevation graph)
(for Wintech USB Alti and Wintech USB Ultimate only),
– Details of lap time.
2023. REPORTS Yearly report:
Sums up all the trip for a specific year on a graph with
Weekly / Monthly reports: – Months on the horizontal axis
Sums up all the trip for a specific week / month on a graph with – Monthly odometer on the vertical axis
– Trip days on the horizontal axis
– Trip distance on the vertical axis
Navigation menu: click “Home” Print the current Change user or edit user account Navigation menu: click “Home” Print the current Change user or edit user account
to go back to main menu screen (see section 24.1. of this user guide) to go back to main menu screen (see section 24.1. of this user guide)
save save
Go to previous Saves the current weekly Go to previous
Saves the trip as a .jpg file report as a .jpg file
or next week or next week
Week/month number
Click on “week” or “month” to open a Cumulated distance and number of trip of the year:
calendar and select a new week/month Choose among weekly, – Full calendar year for past years Choose among weekly,
monthly or yearly report – From 1st of January to current day for the current year monthly or yearly report
Roll your mouse over
a trip to detail the
distance and second
chosen information
Choose the second information that will be reported above each trip of the graph, among:
– Average speed
– Duration
– Average cadence (if optional cadence sensor used)
– Average heart rate (for Wintech USB HR and Wintech USB Ultimate only,
if heart rate belt used)
– Total vertical gain (for Wintech USB Alti and Wintech USB Ultimate only)
21You can also read