DRIVELOCK CONTROL CENTER USER GUIDE 2019.1 - 2019 DRIVELOCK SE
←
→
Page content transcription
If your browser does not render page correctly, please read the page content below
DriveLock Control Center User
Guide 2019.1

© 2019 DriveLock SE
DriveLock Control Center User Guide

Table of Contents

Part I           Document Conventions                                                            4

Part II          DriveLock Control Center                                                        6
             1   Log in to DCC                                                                    7
             2   Start page                                                                       7
             3   Functional areas                                                                 8
             4   Working area                                                                     9
                      Ribbons                                                                     9
                      Result views                                                               10
                      Filter editor                                                              11
                      Print and export results                                                   12
                      Schedule results                                                           13
                      Anonymized Data                                                            14

Part III         Helpdesk                                                                      18
             1   Maintenance Tasks                                                              20
             2   Transmit Diagnostic Trace File                                                 21

Part IV          Statistic Reports                                                             23
             1   Create Statistic Reports                                                       24

Part V           Event Reports                                                                 27

Part VI          Forensic Analysis                                                             29
             1   Perform Forensic Analysis                                                      30

Part VII         Inventory                                                                     33
             1   Viewing Inventory Data                                                         34
             2   Adding Warranty and Maintenance Information                                    35

Part VIII        Open DOC                                                                      36
             1   Log in to the DOC                                                              37
                      Notes on certificates                                                      37
             2   DOC Overview                                                                   42
                      DOC Dashboard                                                              42
                      Computers                                                                  42
                      Events                                                                     44
                      Tasks                                                                      44
                      Users                                                                      45

Part IX          Settings                                                                      47

DriveLock Control Center User Guide 2019.1            2                          © 2019 DriveLock SE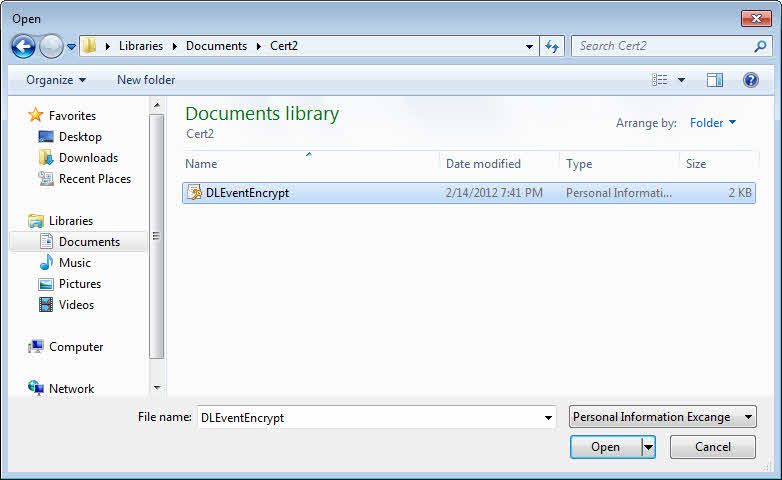
DriveLock Control Center User Guide

DriveLock Control Center User Guide 2019.1   3                     © 2019 DriveLock SE
Part I
Document Conventions
Document Conventions

1          Document Conventions
Throughout this document the following conventions and symbols are used to emphasize important points that you
should read carefully, or menus, items or buttons you need to click or select.

    Caution: This format means that you should be careful to avoid unwanted results, such as
    potential damage to operating system functionality or loss of data

    Hint: Useful additional information that might help you save time.

Italics represent fields, menu commands, and cross-references. Bold type represents a button that you need to click.
A fixed-width typeface represents messages or commands typed at a command prompt.
A plus sign between two keyboard keys means that you must press those keys at the same time. For example, ALT+R
means that you must hold down the ALT key while you press R. A comma between two or more keys means that you
must press them consecutively. For example ‘ALT, R, U’ means that you must first press the Alt key, then the R key, and
finally the U key.

DriveLock Control Center User Guide 2019.1                5                                          © 2019 DriveLock SE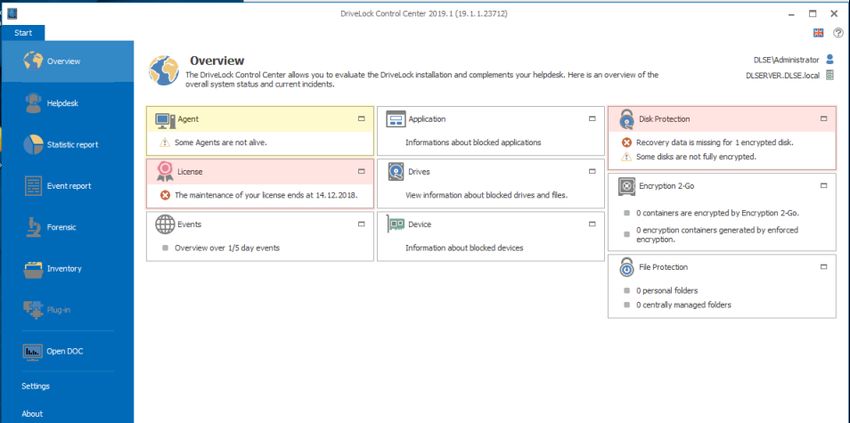
Part II
DriveLock Control Center
DriveLock Control Center

2          DriveLock Control Center
You can use the DriveLock Control Center (DCC) to monitor the status of DriveLock Agents, to investigate events and
incidents and create reports and statistics. The DCC communicates directly with the DriveLock Enterprise Service
(DES), which retrieves information reported by DriveLock Agents from the database server where it stores this data.
Install the DCC on the server where the DriveLock Enterprise Service is running or the workstations of your
administrators and help desk staff.

2.1        Log in to DCC
If you start the DriveLock Control Center from the Start menu or the application icon, the system automatically uses
the user who is currently logged on to the operating system for authentication.
If you have already configured a server connection, it is reused at startup. Otherwise you can specify a connection at
the first start or, if DNS multicast is activated, you can select a detected connection.

Log in with a user name and password
Start the DCC via command prompt with the parameter -LoginDlg to open the login dialog.

Enter a different user name and password to log in to DCC with this account. You can also select or enter a different
server connection here.

2.2        Start page
The DCC Overview displays overview information for the various DriveLock functional areas. To view the details,
maximize the area by clicking the        icon and open the desired statistic or report. For example to get information
about licensing, maximize License.

To go back, select the Start tab in the top left corner and minimize the area again by clicking the     icon.

DriveLock Control Center User Guide 2019.1                  7                                          © 2019 DriveLock SE
DriveLock Control Center

2.3        Functional areas
The presentation and handling is very similar for all functional areas in the DCC. First select a function from the
sidebar on the left. The corresponding working area then is structured into the following zones:

Action Buttons
Here you can start defined tasks or views.

Recently used
Here you see the last recently used views or reports.

Built-in
Shows all built-in views and reports, which are installed with the DriveLock

Personal / Published
If available, shows you the reports, which you have stored for your personal usage or which have been published by
somebody.

DriveLock Control Center User Guide 2019.1                8                                           © 2019 DriveLock SE

DriveLock Control Center

2.4        Working area
2.4.1      Ribbons
As soon as you open an action (view, report), beside the Start tab you get two additional tabs Actions and Options.
The text above shows the corresponding action or option for the two tabs. In the ribbon below you can start
available tasks or set available options for the selected action. The both figures following, shows the display with
one open help desk and one open event report.

Use the tabs below the ribbon to switch between the open actions. To close a tab click the X right on an open tab or
click the middle mouse button on a tab.

DriveLock Control Center User Guide 2019.1                9                                          © 2019 DriveLock SE

DriveLock Control Center

Use the ribbon below Actions, to configure, sort or group your views and tables, search or filter the results, select an
appropriate time range and start tasks which relate to this functional area.

Switch to the options ribbon, to save or publish your configuration, prepare any print output and create schedules to
send automated reports and statistics.

2.4.2      Result views
Customize the views of help desk and reports to fit your needs. Some of the following adjustments are not available
in all functional areas.
    · Update - Event data may change while you view a report. Click Refresh in the Ribbon to see the newest results.

    · Customization dialog - right click on the column heading.

    · Add or remove columns - in the ribbon, click on Columns and select the column names or in the customization
        dialog open the Column chooser and drag columns into the table header or back to the Column chooser.

    · Remove columns - with the mouse drag a column header out from the table.

    · Move columns - drag a column to a new position.

    · Adjust the column with - drag the border of a column heading or select Best fit in the customization dialog.

    · Sort columns - click to a column heading to sort this column and to revert the sort order or select Clear sorting
        in the customization dialog to remove a sorting.

    · Group data - select Group By Box in the customization dialog and drag one or more columns to the group by
        box on the top of the column headings or back to the table headings. In the ribbon click Group and select the
        desired columns. To show or hide grouped content in the table on the left side click on > or v.

    · Time range - by default results of the last five days are shown. In the ribbon click to Range and drag the slider
        or click to Start/end and enter dates.
    · Filter data - double click to any value within the table to easily filter the results by this value. The filter will be
        shown at the bottom of the table. Click X to remove the filter. The last five filters will be available in the
        history.
    · Predefined filters and filter history - in the ribbon select Filter and an existing Filter.

    · Auto filter - in the ribbon select Filter / Auto filter row. Enter text below the column headings to filter by this
        criteria immediately. If you start with an asterisk (*) the filter changes to Contains instead of Begins with.
    · Filter editor - the DCC includes wide filtering capabilities that you can use to control which data is displayed
        in a report. You can define both simple filter conditions and detailed logical expressions. Fore more details
        see chapter Filter editor.
After you have finished the customizing, open the ribbon Options, save the results for your personal usage and
eventually publish it for other administrators.

DriveLock Control Center User Guide 2019.1                   10                                            © 2019 DriveLock SE
DriveLock Control Center
Saved views are only visible for the tenant, they have been created for. Built-in views are visible for all tenants.
Permissions
Published views can be opened by other administrators (read access) by default. You can grant or deny permissions
to any user or group that has been added to the DriveLock Control Center. Open a view and click Properties in the
Options ribbon and then Security. Add users and/or groups and change their permissions as suitable.
· Full - allow changes to the definition and permissions.
· Change - allow changes to the definition.
· Read - allow opening the view.
2.4.3 Filter editor
To create a custom filter, in the ribbon open Filter / Editor. You can use the filter editor to define one or more
conditions using standard logical expressions. Only events that match your filter expressions are displayed.
To create a filter condition, perform the following steps in the Filter Editor:
· Click the (+) button.
· In the new filter condition, click [Type] and then click the name of a column to be evaluated for the filter.
· Click Equals and then click one of the displayed expressions. Which expressions are available depends on the
column’s data type. Examples of expressions include Equals, Is greater than, Is less than, Contains, Begins with
and Ends with.
· Click and then select or type the value to be includes in the expression. Depending on the data
type of the column, you can select from a list, a calendar or type a value.
By default, when you add multiple conditions, the Filter Panel combines them with an And operator. This means that
only events that match all conditions are displayed. To change the operator type, click And and then click of the
following operators:
· And: Only events that match all of the conditions are displayed.
· Or: Events that match any of the conditions are displayed.
DriveLock Control Center User Guide 2019.1 11 © 2019 DriveLock SEDriveLock Control Center
· Not And: Only events that match none of the conditions are displayed.
· Not Or: Events that don’t match at least one of the conditions are displayed.
To add additional conditions to a filter expression, click an operator and then click Add Condition.
To enable complex filtering, you can group and nest filter conditions. For example, to create a filter that displays all
Warning and Error during April 2010, create the following groups of conditions:
· Type equals Warning or Type equals Error.
· Date is greater than July 3, 2011 and Date is less than July 30, 2011.
· Combine the two previous groups of conditions with an And operator.
To add a new group, click an existing operator, such as And or Or, and then click Add Group. A new group is
displayed at an indented level below the current operator. The new group initially contains an empty filter condition.
You can change the operator for the group, edit the filter condition or add additional conditions to the group.
The DCC always evaluates the conditions in each group at the lowest level of the outline. The results from each group
are then evaluated using the operator at the next higher level. The events that are displayed are the result of the
entire logical expression.
To remove a single condition, click the (x) button to the right of the condition. To remove a group, click the operator
for the group and then click the (x) button to the right of the group operator. Alternatively, click the group operator
and then click Remove Group. To clear all conditions, click the top-level operator and then click Clear All.
To remove a filter from a report view, on the Filter ribbon, click the No filter button.
2.4.4 Print and export results
In the Options ribbon select Print / Export to open the preview.
DriveLock Control Center User Guide 2019.1 12 © 2019 DriveLock SEDriveLock Control Center Zoom Use the area Zoom, to adjust the view to your needs and to get an overview of the results. Watermark Configure watermarks, to apply text (e.g. CONFIDENTIAL) or apply pictures (e.g. your company design) to the pages. Print Click Quick Print to send the results to a default printer with default settings or use Print to open the printer settings first. Export to Save the results in various export formats, e.g. use PDF for archiving, EXCEL to do additional analysis or HTML to publish the results on your intranet. 2.4.5 Schedule results You can schedule any saved result view, to be automatically generated and be sent via email or be provided in a folder (e.g. a network share). Thus people can get reports regularly without having access to the DCC. Built-in views cannot be scheduled. For example to schedule an automated report for locked drives, open the built-in report Drive events, filter for Event ID = 115 and save the report e.g. as Drives blocked. In the Options ribbon with Schedule / New open a new schedule. DriveLock Control Center User Guide 2019.1 13 © 2019 DriveLock SE
DriveLock Control Center

Assign a name, define the time and the intervals for the report to be started and the format for the output. A
meaningful description helps to understand the purpose of the report.

  For technical reasons, the number of events in a single scheduled reports is limited to 100,000.

Send via email
In the section recipient check E-mail and add on or more email addresses. Click Test e-mail to verify, whether the
emails can be sent.

  To enable the sending of reports you need to configure the DriveLock Enterprise Service to use an SMTP server.
  For information about how to, refer to the DriveLock Administration Manual.

Provide as file
To save a scheduled report in a folder, in the section recipients check File and enter a path for the report to be
stored.

  To store reports to a folder, the DriveLock Enterprise Service must be able to access that folder and needs write
  permissions to that folder.

To deactivate a schedule without changing the settings, uncheck the option Enabled.

2.4.6      Anonymized Data
In some jurisdictions, such as Germany, the use and storage of personally identifiable data is tightly regulated.
Regulations and legal requirements may also apply to such data when it could be used for surveillance of user
activities.
To enable organizations to comply with privacy laws, the DriveLock Control Center includes functionality that can
prevent an administrator or company management from using event data to track the activities of specific users. The
DriveLock Control Center uses permissions to control who can view and create reports and forensic analyses. In
addition, the DriveLock Agent can anonymize user and computer names in event data that it sends to the DriveLock
Enterprise Service. This is done by encrypting these fields in events. The DriveLock Control Center displays
anonymized data in the user and computer name columns as “Encrypted”.

DriveLock Control Center User Guide 2019.1                14                                           © 2019 DriveLock SE
DriveLock Control Center

When using anonymous event reporting, administrators can use event data without any restrictions but they cannot
connect specific events with a user or a user’s computer.
To allow authorized personnel to audit anonymized event data, they can use a wizard to temporarily suspend event
data anonymizing.

To start the wizard, click the Decrypt personal data button on the options ribbon.

Click Next to continue.

DriveLock Control Center User Guide 2019.1               15                                      © 2019 DriveLock SE
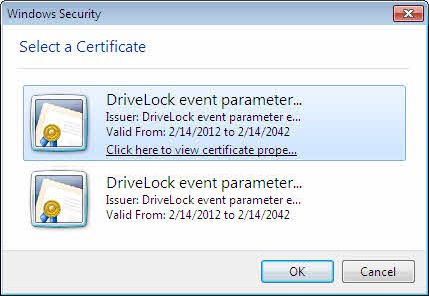
DriveLock Control Center

You need to provide all certificates that were specified in the DriveLock policy to be used for anonymous data
encryption. The order in which you add the certificates does not matter.
The wizard can read the certificates and their associated private keys from a file (*.pfx / *.p12), a smartcard or
token, or the current user’s Windows certificate store.
If a certificate is stored on a smartcard or token, put the smartcard into the reader or plug in the token before you
click Smart card / Certificate store.

Select the certificate.
If the certificate and private key are stored in a file, click File.

DriveLock Control Center User Guide 2019.1                    16                                      © 2019 DriveLock SE
DriveLock Control Center

Select the appropriate file and enter the password that is used to control access to the certificate’s private key.
Click OK to confirm the selection.
If your DriveLock policy contains multiple certificates, repeat the procedure until all required certificates have been
added. After adding all certificates, click Next.
The wizard attempts to decrypt some samples of the existing anonymized data using the certificates you provided. If
some or all of the data cannot be decrypted, the wizard displays a warning. You can select to close the wizard or
return to the certificate selection page and specify different certificates.
If the wizard was able to decrypt anonymized data, the DriveLock Control Center displays user names and computer
names instead of “Encrypted”. In addition, the Decrypt personal data button on the ribbon changes.

The DriveLock Control Center continues to display decrypted data until you click the Stop decryption button or until
you close the DriveLock Control Center.

DriveLock Control Center User Guide 2019.1                17                                           © 2019 DriveLock SE
Part III
Helpdesk
Helpdesk

3          Helpdesk
The Helpdesk area of the DriveLock Control Center provides access to common helpdesk tasks.
In the functional area Helpdesk, open one of of the views. You can define various views to your installed computers
and filter and group by miscellaneous criteria to solve your repeating helpdesk tasks fast and efficient. For how to
adjust, save, publish, print, export and schedule helpdesk views, see chapter Working area. In the details area on the
right, you can show either details for the selected computer or a list of computers last recently connected or you can
force the update of policies.

Predefined Filters
In the ribbon click Filter and in the sub menu see - in comparison to the event reports - additional filters for a
helpdesk view. Use this predefined filters, to easily filter by often used criteria.

Delete a computer
Sometimes you want to remove computers from the computer list, e.g. because you removed them from your
DriveLock environment. To remove a computer from the helpdesk views, select the computer and then on the ribbon,
click Delete. Commit once and, in case recovery data is present, a second time, that you really want to delete. Then
the computer will be deleted including all event and recovery data from the DriveLock database and is no longer
shown in a helpdesk view.

Install Agent
With Install Agent, you can initiate a manual Push-Installation (first or repair installation) of the DriveLock Agent on
any PC in you network.
If Automated Push-Installation is configured, also designated PCs will be shown in the PC list and can be selected to
start the installation via right mouse click.
The administration and execution of the Push-Installation is described in detail in chapter „Push-Installation of
DriveLock“ in the DriveLock Administration Manual.

DriveLock Control Center User Guide 2019.1                 19                                           © 2019 DriveLock SE
Helpdesk

Connect to a computer
For using the agent remote control, connect to a computer. Select the computer in a helpdesk view and in the ribbon
click the icon above Connect or click Connect and enter a computer name. In the working area a new tab opens with
possible actions for the connected computer.
Click Disconnect to terminate the connection. See the DriveLock Administration Manual, chapter Agent Remote
Control to read more about how to perform maintenance and monitoring tasks directly on a connected computer.

  To use the agent remote control or the following maintenance task , the DriveLock Management Console must be
  installed on the computer together with the DCC. If the DriveLock Management Console is not installed, the
  buttons are shown grayed and cannot be used.

3.1        Maintenance Tasks
Use the action buttons In the helpdesk area to perform the same maintenance tasks as you can do in the DriveLock
Management Console with Operating.

These tasks are described in detail in the DriveLock Administration Manual in the chapters as noted below.
      · Temporarily unlock agents (Offline unlock), Unlock multiple Agents, Unlock Terminal Service drives -
        temporally offline unlock devices or drives locked by DriveLock
        Chapter Using Agent Remote Control / Unlocking Agents

      · Container based encryption recovery, Encrypted folder recovery - start offline recovery for encrypted
        containers or encrypted folders
        Chapter DriveLock Encryption 2-Go / Recovering Encrypted Containers
        Chapter DriveLock File Protection / Recovering Encrypted Folders

      · Disk recovery / Emergency logon, Disk recovery tools - initiate the recovery of encrypted disks or perform an
        offline emergency logon, create boot media to recover encrypted disks
        Chapter DriveLock Full Disk Encryption / Recovery Procedures or BitLocker Management Manual

      · Create volume identification files
        Chapter Locking Drives and Devices / ... / Volume Identification Files

DriveLock Control Center User Guide 2019.1                   20                                       © 2019 DriveLock SE
Helpdesk
· Remote wipe - destroy an encrypted disks resp. the disk's user database remotely
Chapter DriveLock Fill Disk Encryption / ... / Initiating a Remote Wipe
3.2 Transmit Diagnostic Trace File
Starting with version 7.8, you can easily transfer all required support information for a support ticket you have
already opened to the Helpdesk.
Please contact DriveLock Support beforehand and open a ticket. We will then send you a ticket ID, which you can
enter below to ensure that your support data is correctly assigned to your request.
Follow these steps to transfer the support information / log files:
1. Start the Helpdesk view.
2. Connect to the computer you want to send log files and support information from.
3. Click Upload trace logs in the menu ribbon.
4. Enter your customer name, the ticket ID you received and a description.
5. Click OK to transmit the data.
DriveLock Control Center User Guide 2019.1 21 © 2019 DriveLock SEHelpdesk DriveLock Control Center User Guide 2019.1 22 © 2019 DriveLock SE
Part IV
Statistic Reports
Statistic Reports
4 Statistic Reports
Statistic reports enable the analysis of DriveLock events over a given period of time and/or based on the number of
events. Hereby it is also possible to compare time frames with each other, and to detect changes.
Statistic reports can be used, for example, to answer the following questions:
· How many malicious programs of which type were detected within the last 3 months?
· How many users have accepted or declined the usage policy within the last two months?
· How many USB sticks were blocked within the past 6 months?
Fundamentally, the statistic reports are similar to pivot tables in Microsoft Excel. As in Excel, you are able to create
graphics based on the determined values in different representation modes to visualize the data in a graphical
manner. The DriveLock Control Center hereby offers you nearly the same flexibility as Excel, without the need to
invest the comprehensive effort required for the creation of pivot tables.
Statistic reports can therefore be used for the following purposes:
· Analysis of changes over a given period of time
· Identification of trends
· Detection of deviations within a time frame
· Comparison of two or more time frames, for example, a year, quarter, month or week
You can adjust, save, publish, print, export and schedule statistic reports (see chapter Working area). The following
just describes the special configuration options.
In the most cases statistic reports don't get their data directly from the event data, but from special statistic
tables which are prepared regularly from the event data. Thus statistic reports may not contain data from the
last 24 hours.
4.1 Create Statistic Reports
To create your own statistic reports, open a suitable built-in statistic. Statistic reports are show in the form of a
pivot table (lower aera) and the corresponding graphical chart (upper aera).
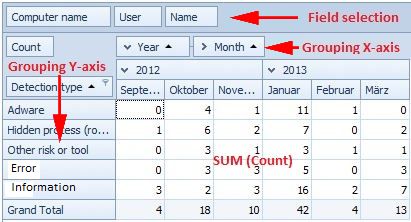
The pivot table contains the following four sections:
· Field selection: This fields can be used for the grouping on the X or Y axis.
DriveLock Control Center User Guide 2019.1 24 © 2019 DriveLock SEStatistic Reports
· Grouping X-axis: The fields shown here are grouped as columns. In the default statistics, commonly the time
is used here (hour, day, month, year).
· Grouping Y-axis: The fields shown here are used as rows. Each of the predefined statistics uses a suitable
field as the standard criteria.
· Sum: The sum fields contain the number of elements in the rows and columns.
Define rows and columns
Drag on or more fields from the field selection to the X-axis or Y-axis or back to the field selection. The time field has
a special feature It is automatically separated into different time periods, which can not be used as individual
fields.
Group rows and columns
More than one filed in the X-axis or Y-axis will be grouped automatically. Drag the fields to a new position to adjust
the grouping. Click on (v) or (>) left of the field name, to show or hide groups. E.g. if you click on this symbol in the
field Month, the data is automatically by Months and the subgroups Week, Day and Hour will be hidden.
Sort and filter
Click the arrow right of the field name to revert the sort order. If you hover the mouse above a filed name, a small
filter symbol indicates, whether you can filter for values. Click the filter and select any suitable values.
Graphical presentation
With the mouse, select rows, columns or sum fields to quickly filter the values. The chart immediately adapts to the
selection.
Note that this selection is not saved. If you want to reuse or schedule a statistic report, please use the filter
capabilities to limit the range of values.
In the ribbon, select a suitable chart type. Especially for pie charts, the values have to be ordered in rows. Click Swap
in the ribbon, to swap rows and columns and to get the desired results.
DriveLock Control Center User Guide 2019.1 25 © 2019 DriveLock SEStatistic Reports DriveLock Control Center User Guide 2019.1 26 © 2019 DriveLock SE
Part V
Event Reports
Event Reports

5          Event Reports
The DriveLock Control Center provides an extensive reporting environment that lets administrators easily discover
endpoint activity trends and create printed reports that document this activity or send these reports via e-mail. Event
reports are reports, which displays selected events in form of a table. Use these reports to answer questions like:
    · Which type of malware was found on which computers and when was it found?

    · Which users have accepted usage policies and when did they accept it?

    · Which USB drives have been locked on which computers?

You can adjust, save, publish, print, export and schedule event reports (see chapter Working area).

DriveLock Control Center User Guide 2019.1               28                                           © 2019 DriveLock SE
Part VI Forensic Analysis
Forensic Analysis
6 Forensic Analysis
Forensic Analysis is a powerful tool. In case of security events you easily drill down to detect the reason or the
origin. Base for forensic analysis are the same event data, which are shown in the tables of event reports. Starting
from an known event, you go from one event to the next one until you tracked the origin.
For example, you want to figure out, which person has plugged in an USB stick you have found, and then investigate
on which computers it has been used with and which data has been copied. Or you want to check, weither a certain
file has been copied to external drives, by whom and when.
Similar to event reports, you can adjust, print and export forensic analysis (see chapter Working area), but you also
have access to tools that allow you to drill down into the report data and gather additional information about
specific events in the report and to discover patterns.
Unlike event reports, you cannot save, publish or schedule forensic analysis, as at a future time, the results
would be different.
6.1 Perform Forensic Analysis
Example for a simple forensic analysis
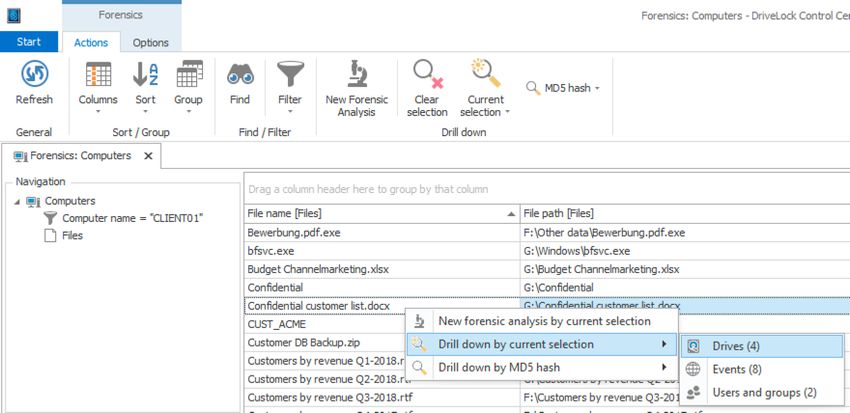
You suspect that sensitive information has been transferred to Computer Client01 via USB sticks.
Open the Forensics view and right-click the computer. Select the New forensic analysis by selection option to open a
new forensic analysis.
Next, right-click Client01 in the result and choose Drill down by current selection -> Files. The result is a list of all
files written to removable media by this computer.
Repeat the steps for the corresponding file - in the example Confidential customer list.docx . Right-click again
and select Drill down by current selection -> Drives. You can see that the file was copied to an external drive.
DriveLock Control Center User Guide 2019.1 30 © 2019 DriveLock SEForensic Analysis Right-click the file - Drill down by current selection -> Users and groups to see that User1 copied the file and you can react accordingly. Start forensic Analysis As in the example above from the Helpdesk, you can initiate forensic analysis directly from event reports too. In the functional area Forensic you find a couple of built-in forensic analysis and two special actions. Filter by connected drive You find an USB stick, e.g. in a meeting room or at the parking lot. Plug this stick to your administrative workstation and click Filter by connected drive. Now start an analysis for this drive and investigate, whether it has been used on any of your company's computers by which users. DriveLock Control Center User Guide 2019.1 31 © 2019 DriveLock SE
Forensic Analysis

Filter by selected file
Start an analysis, open the file and with right click - Drill down by MD5 hash / Events search for all events which
have been reported exactly for that file.

  When using anonymous event reporting, administrators cannot connect specific events with a user or a user’s
  computer (see Anonymized Data).

DriveLock Control Center User Guide 2019.1                32                                          © 2019 DriveLock SE
Part VII
Inventory
Inventory

7           Inventory
You can use the inventory functionality to create a complete inventory of hardware and software in your
organization. Thus you can collect the real number of licenses needed to ensure that installed software is correctly
licensed. Because a software inventory report can tell you reliably on how many computers any software is
installed, you will know whether you need to buy additional licenses. When software licensing is no longer based on
guesses you could save money by not buying more licenses than you need and you don’t have to fear the results of a
software audit.
Inventory functionality is included in all DriveLock editions that include Application Control functionality.

    Because inventory collection is performed by DriveLock Agents you need to activate this functionality in the
    DriveLock policy. For more information, see the DriveLock Administration Manual, chapter Configuring
    Hardware and Software Inventory.

7.1         Viewing Inventory Data
To view inventory data, open the functional area Inventory. In the working area you see all available entities. Click
Computer (e.g.), then double click an entry (here: PMDLW8X64) and select the sub entity Software.

Inventory views are divided into three areas:
      · The left section contains the initial entity of the inventory view

      · The middle section contains the sub entities you selected on the left side.
        Current entities are shown with an more sharp icon.

      · The right side contains additional detailed information about the selected elements.

DriveLock Control Center User Guide 2019.1                  34                                        © 2019 DriveLock SE
Inventory
7.2 Adding Warranty and Maintenance Information
You can add warranty and maintenance information to the Computer and Software entities.
· Computer: Warranty, Purchased from, Purchased on
· Software: License key, License number, End date
When you enter warranty and maintenance expiration dates, DriveLock can automatically alert you when these
dates approach. Activate email notification from the DCC start page with Settings / Inventory notification settings.
To enable the email notification you need to configure the DriveLock Enterprise Service to use an SMTP server.
For information about how to, refer to the DriveLock Administration Manual.
DriveLock Control Center User Guide 2019.1 35 © 2019 DriveLock SEPart VIII Open DOC
Open DOC
8 Open DOC
The DriveLock Operations Center (DOC) is a web-based user interface for DriveLock. You can access the DOC from
your DriveLock Control Center using different web browsers, such as Google Chrome, Microsoft Edge, Mozilla Firefox
or Safari, in the latest version with HTML5 support.
Please note that you cannot open the DOC in older web browsers!
The DOC provides you with an overview of the current status of the computers in your company managed with
DriveLock.
Supported languages are German and English, the language change works like in the DCC directly.
8.1 Log in to the DOC
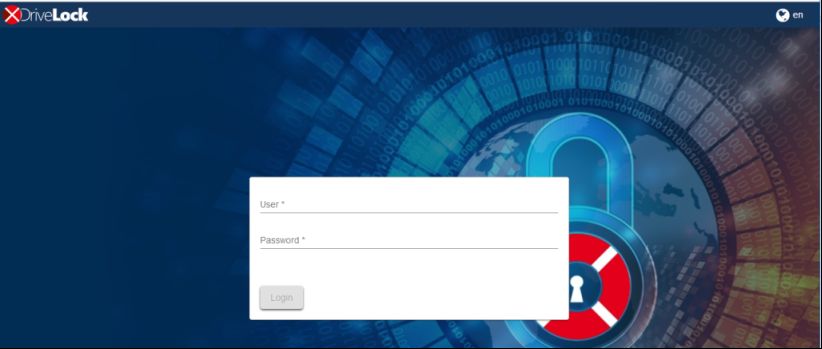
Click Open DOC in the DCC menu to get to the following login screen:
Please note the following:
· Only AD users can log in.
· Warnings may appear because SSL certificates are used. Please read the corresponding note.
· You can set or change the language at this point.
· Any DriveLock user who has full Helpdesk permissions can log in with their password.
· The first valid logged-in user will be the administrator in the DOC, the next logins will all be users. The
administrator can upgrade a user to administrator later.
8.1.1 Notes on certificates
DriveLock uses SSL certificates to communicate with the DriveLock Operations Center (DOC). They can be specified
during the installation of the DriveLock Enterprise Service (DES) or alternatively you can create a self-signed
certificate. For more information about certificates, please refer to the Installation and Administration Guides on
Drivelock Online Help.
DriveLock Control Center User Guide 2019.1 37 © 2019 DriveLock SEOpen DOC We recommend getting a certificate for the DES from a recognized certification authority (CA). If you are using a self-signed certificate, you will see the following warnings when opening the DOC, depending on which browser you are using, because the certificate is not trustworthy from the browser's side. The name of the DES in the examples below is dlserver.dlse.local. The following applies if you are using Mozilla Firefox: Click Accept the risk and continue to accept the certificate. There is no need to view the certificate details or import the certificate. Firefox only adds a security exception for this web page. No further steps are necessary. The following applies if you are using Google Chrome and Microsoft Edge: With both browsers, you need to enter the certificate in the certificate store so that you do not receive a warning every time you start DOC. · Microsoft Edge: · Google Chrome: DriveLock Control Center User Guide 2019.1 38 © 2019 DriveLock SE
Open DOC

Please proceed as follows:
1. Accept the warning from both browsers and open the certificate.
2. You can view the details of the certificate and use the Certificate Import Wizard to import the certificate into the
local certificate store..

3. Store the certificate in a directory of your choice.
4. Open the certificate's context menu and click Install Certificate.

DriveLock Control Center User Guide 2019.1                 39                                           © 2019 DriveLock SE
Open DOC

5. The Certificate Import Wizard opens. On the first page, leave the default setting X.509.
6. In the next dialog, select the Local Computer option.
7. In the third dialog, select the Trusted Root Certificate Authorities option as Certificate Store:

8. Click Finish in the next dialog.

DriveLock Control Center User Guide 2019.1                 40                                          © 2019 DriveLock SE
Open DOC

9. Now the certificate is set and the next time you open the DOC you will be directed to the DOC login screen without
any error message

  Please note, however, that the browser will still consider the certificate not secure and the following warning
  will still appear (in the example below Google Chrome):

DriveLock Control Center User Guide 2019.1               41                                          © 2019 DriveLock SE
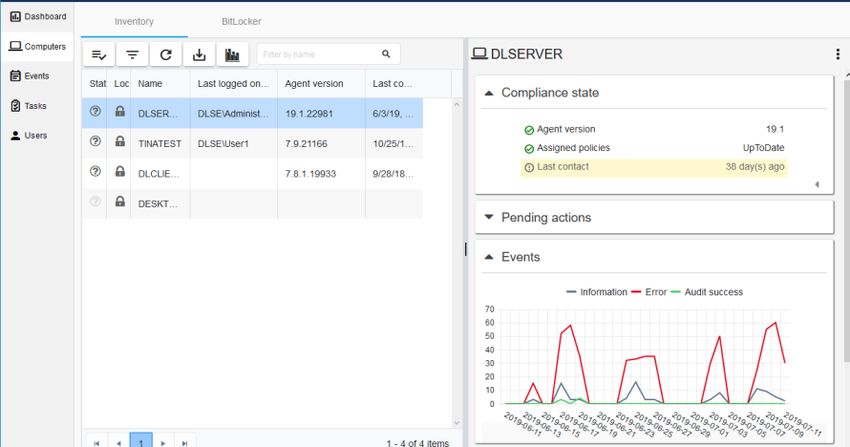
Open DOC

8.2        DOC Overview
Once you have logged in, you will see the DOC Standard Dashboard first.

8.2.1      DOC Dashboard
The standard dashboard provides a general overview of the DriveLock Agent computers on your network. You can
add new dashboards at any time by clicking the + icon.
Take the DOC tour to learn how to work with the dashboard.

· Users can create their own dashboards and arrange the widgets to fit their needs.

· Widgets are simply clicked to open the corresponding view.

8.2.2      Computers
The Computer view provides an overview of all Agent computers. For example, you can see which DriveLock Agent
version is installed on a particular computer or when the computer last had contact with the DES.

DriveLock Control Center User Guide 2019.1              42                                      © 2019 DriveLock SE
Open DOC

You can customize the view:
· Sort by columns: click the column header to sort in ascending order, click a second time to sort in descending
  order and click once more to remove the sorting.
· Add new columns: Add the columns that are most important to you from a choice of different column options. For
  example, if you are using DriveLock BitLocker Management, you can display the encryption status of the Agents
  and trigger encryption accordingly.
· Set filters: Filter by object properties. You can link conditions with 'and/or' and nest them as required.

· The display can be exported to an Excel spreadsheet for further use.

· Custom widgets can also be created here and placed on any of your dashboards.

How to manage individual computers:

DriveLock Control Center User Guide 2019.1                43                                           © 2019 DriveLock SE
Open DOC

· Delete computer: f you want to delete a computer, remember that it will be permanently deleted.

· Unlock computer: In order to unlock a computer, you need the password specified in the corresponding policy.

· Run actions on computers: You can select individual actions here; they will appear in the Pending actions section
  in the Computer view.
· In the BitLocker area, you can set or reset a new BitLocker password for the selected computer and request a
  BitLocker recovery key.

  The BitLocker documentation on the DriveLock Online Help website provides you with more information on
  DriveLock BitLocker Management.

8.2.3      Events
Similar to the DCC Event report, the events on the respective Agent computers are listed in this view by their type
(warning, error, information), event ID, description and other criteria.
You can also customize this view by sorting and adding columns, setting filters etc.

8.2.4      Tasks
The Tasks view provides three options.

For more information on each topic, please refer to the corresponding chapters of the DriveLock Administration
Guide at DriveLock Online Help.
· File Protection recovery

· Encryption 2-Go recovery

DriveLock Control Center User Guide 2019.1                44                                          © 2019 DriveLock SE
Open DOC

· Manage API keys (only for administrators):
  This option is especially designed for customers who want to program the API interface directly (for automation
  purposes). Please contact our Cloud Operations Team for further information.

8.2.5      Users
In the Users view, you can see a list of all DOC users with their name, status, and last login. Just like in the other
views, you can sort columns, add new ones, set filters and export the view to Excel.

  Note that only administrators can add users, change users' permissions, delete users, or run actions on
  computers.

How to add a new user:

1. Click the Add user               icon.
2. Enter the name and the role of the new user.
   You can change the role any time later.

DriveLock Control Center User Guide 2019.1                 45                                            © 2019 DriveLock SE
Open DOC

How to edit the user properties and change the user role:
1. Click the Edit user properties option to change the user name or enter a comment:

2. Click Change user role to specify the user or administrator role.

  Note for deleting a user: You can never delete your own user account!

DriveLock Control Center User Guide 2019.1               46                            © 2019 DriveLock SE
Part IX
Settings
Settings

9          Settings
Here you can change the global security settings and the users specific settings of the DriveLock Control Center.

Tenant
To select a different tenant is available only, if your DES database contains multiple tenants (e.g. different branch
offices or different customers (Security as a Service)) and the current user has permissions for more than one tenant.
Only data of the selected tenant will be shown in the DCC. A reporting over all tenants is not implemented.

Server connection
When you first start the DriveLock Control Center you will be asked for the name and port of the DriveLock Enterprise
Server (DES). To connect to a different DES, click Change DES... and enter a new name and port. The standard port is
6067.

Permissions
You can define different permissions for the various functional areas. For example, you can ensure that helpdesk
personnel only have access to helpdesk tasks but not to reports or forensics.
Open the Security settings...

DriveLock Control Center User Guide 2019.1               48                                          © 2019 DriveLock SE
Settings

Add or Remove users and groups that you want assign permissions and Allow or Deny the usage of the functional
areas.
    · Full: Can view and use the component, including making changes and changing permissions.

    · Change: Can make changes to items in the component, for example create reports.

    · Read: Can view items in the component, for example view reports.

If your DES database contains multiple tenants (e.g. different branch offices or different customers (Security as a
Service)) grant permissions to access the tenants data.

Use Multicast DNS
If Multicast DNS (also DNS-SD) is switched on, the DCC recognizes and presents all DriveLock Enterprise Servers,
which are available in your network, in the server connection dialog. Additionally the helpdesk views show all PCs
with DriveLock Agents installed, which are unknown to the connected DES. You may switch Multicast DNS off, e.g. in
test or trainings environments with more than one DES in the same network
Send DCC Events to the DES
As default DCC Events will be sent to the DriveLock Enterprise Server and can be analyzed in event reports, e.g.
Administration events. Users with full configuration permissions may change the setting.

Agent connection port
Enter the port, which is configured in the policy (Global configuration / Settings / Remote control settings )for agent
remote control. The default is HTTP 6064. If the agent allows/enforces encrypted communication you may/must use
HTTPS (default is port 6065).

Agent alive time
After this time, the DCC assumes, that an agent isn't online any longer and displays state Not Alive.

DriveLock Control Center User Guide 2019.1                49                                            © 2019 DriveLock SE
Settings Inventory notification settings To configure inventory notification, open this dialog, check the options you want and add recipients. See also Adding Warranty and Maintenance Information. Language settings The DCC language is always taken from the the Windows language, if available. Default is English. Currently German and English are supplied. DriveLock Control Center User Guide 2019.1 50 © 2019 DriveLock SE
DriveLock Control Center User Guide
Die in diesen Unterlagen enthaltenen Angaben und Daten,              Information in this document, including URL and other Internet
einschließlich URLs und anderen Verweisen auf Internetwebsites,      Web site references, is subject to change without notice. Unless
können ohne vorherige Ankündigung geändert werden. Die in den        otherwise noted, the example companies, organizations, products,
Beispielen verwendeten Firmen, Organisationen, Produkte,             domain names, e-mail addresses, logos, people, places, and
Personen und Ereignisse sind frei erfunden. Jede Ähnlichkeit mit     events depicted herein are fictitious, and no association with any
bestehenden Firmen, Organisationen, Produkten, Personen oder         real company, organization, product, domain name, e-mail
Ereignissen ist rein zufällig. Die Verantwortung für die Beachtung   address, logo, person, place, or event is intended or should be
aller geltenden Urheberrechte liegt allein beim Benutzer.            inferred. Complying with all applicable copyright laws is the
Unabhängig von der Anwendbarkeit der entsprechenden                  responsibility of the user.
Urheberrechtsgesetze darf ohne ausdrückliche schriftliche            DriveLock and others are either registered trademarks or
Erlaubnis der DriveLock SE kein Teil dieser Unterlagen für           trademarks of DriveLock SE or its subsidiaries in the United States
irgendwelche Zwecke vervielfältigt oder übertragen werden,           and/or other countries.
unabhängig davon, auf welche Art und Weise oder mit welchen          The names of actual companies and products mentioned herein
Mitteln, elektronisch oder mechanisch, dies geschieht.               may be the trademarks of their respective owners.
Es ist möglich, dass DriveLock SE Rechte an Patenten bzw.
angemeldeten Patenten, an Marken, Urheberrechten oder
sonstigem geistigen Eigentum besitzt, die sich auf den fachlichen
Inhalt dieses Dokuments beziehen. Das Bereitstellen dieses
Dokuments gibt Ihnen jedoch keinen Anspruch auf diese Patente,
Marken, Urheberrechte oder auf sonstiges geistiges Eigentum, es
sei denn, dies wird ausdrücklich in den schriftlichen
Lizenzverträgen von DriveLock SE eingeräumt.
Weitere in diesem Dokument aufgeführte tatsächliche Produkt-
und Firmennamen können geschützte Marken ihrer jeweiligen
Inhaber sein.

© 2019 DriveLock SE
You can also read