INSTALLATION AND SETUP GUIDE - FOR CLUSTERED DATA ONTAP SNAPMANAGER 7.2.2 FOR MICROSOFT SQL SERVER - NETAPP SUPPORT
←
→
Page content transcription
If your browser does not render page correctly, please read the page content below

SnapManager® 7.2.2 for Microsoft® SQL Server®

Installation and Setup Guide
For Clustered Data ONTAP®

June 2018 | 215-12168_B0
doccomments@netapp.com
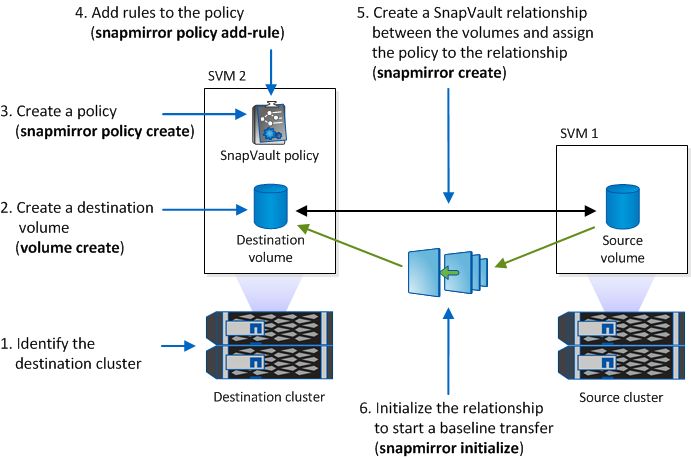
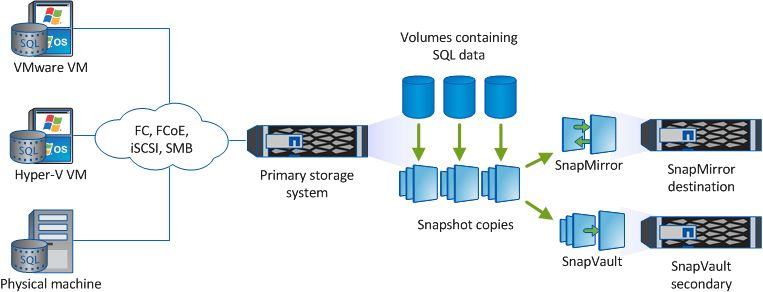
Table of Contents | 3

Contents
      Product overview .......................................................................................... 4
      Deployment workflow .................................................................................. 6
      Preparing for deployment ............................................................................ 7
              Storage layout requirements ........................................................................................ 7
              SnapManager dedicated servers ................................................................................ 10
              SnapManager licensing ............................................................................................. 10
              Supported configurations .......................................................................................... 11
              Supported storage types ............................................................................................ 12
              Windows host requirements ...................................................................................... 13
              Service account requirements .................................................................................... 15
      Installing SnapManager ............................................................................. 16
              Installing SnapManager interactively ........................................................................ 16
              Installing SnapManager from the command line ...................................................... 17
      Migrating databases to NetApp storage ................................................... 19
              Connecting SnapManager to SQL Server instances ................................................. 19
              Migrating databases and configuring SnapManager for SQL Server instances ........ 20
      Preparing storage systems for SnapMirror and SnapVault
        replication ............................................................................................... 25
              Understanding the differences between SnapMirror and SnapVault ......................... 25
              Preparing storage systems for SnapMirror replication .............................................. 26
              Preparing storage systems for SnapVault replication ................................................ 27
      Backing up and verifying your databases ................................................ 30
              SnapManager backup overview ................................................................................ 30
              Defining a backup strategy ........................................................................................ 30
              Backing up your databases for the first time ............................................................. 33
              Verifying the initial backup set .................................................................................. 34
              Scheduling recurring backups ................................................................................... 35
              Scheduling recurring transaction log backups .......................................................... 36
              Scheduling recurring backup set verifications .......................................................... 37
     Where to go next ......................................................................................... 39
     Copyright information ............................................................................... 40
     Trademark information ............................................................................. 41
     How to send comments about documentation and receive update
        notifications ............................................................................................ 42
     Index ............................................................................................................. 43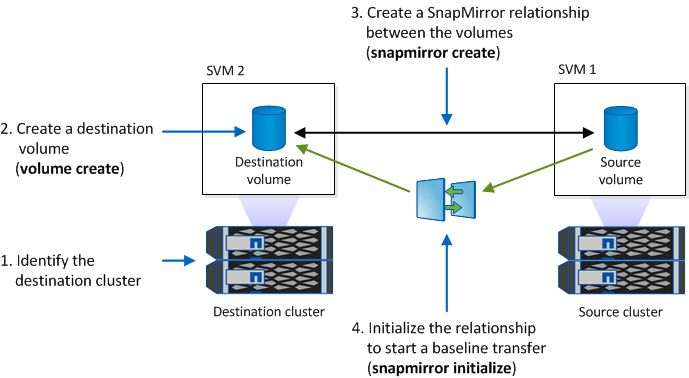
4

Product overview
    SnapManager for Microsoft SQL Server is a host-side component of the NetApp integrated storage
    solution for SQL Server, offering application-aware primary Snapshot copies of SQL databases. You
    can use SnapManager with Data ONTAP SnapMirror technology to create mirror copies of backup
    sets on another volume, and with Data ONTAP SnapVault technology to archive backups efficiently
    to disk.
    Together these tools offer a complete Snapshot-based data protection scheme that is as scalable,
    reliable, and highly available as the underlying storage system. The following illustration shows the
    components in a SnapManager deployment:

    SnapManager highlights
    SnapManager features seamless integration with Microsoft products on the Windows host and with
    NetApp Snapshot technology on the back end. It offers an easy-to-use, wizard-based administrative
    interface.

    •   Integration with the Microsoft Volume Shadow Copy Service (VSS) ensures that write requests
        are frozen and write caches are flushed before backups are taken. SnapManager supports
        Windows Volume Manager, Windows Server Failover Clustering, Microsoft Multipath I/O
        (MPIO), and SQL Server AlwaysOn Availability Groups.

    •   Fast, nondisruptive Snapshot technology using NetApp SnapDrive for Windows software enables
        you back up databases in seconds and restore them in minutes without taking SQL Servers or
        databases offline. Snapshot copies consume minimal storage space. You can store up to 255
        copies per volume.

    •   Automated central administration offers hands-off, worry-free data management. You can
        schedule routine SQL Server database backups, configure policy-based backup retention, set up
        point-in-time and up-to-the-minute restore operations and proactively monitor your SQL Server
        environment with periodic email alerts. PowerShell cmdlets are available for easy scripting of
        backup and restore operations.

    In addition to these major features, SnapManager offers the following:

    •   Integrated FlexClone software enables you to create space-efficient point-in-time copies of
        production databases for testing or data extraction (FlexClone license required)

    •   Simplified migration of existing databases to NetApp storage with an easy-to-use Configuration
        wizard

    •   Nondisruptive, automated backup verification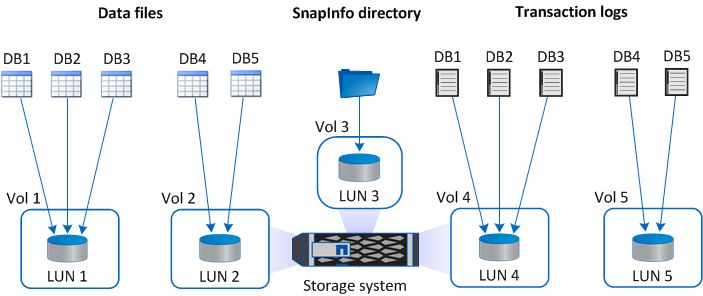
Product overview | 5

•   Fast reseeding of databases in an AlwaysOn cluster

•   Federated database backup of multiple SQL Server instances and databases

•   Support for backup of LUNs, SMB shares, and VMDKs

•   Support for physical and virtualized infrastructures

•   Support for iSCSI, Fibre Channel, FCoE, SMB 3.0 (CIFS), RDM, and VMDK over NFS and
    VMFS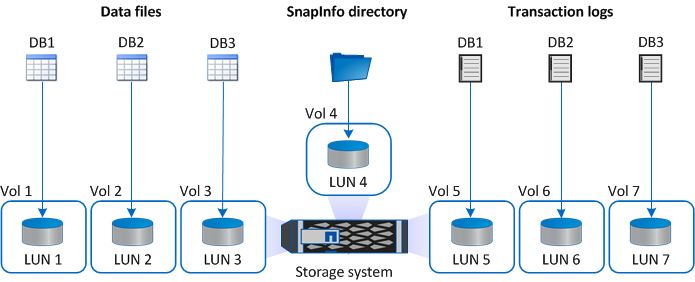
6

Deployment workflow
    Before you can create backups with SnapManager, you need to install the SnapDrive for Windows
    and SnapManager software, and provision NetApp storage. You can then migrate your databases to
    the storage system or create new databases in the system.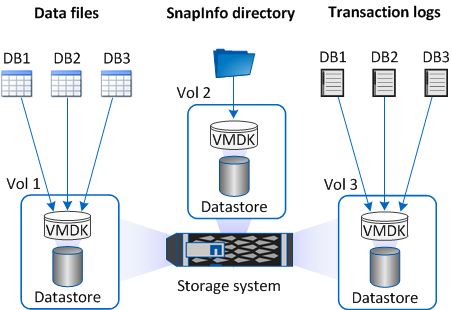
7

Preparing for deployment
   Before you deploy SnapManager, you need to determine your storage layout, choose a SnapManager
   configuration, verify that you have the required licenses, and make sure that your Windows hosts
   meet the minimum requirements.

   Steps

  1. Plan how to lay out your databases on NetApp storage.

  2. Decide whether you are going to use a SnapManager dedicated server for administration or
     verification.

  3. Verify that you have the required licenses.

  4. Verify SnapManager support for your configuration and storage type.

  5. Verify that your Windows hosts meet SnapManager requirements.

  6. Set minimum permissions for SQL Server and SnapManager service accounts.

   Related references
     Storage layout requirements on page 7
     SnapManager dedicated servers on page 10
     SnapManager licensing on page 10
     Supported configurations on page 11
     Supported storage types on page 12
     Windows host requirements on page 13
     Service account requirements on page 15

Storage layout requirements
   A well-designed storage layout ensures that SnapManager can properly back up your databases and
   that you can meet your recovery objectives.
   The following sections define the storage layout requirements and restrictions for LUNs, VMDKs,
   and SMB shares. You should take several considerations into account when defining your storage
   layout, including the size of the database, its rate of change, and the frequency with which you
   perform backups. For more information about these considerations, see NetApp Technical Report
   4353: Best Practices Guide for Microsoft SQL Server and SnapManager 7.1 for SQL Server with
   Clustered Data ONTAP.

   LUN and VMDK requirements
   You need dedicated LUNs or VMDKs for the following:

  1. Master, model, and msdb system databases

  2. Tempdb

  3. User database files (.mdf and .ndf)

  4. User database transaction log files (.ldf)

  5. The SnapInfo directory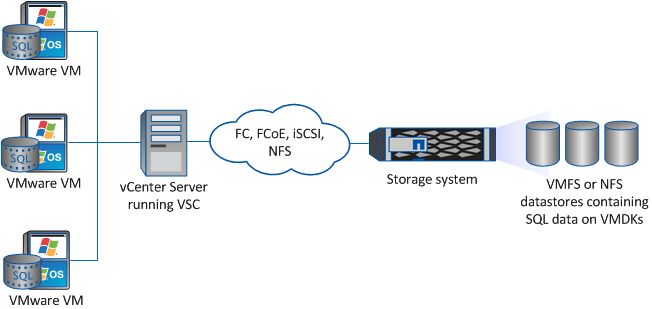
8 | SnapManager 7.2.2 for Microsoft SQL Server Installation and Setup Guide

         The SnapInfo directory stores information about backed up files. You create one or more
         SnapInfo directories when you migrate databases to NetApp storage.

     Snapshot copies are volume-wide, so each LUN should be in a dedicated volume and each VMDK
     should be in a dedicated datastore and volume.
     A LUN or VMDK can contain user database files (.mdf and .ndf) for a single database or for
     multiple databases. Which model you choose, or whether you choose a combination of the models,
     will depend primarily on the number of databases you are backing up. While a single database per
     LUN or VMDK offers the simplest mapping scheme, it will almost always be impractical when you
     are working with hundreds of databases.
     You also need to consider backup and restore performance:

     •   A single database per LUN or VMDK can result in faster restore times but slower backup times
         because you are backing up more volumes.

     •   Multiple databases per LUN or VMDK can result in longer restore times if you are not restoring
         all the databases in the volume.
         This is because SnapManager restores individual databases by mounting the Snapshot copy and
         then performing a file-level copy.

     Follow the same layout model for transaction log files (.ldf). No matter which model you choose,
     you should place transaction logs and database files on different LUNs or VMDKs because
     transaction logs are usually backed up more frequently than database files.
     For more information about considerations for transaction log files, see NetApp Technical Report
     4353: Best Practices Guide for Microsoft SQL Server and SnapManager 7.1 for SQL Server with
     Clustered Data ONTAP.

     LUN and VMDK sample layouts
     The following graphic shows how you might lay out storage with a single database per LUN:

     The following graphic shows how you might lay out storage with multiple databases per LUN:
Preparing for deployment | 9
The following graphic shows multiple databases per VMDK:
LUN and VMDK restrictions
• You cannot store database files on the same LUN or VMDK as the SnapInfo directory.
• You cannot store database files on a LUN that hosts NTFS volume mount points.
• You cannot store database items of any type on a LUN or VMDK that hosts the SQL Server.
• You cannot store database files, transaction logs, or the SnapInfo directory on a SAN boot LUN
or a LUN containing any other directories or files (including system paging files).
• If a database contains multiple filegroups or secondary (.ndf) files, you can spread the database's
files across two or more LUNs or VMDKs, provided those LUNs or VMDKs do not contain files
for any other databases.
Note: In exceptional cases, you can override these restrictions by enabling the unrestricted
database layout option. For more information, see the SnapManager 7.2 for Microsoft SQL
Server Administration Guide.
• For configurations where database files, transaction logs, or SnapInfo directories reside on
VMDKs, those VMDKs cannot share the same datastore (VMFS or NFS) as VMDKs that store
system partitions for any virtual machines.
• For configurations where database files, transaction logs, or SnapInfo directories reside on
VMDKs, NetApp's Virtual Storage Console for VMware vSphere must not back up the datastores
on which those VMDKs reside.
SMB share requirements
There are no requirements or restrictions for databases on SMB shares. You can place all SQL
databases and the SnapInfo directory on the same SMB share or on multiple SMB shares.10 | SnapManager 7.2.2 for Microsoft SQL Server Installation and Setup Guide
SnapManager dedicated servers
Ordinarily, you install SnapManager on each Windows host running SQL Server software. From this
base configuration, you can administer SnapManager locally or remotely. Depending on your needs,
you might also want to install SnapManager on a dedicated administration or verification server.
• An administration server lets you manage SnapManager remotely from a host of your choosing.
You might want to avoid using a primary SQL Server host for SnapManager administration, or it
might simply be more convenient to use a dedicated server.
• A verification server lets you offload backup set verification from a primary SQL Server host.
SnapManager's optional backup set verification feature uses the Microsoft SQL Server Database
Consistency Checker (DBCC) to verify the page-level integrity of databases. Because verification
is a CPU-intensive operation that can degrade SQL Server performance, it is a best practice to run
the utility on a dedicated server. The verification server must have iSCSI or FC connectivity with
the storage system.
Tip: You can configure SnapManager to perform verification during or after backup. You can
also configure it to verify the mirror or vault copy on the target storage system rather than the
primary copy on the source system.
You can administer SnapManager from a verification server if it is more convenient than configuring
a separate administration server.
SnapManager licensing
A SnapManager license and several storage system licenses are required to enable SnapManager
operations. The SnapManager license is available in two licensing models: per-server licensing, in
which the SnapManager license resides on each SQL Server host, and per-storage system licensing,
in which the SnapManager license resides on the storage system.
SnapManager license requirements are as follows:
License Description Where required
SnapManager A host-side license for a specific SQL On the SnapManager host. A
per-server Server host. Licenses are required SnapManager suite license is not
only for SQL Server production hosts required on source and destination
on which SnapManager is installed storage systems when using per-server
and for the optional verification licensing.
server. No SnapManager license is
required for the storage system or for
the optional administration server.
SnapManager A storage-side license that supports On source and destination storage
per-storage any number of SQL Server hosts. systems.
system Required only if you are not using a
(SnapManager per-server license on the
suite) SnapManager host.
Note: Trial licenses are available
for per-storage system licensing
only.Preparing for deployment | 11
License Description Where required
SnapRestore A required license that enables On source storage systems.
SnapManager to restore and verify Required on SnapMirror destination
backup sets. Restores include file systems to perform remote
level restores. verification.
Required on SnapVault destination
systems to perform remote
verification and to restore from a
backup.
FlexClone An optional license for cloning On source storage systems.
databases. Required on SnapVault destination
systems when creating clones from a
backup.
SnapMirror An optional license for mirroring On source and destination storage
backup sets to a destination storage systems.
system.
SnapVault An optional license for archiving On source and destination storage
backup sets to a destination storage systems.
system.
Protocols The following licenses are required: On source storage systems. Required
on SnapMirror destination systems to
• For LUNs, the iSCSI or FC license
serve data if a source volume is
• For SMB shares, the CIFS license unavailable.
• For NFS-type VMDKs, the NFS
license
• For VMFS-type VMDKs, the
iSCSI or FC license
Supported configurations
You can use the NetApp Interoperability Matrix to verify SnapManager support for your
configuration before you install or upgrade SnapManager.
The following table shows the currently supported software configurations:
Windows Server SQL Server SnapDrive for
Windows
2016 (Standard and • 2016 (Standard and Enterprise) Bundled
Datacenter) • 2014 SP1 (Standard and Enterprise)
• 2014 (Standard and Enterprise)
• 2012 SP3 (Standard and Enterprise)
• 2012 SP2 (Standard and Enterprise)
• 2012 SP1 (Standard and Enterprise)
• 2012 (Standard and Enterprise)12 | SnapManager 7.2.2 for Microsoft SQL Server Installation and Setup Guide
Windows Server SQL Server SnapDrive for
Windows
2012 R2 (Standard • 2014 (Standard and Enterprise) Bundled
and Datacenter) • 2012 SP2 (Standard and Enterprise)
• 2012 SP1 (Standard and Enterprise)
• 2012 (Standard and Enterprise)
• 2008 R2 SP3 (Enterprise and Datacenter)
• 2008 R2 SP2 (Enterprise and Datacenter)
• 2008 SP3 (Standard, Enterprise, and Datacenter)
2012 (Standard and • 2014 (Standard and Enterprise) Bundled
Datacenter) • 2012 SP2 (Standard and Enterprise)
• 2012 SP1 (Standard and Enterprise)
• 2012 (Standard and Enterprise)
• 2008 R2 SP3 (Enterprise and Datacenter)
• 2008 R2 SP2 (Enterprise and Datacenter)
• 2008 SP3 (Standard, Enterprise, and Datacenter)
• 2005 SP4 (Standard, Enterprise, and Datacenter)
2008 R2 SP1 • 2014 (Standard and Enterprise) Bundled
(Standard, • 2012 SP2 (Standard and Enterprise)
Enterprise, and
• 2012 SP1 (Standard and Enterprise)
Datacenter)
• 2012 (Standard and Enterprise)
• 2008 R2 SP3 (Enterprise and Datacenter)
• 2008 R2 SP2 (Enterprise and Datacenter)
• 2008 SP3 (Standard, Enterprise, and Datacenter)
• 2005 SP4 (Standard, Enterprise, and Datacenter)
Related information
NetApp Interoperability Matrix Tool
Supported storage types
SnapManager supports a wide range of storage types on both physical and virtual machines. Verify
support for your storage type before you install or upgrade SnapManager.
Machine Storage type
Physical server • FC-connected LUNs
• iSCSI-connected LUNs
• SMB3 shares residing on a Storage Virtual Machine (SVM) (clustered
Data ONTAP 8.2 and later)Preparing for deployment | 13
Machine Storage type
VMware VM • RDM LUNs connected via FC HBA
• RDM LUNs connected via iSCSI HBA
• iSCSI LUNs connected directly to the guest system by the iSCSI initiator
• VMDKs on VMFS or NFS datastores
• A guest system connected to SMB3 shares residing on a Storage Virtual
Machine (SVM) (clustered Data ONTAP 8.2 and later)
Hyper-V VM • Passthrough LUNs connected via FC HBA
• Virtual FC (vFC) LUNs connected via virtual Fibre Switch
• Passthrough LUNs connected via iSCSI HBA
• iSCSI LUNs connected directly to the guest system by the iSCSI initiator
• A guest system connected to SMB3 shares residing on a Storage Virtual
Machine (SVM) (clustered Data ONTAP 8.2 and later)
Windows host requirements
Windows hosts must meet the requirements for the base SnapManager configuration and for each of
the optional dedicated SnapManager servers.
Important notes
• You can install SnapManager on any combination of physical machines or virtual machines. If
you install SnapManager on virtual machines, the verification server must also be installed on a
virtual machine.
• You must use the same version of SnapManager on all of the hosts.
• When you schedule database backups, you can select the individual databases in an AlwaysOn
Availability Group cluster or you can select the cluster itself, which backs up all of the nodes in
the cluster.
If you want to create backups at the node level, you must install SnapManager and SnapDrive for
Windows only on the nodes that you plan to back up. If you want to create backups at the
Availability Group level, you must install SnapManager and SnapDrive for Windows on all of the
nodes.
• Except in VMDK configurations, you can connect the remote verification server to the storage
system by using a different protocol from the protocol that you used to connect to the base
configuration.
Host requirements per server type
The following table lists the host requirements for the base SnapManager configuration and for the
optional administration and verification servers:14 | SnapManager 7.2.2 for Microsoft SQL Server Installation and Setup Guide
Requirement Base Administration Verification Notes
SQL Server Yes No Yes The version of SQL Server that
is running on the verification
server must be the same or
higher than the version that is
running on the base
configuration.
.NET Framework Yes Yes Yes
4.0, 4.5.x, 4.6 or
4.7
Windows Failover Yes Yes Yes Installing SnapManager on a
Cluster Windows Server 2012 Failover
Automation Server Cluster node.
Windows Yes Yes Yes
PowerShell 3.0
SnapDrive for Yes Yes Yes Upgrading or installing a
Windows SnapDrive for Windows version
that is supported by your
version of Data ONTAP.
Port and connection requirements for Windows Firewall implementations
If you have enabled Windows Firewall on your hosts, TCP port 808 must be available (both inbound
and outbound) for SnapManager communications, including communications with the optional
verification servers and administration servers.
Additional requirements for VMDK support
For VMDK support, NetApp Virtual Storage Console (VSC) 4.2.2 for VMware vSphere must be
installed on a Windows host in your network. You can install VSC for VMware vSphere on the
vCenter Server host or on a dedicated host.
The following illustration shows VSC running in a SnapManager deployment:
Related references
SnapManager dedicated servers on page 10Preparing for deployment | 15
Service account requirements
A service account is a user account created explicitly to provide a security context for services
running on Windows Server. You must specify a service account when you install or update a service.
Before working with SnapManager, you must ensure that both the SQL Server and SnapManager
service accounts have the required permissions on the Windows host.
SQL Server service account requirements
SnapManager initiates some SQL Server operations that require access to the file system and
Windows registry. For that reason, the SQL Server service account should be a domain user account
with permission to write to the file system and registry.
SnapManager service account requirements
The SnapManager service account must have administrator privileges on the SQL Server host.
Requirements for special cases are described in the following table:
To... The SnapManager service account...
Use SnapInfo directory Must be a domain user account.
on a CIFS share
Use Windows Must have the sysadmin role in each SQL Server instance installed on
Authentication to the host.
connect with SQL
Servers
Run SnapManager from Must have rights on the SQL Server host.
a Group Managed
Service Account
(gMSA)
Use SnapManager with Must be a local user account. The service account cannot be a domain
Microsoft Message user account.
Queuing in workgroup
mode16
Installing SnapManager
Ordinarily, you install SnapManager on each Windows host running SQL Server software.
Depending on your needs, you might want to install SnapManager on a dedicated administration or
verification server. You can use an interactive wizard or the command line to install the product.
Before you begin
• You should have backed up your SQL databases.
• SnapDrive for Windows must be installed.
About this task
When you schedule database backups, you can select the individual databases in an AlwaysOn
Availability Group cluster or you can select the cluster itself, which backs up all nodes in the cluster.
If you want to back up at the node level, you need to install SnapManager and SnapDrive for
Windows only on the nodes you plan to back up. If you want to back up at the Availability Group
level, you must install SnapManager and SnapDrive for Windows on all nodes.
During installation, SnapManager configures the SQL Browser service to start automatically and
installs the following Windows components:
• SQL 2005 backward compatibility components
• SQL Server 2012, 2014, or 2016 CLR types
• SQL Server 2012 R2, 2014, or 2016 Management Objects
• Microsoft Visual C++ 2012 Redistributable Package (x64)
Related tasks
Installing SnapManager interactively on page 16
Installing SnapManager from the command line on page 17
Installing SnapManager interactively
You can use the SnapManager installation wizard to interactively install SnapManager on a Windows
host.
Steps
1. Download the SnapManager for SQL Server software from the NetApp Support Site.
NetApp Downloads: Software
2. Double-click the downloaded .exe file.
3. Complete the steps in the SnapManager installation wizard to install SnapManager.
Most of the fields in the wizard are self-explanatory. The following table describes fields for
which you might need guidance:Installing SnapManager | 17
Field Description
Account The user account that Windows uses to run SnapManager. This
SnapManager service account must have specific permissions on the
Windows host and the SQL Server. For details, see Service account
requirements on page 15.
Specify the account name by using one of the following formats:
• DomainName\UserName
• UserName@DomainName
Example:
License Type The license type that you purchased, which is either per-server licensing
or per-storage system licensing. For details, see SnapManager licensing
on page 10. Leave the License Key field blank if you are using per-server
licensing and would prefer to specify the license key in the SnapManager
console.
Password The password for the specified account. Leave the password blank if you
entered a group Managed Service Account in the Account field.
Installing SnapManager from the command line
You can run the SnapManager installation program unattended, in silent mode, from the Windows
command line.
Steps
1. Download the SnapManager for SQL Server installer from the NetApp Support Site.
NetApp Downloads: Software
2. From a Windows command prompt on the local host, change to the directory where you
downloaded the product installer.
3. Enter the following command at the command prompt:
installer.exe /s /v”/qn SILENT_MODE=1 [USERNAME=UserName]
[COMPANYNAME=CompanyName] [ISX_SERIALNUM=LicenseKey]
[INSTALLDIR=InstallDirectory] SVCUSERNAME=Domain\UserName
SVCUSERPASSWORD=Password SVCCONFIRMUSERPASSWORD=Password [/L*V DirPath
\LogFileName]”
Enter the following for each variable:
Variable Description
installer The name of the .exe file
UserName The name of the product administrator. If not specified, SnapManager
retrieves the default value from the Windows registry.
CompanyName The name of your company. If not specified, SnapManager retrieves the
default value from the Windows registry.18 | SnapManager 7.2.2 for Microsoft SQL Server Installation and Setup Guide
Variable Description
LicenseKey The per-server license key. Leave this field blank if you are using per-
storage system licensing, or if you would prefer to specify the per-server
license key in the SnapManager console. For details, see SnapManager
licensing on page 10.
InstallDirectory An alternate installation directory. If not specified, SnapManager uses the
default directory:
C:\Program Files\NetApp\SnapManager for SQL
Server
Domain\UserName The user account that Windows uses to run SnapManager. This
SnapManager service account must have specific permissions on the
Windows host and the SQL Server. For details, see Service account
requirements on page 15.
Password The password for the specified user account. Leave the password blank if
you entered a group Managed Service Account in the Account field.
DirPath\LogFileName The location and name of an installation log file, which is useful for
troubleshooting. The asterisk (*) specifies that all installation information
(such as status messages, nonfatal warnings, and error messages) should
be logged.
Example
"SMSQL7.2_x64.exe" /s /v"/qn SILENT_MODE=1 ISX_SERIALNUM=123
SVCUSERNAME=MKTG2\Administrator SVCUSERPASSWORD=examplepwd!
SVCCONFIRMUSERPASSWORD=examplepwd! /L*V C:\SMSQL_Install.log"19
Migrating databases to NetApp storage
After you have provisioned NetApp storage with SnapDrive for Windows, you can migrate your
databases to the storage system or create new databases in the system. In either case, you use the
Configuration wizard to create the SnapInfo directory that SnapManager uses to store information
about backed-up files.
Before you begin
• The SQL database property AutoClose must be set to FALSE.
• For an AlwaysOn Availability Group, the readable secondary value must be set to Yes for all
replicas used with SnapManager.
• Database names must not include any of the following characters: \ / : * ? " < > | [ , ]
• Database names must not end with spaces unless the following DWORD (32-bit) registry was set
to 1 and the SnapManager Service was restarted:
HKEY_LOCAL_MACHINE\SOFTWARE\Network Appliance\SnapManager for SQL Server
\Server\HaveDBWithTrailingSpaces
Related tasks
Connecting SnapManager to SQL Server instances on page 19
Migrating databases and configuring SnapManager for SQL Server instances on page 20
Connecting SnapManager to SQL Server instances
Before you can migrate your databases, you need to connect SnapManager to your SQL Server
instances.
Steps
1. From the Windows Start menu, click SnapManager for SQL Server.
The SnapManager console appears.
2. In the Console Root tree, click SnapManager for SQL Server.
The Add SQL Instance to be managed dialog box appears.
3. To choose an SQL instance, select one from the drop-down list, type the name in the text box, or
click Browse.
Note the following special cases:
If you have... Do this...
A server that does not have a Specify one of the named instances (Server\Instance) instead of the
default SQL Server instance server name. SnapManager adds all of the instances on the server when
you specify one of the named instances.20 | SnapManager 7.2.2 for Microsoft SQL Server Installation and Setup Guide
If you have... Do this...
An Availability Group Specify each Availability Group Replica that you plan to back up.
4. Under Login Details, choose the authentication method that you want SnapManager to use to
connect to the SQL Server:
Use Windows authentication
SnapManager connects to the SQL Server using the Windows account under which
SnapManager runs (the SnapManager service account). This is the most common method.
Use SQL Server authentication
SnapManager connects to the SQL Server using an account defined on the SQL Server.
That account must have sysadmin server role privileges on the SQL Server instance.
SnapManager uses the selected authentication method for all SQL Servers and SQL Server
instances in a cluster, so each server must be set up for that authentication method.
5. Click Add.
The Add SQL Instance to be managed dialog box closes and SnapManager launches the
Configuration wizard.
After you finish
Use the Configuration wizard to configure SnapManager for the SQL Server instance and to migrate
the SQL Server databases to NetApp storage.
Migrating databases and configuring SnapManager for SQL
Server instances
Before you can back up your databases using SnapManager, you need to run the SnapManager
Configuration wizard for each SQL Server instance. You use the Configuration wizard to migrate
databases to NetApp storage and to configure SnapManager for the SQL Server instances.
Before you begin
You must have shut down any applications that are accessing the databases that you want to migrate.
Database migration fails if an application accesses a database.
About this task
Attention: SnapManager takes databases offline when it migrates them. SnapManager takes the
entire SQL Server offline when it migrates the system databases.
You use the SnapManager Configuration wizard to select a verification server, migrate data files and
log files to NetApp storage, map those files to their respective SnapInfo directories, and configure
automatic event notification.
When migrating databases, SnapManager ensures that the files are placed in locations that meet
SnapManager configuration requirements. If you use a separate tool to migrate databases, run the
Configuration wizard to ensure that the files are in correct locations. Incorrectly located files can
impair SnapManager operations.
Even if you create new databases directly on NetApp storage, you need to run the Configuration
wizard to create a mapping between those databases and the SnapInfo directory.
Steps
1. If the Configuration wizard is not open, click Configuration Wizard in the Actions menu.Migrating databases to NetApp storage | 21
2. On the Start page, click Next.
This page includes an option to use a control file. A control file contains configuration details
about an SQL Server instance. You might use this option at another time to export and then
import a configuration. For information about using control files, see the SnapManager 7.2 for
Microsoft SQL Server Administration Guide.
3. On the Verification Settings page, define how SnapManager should verify backup copies:
For this field... Do this...
Verification Server For optimal performance, choose a remote verification server, which
offloads work from the SQL production server.
SQL Server Connection Choose an authentication method for SnapManager to connect to the
SQL Server on the verification server during backup verification:
Use Windows authentication
SnapManager connects to the SQL Server using
the Windows account under which SnapManager
runs (the SnapManager service account). This is
the most common method.
Use SQL Server authentication
SnapManager connects to the SQL Server using an
account defined on the SQL Server. The account
must have sysadmin server role privileges on the
SQL Server instance.
Access a mounted LUN in Keep the default option for mounting Snapshot copies to an empty NTFS
snapshot directory.
SnapManager mounts Snapshot copies to the verification server when it
verifies backup copies. Using an empty NTFS directory is typically better
than assigning drive letters because the verification server can run out of
drive letters if there are more backup copies than available drive letters.
For a Windows Failover Cluster, the mount point directory must be a
shared disk.
4. On the Database Selection page, assign your database files and transaction logs to LUNs, SMB
shares, or VMDKs and then view the results of your selections:
a. In the Database Selection pane, select a database file or transaction log:
b. In the Disk Selection pane, select a LUN, SMB share, or VMDK:22 | SnapManager 7.2.2 for Microsoft SQL Server Installation and Setup Guide
c. Click the button.
d. Repeat substeps a to c for each database's files and logs.
e. In the Database Location Results pane, review the results of your selections:
Tip: To change your selections, click Undo All or select a database and click Reconfigure.
5. On the SnapInfo settings page, choose whether you want a single SnapInfo directory for your
databases or multiple SnapInfo directories.
A single SnapInfo directory works well for many configurations. Multiple SnapInfo directories
might be needed if you have some databases on LUNs and some databases on SMB shares. In
that case, the databases on LUNs need LUNs for the corresponding SnapInfo directories and the
databases on SMB shares need SMB shares for the corresponding SnapInfo directories.
6. On the remaining SnapInfo Settings pages, specify where you want to place the SnapInfo
directory or directories.
7. On the Setup SnapManager Share page, specify a share to ensure that backups of transaction
logs are available to all replicas within an Availability Group.
SnapManager uses the transaction log backups for up-to-the-minute restore operations, database
reseeding, and for using clones as replicas.
8. On the Database Migration Settings page, choose settings for physical database verification,
database deletion, and updates to database table statistics:
For this field... Do this...
Run DBCC physical integrity Clear these fields.
verification before/after
The integrity verification runs on the production database and is resource
migration
intensive, which can negatively impact the performance of your database.
You should run verification on the initial backup set instead.
Delete Copy of Migrated Clear this field.
Database at Original Location
You should always delete the database yourself, in case there are
problems during the migration.
Run UPDATE STATISTICS Leave this field selected.
on tables before detaching the
databases
The following image shows the Database Migration Settings page with the recommended settings
selected:Migrating databases to NetApp storage | 23
9. On the iSCSI Initiator Information page, choose whether to set the iSCSI service as a
dependency and click Next:
• If you use iSCSI, you should keep the option selected.
• If you do not use iSCSI, clear the option.
Setting the iSCSI service as a dependency for all SQL Server services helps protect SQL data if
there is a problem with iSCSI.
10. In the E-Mail Notification Settings page, configure settings for email notifications, event
logging, and AutoSupport notifications.
Most of the fields on this page are self-explanatory. The following table describes fields for which
you might need guidance:
Field Description
Send e-mail notification Enables email notifications to the specified address about the success or
failure of SnapManager operations.
If you select this field, click Advanced to tune the notification settings—
for example, to receive notifications only when operations fail.
Log SnapManager events to If AutoSupport is enabled on the storage system, posts SnapManager
storage system syslog events to the storage system's event log.
Technical support can use this information to troubleshoot issues.
Send AutoSupport If AutoSupport is enabled on the storage system, enables email
notification notifications to technical support about SnapManager events or storage
system problems that might occur.
On failure only Limits the SnapManager events that are posted to the storage system
event log and sent through AutoSupport to failure events only.
11. In the Monitoring and Reporting Settings page, choose whether you want to receive email
notifications that contain the status of backup, verification, and clone operations during the
specified time frame.
To receive these email notifications, you must have enabled email notifications on the previous
page.
12. In the Finish page, review the settings and click Finish.
13. In the Configuration Status dialog box, click Start Now.
SnapManager migrates the databases and updates your SnapManager configuration. You can view
details of the operation in the Configuration Report.
14. After the operation completes, click OK and then click Close.24 | SnapManager 7.2.2 for Microsoft SQL Server Installation and Setup Guide
After you finish
You can rerun the Configuration wizard at any time to make changes to your database configurations.
When you add new databases, you should run the Configuration wizard to ensure that the databases
are stored in valid locations and to create a mapping between those databases and their respective
SnapInfo directories.25
Preparing storage systems for SnapMirror and
SnapVault replication
You can use SnapManager with ONTAP SnapMirror technology to create mirror copies of backup
sets on another volume, and with ONTAP SnapVault technology to perform disk-to-disk backup
replication for standards compliance and other governance-related purposes. Before you perform
these tasks, you must configure a data-protection relationship between the source and destination
volumes and initialize the relationship.
A data protection relationship replicates data on primary storage (the source volume) to secondary
storage (the destination volume). When you initialize the relationship, ONTAP transfers the data
blocks referenced on the source volume to the destination volume.
Note: If you are using SnapDrive 7.1 for Windows, you cannot configure both a SnapMirror
relationship and a SnapVault relationship on the same ONTAP source volume. You must configure
these relationships on different source volumes. This limitation does not exist starting with
SnapDrive 7.1.1 for Windows.
SnapManager does not support cascade relationships between SnapMirror and SnapVault volumes
(Primary > Mirror > Vault). Use fanout relationships only (Primary > Mirror, Primary >
Vault).
Related tasks
Understanding the differences between SnapMirror and SnapVault on page 25
Preparing storage systems for SnapMirror replication on page 26
Preparing storage systems for SnapVault replication on page 27
Understanding the differences between SnapMirror and
SnapVault
SnapMirror is disaster recovery technology, designed for failover from primary storage to secondary
storage at a geographically remote site. SnapVault is disk-to-disk backup replication technology,
designed for standards compliance and other governance-related purposes.
These objectives account for the different balance each technology strikes between the goals of
backup currency and backup retention:
• SnapMirror stores only the Snapshot copies that reside in primary storage, because, in the event
of a disaster, you need to be able to fail over to the most recent version of primary data you know
to be good.
Your organization, for example, might mirror hourly copies of production data over a ten-day
span. As the failover use case implies, the equipment on the secondary system must be equivalent
or nearly equivalent to the equipment on the primary system to serve data efficiently from
mirrored storage.
• SnapVault, in contrast, stores Snapshot copies whether or not they currently reside in primary
storage, because, in the event of an audit, access to historical data is likely to be as important as
access to current data.
You might want to keep monthly Snapshot copies of your data over a 20-year span, for example,
to comply with government accounting regulations for your business. Because there is no
requirement to serve data from secondary storage, you can use slower, less expensive disks on the
vault system.26 | SnapManager 7.2.2 for Microsoft SQL Server Installation and Setup Guide
The different weights that SnapMirror and SnapVault give to backup currency and backup retention
ultimately derive from the limit of 255 Snapshot copies for each volume. While SnapMirror retains
the most recent copies, SnapVault retains the copies made over the longest period of time.
Preparing storage systems for SnapMirror replication
Before you can use SnapManager to mirror Snapshot copies, you need to configure a data-protection
relationship between the source and destination volumes, then initialize the relationship. Upon
initialization, SnapMirror makes a Snapshot copy of the source volume, then transfers the copy and
all the data blocks that it references to the destination volume. It also transfers any other, less recent
Snapshot copies on the source volume to the destination volume.
Before you begin
• You must have created the source and destination volumes in peered clusters with peered storage
virtual machines (SVMs).
Cluster and SVM Peering Express Guide
• You must be a cluster administrator.
• For Snapshot copy verification on the destination volume, the source and destination storage
virtual machines (SVMs) must have a management LIF as well as a data LIF.
The management LIF must have the same DNS name as the SVM. Set the management LIF role
to data, the protocol to none, and the firewall policy to mgmt.
About this task
You can use the ONTAP command-line interface (CLI) or OnCommand System Manager to create a
SnapMirror relationship. The following procedure documents CLI usage.
Important: If you are storing database files and transaction logs on different volumes, you must
create relationships between the source and destination volumes for the database files and between
the source and destination volumes for the transaction logs.
The following illustration shows the procedure for initializing a SnapMirror relationship:
Steps
1. Identify the destination cluster.Preparing storage systems for SnapMirror and SnapVault replication | 27
2. On the destination cluster, use the volume create command with the -type DP option to create
a SnapMirror destination volume that is either the same or greater in size than the source volume.
Important: The language setting of the destination volume must match the language setting of
the source volume.
Example
The following command creates a 2 GB destination volume named dstvolB in SVM2 on the
aggregate node01_aggr:
cluster2::> volume create -vserver SVM2 -volume dstvolB -aggregate node01_aggr -type DP
-size 2GB
3. On the destination SVM, use the snapmirror create command with the -type DP parameter
to create a SnapMirror relationship.
The DP type defines the relationship as a SnapMirror relationship.
Example
The following command creates a SnapMirror relationship between the source volume srcvolA on
SVM1 and the destination volume dstvolB on SVM2, and assigns the default SnapMirror policy
DPDefault:
SVM2::> snapmirror create -source-path SVM1:srcvolA -destination-path SVM2:dstvolB
-type DP
Note: Do not define a mirror schedule for the SnapMirror relationship. SnapManager does that
for you when you create a backup schedule.
If you do not want to use the default SnapMirror policy, you can invoke the snapmirror
policy create command to define a SnapMirror policy.
4. Use the snapmirror initialize command to initialize the relationship.
The initialization process performs a baseline transfer to the destination volume. SnapMirror
makes a Snapshot copy of the source volume, then transfers the copy and all the data blocks it
references to the destination volume. It also transfers any other Snapshot copies on the source
volume to the destination volume.
Example
The following command initializes the relationship between the source volume srcvolA on SVM1
and the destination volume dstvolB on SVM2:
SVM2::> snapmirror initialize -destination-path SVM2:dstvolB
Preparing storage systems for SnapVault replication
Before you can use SnapManager to perform disk-to-disk backup replication, you need to configure a
data-protection relationship between the source and destination volumes, then initialize the
relationship. On initialization, SnapVault makes a Snapshot copy of the source volume, then transfers
the copy and all the data blocks it references to the destination volume.
Before you begin
• You must have created the source and destination volumes in peered clusters with peered storage
virtual machines (SVMs).28 | SnapManager 7.2.2 for Microsoft SQL Server Installation and Setup Guide
Cluster and SVM Peering Express Guide
• You must be a cluster administrator.
About this task
You can use the ONTAP command-line interface (CLI) or OnCommand System Manager to create
SnapVault relationships. The following procedure documents CLI usage.
Important: If you are storing database files and transaction logs on different volumes, you must
create relationships between the source and destination volumes for the database files and between
the source and destination volumes for the transaction logs.
The following illustration shows the procedure for initializing a SnapVault relationship:
Steps
1. Identify the destination cluster.
2. On the destination cluster, use the volume create command with the -type DP option to create
a SnapVault destination volume that is the same size as or larger than the source volume.
Important: The language setting of the destination volume must match the language setting of
the source volume.
Example
The following command creates a 2 GB destination volume named dstvolB in SVM2 on the
aggregate node01_aggr:
cluster2::> volume create -vserver SVM2 -volume dstvolB -aggregate node01_aggr -type DP
-size 2GB
3. On the destination SVM, use the snapmirror policy create command to create a SnapVault
policy.
Example
The following command creates the SVM-wide policy SVM1-vault:Preparing storage systems for SnapMirror and SnapVault replication | 29
SVM2::> snapmirror policy create -vserver SVM2 -policy SVM1-vault
Note: Do not define a cron schedule or Snapshot copy policy for the SnapVault relationship.
SnapManager does that for you when you create a backup schedule.
4. Use the snapmirror policy add-rule command to add rules to the policy that define the
following Snapshot copy labels and the retention policy for each label:
• Daily
• Weekly
• Monthly
• Hourly
• Unlimited
Important: The labels are case-sensitive.
These are fixed labels for options displayed when you perform a backup. You select one of these
options when you archive the backup. You must execute this command once for each of the rules
you are adding.
Example
The following command adds a rule to the SVM1-vault policy that defines the “Daily” label and
specifies that 30 Snapshot copies matching the label should be kept in the vault:
SVM2::> snapmirror policy add-rule -vserver SVM2 -policy SVM1-vault
-snapmirror-label Daily -keep 30
5. Use the snapmirror create command with the -type XDP parameter and the -policy
parameter to create a SnapVault relationship and assign a vault policy.
The XDP type defines the relationship as a SnapVault relationship.
Example
The following command creates a SnapVault relationship between the source volume srcvolA on
SVM1 and the destination volume dstvolB on SVM2, and assigns the policy SVM1-vault:
SVM2::> snapmirror create -source-path SVM1:srcvolA -destination-path SVM2:dstvolB
-type XDP -policy SVM1-vault
6. Use the snapmirror initialize command to initialize the relationship.
The initialization process performs a baseline transfer to the destination volume. SnapMirror
makes a Snapshot copy of the source volume, then transfers the copy and all the data blocks it
references to the destination volume.
Example
The following command initializes the relationship between the source volume srcvolA on SVM1
and the destination volume dstvolB on SVM2:
SVM2::> snapmirror initialize -destination-path SVM2:dstvolB30
Backing up and verifying your databases
You should back up your databases as soon as they are available in NetApp storage. You can then
verify the initial backups and schedule recurring backups and recurring backup verifications.
Related tasks
SnapManager backup overview on page 30
Defining a backup strategy on page 30
Backing up your databases for the first time on page 33
Verifying the initial backup set on page 34
Scheduling recurring backups on page 35
Scheduling recurring transaction log backups on page 36
Scheduling recurring backup set verifications on page 37
SnapManager backup overview
SnapManager uses NetApp Snapshot technology to create online, read-only copies of databases. It
uses an SQL Server utility to verify the integrity of the backups.
SnapManager backs up a database by creating Snapshot copies of the volumes in which the following
reside:
• Database data files
• Transaction logs
• SnapInfo directories
Together these Snapshot copies comprise a backup set. SnapManager uses a backup set to restore a
database.
After SnapManager backs up your databases, it can perform an integrity verification of the backup
sets. SnapManager uses the Database Consistency Checker (DBCC), a Microsoft SQL Server utility,
to verify the page-level integrity of databases. Verification ensures that you can use backup sets to
restore databases as needed.
Important: SnapManager cannot restore databases from Snapshot copies created by Data ONTAP
or SnapDrive. You should perform backups using SnapManager only.
Defining a backup strategy
Defining a backup strategy before you create your backup jobs helps ensure that you have the
backups that you need to successfully restore your databases. Your Service Level Agreement (SLA)
and Recovery Point Objective (RPO) largely determine your backup strategy.
Note: For SnapManager best practices, see NetApp Technical Report 4353: Best Practices Guide
for Microsoft SQL Server and SnapManager 7.1 for SQL Server with Clustered Data ONTAP.
What type of SnapManager backup do you need?
SnapManager supports two types of backups:Backing up and verifying your databases | 31
Backup type Description
Full database Backs up database files and truncated transaction logs.
backup SQL Server truncates transaction logs by removing entries already
committed to the database. This is the most common backup type.
Transaction log Backs up truncated transaction logs, copying only transactions committed
backup since the most recent backup.
If you schedule transaction log backups to work with full database backups,
SnapManager can restore databases to a specific recovery point more
quickly. For example, you might schedule full database backups at the start
and end of the day and transaction log backups every hour.
For both types of backups, you can choose the copy-only option to specify that SQL Server not
truncate transaction logs. Use this option when you are backing up your databases with another
backup application. Keeping transaction logs intact ensures that any backup application can restore
the databases. You typically should not use copy-only in any other circumstance.
When should you back up your databases?
The most critical factor for determining a database backup schedule is the rate of change for the
database. You might back up a heavily used database every hour, while you might back up a rarely
used database once a day. Other factors include the importance of the database to your organization,
your Service Level Agreement (SLA), and your Recover Point Objective (RPO).
Even for a heavily used database, there is no requirement to run a full backup more than once or
twice a day. Regular transaction log backups are usually sufficient to ensure that you have the
backups you need.
Tip: The more often you back up your databases, the fewer transaction logs SnapManager has to
play forward at restore time, which can result in faster restore operations.
Important: SnapManager can perform one operation at a time. Do not schedule overlapping
SnapManager operations.
When should you verify backup copies?
Although SnapManager can verify backup sets immediately after it creates them, doing so can
significantly increase the time required to complete the backup job. It is almost always best to
schedule verification in a separate job at a later time. For example, if you back up a database at 5:00
p.m. every day, you might schedule verification to occur an hour later at 6:00 p.m.
For the same reason, it is usually not necessary to run backup set verification every time you perform
a backup. Performing verification at regular but less frequent intervals is usually sufficient to ensure
the integrity of the backup. A single verification job can verify multiple backup sets at the same time.
Important: SnapManager can perform one operation at a time. Do not schedule overlapping
SnapManager operations.
How many backup jobs do you need?
You can back up your databases using one backup job or several. The number of backup jobs that
you choose typically mirrors the number of volumes on which you placed your databases. For
example, if you placed a group of small databases on one volume and a large database on another
volume, you might create one backup job for the small databases and one backup job for the large
database.
Other factors that determine the number of backup jobs that you need include the size of the
database, its rate of change, and your Service Level Agreement (SLA).32 | SnapManager 7.2.2 for Microsoft SQL Server Installation and Setup Guide
Which backup naming convention do you want to use?
A backup naming convention adds a string to Snapshot copy names. The string helps you identify
when the copies were created. There are two naming conventions:
Naming convention Description
Unique Adds a time stamp to all Snapshot copy names. This is the default option.
Example:
Generic Adds the string “recent” to the name of the most recent Snapshot copy. All
other Snapshot copies include a time stamp.
Example:
The selected naming convention applies to all backups. You should use the unique naming
convention unless you have a script that requires the constant string “recent”.
Also, when the database resides on a VMDK, you must use the Unique naming convention when you
want to clone Snapshot copies.
You can change the naming convention in the Backup Settings dialog box.
Which backup management group do you want to assign to the backup job?
You select a backup management group to apply a labeling convention to Snapshot copies. When you
back up a database, you can choose from three management groups:
Management Description
group
Standard Does not include the name of the management group in Snapshot copy
names.
Example:
Daily Adds “Daily” to Snapshot copy names.
Example:
Weekly Adds “Weekly” to Snapshot copy names.
Example:
For example, if you schedule daily and weekly backups, you should assign the backups to the Daily
and Weekly management groups, respectively.
Note: Management groups do not enforce a backup schedule.
How long do you want to retain backup copies on the source storage system and the
SnapMirror destination?
You can choose either the number of days you want to retain backup copies, or specify the number of
backup copies you want to retain, up to 255. For example, your organization might require that you
retain 10 days worth of backup copies.
If you set up SnapMirror replication, the retention policy is mirrored on the destination volume.You can also read