Java Fundamentals for Android Development - Self Study Guide Content: Course Prerequisite Be Certi ed Android SDK Lab Installation Guide Course ...
←
→
Page content transcription
If your browser does not render page correctly, please read the page content below

Java Fundamentals for
                     Android Development
                                       Self Study

Self Study Guide Content:
  Course Prerequisite
  Be Certified
  Android SDK Lab Installation Guide
  Course Content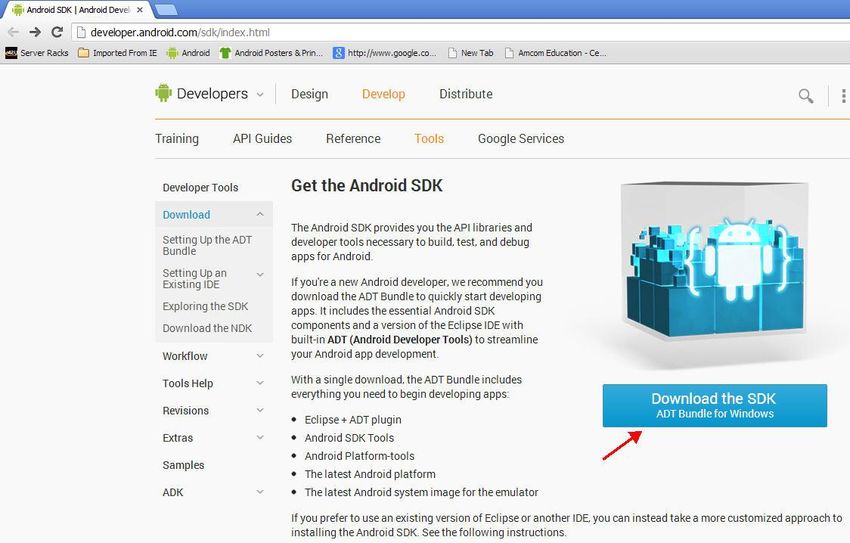
Course Prerequisite
The prerequisite for this course is good knowledge of Object Oriented Programming. Trainees are required to
know Variables, IF /Else statements, the loop concept, arrays and classes.

Be Certified
No any exam or certificate is awarded for this course. This course is actually the prerequisite for Android
application development course and all other Android ATC courses. It can be considered the first step to learn
Android development.
Android SDK Lab Installation Guide

Introduction
The following is a short guide on how to install all software needed to start your Android development.

Lab software include the following:
    1. Java SDK
       This includes the Java virtual machine and development tools, which allows you to compile and run your
       Java code.
    2. Android SDK
       The Android SDK provides you the API libraries and developer tools necessary to build, test, and debug
       apps for Android.
    3. Eclipse IDE
       This is the integrated development environment you need to facilitate your programming task. Google
       officially provides a set of Eclipse plugins for Android development.
    4. Eclipse ADT plugin
       This is a set of plugins for the Eclipse IDE built to give Android developers a powerful, integrated
       environment to build Android applications.
    5. Download Android SDK Platform and system image for emulator
       This includes an emulator for any Android version you require, and allows you to test your Android
       application without the need for a real Android device.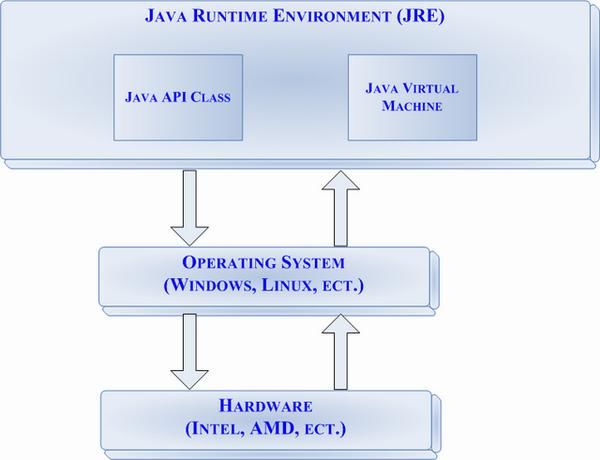
Lab setup step by step
To fully setup your machine for Android development, you only need to setup two programs.
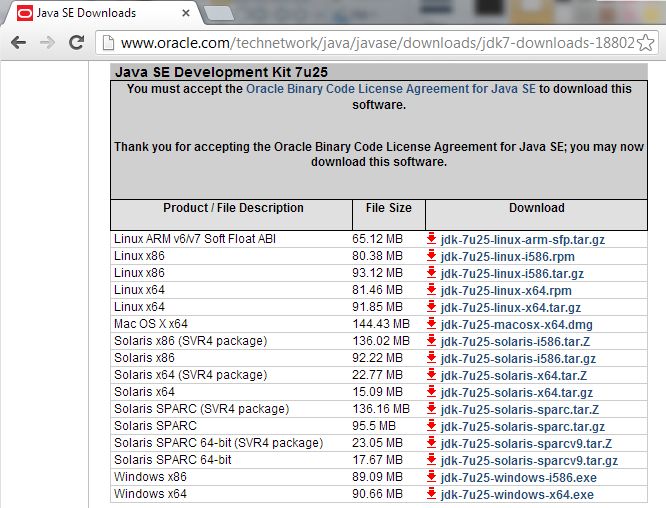
1. Install the Java SDK compatible with your operating system using the following link:
http://www.oracle.com/technetwork/java/javase/downloads/jdk7-downloads-1880260.html
a. Click on Accept License Agreement
b. Click on the link under Download that conforms to your operating system. Make sure to
choose the x86 version if your operating system is 32-bit, or x64 if your operating
system is 64-bit.
2. All other software components listed above are bundled by android.com in one zipped file (.zip):
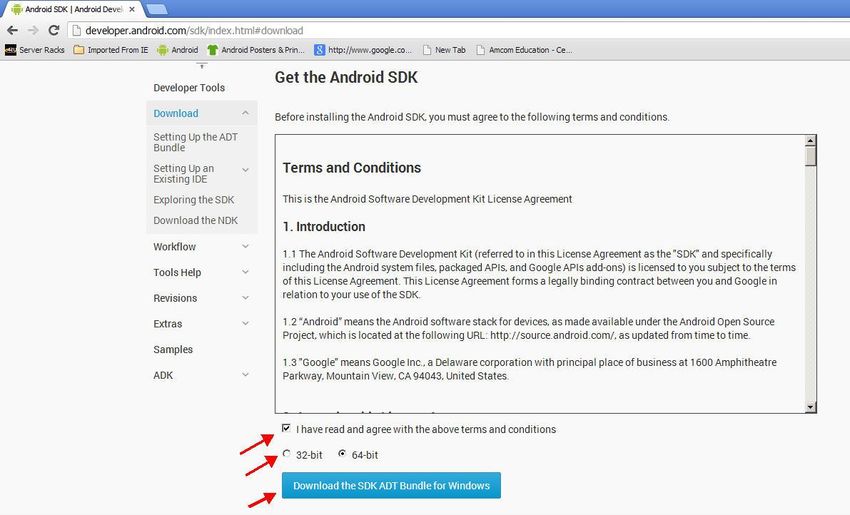
a. Download it from the following location:
   http://developer.android.com/sdk/index.html

b. Make sure to choose the correct type of your machine (32-bit or 64-bit) before starting the
   download.

c. Click "Download the SDK ADT Bundle for Windows"
d. Once downloaded, unzip the file
          e. Double click on eclipse.exe
    3. You’re ready to start Android development

Should you have any question or require any additional clarification, you may contact us at:
support@androidatc.com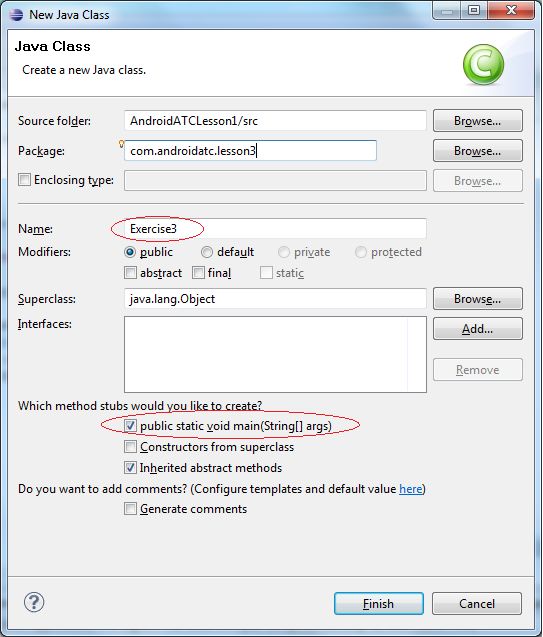

Java Fundamentals for Android™ Development
version B

Copyrights © 2013 Android ATC
Published by : Android ATC
First Printing October 2013.
ISBN : 978-0-9900143-1-7

Information in this book, including URL and other Internet Web site references,
is subject to change without notice. Complying with all applicable copyright laws is
the responsibility of the user. Without limiting the rights under copyright, no part of
this document may be reproduced, stored in or introduced into a retrieval system, or
transmitted in any form or by any means (electronic, mechanical, photocopying,
recording, or otherwise), or for any purpose, without the express written permission
of Android ATC company.
Android ATC company is not responsible for webcasting or any other form of
transmission received from any linked site.
Android ATC company is providing these links to you only as a convenience, and the
inclusion of any link does not imply endorsement of Android ATC of the site or the
products contained therein.

Android ATC company may have patents, patent applications, trademarks,
copyrights, or other intellectual property rights covering subject matter in this
document. Except as expressly provided in any written license agreement from
Android ATC company, the furnishing of this document does not give you any
license to these patents, trademarks, copyrights, or other intellectual property.

Warning and Disclaimer:
This book is designed to provide information about Java fundamentals for Android
development course. Every effort has been made to make this book as complete and
as accurate as possible, but no warranty or fitness is implied.

Trade Mark Acknowledge :
All terms mentioned in this book are known to be trademarks or service marks have
been appropriately capitalized. Use of a term in this book should not be regarded as
affecting the validity of any trade mark or service mark.

Android ATC © 2013                                                                     I
Android is a trademark of Google Inc. The Android robot is reproduced or modified
from work created and shared by Google and used according to terms described in
the Creative Commons 3.0 Attribution License.

Feedback Information:
As Android ATC, our goal is to create in-depth technical books of the highest quality
and value. Each book is crafted with care and precision, undergoing rigorous
development that involves the unique expertise of members from professional
technical community .
Readers' feedback is natural continuation of this process. If you have any comments
regarding how we could improve the quality of this book, or otherwise alter it to
better suite you needs, you can contact us through email at : info@androidatc.com.
Please make sure to include the book title and ISBN in your message.
We greatly appreciate your assistance

Android ATC Team.

Android ATC © 2013                                                                  II
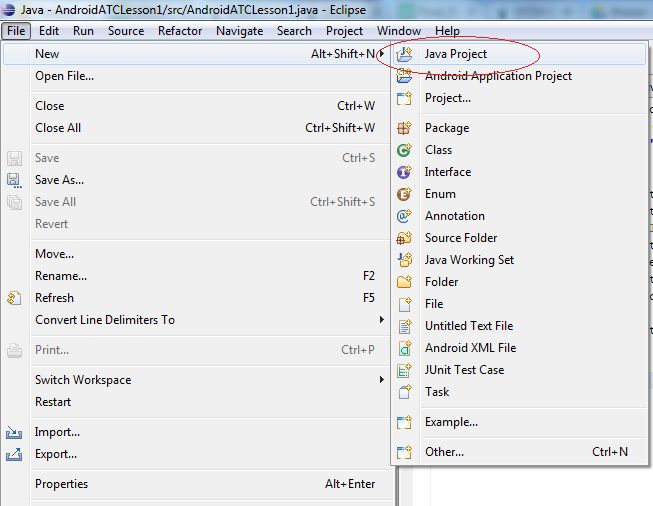
Table of Contents
Introduction ............................................................................................................................... 1

Intended Audience ..................................................................................................................... 1

Lesson 1: Java Basics ................................................................................................................. 3

   Introduction ........................................................................................................................... 3

   Java Programming Language ................................................................................................ 3

   Java Virtual Machine ............................................................................................................. 3

   JDK and JRE .......................................................................................................................... 3

   Setting up your machine for Java programming ................................................................... 4

   Hello World in Java ............................................................................................................... 5

      Using a text Editor .............................................................................................................. 5

      Using an IDE ...................................................................................................................... 6

   Java Primitive Data Type ...................................................................................................... 7

   Naming ................................................................................................................................... 7

   Arrays ..................................................................................................................................... 7

   Control Flow ........................................................................................................................... 8

      If/Else and Switch .............................................................................................................. 8

      Switch statement ................................................................................................................ 9

      While loop........................................................................................................................... 9

      For Loop ........................................................................................................................... 10

      Lab 1................................................................................................................................... 11

Lesson 2: Object Oriented Programming ................................................................................ 18

   Introduction ......................................................................................................................... 18

   Object Oriented Programming ............................................................................................. 18

      Objects .............................................................................................................................. 18

      Classes .............................................................................................................................. 18

      Getters and setters ............................................................................................................ 19

Android ATC © 2013                                                                                                                           III
Inheritance .......................................................................................................................20
Keywords this and super .................................................................................................. 21
Interface............................................................................................................................ 21
Access Modifiers ............................................................................................................... 22
Constructors ..................................................................................................................... 22
Method overriding and overloading ................................................................................. 23
Polymorphism .................................................................................................................. 23
Lab 2 ................................................................................................................................. 26
Lesson 3: More Java Programming .........................................................................................30
Introduction .........................................................................................................................30
Exceptions ............................................................................................................................30
Java Collections.................................................................................................................... 32
Interfaces .......................................................................................................................... 33
Implementations .............................................................................................................. 33
Lab 3 ................................................................................................................................. 37
Introduction ......................................................................................................................... 42
Nested Classes .................................................................................................................. 42
Benefits of inner classes ................................................................................................... 42
Class Variables (static) ......................................................................................................... 43
Class Methods ...................................................................................................................... 44
Enumerated types ................................................................................................................ 44
Serialization.......................................................................................................................... 45
Deserializing ......................................................................................................................... 46
Lab 4 .....................................................................................................................................48
Android ATC © 2013 IVAndroid ATC © 2013 V
Introduction
Since the Android software development kit (Android SDK) is built in Java programming
language, this book serves as a mini-course made up of three lessons on the fundamentals of Java
programming.

The course will teach you the basics of Java programming language and object oriented
programming (OOP) concepts required for the development of Android applications.

If you are already an experienced Java programmer who wants to learn development of Android
applications, you can skip reading this book and move directly to reading the book titled
“Android Application Development” – a companion to the Android application development
course. For everyone else, reading the book and practicing its exercises is a must. It will simply
prepare you for Android development.

Intended Audience
This book is for anyone interested in learning the basics of Java programming language, but
ultimately looking for learning Android application development. All professionals seeking a
certification in any Android-related course provided by Android ATC, should thoroughly
understand the contents of this Java crash course.

Although there is no specific Android ATC exam tied to this course, taking any other Android
programming course (like AND-401) requires sufficient knowledge the contents of this course.

Android ATC © 2013                                                                                   1
Lesson 1: Java Basics
Introduction

Java programming language

Java Virtual Machine

JDK and JRE

Setting up your machine for Java programming

Hello World in Java

Using a text Editor

Using an IDE

Java Primitive Data Type

Naming

Arrays

Control Flow

If/Else and Switch

Switch statement

While loop

For Loop

Lab 1

Android ATC © 2013                             2
Lesson 1: Java Basics
Introduction

This lesson introduces the Java programming language. It starts with the basic syntax of the
language, and ends with a guide on setting up your machine for Java and Android programming.

Java Programming Language

Java programming language was originally developed at Sun Microsystems and released in 1995.
Java applications are typically compiled to byte code (class file) that can run on any Java virtual
machine (JVM) regardless of the operating system running on it. Java is a general-purpose,
object-oriented language. It was designed to let developers "write once, run anywhere" (WORA),
meaning that code that runs on one platform does not need to be recompiled to run on another.
Java is, one of the most popular programming languages in use.

Java Virtual Machine

The Java virtual machine (JVM) is the component of Java framework that executes the compiled
Java code. When a developer compiles a Java file successfully, the Java compiler produces a
bytecode file and has a .class extension. A Java byte code is an intermediate language produced
by a Java compiler and only executed on a JVM.

JDK and JRE

To be able to start programming in Java, a developer needs to main components: Java
development kit and Java Runtime environment. The development kit (JDK) provides a Java

Android ATC © 2013                                                                                    3
compiler in addition to other tools. These tools allow a programmer to write Java code and convert it to a bytecode file to be executed by a JVM. The program that compiles Java code is javac. The Java Runtime environment is the execution environment for Java programs. These programs are compiled into a portable binary format (.class files) by the compiler – a program called java. If you install on your machine the JRE, then your system can run Java programs. To start writing Java programs you need to setup JDK as well. Setting up your machine for Java programming To Start Java Programming, you should install the Java development kit on your machine. You can do so by downloading it from Java SE downloads webpage on Oracle.com – the owner of Java. Make sure to download the correct version compatible to your machine (32bit or 64bit installer). After downloading the installer and setting up your machine, you’ll get the following message: To verify you have successfully installed JDK on your machine, do the following: 1. Open a command prompt by clicking start run, then typing cmd 2. In the windows that opens, type java –version. 3. You should information similar to the following: Android ATC © 2013 4
Hello World in Java

We will see in this section how to write a hello-world program in Java using a plain text editor
(like Notepad) or an integrated development environment (like Eclipse).

Using a text Editor

   1. Open a simple text editor (like Notepad), and type the following Java code:

    public class AndroidATCLesson1 {

            public static void main(String[] args) {
                      System.out.println("Hello World from Android ATC!");
            }

    }

   2. Save the file as Lesson1.java under the path c:\.
        Notice that the file name is the same as the class name in the code.
   3. Open a command prompt and compile the code by typing javac
        AndroidATCLesson1.java
   4. If you don’t see any error displayed by the compiler, it means the compile is successful
        and you can run the program. To run it type java AndroidATCLesson1
   5. The line “Hello World from Android ATC!” should be printed.

Android ATC © 2013                                                                                 5
Once you compile a Java file successfully, another file of extension .class is
created. This is the byte code file that is executed by JVM.
Using an IDE
An integrated development environment (IDE) is an application that provides a set of tools to
help a developer accomplish many tasks more efficiently. The following steps describe how to
create, compile and run the simple Hello-World Java program using the Eclipse IDE.
1. Create and Eclipse project which will contain Java file. Click on File New Java
Project.
2. Enter project name then click Finish.
3. On the left pane, under Package Explorer, expand the project then right click on src.
4. Move cursor to New, then click on Class
5. In Name field, enter the class name: Lesson1.java then click finish
6. In the file editor, the file Lesson1.java will open. Type in the same code as the previous
section.
7. Click on the Run button.
8. The “Hello World!” should display in the Console view.
Android ATC © 2013 6Java Primitive Data Type
All variables in Java must be declared before they can be used. This is done by specifying the type
of the variable and the variable’s name:
int someVar = 1;
Java supports eight different primitive data types:
1. byte: The byte data type is an 8-bit signed integer.
2. short: The short data type is a 16-bit signed integer.
3. int: The int data type is a 32-bit signed integer. It has a maximum value of
2,147,483,647.
4. long: The long data type is a 64-bit signed integer.
5. float: The float data type is a single-precision 32-bit floating point.
6. double: The double data type is a double-precision 64-bit floating point.
7. boolean: The boolean data type has only two possible values: true and false.
8. char: The char data type is a single 16-bit Unicode character.
Naming
Java has the following rules and conventions for naming variables:
Variable names are case-sensitive
Beginning with a letter, the dollar sign "$", or the underscore character "_" is allowed
Subsequent characters may be letters, digits, dollar signs, or underscore characters.
By convention, you should name your variables using “camel case”, i.e. if the name
consists of only one word, it is all lowercase letters. If it consists of more than one word,
the first letter of each subsequent word is capitalized.
Also by convention, constants are all capitalized and contain underscore.
Arrays
Arrays are containers that hold a fixed number of values of a certain type. The length of an array
is fixed and is declared when the array is created.
To declare and array of ten integer elements:
int[] myArray = new int[10];
Android ATC © 2013 7Each item in an array is called an element, and each element is accessed by its numerical index.
Index numbering in arrays begins with 0. The 10th element, for example, is therefore accessed by
index number 9. You can assign a value to an array element using the following syntax:
The following program, Lesson1Array, creates an array of integers, puts some values in it, and
prints each value to standard output.
class Lesson1Array {
public static void main(String[] args) {
// Allocate memory for 5 integers
int[] anArray;
anArray = new int[5];
// Initialize elements
anArray[0] = 10;
anArray[1] = 20;
anArray[2] = 30;
anArray[3] = 40;
anArray[4] = 50;
System.out.println("Value at index 0: " + anArray[0]);
System.out.println("Value at index 1: " + anArray[1]);
System.out.println("Value at index 2: " + anArray[2]);
System.out.println("Value at index 3: " + anArray[3]);
System.out.println("Value at index 4: " + anArray[4]);
}
}
Control Flow
Statements in Java code are executed sequentially - from top to bottom- in the order that they
appear. However, a programmer can control the flow of execution using conditional
statement, loops, and branches. This section describes the usage of decision-making statements
(if/else and switch), loops(for, while), and the branching statements
(break,continue, return) .
If/Else and Switch
If/else statements tell your program to execute a certain section of code only if a particular
condition is true.
if (someExpression)
statement1
else
statement2
Android ATC © 2013 8If someExpression evaluates to true, then statement1 is executed. If someExpression evaluates
to false, then statement2 is executed.
Switch statement
Unlike if/else statements, the switch statement can have a number of possible execution paths. A
switch works with the byte, short, char, and int primitive data types.
The following is an example of switch statement that prints outputs based on the age variable:
int dayOfWeek = 1;
String dayString="";
switch (dayOfWeek) {
case 1: dayString = "Monday";
break;
case 2: dayString = "Tuesday";
break;
case 3: dayString = "Wednesday";
break;
case 4: dayString = "Thursday";
break;
case 5: dayString = "Friday";
break;
case 6: dayString = "Saturday";
break;
case 7: dayString = "Sunday";
break;
}
System.out.println(dayString);
While loop
A while loop statement continually executes a block of code while a particular condition is true.
Its syntax can be expressed as:
while (expression) {
statement(s)
}
Android ATC © 2013 9Expression is a statement that must evaluate to a Boolean value (either true or false). If it
evaluates to true then the following block will execute repeatedly until expression becomes false.
The following code snippet will print out the value of variable counter 10 times until it become
equal to 11:
int counter = 1;
while (counter < 11) {
System.out.println("Count is: " + counter);
counter++;
}
For Loop
The for statement provides a compact way to iterate over a range of values. Programmers often
refer to it as the "for loop" because of the way in which it repeatedly loops until a particular
condition is satisfied. The general form of the for statement can be expressed as follows:
for (initialization; termination-condition; increment) {
statement(s)
}
The following code uses the general form of the for statement to print the numbers 1 through 10
to standard output:
for (int i = 1; iLab 1
Objectives Create a new Java project under Eclipse
Practice control statements in Java
Pre-requisites
You need to create a new Java project under
Eclipse before solving these exercises. Follow
the steps in the section below.
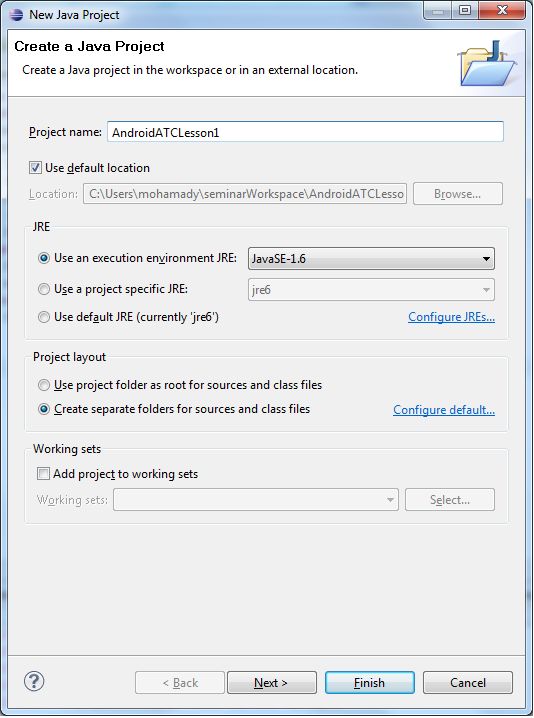
Android ATC © 2013 11Creating a Java project Create a Java project under Eclipse following these steps 1. Open Eclipse IDE. 2. On the File menu, point to New, and then choose Java Project. 3. In the New Java Project Dialog, enter AndroidATCLesson1 in Project name field. Android ATC © 2013 12
4. Click on Finish, keeping all values as default.
Now you will have a new empty Java project created.
Exercise
Write the Java code that prints numbers from 1 to 10, each on a separate line.
In this exercise, you will create a new Java project under Eclipse and write required code then run
the program.
Create a Java project under Eclipse
Follow the steps from 1 to 4 in section “Creating a Java project” above.
Create a Java package
a. In the Navigator view to the left of you Eclipse editor, right click on folder src
b. In menu that shows up, point to New, and then choose Package.
Android ATC © 2013 13c. In the “New Java Package” dialog, type in the field Name the following:
com.androidatc.lesson1
d. Click on Finish
Create a Java class to write your code in
a. In the Navigator view to the left of you Eclipse editor, right click on folder src
b. From the menu that shows up, point to New, and then click on Class
Android ATC © 2013 14c. In the “New Java Class” Dialog, type Exercise1 in field Name, click the checkbox
next to “public static void main(String[] args)”
d. Click on Finish
Android ATC © 2013 15 Write the Java code to solve the exercise
a. Eclipse automatically generates the following code and puts it in file Exercise1.java
b. Inside method main(), type the following lines of code:
for (int i=1; ic. Check the console view. You should see the numbers printed out Android ATC © 2013 17
Lesson 2: Object Oriented Programming

Introduction

Java is an object-oriented programming (OOP) language. This lesson will cover the basic
principles and features of OOP and provides some code examples.

Object Oriented Programming

Java is an object oriented programming (OOP) language. It shares with other OOP languages the
same concepts and features. This lesson will introduce you to objects, classes, inheritance, and
interfaces.

Objects

An object is a software bundle of related state and behavior. Software objects are often used to
represent real-world objects we find in real life. Objects are essential to understanding object-
oriented programming. Real world objects share       two characteristics: state and behavior. For
example, a car has a state (current model, maker, color) and behavior (driving, changing gear
…etc.)

Building your code into a separate software object provides many benefits, including code re-use,
information hiding, ease of debugging…etc.

Classes

A class is a prototype from which objects are created. This section defines a class that models the
state and behavior of a real-world object. Classes provide a clean way to model the state and
behavior of real world objects.

Two main properties of define a class: a set of member variables (also called fields), and a set
of member methods (or functions).

          Methods and functions means the same thing in the context of object oriented
          programming and they are used interchangeably in this course.

To represent an object’s state in classes, add member variables to a class. Behaviors of objects are
represented using methods. The following is a simple Java class called Vehicle.

Android ATC © 2013                                                                                  18
class Vehicle {
int speed = 0;
int gear = 1;
void changeGear(int newGear) {
gear = newGear;
}
void speedUp(int increment) {
speed = speed + increment;
}
void printStates() {
System.out.println(" speed:" + speed + " gear:" + gear);
}
}
The state of the Vehicle object is represented with the variables speed and gear. The behavior of
the object can be changed using the two methods changeGear() and speedUp().
Getters and setters
A set of methods are usually created in a class to specifically read/write the values of member
variables. These are called getters - used to get the values – and setters – used to change the
values of member variables.
Getters and setters are crucial in Java classes as they are used to manage the state of an object.
In the Vehicle class provided previously, we can add two methods (a getter and a setter) for each
member variable. The following is the full code of the class after adding the getters and setters:
class Vehicle {
int speed = 0;
int gear = 1;
// Start of getters and setters
public int getSpeed() {
return speed;
}
public void setSpeed(int s) {
speed = s;
}
public int getGear() {
return gear;
}
public void setGear(int g) {
gear = g;
}
// End of getters and setters
void changeGear(int newGear) {
Android ATC © 2013 19gear = newGear;
}
void speedUp(int increment) {
speed = speed + increment;
}
void printStates() {
System.out.println(" speed:" + speed + " gear:" + gear);
}
}
You can let Eclipse generate getters
and setters for you. Right click inside a
class code and choose Source then
Generate Getters and Setters, as
in the screen capter:
Inheritance
Inheritance provides a powerful and natural mechanism for organizing and structuring your
software. It set a parent-child relationship between two different objects.
Object-oriented programming allows classes to inherit commonly used state and behavior from
other classes. In following example, Vehicle becomes the parent (superclass) of Truck and Car. In
the Java programming language, each class is allowed to have one direct superclass, and each
superclass has the potential for an unlimited number of subclasses.
public class Car extends Vehicle {
int numOfSeats;
//Set of statements defining
//a car’s state and behavior
}
public class Truck extends Vehicle {
public int loadWeight;
//Set of statements defining
//a truck’s state and behavior
}
The Car and Truck now share the same state and behavior defined in class vehicle.
Android ATC © 2013 20Keywords this and super
Two Java keywords you might encounter when writing you class code with inheritance: this and
super. Keyword this is used as a reference to the current class itself, while super is a reference
to the parent class that this class inherent from. In other words, super is used to access
member variables and methods of the parent class.
Keyword super is especially useful when you want to override a superclass's method in a child
class but you want to invoke the superclass’s method. For example, in class Car, you can override
method printStates() and call Vehicle’s printStates():
public class Car extends Vehicle {
int numOfSeats;
void printStates() {
super.printStates();
System.out.println(" Number of Seats:" + numOfSeat);
}
}
Calling Car’s printStates() method will invoke first Vehicle’s printStates(),
then the print out statement.
Interface
An interface is a contract between a class and the outside world. When a class implements an
interface, it must provide the behavior specified by that interface. Let’s take the Vehicle example
above, and create an interface for it.
public interface IVehicle {
void changeGear(int newValue);
void speedUp(int increment);
}
Then the Vehicle class implements the IVehicle interface using following syntax:
class Vehicle implements IVehicle {
int speed = 0;
int gear = 1;
public void changeGear(int newValue) {
gear = newValue;
}
public void speedUp(int increment) {
speed = speed + increment;
}
void printStates() {
System.out.println(" speed:" + speed + " gear:" + gear);
}
}
Android ATC © 2013 21Note that class Car must provide and implementation for methods changeGear() and speedUp().
Access Modifiers
Access modifiers determine whether other classes can use a particular field or invoke a particular
method. There are four types of access control:
At the class level—public, or default (no explicit modifier).
At the member level—public, private, protected, or default (no explicit modifier).
A class may be declared with the modifier public, in which case that class is visible to all classes
everywhere. If a class has no modifier (the default), it is visible only within its own package
(packages are named groups of related classes.)
At the member level, in addition to the public modifier or no modifier (package-private), there
are two additional access modifiers: private and protected. The private modifier specifies that the
member can only be accessed in its own class. The protected modifier specifies that the member
can only be accessed within its own package and, in addition, by any other subclass of its class.
Access Levels
All
Modifier Class Package Subclass
Other
public Y Y Y Y
protected Y Y Y N
Default Y Y N N
private Y N N N
Constructors
Constructors are invoked to create objects. They are similar to functions but differentiated by the
following:
Constructors have the same name as the class
They do not have any return type.
Calling a constructor to create a new object would initialize an object’s members. Suppose
Vehicle has the following constructor:
Android ATC © 2013 22public Vehicle(int s, int g){
speed = s;
gear = g;
}
Creating a new object of type Vehicle would require invoking the constructor with the new
keyword:
Vehicle vehicle = new Vehicle(4, 2);
This line will create an object of type Vehicle and has its two members speed and gear initialized
to 4 and 2 consecutively.
Method overriding and overloading
Within the same class, you can create two methods of the same name but differs in the number of
arguments and their types. This is called method overloading. Note that changing the return type
alone is not allowed to overload a method. You should change the parameters signature if
needed.
Method overriding occurs when a class inherits a method from a super class but provides its own
implementation of that method. In the following code, class car overrides method speedUp()
defined in class Vehicle.
public class Car extends Vehicle {
int numOfSeats;
public void speedUp(int increment) {
speed = speed + increment + 2;
}
}
Suppose you create an object of type car and called the speedUp(). Then, the Vehicle’s method is
ignored and the one inside class Car is executed:
Car car = new Car();
car.speedUp(2);
Polymorphism
In the context of object-oriented programming, polymorphism means that different subclasses of
the same parent class can have different behaviors, yet share some of the functionalities of the
parent class.
Android ATC © 2013 23To demonstrate polymorphism, we will add method showInfo() to class Vehicle. This method
prints all info in an object of type Vehicle:
public void showInfo() {
System.out.println("The vehicle has a speed of: " + this.speed
+ " and at gear " + this.gear);
}
However, if the Truck subclass uses this method, the member variable loadWeight will not be
printed out, since it’s not a member of the parent class Vehicle. We resolve this, we can override
method showInfo() as follows:
public void showInfo() {
super.showInfo();
System.out.println("The truck has is carrying a load of: "
+ this.loadWeight);
}
Notice that Truck’s method showInfo(), will call the parent’s showInfo() and add to it its own
behavior – which prints the value of loadWeight.
We can do the same thing with class car.
public void showInfo() {
super.showInfo();
System.out.println("The car has "
+ this.numOfSeats + " seats.");
}
Now, to test the polymorphic behavior, we will create 3 objects, each of different type of Vehicle:
class Lesson1Array {
public static void main(String[] args) {
Vehicle vehicle1, vehicle2, vehicle3;
vehicle1 = new Vehicle(50,2);
vehicle2 = new Car(50,2,4);
vehicle3 = new Truck(40,2,500);
System.out.println("Vehicle 1 info:");
vehicle1.showInfo();
System.out.println("\nVehicle 2 info:");
vehicle2.showInfo();
Android ATC © 2013 24System.out.println("\nVehicle 3 info:");
vehicle3.showInfo();
}
}
Once we run this class, we have three different output statements.
Vehicle 1 info:
The vehicle has a speed of: 50 and at gear 2
Vehicle 2 info:
The vehicle has a speed of: 50 and at gear 2
The car has 4 seats.
Vehicle 3 info:
The vehicle has a speed of: 40 and at gear 2
The truck has is carrying a load of: 500
In the above example, JVM has called each object’s method instead of calling Vehicle’s object for
all three objects.
Android ATC © 2013 25Lab 2
Objectives Implement parent-child relationship in Java
Understand method overriding
Understand method overloading
Pre-requisites
You need to create a new Java project under Eclipse
before solving these exercises. Follow the steps
detailed in Lesson 1 of this book.
Android ATC © 2013 26Exercise
Create a Java project made up of two classes and one interface: Parent class that implements the
interface, and Child class which extends Parent. Override a method in Parent, and overload
another one in Child.
Create a new Java project under Eclipse
a. Follow the steps to create a new project as explained in section “Creating a Java
project” of Lab 1.
Create a Java package
a. In the Navigator view to the left of you Eclipse editor, right click on folder src
b. In menu that shows up, point to New, and then choose Package.
c. In the “New Java Package” dialog, type in the field Name the following:
com.androidatc.lesson2
d. Click on Finish
Android ATC © 2013 27 Create two Java classes to write your code in
a. In the Navigator view to the left of you Eclipse editor, right click on folder src.
b. From the menu that shows up, point to New, and then click on Class
c. In the “New Java Class” Dialog, type Parent in field Name
d. Click Finish
e. Repeat steps a to d, but in step c type Child in field Name
Create a Java interface
a. In the Navigator view to the left of you Eclipse editor, right click on folder src
b. From the menu that shows up, point to New, and then click on Interface
Android ATC © 2013 28c. In the “New Java Interface” Dialog, type IParent in field Name
d. Click Finish
Write the Java code to solve the exercise
a. Open file Parent.java
b. Type in it the following code
package com.androidatc.lesson1;
public class Parent implements IParent {
public void firstMethod(int i) {
}
public void secondMethod(int i) {
}
}
c. Open file Child.java
d. Type in the following code
package com.androidatc.lesson1;
public class Child extends Parent{
public void firstMethod(int i) {
}
public void thirdMethod(int i) {
}
public void thirdMethod(int i, int n) {
}
}
e. Open file IParent.java
f. Type in the following code
package com.androidatc.lesson1;
public interface IParent {
void secondMethod(int i);
}
Method firstMethod() in class Child overrides method firstMethod() of
class Parent.
Method thirdMehod() in class Child is overloaded.
Android ATC © 2013 29Lesson 3: More Java Programming
Introduction
After covering the basic object oriented programming principles in the previous lesson, this
lesson will cover additional topics you would probably face during Java coding.
Exceptions
Handling errors is an essential part of writing a robust code. Java uses exceptions to handle
errors. This section explains exceptions and how to use them.
When an error occurs, the Java runtime environment handles an error object that is created by
the method where the error occurs. This object is called exception, and contains basic
information about the error (like the type of the error, the location, the stack of methods that lead
to the error…etc.). The process of creating an exception object and handling it by the system is
called throwing an exception.
The list of methods that lead to the error is called “the call stack”. When handling the error, the
system searches through that stack to find an error handler in the code; i.e. exception handler. All
exception objects are children of the parent class Exception. The different types or errors
thrown are children of class Exception.
Exceptions in Java can be categorized into three types:
Exception Category Description
Checked Exception These are errors inside the application’s code and a
programmer who intends to create a robust well-written code
is expected to recover from these errors. For example, reading
from a file on the disk, a programmer should expect is non-
existent. In this case, the programmer should expect a
java.io.FileNotFoundException, thrown, and thereafter
catch this exception and notify the user of a proper action.
Unchecked Exception These come in two types themselves: Errors and Runtime
exceptions. They are grouped in one category because both
cannot be anticipated or recover from by a programmer.
Errors are external to the applications. For example, suppose
that an application successfully opens a file for input, but is
Android ATC © 2013 30unable to read the file because of a hardware or system
malfunction. The unsuccessful read will throw
java.io.IOError, and it makes sense for the program to
print a stack trace and exit. Errors are those exceptions of type
Error class and its sub-classes.
Runtime exceptions usually indicate programming bugs such
as logic errors. They are or type RuntimeException class and
its subclasses.
Handling errors (exceptions) in Java is done through the try-catch-finally blocks. While the
finally block is optional, the try and catch are obligatory to fulfill error handling.
Let’s look at the following code:
1. public class AndroidATCLesson3 {
2. public static void main(String[] args) {
3. System.out.println("Hello World from Android ATC!");
4. String nullString = null;
5. System.out.println("Entered try statement");
6. String partialString = nullString.substring(1);
7. // Execution will break before reaching this line
8. System.out.println("Partial string is: " + partialString);
9. }
10. }
Running the code above will result in an error thrown of type NullPointerException, specifically
at line 6, where we are trying to read from a string object that is null (not initialized)
To properly handle this error, we should modify the above code to become:
1. public class AndroidATCLesson3 {
2. public static void main(String[] args) {
3. System.out.println("Hello World from Android ATC!");
4. String nullString = null;
5. try {
6. System.out.println("Entered try statement");
7. String partialString = nullString.substring(1);
8. // Execution will continue in the exception block
9. System.out.println("Partial string is: "+partialString);
Android ATC © 2013 3110. } catch (Exception e) {
11. System.out.println("Error occured: "+e.getMessage());
12. e.printStackTrace();
13. }
14. }
15. }
Instead of breaking the code execution and halting the program, this code will handle the
NullPointerException properly by printing the error details and continuing execution past the
catch block.
The finally block can be used after the exception block. This block of code will always run
whether there is an exception thrown or not.
try {
System.out.println("Entered try statement");
String partialString = nullString.substring(1);
// Execution will break before reaching this line
System.out.println("Partial string is: " + partialString);
} catch (Exception e) {
System.out.println("Error occured: "+e.getMessage());
e.printStackTrace();
} finally {
System.out.println("This line of code will always run!");
}
We use finally block in many cases where there is some resources that need be freed but an
exception might prevent us from doing so. For example, when reading from a file, a well written
program should close the file after finishing reading and/or writing into it. If an exception was
thrown, the line of code that closes the file might be skipped. The finally block would be the best
place to close the file in.
Java Collections
Java provides a set of classes and interfaces to help developers handle a collection of objects.
These collection classes similar to an array, except their size can grow dynamically during run
time. This section will provide an overview of some of the more popular Java collection classes.
Android ATC © 2013 32Interfaces
Java collections are mainly located in package java.util. It provides two main Interfaces:
Collection and Map. These two are the core of the Java Collection framework. Other interfaces
inherit from these two. For example, the List and Set interfaces inherit from Collection interface.
All of these interfaces are generic; i.e. the type of the object contained in the collection should be
specified by the programmer. There is a main difference between subclasses of Collection
interface and those of Map interface.
The collection contains a group of objects that can be manipulated and passed around. The
elements can be duplicated or unique, depending on the type of sub-class. For example, a Set
only contains unique objects.
The Map interface, however, maps keys to values and cannot contain duplicate keys and each key
can only map one value at most.
Implementations
Implementations are the data objects used to store collections, which implement the previous
section. This lesson describes the following implementations:
ArrayList
An Arraylist is a resizable-array implementation of the List interface. It implements all optional
list operations, and permits all elements, including null. It also provides methods to manipulate
the size of the array that is used internally to store the list.
import java.util.*;
class TestArrayList {
public static void main(String args[]) {
// Creating an array list
ArrayList androids = new ArrayList();
// Adding elements
androids.add("Cupcake");
androids.add("Donut");
androids.add("Eclair");
androids.add("Froyo");
androids.add("Gingerbread");
androids.add("Honeycomb");
androids.add("Ice Cream Sandwich");
androids.add("Jelly Bean");
System.out.println("Size of ArrayList: " + androids.size());
// Display the contents of the array list
System.out.println("The ArrayList has the following elements: "
+ androids);
// Remove elements from the array list
Android ATC © 2013 33System.out.println("Deleting second element...");
androids.remove(3);
System.out.println("Size after deletions: " + androids.size());
System.out.println("Contents after deletions: " + androids);
}
}
The following is the output of the program:
Size of ArrayList: 8
The ArrayList has the following elements: [Cupcake, Donut, Eclair, Froyo,
Gingerbread, Honeycomb, Ice Cream Sandwich, Jelly Bean]
Deleting second element...
Size after deletions: 7
Contents after deletions: [Cupcake, Donut, Eclair, Gingerbread, Honeycomb,
Ice Cream Sandwich, Jelly Bean]
HashSet
This class implements the Set interface and permits the null element. This collection does not
allow duplicates. It creates a collection that uses a hash table for storage. A hash table stores
information by using a mechanism called hashing where the value stored is used to determine a
unique key, which is used as the index at which the data is stored. The advantage of hashing is
that it allows fast execution times for basic operations, like add( ) and remove().
The following is an example of HashSet.
class TestHashSet {
public static void main(String args[]) {
// Creating a HashSet
HashSet androids = new HashSet();
// Adding elements
androids.add("Cupcake");
androids.add("Cupcake");
androids.add("Eclair");
androids.add("Eclair");
androids.add("Gingerbread");
androids.add("Honeycomb");
androids.add("Ice Cream Sandwich");
androids.add("Jelly Bean");
Android ATC © 2013 34System.out.println("The contents of the HashSet: "+androids);
}
}
The output of the program is:
The contents of the HashSet: [Eclair, Cupcake, Honeycomb, Ice Cream Sandwich,
Jelly Bean, Gingerbread]
Notice that there is one “Cupcake” element and one “Éclair” element in the HashSet although
each was added twice in the code.
HashMap
This is a hash table based implementation of the Map interface. It allows null elements and does
not add any methods of its own.
The following program illustrates HashMap. It maps names to account balances.
import java.util.*;
class TestHashMap {
public static void main(String args[]) {
// Creating a HashMap
HashMap androids = new HashMap();
// Adding elements
androids.put("Cupcake", new Double(1.5) );
androids.put("Donut",new Double(1.6));
androids.put("Eclair", new Double(2.1));
androids.put("Froyo", new Double(2.2));
androids.put("Gingerbread", new Double(2.3));
androids.put("Honeycomb", new Double(3.1));
androids.put("Ice Cream Sandwich", new Double(4.0));
androids.put("Jelly Bean", new Double(4.1));
// Get a set of the entries
Set set = androids.entrySet();
// Get an iterator
Iterator i = set.iterator();
// Display elements
while (i.hasNext()) {
Map.Entry me = (Map.Entry)
i.next();
Android ATC © 2013 35System.out.print(me.getKey() + ": ");
System.out.println(me.getValue());
}
System.out.println();
// Increase version number of Eclair
Double version = androids.get("Eclair");
androids.put("Eclair", new Double(version + 0.1));
System.out.println("New version number of Eclair: "
+ androids.get("Eclair"));
}
}
The output of the program is:
Eclair: 2.1
Cupcake: 1.5
Honeycomb: 3.1
Froyo: 2.2
Donut: 1.6
Ice Cream Sandwich: 4.0
Jelly Bean: 4.1
Gingerbread: 2.3
New version number of Eclair: 2.2
Android ATC © 2013 36Lab 3
Objectives Write code that uses ArrayList methods.
Read strings from a file
Learning the benefits of the Set collection.
Pre-requisites
You need to create a new Java project under Eclipse
before solving these exercises. Follow the steps
detailed in Lesson 1 of this book.
Android ATC © 2013 37Exercise
Write a program that saves ten strings in an ArrayList. The strings have the following format:
“Element – X”, where X is a number between 1 and 10. Demonstrate the usage of methods:
add(), remove(), and indexOf().
Create a new Java project under Eclipse
a. Follow the steps to create a new project as explained in section “Creating a Java
project” of Lab 1
Create a Java package
a. In the Navigator view to the left of you Eclipse editor, right click on folder src
b. In menu that shows up, point to New, and then choose Package.
c. In the “New Java Package” dialog, type in the field Name the following:
com.androidatc.lesson3
d. Click on Finish
Android ATC © 2013 38 Create a Java class to write your code in
a. In the Navigator view to the left of you Eclipse editor, right click on folder src.
b. From the menu that shows up, point to New, and then click on Class
c. In the “New Java Class” Dialog, type Exercise3 in field Name, click the checkbox
next to “public static void main(String[] args)”
d. Click on Finish
Android ATC © 2013 39 Write the Java code to solve the exercise
a. Open file Exercise3.java
b. Type inside method main() the following code:
ArrayList arrayList = new ArrayList();
for (int i = 1; i Check the console view.
You should see the desired output.
Android ATC © 2013 41Lesson 4: Java Topics
Introduction
This lesson will delve into another set of OOP features and Java-specific topics.
Nested Classes
Using Java, you can define a class within another class. These are called nested classes:
class OuterClass {
...
class NestedClass {
...
}
}
Nested classes can be static and called static inner classes.
class OuterClass {
...
static class StaticInnerClass {
...
}
class InnerClass {
...
}
}
A nested class is a member of its enclosing class. Non-static inner classes have access to other
members of the outer class, even if they are declared private. However, static inner classes do
not. Similar to member variables and methods, an inner class can be
declared private, public, protected, or package private.
Benefits of inner classes
The following are some reasons that tempt a programmer to use inner classes:
Improve logical grouping of classes that are only used in one place. If a class B is
useful to only one other Class A, then it is logical to make class B an inner class of class A.
Android ATC © 2013 42 Increase encapsulation. If class B needs to access private members of class A, a
programmer can hide class B inside A and keep all members of A private, and at the same
time hide class B from external classes.
Improve code readability and maintainability. Creating inner classes within an
outer class provides a clearer placement of code.
Class Variables (static)
When we create several objects of the same class, each object (instance) has its own distinct copy
of member variables. Sometimes, we might want a variable that is common to all objects of the
same class. To achieve this we use static modifier.
Member variables that have the static modifier in their declaration are called static
fields or class variables. They are associated with the class, rather than with any object. Every
instance of the class shares a class variable, which is saved in a fixed memory location. Any object
can change the value of a class variable, but class variables can also be manipulated without
creating an instance of the class.
For example, let’s modify the Car class of the previous lesson by adding a class variable. The
member variable numOfSeats might have different values for different objects of type Car.
However, we can add a class variable called numberOfCars which will be used to keep track of
the number of Car objects created.
public class Car extends Vehicle {
public int numOfSeats;
// A class variable for the
// number of Car objects created
public static int numberOfCars;
...
}
Class variables are referenced by the class name itself to make it clear they are class variables, as
in:
Car.numberOfCars;
You can call static variables with an object variable:
car1.numberOfCars;
… but this is not recommended since the class variable will look like a regular
member variable.
Android ATC © 2013 43Class Methods
Java also supports static methods as well as static variables. Static methods, which have
the static modifier in their signature, should be invoked with the class name, without the need
for creating an instance of the class, as in
ClassName.methodName(args)
You can also call static methods with an object reference:
car1.getNumberOfCars();
… but this is not recommended since the class variable will look like a regular
member variable.
A common use for static methods is to access static fields. For example, let’s modify the Car class
by adding a static method that returns the numOfCars static variable:
public static int getNumberOfCars(){
return numberOfCars;
}
Class methods cannot access instance variables or instance methods directly—they must use an
object reference. Also, class methods cannot use the this keyword as there is no instance
for this to refer to.
Enumerated types
An enumerated type (also called enumeration or enum) is a data type consisting of a set of named
constants called elements or enumerators of the type. The enumerator names behave as
constants in the language. A common example of enumeration is the days of the week. Because
they are constants, the names of an enum type's fields are in uppercase letters.
To define an enum type in Java, we use the enum keyword. For example, the following enum type
defines a set of employee title enumerations:
public enum Title {
PROJECT_MANAGER,TECHNICAL_LEADER, MANAGING_DIRECTOR, CEO, CFO
}
Android ATC © 2013 44You can also read