GE iFIX Using the .NET Component - Version 6.5 - General Electric
←
→
Page content transcription
If your browser does not render page correctly, please read the page content below
GE iFIX
Using the .NET Component

Version 6.5
February 2021
Disclaimer of Warranties and Liability
The information contained in this publication is believed to be accurate and reliable. However, General Electric Company
assumes no responsibilities for any errors, omissions or inaccuracies. Information contained in the publication is subject to
change without notice.
No part of this publication may be reproduced in any form, or stored in a database or retrieval system, or transmitted or dis-
tributed in any form by any means, electronic, mechanical photocopying, recording or otherwise, without the prior written
permission of General Electric Company. Information contained herein is subject to change without notice.

Trademark Notices

© 2021, General Electric Company. All rights reserved.
* Indicates a trademark of General Electric Company and/or its subsidiaries.
All other product names and marks identified throughout this book are trademarks or registered trademarks of their respect-
ive companies. They are used throughout this book in editorial fashion only. No such use, or the use of any trade name, is
intended to convey endorsement or affiliation.
No part of this publication may be reproduced in any form, or stored in a database or retrieval system, or transmitted or dis-
tributed in any form by any means, electronic, mechanical photocopying, recording or otherwise, without the prior written
permission of GE. Information contained herein is subject to change without notice.

We want to hear from you. If you have any comments, questions, or suggestions about our documentation, send them to the
following email address:
doc@ge.com
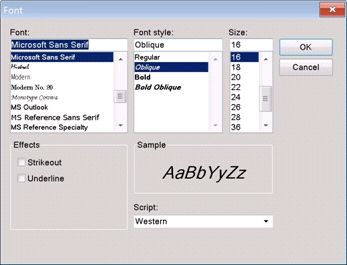
Table of Contents

   Using the .NET Component                                                                         2

   Introduction                                                                                     3

   General Overview of Component Hosting                                                            5

     .NET Component Browser Dialog Box                                                              5

        Browse Tree                                                                                 6

        Add Components                                                                              6

        Add Group                                                                                   6

        Delete Node                                                                                 6

        Help                                                                                        6

     Supported .NET Control Types                                                                   6

     Inserting a .NET Component into a Picture                                                      7

          To insert a .NET component into a picture:                                                7

          To access the properties for the .NET component:                                          7

     Binding .NET Component Properties to an iFIX Data Source                                       7

          To bind a .NET component to an iFIX data source:                                          8

        Example                                                                                     8

     Using Font and Enumeration Properties for .NET Components                                      8

        Font Properties for Windows Forms Components                                                9

            To access font properties for Windows Forms components from the iFIX WorkSpace:         9

          Example                                                                                   9

        Font Properties for Windows Presentation Framework Components                               10

            To access font properties for Windows Presentation Framework components from the iFIX
            WorkSpace:                                                                              11

          Example                                                                                   11

        Enumeration Properties for .NET Components                                                  11

     Scripting in VBA                                                                               12

        Adding References in VBA                                                                    13

            To add references in Microsoft Visual Basic:                                            13

        Using Intellisense®                                                                         13

        Accessing Component Properties and Methods Through Scripting                                13

© 2020 General Electric Company. All rights reserved.                                                    i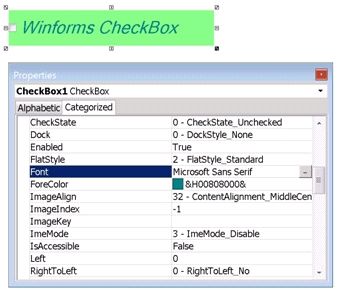
Example                                                                                      14

          Code from the Example                                                                        16

        Using Event Handlers                                                                           16

          Example 1                                                                                    17

          Code from Example 1                                                                          18

          Example 2                                                                                    19

          Code from Example 2                                                                          19

        Handling Events with Non-Converted Parameters                                                  20

          Example                                                                                      21

          Code from the Example                                                                        23

        Using Properties and Methods of the iFIX Container                                             24

     Advanced Features                                                                                 25

      Creating New Components                                                                          25

        Creating a .NET Control                                                                        25

          Example                                                                                      26

        Deleting Nodes on the Component Browser                                                        27

        Supporting Files for .NET Components                                                           27

        Uniqueness of .NET Control Assembly Names                                                      28

          .NET Component Directories                                                                   28

      Using New Components on iFIX Systems                                                             28

        Copying Compiled Component Files to iFIX Nodes                                                 29

        Adding Components to the .NET Component Browser Dialog Box                                     29

            To add a new component to a single system using the Component Browser dialog box:          29

            To synchronize components across all systems:                                              30

        Copying Pictures That Include .NET Components                                                  30

        Re-linking Components from Another iFIX Machine                                                30

            To re-link a custom component from another iFIX machine:                                   30

      Data Conversion Rules                                                                            31

        Properties and Methods                                                                         31

        Events                                                                                         32

        Passing Complex Data Types                                                                     32

ii                                                    © 2020 General Electric Company. All rights reserved.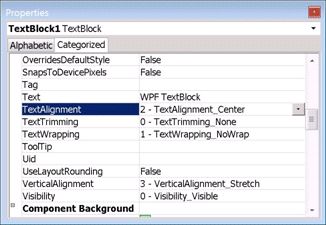
DataTable, DataView (both of System.Data), and IEnumerable (of System.Collection)   32

           List, List, List, List, and List (all of Sys-
           tem.Collections.Generic)                                                            33

           ArrayList (of System.Collections)                                                   33

        Strategies for Parameter Types That Cannot Be Converted                                34

     Error Logging                                                                             34

        Default Logging Settings                                                               34

           To change the default logging level:                                                35

     Sample Projects in Visual Studio                                                          35

   Index                                                                                       37

© 2020 General Electric Company. All rights reserved.                                           iii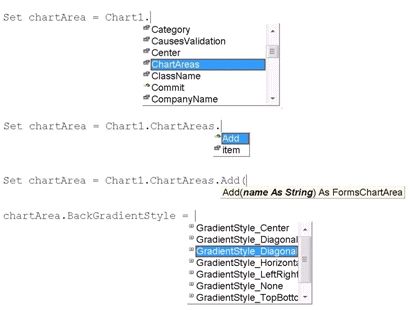
© 2020 General Electric Company. All rights reserved. 1
Using the .NET Component

The .NET Component feature for iFIX allows you to host .NET components within your iFIX pictures.
These .NET Components include pre-selected ones from the .NET Framework, samples from GE, or cus-
tom ones that you develop or buy.

Creating custom components requires proficiency in Microsoft® Visual Studio® 2010 and the .NET Frame-
work. In addition, to develop your own .NET components, you must be proficient in programming with the
.NET Framework. For iFIX scripting, you must have a working knowledge of the Visual Basic programming
language.

To help you use the .NET Component feature, this Help file includes the following sections:

    l   Introduction
    l   General Overview of Component Hosting
    l   Advanced Features

2                                                     © 2020 General Electric Company. All rights reserved.
Introduction
The .NET Component feature allows you to host .NET components within your iFIX pictures. All hosted
.NET components will look and function as OLE objects (ActiveX controls) within your iFIX pictures. Just
as other iFIX controls allow you to access the Property Window and Basic Animations dialog box, so do
hosted .NET components. Screen editing actions, such as Select, Move, Resize, Delete, Undo, Copy, and
Paste are all supported for .NET components as well.
The Component Hosting feature is installed by default when you install iFIX.
NOTES:
l The Backup and Restore Utility does not support backing up .NET Component files.
l .NET Component is not supported on the XP Embedded OS.
l Upgrading or in any way re-installing iFIX will result in replacing any .NET Component files that are supplied
with the product install. This includes sample files such as Visual Studio solutions and projects in the Sample
Components folder which you may have modified. If you have modified these files, they will lose their changes
on an upgrade or re-install of iFIX. If you make any changes to these Visual Studio files, they should be backed
up prior to upgrade/re-install.
l If a user is a member of the Power Users group in Windows security, that user will be unable to open pictures
with .NET components in them unless an Administrator has previously opened that picture on that PC. When an
Administrator opens the picture they register the .NET assemblies for the contained controls on that machine,
which allows Power Users to later open that same picture. Standard Windows Users do not encounter this same
problem. This note applies to Power Users in Windows Vista and later.
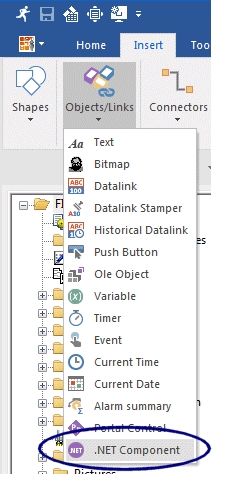
You can access the .NET Component on the Insert menu in the iFIX WorkSpace, as shown in the following
figure.
© 2020 General Electric Company. All rights reserved. 3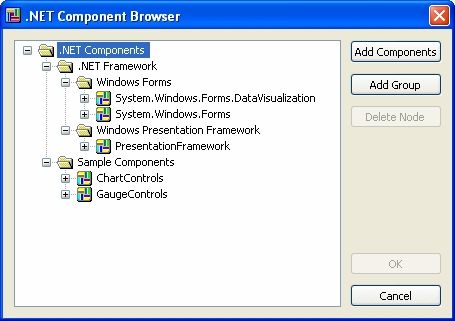
4 © 2020 General Electric Company. All rights reserved.
General Overview of Component Hosting

 You can access the .NET Component on the Insert tab in the iFIX WorkSpace by selecting Objects/Links,
 and then clicking .NET Component. The .NET Component Browser dialog box appears, as shown in the fol-
 lowing figure.

 The hosting environment:

     l   Exposes the public properties, methods, and events of the underlying .NET control.
     l   Provides type descriptions to support property editing and binding, method invocation, and event
         handling with the iFIX user interface and scripting.

.NET Component Browser Dialog Box

 The .NET Component Browser dialog box allows you to manage .NET components for use within your iFIX
 pictures. After selecting it from Objects/Links on the Insert tab in the iFIX WorkSpace, the .NET Com-
 ponent Browser dialog box appears as shown in the following figure.

© 2020 General Electric Company. All rights reserved.                                                       5
The .NET Component Browser dialog box provides the following capabilities: Browse Tree The tree allows you to browse the .NET components installed on your computer and in the sample pro- jects folder. Add Components Click to add a new set of components from a .NET assembly to the list of components in the browser. Add Group Click to add a new group in the browser. Delete Node Select an Assembly node or an empty Group node and click Delete to remove it from the browse tree. Help Click to display this Help file. Supported .NET Control Types The components initially listed in the .NET Component Browser dialog box are built-in components that can be used immediately. These supported .NET control types describe the kinds of .NET classes (types) 6 © 2020 General Electric Company. All rights reserved.
that are able to be hosted; this is intended to guide advanced users by indicating the kinds of .NET con-
 trols they can develop or buy from a third party.

 Component hosting in iFIX supports both Windows Forms (WinForms) and Windows Presentation Frame-
 work control types in the Microsoft .NET Framework. You can find these built-in controls in the .NET Com-
 ponent Browser dialog box. One group is labeled "Windows Forms," and the other group is named
 "Windows Presentation Framework." The Windows Forms group contains the Sys-
 tem.Windows.Forms.DataVisualization and System.Windows.Forms assemblies. The Windows Present-
 ation Framework group contains the PresentationFramework assemblies. The following figure illustrates
 these groups and assemblies.

 The individual controls contained in each of these subfolders cover the majority of .NET controls used for
 non-web-based applications.

Inserting a .NET Component into a Picture

 You can access the .NET Component feature on the Insert menu in the iFIX WorkSpace. This menu option
 opens the .NET Component Browser dialog box, allowing you to select a .NET component to insert into
 your picture. After you insert the component into your picture, you can modify the properties and then
 bind the component to a data source to any of these properties.

   To insert a .NET component into a picture:

     1. In the iFIX WorkSpace, in Ribbon view, click the Insert tab.
     2. On the Insert tab, select Objects/Links, and then click .NET Component. The .NET Component
        Browser dialog box appears.
     3. In the tree browser, select the .NET component that you want to add and then click OK. (A com-
        ponent must be selected for the OK button to be enabled. For example, you could add one of the
        two sample components: TrendChart or LinearGauge.)

   To access the properties for the .NET component:

     1. In the iFIX picture, select the .NET Component for which you want to view the properties.
     2. Right-click the component and select Property Window. The Property Window appears, if it is not
        already displaying.
     3. Scroll through the Alphabetic list to locate the property that you want to view or modify.

Binding .NET Component Properties to an iFIX Data Source

© 2020 General Electric Company. All rights reserved.                                                         7
The properties exposed by a .NET component, as listed on the Property Window, can be bound to iFIX
data sources. As a result of a property binding, the value of the property will change once the value of the
data source changes. This makes the component a monitor of the property value.
To bind a .NET component to an iFIX data source:
1. In the iFIX WorkSpace, right-click the .NET component and select Animations. The Basic Anim-
ations Dialog appears.
2. Under Advanced Animations, click the Configure button. The .NET Component Animations dialog
box appears.
3. On any of the tabs, locate the property that you want to bind to a data source, and then click the
Animate check box next to the property. The Data Source area appears below the list of prop-
erties (if it is not already displaying).
4. Next to the Data Source field, click the Browse (...) button. The Expression Builder dialog box
appears.
5. Select a data source and click OK.
6. Enter the Animation or Historical Properties and click OK. For more information on creating data
sources, refer to the Creating Pictures e-book.
Example
The following example shows how to set the Reading property of the LinearGauge sample object to a
Float data type that has a value range from 0 to 100, and a data source of the current value. This
example assumes that you already have a RAMP block created within the iFIX database.
1. In your iFIX picture, insert the sample LinearGauge .NET component.
2. Right-click the component and select Animations. The Basic Animations Dialog appears.
3. Under Advanced Animations, click the Configure button. The .NET Component Animations dialog
box appears.
4. On the Component tab, locate the Reading property in the property list.
5. Click the Animate check box next to the Reading property.
6. Next to the Data Source field, click the Browse (...) button. The Expression Builder dialog box
appears.
7. Select a configured data source of the Float type that has a value range from 0 to 100. For
example, if you have a RAMP block already created in your database, select the RAMP.F_CV data
source.
8. On the Animation Properties tab, in the Data Conversion drop-down list box, select Object.
9. Click the OK button. After the dialog boxes close, the Save button gets enabled because a data
binding has been created and added to the current picture.
10. Click the Save button to save the current page.
11. Click the Run button on the top toolbox of the iFIX WorkSpace to switch the picture into the run
mode and view the Linear Gauge object with its pin handle moving as the data source changes.
Using Font and Enumeration Properties for .NET Components
8 © 2020 General Electric Company. All rights reserved.The Font and Enumeration properties for .NET components can be accessed from the iFIX Property Win-
dow and through VBA scripting. For example, the Brush property in the Windows Presentation Frame-
work is split into individual fields (colors and positions), so that it may be easily configured within the iFIX
Property Window editor. The Font and Enumeration properties are also converted for the same con-
venience.
For information on working with font and enumeration properties of .NET Components, refer to the fol-
lowing sections:
l Font Properties for Windows Forms Components
l Font Properties for WPF Components
l Enumeration Properties for .NET Components
Font Properties for Windows Forms Components
Windows forms-based controls use the Font class (System.Drawing.Font) to access the font element in
painting their graphics. The Font class is converted to an interface that is compatible to the VBA
IFontDisp interface. As a result, any font properties of Windows forms-based controls may be configured
the same way ActiveX controls are configured in the iFIX WorkSpace.
To access font properties for Windows Forms components from the iFIX WorkSpace:
1. In the iFIX picture, select the .NET Component for which you want to access the font properties.
2. Right-click the component and select Property Window. The Properties window appears, if it is not
already displaying.
3. Scroll through the Alphabetic list to locate the font property that you want to view or modify.
4. Click the ellipsis (...) button next to the font property. The Font dialog box appears.
5. Enter your changes and click OK.
Example
The following figure shows a Windows Forms CheckBox control (in the .NET Component Browser dialog
box: .NET Components > .NET Framework > Windows Forms > System.Windows.Forms > CheckBox) and
its Font property highlighted on the Property Window dialog box of the iFIX WorkSpace.
© 2020 General Electric Company. All rights reserved. 9Click the ellipsis (...) button, and the Font dialog box appears, as shown in the following figure. This dialog box allows for setting a font by selecting its type, style, size, and effects. Font Properties for Windows Presentation Framework Components Windows Presentation Framework controls follow a different convention for font properties from Win- dows Forms (WinForms) controls. For Windows Presentation Framework controls, the FontFamily class only includes information for a font type. Other font structures, such as FontStretch, FontStyle, and FontWeight, handle the various font styles and effects. For these controls, the size of a font is accessed through a separate property usually called FontSize. As the Font dialog box is still the best way to select from all available fonts, the FontFamily data type is converted to the IFontDisp compatible interface. 10 © 2020 General Electric Company. All rights reserved.
To access font properties for Windows Presentation Framework components from the iFIX WorkSpace:
1. In the iFIX picture, select the .NET Component for which you want to access the font properties.
2. Right-click the component and select Property Window. The Property Window appears, if it is not
already displaying.
3. Scroll through the Alphabetic list to locate the font property that you want to view or modify.
4. Click the ellipsis (...) button next to the font property. The Font dialog box appears.
5. Enter your changes and click OK.
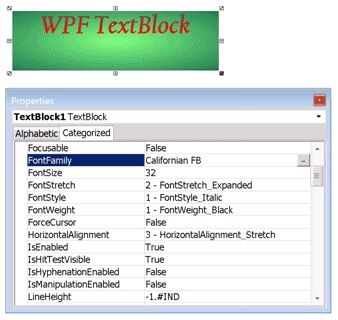
Example
The following figure shows a Windows Presentation Framework TextBlock control (in the .NET Com-
ponent Browser dialog box: .NET Components > .NET Framework > Windows Presentation Framework >
PresentationFramework > TextBlock) and its Font property highlighted on the Property Window dialog
box.
Click the ellipsis (...) button, and the Font dialog box appears. Be aware that unlike the Font dialog box for
the Windows Forms components, only a font type can be set within the Font dialog box for Windows
Presentation Framework controls. Other font properties can be set directly through separate font prop-
erties. For a TextBlock component, as shown in the previous figure, the properties are named: FontSize,
FontStretch, FontStyle, and FontWeight.
NOTE: Not all fonts support all FontStretch, FontStyle, and FontWeight settings.
Enumeration Properties for .NET Components
All enumerations are internally numeric types, but enumeration types make property access easier as
they provide meaningful names for the underlying numeric values. For example, for a horizontal align-
ment property, instead of setting somewhat meaningless and error-prone numbers such as 0, 1, 2, and
so on, you can select a setting name such as Left, Center, and Right from the available setting list.
© 2020 General Electric Company. All rights reserved. 11All the .NET Framework enumeration types used in .NET Components are converted to VBA-recognizable
enumerable types. Enumeration values are shown on the Property Window editor, following the VBA con-
vention, as:
- _
The following figure shows some enumeration properties of the Windows Presentation Framework Tex-
tBlock control in the iFIX Property Window editor.
Scripting in VBA
The Property Window editor and the Basic Animation dialog box in the iFIX WorkSpace allow for con-
figuration and binding of properties of primitive data types. Beyond these, the integrated VBA scripting
supported within iFIX allows for:
l Getting or setting properties of the primitive and complex data types.
l Calling methods.
l Handling events.
Because the hosting environment for the .NET Component exposes all the properties, methods, and
events of the underlying .NET component with appropriate data conversions, the underlying component
can be fully manipulated with VBA scripting.
The following sections describe how to access these features in VBA:
l Adding References in VBA
l Using Intellisense
l Accessing Component Properties and Methods Through Scripting
l Using Event Handlers
l Handling Events with Non-Converted Parameters
l Using Properties and Methods of the iFIX Container
12 © 2020 General Electric Company. All rights reserved.Adding References in VBA
The GEIP_Orion_DataConversion reference must be added to the project in the Microsoft Visual Basic
project in order to access .NET Component properties for non-primitive data types through scripting.
Optionally, you may also want to include the Microsoft ActiveX Data Objects Library (version 2.7 or
higher) or other references.
To add references in Microsoft Visual Basic:
1. In the iFIX WorkSpace, right-click the component and select Edit Script. The Microsoft Visual Basic
Editor appears.
2. On the Tools menu, click References. The References dialog box appears.
3. Scroll through the list of components and make sure check marks appear next to the references
you want to add. For instance:
l GEIP_Orion_DataConversion (for the .NET Component)
l Microsoft ActiveX Data Objects Library (version 2.7 or higher for other references)
4. Click OK.
Using Intellisense®
VBA scripting is assisted with IntelliSense because the hosting environment exposes the properties and
methods of the underlying .NET component with data types that VBA scripting supports. The following fig-
ure shows IntelliSense examples at work for the Chart object included in the Windows Forms folder.
Accessing Component Properties and Methods Through Scripting
© 2020 General Electric Company. All rights reserved. 13Some properties and methods unavailable through the Property Window in the iFIX WorkSpace (because
they involve complex data types) can be accessed through scripting. To access scripting in iFIX, select the
component, and on the right-click menu, select Edit Script to open the Visual Basic Editor. Before you
begin editing your scripts, you must add the proper references (for GEIP_Orion_DataConversion and
Microsoft ActiveX Data Objects Library, version 2.7 or higher, if required). For steps, see the Adding Refer-
ences in VBA section.
Example
This example takes the Chart component from the Windows Forms (in the .NET Component Browser dia-
log box: .NET Components > .NET Framework > Windows Forms > Sys-
tem.Windows.Forms.DataVisualization > Chart), and adds a ChartArea object to it.
Without the ChartArea object, the Chart object appears only as a selectable area. This is because the
Chart component requires at least one ChartArea object to be added to it. As chart areas and their con-
tainer (Chart Area Collection) are complex data types, the Property Window editor in the iFIX WorkSpace
cannot handle them. The action, however, can be done with VBA scripting, as shown in the following
example.
IMPORTANT: This example assumes that you have the Microsoft Northwind sample database for SQL Server or SQL
Server Express for this example to work. If you use SQL Server, the Northwind database may already be installed. To
verify, check that Northwind is one of the databases installed on your system. If it is not installed (for either SQL Server
or SQL Server Express), you can obtain it from the Microsoft web site.
1. In the iFIX WorkSpace, create a new picture.
2. In the iFIX WorkSpace, in Ribbon view, click the Insert tab.
3. On the Insert tab, select Objects/Links, and then click .NET Component. The .NET Component
Browser dialog box appears.
4. In the tree browser, in the .NET Components folder, open .NET Framework, Windows Forms, Sys-
tem.Windows.Forms.DataVisualization, and then select the Chart component and click OK.
5. Optionally, resize the object. Be aware that in the iFIX WorkSpace, you should be able to see the
object handles when you click on it, but the chart object will be transparent in Configure mode;
this behavior is expected.
6. In the iFIX WorkSpace, right-click the Chart component and select Edit Script. The Microsoft Visual
Basic Editor appears again.
7. On the Tools menu, click References. The References dialog box appears.
8. Scroll through the list of components and make sure check marks appear next to the following ref-
erences, and click OK:
l GEIP_Orion_DataConversion
l Microsoft ActiveX Data Objects Library (version 2.7 or higher)
9. In the global area, under (General), add the following code to the global code section:
Dim chartArea As GEIP_Orion_DataConversion.FormsChartArea
Dim mouseDown As Boolean
The first line defines a variable for the Chart Area object, and second line is for the component
event handlers for the examples in the Using Event Handlers section.
14 © 2020 General Electric Company. All rights reserved.10. Click the Save button to save the script.
11. Select the CFixPicture object from the object combo box on the top-left of the scripting window.
Ignore or delete the KeyDown handler code.
12. Select the Initialize handler of the picture object from the top-right event combo box, and an Ini-
tialize handler will be added to the script.
13. Replace the CFixPicture_Initialize code with the following code snippet:
Private Sub CFixPicture_Initialize()
Dim conn As New Connection
Dim rs As New Recordset
Set chartArea = Chart1.ChartAreas.Add("area1")
chartArea.BackColor = RGB(0, 254, 1)
chartArea.BackGradientStyle = GradientStyle_DiagonalRight
chartArea.Area3DStyle.Enable3D = True
conn.ConnectionString = "Provider=SQLNCLI10.1;Data Source=localhost;" _
& "Initial Catalog=Northwind;Integrated Security=SSPI;"
conn.Open
rs.Open "Select Top 12 CustomerID, Freight from Orders", conn
Chart1.DataBindTable rs, "CustomerID"
rs.Close
Chart1.Series(0).ChartType = SeriesChartType_Column
Chart1.Series(0).SetCustomProperty "DrawingStyle", "Cylinder"
conn.Close
End Sub
NOTE: You may need to modify the Provider or Data Source settings to specify different database settings. The
code above assumes you are using the Northwind database on your local computer. For instance, if you are
using SQL Server on another computer, and the computer name where the server resides is MyComputer, you
would replace .\localhost with MyComputer.
In the second code paragraph of this code snippet, the chartArea object is set to the result of call-
ing the Chart Area Collection object's method: Add(). The collection object is a property of the
Chart1 object, which has been added when the Chart component is constructed.
NOTE: For different system configurations (SQL Server, database, and tables), the code for the connection
string and record set selection and setting will require appropriate changes. The second string parameter of the
DataBindTable method must be a string column of the selected table, and the other selected columns must be
numeric. The other valid values for the second string parameter of the SetCustomProperty method are Emboss,
LightToDark, Wedge, and Default (refer to Microsoft help on System.Windows.Forms.DataVisualization).
14. Click the Save button on the toolbar to save the script.
15. Close the Microsoft Visual Basic Editor, and save the picture in the iFIX WorkSpace.
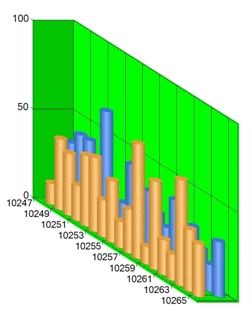
16. Select Run to view your picture. The chart should display similar to the following figure. (This
graph, however, was resized to a longer shape, after it was placed into the WorkSpace in step 5.)
© 2020 General Electric Company. All rights reserved. 15Code from the Example
When you are finished with the example, your code should look similar to this:
Dim chartArea As GEIP_Orion_DataConversion.FormsChartArea
Dim mouseDown As Boolean
Private Sub CFixPicture_Initialize()
Dim conn As New Connection
Dim rs As New Recordset
Set chartArea = Chart1.ChartAreas.Add("area1")
chartArea.BackColor = RGB(0, 254, 1)
chartArea.BackGradientStyle = GradientStyle_DiagonalRight
chartArea.Area3DStyle.Enable3D = True
conn.ConnectionString = "Provider=SQLNCLI10.1;Data Source=localhost;" _
& "Initial Catalog=Northwind;Integrated Security=SSPI;"
conn.Open
rs.Open "Select Top 12 CustomerID, Freight from Orders", conn
Chart1.DataBindTable rs, "CustomerID"
rs.Close
Chart1.Series(0).ChartType = SeriesChartType_Column
Chart1.Series(0).SetCustomProperty "DrawingStyle", "Cylinder"
conn.Close
End Sub
Private Sub Chart1_MouseDown(ByVal state As Long, ByVal x As Long, ByVal y As Long)
mouseDown = True
End Sub
Private Sub Chart1_MouseMove(ByVal state As Long, ByVal x As Long, ByVal y As Long)
If mouseDown = True Then
chartArea.Area3DStyle.Inclination = (x Mod 90) / 2
chartArea.Area3DStyle.Rotation = (y Mod 180) / 2
End If
End Sub
Private Sub Chart1_MouseUp(ByVal state As Long, ByVal x As Long, ByVal y As Long)
mouseDown = False
End Sub
Using Event Handlers
As the generic wrapper exposes all the events defined by an underlying .NET component as a COM con-
nection point interface, the component events can be handled with VBA scripting.
16 © 2020 General Electric Company. All rights reserved.IMPORTANT: These examples assume that you have the Microsoft Northwind sample database for SQL Server or SQL
Server Express for this example to work. If you use SQL Server, the Northwind database may already be installed. To
verify, check that Northwind is one of the databases installed on your system. If it is not installed (for either SQL Server
or SQL Server Express), you can obtain it from the Microsoft web site.
Example 1
This first example takes the Chart component from the Windows Forms (in the .NET Component Browser
dialog box: .NET Components > .NET Framework > Windows Forms > Sys-
tem.Windows.Forms.DataVisualization > Chart), and adds the MouseDown, MouseMove, and MouseUp
event handlers.
1. Open the example iFIX picture from the Accessing Component Properties and Methods Through
Scripting section, and save it under a new name.
2. In the iFIX WorkSpace, right-click the Chart component and select Edit Script. The Microsoft Visual
Basic Editor appears.
3. Select the Chart1 object from the top-left object combo box, and then select the MouseDown
event. An empty event handler will be inserted to the current script.
4. Add a simple line to set the MouseDown variable to True. For example, the finished handler will
look similar to the following:
Private Sub Chart1_MouseDown(ByVal state As Long, ByVal x As Long, ByVal y As Long)
mouseDown = True
End Sub
5. Select the MouseMove event to add the event handler, and replace the code that was auto-
matically added with the following:
Private Sub Chart1_MouseMove(ByVal state As Long, ByVal x As Long, ByVal y As Long)
If mouseDown = True Then
chartArea.Area3DStyle.Inclination = (x Mod 90) / 2
chartArea.Area3DStyle.Rotation = (y Mod 180) / 2
End If
End Sub
6. Select the MouseUp event to add the event handler, and replace the code that was automatically
added with the following:
Private Sub Chart1_MouseUp(ByVal state As Long, ByVal x As Long, ByVal y As Long)
mouseDown = False
End Sub
NOTE: The original .NET events have been converted to Win32-like messages in this example. The X and Y val-
ues are the X and Y coordinates of the mouse pointer, respectively. The state value is the mouse button state
(not used here).
7. Click the Save button on the toolbar to save the script.
8. Go back to the iFIX WorkSpace, and switch to the Run mode.
9. Click the left mouse button on the chart graph, hold the button, and move the mouse down. The
chart will rotate and incline according the current mouse position. The following figure shows an
example of the chart at a rotated and inclined position.
© 2020 General Electric Company. All rights reserved. 17NOTE: The logic in the MouseMove handler above is simplified to emphasize the main points of event handling.
More sophisticated code is needed to make the graph move more smoothly in rotation and inclination.
Code from Example 1
When you are finished with Example 1, your code should look similar to this:
Dim chartArea As GEIP_Orion_DataConversion.FormsChartArea
Dim mouseDown As Boolean
Private Sub CFixPicture_Initialize()
Dim conn As New Connection
Dim rs As New Recordset
Set chartArea = Chart1.ChartAreas.Add("area1")
chartArea.BackColor = RGB(0, 254, 1)
chartArea.BackGradientStyle = GradientStyle_DiagonalRight
chartArea.Area3DStyle.Enable3D = True
conn.ConnectionString = "Provider=SQLNCLI10.1;Data Source=localhost;" _
& "Initial Catalog=Northwind;Integrated Security=SSPI;"
conn.Open
rs.Open "Select Top 12 CustomerID, Freight from Orders", conn
Chart1.DataBindTable rs, "CustomerID"
rs.Close
Chart1.Series(0).ChartType = SeriesChartType_Column
Chart1.Series(0).SetCustomProperty "DrawingStyle", "Cylinder"
conn.Close
End Sub
Private Sub Chart1_MouseDown(ByVal state As Long, ByVal x As Long, ByVal y As Long)
mouseDown = True
End Sub
Private Sub Chart1_MouseMove(ByVal state As Long, ByVal x As Long, ByVal y As Long)
If mouseDown = True Then
chartArea.Area3DStyle.Inclination = (x Mod 90) / 2
chartArea.Area3DStyle.Rotation = (y Mod 180) / 2
End If
End Sub
Private Sub Chart1_MouseUp(ByVal state As Long, ByVal x As Long, ByVal y As Long)
mouseDown = False
End Sub
18 © 2020 General Electric Company. All rights reserved.Example 2
This second example takes the same Chart component from the Windows Forms (in the .NET Component
Browser dialog box: .NET Components > .NET Framework > Windows Forms > Sys-
tem.Windows.Forms.DataVisualization > Chart), with the MouseDown, MouseMove, and MouseUp
events, and adds code for two columns. These columns come from another table in the Northwind data-
base. The code between the conn.Open and conn.Close references in the CFixPicture_Initialize() handler
from the first example is replaced with new code.
1. Open the example iFIX picture from the example above. Save it under a new name.
2. In the iFIX WorkSpace, right-click the Chart component and select Edit Script. The Microsoft Visual
Basic Editor appears.
3. Replace the code between conn.Open and conn.Close in the CFixPicture_Initialize() handler with
the following code (this code selects two numeric columns from another table in the Northwind
database):
rs.Open "select Top 50 OrderID, UnitPrice, Quantity from [Order Details]", conn
Chart1.DataBindTable rs, "OrderID"
rs.Close
Chart1.Series(0).ChartType = SeriesChartType_Column
Chart1.Series(0).SetCustomProperty "DrawingStyle", "Cylinder"
Chart1.Series(1).ChartType = SeriesChartType_Column
Chart1.Series(1).SetCustomProperty "DrawingStyle", "Cylinder"
4. Click the Save button on the toolbar to save the script.
5. Go back to the iFIX WorkSpace, and switch to the Run mode. The following figure shows an
example of the chart, with two numeric columns and rotated.
Code from Example 2
When you are finished with Example 2, your code should look similar to this:
Dim chartArea As GEIP_Orion_DataConversion.FormsChartArea
© 2020 General Electric Company. All rights reserved. 19Dim mouseDown As Boolean
Private Sub CFixPicture_Initialize()
Dim conn As New Connection
Dim rs As New Recordset
Set chartArea = Chart1.ChartAreas.Add("area1")
chartArea.BackColor = RGB(0, 254, 1)
chartArea.BackGradientStyle = GradientStyle_DiagonalRight
chartArea.Area3DStyle.Enable3D = True
conn.ConnectionString = "Provider=SQLNCLI10.1;Data Source=localhost;" _
& "Initial Catalog=Northwind;Integrated Security=SSPI;"
conn.Open
rs.Open "select Top 50 OrderID, UnitPrice, Quantity from [Order Details]", conn
Chart1.DataBindTable rs, "OrderID"
rs.Close
Chart1.Series(0).ChartType = SeriesChartType_Column
Chart1.Series(0).SetCustomProperty "DrawingStyle", "Cylinder"
Chart1.Series(1).ChartType = SeriesChartType_Column
Chart1.Series(1).SetCustomProperty "DrawingStyle", "Cylinder"
conn.Close
End Sub
Private Sub Chart1_MouseDown(ByVal state As Long, ByVal x As Long, ByVal y As Long)
mouseDown = True
End Sub
Private Sub Chart1_MouseMove(ByVal state As Long, ByVal x As Long, ByVal y As Long)
If mouseDown = True Then
chartArea.Area3DStyle.Inclination = (x Mod 90) / 2
chartArea.Area3DStyle.Rotation = (y Mod 180) / 2
End If
End Sub
Private Sub Chart1_MouseUp(ByVal state As Long, ByVal x As Long, ByVal y As Long)
mouseDown = False
End Sub
Handling Events with Non-Converted Parameters
The event handlers, such as the MouseDown, MouseMove, and MouseUp event handlers described in the
Using Event Handlers section, are converted by the data conversion module from the corresponding .NET
event handlers. For component hosting in iFIX, key event handlers are converted to names similar to
their counterpart Win32 key messages.
Any non-converted parameters defined by a component are represented as Win32-like parameters, but
with two string arguments: the name of the event raiser, and the .NET argument type.
These string arguments are not very useful in these non-converted (more correctly, not fully converted)
cases. However, as the events are actually raised in the meaningful manners, these events can be
handled in a normal manner using the event raiser's properties and methods to access companion
information.
20 © 2020 General Electric Company. All rights reserved.Example
This example takes the DataGrid and ComboBox components from the Windows Presentation Frame-
work (in the .NET Component Browser dialog box: .NET Components > .NET Framework > Windows
Presentation Framework > DataGrid, and ComboBox), and adds some code to alternate the row color in
the table, and to allow you to use the ComboBox control to select a row in the DataGrid.
First, with the DataGrid object, we configure the AlternatingRowBackground component property. Then,
for the ComboBox object, we add the SelectionChanged event with two string parameters, because the
Windows Presentation Framework SelectionChangedEventArgs class contains unconverted parameters.
Both the DataGrid and ComboBox components support the SelectionIndex property, which allows you to
select a corresponding row in the DataGrid, using the ComboBox control.
IMPORTANT: This example assumes that you have the Microsoft Northwind sample database for SQL Server or SQL
Server Express for this example to work. If you use SQL Server, the Northwind database may already be installed. To
verify, check that Northwind is one of the databases installed on your system. If it is not installed (for either SQL Server
or SQL Server Express), you can obtain it from the Microsoft web site.
1. In the iFIX WorkSpace, create a new picture.
2. In the iFIX WorkSpace, in Ribbon view, click the Insert tab.
3. On the Insert tab, select Objects/Links, and then click .NET Component. The .NET Component
Browser dialog box appears.
4. In the tree browser, in the .NET Components folder, open .NET Framework, Windows Presentation
Framework, Presentation Framework, and then select the DataGrid component and click OK.
5. On the Insert tab, select Objects/Links, and then click .NET Component. The .NET Component
Browser dialog box appears.
6. In the tree browser, in the .NET Components folder, open .NET Framework, Windows Presentation
Framework, Presentation Framework, and then select the ComboBox component and click OK.
Insert the ComboBox below the DataGrid in the iFIX picture.
7. In the iFIX WorkSpace, right-click the DataGrid component and select Property Window, if it is not
already displayed. The Property Window appears in the iFIX WorkSpace.
8. Click the Categorized tab, and scroll to the Component AlternatingRowBackground category for
the DataGrid object as shown in the following figure. Change the property settings to match the
AlternatingRowBackground_Color1, AlternatingRowBackground_Color2, Altern-
atingRowBackground_Point2X, and AlternatingRowBackground_Type properties in the following
figure:
When you are complete, the following four properties should have these settings:
© 2020 General Electric Company. All rights reserved. 21l AlternatingRowBackground_Color1 as &H000FF0F0&
l AlternatingRowBackground_Color2 as &H000020F0&
l AlternatingRowBackground_Point2X as 1
l AlternatingRowBackground_Type as 1 - BrushType_Linear.
9. Save the picture.
10. In the iFIX WorkSpace, right-click the DataGrid component and select Edit Script. The Microsoft
Visual Basic Editor appears.
11. On the Tools menu, click References. The References dialog box appears.
12. Scroll through the list of components and make sure check marks appear next to the following ref-
erences:
l Microsoft ActiveX Data Objects Library (version 2.7 or higher)
l GEIP_Orion_DataConversion
13. Select the Initialize handler of the picture object from the top-right event combo box, and an Ini-
tialize handler will be added to the script. Replace the initialize handler with the following code:
Private Sub CFixPicture_Initialize()
Dim conn As New Connection
Dim rs As New Recordset
conn.ConnectionString = "Provider=SQLNCLI10.1;Data Source=.\sqlexpress;" _
& "Initial Catalog=Northwind;Integrated Security=SSPI;"
conn.Open
rs.Open "Select Top 20 * from Orders", conn
Set DataGrid1.ItemsSource = rs
rs.MoveFirst
Do While Not rs.EOF
ComboBox1.Items.Add CStr(rs!CustomerID)
rs.MoveNext
Loop
ComboBox1.SelectedIndex = 0
rs.Close
conn.Close
End Sub
14. Click the Save button on the toolbar to save the script.
15. Go back to the iFIX WorkSpace, and switch to the Run mode. The two objects will look similar to
those in the following figure.
NOTE: These example objects were resized after they were placed in the picture. You can optionally resize your
objects too. Be aware that in the iFIX WorkSpace, you should be able to see the object handles when you click
on the grid, but the grid object will be transparent in Configure mode; this behavior is expected.
22 © 2020 General Electric Company. All rights reserved.16. Right-click the ComboBox object and select, Edit Script.
17. Add the SelectionChanged event to the ComboBox object. An event handler will be inserted (but
with two string parameters because the WPF SelectionChangedEventArgs class is not converted).
18. Change the event handler code so that it matches the code below, as demonstrated by the fol-
lowing code snippet:
Private Sub ComboBox1_SelectionChanged(ByVal addedItems As Variant, ByVal removedItems As Variant)
DataGrid1.SelectedIndex = ComboBox1.SelectedIndex
DataGrid1.ScrollIntoView DataGrid1.SelectedItem
End Sub
As the DataGrid component contains a method that supports scrolling of the view port, the line of
code referring to the ScrollIntoView method makes the selected row always visible in this
example. With this event scripting, the ComboBox object can now drive the DataGrid object.
19. Save the picture, and switch to run mode. Try using the drop-down list to change the row focus in
the grid.
The selection of an item in the ComboBox is reflected accordingly, as a selection of a row in the
DataGrid.
Code from the Example
When you are finished with the example, your code should look similar to this:
Private Sub CFixPicture_Initialize()
Dim conn As New Connection
Dim rs As New Recordset
conn.ConnectionString = "Provider=SQLNCLI10.1;Data Source=localhost;" _
& "Initial Catalog=Northwind;Integrated Security=SSPI;"
conn.Open
rs.Open "Select Top 20 * from Orders", conn
Set DataGrid1.ItemsSource = rs
rs.MoveFirst
Do While Not rs.EOF
ComboBox1.Items.Add CStr(rs!CustomerID)
rs.MoveNext
Loop
ComboBox1.SelectedIndex = 0
rs.Close
conn.Close
End Sub
Private Sub ComboBox1_DropDownOpened(ByVal param1 As String, ByVal param2 As String)
End Sub
Private Sub ComboBox1_SelectionChanged(ByVal addedItems As Variant, ByVal removedItems As Variant)
DataGrid1.SelectedIndex = ComboBox1.SelectedIndex
© 2020 General Electric Company. All rights reserved. 23DataGrid1.ScrollIntoView DataGrid1.SelectedItem
End Sub
Private Sub DataGrid1_ColumnDisplayIndexChanged(ByVal param1 As String, ByVal param2 As String)
End Sub
NOTE: The SelectionChanged event is actually converted with two parameters of Variant(SafeArray). The SafeArray
interface requires more advanced scripting and is not used here.
Using Properties and Methods of the iFIX Container
The hosting environment and the iFIX component container work together to combine the properties and
methods of the container with those of the underlying .NET control. This makes it possible to access the
properties of the container and the .NET control from within the iFIX Properties Window or to access the
properties and methods with a single variable inserted by the VBA scripting tool.
The following common properties of the component container are grouped under the label Misc, in the
iFIX Properties Window for the .NET Component:
l Name
l Cancel
l ContextID
l ControlOrderIndex
l Default
l Description
l EnableTooltips
l Height
l HighlightEnabled
l HorizontalPosition
l HorizontalScaleDirection
l HorizontalScalePercentage
l IsSelectable
l Layer
l UniformScale
l VerticalPosition
l VerticalScaleDirection
l VerticalScalePercentage
l Visible
l Width
For more information on the meaning and usage of these properties and additional properties and meth-
ods available with VBA scripting, refer to the iFIX Automation Reference.
24 © 2020 General Electric Company. All rights reserved.Advanced Features
The hosting environment supports hosting and interfacing with the built-in Windows Presentation Frame-
work or Windows Forms (WinForms) controls. Advanced features are provided to allow you to build com-
ponents from any .NET controls – your own or from a third party – created from these built-in controls.
The following sections provide more information on how to use this advanced functionality:
l Creating New Components
l Using New Components on Other iFIX Systems
l Data Conversion Rules
l Error Logging
l Sample Projects in Visual Studio
Creating New Components
In addition to the build-in Windows Presentation Framework or Windows Forms controls, you can use
third-party controls or create your own controls based on any built-in controls. For more information on
the task you want to perform, refer to the following sections:
l Creating a .NET Control
l Deleting Nodes on the Component Browser
l Supporting Files for .NET Components
l Uniqueness of .NET Control Assembly Names
Creating a .NET Control
In addition to using a third-party control, you can also create your own custom .NET component, as the
example below describes. Any custom or third-party .DLL file should reside in the \DotNet
Components folder.
Custom or third-party controls can be derived and hosted from the following pre-built controls, following
the .NET Framework 4.0 classes:
l For Windows Forms: System.Windows.Forms.Control and any of approximately 60 control classes
in the System.Windows.Forms namespace.
l For Windows Presentation Framework: System.Windows.UIElement, Sys-
tem.Windows.FrameworkElement, and any of the approximately 100 control classes in the Sys-
tem.Windows.Controls namespace.
NOTE: All custom controls must define a parameter-less constructor or no constructors at all (so that the compiler will
add a parameter-less one). This step is required so that custom controls can be created in an environment that requires
© 2020 General Electric Company. All rights reserved. 25no parameters to be passed in. All ActiveX controls working with a COM client and .NET controls used by a user-inter-
face configurable .NET environment require this configuration.
You can add the new components to your .NET Component Browser dialog box, as described in the
Adding Components to the .NET Component Browser Dialog Box section.
Additionally, you can then copy the associated .DLL files to each iFIX install where you want to display the
picture, as well as the GEIP.Orion.Components.dat file, as described in the Copying Component files to
Other Systems section.
Example
The following example shows how to create a Trend Chart within the .NET Framework 4.0.
1. Create a folder under \DotNet Components named: My Sample Components.
2. Use the Notepad text editor to save the following code as a C# source file named TrendChart.cs.
using System;
using System.Drawing;
using System.Windows.Forms.DataVisualization.Charting;
namespace ChartControls
{
public class TrendChart : Chart
{
private double _value;
private ChartArea _area;
private Series _series;
private Title _title;
public TrendChart()
{
BackColor = Color.Silver;
BorderSkin.SkinStyle = BorderSkinStyle.FrameThin5;
_title = Titles.Add("Trend Chart");
_title.Font = new Font("Arial", 10, FontStyle.Bold);
_area = ChartAreas.Add("area0");
_area.AxisX.LabelStyle.Format = "hh:mm:ss";
_area.AxisX.LabelStyle.Interval = 5;
_area.AxisX.LabelStyle.IntervalType = DateTimeIntervalType.Seconds;
_area.AxisX.MajorGrid.Interval = 5;
_area.AxisX.MajorGrid.IntervalType = DateTimeIntervalType.Seconds;
_area.BackColor = Color.Orange;
_area.BackGradientStyle = GradientStyle.TopBottom;
_series = Series.Add("series0");
_series.ChartType = SeriesChartType.Line;
_series.ShadowOffset = 1;
}
public string Title
{
get { return _title.Text; }
set { _title.Text = value; }
}
public double Value
{
get { return _value; }
set
{
_value = value;
DateTime current = DateTime.Now;
_series.Points.AddXY(current.ToOADate(), _value);
double removeBefore = current.AddSeconds(-25).ToOADate();
while (_series.Points[0].XValue < removeBefore)
_series.Points.RemoveAt(0);
_area.AxisX.Minimum = _series.Points[0].XValue;
26 © 2020 General Electric Company. All rights reserved._area.AxisX.Maximum
= DateTime.FromOADate(_series.Points[0].XValue).AddSeconds(30).ToOADate();
}
}
}
}
NOTE: The TrendChart class in this above example is derived from the Framework 4.0 Chart class. In the con-
structor, a ChartArea and a Series are added to the chart control, which is then configured by setting some
ChartArea and Series properties. Two properties are defined: Title for setting a chart title, and Value for binding
to a data source. When the data value changes, the set action of the Value property adds a new data point to
the chart. If the number of data points excesses a preset limit, the oldest points are removed.
3. Save this text file as TrendChart.cs, and copy it into the My Sample Components folder created in
step 1.
4. Open a Command Prompt window, change the directory to the \DotNet Com-
ponents\My Sample Components folder, and issue the following command:
C:\WINDOWS\Microsoft.NET\Framework\v4.0.30319\csc /t:library /out:ChartControls.dll /r:Sys-
tem.dll;System.Windows.Forms.dll;System.Windows.Forms.DataVisualization.dll TrendChart.cs
This command assumes that .NET Framework 4.0 is installed in the default folder. Observe that
the compiled assembly ChartControls.dll is saved into the My Sample Components folder.
NOTE: The TrendChart control from this example can also be built with Visual Studio 2010. A sample project for
this control is included in the folder \DotNet Components\Sample Com-
ponents\VS2010SampleProjects folder.
5. Add your new component to the .NET component Browser dialog box, so that you can add it to
your iFIX picture. For steps, refer to the Adding Components to the .NET Component Browser Dia-
log Box section
Deleting Nodes on the Component Browser
The .NET Component Browser dialog box includes a button labeled Delete Node, to allow a user to delete
a Group or Assembly node on the browser. This feature is necessary to keep the browser clean and well
organized, but use care when deleting a component assembly node (such as the ChartControls node). An
iFIX picture will fail to load if it contains any control objects created from the components of the deleted
assembly. The deletion action is safeguarded by the following rules:
l The root Group node (.NET Components) may not be deleted.
l A Group node may not be deleted if it contains child nodes.
l An Assembly node may not be deleted if any opened iFIX pictures contain controls objects created
from its components.
An issue could occur if a closed picture that contains components from the deleted assembly is then
opened. In this case, because the iFIX WorkSpace does not check references in the closed pictures, an
error may occur on load. This is the same behavior as that of an unregistered ActiveX control in the iFIX
WorkSpace.
Supporting Files for .NET Components
© 2020 General Electric Company. All rights reserved. 27Supporting files for .NET components are automatically created from the original .NET source assembly
(such as the ChartControls.dll) when you add the assembly through the .NET Component Browser dialog
box. Assemblies referenced by the source assembly and not installed in the assembly cache must be put
in the same folder. If you installed to the default location, this folder is: C:\Program Files
(x86)\GE\iFIX\DotNet Components.
The component creation process creates the following essential files for a .NET source assembly to sup-
port hosting and communicating with all the components created from the selected controls in the
source assembly:
l _.dll – the component assembly.
l _.tlb – the component type library.
Some of the temporary or debugging files may be created when you create a .NET component, but they
are not essential for the component to function. If the same source assembly is selected to the Add Com-
ponents process the second time, the ordinal number will increase.
NOTES:
l Do not manually delete the essential supporting files.
l Occ is short for Orion COM Component.
Uniqueness of .NET Control Assembly Names
The original control assembly name (an example of a control assembly name is ChartControls.dll), and
any other control assembly names associated with it, must be unique among all .NET control assemblies
that are used to build iFIX hostable components. Otherwise, unexpected results may happen as the .NET
runtime will use the first loaded control assembly for all same named assemblies.
NOTE: .NET has provisions to support the loading assemblies with the same name but different versions. However, that
requires the versioned assemblies be signed and installed into the system assembly cache, which is not a supported
scenario for GE component hosting.
.NET Component Directories
All original .NET control assemblies must be stored under the root component directory: \.NET components. When an original control assembly is selected to build iFIX hostable com-
ponents, the supporting assembly and type library are saved in the same directory. When components
are copied from one system to another, the folder hierarchy must be maintained.
Network shared folders for component storage are not supported due to .NET security implementations.
Using New Components on iFIX Systems
After you create your new .NET components, if you want to use them on iFIX systems you need to:
1. Copy the compiled .NET Component files to each iFIX node that you want to use the new controls.
2. Add the new components to the .NET Component Browser dialog box on each iFIX node where
you want to display them.
For steps, refer to the sections above.
28 © 2020 General Electric Company. All rights reserved.Copying Compiled Component Files to iFIX Nodes
If new .NET Components are created and inserted into iFIX pictures on one iFIX system, and the saved
pictures are opened on another iFIX system, the pictures will not load with the new components if the
corresponding component files do not exist on the new system. This is true for ActiveX controls that are
not installed (copied and registered) on a new target system.
There is no need to register the new components; you do not need to register the component assembly
or the component type library files. You only need to copy the associated files to other systems, using the
same directory hierarchy, relative to the iFIX install folder. For example, if you modified the TrendChart
control, you would copy the ChartControls.dll, Occ.ChartControls.dll, and Occ.ChartControls.tlb to the
\DotNet Components\Sample Components folder of the other iFIX system (even if it is a cli-
ent with mapped drives in use). The TrendChart objects configured on the original system will then load
and function on the new system.
Any custom or third-party supporting assemblies in the iFIX install folder must also be copied to the iFIX
install folders of other systems. Some third-party common assemblies may need to be installed into the
system assembly cache or be copied to the iFIX install folder.
Basically, the \DotNet Components folder should be the same on each iFIX node.
Adding Components to the .NET Component Browser Dialog Box
After you create a new custom .NET component, you need to add it to the tree view area in the .NET
Component Browser dialog box in order to add the control to an iFIX picture on your system. Use the
interface in the Component Browser dialog box to add a new component to an individual system.
Later, if you want to synchronize this new component across all of your iFIX system (clients and servers),
manually copy the all of the files in the DotNet Components folder, including subfolders, and the master
browser file (GEIP.Orion.Components.dat file) and any other .dll files your assemblies use, to each system
that you want to synchronize. Basically, the \DotNet Components should be the same on
each iFIX node.
To add a new component to a single system using the Component Browser dialog box:
1. In the iFIX Workspace, in Ribbon view, click the Insert tab.
2. On the Insert tab, select Objects/Links, and then click .NET Component. The .NET Component
Browser dialog box appears.
3. With the top level folder selected, .NET Component, click the Add Group button. The Add a Com-
ponent Group dialog box appears.
4. Enter a group name and description, and click OK. (The Description field is optional, but if text is
entered, it will display as a tooltip when the mouse hovers on the group node.)
5. With the new group selected, click the Add Components button. The Add .NET Components dialog
box appears.
6. Click the browse (...) button to select a component source. The dialog box populates with the Com-
ponent Assembly Name, along with the associated classes.
© 2020 General Electric Company. All rights reserved. 29You can also read