VMware Workspace ONE Access Administration Guide - January 2021 VMware Workspace ONE Access - VMware Docs
←
→
Page content transcription
If your browser does not render page correctly, please read the page content below
VMware Workspace ONE
Access Administration
Guide
January 2021
VMware Workspace ONE Access
VMware Workspace ONE Access Administration Guide

You can find the most up-to-date technical documentation on the VMware website at:

https://docs.vmware.com/

VMware, Inc.
3401 Hillview Ave.
Palo Alto, CA 94304
www.vmware.com

               ©
Copyright          2015 - 2021 VMware, Inc. All rights reserved. Copyright and trademark information.

VMware, Inc.                                                                                            2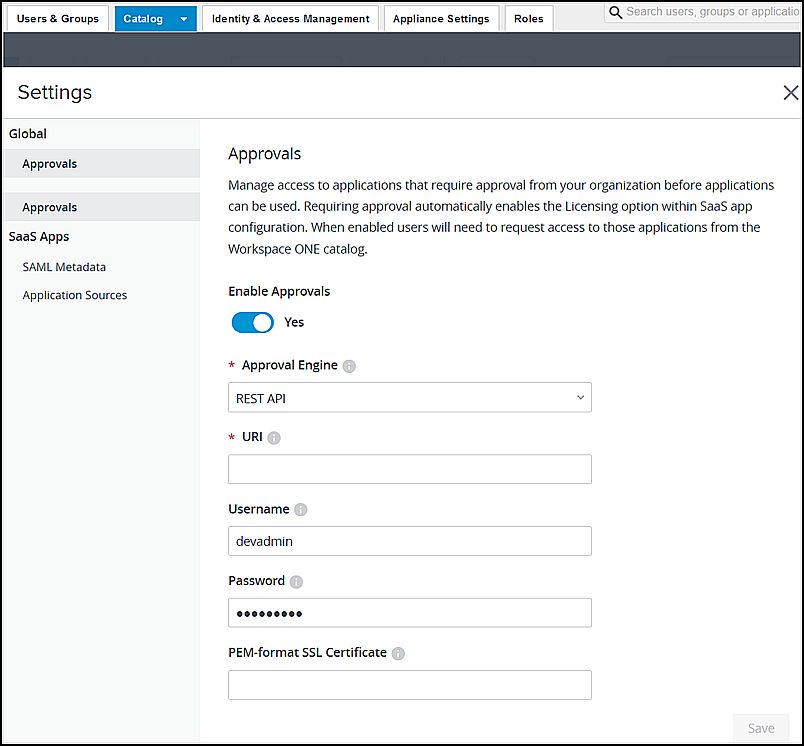
Contents

     1 Working in VMware Workspace ONE Access Console 6
               Navigating in the Workspace ONE Access Console      6
               Workspace ONE Access Identity and Access Management Settings Overview                      8
               Join or Leave the Customer Experience Improvement Program for Workspace ONE Access (On
                  Premises Only) 10

     2 Managing Administrator Roles in Workspace ONE Access 12
               About the Roles-Based Access Roles in Workspace ONE Access             12
               Add an Administrator Role in Workspace ONE Access       15
               Assign Users and Groups to a Workspace ONE Access Administrator Role                  16
               Removing Workspace ONE Access Administrator Roles        16
                  Remove Workspace ONE Access Administrator Role from Individual Users                    17
                  Remove a Group from a Workspace ONE Access Admin Role               17
               Example 1. Create an Admin Role in Workspace ONE Access to Manage Office 365 Application
                  and Entitlements 18
               Example 2. Create an Admin Role in Workspace ONE Access to Manage Password Reset in a
                  Local Directory 20

     3 Using Local Directories in Workspace ONE Access 22
               Creating a Local Directory in Workspace ONE Access      24
                  Set User Attributes at the Global Level Workspace ONE Access             24
                  Create a Local Directory Workspace ONE Access        25
                  Associate the Local Directory with an Identity Provider in Workspace ONE Access                   27
               Changing Local Directory Settings in Workspace ONE Access         28
               Deleting a Local Directory in Workspace ONE Access      30
               Configuring Authentication Method for System Admin Users in Workspace ONE Access                          30

     4 How Just-in-Time User Provisioning Works in Workspace ONE Access 32
               Create Local Groups in Workspace ONE Access    33
               Review User Attributes for Just-in-Time Provisioning in Workspace ONE Access                    34
               Requirements to Use SAML Assertions for Just-in-Time Provisioning in Workspace ONE Access
                    35
               Requirements to Use OpenID Connect Claims for Just-in-Time Provisioning in Workspace ONE
                  Access (Cloud Only) 36
               Configuring Just-in-Time User Provisioning in Workspace ONE Access               37
               Deleting a Just-in-Time Directory in Workspace ONE Access         38
               Disabling Just-in-Time User Provisioning in Workspace ONE Access            39
               Just-in-Time Error Messages in Workspace ONE Access          39

VMware, Inc.                                                                                                                  3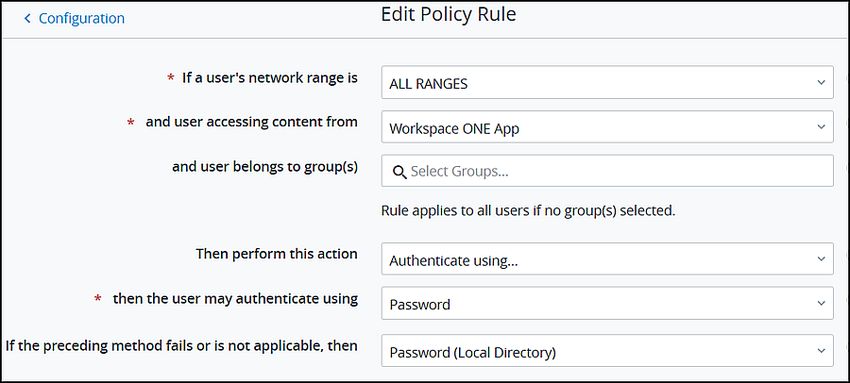
VMware Workspace ONE Access Administration Guide

     5 Managing the User Login Experience in Workspace ONE Access 41
               Selecting a Domain When Logging In with Workspace ONE Access                        41
               Login Experience in Workspace ONE Access Using Unique Identifier                     42
               Set Up Unique Identifier-Based Log In in Workspace ONE Access                   42
               Requiring Terms of Use to Access the Workspace ONE Catalog                     43
                  Set Up and Enable Terms of Use in Workspace ONE Access                      44
                  View Status of Terms of Use Acceptance in Workspace ONE Access                         44
               Configure Workspace ONE Access to Display the Login Pages in an iFrame                         45

     6 Managing Users and Groups in Workspace ONE Access 47
               Managing Users    48
                  Select Users from Active Directory to Add to the Workspace ONE Access Directory                       49
                  Reviewing User Profile Information in Workspace ONE Access                   49
               Managing Groups in Workspace ONE Access             50
                  Syncing Active Directory Groups to the Workspace ONE Access Directory                            50
                  Create Local Groups and Configure Group Rules in Workspace ONE Access                            51
                  Edit Group Rules in Workspace ONE Access              53
                  Add Resources to Groups in Workspace ONE Access                   53
                  Sync Members of a Group Manually to Workspace ONE Access Directory                           54
               Create Local Users in Workspace ONE Access           54
                  Add Local Users in Workspace ONE Access               55
                  Disable or Enable Local Users in Workspace ONE Access                  56
                  Delete Local Users in Workspace ONE Access             56
               Managing Passwords in Workspace ONE Access                57
                  Configure Password Policy for Local Users in Workspace ONE Access                       57
               Sync Workspace ONE Access Directory to Correct Domain Information                        59

     7 Managing the Catalog in Workspace ONE Access 60
               Managing Catalog Settings from Workspace ONE Access                      60
                  Global Settings to Disable Prompt for Downloading Helper Applications                       61
                  Creating Clients for Remote Application Access              61
                     Set up Remote Access to a Single Catalog Resource                  62
                     Create Remote Access Template            63
               Managing Web Catalog Settings            64
                  Enabling Application Approval for Resource Usage                 65
                     Set up the REST API Approval Engine           65
                  SAML Signing Certificates        66
                     Download SAML Certificates to Configure with Relying Applications                       67
                     Generate a Certificate Signing Request         68
                     Upload a New Certificate Authority for SAML Signing Certificates                    68
                  Configure Application Sources          69

VMware, Inc.                                                                                                                 4
VMware Workspace ONE Access Administration Guide

               Set Up People Search in Workspace ONE Access       69
               Grouping Resource into Categories in Workspace ONE Access Catalog       71
                  Create a Categories in the Catalog Page on Workspace ONE Access       71
                  Apply a Category to Resources    72
                  Remove a Category from an Application     72
                  Delete a Category     72

     8 Accessing Hub Services in Workspace ONE Access to Set Up Workspace ONE
               Intelligent Hub 74
               How to Provision the Certificate to Use Push Notification in Workspace ONE Intelligent Hub (On-
                 Premises Only) 77

     9 Customize Workspace ONE Access Branding                         80
               Customize Branding in Workspace ONE Access Console           80
               Customize Branding for VMware Verify Application    82
               Branding Workspace ONE for Windows 10 Custom Out-of-Box in Workspace ONE Access (On -
                  Premises only) 82

    10 Working in the Workspace ONE Access Console Dashboard 84
               Monitor Users and Resource Usage from the Workspace ONE Access Dashboard            84
               Monitoring Workspace ONE Access System Information and Health (On-Premises Only)          85
               Monitoring Rate Limits and Concurrency Limits in Workspace ONE Access (Cloud Only)        86
               Viewing Reports in Workspace ONE Access       90
                  Generate an Audit Event Report in Workspace ONE Access         91

    11 Using SSL Certificates in Workspace ONE Access Service (On-Premises Only)
                 93
               Installing an SSL Certificate for the Workspace ONE Access Service (On-Premises Only)     93
               Installing Trusted Root Certificates for Workspace ONE Access (On-Premises Only)     95
               Installing a Passthrough Certificate on Workspace ONE Access (On-Premises Only)      96
               Replace SSL Certificate in Workspace ONE Access Service (On-Premises Only)     96

VMware, Inc.                                                                                                  5
Working in VMware Workspace
ONE Access Console 1
®
The VMware Workspace ONE Access ™ console provides you with a centralized management
console with which you can manage users and groups, set up and manage authentication and
access policies, and add resources to the catalog and manage entitlements to those resources.
You can also configure Workspace ONE UEM integration. Note that Workspace ONE Access was
formerly known as VMware Identity Manager.
The key tasks you perform from the Workspace ONE Access console is manage user
authentication and access policies and entitle users to resources. Other tasks support this key
task by providing you with more detailed control over which users or groups are entitled to
which resources under which conditions.
When Workspace ONE Hub Services is integrated with Workspace ONE Access, end users can
access their work resources from their user web portal in a browser or from the Workspace ONE
Intelligent Hub App on their devices. You can access the Hub Services console from the
Workspace ONE Access console to set up how employees use Workspace ONE Intelligent Hub
to access apps, receive notifications, and search for people.
Note For documentation about configuring and managing user authentication and access
policies, see the Managing Workspace ONE Access User Authentication Methods guide.
This chapter includes the following topics:
n Navigating in the Workspace ONE Access Console
n Workspace ONE Access Identity and Access Management Settings Overview
n Join or Leave the Customer Experience Improvement Program for Workspace ONE Access
(On Premises Only)
Navigating in the Workspace ONE Access Console
The tasks in the Workspace ONE Access console are organized by tabs.
If you have administrator privileges, you can log in to the Workspace ONE Access console from
your user portal page. To open the console pages, click your profile on the right and select
Administration Console.
VMware, Inc. 6VMware Workspace ONE Access Administration Guide
To access the Workspace ONE Access administration console directly, enter the Workspace ONE
Access URL as https:///SAAS/admin. When the login page displays, select
the domain, if requested and log in with your Active Directory user name and password, or select
System Domain and log in as the Workspace Access admin.
To log in directly to the console as the system domain admin, enter the following URL
/SAAS/login/0. The System Domain login screen displays.
Tab Description
Dashboard The User Engagement dashboard can be used to monitor user activity and resources used. This
dashboard displays information about who signed in, which applications are being used, and how
often they are being used.
For on premises deployment, a System Diagnostics dashboard displays a detailed overview of the
health of the service in your environment and other information about the services. You can also
manage the configuration of the appliance, including configuring SSL certificates for the appliance,
change the services admin and system passwords.
You can create reports to track users' and groups' activities, resource and device use, and audit
events by user.
Users and In the Users and Groups tab, you manage and monitor users and groups imported from your Active
Groups Directory or LDAP directory, create local users and groups, and entitle the users and groups to
resources. The password restriction policy for local users is managed in the User and Groups Settings
page.
Catalog The Catalog is the repository for all the resources that you can entitle to users. In the Catalog tab, you
add Web applications and manage existing resources. In the Virtual Apps Collection page, you
manage Horizon, Citrix, Horizon Cloud, and ThinApp desktops and application integrations.
You group applications into categories and can access information about each resource.
On the Catalog Settings page, you download SAML certificates and manage resource configurations.
From the Catalog > Hub Configuration page, you access the Hub Service console. From the Hub
Services console, you can design and set up how users use Workspace ONE Intelligent Hub to access
the catalog, receive notifications, search for people they work with, and use support services.
Identity & The Identity and Access Management tab is where you set up and manage the directory service,
Access authentication methods, access policies, and preferences. You can configure Okta and Workspace
Management ONE UEM settings to integrate with Workspace ONE Access.
Roles In the Roles tab, you manage administrator roles. Users can be assigned as admins to the three pre-
defined administrator roles and you can create custom administrator roles that give limited
permissions to specific services in the Workspace ONE Access console.
Appliance For the on premises deployments, the Appliance Settings tab is displayed. You manage the license
Settings settings and configure SMTP settings.
Supported Web Browsers to Access the Workspace ONE Access
Console
The Workspace ONE Access console is a web-based application you use to manage the
Workspace ONE Access service. You can access the Workspace ONE Access console from the
latest versions of Mozilla Firefox, Google Chrome, Safari, Microsoft Edge, and Internet Explorer 11.
Note In Internet Explorer 11, JavaScript must be enabled and cookies allowed to authenticate
through Workspace ONE Access.
VMware, Inc. 7VMware Workspace ONE Access Administration Guide
Workspace ONE Intelligent Hub for End Users
End users can access entitled resources from the Workspace ONE Intelligent Hub app on their
devices or from the Intelligent Hub portal in web browsers. The Intelligent Hub portal is the
default interface used when users access and use their entitled resources with a browser.
When Workspace ONE UEM is integrated with Workspace ONE Access, end users can see all
applications that they are entitled to. Native applications that are internally developed or publicly
available in app stores can be made available to your end users from the Hub portal.
Workspace ONE Access Identity and Access Management
Settings Overview
The Identity and Access Management tab in the Workspace ONE Access console is where you
can set up and manage the authentication methods, access policies, directory service, and
integrate with Workspace ONE UEM.
The following is a description of the setup settings in the Identity and Access Management tab.
Table 1-1. Identity and Access Management Set Up Settings
Setting Description
Setup > Connectors The Connectors page lists the connectors that are deployed inside your enterprise
network. The Workspace ONE Access connector is an on-premises component of
Workspace ONE Access that integrates with your on-premises infrastructure.
The following enterprise services can be installed on a connector.
n Directory Sync service that syncs users from Active Directory or LDAP directories to
the Workspace ONE Access service.
n User Auth service that provides connector-based authentication methods, including
Password (cloud deployment, RSA SecurID (cloud deployment), and RADUS (cloud
deployment).
n Kerberos Auth service that provides Kerberos authentication for internal users.
Setup > Custom Branding In the Custom Branding page, you can customize the appearance of the Workspace ONE
Access console header and sign-in screen.
Note You customize the look and add a logo that displays in the Workspace ONE
Intelligent Hub app or Hub portal view from the Hub Services console, Branding page.
Setup > User Attributes The User Attributes page lists the default user attributes that sync in the directory. You can
add other attributes that you can map to Active Directory attributes. See the Directory
Integration with VMware Workspace ONE Access guide.
Setup > Auto Discovery For on-premises deployment, when Workspace ONE Access and Workspace ONE UEM are
integrated, you can integrate the Windows Autodiscovery service that you deployed in
your Workspace ONE UEM configuration with the Workspace ONE Access service. For
more details about setting up auto discovery in Workspace ONE UEM in on-premises
deployments, see the Workspace ONE UEM documentation Auto discovery Service
Installation Guide.
For cloud deployments, you can register your email domain to use the auto-discovery
service to make it easier for users to access their apps portal using Workspace ONE
Intelligent Hub. End users can enter their email addresses instead of the organization's URL
when they access their apps portal through Workspace ONE Intelligent Hub.
VMware, Inc. 8VMware Workspace ONE Access Administration Guide
Table 1-1. Identity and Access Management Set Up Settings (continued)
Setting Description
Setup > Okta On this page, you can enter your Okta tenant information to connect Workspace ONE
Access to the Okta tenant and retrieve apps from Okta. See Integrating VMware
Workspace ONE with Okta for configuration information.
Setup > VMware On this page, you can set up integration with Workspace ONE UEM. You can enable the
Workspace ONE UEM catalog settings with UEM, enable compliance check to verify that managed devices
adhere to Workspace ONE UEM compliance policies, and enable user password
authentication through the AirWatch Cloud Connector (ACC). See Guide to Deploying
VMware Workspace ONE with Workspace ONE Access guide on the Workspace ONE
Documentation page.
Setup > Preferences The Preferences page displays features that the admin can enable. This page includes the
following preferences.
n Enable Show that the System Domain on Login Page .
n Enable persistent cookies. The persistent cookie stores users' sign-in session details so
that users do not need to reenter their user credentials when accessing their managed
resources from their iOS or Android mobile devices. See the Managing User
Authentication Methods guide.
n Enable Hide Domain Drop-Down Menu, when you do not want to require users to select
their domain before they log in.
n Select the User Sign-in Unique Identifier option to display the identifier-based login
page. See Chapter 5 Managing the User Login Experience in Workspace ONE Access.
n Customize the Sign-in Input Prompt can be used to customize the prompt in the user
text box on the sign-in screen.
n Enable Sync Group Members to the Directory when Adding Groups to sync the
members in the groups from Active Directory. When this is disabled, names are synced,
but members of the group are not.
n Enable User Sign-in Unique Identifier to hide the domain request page.
Setup > Terms of Use On this page, you can set up Workspace ONE terms of use and ensure that end users
accept these terms of use before using the Workspace ONE Intelligent Hub portal.
The following is a description of the settings to use to manage the services in the Identity and
Access Management tab.
VMware, Inc. 9VMware Workspace ONE Access Administration Guide
Table 1-2. Identity and Access Management Manage Settings
Setting Description
Manage > Directories The Directories page lists directories that you created. You create one or more directories
and then sync those directories with your enterprise directory deployment. On this page,
you can see the number of groups and users that are synced to the directory and the last
sync time. You can click Sync Now, to start the directory sync.
When you click a directory name, you can edit the sync settings, navigate the Identity
Providers page, and view the sync log.
From the directories sync settings page, you can manage the following.
n Schedule the sync frequency.
n View the list of domains associated with this directory.
n Change the mapped attributes list.
n Update the user and groups list that syncs.
n Set the safeguard targets.
See the Directory Integration with VMware Workspace ONE Access guide.
Manage > Identity You can configure and manage the following identity provider types on this page.
Providers n Workspace ONE Access identity provider for Kerberos authentication
n Built-in identity provider for User Auth authentication methods and authentication
methods managed by Workspace ONE Access
n Third-party identity providers
See the Managing Workspace ONE Access User Authentication Methods guide.
Manage > Password On the Password Recovery Assistant page, you can change the default behavior when
Recovery Assistant "Forgot password" is clicked in the sign-in screen by the end user.
Manage > Authentication The Authentication Methods page is used to configure cloud authentication methods
Methods associated to the Workspace ONE Access service. These authentication methods are then
associated with the built-in identity providers. See Managing Authentication Methods for
Identity Providers for configuration information.
Manage > Policies The Policies page lists the default access policy and any other Web application access
policies you created. You also configure the network ranges to use from this page.
Policies are a set of rules that specify criteria that must be met for users to access their
Workspace ONE Intelligent Hub portal or to launch Web applications that are enabled for
them. You can edit the default policy. If Web applications are added to the catalog, you
can add new policies to manage access to these Web applications. See Managing Access
Policies in Workspace ONE Access That Apply to Users for more information about access
policies.
Manage > Enterprise The User Auth service and Kerberos Auth service authentication methods are configured
Authentication Methods and managed from this page. See Managing User Authentication Methods in VMware
Workspace ONE Access.
Join or Leave the Customer Experience Improvement
Program for Workspace ONE Access (On Premises Only)
This product participates in VMware’s Customer Experience Improvement Program (“CEIP”).
Details regarding the data collected through CEIP and the purposes for which it is used by
VMware, Inc. 10VMware Workspace ONE Access Administration Guide
VMware are set forth at the Trust & Assurance Center at http://www.vmware.com/trustvmware/
ceip.html. To join or leave the CEIP for this product, follow this procedure.
Note If your network is configured to access the Internet through HTTP proxy, to send the data
collected through CEIP to VMware you must adjust the proxy settings in VMware Workspace
ONE Access. See Setting Proxy Server Settings in the Installing and Configuring VMware
Workspace ONE Access guide.
Procedure
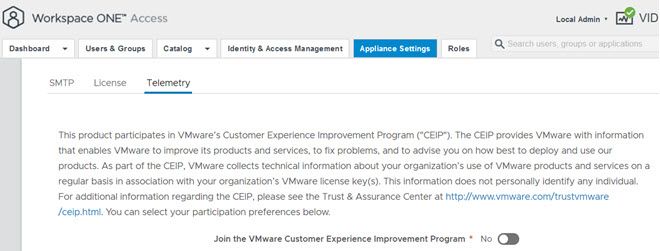
1 In the Workspace ONE Access console, click the Appliance Settings tab, then select
Telemetry.
2 Select the Join the VMware Customer Experience Improvement Program check box to join
the CEIP program or deselect the check box to leave the CEIP program.
3 Click Save.
VMware, Inc. 11Managing Administrator Roles in
Workspace ONE Access 2
Workspace ONE Access uses role-based access control to manage administrator roles. With
roles-based access control, you create functional roles that control admin access to tasks in the
Workspace ONE Access console, and assign the roles to one or more users and groups.
Three predefined administrator roles are built in to the Workspace ONE Access service. You can
assign these predefined roles to users and groups in your service. You cannot modify or delete
these roles.
You can also create custom administrator roles that give limited permissions to specific services
in the Workspace ONE Access console. Within the service, specific operations can be selected as
the type of action that can be performed in the role.
This chapter includes the following topics:
n About the Roles-Based Access Roles in Workspace ONE Access
n Add an Administrator Role in Workspace ONE Access
n Assign Users and Groups to a Workspace ONE Access Administrator Role
n Removing Workspace ONE Access Administrator Roles
n Example 1. Create an Admin Role in Workspace ONE Access to Manage Office 365
Application and Entitlements
n Example 2. Create an Admin Role in Workspace ONE Access to Manage Password Reset in a
Local Directory
About the Roles-Based Access Roles in Workspace ONE
Access
The three predefined administrator roles that can be granted in the Workspace ONE Access
server are super administrator, read-only administrator, and directory administrator.
n The super administrator role can access and manage all features and functions in the
Workspace ONE Access services.
VMware, Inc. 12VMware Workspace ONE Access Administration Guide
The first super administrator is the local administrator user that Workspace ONE Access
creates when you first set up the service. The service creates the administrator in the System
Domain of the System Directory. You can assign other users to the super administrator role in
the System Directory. As a best practice, grant the super administrator role to a select few.
n The read-only administrator role can view the details in the Workspace ONE Access console
pages, including the dashboard and the reports, but cannot make changes. All administrator
roles are automatically assigned the read-only role.
Note Some Workspace ONE Access console pages are not enabled to be viewed by an
admin entitled to only the read-only role. When read-only admins try to view these pages,
they are redirected to the dashboard.
n The directory administrator role can manage users, groups, and directories. The directory
administrator can manage directory integration for both enterprise directories and local
directories within your organization. The directory administrator can also manage local users
and groups.
Figure 2-1. Roles Tab in Workspace ONE Access Console
You can assign these predefined roles to users and groups in your service. You cannot modify or
delete these roles.
You can also create custom administrator roles that give limited permissions to specific services
in the Workspace ONE Access console. Within the service, specific operations can be selected as
the type of action that can be performed in the role.
Multiple roles can be assigned to the same user and groups. When a user is assigned more than
one role, the behavior of the roles applied is additive. For example, if an administrator is assigned
two roles, one with write access to policy management and the other without, that administrator
has access to modify policies.
Role-based access control can be set up to manage the following services in the administrator
console.
VMware, Inc. 13VMware Workspace ONE Access Administration Guide
Service Type Service Description
Catalog The Catalog is the repository of all the Workspace ONE resources that can be entitled to
users.
The Catalog service can manage the following types of actions.
n Web Applications
n App sources
n Third-party applications
n ThinApp Virtual Apps Collection
n Virtual Apps Collection which includes Horizon, Horizon Cloud, and Citrix-based
applications.
Note A super admin is required to initiate the getting started flow in the Virtual Apps
Collection page in the Catalog. After the initial getting started flow, admin roles with the
Catalog service can manage ThinApp packages and Desktop applications.
Directory Management The Directory Management service can manage the following types of actions either for the
organization or for specific directories in your organization.
n Enterprise Directory. The admin can add, edit, and delete directories in the service.
Editing a directory includes managing directory settings, including sync settings.
n Local Directory. The admin can create, edit, and delete local directories. Editing a
directory includes managing settings and creating, editing, and deleting local users and
groups.
When the Directory Management service is included in a role, the Identity & Access
Management service must also be configured in the role.
Users and Groups The Users and Groups service can manage the following types of action in your total
organization or for specific domains in your organization.
n Groups
n Users
n Password resets for local users
Entitlements The Entitlement service can assign users to web and virtual applications.
The following types of entitlement actions can be managed. For each of these actions, you
can configure the role to assign users and groups to all the resources in your organization
or to specific applications. You can also entitle applications to users and groups within
specific domains.
n Web entitlements
n Third-party entitlements
Roles Administration The Roles Administration service can manage the assignment of the admin role to users.
When you create a role with the Roles Administration service, you must configure the User
and Groups service and select the Manage Users and Manage Groups actions.
Administrators who are assigned this role can promote users and groups to the
administrator role and can remove the administrator role from users or groups.
Identity & Access The Identity & Access Management service can manage the settings in the Identity & Access
Management Management tab. To manage the directory settings, the Directory Management service is
also required.
Note Administrators with the Identity and Access Management role can integrate
Workspace ONE Access with Workspace ONE UEM and create the directory from the
Workspace ONE UEM console.
VMware, Inc. 14VMware Workspace ONE Access Administration Guide
When you add a role, you select the service and define which actions can be performed in the
service. In some of the services, you can select to manage all resources for the selected action or
some resources.
Manage Read-Only Access
Read-only Access is granted with each role that is assigned to an administrator. You can also
assign users and groups to the read-only role from the ReadOnly Admin roles page.
The read-only administrator role gives users admin access to view the Workspace ONE Access
console, but unless an administrator is assigned another role with additional access, they can
only view the content in the Workspace ONE Access console.
When you assign the read-only role as a separate role, you can remove the role from the
ReadOnly Admin role Assign page or from the user or group profile page.
Add an Administrator Role in Workspace ONE Access
With role-based access control, you can create a role to manage one action or many actions.
When you create a role, you can add one or more services to the role. You name the role, select
the type of services and the specific actions within the service that the role can manage.
n When you create a role with the Directory Management service, the Identity and Access
Management service must also be configured in the role.
n When you create a role with the Roles Administration service, the User and Groups service
must also be configured with the actions to manager users and to manage groups selected.
Prerequisites
To create a role in the Workspace ONE Access service, you must be a super admin who can
access and manage all features and functions in the Workspace ONE Access services, or an
admin assigned the role that is configured with the Roles Administration service.
Procedure
1 In the console Roles tab, click Add.
2 In the Role Name text box, enter a descriptive role name and add a description.
Each role name in your environment must be unique.
3 Click Next.
4 Select the service to be managed by this role.
5 In the Actions drop-down menu, select the type of actions that can be managed.
6 Select All resources to manage all resources within the action, or select Some and then select
the condition that can be managed from the Conditions drop-down menu.
7 To add additional actions to be managed by this role, click + and complete the configuration
action.
VMware, Inc. 15VMware Workspace ONE Access Administration Guide
8 Click Save.
The Services page displays the configuration you set up.
9 If you want to add another service to this role, select the service and complete the
configuration steps 5–8.
10 When finished, click Save on the Configuration page.
What to do next
Assign this role to users to make them administrators of this service.
Assign Users and Groups to a Workspace ONE Access
Administrator Role
A Workspace ONE Access super administrator or a role that includes the role administrator
service and the users and groups service can assign a role to users and groups to elevate them
to administrators of that role.
Prerequisites
n Before adding an administrator role to a user who is synced from the Workspace ONE UEM
directory, make sure that the user profile is configured with an Admin User Promote account
in the Workspace ONE UEM console.
When users with the Admin User Promote account sync to Workspace ONE Access, they are
recognized as administrators and can be assigned a role in Workspace ONE Access. If an
admin is not in this account in the UEM console, when the Workspace ONE UEM directory
syncs with the Workspace ONE Access directory, the admin role is removed from the user
profile.
Procedure
1 In the Workspace ONE Access console Roles tab, select the role and click Assign.
2 Enter a name in the search box and select the user or group.
Only groups with fewer than 500 users in the group can be promoted to an administrator
role.
3 Click Save.
The users or groups become administrators for the role. The user profile page is updated to
show the role.
Removing Workspace ONE Access Administrator Roles
An Administrator role in Workspace ONE Access can be revoked from the specific role’s Assign
page. You can revoke all roles that are assigned to a user from the user’s profile page.
VMware, Inc. 16VMware Workspace ONE Access Administration Guide
You can remove the group from the role, to revoke the role for all members of the group. You
cannot remove a role from a specific member of the group. To remove only the user from the
role, you remove the user from the group.
Remove Workspace ONE Access Administrator Role from Individual
Users
A super administrator or a role administrator can remove an administrator user from a role in the
Workspace ONE Access service.
You can begin from the user's profile page in the Users and Groups tab to revoke the role. When
you begin from the profile page, you click the link to remove the role and are redirected to the
Roles page.
Note Administrator roles can be revoked directly from the role's Assign page.
Procedure
1 In the Workspace ONE Access console Users and Groups tab, select Users and then the user
name.
The Profile page, Roles row lists all the roles assigned to this user.
2 In the Roles row, click here.
You are redirected to the Roles page.
3 Select the role and click Assign.
4 Click X next to the name.
5 Click Save.
The user is removed from the role and the role is removed from the user profile.
Results
Remove a Group from a Workspace ONE Access Admin Role
When you remove a group from a role, access is revoked for all members of the group. The
Roles section of the user and the group profile pages is updated to remove the role.
Individual member of a group cannot be removed from a role. To remove a member of a group
from a role, remove the user from the group.
If a user in the group was directly assigned to the role, when the group is removed from the role,
the administrator role is maintained for the user.
Note Group administrator roles can be revoked directly from the role's Assign page.
VMware, Inc. 17VMware Workspace ONE Access Administration Guide
Procedure
1 In the console Users and Groups tab, select Groups and then the group name.
The Profile page, Roles row lists all the roles assigned to this group.
2 In the Roles row, click here.
You are redirected to the Roles page.
3 Select the role and click Assign.
4 Click X next to the group name.
5 Click Save.
The group is removed from the role. The role is removed from the group profile and from
each member profile.
Example: Example of Removing Groups from a Role
Group A, which includes User1, User2, and User3, is assigned to the Directory Admin role. The
Group A, User1, User2, and User3 profiles are updated to reflect the Directory Admin role in their
profile pages.
User2, also is directly assigned to the Directory Admin role.
You revoke access to Group A. Group A, User1, and User3 are removed from the role and the
role is removed from these profile pages.
Because User2 was directly assigned to the Directory Admin role, User2 is still assigned to the
Directory Admin role.
Example 1. Create an Admin Role in Workspace ONE Access
to Manage Office 365 Application and Entitlements
With role-based access control in Workspace ONE Access, you can grant administrator access to
users and groups, enabling them to manage specific applications.
For example, the super administrator can delegate the day-to-day duties to manage the Office
365 application in Workspace ONE to another administrator. You create an administrator role to
manage Office 365 in Workspace ONE and to manage the entitlements to the application.
Procedure
1 In the console Roles page, click Add. Create a descriptive role name and describe the
purpose of the role. Click Next.
VMware, Inc. 18VMware Workspace ONE Access Administration Guide
2 In the Configuration page, select the Catalog service. For Actions, select Manage Web
Applications. For Resources, select Some. For Conditions, select Web Applications and
enter Office 365 in the search box. Save the configuration.
You can add other applications to manage. For example, search for SalesForce and add it to
the list of web applications to be managed in this role.
3 Again, on the Configuration page, select the Entitlements service. For Actions, select
Manage Web Entitlements. For Resources, select Some. For Conditions, select Applications
and in the search box, enter Office 365 to select the same application. Save the
configuration.
If you added another application in the Catalog Service, make sure that you add it here, if you
want the admin to manage the entitlements.
4 On the Configuration page, click Save again.
The role to manage the Office 365 application is created and is listed on the Roles page.
VMware, Inc. 19VMware Workspace ONE Access Administration Guide
5 Select the role you created and click Assign. In the Search text box, enter the users or group
names who should be granted access. Select the user or group and click Save.
The user or group is now the administrator for this role. The profile page is updated to show
the assigned administrator role.
Example 2. Create an Admin Role in Workspace ONE
Access to Manage Password Reset in a Local Directory
You can create a simple administrator role in Workspace ONE Access to manage password
resets for specific domains.
Procedure
1 In the Workspace ONE Access console Roles page, click Add, enter a descriptive role name,
and describe the purpose of the role. Click Next.
VMware, Inc. 20VMware Workspace ONE Access Administration Guide
2 In the Configuration page, select the User and Groups service. For Actions, select Reset
Password. For Resources, select Some. For Conditions, select the local domain and enter the
local directory name in the search box to select the local directory. Save the configuration.
3 Select the role you created and click Assign. In the Search text box, enter the user or user
group name. Select the user or group and click Save.
The users or group is now the administrator for this role. The profile page is updated to show
the assigned administrator role.
VMware, Inc. 21Using Local Directories in Workspace ONE Access 3 A local directory is one of the types of directories that you can create in the Workspace ONE Access service. A local directory enables you to provision local users in the service and provide them access to specific applications, without having to add them to your enterprise directory. A local directory is not connected to an enterprise directory and users and groups are not synced from an enterprise directory. Instead, you create local users directly in the local directory. A default local directory, named System Directory, is available in the service. You can also create other local directories. System Directory The System Directory is a local directory that is automatically created in the service when it is first set up. This directory uses a domain called System Domain. You cannot change the directory or domain name of the System Directory or add new domains to it. You cannot delete the System Directory or the System Domain. For Workspace ONE Access cloud deployments, a local administrator user is created in the System Domain of the System Directory when the tenant is first set up. The credentials you receive when you get a new tenant belong to this local administrator user. The local administrator user that is created when you first set up the Workspace ONE Access appliance is created in the System Domain of the System Directory. The System Directory is typically used to set up a few local administrator users to manage the service. To provision end users and additional administrators and entitle them to applications, creating a new local directory is recommended. Local Directories Besides the System Directory, other local directories can be created. Each local directory can have one or more domains. When you create local users, you specify the directory and domain for users. VMware, Inc. 22
VMware Workspace ONE Access Administration Guide

You can select user attributes that are required for the local users. User attributes such as
userName, lastName, firstName, and email are specified at the global level in the Workspace ONE
Access service and are required. Global user attributes apply to all directories in the service. At
the local directory level, you can select other attributes that are required for the directory.
Selecting other attributes allows you create a custom set of attributes for each local directory.

Creating local directories with customized mapped attributes is useful in scenarios such as the
following.

n   You can create a local directory for a specific type of user that is not part of your enterprise
    directory. For example, you can create a local directory for partners, and provide partners
    access to only the specific applications they need.

n   If you want different user attributes or authentication methods for different sets of users, you
    can create different local directories. For example, you can create a local directory for
    distributors that has user attributes such as region and market size, and another local
    directory for suppliers that has user attributes such as product category and supplier type.

Identity Provider for System Directory and Local Directories
By default, the System Directory is associated with an identity provider named System Identity
Provider. The Password (Local Directory) authentication method is enabled on this identity
provider. The default_access_policy_set policy rule sets up this password authentication for the
ALL RANGES network range for the Web Browser device type. You can configure additional
authentication methods to the policy rules.

When you create a new local directory, this local directory is not associated with an identity
provider. After creating the local directory, create a new built-in identity provider of type
Embedded. Associate the local directory with the identity provider and enable the Password
(Local Directory) authentication method. Multiple local directories can be associated with the
same identity provider.

The Workspace ONE Access connector is not required for either the System Directory or for
local directories you create.

Password Management for Local Directory Users
By default, all users configured in local directories can change their password in the user portal or
from the Intelligent Hub app. You can set a password policy for local users. You can also reset
local user passwords as needed.

Users click their name in the top-right corner to change their passwords when they are logged
into their user portal . They select Account from the drop-down menu and click the Change
Password link. In the Intelligent Hub app users can change their passwords by clicking their
profile and selecting Change Password.

For information on setting password policies and resetting local user passwords, see Managing
Passwords in Workspace ONE Access.

VMware, Inc.                                                                                           23
VMware Workspace ONE Access Administration Guide This chapter includes the following topics: n Creating a Local Directory in Workspace ONE Access n Changing Local Directory Settings in Workspace ONE Access n Deleting a Local Directory in Workspace ONE Access n Configuring Authentication Method for System Admin Users in Workspace ONE Access Creating a Local Directory in Workspace ONE Access To create a local directory in the Workspace ONE Access service, you specify the user attributes for the directory, create the directory, and identify it with an identity provider. Set User Attributes at the Global Level Workspace ONE Access Before you create a local directory in Workspace ONE Access, review the global user attributes on the User Attributes page and add custom attributes, if necessary. User attributes, such as firstName, lastName, email and domain, are part of a user's profile. In the Workspace ONE Access service, user attributes are defined at the global level and apply to all directories in the service, including local directories. At the local directory level, you can override whether an attribute is required or optional for users in that local directory, but you cannot add custom attributes. If an attribute is required, you must provide a value for it when you create a user. The following words cannot be used when you create custom attributes. Table 3-1. Words that cannot be used as Custom Attribute Names active addresses costCenter department displayName division emails employeeNumber entitlements externalId groups id ims locale manager meta name nickName organization password phoneNumber photos preferredLanguage profileUrl roles timezone title userName userType x509Certificate Note The ability to override user attributes at the directory level only applies to local directories, not to Active Directory or LDAP directories. Procedure 1 In the Workspace ONE Access console, click the Identity & Access Management tab. VMware, Inc. 24
VMware Workspace ONE Access Administration Guide
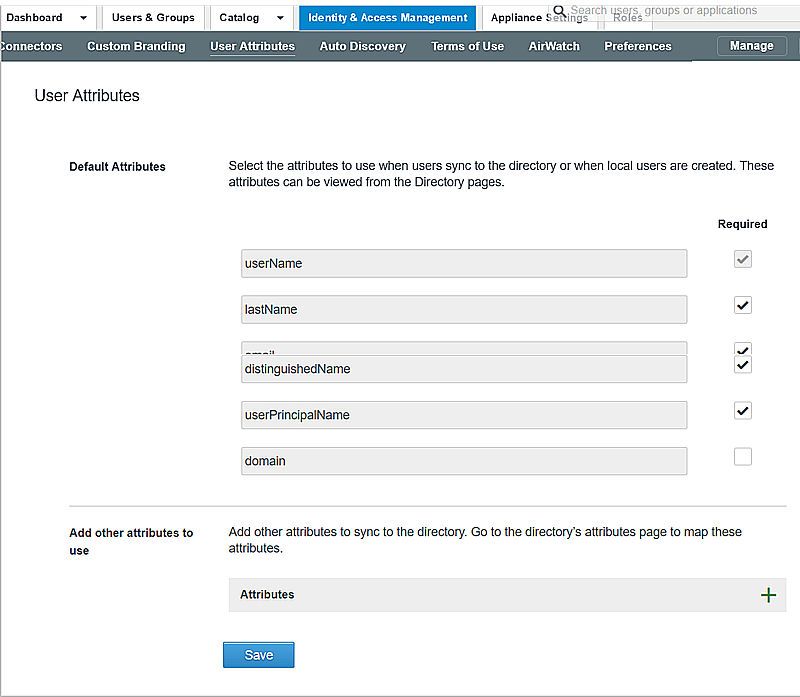
2 Click Setup, then click the User Attributes tab.
3 Review the list of user attributes and add additional attributes, if necessary.
Note Although this page lets you select which attributes are required, it is recommended
that you make the selection for local directories at the local directory level. If an attribute is
marked required on this page, it applies to all directories in the service, including Active
Directory or LDAP directories.
4 Click Save.
What to do next
Create the local directory.
Create a Local Directory Workspace ONE Access
After you review and set global user attributes, create the local directory in Workspace ONE
Access.
Procedure
1 In the Workspace ONE Access console, click the Identity & Access Management tab, then
click the Directories tab
2 Click Add Directory and select Add Local User Directory from the drop-down menu.
3 In the Add Directory page, enter a directory name and specify at least one domain name.
The domain name must be unique across all directories in the service.
For example:
VMware, Inc. 25VMware Workspace ONE Access Administration Guide
4 Click Save.
5 In the Directories page, click the new directory.
6 Click the User Attributes tab.
All the attributes from the Identity & Access Management > Setup > User Attributes page are
listed for the local directory. Attributes that are marked required on that page are listed as
required in the local directory page too.
7 Customize the attributes for the local directory.
You can specify which attributes are required and which attributes are optional. You can also
change the order in which the attributes appear.
Important The attributes userName, firstName, lastName, and email are always required for
local directories.
n To make an attribute required, select the check box next to the attribute name.
n To make an attribute optional, deselect the check box next to the attribute name.
n To change the order of the attributes, click and drag the attribute to the new position.
If an attribute is required, when you create a user you must specify a value for the attribute.
For example:
VMware, Inc. 26VMware Workspace ONE Access Administration Guide
8 Click Save.
What to do next
Associate the local directory with the identity provider you want to use to authenticate users in
the directory.
Associate the Local Directory with an Identity Provider in Workspace
ONE Access
Associate the local directory with an identity provider in Workspace ONE Access so that users in
the directory can be authenticated. Add a new built-it identity provider of type Embedded and
enable the Password (Local Directory) authentication method on it.
Prerequisites
The Password (Local Directory) authentication method must be configured in the Identity &
Access Management > Authentication Methods page.
Network ranges of defined IP addresses that local users can use set up.
Procedure
1 In the Identity & Access Management tab, click the Identity Providers tab.
2 Click Add Identity Provider and select Create Built-in IDP.
3 Enter the following information.
Option Description
Identity Provider Name Enter a name for the identity provider. For example, Local Users.
Users Select the local directory you created.
Network Select the networks from which this identity provider can be accessed.
VMware, Inc. 27VMware Workspace ONE Access Administration Guide
Option Description
Authentication Methods Select Password (Local Directory).
KDC Certificate Export You do not need to download the certificate unless you are configuring
mobile SSO for Workspace ONE UEM-managed iOS devices.
4 Click Add.
Results
The identity provider is created and associated with the local directory. Later, you can configure
other authentication methods on the identity provider.
You can use the same identity provider for multiple local directories.
What to do next
Create local users and groups. You create local users and groups in the Users & Groups tab in
the identity manager console. See Chapter 6 Managing Users and Groups in Workspace ONE
Access for more information.
Changing Local Directory Settings in Workspace ONE
Access
After you create a local directory in Workspace ONE Access service, you can modify its settings
at any time.
You can change the following settings.
n Change the directory name.
n Add, delete, or rename domains.
n Domain names must be unique across all directories in the service.
VMware, Inc. 28VMware Workspace ONE Access Administration Guide
n When you change a domain name, the users that were associated with the old domain
are associated with the new domain.
n The directory must have at least one domain.
n You cannot add a domain to the System Directory or delete the System Domain.
n Add new user attributes or make an existing attribute required or optional.
n If the local directory does not have any users yet, you can add new attributes as either
optional or required, and change existing attributes to required or optional.
n If you have already created users in the local directory, you can add new attributes as
optional attributes only, and change existing attributes from required to optional. You
cannot make an optional attribute required after users have been created.
n The attributes userName, firstName, lastName, and email are always required for local
directories.
n As user attributes are defined at the global level in the Workspace ONE Access service,
any new attributes you add will appear in all directories in the service.
n Change the order in which attributes appear.
Procedure
1 Click the Identity & Access Management tab.
2 In the Directories page, click the directory you want to edit.
3 Edit the local directory settings.
Option Action
Change the directory name a In the Settings tab, edit the directory name.
b Click Save.
Add, delete, or rename a domain a In the Settings tab, edit the Domains list.
b To add a domain, click the green plus icon.
c To delete a domain, click the red delete icon.
d To rename a domain, edit the domain name in the text box.
Add user attributes to the directory a Click the Identity & Access Management tab, then click Setup.
b Click the User Attributes tab.
c Add attributes in the Add other attributes to use list, and click Save.
VMware, Inc. 29VMware Workspace ONE Access Administration Guide
Option Action
Make an attribute required or a In the Identity & Access Management tab, click the Directories tab.
optional for the directory b Click the local directory name and click the User Attributes tab.
c Select the check box next to an attribute to make it a required attribute,
or deselect the check box to make it an optional attribute.
d Click Save.
Change the order of the attributes a In the Identity & Access Management tab, click the Directories tab.
b Click the local directory name and click the User Attributes tab.
c Click and drag the attributes to the new position.
d Click Save.
Deleting a Local Directory in Workspace ONE Access
You can delete a local directory that you created in the Workspace ONE Access service. You
cannot delete the System Directory, which is created by default when you first set up the service.
Caution When you delete a directory, all users in the directory are also deleted from the service.
Procedure
1 Click the Identity & Access Management tab, then click the Directories tab.
2 Click the directory you want to delete.
3 In the directory page, click Delete Directory.
Configuring Authentication Method for System Admin Users
in Workspace ONE Access
The default authentication method that admin users enter to log in from the System directory is
Password (Local Directory). The default access policy includes a policy rule configured with
Password (Local Directory) as a fallback method so that admins can log in to the Workspace
ONE Access console and to the portal.
When you create access policies for specific Web and desktop applications that the system
admin role is entitled to, configure a rule in the policies to include Password (Local Directory) as a
fallback authentication method. Otherwise, an admin cannot log in to the application.
VMware, Inc. 30VMware Workspace ONE Access Administration Guide VMware, Inc. 31
How Just-in-Time User
Provisioning Works in Workspace
ONE Access
                                                                                             4
Just-in-Time provisioning provides another way of provisioning users in the Workspace ONE
Access service. Instead of syncing users from an Active Directory or other LDAP directory
instance, with Just-in-Time provisioning users are created and updated dynamically when they
log in through SAML SSO or OpenID Connect SSO.

Note An OpenID Connect identity provider only can be configured for Workspace ONE Access
cloud tenants.

In this scenario, Workspace ONE Access acts as the service provider (SP).

Just-in-Time configuration can only be configured for third-party identity providers. It is not
available for the connector. The third-party identity provider manages all user creation and
management either through SAML assertions or OpenID Connect claims.

Just-in-Time Directory
The third-party identity provider must have a Just-in-Time directory associated with it in the
service.

When you enable Just-in-Time provisioning for an identity provider, you create a Just-in-Time
directory and specify one or more domains for it. Users belonging to those domains are
provisioned to the directory. If multiple domains are configured for the directory, a domain
attribute must be included in the configuration. If a single domain is configured for the directory,
a domain attribute is not required, but if specified, its value must match the domain name.

Only one directory, of type Just-in-Time, can be associated with an identity provider that has
Just-in-Time provisioning enabled.

User Creation and Management
If Just-in-Time user provisioning is enabled, when a user goes to the Workspace ONE Access
service login page and selects a domain, the page redirects the user to the correct identity
provider. The user logs in, is authenticated, and the identity provider redirects the user back to
the Workspace ONE Access service. The data required to provision the user is in the SSO

VMware, Inc.                                                                                         32
VMware Workspace ONE Access Administration Guide
response and is used to create the user in the Workspace ONE Access service. Only the data for
the user attributes that are mapped in the Workspace ONE Access directory are used to
provision the user. The user is also added to groups based on the attributes and receives the
entitlements that are set for those groups.
On subsequent logins, if there are any changes in user data, the user data is updated in the
service.
Just-in-Time provisioned users cannot be deleted. To delete users, you must delete the Just-in-
Time directory.
All user management is handled through the identity provider response. You cannot create or
update these users directly from the service. Just-in-Time users cannot be synced from Active
Directory or other LDAP directories.
This chapter includes the following topics:
n Create Local Groups in Workspace ONE Access
n Review User Attributes for Just-in-Time Provisioning in Workspace ONE Access
n Requirements to Use SAML Assertions for Just-in-Time Provisioning in Workspace ONE
Access
n Requirements to Use OpenID Connect Claims for Just-in-Time Provisioning in Workspace
ONE Access (Cloud Only)
n Configuring Just-in-Time User Provisioning in Workspace ONE Access
n Deleting a Just-in-Time Directory in Workspace ONE Access
n Disabling Just-in-Time User Provisioning in Workspace ONE Access
n Just-in-Time Error Messages in Workspace ONE Access
Create Local Groups in Workspace ONE Access
Users provisioned through Just-in-Time provisioning in the Workspace ONE Access service are
added to groups based on their user attributes and derive their resources entitlements from the
groups to which they belong.
Before you configure Just-in-Time provisioning, ensure that you have local groups in the service.
Create one or more local groups, based on your needs. For each group, set the rules for group
membership and add entitlements.
Note Reference to local groups is synonymous with system domain groups.
Procedure
1 In the Workspace ONE Access console, click the Users & Groups tab.
2 Click Create Group, provide a name and description for the group, and click Add.
3 In the Groups page, click the new group.
VMware, Inc. 33VMware Workspace ONE Access Administration Guide
4 Set up users for the group.
a In the left pane, select Users in This Group.
b Click Modify Users in This Group and set the rules for group membership.
5 Add entitlements to the group.
a In the left pane, select Entitlements.
b Click Add Entitlements and select the applications and the deployment method for each
application.
c Click Save.
Review User Attributes for Just-in-Time Provisioning in
Workspace ONE Access
Review the user attributes that are set for all Workspace ONE Access directories in the User
Attributes page and modify them, if necessary. When a user is provisioned through Just-in-Time
provisioning, the data in the SAML assertion or the OpenID Connect token is used to create the
user. Only those SAM attributes or OpenID Connect claims that match the attributes listed in the
User Attributes page are used.
Note An OpenID Connect identity provider is only for Workspace ONE Access cloud tenants.
Important If an attribute is marked required in the User Attributes page, the SAML assertion or
OpenID Connect token must include the attribute, otherwise login fails.
When you make changes to the user attributes, consider the effect on other directories and
configurations in your tenant. The User Attributes page applies to all directories in your tenant.
Note You do not have to mark the domain attribute required.
Procedure
1 In the administration console, click the Identity & Access Management tab.
2 Click Setup and click User Attributes.
VMware, Inc. 34You can also read