SMS 2.0 SkySTS Server Launch Kit - Skyward Support Center
←
→
Page content transcription
If your browser does not render page correctly, please read the page content below
SMS 2.0 SkySTS Server Launch Kit
GENERAL INFORMATION .............................................................................................................................. 3

   SKYSTS AND WHAT IT MEANS TO YOU ................................................................................................................................3
   SKYSTS INSTALL FOR CLOUD HOSTED AND MANAGED SERVICES CUSTOMERS ............................................................................3
   SKYSTS ON-PREMISES SERVER PRE-INSTALL CHECKLIST ........................................................................................................4
   SKYSTS ON-PREMISES INSTALL SUMMARY..........................................................................................................................4
   SKYSTS ON-PREMISES SERVER FIREWALL REQUIREMENTS .....................................................................................................5
   CHOOSING THE SKYSTS SERVER(S) ....................................................................................................................................5

SMS 2.0 APPLICATION CONFIGURATION ................................................................................................... 6

   WEB CONFIGURATION / SINGLE SIGN-ON CONFIGURATION ...................................................................................................6

SKYSTS SERVER INSTALLATION ................................................................................................................. 8

   DOWNLOAD SKYSTS INSTALLER EXE FROM SKYWARD FTP SITE ...............................................................................................8
   SSL CERTIFICATE REQUIREMENTS ......................................................................................................................................8
   SKYSTS SERVER INSTALL ..................................................................................................................................................9
   TEST SKYSTS INSTALLATION ...........................................................................................................................................14

IDENTITY PROVIDER / RELYING PARTIES CONFIGURATION(S) ........................................................ 15

   SMS 2.0 AS AN IDENTITY PROVIDER CONFIGURATION .........................................................................................................15
   CONFIGURE COMMON RELYING PARTIES ..........................................................................................................................19
   SMS 2.0 TO A REMOTE IDENTITY PROVIDER CONFIGURATION ..............................................................................................21
   TESTING RELYING PARTY / IDP CONFIGURATIONS ...............................................................................................................29
   TROUBLESHOOTING IDENTITY PROVIDER CONFIGURATION(S) ................................................................................................33

RENEWING THE SSL CERTIFICATE ........................................................................................................... 34

   SSL CERTIFICATES USAGE ..............................................................................................................................................34
   SKYSTS WEBSITE CERTIFICATE RENEWAL .........................................................................................................................34
   SKYSTS APPLICATION CERTIFICATE RENEWAL ....................................................................................................................34
   SSL CERTIFICATE PERMISSIONS .......................................................................................................................................35

ADVANCED CONFIGURATION OPTIONS ................................................................................................... 36

   ADDING AN SSO AWARE DISTRICT LINK IN FAMILY / STUDENT ACCESS...................................................................................36
   ADDING AN SSO AWARE NEWSFEED LINK IN SKYPORT FOR ALL USERS...................................................................................37
   ADDITIONAL IIS SETUP FOR LOAD BALANCING SKYSTS ........................................................................................................39
   CONFIGURING MULTIPLE SKYSTS INSTANCES ....................................................................................................................40
   CUSTOMIZING LOGIN PAGES ..........................................................................................................................................40
   SKYSTS CONFIGURATION VALUES ...................................................................................................................................41

________________________________________________________________________________________________________
02.11.2021                                  www.skyward.com                                   Page 2 of 41

General Information
SkySTS and what it means to you
SkySTS (Skyward Secure Token Service) allows SMS 2.0 users to authenticate to a 3rd party
Identity Provider (IdP), and it allows SMS 2.0 to be an Identity Provider (IdP) for 3rd party
systems.

SMS 2.0 to a remote IdP: This means the SMS 2.0 users can log in using credentials from a 3rd
party IdP that supports SAML 2, such as Office 365 (Azure) or ClassLink, using SAML 2. For
an overview video of the Single Sign-On process for your Skyward end-users and other
recommended Skyward Security Best Practices, please visit our link to the Skyward Security
Best Practices Blog.

SMS 2.0 as an IdP: This means that users of the 3rd party system can log in to the 3rd party
system using their SMS 2.0 username/password using SAML 1, 2, or wsFed.

SkySTS is an IIS web-based application that needs to be installed and configured on the SMS 2.0
Web Server(s).

The customer is responsible for the SAML configuration(s) in the 3rd Party Applications

SkySTS Install for Cloud Hosted and Managed Services Customers
If your Cloud Hosted, your hosting provider will install the SkySTS application. If your
Managed Services, IT Services will install the SkySTS application. Cloud Hosted and Managed
Services customers should create an IT Services Service Call to request the SkySTS Install by
calling 1-800-236-0001 or visiting the Support Center.

The customer is responsible for configuring 3rd Relying Parties and Identity Providers in SMS
2.0.

If you are ISCorp Secure Cloud-hosted customer, you must:

    1. Provide the 3rd Party Metadata URL to Skyward or ISCorp so that they can enter a
       Firewall exception.

    2. After the SkySTS install is completed you will be given your SkySTS URL.

Next Step: SMS 2.0 Application Configuration

________________________________________________________________________________________________________
02.11.2021                                  www.skyward.com                                   Page 3 of 41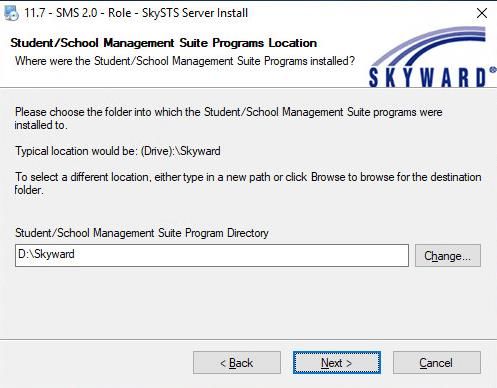
SkySTS On-Premises Server Pre-Install Checklist
    On-Premises System Requirements:
    • SMS 2.0 February 2019 Release Addendum 6 or newer (05.19.02.00.06-11.7)
    • Windows 2019 / 2016 / 2012 R2 / 2012 Server
    • Windows 2012 Requires Windows Service Pack 2
    • VMWare/Hyper-V / Citrix Xen Virtual Servers are supported
    • .NET 4.5 or Newer
    • SkySTS can be set up on any SMS 2.0 Web IIS Server with Progress OpenEdge already
      installed.
    • SkySTS can be configured while users are in Skyward.
    • A purchased SSL Certificate is required (it can be the same certificate used by the SMS
      2.0 Web application)

SkySTS On-Premises Install Summary
SkySTS configuration typically takes approximately 30+ minutes setup per Web Server.

  1.    Configure the SkySTS Application Settings (~5 minutes)
  2.    Run 11.7 - SMS 2.0 SkySTS Server Install Installer (~5 minutes)
  3.    Configure Identity Provider (IdP) or Relying Parties in SMS 2.0 (~10 minutes)
  4.    1 Configure 3rd Party Applications.

  5.    Optional – Advanced Configuration options (~15 minutes)
  6.    Test SkySTS (~10 minutes)
1 The   customer is responsible for the SAML configuration(s) in the 3rd Party Applications.

________________________________________________________________________________________________________
02.11.2021                                  www.skyward.com                                   Page 4 of 41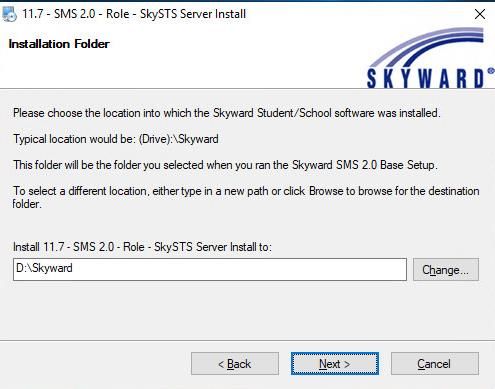
SkySTS On-Premises Server Firewall Requirements
If the SMS 2.0 IIS Web Server(s) have a firewall between the Web Server and the database,
please ensure the following ports are open. Customers may define custom ports when the initial
setup was completed so all ports should be verified using the OpenEdge Explorer / Management
Tool.

    Default ports used by SkySTS
    • From Web Server(s) to Database Server →NameServer UDP Port 5162
    • From Web Server(s) to Database Server → TCP Port for the Stateless AppServer
           o Student Management default → TCP 3095
           o School Management (Combined Database) default → TCP 3099
           o Student Management Training default → TCP 4001
           o School Management Training (Combined Database) default → TCP 4005
    • Both Directions Web Server(s) / Database Server -> TCP Port Range for the Stateless
       AppServer Default → TCP range 2002 – 2202

Note: The Stateless AppServer for Student Management is named asStuMon, for School
Management and (Combined Database) is named asSkyMon For Training systems, the Stateless
AppServer for Student Management is named asStuMonTrn, for School Management and
(Combined Database) is named asSkyMonTrn

Choosing the SkySTS Server(s)
 If only one Database/Web/Report Server is installed, then this is where SkySTS Server will be
 configured. If you have multiple servers, you should configure SkySTS on the Web Server that
 is accessible from the internet. Verify the server meets the minimum requirements before
 configuring SkySTS.

 SkySTS can be configured while users are in SMS 2.0. If .NET was recently installed, a reboot
 is suggested but not always necessary. In some rare situations, the server must be rebooted
 before SkySTS will work correctly.

If multiple load-balanced web servers exist, you must install SkySTS on every Web Server.
Also, complete the Additional IIS Setup for Load Balancing SkySTS to set up a Machine Key
for the load-balanced servers; information included in Advanced Configuration Options at the
end of this guide.

________________________________________________________________________________________________________
02.11.2021                                  www.skyward.com                                   Page 5 of 41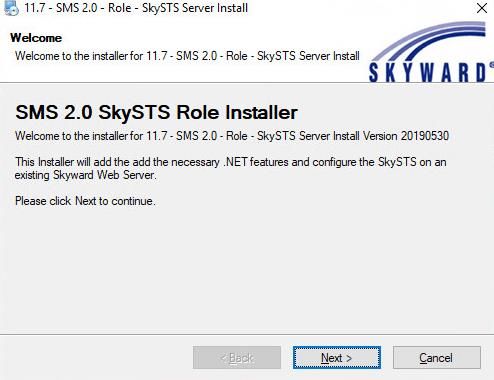
SMS 2.0 Application Configuration
Web Configuration / Single Sign-On Configuration

Note: The first step is to configure the SkySTS Single Sign-On (SSO) section of the Web
Configuration page using the SMS 2.0 Student / School web application. Do not skip this step,
the SkySTS application will not run if this SSO configuration screen is not completed. Some of
the fields are auto-filled but editable. Some of the fields are blank and information needs to be
entered.

1. Log into SMS 2.0 web product → Product Setup → Skyward Contact Access → District
   Setup → Configuration → Select Web Configuration

________________________________________________________________________________________________________
02.11.2021                                  www.skyward.com                                   Page 6 of 41
2. Scroll down to the Single Sign-On section → Enter the SSO values described in the
        table below → Save

 Field Name       Description                      Example(s)
 SSO Button       This is the text that will       Login using
 Text             display on the SSO button
                  that will be added to the        Replace  with the friendly name of
                  SMS 2.0 login screen. The        your IdP, such as Office 365, Google, or ClassLink.
                  SSO button will not display
                  on the login screen if this
                  field is left blank.
 SSO URL:         Leave this field blank for       Example:
                  now, this will be added after    https://skyward.yourschool.org/skysts/sso/Skyward/lo
                  you create an Idp record in      gin/Google
                  SMS 2.0.
 Organization     Enter an identifying name        Your School District Name
 Name             that will be used in the
                  SkySTS metadata.
 Organization     Enter a display name that        Your School District Name
 Display Name     will be used in the SkySTS
                  metadata.
 Organization     Enter the home page of the       http://www.yourschool.org
 URI              organization that will be used
                  in the SkySTS metadata.
 Base URL         Enter the Base URL of your       Student: https://skyward.yourschool.org/skysts/
                  SkySTS Application. For          Business:https://skyward.yourschool.org/skystsbus/
                  Cloud Hosted customers the       For ISCorp Gold/Silver Cloud Hosted customers.
                  URL is provided by Skyward       Student:
                  or your Hosting provider.        https://skyward.iscorp.com/SkySTSyourschoolfin
                                                   Business:
                                                   https://skyward.iscorp.com/SkySTSyourschooledu

Next Step:
If your Cloud Hosted or Managed Services please jump to Identity Provider / Relying Parties
Configuration(s) or on-premises hosted and self-managed, continue onto the SkySTS Server
Installation

________________________________________________________________________________________________________
02.11.2021                                  www.skyward.com                                   Page 7 of 41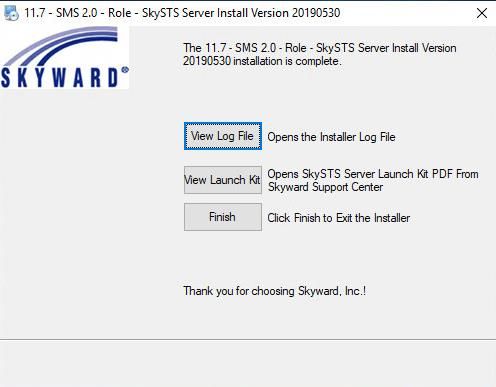
SkySTS Server Installation
Download SkySTS Installer Exe from Skyward FTP site
Note: The SkySTS installer only has choices for a Student or Combined SMS 2.0 setup. If you
would like to have an SMS 2.0 Business setup for SkySTS, please contact IT Services by placing
a call in the queue. If your Cloud Hosted or Managed Services please jump to SkySTS Install
for Cloud Hosted Customers.

1. Connect to our Secure FTP Instructions using the instructions found here:
   Secure FTP Instructions

2. Navigate to the Secure FTP folder of Hardware → Public → OE11.7-Customer-DVD →
   Windows

3. Download the file 11.7 - SMS 2.0 - Role - SkySTS Server Install.exe

4. Save the exe file to the ?:\skyward\install folder on the Web server(s)

SSL Certificate Requirements
 During the installation, you will be prompted to choose a certificate from the Local Computer
 Personal Certificate Store. You can use the same certificate that is used for the SMS 2.0 Web
 Applications if it is in the Local Computer Personal Certificate Store and it is exportable.

     •   The certificate must be in the Local Computer Personal Certificate Store
     •   The certificate must contain the Public Key and Private Key (The certificate must be
         exportable).

________________________________________________________________________________________________________
02.11.2021                                  www.skyward.com                                   Page 8 of 41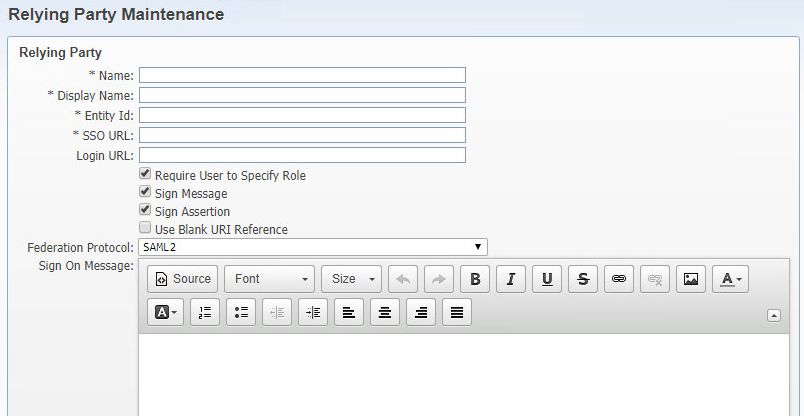
SkySTS Server Install
    Note:

        1. The 11.7 - SMS 2.0 - Role - SkySTS Server Install.exe needs to be installed on at
           least one SMS 2.0 Web server that runs the IIS Web Server.

1. To start the SkySTS Server install, double click 11.7 - SMS 2.0 - Role - SkySTS Server
   Install.exe file.

2. The Welcome screen to SkySTS Server Install will appear →? Next

3. The Installation Folder window will display → The Install will automatically detect the
    current OpenEdge Installation path. If the path is not correct change to the Drive and folder
    path where Skyward was installed → Choose Next.

________________________________________________________________________________________________________
02.11.2021                                  www.skyward.com                                   Page 9 of 41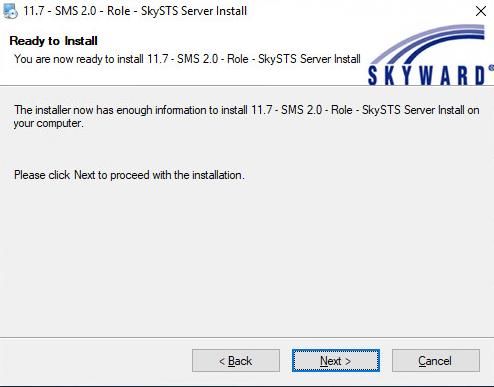
4. The Skyward Suites Selection window will display → Select your either the Student
   Management or School Management Suite (Student and Business Combined Database) →
   Choose Next.

5. The Training Database Setup window will display → Select either the No Training
   Database or Only A Training Database → Choose OK.

________________________________________________________________________________________________________
02.11.2021                                  www.skyward.com                                  Page 10 of 41
6. The Programs Location window will display → Choose your Student Management or
   School Management or Student Management Training or School Management Training
   program folder → Choose Next.

7. The Database Location window will display → Select Yes if this server is also your Student
   Management or School Management Database Server and proceed to step 8. Select No if this
   server is not your Database Server and proceed to step 7b. → Choose Next.

________________________________________________________________________________________________________
02.11.2021                                  www.skyward.com                                  Page 11 of 41
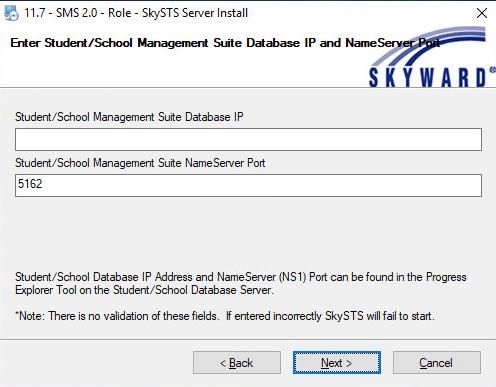
7b. If you selected No → Enter the IP Address and NameServer Port of your Student
            Management or School Management Student Management Training or School
            Management Training Database → Choose Next.

            Note: The standard Student / School NameServer Port is 5162

8. The Ready to Install windows displays → Choose Next to start the installation

________________________________________________________________________________________________________
02.11.2021                                  www.skyward.com                                  Page 12 of 41
9. The Installing SkySTS Server window displays → The information that scrolls across the
screen can be viewed in the installer log file.
10. The Select A Certificate program displays a list of SSL Certificates from the Local Machine
Personal SSL Store → Click More choices → Select the desired certificate → Click OK
________________________________________________________________________________________________________
02.11.2021 www.skyward.com Page 13 of 4111. The Installation Complete window displays → Choose the button to View Installer Log,
View Launch Kit (this file), Choose Finish to exit the installer.
Congratulations! You have completed the Installation.
Now on to testing…...
Test SkySTS Installation
1. From any web browser → browse to the Student/School URL
https://{DNSNAME}/SkySTS (URL is not case sensitive)
The browser will display the SkySTS Manage Skyward Single Sign-On information page
with Refresh buttons in the title bar to read updated info if edited in the SMS 2.0 application
If you reached this point without any errors your SkySTS installation was successful.
Next step: Add Identity Provider / Relying Parties Configuration(s)
________________________________________________________________________________________________________
02.11.2021 www.skyward.com Page 14 of 41Identity Provider / Relying Parties Configuration(s) To use SkySTS with a 3rd Party you must complete SMS 2.0 to a remote Identity Provider Configuration and/or complete SMS 2.0 as an Identity Provider Configuration depending on your authentication needs. SMS 2.0 as an Identity Provider Configuration This section is for users of a 3rd party system wanting to log into the 3rd party system using their SMS 2.0 username/password using SAML 1, 2, or wsFed. Add Relying Party Configuration(s) This section is used for adding and configuring a Relying Party to SkySTS. The Relaying Party information is supplied by the 3rd party that will be using SkySTS for authentication. If you do not have the Relying Party information, this can be skipped and added later. Note: Michigan MiLearn Customers can use Michigan MiLearn Configuration 1. Log into SMS 2.0 Web → Product Setup → Skyward Contact Access → District Setup → Configuration → Select Web Configuration → Scroll down towards the bottom of the page → Select Relying Party Configuration button. 2. Select the Add Button ________________________________________________________________________________________________________ 02.11.2021 www.skyward.com Page 15 of 41
3. Each Relying Party must be added using the Add button (or “Edit” with an existing Relying
   Party) → Enter the values supplied by the Relying Party vendor in the Relying Party
   Maintenance screen → Save

The table below describes the Identity Provider Fields.

     Field            Description                     Example
     Name
     Name             The identifier of the           WordPress
                      Relying Party. Utilized
                      in SkySTS to create
                      unique URL endpoints.
     Display          Display name of the             WordPress Saml Relying Party
     Name             Relying Party (for
                      debugging purposes)
     Entity ID        Identity URI of the             https://blog.erd101.com/saml/
                      Relying Party. (Found in
                      Relying Party metadata)
     SSO URL          Single Sign-On                  https://blog.erd101.com/saml/
                      endpoint. Often the same
                      as the Entity ID. (Found
                      in Relying Party
                      metadata)
     Login            Endpoint which starts           https://blog.erd101.com/login?userSaml=true
     URL              the login process.
                      Usually the same as the
                      SSO URL above, but
                      may have extra query
                      string parameters, etc.,
                      depending on the
                      system.
     Require          Whether to show the role        True
     User to          drop down to the user.
     Specify
     Role
     Sign             Whether to                      True
     Message          cryptographically sign
                      the entire token
________________________________________________________________________________________________________
02.11.2021                                  www.skyward.com                                  Page 16 of 41
Sign Whether to cryptographically True
Assertion sign the token assertion.
Use Blank Whether to leave the False
URI XML Signature URI
Reference reference blank. This
should only be checked
if all else fails—it is
used to work around a
bug in MS XML
signature processing.
Federation The protocol with which SAML2
Protocol the Relying Party
corresponds.
Add Relying Party Claim(s)
SkySTS will provide claims about the user in the token assertion. These claims must be
configured in the SMS 2.0 Application. Generally, at least a “NameID” claim and one other
claim must be provided for the assertion to be valid, but the configuration of the claims is
dependent upon the information which the 3rd party Relying Party needs.
Claims Notes:
• Saml assertions require at least one claim.
• Saml1 assertions require URIs as the Claim Type.
• The “NameID” claim type
(http://schemas.xmlsoap.org/ws/2005/05/identity/claims/nameidentifier) is unique
in that it is parsed out internally as the “Subject” of the assertion. Therefore, it
does not count towards the 1 claim required.
1. To add a new claim, from the Relying Party Page → Click on the arrow to expand your
newly added Relying Party → Click Add Relying Party Claim
________________________________________________________________________________________________________
02.11.2021 www.skyward.com Page 17 of 412. Add Relying Party Claim provided by the 3rd party vendor into the Relying Party Claim
Maintenance screen → Save
The table describes the Relying Party Claim Fields.
Table describing Relying Party Claim Fields
Field Name Description Example
Claim Type An identifier which the Relying Party http://schemas.xmlsoap.org/ws/20
will use to identify the claim on the 05/05/identity/claims/nameidentifi
receiving end. Specific to each er
Relying Party.
Skyward Field The data of the Skyward User to send NameID
in the claim.
Description Helpful display field for the generated Name ID of User
metadata.
Name Format Almost always the default (shown in urn:oasis:names:tc:SAML:2.0:attr
the example). Other values may be name-format:basic
found @ http://docs.oasis-
open.org/security/saml/v2.0/saml-
core-2.0-os.pdf section 8.2.
Next Step: Test Relying Party Configuration(s)
________________________________________________________________________________________________________
02.11.2021 www.skyward.com Page 18 of 41Configure Common Relying Parties
Michigan MiLearn Configuration
Configuring SkySTS as an IdP for Michigan MiLearn
Relying Party and Relying Party Claims must be configured for SkySTS to send assertions to the
MiLearn application. The configuration for MiLearn will be consistent across all installations
and is listed below.
For help adding the Relying Party information SMS 2.0, please refer to Add Relying Party
Configuration(s).
Michigan MiLearn Relying Party Information
Please note: The Relying Party must be named “MiLearn” for the links within Skyward to be
generated correctly.
• Name: MiLearn
• Display Name: Michigan DoubleLine Partners
• Entity Id: https://adfs.midatahub.org/adfs/ls/
• SSO URL: https://adfs.midatahub.org/adfs/ls/
• Login URL: https://sport.mde.state.mi.us/AuthServices
• Require User to Specify Role: True
• Sign Message: True
• Sign Assertion: False
• Use Blank URI Reference: True
• Federation Protocol: SAML2
________________________________________________________________________________________________________
02.11.2021 www.skyward.com Page 19 of 41Michigan MiLearn Required Claims
For help adding the Relying Party information SMS 2.0, please refer to Add Relying Party
Claim(s)
• Claim 1
o Claim Type:
http://schemas.xmlsoap.org/ws/2005/05/identity/claims/nameidentifier
o Skyward Field: NameId
o Description: Name ID of User
o Name Format: urn:oasis:names:tc:SAML:2.0:attrname-format:basic
• Claim 2
o Claim Type: http://mde.skyward.com/claims/DistrictId
o Skyward Field: District Code
o Description: Display Code of the User
o Name Format: urn:oasis:names:tc:SAML:2.0:attrname-format:basic
• Claim 3
o Claim Type: http://mde.skyward.com/claims/Role
o Skyward Field: Role
o Description: Role of User
o Name Format: urn:oasis:names:tc:SAML:2.0:attrname-format:basic
• Claim 4
o Claim Type: http://mde.skyward.com/claims/UniqueId
o Skyward Field: EDFI UniqueID
o Description: EDFI Unique ID
o Name Format: urn:oasis:names:tc:SAML:2.0:attrname-format:basic
Michigan MiLearn Setup and Training Manual
Next Step for MiLearn: Now that you have added MiLearn to your SkySTS configuration, please
reference the Ed-Fi 3.1 Setup Guide for instructions on testing the MiLearn Integration.
Ed-Fi 3.1 Setup Guide
________________________________________________________________________________________________________
02.11.2021 www.skyward.com Page 20 of 41SMS 2.0 to a remote Identity Provider Configuration
This section is for customers that want Web users to authenticate to SMS 2.0 using credentials from a 3rd
Party Identity Provider, such as Office 365 (Azure), ClassLink, Google, or other 3rd Party using SAML.
1. The first step is to create the 3rd Party Identity Provider SAML application(s) using the 3rd Party’s
configuration tool.
For examples of common 3rd Party SAML Application(s) jump to → Configure Google
SAML Application(s) or Configure Azure / Office 365 SAML Applications.
For other 3rd Party’s reference, the vendors instructions for creating the SAML Application
then continue to SMS 2.0 Identity Provider Configuration
________________________________________________________________________________________________________
02.11.2021 www.skyward.com Page 21 of 41Configure Google SAML Application(s)
Configuration of your Google SAML App within Google Admin is the responsibility of the
customer, Skyward IT Services can help as a billable consulting service. If you are interested in
billable consulting services please submit an IT Services Service Call using the Support Center
(Customer Login Required) or contact Tom Kellnhauser.
The Google link describing the steps to create a custom SAML application in Google Admin
Console is found here: https://support.google.com/a/answer/6087519?hl=en
You will want to open the SkySTS Base URL information page while adding the custom SAML
Application. Ex. https://skyward.yourschool.org/SkySTS
The For Configuring (blue) section of the Identity Provider section holds information that you
will need to copy/paste to the SAML application fields during setup.
Information when creating custom SAML App in Google Admin
1. Identity Provider Details Suggested Field Values:
• ACS URL*: Enter your Assertion Consumer Service URL from SkySTS
• Entity ID: Enter your Entity ID URL from SkySTS
• Start URL: Leave Blank
• Certificate: Leave Default Google Certificate listed
• Signed Response: Enable (Checkbox checked)
• Name ID1: Basic Information / Primary Email
• Name ID Format: EMAIL
1The Name ID is how Google and Skyward match up the SSO users. A common config is to
match the Primary Email, which requires both systems to have the same email address entered
for your SSO users.
________________________________________________________________________________________________________
02.11.2021 www.skyward.com Page 22 of 412. Below the Certificate name, click Manage Certificates → Click Download IDP Metadata
→ Save as an.xml file → Open the.XML file in a text editor (Notepad). You will copy and
paste this information when creating the SMS 2.0 Identity Provider for Google.
Note: If Google changes their Metadata information, it will break the SSO with Skyward
until the new Metadata XML is updated in the Skyward IdP Maintenance screen.
Next Step: Configure the Identity Provider in SMS 2.0 → SMS 2.0 Identity Provider
Configuration
________________________________________________________________________________________________________
02.11.2021 www.skyward.com Page 23 of 41Configure Azure / Office 365 SAML Applications
Configuration of your SAML App within Azure Portal is the responsibility of the customer,
Skyward IT Services can help as a billable consulting service. If you are interested in billable
consulting services please submit an IT Services Service Call using the Support Center
(Customer Login Required) or contact Tom Kellnhauser.
The Microsoft link describing the steps to create a non-gallery SAML application in Azure Portal
is found here: https://docs.microsoft.com/en-us/azure/active-directory/manage-apps/configure-single-
sign-on-non-gallery-applications
You will want to open the SkySTS Base URL information page while adding the custom SAML
Application. Ex. https://skyward.yourschool.org/SkySTS
The For Configuring (blue) section of the Identity Provider section holds information that you
will need to copy/paste to the SAML application fields during setup.
Information when creating custom SAML App in Azure Portal
1. Identity Provider Suggested Field Values
• In Azure: Basic SAML Configuration
o Entity ID: Enter your Entity ID URL from SkySTS
o Reply URL (ACS URL): Enter your Assertion Consumer Service URL from
SkySTS
o Sign-On URL: After creating the Idp record in SMS 2.0, browse to the
SkySTS Base URL, then in the Identity Providers area, use the Skyward
Login URL for the Azure Idp for this field.
o Relay State: Leave Blank
o Logout URL: Enter your Single Logout Service URL from SkySTS
• In Azure: User Attributes & Claims
o 1NameID: Modify the NameID Claim Source Attribute: Typically the Email
Address or Login Name (Login Name = user.onpremisessamaccountname)
o Modify the NameID User Identifier format to Persistent
1The NameID is how Azure and Skyward match up the SSO users. A common configuration is
to match the Primary Email or the Login Name, which means the user's values must match in
both systems.
Next Step: SMS 2.0 Identity Provider Configuration
________________________________________________________________________________________________________
02.11.2021 www.skyward.com Page 24 of 41SMS 2.0 Identity Provider Configuration
This section is for adding and configuring Identity Providers (IdP) in SkySTS. The IdP
information is supplied by the 3rd party that SMS 2.0 will use for authentication.
1. In SMS 2.0 navigate to Product Setup → Skyward Contact Access → District Setup →
Configuration → Select Web Configuration → Scroll down towards the bottom of the page
→ Select the Identity Provider Configuration button
2. Select the Add Button to add a new IdP
3. Enter the Field Values listed below → Choose the Source Field → Save
Note: An error validating the IdP(s) MetaData URLs might occur while saving, this is a
cosmetic issue and can be ignored.
________________________________________________________________________________________________________
02.11.2021 www.skyward.com Page 25 of 41Common IdP Field Values (* fields are required)
o *Name: Google or Azure (Arbitrary Name that Identifies the IdP)
o *Status: Active
o Metadata URL: Enter the 3rd Party IdP MetaData URL (Preferred)
o Metadata XML: Only used when no MetaData URL is provided. For Google
Copy/Paste the contents of the MetaData IDP file XML file.
o *Identity Claim Type: Leave as NameID
o *Source Field1: Choose the field for the NameID claim, this will be the data that
is used to identify user’s between SMS 2.0 and the IdP.
o Require Assertion Signed:
▪ For Google IdP: Disabled (Checkbox unchecked)
▪ For Azure /Office 365 IdP: Enabled (Checkbox checked)
▪ For Others, Match the 3rd Party IdP configuration
o Require Message Signed:
▪ For Google IdP: Enabled (Checkbox checked)
▪ For Azure /Office 365 IdP: Disabled (Checkbox unchecked
▪ For Others, Match the 3rd Party IdP configuration
o Auto Redirect2 Login Requests to this Identity Provider: Typically, unchecked
1The Source Field is important because it determines the data field that Skyward is using during
the NameID claim. A common config is to match the Email Address, which requires both
systems to have the same email address entered for your SSO users. Another common config is
to match the Login Name, which requires both systems to have the same login name entered for
your SSO users.
2Auto-redirect if checked means when running the SMS Web URL, the system will
automatically redirect to the IdP Login. Use with caution.
• If the user is logged into the IdP on a device, then that the user will automatically be
logged into SMS using the same IdP credentials with no intervention from the user.
• If the user is NOT logged into the IdP on the device then the IdP logon screen will
display, and the user will enter their IdP credentials to authenticate to the SMS 2.0 Web
application.
The following table further describes the IdP Fields.
Field Name Description Example
Name A unique name for the IdP Office 365 IdP or Google
Status The status of the IdP Active (default) or Inactive
________________________________________________________________________________________________________
02.11.2021 www.skyward.com Page 26 of 41Metadata URL IdP Metadata URL - Entering a Ex: https://FQDN/path/to/metadata
Metadata URL is preferred vs. directly
adding the Metadata XML. A Metadata URL will dynamically
update if the Metadata from the
Remote IdP changes.
Metadata XML IdP Metadata – Required if the Use ONLY if the metadata URL
Remote IdP does not provide a cannot be supplied). If you enter the
Metadata URL. Metadata XML and the Remote IdP
changes their Metadata, it will break
the SSO until the new Metadata XML
is updated in the IdP Maintenance
screen.
Identity Claim Identity claim used between SMS 2.0 NameId Default Value
Type and the IdP
Identity Source Choose the SMS 2.0 Database Source Default SMS 2.0 Database field:
field used that will be used in the Internal Name Identifier (NameID)
claim. The data in the field you
choose is used to match the data in the Other fields available:
claim from the remote IdP. Login Name (DUSERID)
Alphakey
Email Address (NameEmail)
Require Either a Signed Assertion or Signed Signed Assertion should be enabled
Assertion Message is required. by default
Signed
Require Message Either a Signed Assertion or Signed Signed Messages should be disabled
Signed Messaged is required. by default.
Auto-Redirect Auto redirects login requests to this Disabled by default, if there are
Login Requests IdP, instead of showing the SkySTS multiple IdP records this option can
Skyward login page where an IdP only be selected for one IdP record.
button exists.
4. Obtain the SSO URL for your IdP by browsing to your SkySTS Base URL → in the upper
right-hand corner → click the button to refresh your Identity Providers.
Note: If the screen displays an error → click your browser refresh button.
Scroll down to the Identity Providers section, the Skyward Login URL is your SSO URL
5. In SMS 2.0 navigate to Product Setup → Skyward Contact Access → District Setup →
Configuration → Select Web Configuration → Scroll down to the Single Sign-On section
→ enter the SSO URL for your IdP.
Next Step: Configure which groups of users can log in using the Identity Provider → Configure
User Login Option(s) in SMS 2.0
________________________________________________________________________________________________________
02.11.2021 www.skyward.com Page 27 of 41Configure User Login Option(s) in SMS 2.0
This section is for SMS 2.0 users logging into SMS 2.0 Web using credentials from a 3rd party
IdP, such as Office 365 (Azure), ClassLink, or Google using SAML 2. The system allows you to
define which user types can log in using SAML 2 (aka Federated Services)
Note: Federated Services and LDAP authentication options can be used at the same time. This
allows you flexibility, for example, you may configure Employees/Secured Users to login using
LDAP and then configure a different group of users like Guardians or Students to login using
SSO.
1. In SMS 2.0 navigate to Product Setup → Skyward Contact Access → District Setup →
Configuration → Select Single Sign-On Configuration → Select the Federated Services
radial option.
Select the user types that are allowed to log in using SSO (aka: Federated Services) → Save
Next Step: Test Logging in using SSO → Test Identity Provider Configurations
________________________________________________________________________________________________________
02.11.2021 www.skyward.com Page 28 of 41Testing Relying Party / IdP Configurations
Test Relying Party Configuration(s)
The main configuration of SkySTS is accomplished through an interface in the SMS 2.0 Web
application. Changes to this configuration are pulled in during the initial boot of the SkySTS and
refreshed periodically or by using the refresh buttons. The SkySTS page provides useful
information, including links to the Metadata for each configured Relying Party, which can be
consumed by that Relying Party for their configuration purposes.
1. From any web browser → Enter the Student/School URL https://{DNSNAME}/SkySTS
(URLs not case sensitive) or Cloud Hosted customers will use the SkySTS URL
provided by the hosting provider → the Manage Skyward Single Sign-On page will
display.
2. Relying Party Test
a. If the Relying Parties do not display, click the refresh Relying Parties button
________________________________________________________________________________________________________
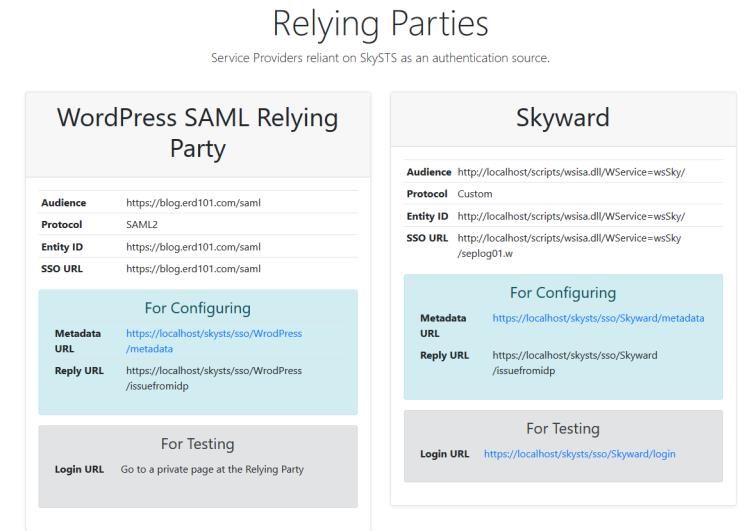
02.11.2021 www.skyward.com Page 29 of 41b. After clicking on the Refresh Relying Parties button…
Skyward as a Relying Party will always be displayed whether you are setting up Skyward to
accept credentials from vendors such as Google or are going to use Skyward as the credentials
for a vendor.
c. To test the Relying Party login, click the Relying Parties Login URL → the 3rd
Party’s Login Screen will display.
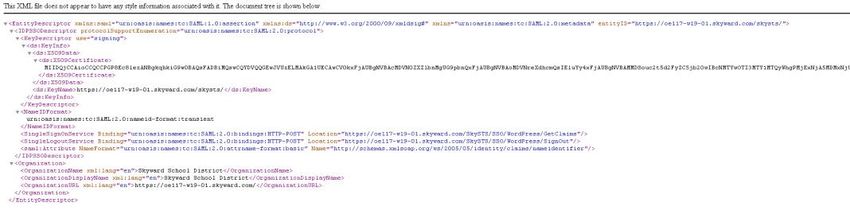
d. To test the Relying Party Metadata → Click Relying Parties Metadata URL
→ an XML Metadata Screen like below should load.
The Relying Party configuration in SMS 2.0 is completed. You will need to complete the IdP
configuration in the 3rd Party Application.
Optional Next Step: Create a District Link or Newsfeed SSO enable Link in Skyward → Adding
an SSO Aware District Link in Family / Student Access or Adding an SSO Aware Newsfeed
Link in SkyPort for All Users
________________________________________________________________________________________________________
02.11.2021 www.skyward.com Page 30 of 41Test Identity Provider Configuration(s)
The main configuration of SkySTS is accomplished through an interface in the SMS 2.0 Web
application. Changes to this configuration are pulled in during the initial boot of the SkySTS and
refreshed periodically or by using the refresh buttons. The SkySTS page provides useful
information, including links to the Metadata for each configured IdP, and commonly used URLs
for each IdP.
1. From any web browser → Student/School URL https://{DNSNAME}/SkySTS (URLs
not case sensitive) → The Manage Skyward Single Sign-On page will display.
2. Identity Provider Test
a. If the Identity Provider(s) do not display, click the refresh Identity Providers
button
b. After clicking on the Refresh Relying Parties button…
________________________________________________________________________________________________________
02.11.2021 www.skyward.com Page 31 of 413. If you configured an SSO Button URL you can test the Identity Provider using the SSO button
found on the SMS 2.0 Login screen, or you can test using the SkySTS Testing Login page found
at: https://{DNSNAME}/SkySTS/sso//Skyward/login
If the testing was successful, Congratulations! This completes the setup for using SSO with a 3rd
party remote Identity Provider. If you need further assistance go to Troubleshooting Identity
Provider Configuration(s).
________________________________________________________________________________________________________
02.11.2021 www.skyward.com Page 32 of 41Troubleshooting Identity Provider Configuration(s)
The best way to diagnose configuration issues is to get a SAML Trace of the failure. To gather a SAML
Trace using your Web Browser you can follow these steps.
1. Install a SAML trace extension in your web browser: The most useful information can be
captured using a SAML trace extension added to your Web Browser, I use the SAML Chrome
panel or the SAML-tracer for Chrome. There are other available if you have a preference or use
a different web browser.
2. Hit F12 to display the developer tools in your browser, this will also allow you to see your SAML
trace extension.
3. In the developer tools panel, locate the SAML tab extension you installed (example screenshot
below)
4. Reproduce the SSO login issue to receiving an error message.
5. Locate the SAML in the SAML extension, select all and, copy the entire contents of each SAML
entry to a text file(s). Repeat for each SAML entry.
6. Create an IT Services Service Call using Support Center and send the SAML trace text file(s) to
Skyward. The SAML Trace typically will help us find the problem.
Chrome Browser SAML Chrome Panel example:
________________________________________________________________________________________________________
02.11.2021 www.skyward.com Page 33 of 41Renewing the SSL Certificate
SSL Certificates Usage
There are 2 places the SSL certificate is used by the SkySTS.
• The SkySTS WebSite Certificate configured in the IIS Web Server binding
• SkySTS Application Certificate used signing the XML messages sent to Relying Parties
configured in the SkySTS web.config configuration values.
SkySTS Application Certificate supports the following Algorithms:
• RSA-SHA1
• RSA-SHA256
• RSA-SHA384
• RSA-SHA512
DSA is not supported as it is also now deprecated.
ECDSA is not currently supported.
Install the new SSL Certificate using the SSL certificate vendor’s instructions for Windows IIS
WebServers. SkySTS Application Certificate must be marked as exportable during the
installation
SkySTS WebSite Certificate Renewal
To renew the SkySTS WebSite Certificate install the new SSL Certificate for IIS on the SkySTS
Web Server(s). After installing the certificate, use the IIS Administration tool to modify the IIS
HTTPS binding so that the binding uses the new certificate.
Impact: If SkySTS WebSite SSL Certificate is from a vendor that is trusted by the end-user
clients, the renewal will have no impact on your end-users.
SkySTS Application Certificate Renewal
To renew the SkySTS Application Certificate, make sure the new SSL certificate is installed or
copied into the Windows Certificate Machine Store in the Personal folder on the SkySTS Web
Server(s). You will then need to view the details of the certificate to obtain the thumbprint of the
new certificate. This can be done using the MMC Console with the Certificate snap-in.
The last step is to update [skyward]\SkySTS\Web.config configuration file using the new
thumbprint as the SigningCertificateIdentifier. For details view the SkySTS Configuration
Values.
________________________________________________________________________________________________________
02.11.2021 www.skyward.com Page 34 of 41Impact: The impact of an SSL Certificate renewal will depend on the SkySTS usage by the customer and largely on the 3rd party vendors ability to dynamically read the updated Metadata, specifically the certificate thumbprint will change. If the XML Metadata is statically configured by the 3rd party then this needs to be updated when the certificate is updated, if the vendor uses the Metadata URL and can dynamically read the certificate thumbprint change, then no action is required. In typical 3rd party IdP / SSO use cases, such as Google or Azure, the IdP doesn't use our Metadata or Metadata URL. SkySTS can also act as an IdP, and typically the 3rd Party would use either the static XML Metadata or the Metadata URL. If the 3rd Party XML Metadata was statically provided in the configuration, then it must be manually updated when the SSL certificate changes. SSL Certificate Permissions IIS requires permissions on both the certificate and the certificate’s private key. In some cases, you will need to manually add permissions to the private key. To do so, right-click the certificate in the store and select “All Tasks → Manage Private Keys”. Click “Add…”, and a new dialogue will open. In this dialogue, set the location as the current machine and the object name as “IIS AppPool\[NameOfAppPool]” as in the screenshot below. ________________________________________________________________________________________________________ 02.11.2021 www.skyward.com Page 35 of 41
Advanced Configuration Options
Adding an SSO Aware District Link in Family / Student Access

District Links allows you to create a link to a 3rd party application that uses SkySTS for Single Sign-On.
Family / Student Access users can click a link in Family / Student access that automatically logs them
into the 3rd party application using Skyward as the Identity Provider. This is common for 3rd party
applications that are set up as relying parties.

1. Browse to Web Student Management → Student → Student Access → Setup →
   Configuration → District Link Setup → Click Add

2. Enter the Order → Enter the 3rd party SSO URL in the URL field → Enter your Link Text →
   Choose the entities → Choose your display options (Family Access / Student Access) →
   Enable the “Use SkySTS” advanced option → Save

________________________________________________________________________________________________________
02.11.2021                                  www.skyward.com                                  Page 36 of 41
Adding an SSO Aware Newsfeed Link in SkyPort for All Users

Newsfeed Links allows you to create a link to a 3rd party application that uses SkySTS for Single Sign-
On. All Users, including employees, can click a link in SkyPort that automatically logs them into the 3rd
party application using SkySTS as the Identity Provider. This is common for 3rd party applications that
are set up as relying parties.

1. Browse to Product Setup → Contact Access → District Setup → SkyPort Setup →
   Newsfeeds → Newsfeed Categories → Click Add → Example: SSO Links

    Note: It is important to set a widget number so newsfeeds of this category can be added to the
    dashboard and appear together in the same widget.

2. Next, browse to Product Setup → Contact Access → District Setup → SkyPort Setup →
   Newsfeeds → Newsfeeds → Click Add

3. Choose the Category → Enter the Summary, example: Registration Gateway Staff → Choose
   the Entities to Display For → Enable the Active setting → Choose your Display From / To
   dates → Enter the 3rd Party Vendors SSO URL → Enable the Use SkySTS setting → Enter
   Link Text / Details → Save

________________________________________________________________________________________________________
02.11.2021                                  www.skyward.com                                  Page 37 of 41
4. Next browse to Product Setup → Contact Access → District Setup → SkyPort Setup → District Widget Selection → Locate the Newsfeed Category (Example: SSO Links) → Select Display Widget Options → Save 5. The Widget will appear on the User’s SkyPort Dashboard like the example below. ________________________________________________________________________________________________________ 02.11.2021 www.skyward.com Page 38 of 41
Additional IIS Setup for Load Balancing SkySTS
If you use multiple load-balanced SMS 2.0 Web Servers, please follow these steps to setup
SkySTS for load balancing. SkySTS must be configured on all SMS 2.0 Web Servers that
participate in load balancing.

1. Select one of the Skyward Web Servers that has SkySTS configured. Open the
   Administrative Tools Control Panel → Open the Internet Information Services (IIS)
   Manager.

2. Expand the IIS Server → Expand Sites → Expand the Skyward Web Site → Select
   SkySTS Application → Click on the Machine Key icon.

3. Under Validation Key → Uncheck the option to automatically Generate at Run Time →
   Uncheck the option to Generate a Unique Key for each application → Under Decryption
   Key → Uncheck the option to automatically Generate at Run Time → Uncheck the option
   to Generate a Unique Key for each application.

________________________________________________________________________________________________________
02.11.2021                                  www.skyward.com                                  Page 39 of 41
Configuring Multiple SkySTS Instances
The template configuration file [skyward]\SkySTS\Web.config.template is setup to define
multiple running instances of SkySTS for hosted sites.

To run multiple SkySTS instances each instance of SkySTS must have a unique configuration
section defined with a unique name. The IIS Virtual Application must match the name of the
configuration section.

For example, in a single instance installation, we would replace all mentions of
“SkySTSCustomerOne” with the name of the actual customer, “SkySTSStevensPointWI” and set
the configuration values for this customer within this configuration section. Once that is done
we would replace all mentions of “SkySTSCustomerTwo” in the same manner. You can support
as many instances of SkySTS on anyone IIS Web Server as you wish by adding additional
configuration sections and values.

In IIS you must create a SkySTS Virtual Application for each configuration section, for the
example above you would need a SkySTS Virtual Application named
“SkySTSStevensPointWI”.

Customizing Login Pages
You can add custom images and styling to the login page presented by SkySTS in much the
same way as within SMS 2.0. Both a custom header and a custom footer for the page may be
provided in the SkySTS web.config file

The application folder contains some example styling to use as a template, but any valid URL
may be supplied within the configuration section. However, it is recommended that the files be
placed in the supplied folder to avoid cross-domain issues.
The header and footer are displayed within the login page of the STS within Iframes on the page.

________________________________________________________________________________________________________
02.11.2021                                  www.skyward.com                                  Page 40 of 41
The following table describes the SkySTS configuration values in detail found in the
[skyward]\SkySTS\Web.config file.

SkySTS Configuration Values

All relevant configuration settings are within the element you defined. The available
configuration values are as follows:

     KEY                                           DESCRIPTION             EXAMPLE
     AppserverHost                                 OpenEdge                STUDB.skyward.com
                                                   AppServer Host
     AppserverName                                 OpenEdge                asStuMon
                                                   AppServer
                                                   Name
     NameserverPort                                OpenEdge                5162
                                                   Nameserver Port
     SigningCertificateLocation                    Type of         •       Store (will use Machine Certificate
                                                   certificate             Store and lookup by thumbprint)
                                                   storage         •       Resource (will use the certificate
                                                                           bundled with the application)
                                                                       •   File (will use a certificate on the file
                                                                           system and lookup by path)
     SigningCertificateIdentifier                  Thumbprint or           d9 0b 3f 2a f7 18 f3 f6 2a 46 df bc 44
                                                   path of                 09 78 e3 0b f9 be 98
                                                   certificate
     SkywardCommunityIDLogDirectory                Path in which to        ?:\skyward\wrk\SkySTS
                                                   store log files
     SkywardCommunityIDLogLevel                    Lowest level of     •   None
                                                   logging to          •   ErrorOnly
                                                   display             •   Basic
                                                                       •   Verbose
                                                                       •   Debug
     LoginHeaderURL                                Optional URL to         /SkySTS/CustomHTML/Header.html
                                                   a custom login
                                                   page header
     LoginFooterURL                                Optional URL to         / SkySTS
                                                   a custom login          /CustomHTML/Footer.html
                                                   page footer

________________________________________________________________________________________________________
02.11.2021                                  www.skyward.com                                  Page 41 of 41
You can also read