2004 Prius EV (Electric Vehicle) Button Installation Instructions
←
→
Page content transcription
If your browser does not render page correctly, please read the page content below
2004_prius_evv2.doc Page 1 of 20                                                         Last updated March 13th, 2004

             2004 Prius EV (Electric Vehicle) Button
                    Installation Instructions

*Disclaimer: The modification below is undertaken at your own risk. It could result in damage to your vehicle. You could be
injured doing the modification. It could easily void your warranty. It may reduce your gas mileage. It may shorten the life of
your NiMH battery and lead to early replacement not covered by the Hybrid Warranty. It may irreversibly damage the HV
ECU (Hybrid Computer) of your car and require expensive replacement. Neither the author, Evan Fusco, MD nor anyone
distributing this document will be held responsible for injuries or damage or financial loss resulting from any of the
modifications. If you choose to make these alterations to your vehicle you do so under your own risk and responsibility. The
information here is provided for informational purposes only and it is not suggested or advised that you carry them out. You
should not try this unless you are reasonably comfortable working with electronics. I provide no guarantee that the
information contained here is accurate though I've tried to assure that it is.

What this is:
          These instructions allow you to take advantage of the built-in feature of what is commonly called
"EV (electric vehicle) Mode" of your 2004+ Prius. In Japan and European versions of the Toyota Prius the
vehicle is sold with an EV Button pre-installed by Toyota. For some reason, in the North American version
this button is left off (note: speculation focuses on possible EPA/NHTSB regulations that were unclear as
to whether the option to use 2 different 'fuels' was legal. Also it has been speculated that the decision came
from Toyota, but no clear statement, at this writing, has come from Toyota. The EV button MAY become
a dealer option or as a standard feature on future model year Priuses).

         However, the HV ECU is programmed for the EV button. Accessing this feature is a basically
simple procedure. One simply needs to plug a wire into the proper plug on the ECU, attach that wire and a
ground wire to a momentary switch and EV mode is available.

         Unfortunately, accessing the proper pin to plug the wire into the ECU plug, accessing the ECU
and threading the wire and finding a ground are a bit tricky. These instructions are designed to take you
step by step through the procedure.

What the EV Button Does (and Doesn't Do):
          Recall that the Prius cannot be plugged in. ALL power for the vehicle is derived from the ICE
(internal combustion engine) by burning gasoline. Extra energy normally wasted in a non-hybrid vehicle is
recaptured and stored in the HV (high-voltage) NiMH (nickel metal-hydride) battery, and at times of
demand that electrical energy is used to power the Prius. Thus, putting the Prius in EV mode via an EV
button will not give you free power or improve MPG. In fact, the owner's manuals of the European and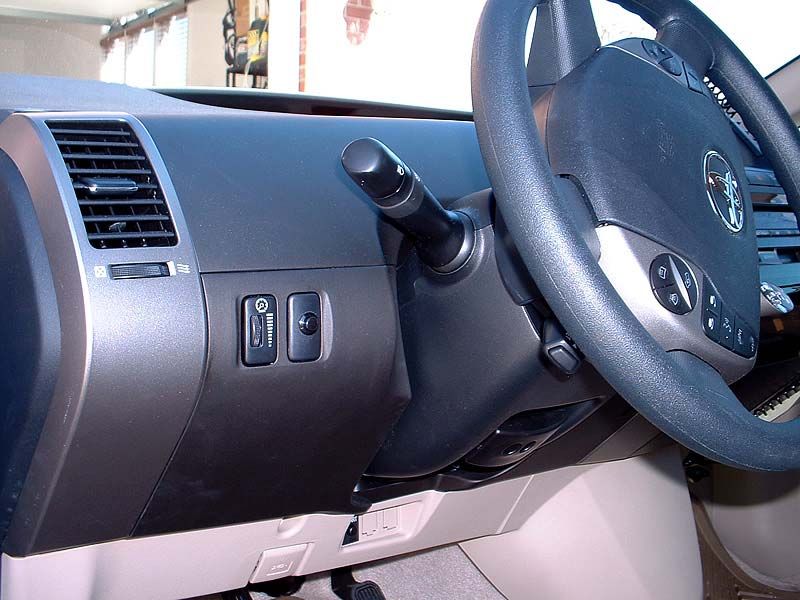
2004_prius_evv2.doc Page 2 of 20                                               Last updated March 13th, 2004

Japanese Priuses with the EV button warn that use of the EV button could LOWER your MPG. The
general feeling among the North American Prius community is that there are times where using the EV
button could, possibly, improve fuel efficiency. I'll try to summarize those situations at the end of the
install instructions.

          When you power on your Prius after it's been off for a period of time, it will briefly start in
electric-only mode. After about 7 seconds, the ICE (internal combustion engine) will start automatically in
order to warm the catalytic converter and the ICE itself. This is the period of time where emissions are the
greatest in this otherwise very low-emission vehicle. If you had planned to simply move your car a short
distance, you could avoid creating those increased emissions by utilizing the EV button.

What You Need:
    •    Phillips Screwdriver
    •    Jeweler's flat screwdriver
    •    22 gauge dual strand wire (speaker wire works well)--about 6' length
    •    Wire cutters/stripper
    •    Soldering Iron & Solder
    •    Drill & Bit (1/2" if using the recommended button, otherwise determined by your selected button)
    •    Wire Coat Hanger--cut and straightened out
    •    Electrical Tape
    •    Paper Clip
    •    Momentary Switch (I recommend and used the Radio Shack SPST Momentary Pushbutton Switch
         (Part Number: 275-644)

*Optional Items
         Other switches will work perfectly well--any momentary switch will do. Toyota's OEM EV
button is available in Europe and Japan if you have access to a source that can buy it for you and ship it to
you. It also includes an illumination LED, but, so far, no one knows how to enable the illumination. The
Japanese Button Part number is 84720-47010; the matching connector is 90980-10964.

          If you choose not to retrieve the receptacle pin from the flasher you can order and buy them from
Toyota (Part # 82998-126900 - normal or Part # 82998-12700 - gold plated). Alternatively, you can buy a
D-sub 9-pin female connector from Radio Shack. It comes with a connector housing and ~ 12 receptacles
that will work.

    •    Wire Splicing clips (to more easily splice into the ground wire)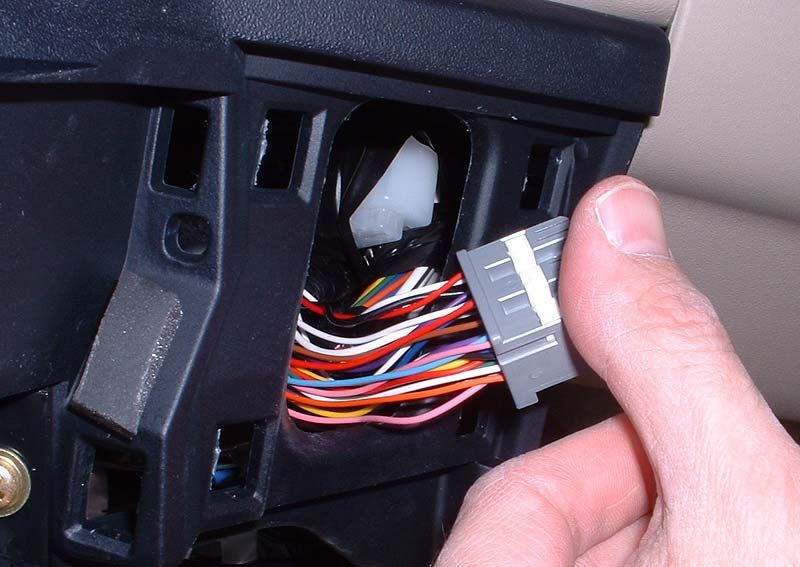
2004_prius_evv2.doc Page 3 of 20                                              Last updated March 13th, 2004

Time and Difficulty:
         I found the install to be moderately difficult and pretty time-consuming (about 3 hours); others
have found it simple and report they have done it in as little as 30 minutes. Your experience will depend on
your familiarity with the tools and electronics. I, personally, found insertion of the connection pin into the
HV ECU plug to be difficult and almost got the first pin irrevocably stuck in the slot. I spent quite a bit of
time with that part alone. I also found threading the wire behind the dash to be fairly tricky. I think the
average person, not encountering any problems, could do this job in about 1-1½ hours.

Procedure in Brief:
    1)    Remove bottom cover of steering wheel
    2)    Locate and unplug flasher plug
    3)    Open plug and remove 1-3 unused connector pins
    4)    Reattach steering wheel cover
    5)    Dismantle part of dash (vents) and remove lower glove box
    6)    Locate HV ECU (gray plugs) and remove lower plug
    7)    Solder wire to connector pin and insert into ECU plug (#27)
    8)    Splice EV button ground wire into ECU plug ground wire (#1)
    9)    Plug ECU plug back into the ECU
    10)   Thread wire behind dash to opening near dimmer switch
    11)   Attach switch to cover and solder wires in place
    12)   Reassemble the dash
    13)   Test

Procedure in Detail:
*Review ALL steps before proceeding and be sure you understand all terms used and you've looked
at all diagrams and pictures.

1) Remove the bottom cover of the steering wheel by releasing the steering wheel adjustment handle and
unscrewing the silver screw in that recess.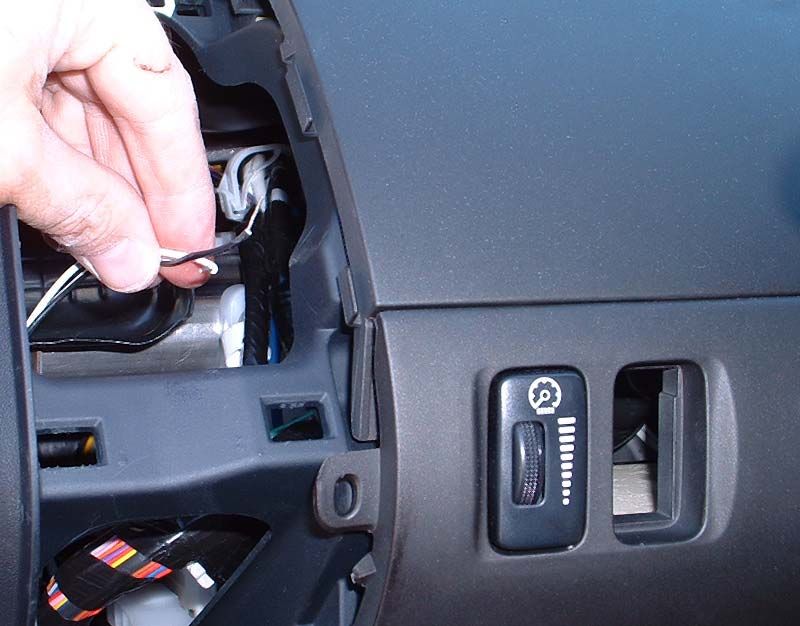
2004_prius_evv2.doc Page 4 of 20                                               Last updated March 13th, 2004

Then, turn the steering wheel 90 degrees right and remove the black screw that becomes visible on the right
side of the steering column.

Then turn the wheel 180 degrees left (90 degrees from normal position) and remove the black screw on the
left side of the steering column.

Carefully pull down on the lower portion of the steering column cover until it releases. Mine was a bit
stiff/stuck to the upper part and you may need to carefully use a butter knife or screwdriver to start prying
them apart.
2004_prius_evv2.doc Page 5 of 20                                               Last updated March 13th, 2004

2) Locate and unplug the white flasher plug visible just on the left side of the bottom of the steering
column.

3) 2 little clips keep a cover locked in place. Pull those apart and remove the cover. Inside you'll see lines
of silver connector pins--some with wires attached, some without.

You should remove between 1 and 3 of those pins--2 is probably safe, 3 might be better, since if you plan
to install an OEM button at some point, you'll probably need more pins for that. (You need one pin for the
procedure, but it's handy to have a back-up.) To remove the pins, you can use your paper clip to start the
process of sliding them out, and then they just pull right out.
2004_prius_evv2.doc Page 6 of 20                                            Last updated March 13th, 2004

Stick them to a piece of tape or put them somewhere secure so you can find them later. Snap the cover
back into place, and plug the flasher plug back in.

4) Replace the steering wheel cover by reversing the process. Be sure everything's aligned properly and
that there are no gaps.

5) Now you'll need to dismantle part of the dash to get access to the ECU and other areas. First, open the
top and bottom glove box doors. Squeeze the inside sides of the lower glove box together to get the catches
past the portion of the dash frame that keeps the door from falling all the way open. Then pull the entire
door straight toward you - it will unclip from the hinges at the bottom of the glove box.
2004_prius_evv2.doc Page 7 of 20                                               Last updated March 13th, 2004

You may also need to unclip the little hydraulic piston that keeps the door from falling open too quickly.
Next, grasp the bottom of the silver vent piece next to the glove box. Pull it toward you firmly. It should
unclip at the bottom first. Then pull the whole unit straight out.

You'll eventually need to remove the driver's side (far left) vent piece as well. Finally, remove the smaller
square plastic piece just below the passenger side vent--it pulls straight out.
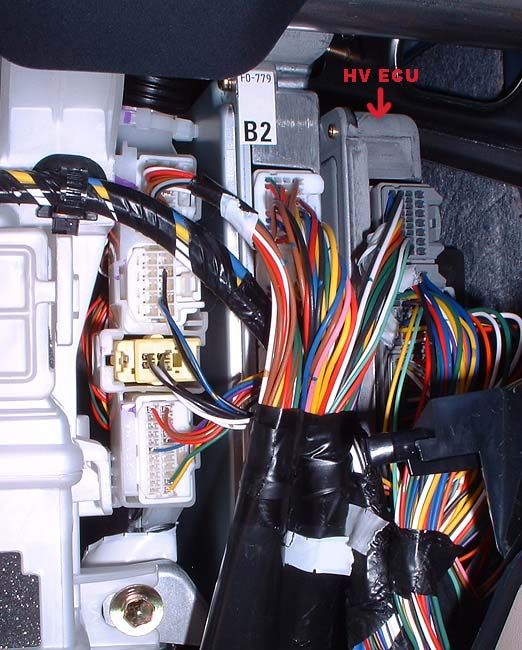
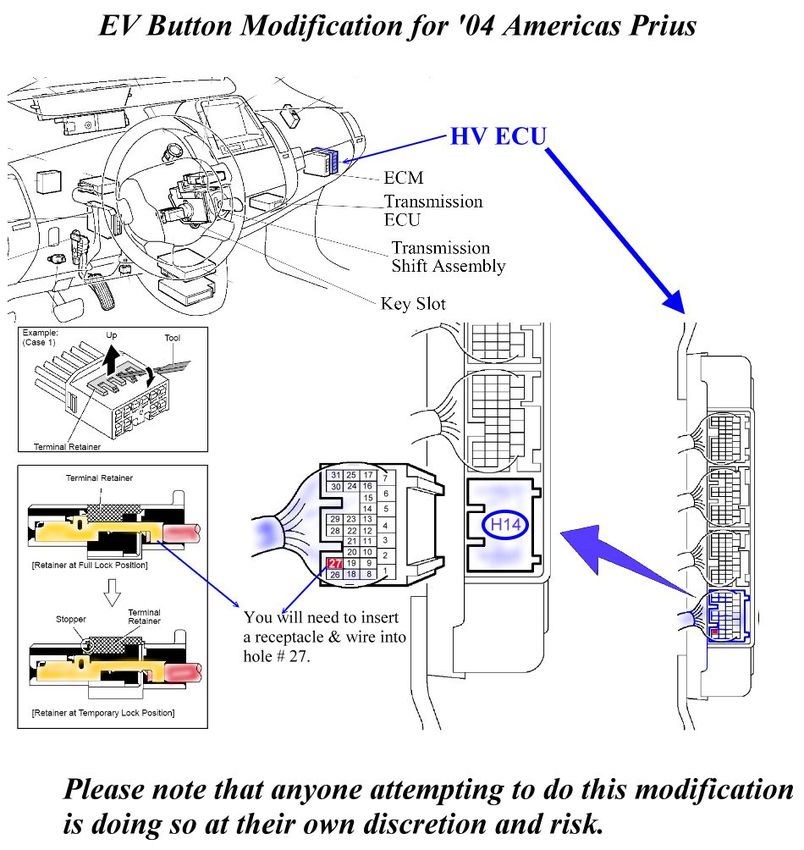
2004_prius_evv2.doc Page 8 of 20                                            Last updated March 13th, 2004

6) Locate the HV ECU just to the right of and a little behind where the glove box was.
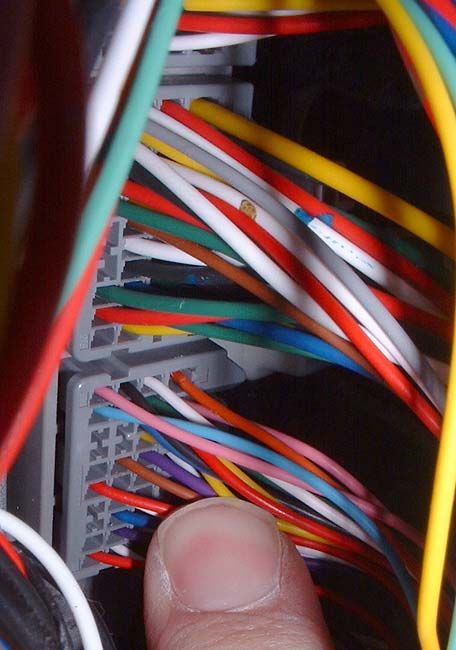
2004_prius_evv2.doc Page 9 of 20                                            Last updated March 13th, 2004

There are 3 vertically oriented ECUs, 2 with white. The HV ECU is the one farthest to the right and is the
only one with gray plugs.

You'll probably need to carefully push some of the bundles of wires out of the way and carefully wedge
your hand into the space. Reach in and release the catch on the lower-most gray plug of the HV ECU
(H14).
2004_prius_evv2.doc Page 10 of 20                                           Last updated March 13th, 2004

There's a small catch on the right side of the plug that you need to squeeze in to get the plug out.
Remember the orientation of the plug so you can properly identify the holes where you need to insert the
connector pin and wire. Once removed pull it carefully through the lower most opening (where you
removed the square plastic piece below the vent piece).
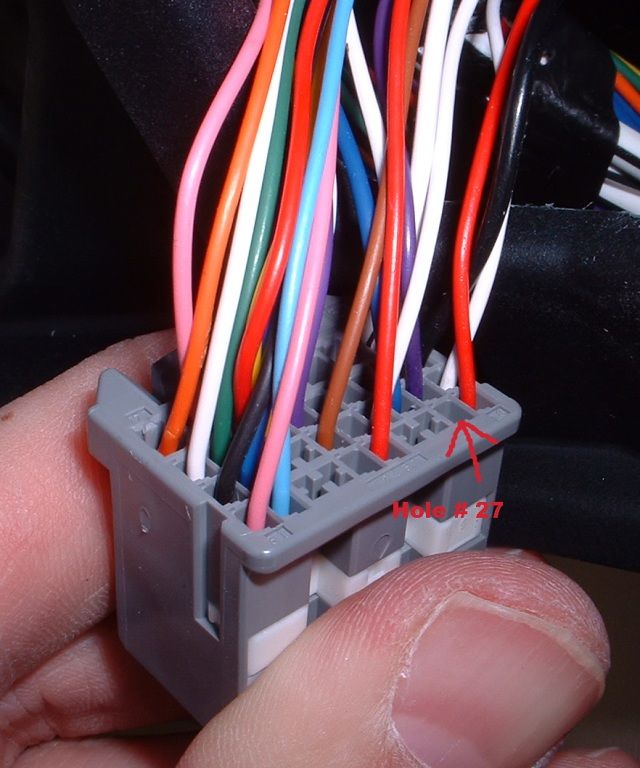
2004_prius_evv2.doc Page 11 of 20                                                         Last updated March 13th, 2004

7) Note: Read all of this step before you proceed. Print out the diagram of the H14 plug and terminal retainer to have with
you for reference. For me, this was the hardest and most time-consuming step.

You'll now solder your wire to one of the connector (receptacle) pins you removed from the flasher control
plug. Strip about 1/4" of wire from the wire you're going to use (or do all 4 wires now to save time later).
Twist the strands together and, optionally; put a few drops of solder on each stripped end to keep the wires
from fraying. Now, insert your wire into the larger hole of the connector pin. You may have to bend the
tip of the wire a bit as you'll need to get the wire over and pushed down into 2 little "grabbers. Now solder
the wire to the connector pin.

(Option: I think the connector pin is designed to use a non-stripped wire pushed down into those 'grabbers'
which will, when crimped slightly, cut into the plastic shielding and make contact with the wire underneath.
This would, if it works, probably be a little better as the wire is less likely to fatigue. I have NOT tested
this method and it may require a 24 gauge wire instead of a 22. If you have extra pins, you might want to
test this out, as it will save you the stripping and soldering steps and may be more durable.)

Next, double-check the orientation of the plug, compare it to the diagram of the plug and locate hole
number 27. Using the jeweler's screwdriver or the paper clip, you must raise up the white terminal retainer.
2004_prius_evv2.doc Page 12 of 20                  Last updated March 13th, 2004

Look carefully at the ECU-Diagram

for the proper orientation of the connector pin.
2004_prius_evv2.doc Page 13 of 20                                              Last updated March 13th, 2004

When you are confident of the orientation, while holding the terminal retainer up, insert the connector pin
FULLY into hole #27.

You will need to use the little jeweler's screwdriver on the end of the connector pin to push the pin all the
way in. Once it's in, push the terminal retainer back down to lock the pin into place.

8) There is a white wire with a black stripe coming from hole #1--it is grounded. It is probably the easiest
access point to ground, though a screw on the ECU would also be grounded. I cut and spliced the ground
wire into that wire.

If you have a splicing connector that would work very well here as well. If you do cut the wire to splice
into it, be sure to solder and tape the wires together to make them secure.

9) Recheck your splice and confirm that the connector pin is in the correct location and then reinsert the
plug back into the ECU.
2004_prius_evv2.doc Page 14 of 20                                             Last updated March 13th, 2004

10) Thread the remainder of your wire through the hole where you had the plug out. You'll see another
bundle or two of wires running just above and behind the lower glove box area.

Run your wires along there. Then, secure the wire along the other bundles using tape, zip ties or twist ties
as needed to avoid any lose wires that could get snagged by the glove box or something sticking out of the
glove box.
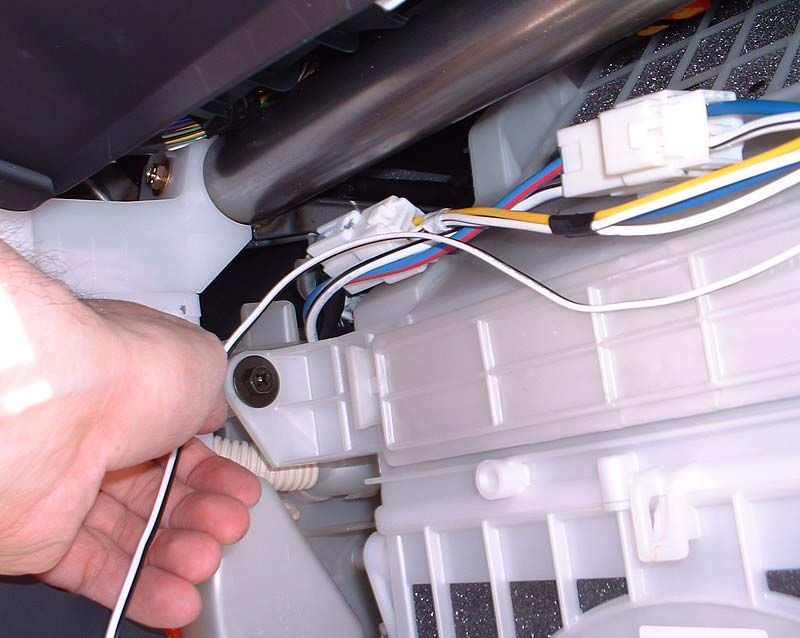
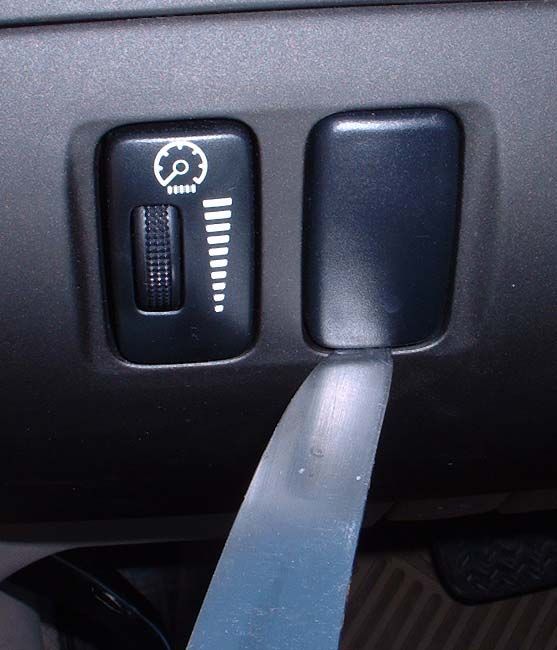
2004_prius_evv2.doc Page 15 of 20                                            Last updated March 13th, 2004

11) Remove the left side vent piece and plug covering the hole next to the dimmer switch.

Tape the free end of your wires to a straightened-out wire coat hanger. Carefully push the coat hanger
behind/under the multi-function display (MFD) area, past the steering column and all the way to the far left
side of the area behind the dash. You should be able to grab the end of the wire/coat hanger either through
the opening where the vent cover was removed or by reaching up under the dash.
2004_prius_evv2.doc Page 16 of 20 Last updated March 13th, 2004
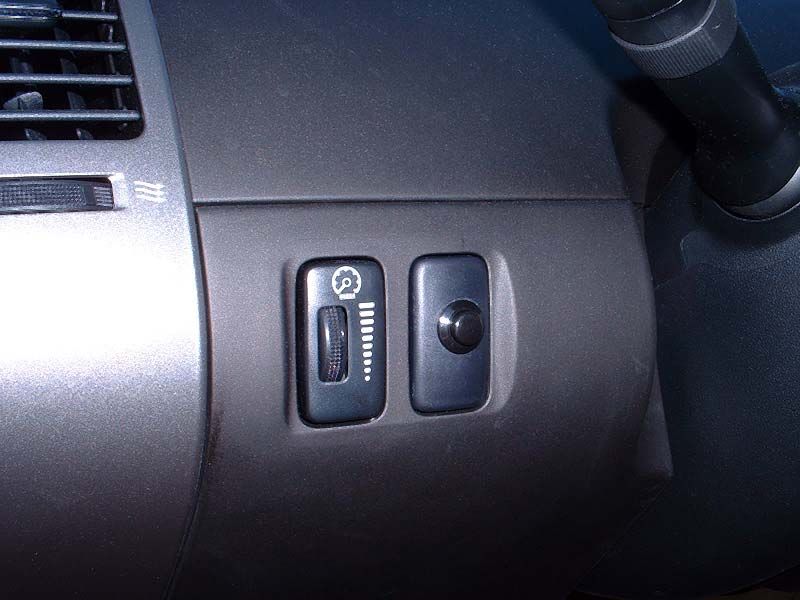
2004_prius_evv2.doc Page 17 of 20                                                 Last updated March 13th, 2004

Once located, thread it up along the far left side over to the opening next to the dimmer switch. You'll need
to remove the wire from the coat hanger to get it through that hole. Pull all the excess wire out of the hole
in the dash where the button will go next to the dimmer switch.

11) To attach the button to the plug, you'll need to trim off several of the 'fins' in the middle. I used wire
cutters for most of that, then a box cutter to trim it down further.

Then drill the hole for your button in the center of the plug.

Be careful, as the residual fins will catch your drill bit if you're holding it in your hand.
2004_prius_evv2.doc Page 18 of 20                                              Last updated March 13th, 2004

Once the hole is drilled, attach the button to the plug.

You may not be able to get the nut flush due to the residual fins, but it doesn't matter as long as the button
is secure. Now solder the wires to the connectors on the button. DON'T overheat the connectors, as it
could damage the button's internal contacts. (It doesn't matter which wire goes onto which contact.)

12) Bundle up the excess wire and secure it with a zip or twist tie, push it into the hole, then push the plug
with the new button back into the slot.

Replace all dash pieces (do the glove box last).

13) Give it a test! Start your car normally, but in the first 7 seconds, before the ICE kicks in, push your EV
button. There should be a beep and the Prius will put you into the Energy Screen if you weren't already
there. Now drive. The ICE should not start as it usually does (see below).
2004_prius_evv2.doc Page 19 of 20                                             Last updated March 13th, 2004

EV Button Use:
         EV will engage only at speeds less than 30mph. EV will engage only if the HV battery SOC (state
of charge) is above 3 bars. The EV will automatically disengage when the SOC drops to 2 bars, when
speed exceeds 34mph, or under hard acceleration. It's estimated that the Prius can drive up to 2 miles in
EV mode if entered with the HV battery at a full SOC. When EV mode is engaged, the MFD will switch to
the 'Energy Screen' regardless of what it had shown before and will remain there for the duration of the
time you're in EV mode. There will be 1 beep when EV mode is engaged, 3 beeps if it doesn't engage when
the button is pushed. Cruise will be disengaged when you enter EV mode and cannot be engaged while in
EV mode. When you've been in EV mode and you push the button again to disengage EV the ICE will
almost always start immediately to recharge the HV battery.

         EV can engage prior to ICE startup, but once ICE has started, EV will engage only once ICE is
sufficiently warm. The car must be stopped and in "P" or in "D" to engage EV.

When it might be a good idea to use EV mode:
   1) Very short trips, as in re-parking/relocating the car to a different spot on the parking lot.
   2) To keep noise down in very early or very late hours in a small neighborhood.
   3) When you will be driving at normal speed eventually, but have to drive very slowly and with
        frequent stops after initial start up. For example: leaving a parking garage after work with many
        other cars in front of you. The ICE is least efficient during these times, and starting the ICE can
        be delayed until you'll be using it at a more efficient speed.
   4) When you know you'll be traveling at low speed before a long downhill area when you can
        recharge the battery with regeneration.

Be aware:
         Toyota warns that use of the EV button could reduce fuel efficiency. Also, extreme swings in
SOC of NiMH batteries can cause damage or shorten the usable life of the battery. The system is
programmed to avoid over-charging or deep discharging, but some risk to the battery may exist. If you
have a problem with your battery or Hybrid system or ECU and you have performed this modification, it
may void your warranty and you could be responsible for thousands of dollars for repairs even if it can't be
shown that the EV button was the cause of the damage. Consider this very carefully before you perform
this modification.

Alternatives:

Cruise Control EV
        Coastal Dave has devised a simple system to use the Cruise Control Cancel to engage and
        disengage EV mode. He is currently testing the circuit to assure safety/reliability. If he makes the
        circuit diagram public, I'll provide that information at a later time.

Headlight Flasher EV
       Another elegant way to install EV Mode is to use the headlight flasher. This is an even easier
       installation requiring no special circuit and only one wire. To do the installation leave the bottom
       cover of the steering column off when you retrieve the connector pins. Now, put one of the
       connector pins on both ends of a strand of wire. Plug one end into the ECU just as with the
       standard EV button. Thread the wire behind the dash but then pull it up along the steering
       column. Pull out the purple wire from the flasher plug and insert your EV wire into the now open
       slot. There is no need for an additional ground as the flasher is already grounded. Once
       reassembled you have a reversible and invisible EV mode. Your headlights will still flash when
       the headlight stem is pulled toward you while the headlights are on. You just won't be able to
       flash the lights when your headlights are turned off. EV is engaged or disengaged by pulling the
       headlight stem toward you.

Evan Fusco, MD
efusco@yahoo.com
2004_prius_evv2.doc Page 20 of 20 Last updated March 13th, 2004
acknowledgments:
• Wayne Brown--first in the US to discover/confirm, implement, and test the EV button and then
shared the information with me.
• Coastal Dave (http://www.coastaletech.com) for finding and sharing the location of the free
connector pins.
• Wayne's anonymous friend in the UK who assisted him in figuring the whole thing out.
• Felix Kramer for editing and content suggestions
• Dave Griffiths for PDF layout and creation
All the helpful commentators and supporters at http://groups.yahoo.com/group/Prius-2G/, and
http://www.PriusChat.ComYou can also read