User Guide Kylie Dingwall, Tricia Nagel - Version 2.0 - School of Health Research
←
→
Page content transcription
If your browser does not render page correctly, please read the page content below
User Guide
        Version 2.0

Kylie Dingwall, Tricia Nagel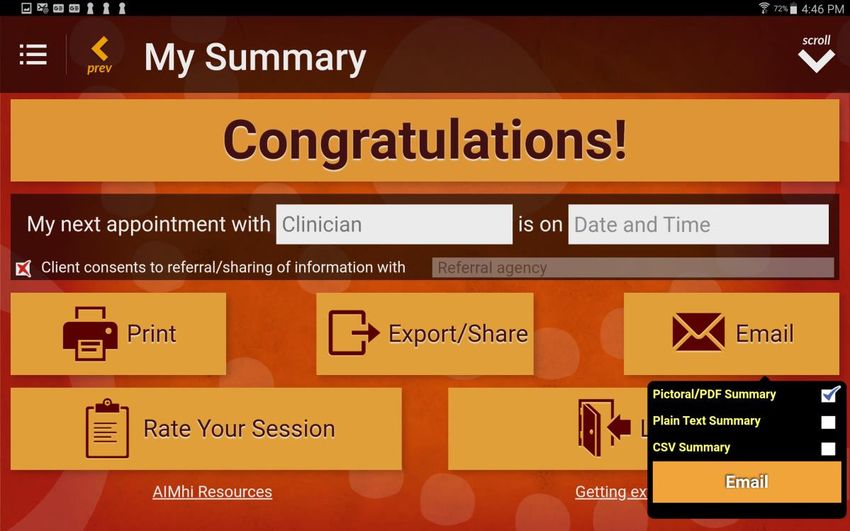
Acknowledgements
We would like to acknowledge the generous contributions of Aboriginal Mental
Health Workers on the Tiwi Islands and in Darwin, and of many health
professionals in the Northern Territory and across Australia who have engaged
with the AIMhi team and contributed their expertise to this story. In particular we
acknowledge AIMhi First Nations1 researchers past and present, especially Patj
Patj Janama Robert Mills, Carolyn Griffin, Valerie Thompson, John Cusack and
Daniel Mulholland.

The eMental Health in Practice (eMHPrac) support service is a collaboration
between Menzies School of Health Research, University Centre for Rural Health,
Black Dog Institute and led by Queensland University of Technology. eMHPrac is
funded by the Australian Government as part of the National eMental Health
Strategy.

Suggested citation: Dingwall, KM & Nagel, T. (2021) AIMhi Stay Strong App:
User Guide V2.0. Darwin: Menzies School of Health Research.
© 2021 Menzies School of Health Research

                            Icon Legend

                       Information Management Tips

                       Security/Confidentiality Tips

                       Tip Relevant for iPad/Apple Users

                       Tip Relevant for Samsung
                       Galaxy/Google Users

1Please note that when we mention the terms ‘First Nations’ and ‘Indigenous’ we include all
Aboriginal and Torres Strait Islander people and acknowledge their rich traditions and
heterogeneous cultures

2
Contents
Acknowledgements ............................................................................................... 2
Introduction ........................................................................................................... 4
iPad Set Up .................................................................................................... 5
Google Play (Android/ Samsung Galaxy) Set Up ............................................. 6
Set-up Service Name and User Accounts ............................................................. 7
Getting Started Using the App .............................................................................. 7
Password Changes ........................................................................................... 7
Create a Client Record ...................................................................................... 7
Taking Client Photo ........................................................................................... 8
Trialling the App without Client Contact ............................................................. 8
Database ........................................................................................................... 8
Database and Confidentiality............................................................................. 9
Navigating the App .......................................................................................... 10
Navigation Menu ............................................................................................. 10
Help Icon and Audio ........................................................................................ 11
Kessler and Patient Health Questionnaires ..................................................... 11
Help Page........................................................................................................ 12
Email Summary ............................................................................................... 12
Session Rating Questions ............................................................................... 14
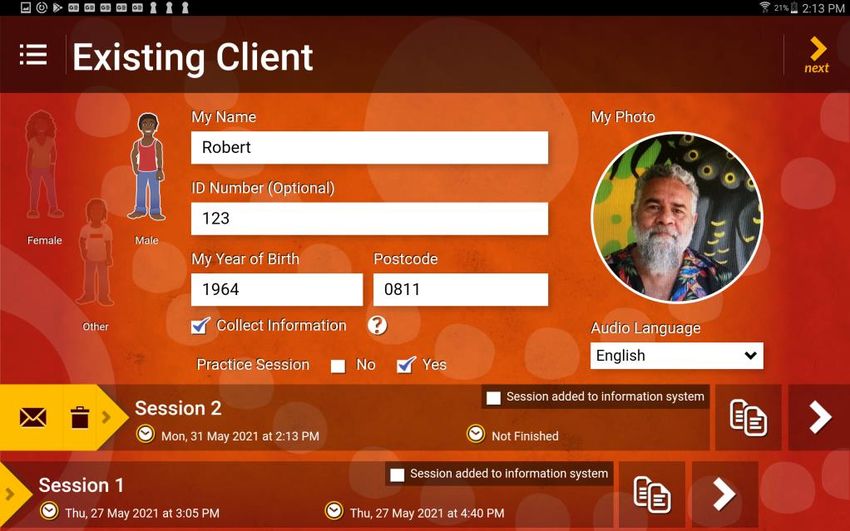
Existing Clients ................................................................................................... 14
Exporting and Importing a Client Record ......................................................... 14
Deleting, Emailing or Copying Sessions .......................................................... 15
Goals Review .................................................................................................. 16
Frequently Asked Questions ............................................................................... 17
Technical Support ............................................................................................... 20
Helpdesk Support ............................................................................................ 20
Connecting to a Wi-Fi Network ................................................................... 20
Connecting to a Wi-Fi Network Samsung Galaxy....................................... 21
Installing a SIM Card ....................................................................................... 21
Inserting a SIM Card ....................................................................................... 21
Activating a SIM Card ...................................................................................... 23
3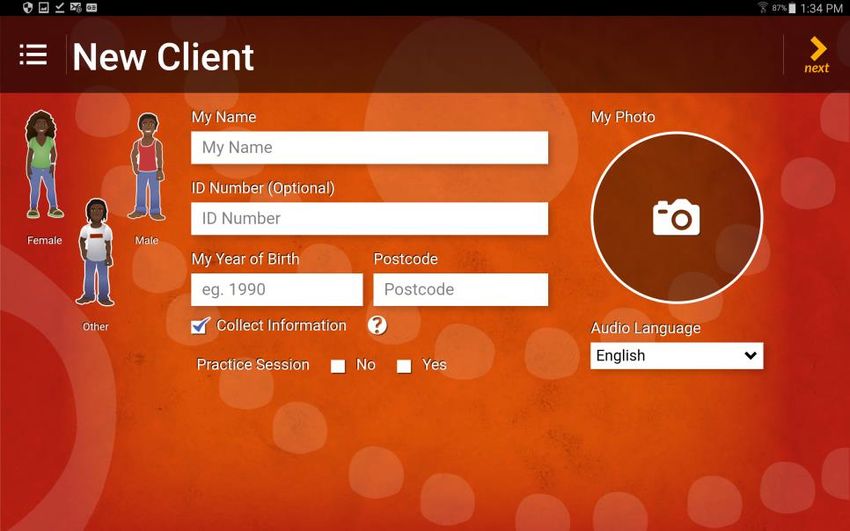
Introduction
The Stay Strong app was developed by the Menzies School of Health Research
(Menzies), in partnership with the Queensland University of Technology (QUT). It
is based on the tools developed by Aboriginal people for Aboriginal people as part
of the Aboriginal and Islander Mental Health Initiative (AIMhi).

The AIMhi Stay Strong app is a motivational care planning tool that assists health
providers to promote wellbeing with Aboriginal clients by considering their social
supports, strengths, worries and the goals or changes they would like to make.
Users are first asked to identify the people in their life that help keep them strong.
They are then asked to identify their strengths in four areas of their life and this is
represented visually as leaves on a tree. As more strengths are inputted, the
leaves grow stronger and healthier. Similarly, users are asked to identify things in
their life that take away their strength and as more worries are identified, the leaves
on the tree wilt and change colour. Users are then left with a visual representation
of the areas in their life where they are strong and not so strong. The app includes
tips for making change and wellbeing assessments including the Kessler 5 and 10
and now the PHQ-2. It is designed for use by Aboriginal Health Workers, nurses,
GPs, allied health professionals, wellbeing workers and others to facilitate delivery
of a structured brief intervention. The app provides help text and audio instructions
to reduce the impact of low computer or English literacy. A summary of the Stay
Strong Plan can be securely transferred or printed in text, pictorial or csv format to
keep a record of the session. The app is password protected to ensure client
confidentiality. Users will always be asked to re-enter their password upon opening
the app and again when accessing existing client data.

Digital mental health (dMH) provides an efficient and cost-effective opportunity to
reach populations with poor service access. The AIMhi Stay Strong app is
designed to provide an effective, visually appealing, culturally relevant and person-
centred low intensity intervention suitable for clinician supported delivery in a
variety of primary care, specialist care and community settings. The app, once
downloaded, does not require ongoing access to the internet.

Menzies is evaluating implementation of the AIMhi Stay Strong app, including the
development and delivery of a training and support package for using dMH
strategies in primary healthcare. This evaluation is part of the eMental Health in
Practice (eMHPrac) project. Training in dMH approaches for organisations working
with Indigenous clients including training in the AIMhi Stay Strong app is currently
being offered in selected locations nationally. A preview of the app is available at:
www.menzies.edu.au/aimhiapp.

4
iPad Set Up
In order to set up the Stay Strong app on an iPad you will need an Apple ID and
internet/Wi-Fi connection.
   •   Download      the    Stay   Strong   app             from    the   App   store:
       https://apps.apple.com/app/id1558614011
   •   In order to download the app, you will need an Apple ID. If you don’t already
       have one, set one up following the on screen instructions or follow this guide
       (https://support.apple.com/en-au/HT204316).
          If you are using an iPad owned by your organisation, you may like to set
       up an Apple ID for your organisation rather than using a personal one. It
       may be worth checking with your IT department whether your organisation
       already has an Apple ID.

   •   If you are setting up a new Apple ID you will need to provide a credit card
       number.
          If you do not wish to keep the credit card details linked to the Apple
       ID/iPad (eg: if multiple staff members or clients are to use the iPad), as soon
       as you have set up the Apple ID and downloaded the free Stay Strong app
       you can remove the credit card details by going to Settings>iTunes & App
       Store>Apple ID>Payment Information. For more information, see
       http://support.apple.com/en-us/HT204034

          Please note: the Stay Strong app is not yet compatible with iPhones,
       laptops, desktops and some other devices.

                         Figure 1:   App Installation Apple Store

                                                                                    5
Google Play (Android/ Samsung Galaxy) Set Up
In order to set up the Stay Strong app on a Samsung Galaxy device you will need
to have an active Google Account and access to internet/WiFi connection.
To Set up a Google account:
      1. On your device- Open your Settings.
      2. Search for Accounts Add account           Google                  .
      3. Follow the instructions to add your account.
Download the Stay Strong app for the Google Play Store:
https://play.google.com/store/apps/details?id=au.edu.menzies.aimhistaystrong

    Please note: the Stay Strong app is not compatible with smart phones and
some Samsung Galaxy devices. Please ensure that you check the compatibility of
the device before purchasing any new devices or the app.
A warning will be displayed on Google Play Account if the device is incompatible.

              Figure 2:   App Installation from Google Play (no eligible devices)

6
Set-up Service Name and User Accounts
    The first time you open the app, you will be asked to enter your service name
and register as a practitioner. Please either choose a service name from the list
or enter a service name that clearly identifies your service. You will need to be
connected to the internet/Wi-Fi for this process however; once this is set up
you can use the app without internet/WiFi access. See Connecting to WiFi help

    The first person who registers will be the Administrator for that device.

    The administrator can access all users’ client files, reset other practitioner’s
passwords, assign administrator privileges to other users and delete user accounts
(from ‘Administration’ section in the menu).

   You will need to set up a new practitioner account for each user so that they
have their own password.

    To set up a new practitioner you will need to enter a name, email address and
a password. The email address entered will be used to reset your password if you
use the ‘forgot password’ link on the login page (see below).

   Passwords must be at least 8 characters with one uppercase letter, one
lowercase letter, a numeral and a symbol in them.

Subsequent users will be identified as Practitioners and will only have access to
their own client files (i.e. only the client files they create).

Getting Started Using the App
Password Changes
You can change your password by tapping on the ‘Administration’ tab (for
administrators) or the ‘My Details’ tab (for practitioners) in the menu.
If you have forgotten your password, you can reset your password by tapping on
the words ‘Forgot Password’ underneath the login button. If you do this, an email
will be sent to the email address you registered with. You should open this email
from the iPad and tap on the link in the email. If you are unable to access the email
from the iPad, you can open the app, tap the “forgot password” link and type in the
code given to you in the email. When you tap ‘submit’ your details will appear with
a blank password field. Type in a new password and tap ‘next’.

Create a Client Record
When you create a client record you will be asked to enter or select the client’s:

                                                                                     7
•   First name
    •   Year of birth
    •   Postcode
    •   Gender
    •   Audio language
You will also be asked to:
   • Agree to collection of deidentified information from the app in the app
      database (see Database and Confidentiality sections below)
   • Select whether it is a practice client session or not (see below)

Taking Client Photo
If your client wishes, you can incorporate a photo of them into the app. Simply tap
on the   camera icon and use the device to take the client’s photo. If you are
happy with the photo click ‘use’. You also have the option to retake the photo if
you are not happy with it.
    You will need to allow the app to access the device’s camera by clicking ‘allow’
    when prompted.
    Client photos are not stored on the device, they are only stored in the app itself.

Trialling the App without Client Contact
   If you do not work directly with clients or would like to practice with the app
when not with a client, please select ‘yes’ for ‘practice session’ on the ‘New Client’
page (see picture below) by tapping on it.

    This helps Menzies identify and exclude ‘practice’ data in the database. This
way any practice sessions can be separated from the analysis of real client data
for evaluation.

Database
   In order to assess how the app is used, anonymous data from the app is
collected in a database. The database is only accessed by the Menzies research
team and is secured by a complex password. Information collected is non-
identifiable and includes how much time is spent on each page; whether all
components of the app are completed; number of people entered; which strengths
and worries were chosen; the goals and steps entered; outcome measure data if
completed; number of sessions; the number of times the help page was triggered.

8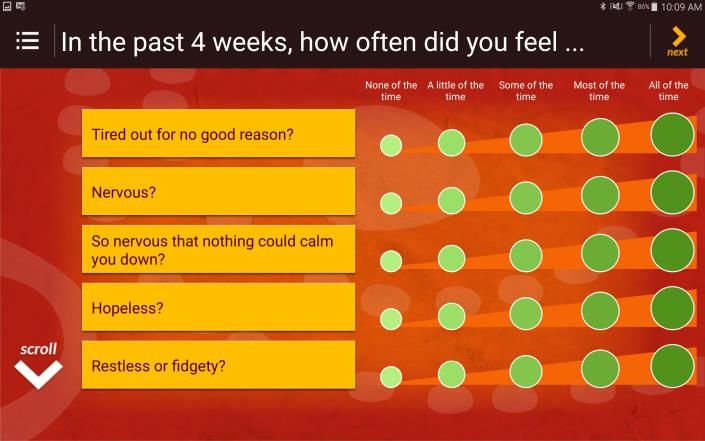
Database and Confidentiality
   No names are exported to the database to ensure the information remains
anonymous. We have received approval from relevant ethics committees to collect
non-identifiable information from the app for research and quality improvement
purposes.
If you are willing to share anonymous client information with us, please ensure that
the box ‘Collect Information’ is ticked on the ‘New Client’ page (see below).

                             Figure 3: New Client Registration

  If the collect information box displays a red cross, this means that that client’s
data will not be exported to the research database, it will only be stored on your
device for you to access. Data stored on the app is partially de-identified as the full
date of birth is not collected, only year of birth, and you may use only the first name.
    The photo is never collected in the database and is only stored in the app (which
is password protected). It is not stored in the device’s photo album.

                                                                                      9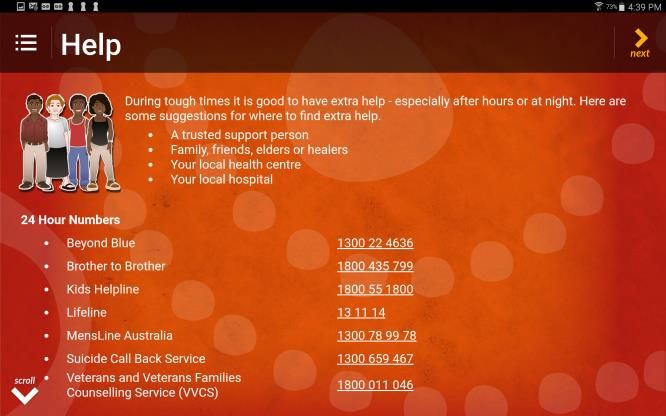
Navigating the App
You can use the ‘Menu’, ‘next’ button and ‘help icon’ to help you navigate the app
(see below).

                                                                                 Next
     Menu
                                                                                 button
     icon

                                  Help icon
                               Figure 4: App Navigation

Navigation Menu
The Menu pops out (as below) when you tap the ‘menu’ icon in the top left corner.
The menu allows you to navigate to any page of the app and return to previous
pages if you need to.
   If you tap on ‘Existing Clients’, you will always be asked to re-enter your
password. This ensures that your existing client list remains private and is only
accessible by authorised users.

                              Figure 5: Navigation Menu

10
Help Icon and Audio
When you tap on the ‘help icon’, help text will appear with the instructions on what
to do for that part of the app. This box also allows you to tap the ‘audio icon’ to
play the audio instructions for that page. You can pause the audio instructions by
re-tapping the audio icon, or stop the audio by tapping the square next to the audio
icon. If you tap outside the help text box, the box will disappear while the audio
keeps playing.
Audio
icon
Stop
audio
Figure 6: Help icon and Audio function
Kessler and Patient Health Questionnaires
The Kessler 10 (K10), the Kessler 5 (K5), and the Patient Health Questionnaire
(PHQ-2) have been incorporated into the app. The Kessler scales (K10 and K5)
are each a short measure of non-specific psychological distress. The PHQ-2 is the
short form version of the PHQ-9, a measure of depression. These are optional
features accessed through the navigation Menu.
Figure 7: Kessler 10
11Wellbeing measure scores appear on the summary page:
Figure 8: Kessler 5 summary
Help Page
On the wellbeing measures summary page, you will also see a prompt for
‘Suggestions for extra help’ which will take you to our new help page.
Figure 9: Help page
This page also appears if a client chooses self-harm or suicide when inputting their
worries, or if they score ‘high’ distress on one of the wellbeing measures. It is also
available as an option at the end of the summary page by clicking ‘Getting extra
help’.
Email Summary
When you have navigated through all pages of the app (and you navigate to the
end of the ‘My Summary’ section) you will have the option of emailing a text,
pictorial pdf or csv (i.e. excel) summary of the data that you have entered into the
app (Figure 10). To do this, simply tap the ‘Email Summary’ button and enter your
(or your client’s) email address and select the summary format you wish to export.
12You can also email a summary from the Existing Clients page. Simply slide across
the yellow triangle on the left of each client record and you will have an option to
email (envelope icon) or delete (trashcan icon) each client session (see picture in
Existing Client section below). The email summary is partially de-identified as it
only has a first name and not a full date of birth. The email is sent from a secure
server.
You can print the pictorial version of the plan through tapping on the ‘Print’ icon.
In addition, the ‘Export /Share’ button allows you to share the data securely in
text, pictorial pdf or CSV format (Figure 10). If you share the data via email from
this function, you can edit the email before sending. However, once the file is
exported from the app the information is sent via the email account set up on the
device. It is important to ensure that your device is password protected so that the
information in your email is secure.
If using this method, once sent, a copy of this email summary will be saved in
the ‘Sent’ folder of your device’s email account. If you are using a shared device,
you might like to delete this from the sent folder in the device email account to
prevent unauthorised users viewing this confidential summary.
Figure 10: Email, Print and Export/Share summary functions
13Session Rating Questions
The ‘Rate your session’ button allows clients to let us know about their
experience of the app in terms of their understanding of wellbeing, how they are
feeling, and a snapshot of their motivation.
Figure 11: Rating the Session
Existing Clients
Exporting and Importing a Client Record
You can now share client records across devices. First, open the app to the
‘Existing Clients’ list (Figure 12). Slide across the yellow triangle and press the
‘export’ icon (square with arrow pointing out). A code and password will be
displayed. You can then jot this down and share it with another practitioner.
Import icon
Export icon
Figure 12: Existing client list
14On the device you want to import to, open the Stay Strong app, navigate to the
‘Existing Client’ list, press the import icon (square with arrow pointing in) and type
in the code and password, then click on ‘import’ (see Figure 13).
Figure 13: Importing a client
Deleting, Emailing or Copying Sessions
If you slide the yellow triangle across next to the client information (see Figure 14),
you can choose to email (envelope icon) or delete (trashcan icon) that session. If
you click on the copy icon, you can copy the whole record and then edit, whilst
keeping a copy of the original plan.
Slide across Copy icon
to email or
delete record
Figure14: Existing record navigation
15Goals Review
To review a session, you open the ‘existing clients’ tab, click on the ‘copy’ icon
and your previous session will be duplicated, and the goals review pages become
available. You can then revise the session while keeping the original session intact.
You can review family, strengths and worries as usual, making changes where
they arise and listening to how your client is going in these areas. Once you reach
the goals section you are prompted to review ‘current’ goals.
Open goal to
record progress
Figure 15: Review current goals or set a new goal
Click on the arrow (see Figure 15) to open a current goal and record progress, add
a new step or edit a step or the goal (Figure 16). We have maintained a maximum
of two current goals so as not to overload clients, but we have also made sure that
previous ‘old’ goals can still be seen and accessed.
Edit goal
Slide across
to edit or Score progress
delete step to current goal
Figure 16: Score progress to current goals
16Frequently Asked Questions
Do I log in as administrator or as practitioner?
On each device, there must be at least one ‘administrator’. During setup the first
person who sets up a login account becomes an ‘administrator’. If more than one
person is going to be using the same device, when others register, they can
become either ‘administrators’ or ‘practitioners’.
The main difference between administrators and practitioners is that
administrators can see all client records stored on the device, whereas
practitioners can only see their own client records (i.e. only the client records they
created). The ‘administrator’ can also reset passwords for other users and assign
administrator privileges to other users.
If more than one person from your organisation will be using the same device,
you’ll need to think about who the administrator/s should be and how you plan to
manage this.
Do I need to register as a new practitioner each time?
No. You should log in using the same practitioner or administrator username each
time.
I've forgotten my password and don't have current internet access.
What do I do?
If this happens, and there is another person who is an administrator on that device
(iPad or Tablet), they can log in and change your password for you through the
‘administration’ option in the menu.
If there are no other administrators on the device, you will need to wait until you
have internet access (WiFi or 3G).
When you have internet access, click on the ‘forgot password’ button’. An email
will be sent to the email address with which you registered. You should open this
email from the device and tap on the link in the email.
17If you are unable to access the email account from the device, you can write down the activation code given in the email, open the app, tap the “forgot email” button and enter the activation code given to you in the email. When you tap ‘login’ your details will appear with a blank password field. You will then need to type in a new password and tap ‘next’. Does the app security ensure client information is confidential? Client data is password-protected within the app and cannot be accessed remotely from another device. However, it is up to you and your organisation to make sure that the device and all emails and hard copies are kept safe. If you haven’t already, you might like to consider developing some rules or policies around the use of the device. We recommend deleting emails of client summaries from the sent box on your device and email account, delete any screenshots you take that are stored in your photo album on the device, and set up a password or pin to protect the device itself (as well as the app). We encourage users to only use first names (not surnames) in the app. Data collected in the research database is non-identifiable as no names are exported. The database is protected by a secure and complex password and is only accessible by the research team. How do I give the client a copy of their summary? You can print a copy of the summary directly from the device or email the summary to your email address and then print. If the client has an email address, you could also email the client their summary directly. If I review a client and update their plan, do I lose their previous session? No. Each time you see an existing client, you have the option of starting a new session on the app or changing a previous session. You can copy a previous session to update by clicking on the copy icon (Figure:13 Existing record navigation) on the existing clients sessions page. This means you won’t have to re-enter all the information you entered previously, you can change it, but the original version remains unchanged. If I delete or uninstall the app, do I lose data? We don’t recommend deleting/ uninstalling the app as you will most likely lose your data. However, if you have emailed client summaries and stored the summaries before deleting, you will still have a record of the information. If the app is uninstalled, the data contained within it is deleted. 18
What if the app crashes when I haven’t finished the session do I lose my
information?
Once you reopen the app all the information should have been stored and you can
start where you left off.

Do I have to retype all the information in again every time I see
someone?
No. You can copy (Figure:13 Existing record navigation) the previous session and
adapt, add and take away information without affecting the first session. In the
existing clients file, look for the client you are working with and the session you
want to work from.

Press the copy icon. This takes you to the ‘people who keep me strong’ page with
all information from the previous session entered. Change whatever needs to be
changed during the session. This will be saved as a new session with current dates
and                                                                         times.

                                                                                19
Technical Support
Helpdesk Support
For help with downloading or using the Stay Strong app, contact:
Email: info.aimhi@menzies.edu.au
Connecting to a Wi-Fi Network
Source: https://support.apple.com/en-au/HT202639
Wi-Fi is a technology that allows you to wirelessly connect to a local area
network. A Wi-Fi connection will allow you to browse the Internet, connect to the
App Store and iTunes Store, and use many other features of your iPad. There
are multiple ways to connect to a Wi-Fi network. Here are ways to connect to the
most common Wi-Fi network configurations.
Make sure Wi-Fi is on and that you can see your network
Tap Settings > Wi-Fi and make sure Wi-Fi is turned on. Tap the name of your Wi-
Fi network to join. A blue checkmark beside a network name means you're
connected.
To connect to a network
1. Tap Settings > Wi-Fi.
2. When Wi-Fi is on, your device will automatically search for available Wi-Fi
networks.
3. Tap the name of your desired Wi-Fi network.
4. When your device is connected to a Wi-Fi network, a checkmark will
appear to the left of the network name. The Wi-Fi logo will also appear in
the status bar at the top left of your display
To connect to a password-protected network
1. Tap Settings > Wi-Fi.
2. When Wi-Fi is on, your device will automatically search for available Wi-Fi
networks.
3. Tap the name of your desired Wi-Fi network. A password-protected
network will have a lock icon to the right of the network.
4. You will be prompted to enter the password. Enter the password for the
Wi-Fi network.
5. Tap Join.
206. When your device is connected to a Wi-Fi network, a checkmark will
appear to the left of the network name. The Wi-Fi logo will also appear in
the status bar at the top left of your display.
To connect to hidden network
1. Tap Settings > Wi-Fi. By default a hidden network will not appear in your
available network list.
2. Tap Other.
3. Enter the exact name of the network:
4. Tap Security to choose the security type. Note: Not all hidden networks
are secure. Please check with the network administrator if necessary.
5. Choose the appropriate security type, and then tap " Back" in the top left.
6. You will now be able to type the network password in the Password field.
7. Tap Join.
When your device is connected to a Wi-Fi network, a checkmark will appear to the
left of the network name. The Wi-Fi logo will also appear in the status bar at the
top left of the display.
Connecting to a Wi-Fi Network Samsung Galaxy
A good video to watch if you need to set up your WiFi on a Samsung Galaxy tablet
is available on the following link.
Source: https://tablets.gadgethacks.com/how-to/set-up-wi-fi-connection-samsung-
galaxy-tab-411602/
Installing a SIM Card
A Subscriber Identity Module (SIM) card is a portable memory chip used mostly in
mobile phones and tablets. These cards hold the personal information of the
account holder, including his or her phone number, address book, text messages,
and other data. Each card has a unique number printed on the microchip, which
the carrier needs to activate it. SIM cards are tied to a particular carrier and can
only be used with a service plan from that carrier.
Source: https://support.apple.com/en-us/HT201337
Inserting a SIM Card
1. Insert the SIM tool provided with your iPad or a paperclip into the small hole
in the SIM tray on the side of your device and push to remove the SIM tray
2. Place the SIM on the SIM tray, ensuring that the angled corner of the SIM
is aligned with the angled corner of the SIM tray.
213. Re-insert the SIM tray and push until it clicks into place. iPad Air 2 iPad mini 3 iPad Air iPad mini 2 iPad mini iPad (4th generation) iPad (3rd generation) iPad 2 Wi-Fi + 3G (GSM model) Note: Insert the SIM-eject tool that came with your iPad at a 45° angle. iPad Wi-Fi + 3G Here's a list of the iPad models and the SIM cards they use: 22
Model                                    nano-SIM card micro-SIM card

 iPad Air 2 Wi-Fi + Cellular*             ✓

 iPad Air Wi-Fi + Cellular                ✓

 iPad (4th generation) Wi-Fi + Cellular                    ✓

 iPad (3rd generation) Wi-Fi + Cellular                    ✓

 iPad 2 (Wi-Fi + Cellular)                                 ✓

 iPad (Wi-Fi + 3G)                                         ✓

 iPad mini 3 Wi-Fi + Cellular*            ✓

 iPad mini 2 Wi-Fi + Cellular             ✓

 iPad mini Wi-Fi + Cellular               ✓

Activating a SIM Card
http://www.ekit.com/userguides/ipad_data_userguide_en.pdf

1. Check the service (mobile) number or SIM serial number on the SIM card pack

2. Activate online or over the phone following your carrier’s instructions.

3. For Telstra, enter your details and follow the prompts at

https://www.my.telstra.com.au/activate?ti=TR:TR:june12:ppaapp:prepaidactivatio
n:ppa

                                                                              23
You can also read