Mini Nail Drill and Grinding Machine for Foot and Nail Care - Instruction manual - b-on-foot
←
→
Page content transcription
If your browser does not render page correctly, please read the page content below
Mini - Instruction manual

   Nail Drill and Grinding Machine for Foot and
                      Nail Care

                                          Mini

                            Instruction manual
                                Issue 02/2021

IM Mini 02/2021                                  Page 1 of 14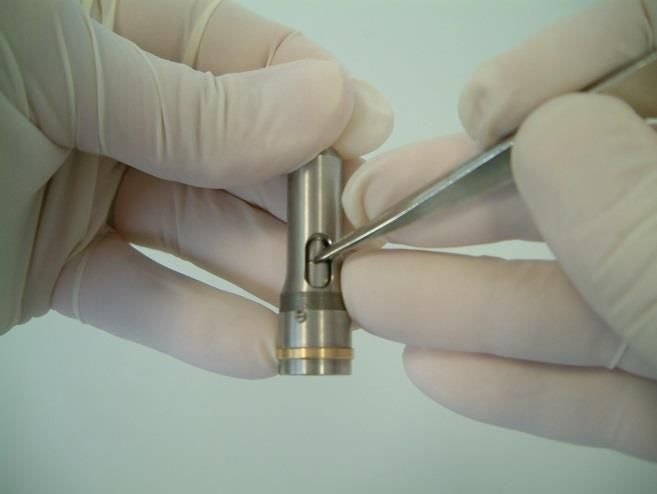
Mini - Instruction manual

Table of contents

1.      Device description ......................................................................................................................... 3
2.      Explanation of symbols used......................................................................................................... 4
3.      Scope of supply ............................................................................................................................. 4
4.      Scope of application ...................................................................................................................... 5
5.      Requirements to be met by the operator ..................................................................................... 5
6.      Personnel and client protection.................................................................................................... 5
7.      Safety instructions......................................................................................................................... 5
8.      Commissioning .............................................................................................................................. 6
9.      Operation of the nail drill and grinding machine .......................................................................... 6
9.1.    Operation and control of the motor handpiece ........................................................................... 7
9.2.    Sleep mode ................................................................................................................................... 7
9.3.    Overload protection ...................................................................................................................... 7
9.4.    Changing the rotating instruments ............................................................................................... 7
10.     Maintenance and disinfection ...................................................................................................... 8
10.1. Cleaning and disinfection .............................................................................................................. 8
10.2. Cleaning the automatic clamping device .................................................................................... 10
11.     Fault analysis ............................................................................................................................... 12
12.     Technical specifications .............................................................................................................. 13
13.     Warranty ..................................................................................................................................... 14
14.     Disposal instruction..................................................................................................................... 14

Page 2 of 14                                                                                                                      IM Mini 02/2021
Mini - Instruction manual
Dear customer,
Thank you for the confidence you have placed in us by purchasing the Nail Drill and Grinding Machine Mini. The
device is manufactured and tested according to strict quality criteria.
During the development of the Nail Drill and Grinding Machine Mini, special emphasis was placed on simpler
operation, compact dimensions and low weight. The device works with an electronically commutated micro motor,
which enables high performance with a lightweight and slim hand piece.
Please read this instruction manual carefully before using the device for the first time. It provides important
information on the safety, use and maintenance of the device. This will protect you and others and prevent
damage to the device.
We wish you much success and unimpeded joy with your Nail Drill and Grinding Machine Mini.
Yours,
Bahner Feinwerktechnik GmbH
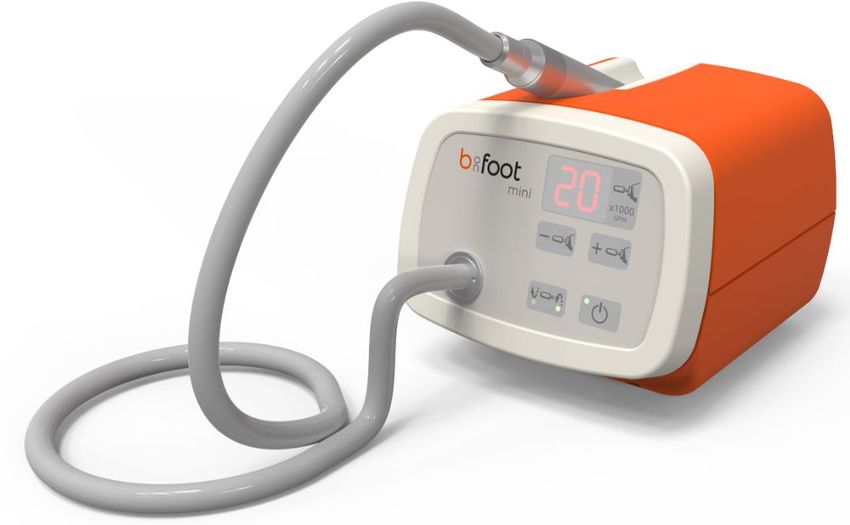
1. Device description
Control panel Speed Hand piece
Display
IM Mini 02/2021 Page 3 of 14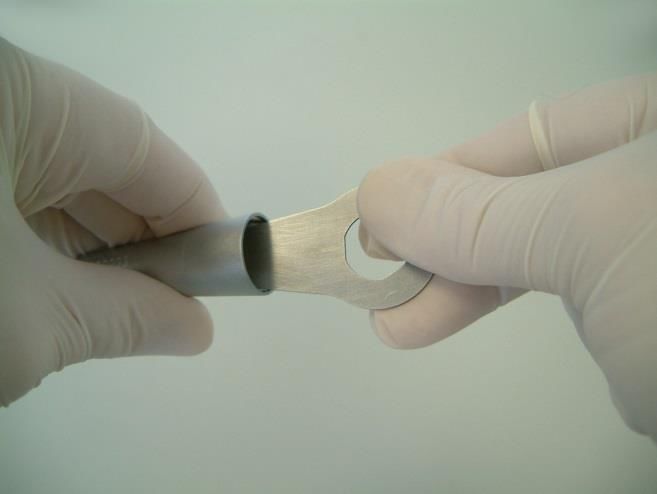
Mini - Instruction manual

2. Explanation of symbols used

On the nameplate of the device:

                   Instruction manual

                   Reference to declaration of conformity

                   Symbol for marking electrical and electronic equipment in accordance with § 7 ElektroG

                   Application part of BF type [application part insulated from earth]

    IPXO           No special protection against penetrating moisture (IP = International Protection).

In the instruction manual:

                   This symbol refers to special information or prohibitions for damage prevention. These
                   instructions serve the purpose of occupational safety

                   This symbol precedes particularly important instructions for compliance with regulations or if
                   there is a risk of damage to property.

3. Scope of supply

The following components are included in the scope of delivery:

         1 piece       Nail Drill and Grinding Machine Mini
         1 piece       Service pack with the following contents:
                         1x Pipe cleaner
                         1x Cleaning brush
         1 piece       Instruction manual

If one of the parts is missing, please file a complaint with your supplier.

                   Carefully store the shipping carton including the padding insert. In case of maintenance or
                   repair, the original packaging must be used for transport.
                   Please also note that Bahner Feinwerktechnik GmbH will not be liable for any damage resulting
                   from failure to observe this information

Page 4 of 14                                                                                         IM Mini 02/2021
Mini - Instruction manual

4. Scope of application

The Nail Drill and Grinding Machine Mini is designed for use in the fields of cosmetic foot care, pedicure and
manicure. The motor hand piece rotates instruments such as files, drills and grinding tools. With these
instruments, hard skin, calluses, nails etc. can be removed quickly and effectively. You can also grind, clean and
polish nails. The device is intended exclusively for commercial use.

5. Requirements to be met by the operator

The Nail Drill and Grinding Machine Mini can only be put into operation by trained and instructed pedicurists,
podiatrists, cosmeticians and nail designers who are familiar with the working method and have the appropriate
training.

6. Personnel and client protection

The device may only be opened by the manufacturer or by qualified personnel authorised by it.
Changes to the device are not permitted.

Operate the device only in perfect condition.
The device must only be used for its intended purpose.

Place the device at a sufficient distance from other electrical devices.
Moisture can lead to electric shock.

After each use and before each client change, the instruments must be disinfected, cleaned or sterilised
according to the instructions of the instrument manufacturer. In this way you avoid a possible transmission of
germs to subsequent clients.

After each use and before each client change, a surface disinfection must be carried out on all surfaces of the
motor hand piece (make sure that no liquid penetrates into the motor hand piece during this disinfection).

During use, the operator should wear protective gloves, goggles and mouth and nose protection.

Only use instruments that are approved for the maximum speed of the hand piece according to the
manufacturer's instructions.

Make sure that hair cannot get into the rotating parts (nail drills or similar) while working with the device. Wear a
hair net if necessary.

7. Safety instructions

Make sure that your power supply corresponds to the specified nominal voltage of the nail drill and grinding
machine. The electrical mains must be provided with an effective earthing and the installation must comply with all
relevant regulations.

Caution: In order to avoid the risk of electric shock, this device may only be connected to a supply conductor with
a protective earth conductor

Only use round, undamaged rotating instruments. This prevents damage to the hand pieces.

Only use rustproof instruments when working with the motor hand piece.

Disconnect the mains plug before starting any maintenance work.

It should be noted that the use of electrical accessories, motors and cables (e.g. motor cables) other than those
provided by the manufacturer and electrical devices located in the immediate vicinity may lead to an increased
emission of interference radiation or reduced immunity of the device.

Please observe the additional safety instructions in the individual chapters.

IM Mini 02/2021                                                                                          Page 5 of 14
Mini - Instruction manual
8. Commissioning
Make sure the device is in a suitable position.
Plug the mains connection cable into an easily accessible socket.
Your Nail Drill and Grinding Machine Mini is now ready for operation.
The device is switched off again by pulling out the mains plug.
9. Operation of the nail drill and grinding machine
The Nail Drill and Grinding Machine Mini has buttons and displays on its front panel which can be used to call up
its functions. To better highlight operating states, some of the buttons are equipped with LEDs that confirm the
call-up of a function.
Speed
Display
Speed
Control
Direction of Standby
rotation Button
Page 6 of 14 IM Mini 02/2021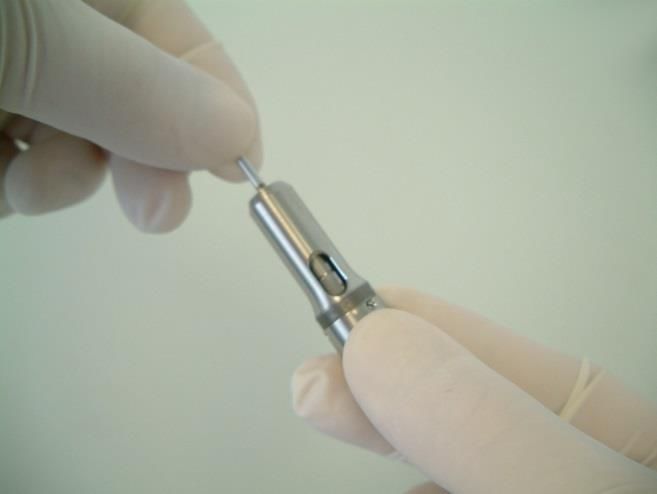
Mini - Instruction manual

9.1. Operation and control of the motor hand piece

A total of 4 buttons are responsible for controlling the hand piece motor. The current speed is displayed in the 2-
digit number field.

Meaning of the buttons & displays:

               Hand piece motor ON/OFF (standby LED display)
               Press this button to switch the micro motor on or off.
               An LED in the keypad indicates that the micro motor is switched on.

               Micro motor - Speed +
               This button increases the speed of the micro motor. The highest adjustable speed is 42,000 rpm.
               The engine speed is increased in steps of 500 rpm each in the range of 2,500 - 10,000 rpm and
               above in steps of 1000 rpm.

               Micro motor - Speed -
               This button reduces the speed of the micro motor. The lowest adjustable speed is 2,500 rpm. The
               engine speed is reduced in steps of 500 rpm each in the range of 2,500 - 10,000 rpm and above in
               steps of 1000 rpm.

               Please always observe the maximum speeds specified by the manufacturer for the nail drill
               currently in use. Do not exceed this under any circumstances, as you could endanger
               yourself and your client.

               Changing the direction of rotation
               Change between clockwise and counter clockwise rotation. One LED each signals the selected
               direction.

9.2. Sleep mode

After a work break of approx. 30 minutes, the device switches to the energy-saving "Sleep mode". The display
becomes dark. After pressing any button on the front panel, the device will wake up again.

9.3. Overload protection

If the motor becomes blocked due to overload (e.g. the nail drill gets entangled in a towel), the hand piece motor
is switched off and the word OF appears.

Remove the cause of the blockage. Wait a minute and turn the power back on with the On/Off button. The work
can be continued as usual.

9.4. Changing the rotating instruments

The rotating instruments (nail drills) are replaced when the motor is at a standstill.

Insert the shaft of the instrument into the hand piece tip as far as it will go.
The shaft of the inserted instrument is automatically clamped when the motor is switched on.

                   Only nail drills with a shaft diameter of 2.35 mm (+0 to - 0.016 mm) may be used (HP
                   shaft).

Never let the motor hand piece run without a nail drill inserted.

If the nail drill cannot be inserted easily, tap the switched off micro motor several times against the ball of the
thumb with the tip of the hand piece. This loosens the locking pins and you can insert the nail drill again without
any problems.

IM Mini 02/2021                                                                                         Page 7 of 14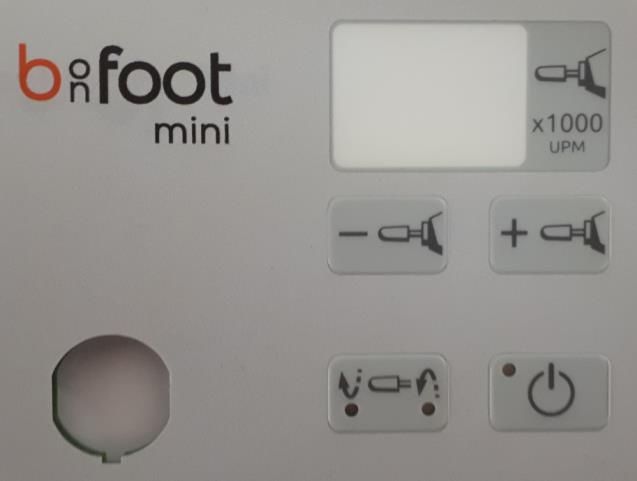
Mini - Instruction manual

10. Maintenance and disinfection

All maintenance and disinfection activities that should be carried out at regular intervals can be found on the
following pages.
The monitoring authorities (e.g. health authorities) could require proof of the activities carried out.

Our tip: Plan your maintenance and disinfection intervals! Enter these dates in your practice calendar or keep a
maintenance record sheet in which the dates are listed and the activities can be confirmed by you.

10.1.       Cleaning and disinfection

The plastic housing, the front panel of the device and the motor hand piece incl. hose can best be kept clean with
a damp cloth with a bacteria-reducing effect (e.g. Microbac tissues).

For disinfection, please use a disinfectant such as Microbac forte or Bacillol AF. The device and the hand piece
including the hose can be wiped off with a cloth moistened with this.

Never spray disinfectant directly onto the device or parts of the device!

The use of disinfectants can result in a slight brightening or matting of the surfaces, which has no effect on the
function or safety of the device.

               Always avoid aggressive solvents, acids and alkalis.

Recommendations for the frequency of disinfections:

After each treatment

        -     Wipe the hand piece, hose and keyboard of the device or all parts touched during treatment with a
              disposable disinfectant wipe.

Daily disinfection

        -     In the case of visibly contaminated surfaces, the surfaces must be disinfected immediately after the
              treatment of the client and the respective exposure time of the disinfectant must be adhered to.

Weekly routine disinfection

        -     Wipe all surfaces, objects, devices, buttons, levers, switches in the client roomwith disinfectant.
        -     In particular, the hand contact points must be disinfected.

                 This cleaning procedure may only be carried out when the mains plug is disconnected.

                 The safety rules for handling alcoholic disinfectants to avoid fire and explosion hazards
                 must be observed!

                 50 ml of applied solution per m² of surface area to be treated or 100 ml total quantity per m²
                 of room floor area must not be exceeded.

                 Sufficient ventilation and removal of ignition sources (no smoking)!
                 Hot surfaces, even inside devices (fan heaters), must be cooled down.

Page 8 of 14                                                                                          IM Mini 02/2021
Mini - Instruction manual
Further information on disinfection
The cleaning of the rotating instruments used must be carried out according to the manufacturer's instructions.
Under the following links you will find corresponding instructions / notes.
Note: In some cases in the federal states, different regulations apply.
http://www.rki.de/DE/Home/homepage_node.html
http://www.zfd.de/
https://www.meisinger.de/index.php/Home.html
http://www.lukas-erzett.com/
http://www.premusa.com/home/default.asp
http://www.mdtdental.com/htmls/home.aspx
During operation, small amounts of dust and dirt can penetrate the hand piece. If the dirt solidifies and
accumulates, it can impair the function of the hand piece and even permanently damage it. Therefore it is
absolutely necessary to dismantle and clean the fixture regularly.
We recommend to clean the fixture weekly.
Set up a fixed date for cleaning your hand piece. This costs only a little time, but gives you and
your clients security and protects this important component from damage. If, after a certain period
of use, it turns out that little dirt accumulates, the cleaning interval can also be extended.
.
Pull the mains plug!
This cleaning procedure may only be carried out when the mains plug is disconnected.
IM Mini 02/2021 Page 9 of 14Mini - Instruction manual
10.2. Cleaning the automatic clamping device
If, despite all constructive measures, it should happen that the nail drill fixture no longer works
perfectly, the clamping function can easily be restored by a simple cleaning process.
Disconnect the device from the power supply and follow the cleaning sequence:
Step 1: Step 2:
For better grip, put on protective gloves and Use the cleaning key to turn the inner main housing
unscrew the tip of the hand piece from the motor. out of the hand piece cover.
Step 3: Step 4:
Pull the main housing out of the hand piece cover. Insert a nail drill into the fixture to prevent twisting of
the hand piece shaft.
Page 10 of 14 IM Mini 02/2021Mini - Instruction manual
Step 5: Step 6:
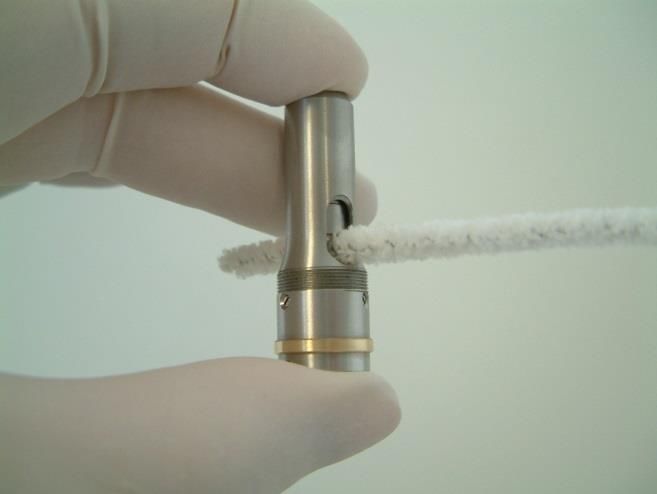
Using pointed tweezers, push the dust protection Push a pipe cleaner through the dirt chamber and
ring towards the nail drill until the dirt chamber remove the dirt accumulation inside.
becomes visible.
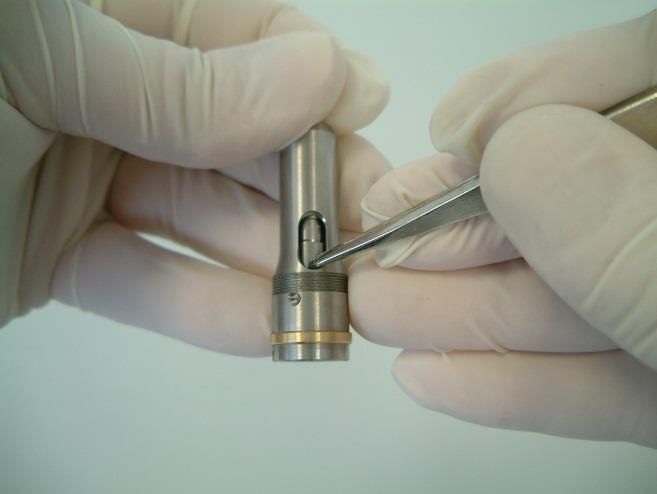
Step 7: Step 8:
Use the pointed tweezers to push the dust Turn the nail drill back and forth to check that the
protection ring for the dirt chamber into its original quick-release device is running smoothly and make
position. sure that no scratching or scraping noises are
audible. Then reassemble the hand piece in reverse
order.
IM Mini 02/2021 Page 11 of 14Mini - Instruction manual
11. Fault analysis
This analysis should help you to solve small problems yourself. If the recommended measures are not
successful, please contact Bahner Feinwerktechnik GmbH.
Problem Cause Measure
Motor blocked by overload, for The instrument is tangled up in a Please remove the cause of the
example. towel or working coat, for blockage and then switch the motor on
The word “OF” appears in the example. again using the ON/OFF button.
speed display.
Nail drill and grinding machine is Nail drill and grinding machine not Plug the mains plug into the socket.
inactive. connected.
Connection socket without Check the fuse/circuit breaker of the
electricity. power supply.
Defective fuse. Have the service change the fuse.
Device goes into "sleep mode" By touching a key, the device returns
after 30 min.without operation to the operating mode.
Problems with the handpiece Dust cap damaged. Check dust cap regularly, must not slip
(If the cap is defective, dirt can get down the cutter when removed. Clean
into the inside of the handpiece the inside of the handpiece.
and damage the installed
mechanics. Consequence: The
milling cutter can no longer be
inserted. Milling cutter rotates
through. Milling cutter no longer
rotates).
Caution mains voltage!
The device may only be opened by the manufacturer or by qualified personnel authorised by it.
Page 12 of 14 IM Mini 02/2021Mini - Instruction manual
12. Technical specifications
Operating voltage: 110 - 230 AC voltage / 50 - 60 hertz
Protection class: 1 / IPX0
Power consumption: Max. 30 VA / in stand-by mode max. 10 VA
Micro motor speed range: 2,500 to 20,000 rpm
Adjustable in steps of 500 rpm in the range of 2,500 rpm - 10,000 rpm
and in steps of 1000 rpm in the range of 10,000 rpm - 20,000 rpm
Our micromotor is brushlessly commutated, has a
higher power, generates less heat and is almost
without wear!
Volume at full power: 42dB (without background noise)
Dimensions: 135 x 110 x 155 mm (width x height x depth)
Length of handpiece / hose unit 1600 mm
Weight: 900 g including motor hand piece
motor hand piece = 170 g
Operating temperature: 10°C - 35°C
After transport or storage below the specified operating temperature,
the device should be acclimatised to room temperature for approx. 30
minutes due to possible condensation
Transport and storage temperature: -10°C to +60°C
Bahner Feinwerktechnik GmbH reserves the right to make technical and optical changes to its products at any
time and without prior notice.
No electromagnetic interactions are known to occur between this device and other devices.
IM Mini 02/2021 Page 13 of 14Mini - Instruction manual 13. Warranty Dear customer, You have made a good choice with the Nail Drill and Grinding Machine Mini. Our devices are produced under constant production control and are characterised by high quality, functional reliability and long service life. The warranty period is 12 months from delivery of the goods to the buyer. § 479 BGB remains unaffected. For easier understanding, here is a brief overview of the two terms "warranty" and "guarantee". Warranty: From January, 01, 2002 the new EU Directive 1999/44 came into force, which among other things regulates the statutory warranty period. Warranty is therefore required by law and includes, among other things, the right to rectification. The buyer thus has the right to assert claims in the case of new purchases from 2002 onwards if the goods prove to be defective from the outset. The decisive factor here is that the defect was already present when the goods were handed over. The warranty does not cover natural wear and tear or damage resulting from faulty or negligent handling, excessive strain or special external influences that are not assumed under the contract, as well as non- reproducible software errors. To be able to judge this, we need the defective product in its original condition (not dismantled). Further claims, in particular for compensation for direct or indirect damage, are excluded. Guarantee: Guarantee is a voluntary performance of the seller or manufacturer in addition to the warranty; the content of the guarantee is therefore not required by law. The guarantee covers the removal of material defects by repair or replacement. In common parlance, any liability for defects for a purchased item is referred to as a guarantee. This is not correct. The amendment concerns only the warranty scheme. Read this instruction manual carefully before putting the device into operation. This avoids operating errors. What to do in case of damage? Please contact the service of Bahner Feinwerktechnik GmbH, they will be happy to assist you with words and deeds. 14. Disposal instruction Do not dispose of the device in domestic waste! According to the EU Directive RL2002/96/EG (WEEE - Directive on Waste Electrical and Electronic Equipment) this product has to be recycled after use. Information can be obtained from the local collection points for waste electronic equipment! Page 14 of 14 IM Mini 02/2021
You can also read