RAM User Guide OmniPay Remote Access Module (RAM) for Merchants - First Data
←
→
Page content transcription
If your browser does not render page correctly, please read the page content below

RAM User Guide
OmniPay Remote Access Module (RAM) for Merchants

© 2020 Fiserv, Inc. or its affiliates. | Confidential
Contents

1.0    Introduction ................................................................................................................... 4
 1.1       Overview .......................................................................................................................... 4
 1.2       Supported Browsers ......................................................................................................... 4
 1.3       About Ram Users and Merchants ..................................................................................... 5
 1.4       What is RAM Session? ..................................................................................................... 5
 1.5       What Are the Merchant Types? ........................................................................................ 5
 1.6       Who Is the Currently Selected Merchant? ........................................................................ 6
 1.7       Changing Merchants Using the Merchant Navigation Area ............................................... 6
 1.8       Selecting Account ............................................................................................................. 8

2.0    Using the Common RAM Functionality ....................................................................... 9
 2.1       Understanding the RAM Page Layout............................................................................... 9
      2.1.1      Using RAM Information Links .................................................................................... 9
        2.1.1.1 Using the Edit Profile Hyperlink .............................................................................10
      2.1.2      Using the Edit Profile Hyperlink ................................................................................11
        2.1.2.1 Using the Quick Links Icon ....................................................................................12
        2.1.2.2 Using My Favourites Icon......................................................................................13
        2.1.2.3 Using the Collapse/Expand Banner Icon ...............................................................13
 2.2       Paginating Large Amounts of Output ...............................................................................13
 2.3       Using the Download Options ...........................................................................................13
 2.4       Posing Dates ...................................................................................................................14
 2.5       About Currencies .............................................................................................................14

3.0    Accessing RAM Pages ............................................................................................... 15
 3.1       Login Page ......................................................................................................................15
 3.2       Welcome Page ................................................................................................................16
 3.3       Unlock Session ................................................................................................................16
 3.4       Users Reset Their Own Password ...................................................................................17
 3.5       About the Merchant Details Page ....................................................................................20

                                                                                                                                          2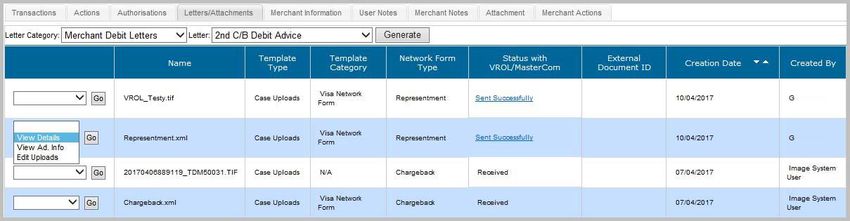
4.0    Using the Transaction Activity Pages ....................................................................... 21
 4.1      Opening the Processed Batches Page ............................................................................21
      4.1.1     Viewing the Transactions Page ................................................................................21
 4.2      Opening the Chargeback Status Page.............................................................................22
      4.2.1     Chargeback Status Details Page ..............................................................................23
 4.3      Viewing the Retrieval Request Page ...............................................................................23
 4.4      Opening the Suspense Transactions Page ......................................................................24
 4.5      Opening the Processed Transactions Page .....................................................................25
 4.6      Opening the Custom Data Search Page ..........................................................................26

5.0    Using the Funding Pages ........................................................................................... 27
 5.1      About the Account Page ..................................................................................................27

6.0    Using the Chargeback Page....................................................................................... 29
 6.1      Searching Chargeback Cases .........................................................................................30
 6.2      Viewing Case Details.......................................................................................................31
 6.3      Viewing Transactions ......................................................................................................31
 6.4      Viewing Actions ...............................................................................................................31
 6.5      Viewing Authorisations ....................................................................................................32
 6.6      Viewing Letters and Attachments ....................................................................................32
 6.7      Viewing Merchant Information .........................................................................................32
 6.8      Viewing Merchant Notes ..................................................................................................33

                                                                                                                                     3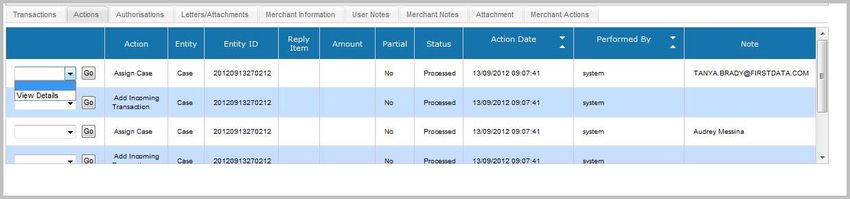
Chapter 1
1.0 Introduction
This chapter provides an overview of the Remote Access Module and also outlines what is contained
within this guide.
1.1 Overview
The Remote Access Module (RAM) is an Internet application developed by OmniPay, which provides
customers with access to their acquiring data held on OmniPay systems.
This document is a guide to the functionality provided by the RAM application for Merchants .
The functions supported by RAM include:
View merchant profiles
View submitted transactions (presentments)
View authorisations
View detail of transaction data on a per-MID level
View summary transaction data on a per-MID level
View data to help in reconciliation and back office functions
View merchant funding
Extract data
View exception items (Retrievals, chargebacks)
Upload, chargeback documents
1.2 Supported Browsers
RAM is approved for use on the following browser versions using default installation settings:
Microsoft Internet Explorer 9.x+ and above (Version 11 has been verified with RAM 6.12.)
Mozilla Firefox 2.x+ and above (Version 45 has been verified with RAM 16.2.)
Google Chrome 40+ (Version 69 has been verified with RAM 18.6.)
Newer browser versions from these same suppliers, which come to market after a given RAM release,
cannot be guaranteed to work in all cases and may have to be run in a backward compatible mode until such
time as a fully compatible RAM release can be made available.
RAM may work correctly with browser versions from other suppliers but this is not specifically guaranteed.
4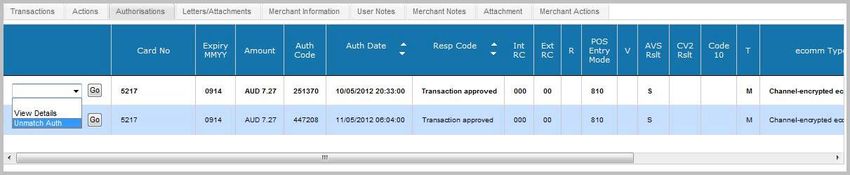
1.3 About Ram Users and Merchants
Every user is assigned a user name and password with which to log on to RAM. You must follow the
password protection procedures set by the institution and take all necessary steps to make sure that your
password remains secret.
You should be aware of the following:
Passwords should not be shared between users
You should not choose passwords that consist solely of a dictionary word or that are easily derived
from personal information such as first or last names, company names or telephone numbers
1.4 What is RAM Session?
A RAM session is invoked when you log onto RAM. This RAM session controls your access to the system
and is valid only for the period covering the time from when you log on until the time when you log off (or are
automatically logged off due to a timeout).
You can have two session timeouts. After the first session timeout, the session is locked but can be
recovered to the point where the session was locked, on successful password entry. After the second
session timeout, the session is killed and you must log on again.
Note: Only one session is allowed per RAM user, if you log on a second time, the first session is
automatically logged out
1.5 What Are the Merchant Types?
There are three types of merchant:
Group merchants
Sub-group merchants
Member level merchants
Group or sub-group merchants are only relevant where merchants are set up within a hierarchy or chain
structure as in Figure 1.1.
Figure 1.1. Merchant Hierarchy
Group
Sub-group Sub-group
Member Sub-group Sub-group
Member Member
5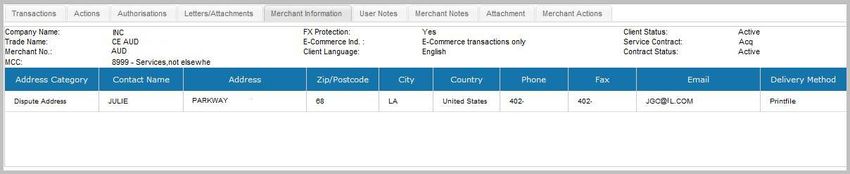
A group merchant is the highest level in the hierarchy and a sub-group merchant is always between the
highest and lowest level of a hierarchy. A member level merchant is the lowest level in a hierarchy.
A group and sub-group merchant cannot acquire transactions, though they can be used to aggregate billing
and settlement. A member level merchant acquires transactions.

1.6    Who Is the Currently Selected Merchant?
When a user logs onto RAM, the selected merchant is set to the merchant number associated with the
RAM user.
The merchant number consists of an indicator (G for group merchants, S for sub-group and M for member
level merchants).

1.7    Changing Merchants Using the Merchant Navigation Area
Searches based on the merchant number are controlled by a common merchant navigation area, which
appears below the RAM Main Menu.
                                               Figure 1.2

                                             Merchant
                                           Navigation Area

The merchant navigation area offers the option to search for data related to a particular merchant or
merchant group. Alternatively, a merchant can be selected using the Select, to switch MID, use the
“Enter Merchant Number” text box (Figure 1.3).
                                 Figure 1.3 Select Merchant Number

                                                                                                        6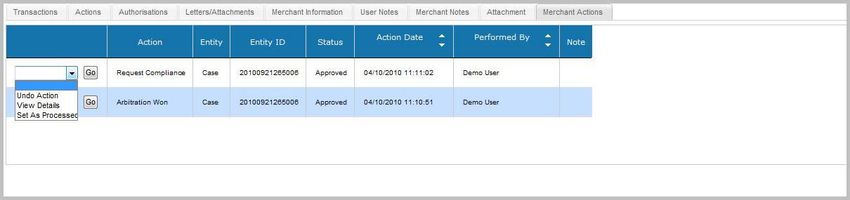
To switch MIS, use the For multi-MID users, select from the list of merchants using the “Select
Merchant” icon “Enter Merchant Number” text box (Figure 1.4).
                                    Figure 1.4 Change Merchant Icon

Clicking the icon, will display the “Select Merchant” pop-up (Figure 1.5).
                                     Figure 1.5 Select Merchant Pop-up

This pop-up will list all the merchants the user has access to. If the user has access to a group merchant, all
the merchants within the group will be listed. Selecting a new merchant (via the hyperlink) will change the
merchant in the merchant navigation section.
Merchants can also be selected using the “Select Trade Name” drop-down box (Figure 1.6).
                                       Figure 1.6 Select Trade Name

Enter the merchant trade name details you wish to search for, using the wildcard character “*” for
potential multiple matches. Select the merchant of interest from the returned list to make that merchant
the active merchant.

                                                                                                           7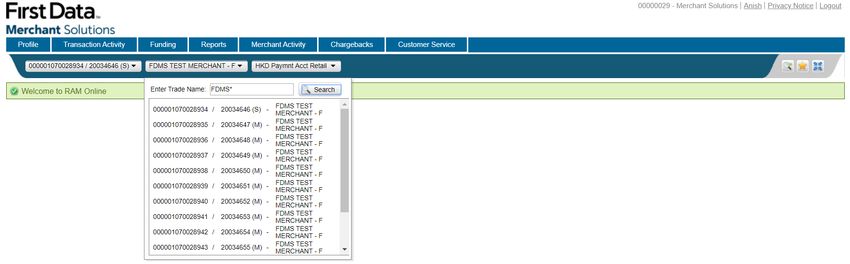
1.8     Selecting Account
In addition to supporting selection of the merchant number, the merchant navigation section also allows
you to select a particular account for a merchant using an account drop-down list. The “Select Account”
dropdown list specifies the particular merchant account against which the search is to be performed.
This drop-down is only available once a merchant has been selected.
                                    Figure 1.7 Select Merchant Account

When the merchant only has one account, no selection is available.
The drop-down list will show the account status if the account is not active.

                                                                                                          8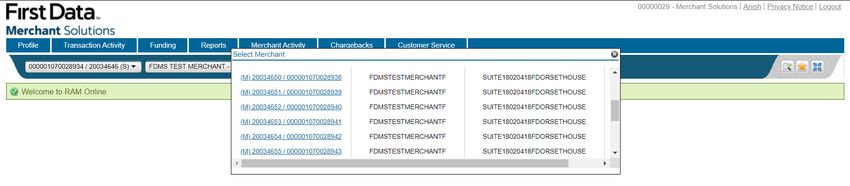
Chapter 2
2.0 Using the Common RAM Functionality
This chapter describes the functionality that is common across many Remote Access Module
(RAM) pages.
The following topics are covered:
Understanding the RAM Page Layout
Displaying Lists of Data
Paginating Large Amounts of Output
Using the Download Options
Posting Dates
2.1 Understanding the RAM Page Layout
Every RAM page has the same standard layout (banner) at the top of the page (Figure 2.1).
Figure 2.1 RAM Page Layout
Institution Logo Main Menu
Merchant Navigation Icon Toolbar
The banner section is broken into different areas:
1. RAM Institution Logo. The logo displayed is specific to each RAM institution.
2. RAM Information Links
3. RAM Main Menu. The Main Menu pages available to each user.
4. RAM Merchant Navigation. The merchant navigation section allows the user change merchant and
merchant account.
5. RAM Icon Toolbar. This toolbar displays icons which facilitate navigation and display of RAM pages.
2.1.1 Using RAM Information Links
The information links area (Figure 2.2) displays the institution name, the user name and a number of
hyperlinks. For users with access to edit their own profile, the user name is displayed as a hyperlink.
9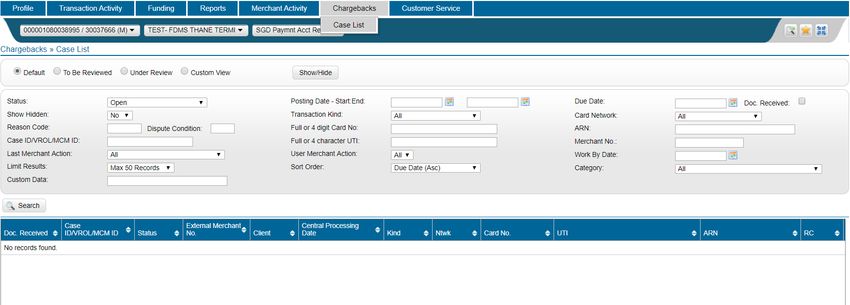
Figure 2.2. RAM Information Links Area
Details of the functionality of the hyperlinks can be found in the following sections:
Using the Edit Profile Hyperlink
Displaying the Legal Disclaimer
Displaying the Privacy Statement
Using the Logout Hyperlink
2.1.1.1 Using the Edit Profile Hyperlink
Users who have authorisation to update their own profile, will have their user name displayed in the
Information Links section as a hyperlink (Figure 2.2). Selecting the hyperlink will display the Edit Profile
pop-up (Figure 2.3).
The Edit Profile tab enables you to maintain information on your own profile. After editing your profile details,
click the “Update” button to save the updates.
Figure 2.3. Edit Profile Pop-up
10The Change Password tab (Figure 2.4) on the Edit Profile pop-up allows you to change your password.
Figure 2.4. Change Password Tab
As with the Change Password page (Opening the Change Password Page), the old password has to be
entered as well as the new password (twice).
The Security Question Details (Figure 2.5) on the Edit Profile pop-up allows you to change the selected
security questions and answers.
Figure 2.5. Security Question Details Tab
2.1.2 Using the Edit Profile Hyperlink
The RAM icon toolbar (Figure 2.6) displays icons which facilitate navigation and display of RAM pages.
Figure 2.6. RAM Icon Toolbar
To see the icon’s description, roll the mouse over the icon.
11Figure 2.7 RAM Menu Toolbar
Icon Toolbar
Details of the functionality of the icons can be found in the following sections:
Using the Quick Links Icon
Using My Favourites Icon
Using the Collapse/Expand Banner Icon
2.1.2.1 Using the Quick Links Icon
Selecting the Quick Links icon (Figure 2.8) displays the Quick Links text box (Figure 3.20).
Figure 2.8 Quick Links Icon
The Quick Links text box enables you to move directly to a selected RAM page. The Quick Links text box
allows the name of a menu item to be typed in directly. A list of matching options appears.
In Figure 2.9, the letter‘s’ was entered and all entries beginning with D are automatically listed. The option
can be selected using either the mouse or the arrow keys.
Figure 2.9 Quick Links Text Box and Drop-Down List
122.1.2.2 Using My Favourites Icon
RAM pages can be added to a favourites list using the My Favourites icon (Figure 2.10).
Figure 2.10. My Favourites Icon
The My Favourites icon allows you to mark your pages of interest and to use the Favourites as an alternative
method of RAM Navigation.
2.1.2.3 Using the Collapse/Expand Banner Icon
The Collapse/Expand icons allow you collapse and expand the RAM Banner.
Use the Collapse icon to show a limited menu banner (Figure 2.11).
Figure 2.11. Collapse Icon
Using the Collapse icon allows you to maximise the amount of space available on the page.
2.2 Paginating Large Amounts of Output
Where a RAM page can return a large amount of output, the output may be divided into multiple pages.
You can navigate through the pages using the “Prev Page” and “Next Page” buttons at the end of the page.
The total number of records and the current position within those records is also displayed.
Where all the output can be fitted on one page, both the “Prev Page” and “Next Page” buttons are displayed
but are disabled.
2.3 Using the Download Options
Most RAM pages offer the option to download the page output using the “Download” button
(see Figure 2.12).
Figure 2.12. Download Button
13Selecting this button displays a pop-up menu (see Figure 2.13) with options to download the file in CSV
(Comma Separated Value) format or Microsoft Excel™ format, depending on your requirements.
Figure 2.13. Download Pop-up Menu
You should treat the downloaded file as confidential and delete the file when it is no longer required.
Note: OmniPay always advises customers of modifications to the RAM application, OmniPay however take
no responsibility for a change to the system that adversely affects a customer-automated process relying on
data downloaded.
2.4 Posing Dates
Most items that are visible in RAM (for example, presentments, chargebacks,) are assigned a posting date.
The posting date is the internal OmniPay processing date on which OmniPay processed the item.
The posting date is not necessarily the same as the calendar date. For example, items that are processed by
OmniPay during the night from March 5th to the morning of March 6th (OmniPay local time) might all receive
a posting date of March 5th.
In addition, many summary totals, such as the total value of all presentments submitted for an institution, are
calculated based on the OmniPay posting date.
Also, many date-based searches, for example, the search for all processed batches within given date range,
are conducted based on the OmniPay posting date.
2.5 About Currencies
There are various kinds of currencies within RAM, including:
The transaction currency, which is the currency in which a transaction was performed at the
Point-Of-Sale
The merchant settlement currency (also known as the merchant funding currency), which is the
currency in which the merchant is paid for the transaction (or is debited for the transaction in the
case of chargebacks)
The payment network (card scheme) settlement currency, which is the currency in which the
institution settles with the payment network (Visa or Mastercard)
The institution local currency, which is a base currency for the entire institution, for FDMS its USD
14Chapter 3
3.0 Accessing RAM Pages
This chapter describes the login and welcome pages. In addition, it also explains how to use the select
merchant page.
3.1 Login Page
You can login to the online account management system via the Internet at:
https://www.omnipaygroup.com/acquirer.
It is recommended that you save the web address in your favourites, and for security reasons, decline any
request from your web browser to remember your password.
Once the Login Page, as shown in Figure 3.1, is displayed, Please enter the Username and Password that
you have been provided and press enter to access the online account management system.
Figure 3.1. Login Page
Note: It is strongly recommended that, if prompted, you do not select the option to allow the browser to
remember your password.
If you are logged on in another session, the older session is automatically logged off and the message
shown in Figure 3.2 is displayed.
Figure 3.2. Message: Older Session Terminated
153.2 Welcome Page
After you successfully log onto RAM, the Welcome Page, as shown in Figure 3.3 is displayed. The menu
pages you have been assigned access to, are displayed at the top of the page.
To change the default initial screen, see Report Access tab on the Displaying Lists of Data. In addition to a
welcome message, if there are any alerts for the user, the Alert Screen page is displayed.
Figure 3.3. Welcome Page
3.3 Unlock Session
When a session is idle for a number of minutes, the page shown in Figure 3.4 is displayed.
Figure 3.4. Unlock Session Page
To unlock the session and go back to the previous page, enter your password again and click the
“Unlock” button.
163.4 Users Reset Their Own Password
1. The first step is to enter an email address to which instructions can be sent (Figure 3.5). The email
address entered must be the same as the email address associated with the user on RAM.
Figure 3.5. Forgotten Password Step 1
A message indicating that an email has been sent to the account is displayed (Figure 3.6).
Figure 3.6. Forgotten Password Step 1 – Email Confirmation
If the user fails to enter valid details, the standard “Forgotten Password” page is displayed.
17If more than the maximum allowed number of attempts are made to re-set the password the user will be
blocked and must contact their administrator to have their access reset (Figure 3.7).
Figure 3.7. Forgotten Password Step 1 – User Blocked
2. The email confirmation sent will contain a hyperlink to the RAM page in the second step of the password
resetting process (Figure 3.8)
Note: The hyperlink included in the password resetting email will expire after one hour; therefore the user
should take action to reset their password immediately.
Figure 3.8. Forgotten Password Step 2
Note: If no security questions have been set up for the user in RAM, the standard Forgotten Password page
is displayed.
183. After successfully confirming the user id and answering the security questions the “Forgotten Password –
Step 3 of 3” page is displayed (Figure 3.9).
Figure 3.9. Forgotten Password Step 3
The user can set up a new password. Upon successfully changing the password, the RAM Login page
(Figure 3.1) is displayed.
Alternatively users can contact our Hotline numbers to get the passwords reset insentiently.
193.5 About the Merchant Details Page
The Merchant Details page (Figure 3.10) displays information relating to the merchant.
Figure 3.10. Merchant Details Page
The main part of the Merchant Details page displays the following:
Contact and company details
Merchant contract details
Account details
Further merchant details are provided on the following tabs:
Bank account information
Address details – User for any correspondence
Acquiring services – Card types accepted
Terminal information – If applicable
20Chapter 4
4.0 Using the Transaction Activity Pages
This chapter describes the Transaction Activity pages, which allow you to view transactional activity, such as,
processed batches and transactions, chargebacks, retrieval requests, suspense transactions, custom data
transactions and funded transactions.
The following topics are covered:
Opening the Processed Batches Page
Opening the Chargeback Status Page
Viewing the Retrieval Request Page
Opening the Suspense Transactions Page
Using the Processed Transactions Page
Viewing the Custom Data Search Page
4.1 Opening the Processed Batches Page
The Processed Batches page (Figure 4.1) shows the batch (es) submitted for a given merchant or merchant
group/sub-group within a selected range of posting dates. The date range is limited to 31 days to ensure
that the performance is consistent. Searches by a specific batch number are also allowed.
Figure 4.1. Processed Batches Page
4.1.1 Viewing the Transactions Page
The Transactions page (Figure 4.2) is accessed by clicking on a “View Batch” hyperlink on the Processed
Batches page (see Opening the Processed Batches Page) or on the “Batch No.” hyperlink on the Processed
Transactions page (see using the Processed Transactions Page). The Transactions page displays all the
transactions in one particular batch.
21Figure 4.2. Transactions Page
4.2 Opening the Chargeback Status Page
The Chargeback Status page (Figure 4.3) shows the transactions involved in the chargeback life cycle,
including first and second chargebacks, representments, transfers and transfer reversals.
Figure 4.3. Chargeback Status Page
The transactions are grouped together by ARN (Acquirer Reference Number), which acts as a unique
identifier for the chargeback life cycle.
22It is possible to search for chargebacks using the following criteria:
Merchant number
Card number
ARN
Reason code
Card scheme
In all cases, a range of posting dates must be specified. To avoid overburdening the server, restrictions are
imposed on the date ranges that can be used for the search. If too large a date range is specified, RAM
automatically adjusts the date range and displays a warning.
4.2.1 Chargeback Status Details Page
The Chargeback Status Detail page (Figure 4.4) shows the transactions detail for a particular transaction
involved in the chargeback life cycle (for example, a first chargeback or a representment). The Chargeback
Status Detail page is accessed through the ARN hyperlink on the Chargeback Status page (see Opening the
Chargeback Status Page).
Figure 4.4 shows the Chargeback Status Detail page for a first chargeback.
Figure 4.4. Chargeback Status Detail Page (First Chargeback)
4.3 Viewing the Retrieval Request Page
The retrieval request page (Figure 4.5) displays incoming retrieval requests from the card schemes. It is
possible to search for retrieval requests for particular card numbers (enter either a full card number or the
last 4 digits of the card number) and particular ARNs (Acquirer Reference Numbers).
23Figure 4.5. Retrieval Request Page
4.4 Opening the Suspense Transactions Page
The Suspense Transactions Page (Figure 4.6) displays transactions for a merchant that have been
submitted and processed but have failed validation checks and have therefore not been posted to the
merchant’s account.
The date range entered is limited to 31 days.
Figure 4.6. Suspense Transactions Page
244.5 Opening the Processed Transactions Page
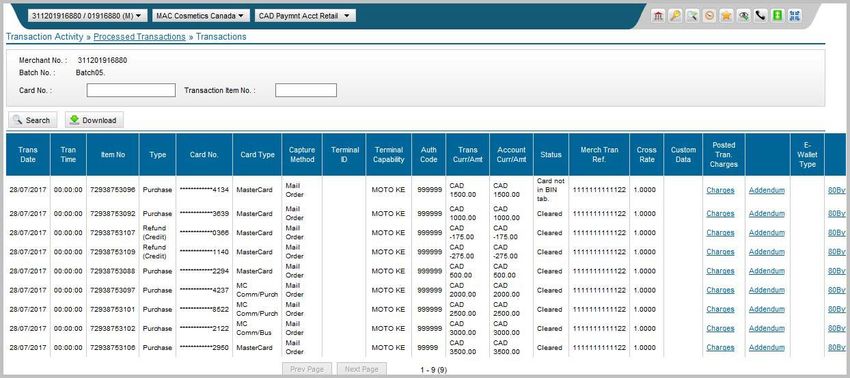
The Processed Transactions page (Figure 4.7) behaves like a combination of the Processed Batches and
the Transactions pages.
A merchant user can use the Processed Transactions page to display all processed transactions for all
merchants within the merchant group or for a particular merchant
The report can show up to 100 transactions per page (scrolling).
The suggested filename for the CSV download file is Processed_Transactions_YYYY
,mnbvcxMDDTHHMM.csv.
Figure 4.7. Processed Transactions Page – LHS
25Figure 4.8. Processed Transactions Page – RHS
4.6 Opening the Custom Data Search Page
The Custom Data Search Page (Figure 4.9) displays transactions associated with a particular item of custom
data that was received from the merchant.
Figure 4.9. Custom Data Search Page
26Chapter 5
5.0 Using the Funding Pages
This chapter describes the Funding Pages, which support the functionality to view postings to
merchant accounts.
5.1 About the Account Page
The Account page (Figure 5.1) shows postings to merchant accounts for the specified range of posting/value
dates. All monetary items affecting a merchant’s account(s) can be viewed through this page.
Figure 5.1. Account Page
27Field Description
Rev “Yes” if this is a reversal.
Blank otherwise.
For example, “Yes” for chargebacks that were originally charged to the merchant (that is,
chargebacks that were transferred to the merchant's payment account retail), but which
the merchant was able to successfully defend (and which were then reversed out of the
merchant's payment account retail).
Trans Curr/Amt Transaction currency and amount of the item in question.
Acc. Amt. The gross amount posted to the account, in the account currency (the transaction amount
is converted to the account currency if necessary).
Acc. Charges Applicable charges for the item, expressed in the account currency.
Acc. Amt. Net The net amount in the account currency, after taking into account any charges.
Card Type The type of credit card used in the transaction.
This is only available for:
* Merchant Purchase Deposits.
* Merchant Debits.
* Chargebacks.
Batch No. The batch number used to submit the transaction This is only available for:
* Merchant Purchase Deposits.
* Merchant Debits.
The batch number is displayed as a hyperlink. Clicking the hyperlink brings you to either
the “Processed Batches” page (see Opening the Processed Batches Page) or the
“Processed Transactions” page (see Opening the Chargeback Status Page). The page
opened is determined by the user profile settings (Displaying Lists of Data).
ARN Acquirer Reference Number.
This is only available for Chargebacks.
Addendum ARN ARN created by transferring a transaction or by Misc. Batch Input.
Fee Sequence Code Fee Sequence Code for a transaction.
Fee Sequence Description Fee Sequence Description per Fee Sequence Code.
28Chapter 6
6.0 Using the Chargeback Page
This chapter describes the options and functions available in the RAM Chargeback System for users that
work dispute cases.
Column Description
Doc. Received Date when the corresponding documentation from VROL or MasterCom was received.
Case ID The unique identifier for a case assigned by OmniPay Systems. It is also a link to the
Chargeback Case Detail Page.
Inst. Institution Number. This column is hidden if you have access to only one institution.
Status Current case status.
External Merchant No. External Merchant Number.
Client Client Number (Internal Merchant Number).
Central Processing Date Central processing date of the latest incoming transaction for the case.
Kind Transaction kind abbreviation of the latest incoming transaction for the case.
Ntwk Card Network.
Card No. Card Number. Masked
UTI Acquirer Reference Number. It is also a link to the Chargeback Case Detail Page.
ARN Unique Transaction Identifier.
RC Card network reason code.
Reason Code Reason code description.
Case Priority Priority of the case category.
Netwk Sett Amt Network settlement amount of the latest incoming transaction for the case.
Netwk Sett Curr Network settlement currency of the latest incoming transaction for the case.
Local Amt Settlement amount expressed in the institutions local currency.
Local Curr Local currency associated with the local amount.
Work By Date The date by which a case should be actioned.
Due Date Countdown The countdown to the due date, that is, the number of days left to the due date.
Due Date Case due date.
Posting Date Posting date of the latest incoming transaction for the case.
CCN Chargeback reference number.
Assigned To Chargeback user name assigned to the case.
Merchant Name Merchant Master DBA name.
Capture Method Capture method of the original presentment.
Last Merchant Action Last merchant action taken on the case.
User Merchant Action ser who performed the last merchant action on the case.
Custom Data The custom data reference that has been entered in the 80byte file.
Transaction Date The presentment transaction date.
Merch Tran Ref. The presentment original merchant reference value.
Merchant Funding Currency The currency in which the merchant was funded for the presentment.
Merch Funding Amt Gr The presentment amount gross in merchant funding currency.
29In order to work a chargeback case, you first search for and select a case, then review its details and finally
take one or more actions. By searching cases, you can generate a list of cases and then select a case to
work on. You search for cases using the Case List page.
Merchant will click on Chargeback > case list
Figure 6.1.
6.1 Searching Chargeback Cases
In order to view a chargeback case, you first search for and select a case, then review its details and finally
take one or more actions.
Figure 6.2.
306.2 Viewing Case Details
To access the Chargeback Case Detail page (Figure 6.3), click the required Case ID or ARN link on the
Case List page.
Figure 6.3. Chargeback Case Detail Page
6.3 Viewing Transactions
To view the incoming and outgoing transactions for a case on the Chargeback Case Detail page (Figure 6.3),
click the “Transactions” tab. Table 4.8 describes the columns displayed on the “Transactions” tab.
6.4 Viewing Actions
To view all recorded actions performed on a case on the Chargeback Case Detail page, click the “Actions”
tab (Figure 6.4).
Figure 6.4. Chargeback Case Detail Page Actions Tab
316.5 Viewing Authorisations
To view all the possible authorisation matches for the case on the Chargeback Case Detail page, click the
“Authorisations” tab (Figure 6.5). The authorisation highlighted in bold is the currently matched authorisation.
Figure 6.5. Chargeback Case Detail Page Authorisations Tab
6.6 Viewing Letters and Attachments
To view all the letters and attachments of a case on the “Chargeback Case Detail” page, click the
“Letters/Attachments” tab (Figure 6.6).
Figure 6.6. Chargeback Case Detail Page Letters/Attachments Tab
6.7 Viewing Merchant Information
To view all merchant details of a case on the Chargeback Case Detail page, click the “Merchant Information”
tab (Figure 6.7).
Figure 6.7. Chargeback Case Detail Page Merchant Information Tab
326.8 Viewing Merchant Notes
Merchant notes are created by merchant-type RAM users. To view all merchant notes on a case on the
Chargeback Case Detail page, click the “Merchant Notes” tab (Figure 6.8).
Figure 6.8. Chargeback Case Detail Page Merchant Notes Tab
3334 © 2020 Fiserv, Inc. or its affiliates. All rights reserved. Fiserv is a registered trademark of Fiserv, Inc. Other products referenced in this material may be trademarks or registered trademarks of their respective companies.
You can also read