50 Paint Shop Pro Tips and Tricks - by Stargazy Creations November 2011
←
→
Page content transcription
If your browser does not render page correctly, please read the page content below
50 Paint Shop Pro Tips and Tricks
                                   by Stargazy Creations
                                     November 2011
PSP Tip 01: Drawing Straight Lines with Paint Shop Pro
If you want to draw a straight line, select your brush, click once at the beginning point. Hold down
the SHIFT key and click at the end point. PSP will now paint a straight line between these two points.
If you increase the step size, you can also create dotted lines.
This works also with the eraser tool. So it is pretty easy to cut out a line of holes with the same
distance.
And you can also use this for tubes. There are endless possibilities.

PSP Tip 02: Text on path with Paint Shop Pro
This one is pretty easy and many tutorials are out there. Nevertheless I would like to mention this
again because of the variety of possibilities this function offers.
First of all, create a vector shape where you want to add the text to. This can be a curve, a cycle, a
preset form or any other shape. Make sure that it is created on a vector layer.

After you have your vector shape complete, select the text tool. Move the cursor of the text tool
anywhere over the edge of the shape. The cursor will now change to a small "A" with a curve which
represents that you want to write text to that particular area of the path.
Once this cursor appears, left click on your mouse to begin writing the text. The text will now follow
exactly the form of the shape. If you are done with your text, you can hide the vector shape (do not
remove it!).
Then apply additional effects if you like.

http://stargazy-creations.blogspot.com                                                                Page 1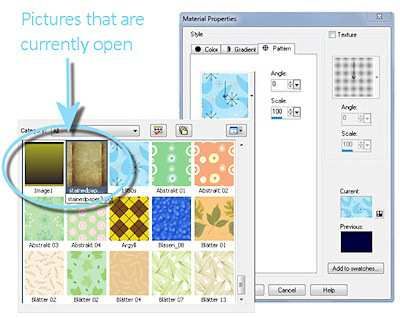
PSP Tip 03: Inner Shadow with Paint Shop Pro
Photo Shop offers a special feature for an inner shadow. Nevertheless this effect can be created with
Paint Shop Pro as well. It will change an object as shown here:

Create your element and select it
Change the selection to "Float"
Select "Effects -> 3D Effects -> Cutout"
Apply these settings:
Vertical and Horizontal = 0
Opacity = 100
Blur = depends on the size of you object (30 to 100)
Shadow Color = a darker color, matching to your element
Hit OK and you are done

PSP Tip 04: Reverse Text on a Path
A few days ago I described how a text will follow a path in Paint Shop Pro. Today I will show how the
text will follow the reverse path.
Here is an example of what I mean:

First you have to create you vector object that you text should follow. Now you have to make sure
that it is really a path. In general that is not the case for the default shapes of PSP like cycles,
rectangular etc. So select your object and choose Objects -> Convert to Path from the menu at the
top of the screen. You can also do this in the layer palette with right clicking on the layer of the
object and then selecting Convert to Path.
Select now the Pen Tool from the Tools Toolbar and right-click on your object. Choose Edit -> Reverse
Path.
Add your text and you will see that the text follows now the reversed object.

http://stargazy-creations.blogspot.com                                                          Page 2

PSP Tip 05: Quick Color Picking
You can pick a color very quickly while using the brush tools by holding down the CTRL key and
clicking on an image to set the foreground color. A CTRL and a right-click will change the background
color.

PSP Tip 06: The Join Parameter for Vector Shapes
I'm sure that you recognized the Join parameter in the parameter menu if you are creating some
vector shapes in Paint Shop Pro.

But have you ever used it? Maybe not, because you don't know that it does.
So here is a short explanation. The Join parameter defines how the edges of your shape will look like.
So you can easily sharpen or round the edges.
Here is how the edges will look like:

PSP Tip 07: How to use Photo Masks with Photoshop and Paint Shop Pro
This week I prepared a small tutorial for you. It describes how you use photo masks in Photoshop and
Paint Shop Pro.
Many of you think that using proto masks is a kind of magic and very complicated. It's a little bit
tricky in Paint Shop Pro, but this tutorial shows an easy way to get great results.
You can download it here: http://www.stargazy.de/tutorials/STG_Tutorial_How_To_Use_Masks.pdf

http://stargazy-creations.blogspot.com                                                            Page 3

PSP Tip 08: Add a new layer without the layer dialog box
Are you tired from confirm away the "New Layer" dialog when adding a new layer if don't want to
make any changes to the layer settings? Then this tip will help you.
Just hold down the shift key and then click on the button or the menu item to add a new layer
(raster, vector, art media ..) and a new layer will be created without opening the dialog.
Works with groups and adjustment layers as well :-)

PSP Tip 09: Repeat the last command in Paint Shop Pro
This is a very handy shortcut. Use CTRL + Y to repeat the last command that you used in Paint Shop
Pro.
I use it very often, when I finished a layout and want now add shadows to the different layers. And
this is how it works in this case:
Activate the bottommost layer and apply your shadow. Then activate the next layer and simply click
CTRL + Y. A shadow with the same preferences as before will be added. Isn't this great?
This works with all other commands too (and also in other Windows applications e.g. MS Word).

PSP Tip 10: How To Color a Black and White Image in Paint Shop Pro
I assume you noticed already that the Colorize command in Paint Shop Pro does not work with pure
black and white images.
Therefore I recommend to add a separate layer below the black and white layer and fill it with a
color, gradient or pattern you like. Then set the blend mode of the black and white layer to Multiply,
Darken or Soft Light. You can also adjust the intensity using the Opacity slider.

PSP Tip 11: Copy a layer into to another image in Paint Shop Pro
That one is pretty easy. Open both images. Activate the source image and make sure that the layer
palette shows the layer that you want to copy. Now just click on the layer in the layer palette and
with the left mouse button pressed, simply drag it into your target image. Release the mouse key and
the layer will appear in the target image.
Works with layer groups as well.

PSP Tip 12: Use of the Revert Command in Paint Shop Pro
Have you ever tried the Revert command in Paint Shop Pro? This command removes all changes
made to your image since it was last saved.
Just select File -> Revert and all your changes since the image was saved are gone.

PSP Tip 13: Saving and Loading Your Workspace with Paint Shop Pro
Have you customized you workspace with a lot of effort so that it fits to your needs? There is a nice
option in Paint Shop Pro to save all your workspace settings.
Save the current workspace: Select File -> Workspace -> Save (Shift+Alt+S). Type a name for your
workspace and click on Save. You can save in a folder other than the default program folder by
clicking 'File Locations' button in the 'Save Workspace' dialog.
Load a workspace: Select File -> Workspace -> Load (Shift+Alt+L). Select from the list of recent
workspaces.

http://stargazy-creations.blogspot.com                                                             Page 4

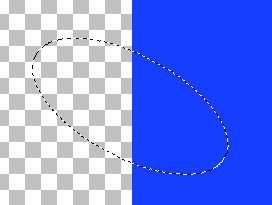
PSP Tip 14: Start Drawing a Shape from its Center in Paint Shop Pro
In general if you start drawing a shape, PSP starts from a corner. If you want to start drawing from
the center of the shape, click on the right mouse button and drag to draw your shape.
If you want to draw a rectangle, ellipse or symmetric shape, hold down the CTRL key while drawing
the shape.

PSP Tip 15: Rotate a Selection in Paint Shop Pro
As you already know, you can move a selection with the mouse or the arrow keys. But you can also
rotate a selection and it is that easy.
Select the area you want to rotate.

Then choose Selections -> Edit Selection. The selection will turn red.

Activate the Pick tool and you can now manipulate or rotate the selection as any other object.

When you have finished you rotation, choose Selections -> Edit Selection again and your selection
marquee will appear.

http://stargazy-creations.blogspot.com                                                           Page 5
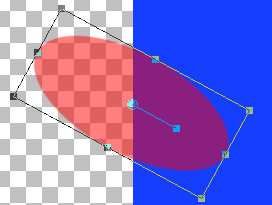
By the way, you can also use the Mesh Warp Tool or use the deformer option of the Pick Tool to
manipulate the selection.

PSP Tip 16: Move a Selection in Paint Shop Pro X and up
To move a selection pixel by pixel, move the selection with the arrow keys.
To move a selection by 10 pixels, hold down the CTRL key and move the selection with the arrow
keys.
To move a selection by 50 pixels, hold down the SHIFT key and move the selection with the arrow
keys.
To move a selection by 100 pixels, hold down the SHIFT and CTRL key and move the selection with
the arrow keys.

http://stargazy-creations.blogspot.com                                                       Page 6
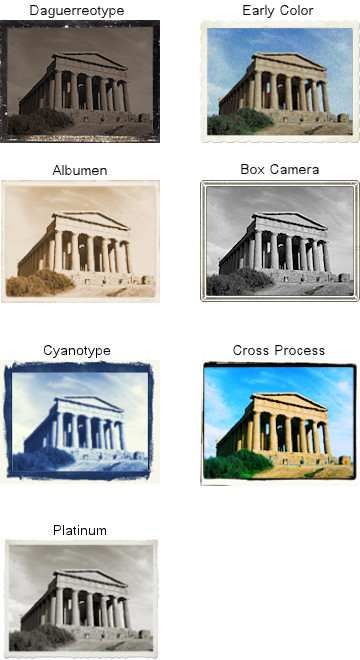
PSP Tip 17: Using the Time Machine in Paint Shop Pro
I played around with functionalities that I never used before and I found the Time Machine which is a
great tool for photo manipulation.
You will find it here: Effects -> Photo Effects -> Time Machine ...
The Time Machine lets you recreate some vintage photographic styles. It lets you choose from seven
styles, which range from the year 1839 to the 1980s.
You can adjust the intensity of the effect and decide if you want to have a frame with your picture.
I applied the different effects to a photo so that you can see what it does:

http://stargazy-creations.blogspot.com                                                          Page 7
PSP Tip 18: Move the Selection Marquee in Paint Shop Pro
Do you know that you can move the selection marquee? This is very handy if you selected e.g. a
square area of an image and the square does not sit where you want to have it.

Just select the Move Tool , then right-click into the selection marquee, hold down the mouse
button and move the marquee where you want it to be.

PSP Tip 19: Using the Mixer Palette in Paint Shop Pro
Have you ever used the Mixer Palette in PSP? You can use the Mixer palette to blend colors and
create paint swatches similar to those you would create by using a traditional artist’s palette. Once
you have created a color, you can use the Art Media brushes to apply it to the canvas.
On the Materials palette, set the Foreground and Stroke Property box to Color and select your first
color. On the Mixer palette, select the Mixer Tube tool     and paint some strokes in the Mixer area.
Select an additional color and paint again some strokes. As you can see, the colors blend in the areas
where you paint over the first color. Use the Mixer Knife tool  and drag in the Mixer area to smear
colors together. Add additional colors and smear them together as you like.

To work with the colors you just created, on the Mixer palette, choose the Mixer Dropper tool
and click a color in the Mixer area. With a left-click you will change your foreground color, with a
right-click your background color.
You can save your Mixer area for further use.

PSP Tip 20: Print a Contact Sheet in Paint Shop Pro
It is very easy to print a contact sheet in PSP. Here is how it works:
Open the Organizer and select the files that you want to print on your contact sheet.
Click on the Print Contact Sheet button:

Adjust the print parameters as you need them and then click Print.

PSP Tip 21: Adding a Border to a Selection in Paint Shop Pro
This is a very handy tip if you want to check your image for stray pixels or if you want to create
stickers.

http://stargazy-creations.blogspot.com                                                               Page 8
Select the element for which you want to have the border and choose Selections -> Modify -> Select
Selection Borders.
In the Select Selection Borders dialog box mark one of the following options: Inside, Outside, Both
sides.
The following image illustrates the different options:

Type a value in the Border width box and I recommend checking the Anti-alias check box for
smoothing the edges.
Click OK and PSP will change the selection to a border. You can now handle the new selection as you
like e.g. fill it with a color of your choice.

PSP Tip 22: Move the Center of Rotation in Paint Shop Pro
I'm sure you already have used the Pick Tool     to rotate images or vector shapes. But did you know
that you can move the center of rotation?
If you want to change the center of rotation before you interactively rotate the image, hold down
Ctrl, and drag the rotation pivot point (the circle at the center of the image) to a new position.
Unfortunately PSP will not store this new position. The next time you click on the object, the center
of rotation will be in the center of the object again.

PSP Tip 23: Using the Magnifying Window in Paint Shop Pro
PSP offers a great option to view details of an image: the magnifying window.
Just press CTRL+ALT+M and a small window appears that shows the area around the cursor at 500%.

Press CTRL+ALT+M again and the window will disappear.

http://stargazy-creations.blogspot.com                                                          Page 9
PSP Tip 24: Fast scale to 100% in Paint Shop Pro
If you zoomed in or out in a picture and you quickly want to change to the 100% view, just click CTRL-
ALT-N and the picture will be zoomed back to 100%.

PSP Tip 25: Drawing Lines in Paint Shop Pro

If you draw a line with the Line Tool (                                   ), press the Shift key and you
will get fixed angles in 45 degree increments.

PSP Tip 26: Adjusting the Guidelines in Paint Shop Pro
If you work often with the guidelines in Paint Shop Pro as I do, this trick is very handy. In general you
can move the guidelines with small handles on the rulers.

Now just double-click on this handle and a small dialog will open. Here you can type in the exact
position of the guideline. If you click on OK, the guideline will be moved to that position.

PSP Tip 27: Second Window for One Image in Paint Shop Pro
Are you often working zoomed in by 200 to 400 percent on your picture and you quickly want to see
how it looks with 100%?
Then go to Window --> New Window to open a second copy of your image and change the zoom
level there. Any changes you make will now appear in both windows.

PSP Tip 28: The Asterisk
Have you ever noticed an asterisk to the right of your image's file name? That means that you
haven't saved your most recent changes.

PSP Tip 29: Removing the Paint Shop Pro splash screen
Many users like to remove the splash screen to decrease the time it takes to launch the program
(nevertheless, I'm not quite sure if it really saves time).
In Paint Shop Pro choose File > Preferences > General Program Preferences from the menu.
Click the Miscellaneous tab and unmark Show splash screen when application starts.

PSP Tip 30: Enable the Precise Cursor in Paint Shop Pro
Paint Shop Pro offers two types of cursors: the standard cursor and the precise cursor.
The standard curser always shows the selected tool and makes it sometimes difficult to do a precise
selection e.g. when you are extracting something.
To select the precise cursor choose File > Preferences > General Program Preferences and go to the
Display and Caching tab. Mark the Use precise cursors check box to enable the precise cursor.

http://stargazy-creations.blogspot.com                                                           Page 10
PSP Tip 31: A Must-Have PSP Script: VectorTube
If you haven't already downloaded and used this script, this is what is does:
This script takes the currently selected vector object and paints the edges of the objects with the
currently selected tube. The vector object can be either lines drawn with the Pen tool, Preset Shapes,
or Text. Just choose a tube, select the vector objects(s) that you want to paint and run the script.
Note that squares, circles, text etc. might have to be changed into a path first before this script
works.
Download it here: http://pixelnook.home.comcast.net/~pixelnook/VectorTube.htm

PSP Tip 32: Adding Textures or Patterns in Paint Shop Pro
If you want to use an own pictures as a pattern or texture, simply save them in the Textures or
Pattern folder. They can be in any format recognized by PSP (e.g. .jpg, .bmp, .pspimage ...).
Have you noticed that PSP offers beside the patterns stored in the Pattern folder, all currently open
images are offered as patterns as well if you open the Material Properties? This is very handy. There
is no need to store a picture as a pattern if you just want to use it once.

http://stargazy-creations.blogspot.com                                                           Page 11
PSP Tip 33: Promote a selection to a layer in Paint Shop Pro
To promote a selection to a new layer, just create your selection in your image and choose Selections
-> Promote Selection to Layer.
The promoted selection will now appear in a layer above the original layer.
The advantage is (instead of just copying the selection (CTRL+C) and insert it again as a new layer
(CTRL+L)) that the promoted selection remains on its original position. If you just insert a copied
selection as a new layer, PSP will center the copied object.

PSP Tip 34: Export gradient files from Paint Shop Pro for use in other graphic
programs
Do you know that you can export gradient files from PSP and use them in other graphic programs e.g.
Photoshop? Here is how it works.
In the Gradient Editor, select one or more gradients you want to export and then click on Export.
The Export dialog box appears. Select a target folder and type a name for the gradient file. Click on
Export and Paint Shop Pro will export the selected gradients to a GRD file.
The GRD file format is commonly used in other applications.

PSP Tip 35: Hiding and displaying the selection marquee in Paint Shop Pro
The selection marquee (marching ants) is visible by default. When you work with a selection, it is
sometimes helpful to hide the selection marquee temporarily without disabling the selection. For
example, you may want to see the results of pasting a selection or of feathering a selection’s edges.
Choose Selections -> Hide Marquee or just press Ctrl + Shift + M.
When you hide the selection marquee, it does not deselect or clear the selection. The tools and
commands you use while the selection marquee is hidden apply only to the selected area.

PSP Tip 36: Quick Tip for Altering Vector Shapes in Paint Shop Pro
If you are working a lot with vector shapes, you may have noticed that you often have to change
between the pick tool      .(e.g. to position or resize the shape) and the pen tool (e.g. for changing
colors or nodes).

Have you noticed the small icon   in the properties bar of the pick tool? Click on it and you can
change some of the shape properties on the fly (e.g. colors or line thickness).

PSP Tip 37: Resizing Thumbnails in Layers Palette
Did you know that the size of the layer thumbnails (PSP X and up) can be changed by you?
Choose File -> Preferences -> General Program Preferences and the General Program Preferences
dialog box appears.
On the left pane of the dialog box, choose Palettes.
In the Layers palette group box, mark the Palette thumbnails check box, and type or set a value in the
Size control. (The default setting is 50 pixels.)

http://stargazy-creations.blogspot.com                                                         Page 12
PSP Tip 38: "Unerasing" with Paint Shop Pro
I'm sure that you have used the Eraser tool a lot of times. But when you use it with the right mouse
button, the Eraser tool "unerases".
There is no need to "undo" if you erased some pixels you didn't want to erase. Just unerase those
pixels. PSP remembers the color of the erased pixels and restore them.

PSP Tip 39: Large Menu Icons in Paint Shop Pro
Would you like your toolbar icons to be larger? Right click the toolbar and select Customize. Under
the Options tab you will find a checkbox for Large Icons.

PSP Tip 40: Do you use a pen tablet with PSP?
Make sure its pressure support features are not disabled by looking under File -> Preferences ->
General Program Preferences -> Miscellaneous.
Pressure support works in PSP 9 for the painting tools and in PSP X and higher for the general brush
as well.

PSP Tip 41: Text on Paths - Extended
I was asked for a tutorial that describes how this effect can be achieved:

I found a tutorial in the Internet (http://www.state-of-entropy.com/circle.htm) that describes the
way how to do this with two circles with different diameters.
Nevertheless I tried it myself and I found a second solution that is more convenient in my opinion. So
here it is:
Open a new document and draw a vector circle. Select your circle object and choose Objects ->
Convert to Path from the menu at the top of the screen. You can also do this in the layer palette with
right clicking on the layer of the object and then selecting Convert to Path.

http://stargazy-creations.blogspot.com                                                        Page 13
Now select the text tool. Position the cursor of the
text tool anywhere over the edge of the shape. The
cursor will now change to a small "A" with a curve
which represents that you want to write text to that
particular area of the path.
Enter you text,, position it as you like and the picture
should now look somehow like that:

Make sure that the circle object and the text object
are both assigned to the same vector layer.

Now copy this vector layer and select the circle within
the new vector layer. Select now the Pen Tool from
the Tools Toolbar and right-click
                            click on the circle. Choose
Edit -> Reverse Path.

Select your text tool and change the text on the
bottom as you like.
                  e. To position the text outside the
circle, mark the complete text (CTRL-A)
                                (CTRL and set now
the Leading parameter of your text to something
below zero. In this example I used “-24”
                                    “     but this
depends in your font size.
The Leading value adjusts the distance between
                                         betw      the
line of the circle and the text. Decrease the leading
value to move the text out of the circle.

The last thing you have to do is now to adjust the text

http://stargazy-creations.blogspo
                                ot.com                     Page 14
and hide the two circles.
PSP Tip 42: Working Faster with Layers in Paint Shop Pro
I added some additional layer tools to the menu bar for my layer palette. So it is much easier to work
with the layers. Select a layer and click on the desired tool or (just faster) click on the layer, drag it
and drop it on the tool.
PSP Tip 43: Center an Object in Paint Shop Pro
It's easy to center vector or text objects. If you select the object with the Object Selection Tool
you will get these nice little helpers in the menu bar which allows you to position the object. The tool
e.g. will center your object on the canvas.
But what about other objects or elements that you created? So if you have created an object with a
transparent background that you want to have centered, just activate the appropriate layer, press
CTRL-A to select all and then CTRL-X (or CTRL-C) to cut or copy the content of the layer into the
clipboard. Then insert the content of the clipboard as a new layer with CTRL-L and PSP will create the
new layer and center element you cut out before (works only on layers with transparent
background).
http://stargazy-creations.blogspot.com Page 15PSP Tip 44: How to use Photoshop ABR files in Paint Shop Pro If you are working with Paint Shop Pro instead of Photoshop, you might have seen some Photoshop brushes you would like to use in Paint Shop Pro as well. Unfortunately the ABR files cannot be used as they are. They need to be converted. Here is a small tutorial that shows how it works. First of all, you have to download the small utility abrViewer. You can download it here: http://abrviewer.sourceforge.net/ Start abrViewer and open your ABR file with File -> Open brush sets. All brushes in this set are now displayed as thumbnails. Now select Export -> Thumbnail for exporting the different brushes. Define your target directory and the program will convert all the brushes to PNG files Open Paint Shop Pro and load the PNG files which you want to use as brushes. Activate a specific PNG image and select File -> Export -> Custom Brush … Give the new brush a descriptive name and save it. If you now activate your paint brush tool, the new brush will appear in the selection box. Just a short hint: Older versions of Paint Shop Pro can only work with a maximum brush size of 500 x 500 px. In this case you have to decrease the image size before exporting. PSP Tip 45: Saving Presets in Paint Shop Pro Do you use specific functions or specific effects over and over and you are tired of always typing in the same parameters? So who don't save the parameters as your personal presets? Here is how it works. This tip is really a time saver. Nearly every dialog box, where you can define parameters, has a Settings or Preset (in older versions of Paint Shop Pro) area. First you have to set all your parameters in the dialog box as you want to have them saved. To save your parameters, just click on the Save Icon ( ) in the Settings area. A dialog box opens where you can define a name for your parameters. Then click Save and Paint Shop Pro will save the parameters. You will find you saved settings now in the drop down box in the Settings area. Just select it and you specific parameters will appear. http://stargazy-creations.blogspot.com Page 16
PSP Tip 46: Plug-in for Adding 3D Shadows to an Object
I stumbled over a plug-in for creating 3D shadows in Paint Shop Pro and I thought it is worth to share
this information. This plug-in creates various types of 3D shadows from objects. And the best of all: It
can be downloaded for free!

You can download the plug-in here:
                             here http://www.artistic-effects.com/3d-shadow/
                                                                     shadow/

PSP Tip 47:: Adjusting Brush Size Using the Keyboard and Mouse
Adjusting the brush size in Paint
                             aint Shop Pro can be very time consuming if you are just creating a
textured surface e.g. for an overlay. But I found a quick (and soooo cool) way to do this with the
keyboard and the mouse.
And it's just that simple: Hold down the ALT key and the left mouse
                                                              mouse button and drag the mouse
forward or backward to decrease or increase the brush size.

PSP Tip 48:: Making Holes for Stitches in Paint Shop Pro
I have tried several methods to create holes for stitches in Paint Shop Pro. Here is one, I want to
share with you.

Open your image or create a new one, where you want to add the holes. I prefer to create a new
layer in the background with a darker color
                                      colo so that I see what I'm doing.

Then create a new layer on top of your background and select your paint brush tool. Choose a fuzzy
brush. Since I wasas not satisfied with the standard
                                            standard brushes, I created my own. If you want to use it,
just right-click on the picture
                          icture and save it. Then open it in PSP end
                                                                  end export it as a new brush tip.

http://stargazy-creations.blogspo
                                ot.com                                                          Page 17
Select a light color (that should mimic the torn paper), lower the density (40-50) and set the brush size around 20. These settings might vary and depend on the size of your hole. Now paint the shape of your hole. Now select the magic wand tool, and select the middle of the hole. Increase the selection by 5 pixels (this depends on your push size) and hit DEL. We just need a small edge to give the impression of torn paper. Invert the selection (CTRL+I) and apply a shadow and you are done. PSP Tip 49: Closing an image without being asked to save it If you want to close an image without saving and without being asked for saving, then simply hold down the SHIFT key and close the image. Paint Shop Pro will close the image without asking. PSP Tip 50: Moving a Layer This happens to me very often: I grab the Move tool, activate a specific layer that I want to move, click into my image and by incident I clicked on a transparent area of that layer and moved ... the Move tool will grab anything below my layer and moves the wrong thing instead of what I'm trying to move ... So here is the trick: Activate the layer you want to move, hold down the SHIFT key and then click and move. Only the active layer will be moved now. http://stargazy-creations.blogspot.com Page 18
You can also read