Developing with Android Studio
←
→
Page content transcription
If your browser does not render page correctly, please read the page content below
CHAPTER 6
Developing with Android Studio
Donn Felker
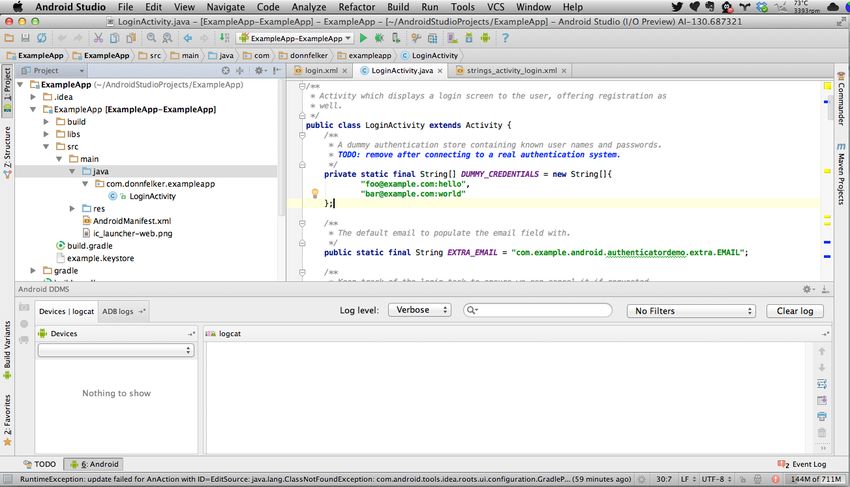
Android Studio (shown in Figure 6-1) is the IDE for Android that was announced in
May 2013 at the Google I/O developers event, and is intended as an alternative to Eclipse.
At the time of this writing, Android Studio is currently in Early Access Preview, with
the most recent version being 0.0.5. At this time, Android Studio is not ready for full
end-to-end Android application development, but should be ready in the coming
months. I highly advise you review this chapter, as this is where Android development
is migrating to in the future. Android Studio is based on the Java IDE called IntelliJ. If
you’ve worked with other products by JetBrains (developer of IntelliJ), such as RedMine,
PyCharm, PhpStorm, WebStorm, or AppCode, you will find yourself at home. All In‐
telliJ products share the same shell IDE, which you’ll see as soon as you open up Android
Studio. In this chapter, I intend to familiarize you with Android Studio and show how
you can use it for Android development.
Although Android Studio is a brand new IDE, it is important to note that most of your
IDE skills from Eclipse apply to Android Studio as well. Most of the tooling in Android
Studio is very similar to Eclipse, such as shortcuts, designers, and code editors. You’ll
still export signed APKs, view logcat, and edit code virtually the same way in Android
Studio as if you were in Eclipse. Think of Android Studio like this: if Eclipse were a
trusty old power drill used in construction, Android Studio is the new cordless high-
powered version of that same drill. Android Studio has some of the same options, and
some new ones that you’ll need to familiarize yourself with. In the end, you’ll still feel
comfortable enough to use the tool to get the desired result—an Android app.
Installing Android Studio
Google has made installing Android Studio as simple as possible. Just visit the Android
Studio page and download the installer for your platform. Supported platforms include
Windows, Mac OS X, and Linux. Follow the installation instructions for your platform
71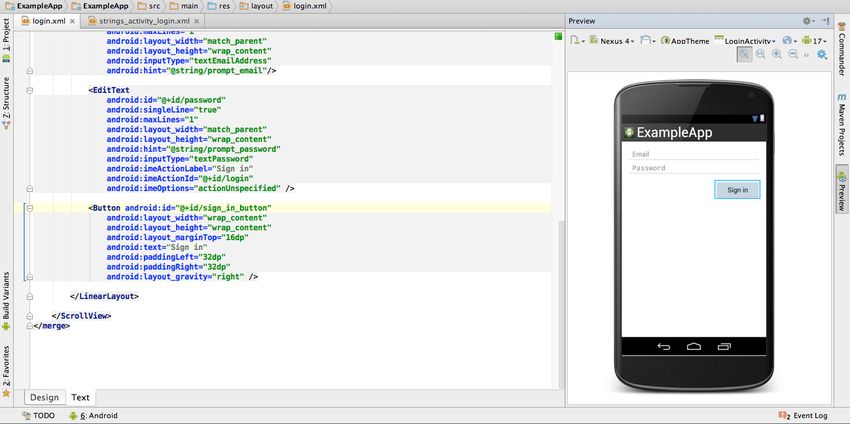
Figure 6-1. Android Studio with the Editor, Project, and Android panels

to install the application. Installation instructions are not provided in this chapter be‐
cause installation instructions change often. If you encounter issues, please visit the
Android Studio installation page.

Bundled SDK
Android Studio comes bundled with its own version of the Android SDK, which is
preconfigured to be used with Android Studio upon installation. On Mac OS X, it is
located in the package contents for the application, as I determined by choosing Android
Studio → Show Package Contents (see Figure 6-2) and checking the resulting screen (as
shown in Figure 6-3). This means that if you already have an SDK installed, Android
Studio will not use the previously installed SDK by default. If you would like to use the
existing SDK on your machine, follow these steps from Stack Overflow.

72   |   Chapter 6: Developing with Android Studio
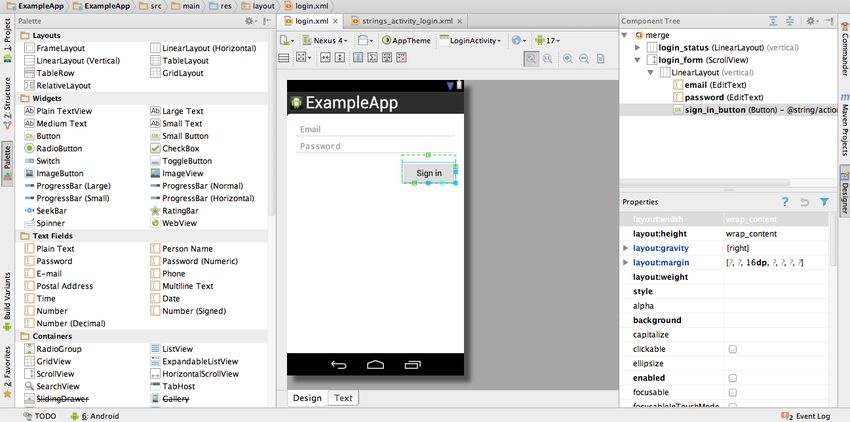
Figure 6-2. Showing the package contents of the Android Studio application

                                                             Installing Android Studio   |   73
Figure 6-3. The SDK folder in the Android Studio package contents

Default Project Location
After installing Android Studio, you can create a new project and define a destination
location for the project files. If you don’t explicitly define a location for your project,
Android Studio will place your files into the ~/AndroidStudioProjects folder in the cur‐
rent user’s folder on your machine.

Anatomy of the Android Studio IDE
The Android Studio IDE is comprised of a vast array of panels, tools, and functions to
help you become as productive as possible at developing Android applications. I’ll cover
the most common panels, windows, and toolbars with which you’ll be interacting.

Panels
The main panels that you will interact with during your day-to-day development of
Android apps appear in Table 6-1.
Table 6-1. Important panels in Android Studio
Panel               Description
Project Panel       Allows you to navigate through the file hierarchy of your project and select, open, edit, and perform
                    various other actions on your files.
File Editor         The main editing window in Android Studio. This is where you write your code.

74   |   Chapter 6: Developing with Android Studio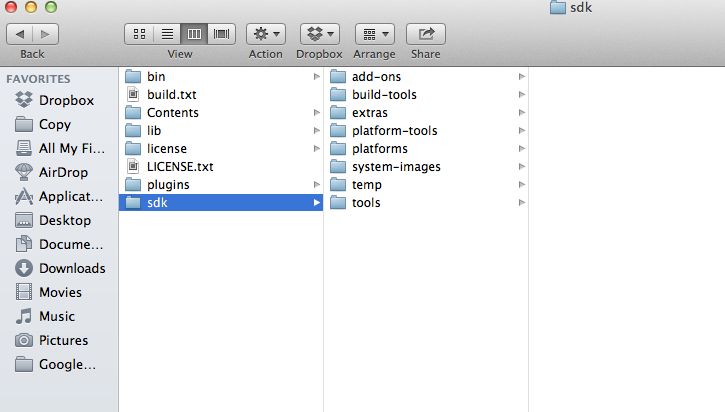
Panel              Description
Android Panel      Presents the devices (emulators and physical devices) connected to your system, and allows you to view
                   the logcat output, filter the output, and view ADB logs.
Messages Panel     Here you’ll find any important messages that the IDE presents, such as compilation errors.
TODO Panel         Shows all the TODO comments sprinkled throughout your project’s code.
Find Results Panel Here you can examine the results of any find command that you execute. Examples include the Find
                   Results command (Edit Find Find) and the Find Usages command (Edit Find Find Usages).
Maven Panel        If your project is Maven-based, interact with this panel to perform Maven activities.
Gradle Panel       If you’re utilizing the new Gradle build system, you can find the tools necessary to interact with Gradle
                   here.
Event Log Panel    At times, the Android Studio IDE may encounter an unexpected error or have important events that need
                   to be visible to you, the developer. This panel will show you these events.

The final area, which is of utmost importance, is the status bar at the bottom of Android
Studio, shown in Figure 6-4. This is where the majority of status updates will occur when
background processes run. Some of these background processes include updating in‐
dices on the files, Maven or Gradle background processing, and event errors. The right-
most box shows the IDE’s memory usage.

Figure 6-4. The Android Studio status bar

Toolbars
Android Studio ships with a highly customizable toolbar that is easily accessible from
the top of the display. The default toolbar that ships with Android Studio is shown in
Figure 6-5.

Figure 6-5. The default toolbar in Android Studio

Table 6-2 describes each set of tools from left to right.
Table 6-2. Tools in the default toolbar
Tool                     Description
File Actions             Actions such as Open, Save, and Synchronize.
Undo/Redo                Undo and redo the previous action.
Cut/Copy/Paste           Quickly cut, copy, and paste from the toolbar.

                                                                                 Anatomy of the Android Studio IDE        |    75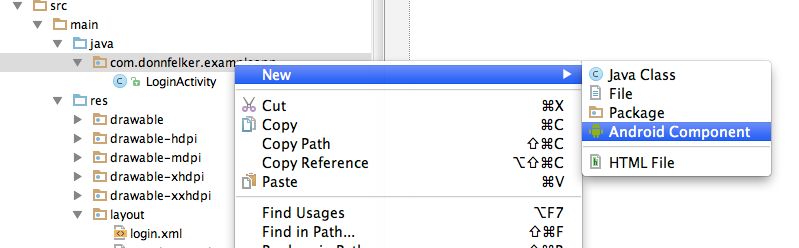
Tool                       Description
Find/Replace               Find and replace values in the project files.
Navigation                 Navigate forward and backward in the most recent files that you’ve accessed or edited recently.
Build/Run/Debug/           These buttons are some of the most common buttons that you will use in Android Studio, as they
Attach                     allow you to build, run, debug, and attach to a running Android process for debugging.
Settings                   These access the IDE Preferences and Project Structure.
Android Actions            The Android Action Group allows you to sync your project with the Gradle files, open the AVD or
                           SDK Manager, and open the Android Monitor application.
Help                       Where you can go for help in using Android Studio.

Useful Actions in Android Studio
In addition to the various panels and toolbars, Android Studio has a wide feature set
that is accessible via the top menu and various contextual menus. Table 6-3 shows a few
of the common actions that you’ll want to familiarize yourself with.
Table 6-3. Common actions
Action               Description
New Module/          You can easily add a new Android Module, Android Library, or Java Library to your application by simply
Library/Java         choosing the File New Module or File Import Module file option and following the wizard through
Library              the process.
Preferences          At times, you may want to customize Android Studio. You can do this by accessing the Preferences through
                     the Android Studio Preferences menu. Some options you can edit are the theme of the IDE, font sizes,
                     keymap, toolbars, and many other options.
Project Structure    An Android project is comprised of modules and libraries, and at times you may need to edit the settings
                     for these modules and libraries. To do so, you’ll need to enter the project structure by visiting the File
                     Project Structure menu.
Showing              Although the default windows that ship with Android Studio are usually sufficient for day-to-day Android
Additional           development, there may come a time when you need to get into the gritty details of the IDE. To explore
Windows              the various other windows that are available to you (such as file structure, commander, VCS changes, etc.),
                     visit the View Tool Windows menu.
Right-Click to       Anytime you’re unaware of the actions you can perform in the IDE, simply right-click the area in which
Explore              you would like to see the various options. Android Studio will present you with the array of options (if
                     available) that are possible in the given context of the IDE panel in which you’re working.

Navigation
Navigation shortcuts are used for navigating around your code base at the speed of light.
Master the shortcuts in Table 6-4 and you’ll increase your productivity immensely.

76     |   Chapter 6: Developing with Android Studio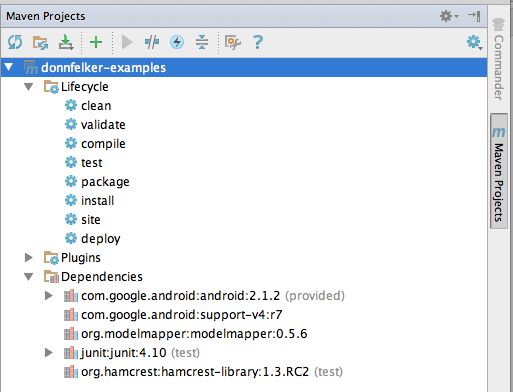
Table 6-4. Keystroke shortcuts in Android Studio
Action               Shortcut on Mac OS X       Shortcut on Windows\Linux
Go to Class          Cmd + O                    Ctrl + O
Go to File           Cmd + Shift + O            Ctrl + Shift + O
Go to Definition     Cmd + B                    Ctrl + B
Back / Forward       Cmd + [ or ]               Ctrl + [ or ]
Code Editor Tab Nav Cmd + Alt + Left or Right Ctrl + Alt + Left or Right
File Switcher        Ctrl + Tab                 Ctrl + Tab
Find Usages          Alt + F7                   Alt + F7
Find                 Cmd + F                    Ctrl + F
Replace              Cmd + R                    Ctrl + R
Find in Path         Cmd + Shift + F            Ctrl + Shift + F
Replace in Path      Cmd + Shift + R            Ctrl + Shift + R

The New Structure of an Android Project
When you first open up Android Studio and create your first new project in the IDE,
you’ll notice that Android Studio introduces a new paradigm in regards to folder and
file placement that is not congruent with what you may be used to in Eclipse. Almost
all of your files are located in the src directory. The new file structure is in place in order
to support the new Gradle build system.

A Tour Around the New Structure
As noted, the new file structure puts the majority of your files in the src folder, as shown
in Figure 6-6. The files in this folder are the source files for your project. These are the
files you’ll be editing the majority of the time. This file structure provides more flexibility
and will eventually provide the ability to provide multiple build variants (different types
of builds with the same project). Everything in your project will still behave the same
for the most part.

                                                                       The New Structure of an Android Project   |   77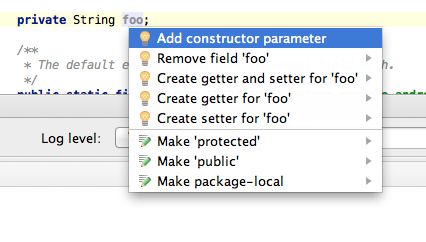
Figure 6-6. An example of the Android folder structure in Android Studio

                    Build variants are not implemented at the time of this writing.

Running and Debugging an Android Project
When you’re ready to deploy your app to a device or an emulator to test and/or debug
it (see “Debugging” on page 98), you can easily do so with Android Studio. The three
various methods for this are Run, Debug, and “Attach Debugger to Android Process.”
All three of these commands are available via the Run menu or the main toolbar in
Android Studio, as shown in Figures 6-71 and 6-8.

     1. The “Attach Debugger to Android Process” item is at the very bottom of this long menu and has been removed
        from this screenshot for brevity.

78     |   Chapter 6: Developing with Android Studio
Figure 6-7. The Run menu
Figure 6-8. The toolbar run actions
To run an Android app on the currently connected device, select Run from the Run
menu or press the Run button in the toolbar. This command will build the Android
application and deploy it to the currently attached device.
To debug an Android app on the currently connected device, select Debug from the
Run menu or click the debug icon in the toolbar. This command will build the Android
app and deploy it to the currently attached device, and attach the debugger to it. At this
point, if any breakpoints are set, Android Studio will stop execution so that you can
inspect your runtime environment for debugging.
Another wildly useful tool is the “Attach Debugger to Android Process” command. This
is mainly used when you need to start your app and navigate through a series of steps
before attaching the debugger at a particular execution point (perhaps right before you
click a button or before you navigate to a new screen). This tool allows you to quickly
flow through your app and then set the breakpoint, instead of having the debugger
running the entire time. To attach the debugger to your currently running app, install
the app with the run command as outlined earlier and then select Run → Attach De‐
bugger to Android Process or press the “Attach Debugger to Android Process” icon in
the toolbar.
Creating New Android Components
A very common task during Android development is to create new components for the
app. You can quickly accomplish this in Android Studio by right-clicking on the package
name and selecting New → Android Component, as shown in Figure 6-9, or by pressing
Cmd + N on Mac, or Ctrl + N on Windows\Linux while your package name is high‐
lighted in the src directory.
Creating New Android Components | 79Figure 6-9. New Android component creation Layout Designer and Layout Preview Android Studio ships with two graphical tools to help you lay out your user interface: Layout Designer and Layout Preview. Layout Designer lets you arrange Views on the screen by dragging and dropping, while Layout Preview lets you see how your screen looks while you are editing your XML resources. I’ll provide a brief introduction to both tools in this section. Layout Designer When you first open an Android layout file, you’ll see the Android designer with the Design tab selected, as shown in Figure 6-10. The other tab is Text, which allows you to hop into the XML that defines the layout. I will cover that in the next section. Figure 6-10. The Android Layout Designer 80 | Chapter 6: Developing with Android Studio
Android Studio’s Layout Designer allows you to easily drag and drop controls onto the
layout surface to quickly create a prototype of the layout that you need. Select one of
the controls from the palette and drag it to the layout. Once the control is in place, you
can edit the various properties of the control by selecting the control and editing the
properties on the right, as shown in Figure 6-10. Layout Designer automatically creates
the underlying XML code that represents the layout you created. The component tree
shows you how the layout is organized in a hierarchical fashion.
To view the XML of a particular control, simply select it in the designer and click Cmd
+ B on Mac, or Ctrl + B on Windows\Linux. You can also right-click and choose “Go
To Definition.” This will open the Text tab of the layout designer and you are navigated
to the XML snippet that defines that control.
In Layout Designer, you can select various devices to emulate, themes, API levels, and
orientations. I highly advise you to peruse the various options in the designer, as it is a
very powerful tool.
If you love graphical editors, the Layout Designer is great for whipping up a user inter‐
face quickly. However, some of us love to get as close to the metal as possible, and in
order to do that you need to edit the XML. To edit the XML, click the Text tab at the
bottom of the Layout Designer.

Layout Preview
As soon as you enter the XML layout, you will notice that the control palette, component
tree, property editor, and drag-and-drop designer are gone and replaced with a slew of
XML code and a layout preview. This is shown in Figure 6-11. The preview shown here
is the Layout Preview tool. You can turn this panel on and off by selecting the Preview
button on the right side of the screen. This panel is shown only when the XML editor
is in use.
The Layout Preview will update any time you make changes to the layout XML. As an
example, if you change a TextView or Button to a bold font style, the Layout Preview
will show the bolded text. If you like being closer to the XML, this is the view for you.
I often hop back and forth between the Layout Designer and Layout Preview tools during
my day-to-day Android development.

                                                        Layout Designer and Layout Preview   |   81
Figure 6-11. The Layout Preview with the XML layout editor
Generating an APK
Generating an APK in Android Studio is a snap. Follow these steps:
1. Select Generate Signed APK from the Build menu. This will display the Generate
Signed APK Wizard.
2. Select your module and click Next.
3. Either supply the path to your keystore that you’re currently using for your Android
application, or create a new keystore.
4. (Optional) Once your keystore values are provided, click “Remember Password”
and Android Studio will keep track of your entered password in a local password
database so you don’t have to enter it again. You will be required to provide a master
password for this password database, so be sure you remember this password. Tools
like LastPass.com are very useful for keeping track of numerous passwords safely.
The remember password feature is very useful if you create or maintain a lot of
Android applications.
5. Click Next.
6. At this point you can define the destination for your APK. You can also specify
whether you’d like to run ProGuard (described in “ProGuard” on page 141), and where
the ProGuard configuration file is located.
7. Click Finish and your APK will be generated in the destination folder.
82 | Chapter 6: Developing with Android StudioInteracting with Maven and Gradle
Maven (see “Using the Maven Tools” on page 151) and Gradle (see “Gradle-Based Build
Tools” on page 146) are build systems that are very popular within the Android commu‐
nity. Android Studio ships with support for Maven and Gradle right out of the box. This
is great considering that in Eclipse you had to use a plug-in that was often buggy and
not entirely reliable. Given that Android Studio ships with support for both tools, you
can easily work with projects that use either technology via a panel in Android Studio.
Interacting with Maven
Projects that use Maven are easy to open in Android Studio. Simply start Android Studio
and open the pom.xml file. Android Studio walks you through the Maven project import
process. Once the import is complete, you can open pom.xml and edit it if needed for
any reason, or you can open the Maven panel. The Maven panel is now populated with
various options, as shown in Figure 6-12.
Figure 6-12. The Maven panel expanded
Once the Maven panel is expanded, you will be able to explore the lifecycle, various
plug-ins, and dependencies. To refresh the Maven project, click the refresh icon in the
top right of the panel. This loads all of the dependencies, plug-ins, etc., that are defined
in the pom.xml file. To execute a lifecycle goal, simply select it and then press the play
button in the top part of the panel. I recommend that you explore the panel and its
options, because you can configure Maven and perform various other actions within it.
Interacting with Maven and Gradle | 83You can build a Maven project in Android Studio in a couple of ways. One way is to execute and build the task you want through the Maven panel. You can also set up a Maven build configuration (Run/Debug Configuration). Finally, you can build through the Build menu. I prefer to build through the Build menu because Android Studio caches the files and and only builds off of changesets, so I’m not running through an entire Android Maven build every time (which can be very time consuming). Interacting with Gradle As with Maven, projects that use the Gradle build system are very easy to work with in Android Studio. There are a couple of panels that you should be familiar with. These panels include the Gradle panel and the Build Variants panel as shown in Figures 6-13 and 6-14. Once your project is loaded, you can open the Gradle panel and interact with the various tasks. You can also open the build.gradle file in the editor and edit anything necessary. Figure 6-13. The Gradle task panel 84 | Chapter 6: Developing with Android Studio
Figure 6-14. The Gradle Build Variants panel

Building your application is quite easy with Gradle. I recommend that you use the Build
menu to build your application because it is the simplest way. If for any reason your
application Gradle files become out of sync with your Android application, you can
select the “Sync Project with Gradle Files” option from the toolbar, as shown in
Figure 6-15. This will update your project with the settings defined in the Gradle file.

Figure 6-15. Sync Project with Gradle Files

Version Control Integration
Android Studio ships with numerous built-in Version Control System (VCS) integra‐
tions. These integrations allow you to perform VCS operations (commit, pull, push,
update, etc.) within Android Studio:

    Git
    GitHub
    Mercurial

                                                             Version Control Integration |   85
SVN (Subversion)
CVS
If you’re using something that is not listed here, plug-ins are available for various other
VCS systems such as Team Foundation Server, Perforce, and others.
To configure your VCS system, select “Enable Version Control Integration” from the
VCS menu and follow the steps. Once it is set up, you will be able to perform various
VCS commands for all the files in Android Studio.
Migrating from Eclipse
Although Android Studio is not ready for prime time yet, it will be shortly and I’m sure
a lot of folks are going to be moving to Android Studio from Eclipse. When the time
comes for you to make the move, you can easily export your project from Eclipse using
the Gradle export tool, and import it into Android Studio. The Android team has written
an easy-to-follow guide on how to migrate from Eclipse.
Android Studio Tips and Tricks
Android Studio is packed with great keyboard shortcuts that allow you to be much more
productive than previous Android development environments (except for IntelliJ,
which is what Android Studio is based on). In this section, I’m going to show you some
of the most common keyboard shortcuts that you’ll use on a daily basis while developing
Android applications.
When in doubt about what you can do in a particular scenario, place your cursor in the
area of interest and press Alt+Enter to see the various options, as shown in Figure 6-16.
Figure 6-16. Context-specific options
86 | Chapter 6: Developing with Android StudioErrors can also be refactored and edited. To do so, place your cursor on the error in the
Android Studio file editor and press Alt + Enter (on all platforms) to view the available
options.
Refactoring and Code Generation
Many of the important code refactoring options available in Eclipse (see “Refactor
Menu” on page 70) are also available in Android Studio. I advise you to review the
“Refactor This …” option in Table 6-5 as well as the other options in the Refactor menu
in Android Studio. Learning common refactorings, such as generating getters and set‐
ters, will save you valuable time and ensure the code you generate is standards-
compliant.
Table 6-5. Refactoring options
Action Shortcut on Mac OS X Shortcut on Windows\Linux
Refactor This … Ctrl + T (after placing cursor on area of Ctrl + T (after placing cursor on area of
interest) interest)
Rename Shift + F6 (to rename files, resources, Shift + F6 (to rename files, resources,
variables—anything) variables—anything)
Generate: Create Constructor, Cmd + N in a file Ctrl + N in a file
New File, Layout, Getters/
Setters, Override Methods,
Copyright
Miscellaneous Shortcuts
Table 6-6 shows a few other miscellaneous shortcuts that I use day to day.
Table 6-6. Other useful shortcuts
Action Shortcut on Mac OS X Shortcut on Windows\Linux
Go to Line Cmd + L Ctrl + L
Reformat Code Alt + Cmd + L Alt + Ctrl + L
Run/Debug Ctrl + R or D Ctrl + R or D
Hiding Panels Make sure the panel is active, then press Shift + Esc Make sure the panel is active, then press Shift + Esc
Android Studio Tips and Tricks | 87Android Studio is packed with a ton of great features. Having used IntelliJ for Android for the last two years, I can honestly say I’m twice as fast at developing Android appli‐ cations and I’ve become a better developer because of it. I believe that Android Studio will be an extension of that same strength and I hope you feel the same way about it after you use it for a while. Additional training resources are available on my website, Donn Felker - Android Stu‐ dio Training. I will update these tutorials as Android Studio evolves, so I encourage you to check it out if you would like to learn more. 88 | Chapter 6: Developing with Android Studio
You can also read