Getting started with Android 7 on the i.MX based COM boards - Getting started with Android 7 - Embedded Artists
←
→
Page content transcription
If your browser does not render page correctly, please read the page content below
Getting started with Android 7
Copyright 2019 © Embedded Artists AB

                                  Getting started with Android 7
                                  on the i.MX based COM boards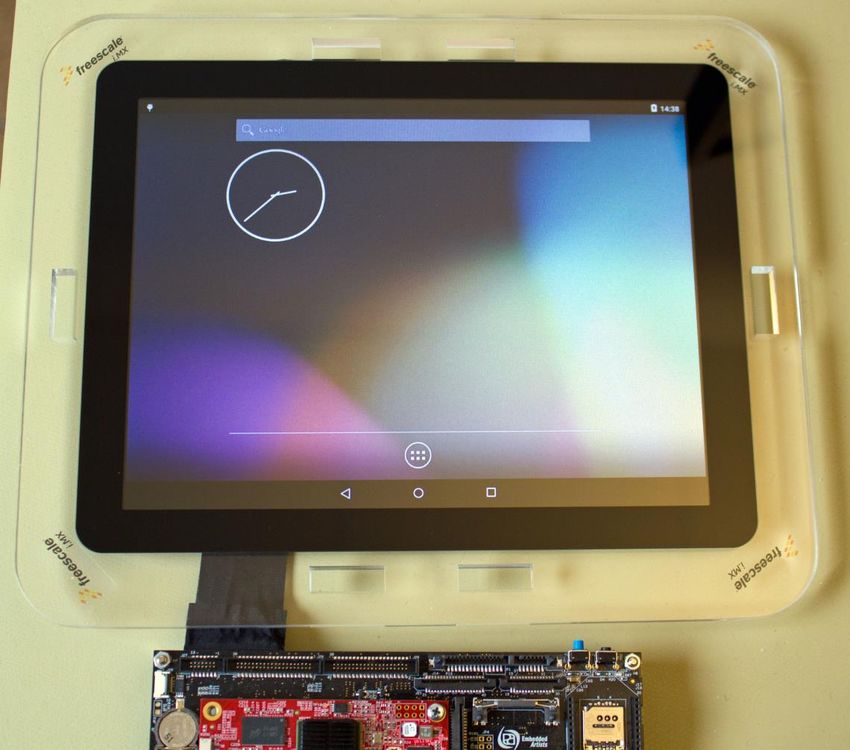
Getting started with Android                                                                                       Page 2

                        Embedded Artists AB
                        Jörgen Ankersgatan 12
                        SE-211 45 Malmö
                        Sweden
                        http://www.EmbeddedArtists.com

                        Copyright 2019 © Embedded Artists AB. All rights reserved.
                        No part of this publication may be reproduced, transmitted, transcribed, stored in a retrieval system, or
                        translated into any language or computer language, in any form or by any means, electronic,
                        mechanical, magnetic, optical, chemical, manual or otherwise, without the prior written permission of
                        Embedded Artists AB.

                        Disclaimer
                        Embedded Artists AB makes no representation or warranties with respect to the contents hereof and
                        specifically disclaim any implied warranties or merchantability or fitness for any particular purpose.
                        Information in this publication is subject to change without notice and does not represent a
                        commitment on the part of Embedded Artists AB.

                        Feedback
                        We appreciate any feedback you may have for improvements on this document. Send your comments
                        by using the contact form: www.embeddedartists.com/contact.

                        Trademarks
                        All brand and product names mentioned herein are trademarks, services marks, registered
                        trademarks, or registered service marks of their respective owners and should be treated as such.

Copyright 2019 © Embedded Artists AB                                                                                                Rev C
Getting started with Android                                                                                                        Page 3

                                       Table of Contents
                                       1 Document Revision History ................................. 5

                                       2 Introduction ........................................................... 6
                                       2.1     Conventions.................................................................................... 6

                                       3 Linux Host Setup .................................................. 7
                                       3.1     Introduction .................................................................................... 7
                                       3.2     Required packages ........................................................................ 7
                                       3.3     Configure GIT ................................................................................. 7
                                       3.4     Install the JDK ................................................................................ 7
                                       3.5     Install the repo tool ....................................................................... 7

                                       4 Download sources ................................................ 9
                                       4.1     Download Android source code ................................................... 9
                                       4.2     Download the NXP Linux kernel ................................................... 9
                                       4.3     Download the u-boot bootloader .................................................. 9
                                       4.4     NXP patches ................................................................................... 9
                                       4.5     Embedded Artists patches .......................................................... 10
                                       4.6     Download Embedded Artists device files .................................. 11

                                       5 Building images .................................................. 12
                                       5.1     Build .............................................................................................. 12
                                       5.1.1     Build types ................................................................................... 12

                                       6 Deploying images ............................................... 13
                                       6.1     Manufacturing tool ....................................................................... 13
                                       6.1.1     Download the tool ........................................................................ 13
                                       6.1.2     Prepare hardware ........................................................................ 13
                                       6.1.3     OTG boot mode – J2 jumper ....................................................... 13
                                       6.1.4     OTG boot mode – DIP switches .................................................. 14
                                       6.1.5     Download your own images ........................................................ 15
                                       6.1.6     Run the tool ................................................................................. 15
                                       6.1.7     Reset the board ........................................................................... 16

                                       7 Display options ................................................... 17
                                       7.1     MCIMX-LVDS1............................................................................... 17
                                       7.1.1     LVDS connector .......................................................................... 17
                                       7.1.2     U-boot settings for iMX6 Quad and iMX6 DualLite ...................... 18
                                       7.2     Innolux AT070TN83 ...................................................................... 18
                                       7.2.1     iMX6 SoloX COM ........................................................................ 18
                                       7.2.2     iMX6 Quad COM ......................................................................... 19
                                       7.3     HDMI .............................................................................................. 20
                                       7.3.1     iMX6 Quad COM ......................................................................... 20

Copyright 2019 © Embedded Artists AB                                                                                                                     Rev C
Getting started with Android                                                                                               Page 4

                                       8 Power button ....................................................... 21
                                       8.1     iMX6 Quad Developer’s Kit .......................................................... 21
                                       8.1.1     Example of modification .............................................................. 21

                                       9 What to do next ................................................... 23
                                       9.1     Application development ............................................................. 23

                                       10 Android Debug Bridge (adb) ............................ 24
                                       10.1     Enable adb support .................................................................... 24
                                       10.2     Connect via network .................................................................. 24
                                       10.3     Take a screenshot ...................................................................... 26
                                       10.4     Install an application .................................................................. 26

                                       11 Troubleshooting................................................ 27
                                       11.1     Out-of-memory during build ...................................................... 27

Copyright 2019 © Embedded Artists AB                                                                                                           Rev C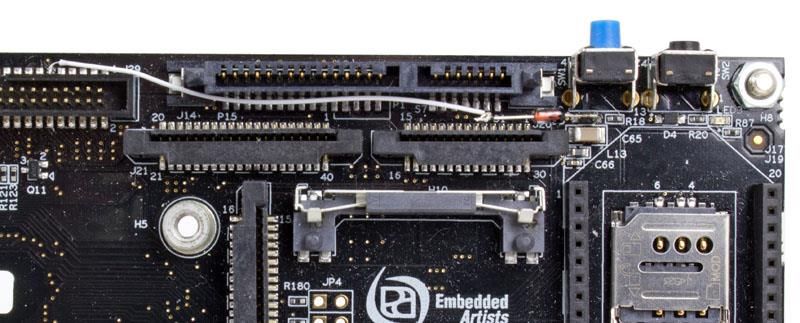
Getting started with Android                                                Page 5

                        1 Document Revision History
                        Revision       Date         Description
                        A              2017-09-04   First release.
                        B              2017-09-27   - iMX6 DualLite now supported
                        C              2019-06-25

Copyright 2019 © Embedded Artists AB                                                         Rev C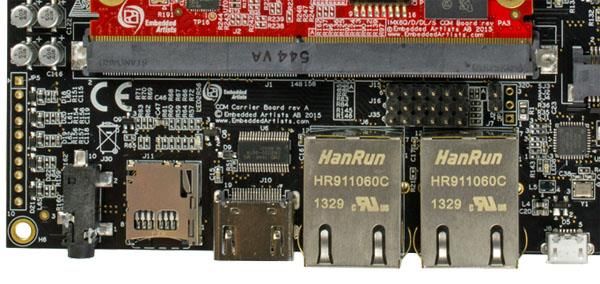
Getting started with Android                                                                                         Page 6

                        2 Introduction
                        This document provides you with step-by-step instructions to download sources, apply patches, and
                        build images needed to create an Android™ system that will run on the i.MX6 SoloX Developer’s Kit
                        (EAK00245), the i.MX6 Quad Developer’s Kit (EAK00251), the iMX6 DualLite Developer’s Kit
                        (EAK00263), the i.MX7 Dual uCOM Developer’s Kit (EAK00268) or the i.MX7 Dual Developer’s Kit
                        (EAK00273).
                        The instructions in this document are based on NXP’s Android™ User’s Guide and the Android version
                        used is 7.1.1 (Nougat).
                        Additional useful documentation:
                               •       NXP’s Android™ User’s Guide – The document can be downloaded from NXP’s website.
                               •       The Getting Started document for the board you are using.
                               •       Working with Yocto to build Linux – This document contains instructions of how to setup a
                                       virtual machine running Linux.
                               •       Android Open Source Project (https://source.android.com/)

                        2.1        Conventions
                        A number of conventions have been used throughout to help the reader better understand the content
                        of the document.
                        Constant width text – is used for file system paths and command, utility and tool names.

                              $ This field illustrates user input in a terminal running on the
                              development workstation, i.e., on the workstation where you edit,
                              configure and build Linux

                              # This field illustrates user input on the target hardware, i.e.,
                              input given to the terminal attached to the COM Board

                              This field i s used to illustrate e xample code or excerpt from a
                              document.

                                This fieild is used for important notes and highlights

Copyright 2019 © Embedded Artists AB                                                                                                  Rev C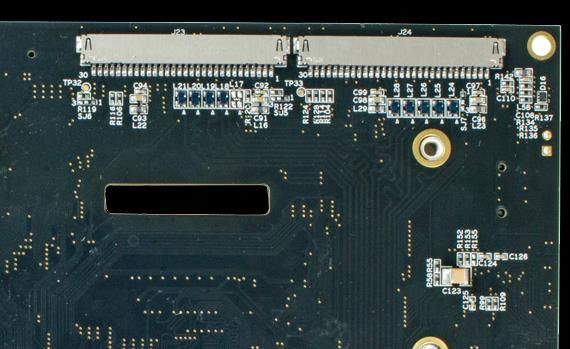
Getting started with Android                                                                                     Page 7

                        3 Linux Host Setup
                                Note: If you want to program the board with pre-compiled Android images and not build the
                                images yourself go to chapter 6 for more information.

                        3.1        Introduction
                        Building an Android system requires a Linux host machine. You can either run this host as a
                        standalone / native computer or as a virtual machine on, for example, a Microsoft Windows PC. Please
                        note that a 64-bit environment is needed and it is recommended to use Ubuntu 16.04 since this is the
                        most tested Linux distribution and also the distribution used when writing these instructions.
                        A list of minimum requirements is available at source.android.com/source/requirements.html. At least
                        250 GB of free disk space is, for example, needed for a single build.
                        3.2        Required packages
                        Several packages must be installed on the host machine to be able to build the Android system.

                              $ sudo apt-get install uuid uuid-dev zlib1g-dev liblz-dev liblzo2-
                              2 liblzo2-dev lzop git-core curl u-boot-tools mtd-utils android-
                              tools-fsutils

                        More packages than above might be required on your system. Please visit the Android Open Source
                        Project page for more information.
                        https://source.android.com/source/initializing
                        3.3        Configure GIT
                        If GIT hasn’t been configured on your computer follow the instructions below. Change “Your name” to
                        your actual name and “Your e-mail” to your e-mail address.

                              $ git config --global user.name “Your name”
                              $ git config --global user.email “Your e-mail”

                        3.4        Install the JDK
                        A Java Development Kit (JDK) must be installed to build Android. Java 8 is needed for Nougat
                        (Android 7) which is the version used in these instructions.

                              $ sudo apt-get install openjdk-8-jdk

                        3.5        Install the repo tool
                        The repo tool has been developed to make it easier to manage multiple Git repositories. Instead of
                        downloading each repository separately the repo tool can download all with one instruction.
                        Download and install the tool by following the instructions below.
                               1. Create a directory for the tool. The example below creates a directory named bin in your
                                  home folder.

                              $ mkdir ~/bin

                               2. Download the tool

Copyright 2019 © Embedded Artists AB                                                                                              Rev C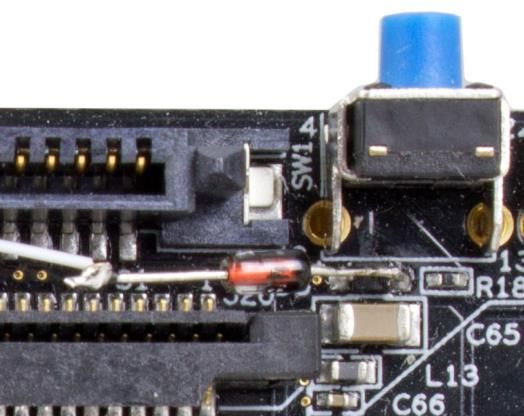
Getting started with Android                                                                                       Page 8

                             $ curl https://storage.googleapis.com/git-repo-downloads/repo >
                             ~/bin/repo

                               3. Make the tool executable

                             $ chmod a+x ~/bin/repo

                               4. Add the directory to the PATH variable as shown below. It is recommended to also add this
                                  line to your “.bashrc” file. The path will then be available in each started shell/terminal and
                                  also after a reboot of your computer.

                             $ export PATH=~/bin:$PATH

Copyright 2019 © Embedded Artists AB                                                                                                Rev C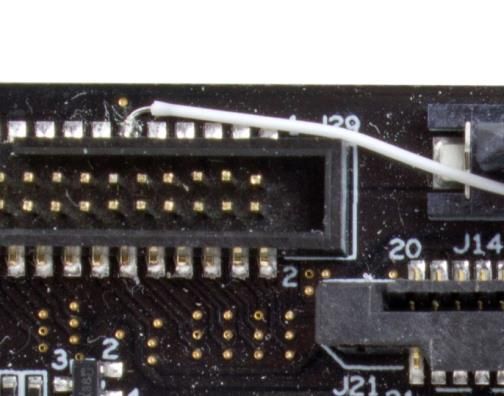
Getting started with Android                                                                                          Page 9

                        4 Download sources
                        4.1        Download Android source code
                        These instructions show how to download all the Android source code.
                               1. Create a directory for the Android sources. In the example below the directory is called
                                  “myandroid”.

                              $ cd ~
                              $ mkdir myandroid
                              $ cd myandroid

                               2. Initialize repo. The file containing all needed repositories is downloaded in this step.

                              $ repo init -u https://android.googlesource.com/platform/manifest
                              -b android-7.1.1_r13

                               3. Start to download files

                              $ repo sync

                                Note: There are a lot of repositories being downloaded so this step can take several hours.

                        4.2        Download the NXP Linux kernel
                        Follow these instructions to download and checkout the Linux kernel to use.

                                Note: The Linux kernel repository is large and can take a long time to download.

                              $   cd ~/myandroid
                              $   git clone git://git.freescale.com/imx/linux-imx.git kernel_imx
                              $   cd kernel_imx
                              $   git checkout n7.1.1_1.0.0-ga

                        4.3        Download the u-boot bootloader
                        Follow these instructions to download and checkout the u-boot version to use.

                              $   cd ~/myandroid/bootable/
                              $   mkdir bootloader
                              $   cd bootloader
                              $   git clone git://git.freescale.com/imx/uboot-imx.git uboot-imx
                              $   cd uboot-imx
                              $   git checkout n7.1.1_1.0.0-ga

                        4.4        NXP patches
                        NXP is providing a lot of patches that must be applied to the Android sources in order for the Android
                        system to work on the iMX processors.
                               1. Create a directory for the patches. The directory created below is only a suggestion. You can
                                  change to a different directory.

Copyright 2019 © Embedded Artists AB                                                                                                   Rev C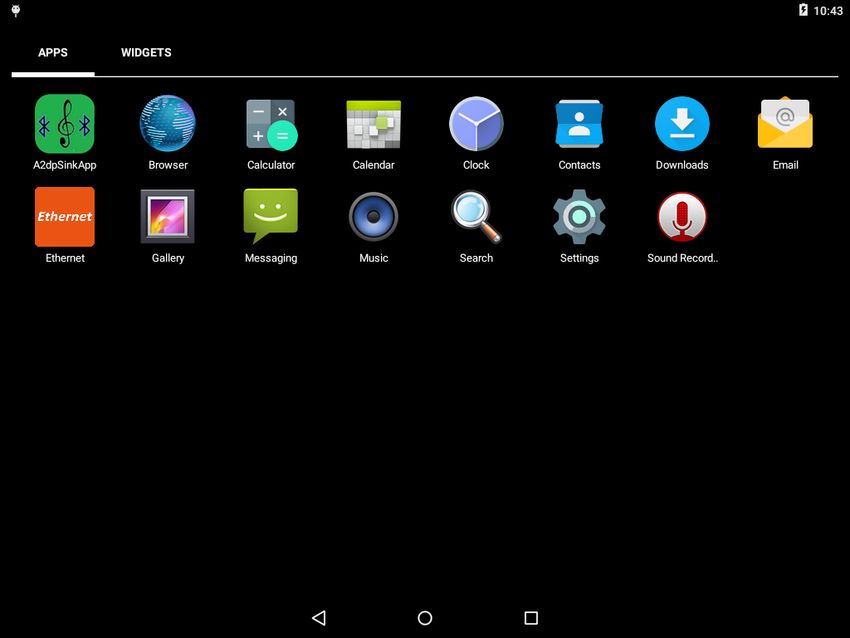
Getting started with Android                                                                                    Page 10

                              $ cd ~
                              $ mkdir nxp_patches
                              $ cd nxp_patches

                               2. Download the patches and put the file into the created directory
                        https://www.nxp.com/webapp/Download?colCode=IMX6_N7.1.1_1.0.0_ANDROID_SOURCE_BSP&ap
                        pType=license&Parent_nodeId=1265411638783721675357&Parent_pageType=product
                               3. Unpack the patches.

                              $ tar -xzvf android_N7.1.1_1.0.0_source.tar.gz

                               4. Prepare to apply the patches

                              $ cd ~/myandroid
                              $ source ~/nxp_patches/android_N7.1.1_1.0.0_source
                              /code/N7.1.1_1.0.0/and_patch.sh

                               5. Patch the sources.

                              $ c_patch ~/nxp_patches/android_N7.1.1_1.0.0_source
                              /code/N7.1.1_1.0.0/ ea_imx_N7.1.1_1.0.0

                               6. If the patch process was successful you should see a success message that looks like below.

                              *************************************************************
                              Success: Now you can build android code for FSL i.MX platform
                              *************************************************************

                        4.5        Embedded Artists patches
                        To get Android running on the Embedded Artists i.MX based boards a few more patches must be
                        applied.
                               1. Create a directory for the patches. The directory created below is only a suggestion. You can
                                  change to a different directory.

                              $ cd ~
                              $ mkdir ea_patches
                              $ cd ea_patches

                               2. Download the Embedded Artists patches and put in the created directory

                              $ wget
                              http://imx.embeddedartists.com/common/android_patches_7.1.1.tar.gz

                               3. Unpack the patches

                              $ tar -xzvf android_patches_7.1.1.tar.gz

                               4. Apply patches to Linux kernel

Copyright 2019 © Embedded Artists AB                                                                                              Rev C
Getting started with Android Page 11
$ cd ~/myandroid/kernel-imx
$ patch -p1 < ~/ea_patches/N7.1.1_kernel_01_base.patch
$ patch -p1 < ~/ea_patches/N7.1.1_kernel_02_remove_gpio_keys.patch
$ patch -p1 <
~/ea_patches/N7.1.1_kernel_03_imx7d_com_rgb_dts.patch
$ patch -p1 < ~/ea_patches/N7.1.1_kernel_04_imx6q_lvds_dts.patch
$ patch -p1 < ~/ea_patches/N7.1.1_kernel_05_imx6dl_lvds_dts.patch
5. Apply patch to u-boot bootloader
$ cd ~/myandroid/bootable/bootloader/uboot-imx
$ patch -p1 < ~/ea_patches/N7.1.1_uboot_01_base.patch
$ patch -p1 < ~/ea_patches/N7.1.1_uboot_02_recovery.patch
$ patch -p1 < ~/ea_patches/N7.1.1_uboot_03_imx7d_com_config.patch
$ patch -p1 < ~/ea_patches/N7.1.1_uboot_04_imx6dl_config.patch
$ patch -p1 < ~/ea_patches/N7.1.1_uboot_05_spl_reinitialize.patch
6. Apply patch to “hardware/imx” directory. Support for the WM8731 codec is added in this step.
$ cd ~/myandroid/hardware/imx
$ patch -p1 < ~/ea_patches/N7.1.1_hardware_imx_01_wm8731.patch
4.6 Download Embedded Artists device files
The device files for the Embedded Artists iMX boards are available in a Github repository. The
instructions in this section describe how to download these files.
1. Go to the device directory
$ cd ~/myandroid/device
2. Download files from repository
$ git clone
https://github.com/embeddedartists/ea_android_devices.git
embeddedartists
3. Checkout the 7.1.1 branch
$ cd embeddedartists
$ git checkout N7.1.1_1.0.0
Copyright 2019 © Embedded Artists AB Rev CGetting started with Android Page 12
5 Building images
When the source code has been downloaded and all patches applied it is time to build the necessary
images for the Android system.
5.1 Build
Follow the instructions below to build all needed images.
1. Set up the environment
$ cd ~/myandroid
$ source build/envsetup.sh
2. Select target. The “lunch“ command will show a list of all available targets. A portion of the
list is shown below. Select the target to build by specifying the number before the target
name, such as 12 for “imx6sxea_com_kit-user”. This target means building the build type
“user” for the iMX6 SoloX Developer’s Kit. See section 5.1.1 for a description of build types.
NOTE: the imx6qea_ target builds images for both iMX6 Quad and iMX6 DualLite.
$ lunch
...
8. aosp_fugu-userdebug
9. imx6qea_com_kit-eng
10. imx6qea_com_kit-user
11. imx6sxea_com_kit-eng
12. imx6sxea_com_kit-user
...
3. Build the images using make.
$ make make 2>&1 | tee build_log.txt
4. When the build has finished the images will be available in the directory below (if the selected
target was imx6sxea_com_kit).
~/myandroid/out/target/product/imx6sxea_com_kit
Note: Building the Android related images can take hours depending on the capabilities of
your computer.
5.1.1 Build types
Build type Description
user Suitable for production. Minimal debug options.
eng This is a development configuration with debugging options.
Copyright 2019 © Embedded Artists AB Rev CGetting started with Android Page 13
6 Deploying images
6.1 Manufacturing tool
NXP’s Manufacturing Tool (MFGTool) can be used to write images to the board. This tool is sending
files and instructions over USB and the board must be set in OTG boot mode for it to work.
At the moment the tool is only available for Microsoft Windows.
6.1.1 Download the tool
Download the zip file containing the manufacturing tool from http://imx.embeddedartists.com/. The
name of the file starts with “mfgtools_imxXXX_android_” and contains pre-compiled Android
images.
Unpack this zip file somewhere on your computer running Microsoft Windows. Below is a description of
some of the content in the zip file.
- mfgtool (root): Contains the actual tool as well as vbs files which can be used to run a
specific download configuration.
- mfgtool/Profiles/Linux/OS Firmware/ucl2.xml: This file contains the
actual download configurations.
- mfgtool/Profiles/Linux/OS Firmware/files: Contains pre-compiled
versions of images. The tool will look in this directory when selecting images to download to
the board.
6.1.2 Prepare hardware
Begin by reading the Getting Started document for the board you are using. This document shows how
to setup the board and also gives an overview of the hardware.
The next step is to put the board into OTG boot mode. If you have an early version of the iMX6 SoloX
Developer’s Kit, that is, a version with a DIP switch mounted as shown in Figure 2, read section 6.1.4
for instructions. Read section 6.1.3 if you have another iMX based developer’s kit or a new version of
the iMX6 SoloX Developer’s kit.
6.1.3 OTG boot mode – J2 jumper
To download images using the manufacturing tool the board must be put into OTG boot mode.
This is accomplished by closing the J2 jumper on the Carrier board; see Figure 1 to locate the jumper.
Please note that in the figure the jumper is in open state which means that the COM board will boot
from eMMC.
Copyright 2019 © Embedded Artists AB Rev CGetting started with Android Page 14
Figure 1 - J2 jumper (opened state)
6.1.4 OTG boot mode – DIP switches
The first version of the iMX6 SoloX COM boards had boot jumpers (DIP switches) mounted on them,
see Figure 2. If you have such a COM board you need to set the boot jumpers as described below to
force it into OTG boot mode instead of closing jumper J2 as described above.
Figure 2 - DIP switch on iMX6 SoloX COM board
1 2 3 4 5 6 7 8
Figure 3 – Boot jumper setting for USB OTG
1. Set the boot jumpers in OTG boot mode as shown in Figure 3. First jumper in the up position
and the second jumper in down position. Please note that the orientation of the DIP switch
component can be different on different COM boards. Make sure you are changing the correct
jumper by looking at the number by the jumper.
2. Make sure a USB cable is connected between the board (micro-B connector on carrier board)
and your PC
Copyright 2019 © Embedded Artists AB Rev CGetting started with Android Page 15
3. Reset the board
Note: When you want to boot the software from eMMC you have to reverse the setting, that
is, first jumper in down position and second jumper in up position.
6.1.5 Download your own images
The simplest way to download your own images is to replace the existing file(s) with your file(s), that is,
replace the files found in “mfgtool/Profiles/Linux/OS Firmware/files”. If you keep the
file names intact the vbs file will download your version of the file.
An alternative is to create a new configuration. In this case you need to open the “ucl2.xml” file and
then copy an existing configuration (the LIST tag and all its children), give it a new name (change the
name attribute) and then modify the instructions so your images are downloaded.
6.1.6 Run the tool
Double click on one of the vbs files to start the manufacturing tool. If the tool can find the board it will
write “HID-compliant device” in the status field, see Figure 4 below. If it cannot find the board it will
write “No Device Connected”.
Figure 4 - Manufacturing Tool
Click the Start button to start the download of files. If all operations are successful the progress bars
will turn green, see Figure 5. Click the Stop button and then Exit to close the manufacturing tool. If an
operation fails the progress bars will turn red. In this case it can be helpful to have a look at the log
MfgTool.log which is found in the same directory as the manufacturing tool.
Figure 5 Manufacturing Tool successful download
Copyright 2019 © Embedded Artists AB Rev CGetting started with Android Page 16
6.1.7 Reset the board
The images have now been downloaded to the board. The boot configuration must now be changed to
booting from eMMC. This is done by removing the J2 boot jumper or reversing the boot jumpers
described in section 6.1.4 in case you have the first version of the iMX6 SoloX Developer’s Kit.
When the boot configuration has been changed reset the board and the downloaded software will start
to execute.
Copyright 2019 © Embedded Artists AB Rev CGetting started with Android Page 17
7 Display options
7.1 MCIMX-LVDS1
This is a 10 inch display with a resolution of 1024x768. The display is equipped with a capacitive
touch screen and is using the LVDS interface. This display is used in the default setup of the Android
system for Embedded Artists iMX6 SoloX COM, iMX6 Quad COM, iMX6 DualLite COM, and iMX7
Dual uCOM boards (as well as for the pre-compiled images available at
http://imx.embeddedartists.com).
The display can be purchased from, for example, Digi-Key and Mouser.
Digi-Key part number: MCIMX-LVDS1-ND
Mouser part number: 841-MCIMX-LVDS1
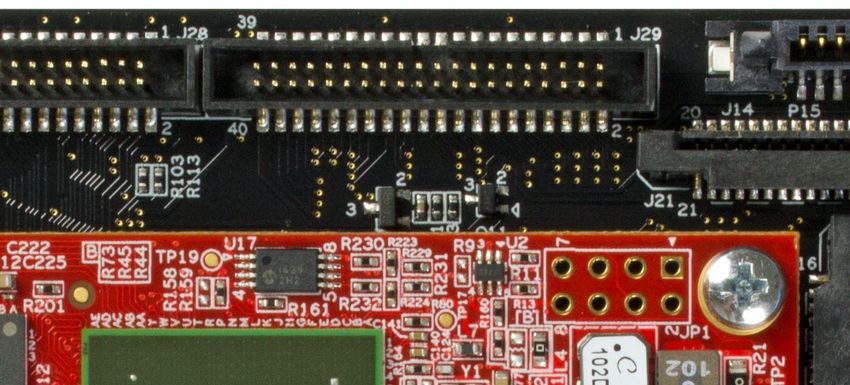
Figure 6 – MCIMX-LVDS1 display and Android desktop
7.1.1 LVDS connector
Connect the display to the J23 LVDS connector on the bottom of the COM Carrier board if you are
using the iMX6 SoloX Developer’s Kit or iMX7 Dual uCOM Developer’s Kit. Connect the display to the
J24 LVDS connector on the bottom of the COM Carrier board if you are using the iMX6 Quad
Developer’s Kit. Figure 7 shows where the LVDS connectors are located.
Copyright 2019 © Embedded Artists AB Rev CGetting started with Android Page 18
J23 J24
Figure 7 - LVDS connectors
7.1.2 U-boot settings for iMX6 Quad and iMX6 DualLite
To be able to get output in the LVDS display when using iMX6 Quad or iMX6 DualLite COM boards
you need to enable lvds1 interface in u-boot.
1. Boot the board and stop u-boot from auto-booting (press any key)
2. Enable lvds1 interface
=> eadisp enable lvds1
=> saveenv
3. Reset the board by pressing the reset button and let Android start
7.2 Innolux AT070TN83
This is a 7 inch display with a resolution of 800x480. The display is equipped with a resistive touch
screen and is using the RGB interface. This display is used in the default setup of the Android system
for Embedded Artists iMX7 Dual COM board (as well as for the pre-compiled images available at
http://imx.embeddedartists.com).
Please note that you must have the COM Display Adapter to use the Innolux display.
Please visit the page “Display solutions for COM boards” for more information about display solutions
and how to use them with Embedded Artists COM boards.
https://www.embeddedartists.com/display-solutions-for-com-boards/
7.2.1 iMX6 SoloX COM
By default, the iMX6 SoloX COM board has been setup to use the LVDS interface. Follow the steps
below to use the RGB interface and Innolux AT070TN83 display instead.
1. In your Android build directory open
device/embeddedartists/imx6sxea_com_kit/BoardConfig.mk
2. Search for TARGET_BOARD_DTS_CONFIG and change it to use imx6sxea-com-kit-rgb.dtb
Copyright 2019 © Embedded Artists AB Rev CGetting started with Android Page 19
TARGET_BOARD_DTS_CONFIG := imx6sx:imx6sxea-com-kit-rgb.dtb
3. The dts file must be modified to correctly enable the AR1021 touch interface. Open the dts file
in kernel_imx/arch/arm/boot/dts/imx6sxea-com-kit-rgb.dts and add the following lines.
&i2c1 {
ar1021_rgb@4d {
status = "okay";
};
egalax_ts_lvds0@04 {
status = "disabled";
};
};
4. Rebuild Android and flash new images to the target
5. Boot the board and stop u-boot from auto-booting (press any key)
6. Enable the rgb interface. By default the display is Innolux AT070TN.
=> eadisp enable rgb
=> saveenv
7. Reset the board by pressing the reset button and let Android start
7.2.2 iMX6 Quad COM
By default, the iMX6 Quad COM board has been setup to use the LVDS interface. Follow the steps
below to use the RGB interface and Innolux AT070TN83 display instead.
1. Create a new dts file called imx6qea-com-kit-rgb.dts with the following content
#include "imx6qea-com-kit.dts"
&i2c1 {
ar1021_rgb {
status = "okay";
};
};
&mxcfb3 {
status = "okay";
};
2. Put the dts file in kernel_imx/arch/arm/boot/dts
3. Open kernel_imx/arch/arm/boot/dts/Makefile and add imx6qea-com-kit-rgb.dtb on a separate
row just like imx6qea-com-kit-lvds.dtb.
4. In your Android build directory open
device/embeddedartists/imx6qea_com_kit/BoardConfig.mk
5. Search for TARGET_BOARD_DTS_CONFIG and change it to use imx6qea-com-kit-rgb.dtb
6. In BoardConfig.mk also change the kernel cmdline
Copyright 2019 © Embedded Artists AB Rev CGetting started with Android Page 20
BOARD_KERNEL_CMDLINE := console=ttymxc0,115200 init=/init
video=mxcfb0:dev=lcd,bpp=32 video=mxcfb1:off video=mxcfb2:off
video=mxcfb3:off vmalloc=128M androidboot.console=ttymxc0
consoleblank=0 androidboot.hardware=freescale cma=448M
7. Rebuild Android and flash new images to the target
8. Boot the board and stop u-boot from auto-booting (press any key)
9. Enable the rgb interface. By default the display is Innolux AT070TN.
=> eadisp enable rgb
=> saveenv
7.3 HDMI
7.3.1 iMX6 Quad COM
By default, the iMX6 Quad COM board has been setup to use the LVDS interface. Follow the steps
below to use the HDMI interface instead.
1. In your Android build directory open
device/embeddedartists/imx6qea_com_kit/BoardConfig.mk
2. Change the kernel command line to use hdmi
BOARD_KERNEL_CMDLINE := console=ttymxc0,115200 init=/init
video=mxcfb0:dev=hdmi,bpp=32 video=mxcfb1:off video=mxcfb2:off
video=mxcfb3:off vmalloc=128M androidboot.console=ttymxc0
consoleblank=0 androidboot.hardware=freescale cma=448M
3. Rebuild Android and flash new images to the target
4. Boot the board and stop u-boot from auto-booting (press any key)
5. Enable the hdmi interface.
=> eadisp enable hdmi
=> saveenv
6. Reset the board by pressing the reset button and let Android start
Copyright 2019 © Embedded Artists AB Rev CGetting started with Android Page 21
8 Power button
An Android device might need hardware buttons to, for example, turn on/off the device or turn on/off
the screen. In the configuration provided by Embedded Artists a “power button” is used to both power
on/off the device and “wake” the device, that is, turn on the screen.
On the iMX6 SoloX Developer’s Kit and the iMX7 Dual uCOM Developer’s Kit the ON/OFF button on
the Carrier board is used as power button, see Figure 8.
Figure 8 - "Power" button
A quick press on this button turns on the display (if the backlight has been turned off). If the backlight is
already on it will be turned off by a quick press on the button. Press the button for a longer time and
you will be asked to turn off the device.
8.1 iMX6 Quad Developer’s Kit
For rev B or older versions of the iMX6 Quad Developer’s Kit the ON/OFF button unfortunately doesn’t
function as a power button (from Android’s point of view). Instead GPIO3.29 on the iMX6 Quad
processor has in the device tree (dts) file been setup as a power key. GPIO3.29 is mapped to GPIO12
on the COM carrier board and this pin is available on expansion connector J29 pin 11, see Figure 9.
J29, pin 11
Figure 9 - Pin 11 on J29 expansion connector
8.1.1 Example of modification
With a small and simple rework it is possible to connect the on/off push-button to GPIO3.29. A diode is
used to isolate the voltage domains, see schematic below. Any small signal or schottky diode with
forward drop voltage below 0.7V can be used.
iMX6 Quad/Dual/DualLite/Solo pin EIM_DATA29-GPIO3_IO29 is connected to COM Carrier board
signals GPIO_12.
Copyright 2019 © Embedded Artists AB Rev CGetting started with Android Page 22
Figure 10 and Figure 11 below illustrated where to solder the diode and wire to make the connection
between the on/off push-button and GPIO3.29.
Figure 10 – Schematic showing the suggested rework
Figure 11 – Photo showing J29, pin 11 connected to the ON/OFF button
Copyright 2019 © Embedded Artists AB Rev CGetting started with Android Page 23
9 What to do next
At this point you have an Android system up-and-running on one of our developer’s kits. You can now
explore the system and play around with the few pre-installed applications.
Please note that Google Mobile Services, such as Google Play, Youtube, Gmail, and Google Maps is
not open source and must be licensed by Google. These applications are therefore not installed on the
system.
Instead of using Google Play you can use the Android Debug Bridge (adb) to install applications, see
chapter 10 for more information about adb.
9.1 Application development
It is likely that you want to run your own applications on the system. It is, however, out-of-scope of this
document to describe Android application development. A good way to start is to go to
developer.android.com which is a site full of useful information for Android application developers.
http://developer.android.com/develop/index.html
Copyright 2019 © Embedded Artists AB Rev CGetting started with Android Page 24
10 Android Debug Bridge (adb)
The Android Debug Bridge (adb) is a tool that lets you interact with an Android device. It is, for
example, possible to retrieve logs or install applications using this tool.
More information about the tool and specifically a list of commands is available at the link below.
http://developer.android.com/tools/help/adb.html#commandsummary
10.1 Enable adb support
There is no need for you to do anything to enable debug support via adb since it has been enabled by
default in the “init.rc” file for the Embedded Artists boards as can be seen below.
For a final product you want to remove the settings below as well as set the property
“ro.adb.secure” to 1.
setprop serv ice.adb.tcp.port 5555
setprop pers ist.service.adb.enable 1
setprop pers ist.service.debuggable 1
setprop pers ist.sys.usb.config adb
An alternative to enable adb in the “init.rc” file is:
1. Go to “Settings” on the Android device
2. Click “About tablet”
3. Click/touch 7 times on “Build number” and developer options will be enabled
4. Go back to “Settings” and then click on “Developer options”
5. Here you can now enable “USB debugging”
10.2 Connect via network
Using adb via the network is enabled by default. The TCP port is set to 5555 in the “init.rc” file.
1. Make sure you have an Ethernet cable connected to the board. Connect it to the first RJ45
connector as illustrated in Figure 12.
2. Retrieve the IP address, for example, by using the pre-installed “Ethernet App”, see Figure 13
and Figure 14.
Figure 12 - Ethernet connector on developer's kit
Copyright 2019 © Embedded Artists AB Rev CGetting started with Android Page 25
Figure 13 - Android Apps
Figure 14 - Ethernet App with IP address
3. Connect to the board
$ cd ~/myandroid
$ cd out/host/linux-x86/bin
$ ./adb connect 192.168.5.82
* daemon not running. starting it now on port 5037 *
* daemon started successfully *
connected to 192.168.5.82:5555
4. If the connect attempt fails you could try to kill the adb server and then connect again
$ ./adb kill-server
Copyright 2019 © Embedded Artists AB Rev CGetting started with Android Page 26
5. If you have connected successfully you can now continue to use adb to interact with the
device.
10.3 Take a screenshot
It is possible to, for example take screenshots or record the device screen as described at the Android
developer site. The instructions below show how to take a screenshot and retrieve it from the device.
http://developer.android.com/tools/help/shell.html#screencap
1. First make sure you have connected to the device as described in section 10.2 above.
2. Take the screenshot
$ ./adb shell screencap /sdcard/screen.png
3. Retrieve the screenshot
$ ./adb pull /sdcard/screen.png
10.4 Install an application
It is possible to install applications using adb.
1. First make sure you have connected to the device as described in section 10.2 above.
2. You must have downloaded the apk file for the application. Here it is assume that it is named
myapp.apk and that it is available in the same directory as the adb utility
3. Install the application
$ ./adb install myapp.apk
1640 KB/s (17339850 bytes in 10.321s)
pkg: /data/local/tmp/myapp.apk
Success
4. The icon for that application can be found among the other applications on the Android
device.
Copyright 2019 © Embedded Artists AB Rev CGetting started with Android Page 27
11 Troubleshooting
11.1 Out-of-memory during build
Description
You get an out-of-memory error while building Java sources. The error message could look like below,
but there are also other variants of the error message.
FAILED: /bin/bash
out/target/common/obj/JAVA_LIBRARIES/framework_intermediates/with-
local/classes.dex.rsp
Out of memory error (version 1.2-rc4 'Carnac' (298900
f95d7bdecfceb327f9d201a1348397ed8a843843 by android-jack-
team@google.com)).
GC overhead limit exceeded.
Try increasing heap size with java option '-Xmx'.
Workaround
Increase the heap size by following the instructions below. The heap size is increased to 4Gbyte in the
example below.
1. Open ~/myandroid/prebuilts/sdk/tools/jack-admin
2. Search for JACK_SERVER_COMMAND and add -Xmx4G as shown below
JACK_SERVER_ COMMAND="java -Xmx4G - XX:MaxJavaStackTraceDe pth=-1 -
Djava.io.tmp dir=$TMPDIR $JACK_SERV ER_VM_ARGUMENTS -cp
$LAUNCHER_JA R $LAUNCHER_NAME"
3. Save the file and then stop the jack-admin server
$ jack-admin stop-server
4. Now run make again to start your build.
Copyright 2019 © Embedded Artists AB Rev CYou can also read