USER GUIDE Quick Start Guide to PT-Mapper Pro Version 5 or later - Pear Technology
←
→
Page content transcription
If your browser does not render page correctly, please read the page content below
USER GUIDE

                Quick Start Guide to
                  PT-Mapper Pro
                 Version 5 or later
                            Revised November 2020

Map Editing Software for Local Councils

                        © Pear Technology Services Ltd. 2020
   Unit 31, Broadmarsh Business Centre, Harts Farm Way, Havant. Hants. UK. PO9 1HS
                       Tel: 023 9249 9689 Fax: 023 9247 8425
                              info@peartechnology.co.uk
                              www.peartechnology.co.uk
Contents

Contents .................................................................................................................................................. 1
Your Information..................................................................................................................................... 2
Contact Information................................................................................................................................ 3
Introduction to the Quick Start Guide .................................................................................................... 4
Terminology ............................................................................................................................................ 4
Opening, Naming and Saving a Map ....................................................................................................... 5
Eyes, Padlocks and Pen Parking .............................................................................................................. 6
‘Safe Mode’ ............................................................................................................................................. 7
Navigating Around a Map ....................................................................................................................... 8
Add and Personalise New Map Layers .................................................................................................... 9
Drawing Tools ....................................................................................................................................... 10
Selecting Objects and Deleting Objects ................................................................................................ 12
Creating Items: Adding Symbols and Text ............................................................................................ 13
Adding Symbols..................................................................................................................................... 13
Adding Text ........................................................................................................................................... 14
Moving Symbols and Text ..................................................................................................................... 14
Rotating Symbols and Text ................................................................................................................... 14
Copying Symbols and Text .................................................................................................................... 15
Mapping Assets and Applying Identifiers ............................................................................................. 16
Measuring Areas and Distances ............................................................................................................ 17
Drawing a Line....................................................................................................................................... 18
Copy Council Owned Land to Own Layer .............................................................................................. 19
Cut Out a Section of a Map ................................................................................................................... 20
Add a Title Box ...................................................................................................................................... 22
Add a Legend......................................................................................................................................... 22
Print Map to Paper and PDF ................................................................................................................. 23
Appendix 1 Viewing an area in Google Earth and Copying from Google Earth to PT-Mapper Pro .... 24
Appendix 2 How to use Inspire Land Titles in PT-Mapper Pro ............................................................ 26
Appendix 3 How to prepare a black and white map ........................................................................... 27
Appendix 4 How to print results showing the Parish Boundary ......................................................... 28
Appendix 5 How to Copy Layer Objects from one map to another map ............................................ 29
Appendix 6 How to insert a crest or logo into your title box .............................................................. 31
Appendix 7 Frequently Asked Questions ............................................................................................ 32

                                                                                                                                                           1
Your Information

                   Please fill in the fields below to help you in future

PSGA Licence number:_________________________________________________________

This is your organisation’s Ordnance Survey Public Sector Geospatial Agreement (previously known
as Public Sector Mapping Agreement) licence number that is required to be included in the Title Box
on any published maps.

PSGA contact:________________________________________________________________

The member of your organisation who signed up to the PSGA (usually the clerk). They will be
responsible for managing your organisation’s login details and who OS will want to liaise with (if
required).

Project leader:___________________________________________________________________

The member of your organisation who will be responsible for managing any mapping projects. You
do not need to appoint one but it may help to do so. Liaising with Pear re installs etc.

Location of your map files:____________________________________________________________

These will be in .mpd format. Do not move files around without checking with your project leader as
doing so could affect everyone’s maps.

The best location to keep them will be somewhere that is backed up and has the same filepath on all
user’s PCs. You may need to liaise with any IT support to make sure.

OS Mastermap Data is saved here:_____________________________________________________

This is the location your main town Mastermap is saved in. It will be in .mpd file format.

When updated, the new map will need to be saved in this location. The best place to keep this will
be in a designated folder with the rest of your Pear maps.

Remote hosting provider:_____________________________________________________________

This is the name of your provider if your software is hosted offsite via Citrix e.g. Microshade.

Name and contact details of IT provider: ________________________________________________

This will enable Pear to liaise directly with your IT provider if the need arises.

                                                                                                     2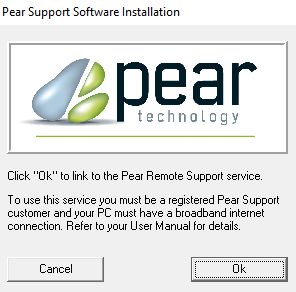
Software purchased by your organisation:
PT-Mapper Pro
PT-MapLink
Cemetery Database
PocketGIS
Maps purchased by your organisation:
Cemetery Map
Allotment Maps
Asset Map
Other_______________________________________________________________________
Planned Use and Projects:
Asset plotting
Tree plotting
Event planning
Other_______________________________________________________________________
Contact Information
Pear Technology info@peartechnology.co.uk
02392 499689
Ordnance Survey PSGA Helpdesk psga@os.uk
03453 757595
3Introduction to the Quick Start Guide
This Quick Start Guide has been designed to cover the most common tasks council members like to
perform. We have tried to keep the task instructions simple yet effective and so each section is
structured as a step-by-step guide. If you have any improvements or would like any other tasks
included then please do let us know.
Terminology
- Layers = The items listed vertically in the left hand column
- Tool Buttons = The icons/pictures along the top horizontal bar
- Before saving a map always double check layers are in ‘safe mode’
- ‘Active layer’ = the layer with the pencil next to it
4Opening, Naming and Saving a Map
In PT-Mapper Pro opening, naming and saving maps is the same as any other Windows programme
Double-click the PT-Mapper Pro icon on the desktop
Select ‘File’ (Top left hand corner)
Select ‘Open Map’ from the list
Browse to your map data file - This will be personal to you (for example C:\My Files\My Maps)
Double-click on map file (will end in .mpd although your computer settings might not show file
extensions)
To Save
Select ‘File’ (Top left hand corner)
Select ‘Save As’ and give file an appropriate name to make a copy
Select ‘Save’
Close down PT-Mapper – Click the cross in the top right hand corner
Note: Whenever you intend to amend or edit a map, always open it and ‘Save As’ leaving the master
map intact. In this way you have a master copy to return to should anything go wrong. The above
instructions ensure this will happen.
For example: if you intend to add all your street lights to your council map it would be best to first
open the master map and save it as ‘street lights map first draft 2020’. This way it is obvious the map is
not a finished version. When all your street lights are added correctly you can then transfer this
information back to the main council master map.
5Eyes, Padlocks and Pen Parking
Eyes
The ‘Eyes’ against each layer have two states and can be changed by a single left click to the
middle of the eye:
Dark blue / on / the layer is visible
Light blue / off / the layer is invisible
A quick way to turn all the ‘Eyes’ on or off at once is to single left click the Dark Blue Eye or
Light Blue Eye in the bottom left hand corner of your screen and below the Layers list.
Padlocks
The ‘Padlocks’ against each layer have two states and can be changed by a single left click in
the middle of the padlock:
Green / locked / layer objects cannot be selected
Red / unlocked / layer objects can be selected
A quick way to lock or unlock all the ‘Padlocks’ at once is to single left click the Green or Red
Padlock in the bottom left hand corner of your screen and below the Layers list.
Pen Parking
To edit, draw or write on a layer you need to move the Pen to that layer which will then be
known as the ‘Active Layer’. To move the Pen, double left click the middle of the Eye on the
chosen layer. Return and store the Pen on the Pen Parking layer when not in use.
6‘Safe Mode’
Safe Mode
The map will be in Safe Mode when the Pen and Padlocks on the Layers list look the same as the
image below i.e.
The Pen is on the ‘Pen Parking’ layer
All the ‘Padlocks’ are safe and green
7Navigating Around a Map
Open your map and ensure the layers are in ‘safe mode’
Zooming
Click ‘Zoom In’ icon
Single left click the area you want to zoom further in to, continue to click for a closer view
To end, single left click the ‘Deselect’ icon
Deselecting means you have dropped the current tool function so you can move onto
the next task
Click ‘Zoom Out’ icon
Single click the area you want to zoom out of, continue to click to zoom further out
To return to view the entire map single left click the deselect tool – this drops the ‘Zoom Out’ tool
Single click the ‘View All’ icon to return the map to full extent
To Pan/Move
To view the surrounding area, zoom in, deselect and then single click the ‘Pan’ icon
Move mouse pointer to an area on the map and hold down the left button. Now drag the mouse,
north, south, east or west and release – continue as required
To return to original view – select ‘View All’ icon
To Find a Street
Click on the ‘Street Finder’ icon
The ‘Layers’ List box on the left will change to information on Street names
Type in street name or select road/street name from the list that has automatically been
provided, scroll down list
Note: Always single left click the ‘Deselect’ tool at the end of any task. This drops the current tool so
you can continue to the next task. This tool also deselects selected map object(s).
8Add and Personalise New Map Layers
Open your map and ensure the layers are in ‘safe mode’
Note: It is important to add your own layers as the existing layers have been created by Ordnance
Survey and should not be modified. If you receive an updated map from Ordnance Survey all their
layers will be replaced by the updates.
Adding a Layer
Click on the ‘Add Layer’ icon
(This is situated in the bottom left hand corner of your screen – the icon furthest to the right in
this group of buttons)
A ‘New Layer’ box (named ‘Edit Layer Properties’) will automatically pop up and you will notice
the pencil in the layers list will automatically have moved to the new layer making it the ‘active
layer’
Note: The pencil can be moved to any layer. If you draw something on the map it will be created on the
layer which has the pencil next to it.
Fill in the details that have popped up in the box
Select ‘OK’
Return map to ‘safe mode’ and click ‘Save’
Close down PT-Mapper – Click the cross in the top right hand corner
Editing Layer Settings
If you wish to change the colour (or any of the other settings) to the layer you have just added
this can be done
Click once on the layer name and the layer name will turn blue
Right click and then select ‘Properties’ from the list – Edit to suit
9Drawing Tools
Draw a Rectangle
Select the Draw Rectangle tool
Move the cursor onto the map and it will assume the shape of a pencil
Single left click to set the corner of the rectangle, move the pencil cursor to the next corner and
single left click, move the pencil cursor down and single left click to complete the rectangle
Note it is the programme that is drawing the rectangle, you are just instructing where three of
the corners are
Single right click to drop the tool
Single right click to deselect the shape
Draw a Polygon
Select the Draw Polygon tool
Move the cursor onto the map and it will assume the shape of a pencil
Single left click to set the first point, move the pencil cursor to the next point and single left click
Repeat until you have set all points and finish with a double left click to complete the shape
Single right click to drop the tool
Single right click to deselect the shape
Draw a Polyline
Select the Draw Polyline tool
Move the cursor onto the map and it will assume the shape of a pencil
Single left click to set the first point, move the pencil cursor to the next point and single left click
Repeat until you have set all points then and finish with a double left click to complete the line
Single right click to drop the tool
Single right click to deselect the line
Note: do not try and draw a shape using the polyline. It will only ever be a series of points and
never a shape, hence it will not assume any ‘fill’ properties.
10If you need to move the node at the end of the line after it has been drawn i.e. to shorten or
lengthen the line, then use the Drag Node tool.
Zoom in to the end of the line
Single left click to select the Drag Node icon from the tool bar
Hover your cursor over the end of the line until it assumes a cross-hair at which point single left
click and hold whilst dragging the node to the new position
Single right click to drop the tool
Draw a Measured Shape
Use this tool to plot a line of specified length and bearing, draw a circle of specified diameter,
area or circumference or draw a rectangle of specified dimensions.
Zoom into the area of the map where you wish to add the shape
Select the Draw Measured Shape from the tool bar
Populate the details required as appropriate within the pop up box (n.b. select 60 segments for a
perfect circle)
Single left click Draw Shape
Single right click to deselect the shape
11Selecting Objects and Deleting Objects
To select an object then the layer on which the object is drawn must be unlocked first.
To Select a Symbol, Text or Shape
Unlock the layer on which the object is drawn by a single left click on the padlock to turn it
red (see page 6)
Single left click anywhere on the symbol, text or shape so that the outline turns red and the
nodes become visible
To Select a Line
Unlock the layer on which the line is drawn by a single left click on the padlock to turn it red
(see page 6)
Hover your cursor over the end of the line until it assume a plus shape i.e. + and then single
left click
The line will turn red and the nodes will become visible
To Select Multiple Layer Objects
To select a number of layer objects in a given area, unlock the layer on which the objects are
drawn by a single left click on the padlock to turn it red (see page 6)
Hold down left mouse button and drag mouse diagonally across the map releasing when you
have a box around the desired area. You may wish to zoom in to the desired area first.
All items on the unlocked layer will now be selected.
To Delete an Object
Unlock the layer on which the object is drawn by a single left click on the padlock to turn it
red (see page 6)
Select the object as above and then either use the delete key on your keyboard or the delete
key from the tool bar
To Undo / Redo last actions
Use the backward or forward buttons to undo or redo the last action
12Creating Items: Adding Symbols and Text
Open your map and ensure the layers are in ‘safe mode’
Note: Make sure the map you already have open or have opened has a new layer added – See Page 9
and carry out steps if not.
Check the pencil is next to the layer you have added
If not double-click the eye next to the layer you have added so the pencil moves to this layer
You are now ready to add items to your own layer
Adding Symbols
Zoom to where you want to plot the item (See Page 8)
Click once on the ‘Add Text’ icon
Change the font to ‘Map Symbols’ by clicking the Symbols button below the font size and colour
buttons – A box will automatically pop up showing ‘map symbols’ font
Important: Double check the font name has changed to ‘Map Symbols’ in the font box, if not; select this
font from the drop down options
Click once on the symbol you require, example Dog Bin
Close the symbols box by clicking the X in the top right corner
Zoom to where you want to plot the item (See Page 8)
Click once on ‘Add Text to Map’ (This is below the font box) – The cursor will change to a pencil
Click on the map on the exact location of where you want to plot the asset
To change the colour and size of the asset use the boxes next to the font name
Single left click ‘Deselect’ icon
Return map to ‘safe mode’ and click ‘Save’
Note: If the symbol is not in the correct location, this can be moved – See Page 14
13Adding Text
Open your map and ensure the layers are in ‘safe mode’
Add and personalise a new layer - text should be kept on a separate layer
Click once on the ‘Add Text’ icon
Change the font style
Type in text in ‘Content’ box e.g. post mounted
Zoom to where you want to plot the item (See Page 8)
Click once on ‘Add Text to Map’ (This is below the font box) – The cursor will change to a pencil
Click on the map where you want to plot the text
Single left click the ‘Deselect’ icon
Note: If the text is not in the correct location, this can be moved – See Below
Moving Symbols and Text
Click once on the symbol or text – this will turn the item red
Click once on the ‘Move’ icon
Hover mouse over the selected symbol or text until it assumes a +
Hold down left mouse button and move to different area, release button when in correct location
Single left click the ‘Deselect’ icon
Rotating Symbols and Text
Click once on the symbol or text – this will turn the item red
Click once on the ‘Rotate’ icon
Hold the Shift key down and rotate the object.
Do NOT use the mouse buttons, simply slide the mouse
Single left click the ‘Deselect’ icon
14Copying Symbols and Text
Click once on the symbol or text – this will turn the item red
Click once on the ‘Copy’ icon
Click once on the ‘Paste at Mouse Pointer’ icon
Click on the map of where you would like the copied version
Click on the map on the exact location of where you want to plot the symbol or text
Continue using these icons and Single left click ‘Deselect’ icon when finished
Return map to ‘safe mode’ and click ‘Save’
15Mapping Assets and Applying Identifiers
Applying an identifier to an asset is more useful than simply numbering the asset. By applying an ‘ID’ to
an object it then becomes linked to that number. It can then be used to link the map to a spreadsheet
using PT-Maplink.
1) Open your map and ensure the layers are in ‘safe mode’
Add a new map layer on which to add your assets. It is best to keep each asset type on its own
layer i.e ‘street lights’ or ‘dog bins’.
Add a symbol to the map to represent your asset (Page 7)
Create a new layer for your Identifier labels. Name it after the type of asset you are labelling i.e.
‘street light IDs’. Identifier labels sit on their own layer so you can hide them if you need to tidy
the map quickly.
Select an asset on the map you wish to add an ID to. It should go red when selected.
Click on the ‘Manage Object Identifiers’ button.
Enter your chosen ‘ID’ number into the Identifier box and hit ‘Apply’.
The ID will need to be unique. If it is not, PT-Mapper Pro will automatically renumber it for you.
Your chosen ID can be up to 12 digits long but the simpler the better.
The ‘ID’ should now appear on the map above your asset. If it does not appear instantly just
refresh the map by clicking the ‘Redraw a map’ button or by zooming in and out.
You can use the text tab to resize the text if necessary.
Return map to ‘safe mode’ and click ‘Save’
16Measuring Areas and Distances
1) Open your map and ensure the layers are in ‘safe mode’
Measuring Areas – Buildings/Land/Gardens
Double-click on the eye next to the ‘Buildings’ layer – This will automatically change the layer
settings, the layer will become active (the padlock will change to an unlocked red padlock and
you will be able to draw on this layer, the eye will turn to a pencil)
Zoom in to the desired building (See Page 8)
Single left click ‘Deselect’ icon
Click once on a building (orange polygon) – This will then be outlined in red and you will be able
to see the area in the bottom tool bar
Change the units if necessary – Select the ‘Units’ tab along the top (above the ‘Add Text’
icon) Change to preference
Double-click the eye next to the ‘Pen Parking’ Layer and single click the red padlock next
to the ‘Buildings’ layer – Your map is now back in ‘safe mode’
Measuring Distances
Double-click on the eye next to the ‘General Surface’ layer – This will automatically change the
layer settings, the layer will become active (the padlock will change to an unlocked red padlock
and you will be able to draw on this layer, the eye will turn to a pencil)
Zoom in to the desired area (See Page 8)
Single left click ‘Deselect’ icon
Click once on the ‘Draw polyline’ icon
Click once at starting point and move mouse to finish point – Do not click, just move the mouse
You will see the measurements in the tool bar at the bottom
Right click once to drop/cancel line
Double-click the eye next to the ‘Pen Parking’ Layer and single click the red padlock next to the
‘General Surface’ Layer – Your map is now back in ‘safe mode’. Click ‘Save’
17Drawing a Line
Add a new layer; name it ‘Planning’ and editing the settings to suit (See page 9)
Zoom in to the desired area (See page 8)
Single left click ‘Deselect’ icon
Click once on the ‘Draw polyline’ icon
Click once at starting point and move mouse to finish point – Do not click, just move the mouse
You will see the measurements in the tool bar at the bottom
Once you are at the final location double left click once to drop/draw the line
Double-click the eye next to the ‘Pen Parking’ Layer and single click the red padlock next to the
‘Planning’ Layer – Your map is now back in ‘safe mode’
Click ‘Save’
18Copy Council Owned Land to Own Layer
1) Open your map and ensure the layers are in ‘safe mode’
2) Add and personalise a new layer – Name it ‘Council Owned Land’ (See Page 9)
Important; Personalise the fill colour so the land stands out against the surrounding areas
Zoom in and find area (See Page 8)
Single left click ‘Deselect’ icon
Click once on the padlock next the OS layer that has the area of interest – Padlock will turn red
Example; Click the padlock next to the ‘Buildings’ layer if you want to make a building council
property
Click once in the centre of the area you want to highlight as council owned land
(The area will change to a white shape outlined in red)
Click once on the ‘Copy Object to Current Layer’ icon
(This will copy and move the selected area to the ‘active layer’)
Single left click ‘Deselect’ icon
The area should now stand out
Return map to ‘safe mode’ and click ‘Save’
19Cut Out a Section of a Map
1) Open your map and ensure the layers are in ‘safe mode’
Note: Make sure the ‘Page Outline’ Layer is unlocked - click once on the green padlock and it will turn
red i.e. be unlocked.
Cut out a section of a map (not to scale)
You are now ready to start cutting out a map section
Zoom in and Pan to area of interest (See page 8)
Ensure the area of interest is in the centre of your screen
Select the ‘Move Page’ icon
(A dotted line and a solid line will now surround the area representing the page margin and the
page outline respectively).
You may need to alter the page outline size if it is too big/small
Double check you are in safe mode and then unlock the padlock next to the ‘Page Outline’ layer
Click once on an outer corner of the page outline so it highlights red
Select the ‘drag node’ icon
Select a corner and hold down the right mouse button and drag to where you would like the
corner to move to – Repeat until all corners cover the area you wish to cut out
Select ‘Edit’ from the top tool bar, next to ‘File’
Select ‘Copy Page’ from the list
Select ‘File’ and the ‘Save As’ from the list
Rename the Map as ‘Example Cut Out’
If you need to produce a map (to scale)
Zoom in and Pan to area of interest (See page 8)
Ensure the area of interest is in the centre of your screen
Select the ‘Move Page’ icon
(A dotted line and a solid line will now surround the area representing the page margin and the
page outline respectively).
20Select File / Page Setup and populate from the drop down lists as appropriate e.g.
Paper size - A4, A3 etc.
Paper Scale – 1250
You may need to move the page if it is not surrounding the area of interest:
Check your map is in safe mode so that you do not inadvertently select other items
Click once in the corner of the ‘Page Outline’ so it turns red
Click the ‘Move’ icon
Click once on a corner of the page outline and drag so it surrounds the area of interest
Select ‘Edit’ from the top tool bar, next to ‘File’
Select ‘Copy Page’ from the list
Select ‘File’ and the ‘Save As’ from the list
Rename the Map as ‘Example Cut Out’
Tidy up the map
There may be extra text around the edge of your new map – You will need to delete this
Click once on the padlock next to the layer list the text is on
Click once on the text you wish to delete – it should highlight red
Press the ‘delete’ key on your key pad
Continue until all the text is deleted and remember to turn the padlocks back to green
Select ‘Tools’ from the top menu line
Select ‘Map Expert’ from the list and then the ‘All Tests’ Button – ‘OK’ and ‘Return’
Select ‘Tools’ from the top tool bar
Select ‘Map Cleaner’ – This will automatically clean the map (not visual - but benefits the
technology)
Click once on the ‘View All’ icon
Return map to ‘safe mode’ and click ‘Save’
21Add a Title Box
Cut out a section of a map and save (See Page 20)
Double check layers are in ‘safe mode’ (See Page 7)
Click once on the ‘Add Title Box’ icon
Select the correct size – most cases it will be ‘General Title A4’
Click once in the corner you would like the title box to be in from the box below
Fill in the details to suit including your PSGA licence number
To save your details as a template for future use:
Select the ‘Title Box’ tab (above the layers list but below the tool icons)
Select ‘Save Title Box as Template’ this will then save all the details for next time
Note: If you would like your council crest imported into the title box – call us; 023 9249 9689
Add a Legend
Single left click the Add a Layer Legend icon which will result in a new tab opening
Select the layers from the list displayed that you wish to appear in the Legend. Suggest you
may wish to exclude the map boundary and probably you will not want the OS layers (if OS
layers are required, select Include OS Layers in List and they will all be displayed for you to
select any or all as appropriate). To select multiple layers hold down Ctrl and single left click
the layers.
Legend Heading – give a title to your Legend which you wish to appear on the map e.g. Key
Number of Columns – decide upon the number of columns you wish to have.
Single left click Draw Legend and the Legend will now be drawn on the map in the bottom
left corner.
Any of the Legend details can be amended followed by a single left click Draw Legend again.
The Legend can also be deleted altogether by single left click Remove Legend.
To move the Legend to a different position on the map, single left click on the Legend to
select and then use the Move tool to drag it to a new position.
22Print Map to Paper and PDF
Quick Print - Printing for Internal Use (Informal)
Zoom and pan to area of interest
Select the ‘Print Current View’ icon
Select printer
Print
Printing for External Use (For Public, Council Meetings etc)
Cut out a section of a map and save (See Page 20)
Double check layers are in ‘safe mode’ (See Page 7)
Click once on the ‘View All’ icon
Add in title box (See page 22)
Select ‘File’ and then ‘Print Page’ from the list
Select the printer
Print
Printing to PDF
Follow the instructions above i.e. Quick Print or Printing for External Use printer select:
Select Microsoft Print to PDF
Name and save the pdf file
23Appendix 1 Viewing an area in Google Earth and Copying from Google
Earth to PT-Mapper Pro
The free desktop version Google Earth Pro must be installed on your
computer for this to work with PT-Mapper Pro.
1. Open your map in PT-Mapper Pro.
2. Check you can see the layers list on the left of the screen. If you cannot see the
Ordnance Survey Layers select “Layers” just below “File”.
3. Double check all layers are in ‘safe mode’ (See your Quick Start Guide for more info
about this).
Showing an Area in Google Earth
1. Double-click on the eye next to the desired layer (e.g. buildings). The layer will now
become the active layer and you will be able to draw on it if wished.
2. Zoom in to the desired area/building (See Quick Start Guide for more).
3. Click in the centre of the building to select it. It will turn white with a red outline.
4. Click once on the Google Earth Pro icon
(This will load Google Earth Pro and show the area you have selected).
24Drawing and Copying an Area from Google Earth to PT-Mapper Pro
Repeat the above steps. You should have Google Earth open and your area of interest
outlined in yellow.
1. In Google Earth click on the ‘Add Polygon’ icon – this runs along the top
horizontal tool bar.
2. A ‘New Polygon’ box will pop up. You can alter the style of the layer if wished but be
aware these changes will not be carried across into PT-Mapper Pro. It may be worth
changing the dropdown menu to ‘Outlined’ rather than ‘Outlined and Filled’.
3. Once happy, move the box to one side (do NOT click ‘OK’).
4. Your mouse pointer will change to a square.
5. Hover above a point and click the left mouse key once, drag to the next point and
left click once, continue until you have a shape – click the right mouse key to undo a
point should you go wrong.
6. Once you have an area drawn and are happy – drag the white box back from where
you moved it to in step 3 and click ‘OK’.
7. In the top half of the left hand column there will be a tab called ‘Untitled Polygon’.
8. Right click on it so it is highlighted in blue and then right click and select ‘Copy’.
9. Go back to PT-Mapper Pro and create a new layer – This will be the layer the
information is pasted on to. See Quick Start Guide for more information on adding
layers.
10. Select ‘Edit’ from the top tool bar – Then from the drop down box select ‘Paste KML
Data’. The new polygon should appear on your new layer.
Don’t forget to save your map if you need to. Click ‘Save’.
25Appendix 2 How to use Inspire Land Titles in PT-Mapper Pro
Open your Land Titles map in Pt-Mapper Pro and navigate to the Land Title you need.
Make the Inspire Land Title layer selectable by clicking the padlock in the layers list to red.
Click on the Land Title you are interested in.
You will either be able to read the Inspire Land Title number over the Land Title you are interested in
or you can read it from the information bar along the bottom of the screen. It will be an 8 digit
number. Note it down.
Click this link to go to the ‘Find a Property’ page on the Land Registry website:
https://eservices.landregistry.gov.uk/eservices/FindAProperty/view/LrInspireIdInit.do
Type your Inspire Land Title number into the box and click Search>>
You are then given the address and opportunity to purchase relevant documents.
26Appendix 3 How to prepare a black and white map
When you wish to print to PDF you may wish to clear a lot of fill colour to highlight your own map
facilities more clearly.
You will need to decide which layers to amend, but generally selecting polygon layers at the top of
the list whilst perhaps omitting the water layers so that they remain blue would be sufficient.
1. Select the layers at the top – to do this hold down Ctrl Key and click all the layers between
the General Surface layer and the Structure Layer, omitting the water layers so that the
layers are highlighted blue
2. Right click and select ‘Properties’
3. Select ‘Pixels’ and change the line width to 2
4. Change the Line Colour to black
5. Untick the Fill Polygons box
6. Click Apply and Ok
7. Save map in the usual way by File / Save As
27Appendix 4 How to print results showing the Parish Boundary
1. Open your base map
2. Left click ‘Map Envelope’ layer so that it is highlighted blue
3. Right click and select ‘Select layer objects’ which displays selected item on map
4. Go to View on the toolbar and select ‘Fit Page to Selection’
5. Your computer will decide the best orientation and scale to fit the map to the chosen page
size. Note if you want to change the paper size go to File / Page Setup first and amend
accordingly.
28Appendix 5 How to Copy Layer Objects from one map to another map
Step 1
1 a) Open your first map (Map 1)
1 b) Select File / Open Map and browse to find and open your second map (Map 2)
1 c) You should now have both maps open as shown
Step 2
2 a) Left click the layer from Map 1 that you want to copy so that it is highlighted blue as
below (in this example Landfill)
2 b) Right click and select ‘Select layer objects’
29Step 3
3 a) From the toolbar at the top select Edit / Copy
Step 4
4 a) Go to Map 2
4 b) From the toolbar at the top select Edit / Paste
4 c) You should now see the copied layer appear in Map 2 (in this example Landfill)
30Appendix 6 How to insert a crest or logo into your title box
You can insert a crest or logo into your title box but they must be in BMP or TIF format. If your crest
is only available as a jpg file, open it in Microsoft Paint and re-save it as a high resolution BMP or TIF
file.
1. Add a title box in the usual way
2. Go to the layers list and move the pencil to the Title Logo layer (double left click the eye)
3. Import your crest by selecting File / Import / Import Raster. Your File Explorer will appear
and you will be able to navigate to your crest and then select your crest.
4. If the following messages then appear, click Import and Finish
5. Your crest will now appear on your map however it is likely to be far too large and so you
will need to resize and move to your preferred location on the Title Box. Single left click on
the crest and use the:
Drag Node tool to pull in the corners and resize
Move Object tool to move the crest to the new position
31Appendix 7 Frequently Asked Questions
Where can I find further help?
Click on Help from the main tool bar
Select User Manual to access:
- PT-Mapper Quick Start Guide
- PT-Mapper Full Guide
- MapLink Full Guide
Select Pear Support when Pear Technical Support staff have asked to connect remotely to
your computer. Click Ok and follow the instructions given by the member of Pear staff.
32What is Safe Mode?
Safe Mode is where all Padlocks are set to green so that the layers are locked (with the exception of
Pen Parking layer) and the Pen is against the Pen Parking layer.
It is good housekeeping to return your map to Safe Mode before you start a new task.
Why should I create new layers?
This is important for three main reasons:
1. To keep your personal council information separate to Ordnance Survey base
information. The OS layers will be updated and so replaced when it becomes out of date
leaving alone your own personalised layers.
2. To make sure you work on top of all the other map information / date and your
information is not hidden by other layers.
3. To keep the map data in an organised fashion.
Reminder: the layers at the ‘top’ of the layers list are at the bottom of the map layer structure – you
build on these.
Note: you can create as many new layers as you wish.
Why does a feature that I have mapped disappear when I deselect?
Check the layer you added the feature to. Was your pencil on the ‘Pen Parking’ layer? If so, the
information will now be on this layer and will be hidden by the layers above it. Move the pencil to
your intended layer and re-try.
Why has my screen gone white and my map lost?
Click once on the ALL icon to return to view the map.
How can I select multiple items on a single layer quickly?
Unlock the layer padlock, hold down the left mouse button and drag the mouse diagonally across
the map releasing when you have a box around the desired area. All items on the unlocked layer will
now be selected.
33How do I get software updates?
Regular software updates are entitled to those who have purchased our Technical Support service.
Remember to check for update regularly by following the instructions below.
Open the PT program (PT-Mapper Pro or MapLink)
Click Help in the top menu bar
Click Check for Updates
If you are not currently on the latest version you will be given an option to upgrade
to it. Follow the on-screen instructions. (It only takes a few moments)
Or if you already are on the latest version you will be presented with the message
below
If you wish to sign up for Technical Support, or need advice, please give us a ring or drop us an email.
Phone: 023 9249 9689 E-Mail: info@peartechnology.co.uk
© Pear Technology Services Ltd, Unit 31, Broadmarsh Business Centre, Harts Farm Way,
Havant, Hampshire, PO9 1HS
34You can also read