PeterConnects RECEPTIONIST USER MANUAL VERSIE 1.0 - Ziggo
←
→
Page content transcription
If your browser does not render page correctly, please read the page content below

PeterConnects
 PeterConnects
 Receptionist User Manual

RECEPTIONIST USER MANUAL
VERSIE 1.0

                            Page 1
PeterConnects
Receptionist User Manual

Content

1.          Note to the reader....................................................................................................................................................... 4
2.          Login page ..................................................................................................................................................................... 4
3.          The Receptionist main screen ................................................................................................................................ 5
3.1         Resizing the panels ....................................................................................................................................................................................................... 6
3.2         Full screen mode ............................................................................................................................................................................................................ 6
4.          Browsing the Contact list......................................................................................................................................... 6
4.1         Queues................................................................................................................................................................................................................................... 7
4.2         Searching a contact ...................................................................................................................................................................................................... 7
4.2.1       Restriction of search results depending on license................................................................................................................................ 8
4.3         Presence ............................................................................................................................................................................................................................... 8
4.4         Hook states ......................................................................................................................................................................................................................... 9
4.5         Favorites................................................................................................................................................................................................................................ 9
4.6         Filtering of contacts ................................................................................................................................................................................................... 10
4.6.1       Changes in Custom directories .......................................................................................................................................................................... 11
4.7         Editing contacts ............................................................................................................................................................................................................ 11
4.7.1       Adding a contact .......................................................................................................................................................................................................... 11
4.7.2       Editing a contact .......................................................................................................................................................................................................... 12
4.7.3       Deleting a contact....................................................................................................................................................................................................... 12
4.8         Sending an email to a contact .......................................................................................................................................................................... 12
4.9         Making a contact note ............................................................................................................................................................................................. 13
5.          Call functionality ..................................................................................................................................................... 14
5.1         Call states, destination and call actions ....................................................................................................................................................... 14
5.1.1       Call states.......................................................................................................................................................................................................................... 14
5.1.2       Destination information .......................................................................................................................................................................................... 14
5.1.3       Call actions....................................................................................................................................................................................................................... 15
5.2         Directed call pickup ................................................................................................................................................................................................... 15
5.3         Transferring a call ........................................................................................................................................................................................................ 15
5.4         Conference calls .......................................................................................................................................................................................................... 16
5.5         Working with queue calls ....................................................................................................................................................................................... 17
5.5.1       Toggling visibility of all joined or all monitored queues ................................................................................................................... 17
5.5.2       Toggling visibility of a single queue ................................................................................................................................................................ 18
5.5.3       Restriction in picking up queue calls ............................................................................................................................................................. 18
5.6         Calling other numbers of a contact ............................................................................................................................................................... 18
6.          Receptionist status ................................................................................................................................................. 19
6.1         Presence ............................................................................................................................................................................................................................ 19

                                                                                                               Page 2
PeterConnects
Receptionist User Manual

6.2         Do not disturb ................................................................................................................................................................................................................ 19
6.3         Forward all calls ............................................................................................................................................................................................................ 19
7.          Personalizing the Receptionist .......................................................................................................................... 20
7.1         Layout preferences .................................................................................................................................................................................................... 20
7.2         Conversation settings ............................................................................................................................................................................................... 20
7.2.1       Call handling ................................................................................................................................................................................................................... 21
7.2.2       Do not disturb ................................................................................................................................................................................................................ 21
7.2.3       Forward all calls ............................................................................................................................................................................................................ 21
7.2.4       Busy camp on ................................................................................................................................................................................................................ 21
7.3         Queue management ................................................................................................................................................................................................. 21
7.3.1       Joined queues................................................................................................................................................................................................................ 22
7.3.2       Queues to monitor ..................................................................................................................................................................................................... 22
7.4         Profile settings ............................................................................................................................................................................................................... 22
8.          Keyboard navigation .............................................................................................................................................. 23
9.          Widgets ........................................................................................................................................................................ 24
9.1         Moving the widgets around .................................................................................................................................................................................. 24
9.2         Adding a widget ............................................................................................................................................................................................................ 24
9.3         Specific widgets ............................................................................................................................................................................................................ 25
9.3.1       Web page widget ......................................................................................................................................................................................................... 25
9.3.2       URL placeholders for widgets ............................................................................................................................................................................. 25
9.4         Overview of all widgets ............................................................................................................................................................................................ 26
10.         Help function ............................................................................................................................................................ 26
10.1        Receptionist version .................................................................................................................................................................................................. 26
10.2        Keyboard shortcuts.................................................................................................................................................................................................... 26
10.3        User Manual .................................................................................................................................................................................................................... 26
11.         Sign out ....................................................................................................................................................................... 27
12.         Global configuration............................................................................................................................................... 27
12.1        Calendar............................................................................................................................................................................................................................. 27
12.1.1      Microsoft Office 365 .................................................................................................................................................................................................. 27
12.1.2      Google Suite.................................................................................................................................................................................................................... 28
12.2        Mail ........................................................................................................................................................................................................................................ 28

Printing and typographical errors reserved. Copyrights © 2021 Vodafone Libertel B.V. Nothing may be reproduced and/or made public by
means of photocopying, microfilm, storage in computer files or otherwise, without the prior written permission of the publisher. No rights
can be derived from the text in this edition. Terms and conditions may be subject to change.

                                                                                                                 Page 3
PeterConnects
Receptionist User Manual

1. Note to the reader
This user manual is aimed at users of the
Receptionist. The images and screenshots in this
document are made to illustrate the described
functionality. Because of this, some details might be
intentionally left out. Depending on the version,
available features and configuration, the actual
application might differ from the screenshots.

                                                                   If you have forgotten your password, you can click on
                                                                   the link ‘Forgot password?’ below the login form. You
                                                                   will be redirected to a webpage where you can reset
                                                                   your password.

                                                                   Note that this link is only visible, if your provider has
                                                                   made this feature available.
2. Login page                                                      If you want your username to be remembered the
                                                                   next time you login, you can check ‘Remember
When you use the browser to navigate to the                        username’.
receptionist (the URL will be provided by your system
administrator), you will be redirected to a login page.
Here you can enter your credentials and click ‘Login’.

                                                          Page 4
PeterConnects
Receptionist User Manual

3. The Receptionist main screen
Once logged in, you will see the Receptionist screen. The figure below explains the different areas:

                                          Detail area, starting
  Conversation area
                                          with the homepage

                           Contact list

When you click on a conversation in F2, the details of that conversation will be shown in the F3 screen
(Conversation details). Clicking on the ‘X’ will close this screen.
When you click on a contact in the contact list (F6), the details of that contact will be shown in the F7 screen
(Contact details). Clicking on the ‘X’ will close this screen.

                                                        Conversation area

                                                           Contact details

Note that call functionality will be explained in chapter ‘Basic call functionality’ later in this document.

                                                                  Page 5
PeterConnects
Receptionist User Manual

3.1 Resizing the panels                                         4. Browsing the
You can resize the panels to any size you like by                  Contact list
dragging the ‘splitters’ (marked blue arrow below):
                                                                The contact list will contain all company contacts.
                                                                The data can be gathered from several sources, such
                                                                as the Active Directory, Outlook or a company
                                                                database.

The positions of the splitters will be remembered
between sessions.

The settings are stored on the PeterConnects server,
so you will have the settings available on other
devices as well.

3.2 Full screen mode
The menu bar contains a button for making the
Receptionist full screen:

                    Tom Janssen (6500)
                                                                When you hover over or select a contact, you have
                    m Janssen (6500)                            the following actions available:

                    t

                                                                          Call the contact.

When the full screen mode is on, you can restore the                      Send a mail to the contact.
screen to its original size with the restore button:
                                                                          Transfer the current call to the contact
                                                                          (only available when you have a current
                    Tom Janssen (6500)                                    (connected) call).
                    m Janssen (6500)                                      Transfer the current call to somebody’s
                                                                          voicemail (only available when you have a
                    t                                                     current (connected) call).

                                                       Page 6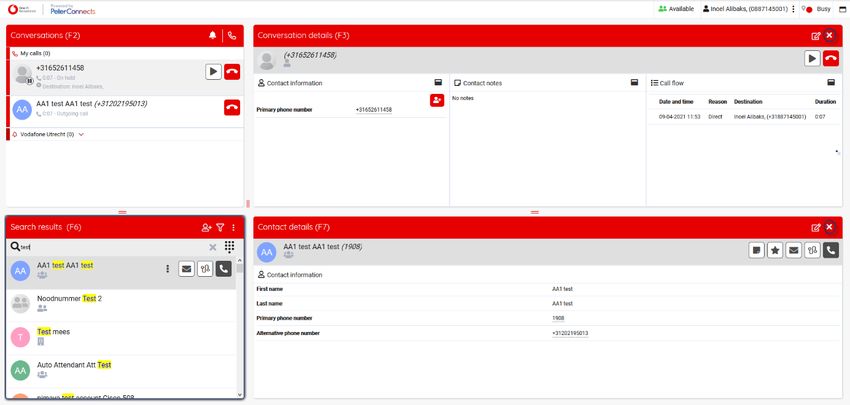
PeterConnects
Receptionist User Manual

Contacts are categorized, and this is indicated by the             4.1 Queues
following icons:
                                                                   As described above, queues are also listed as a
             Personal contact. This contact is only                contact in the contact list, so you can transfer calls
             visible to you.                                       to a queue:

             Group contact. This contact is visible for
             all persons within your group.

             Companywide contact. This contact is
             available for all users in the company.

             Queue. This is not a real contact, but a
             queue to which you can transfer calls.

Click on any contact to see the contact details in the
right screen.

                                                                   4.2 Searching a contact
                                                                   You can start typing to enter text in the search box
                                                                   to search in the contact list (you do not have to click
                                                                   into the Search field first). Your search text will be
                                                                   highlighted in the search results:

                                                          Page 7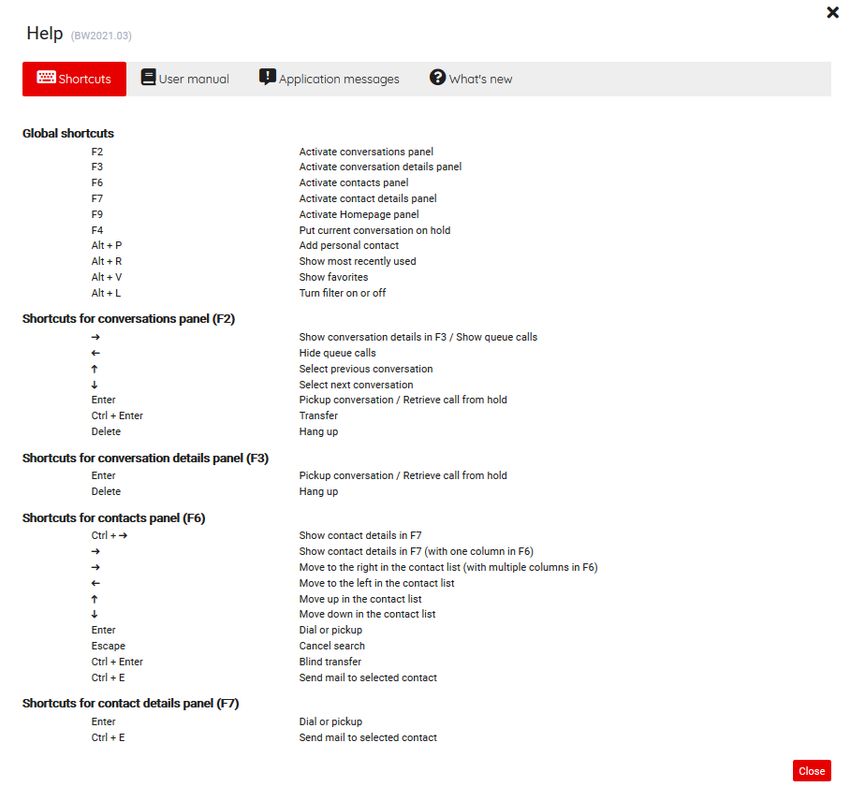
PeterConnects
Receptionist User Manual

You can also search for a number. When the number                 4.3 Presence
is not found, you can still dial that number:
                                                                  When the application is configured, to show presence
                                                                  states of the contacts in your contact list, then the
                                                                  contact list might look like this:

You can click on the X in the search box or press                 Depending on the type of telephony system that
“Escape” to clear the search text.                                your company uses, like One Sync premium, the
                                                                  presence state may look a bit different. The colors
4.2.1 Restriction of search results depending                     however will remain the same. They are:
      on license
Depending on your license, you might see an
exclamation mark in the search box:                                  Green:      Available

                                                                      Red:       Busy or Do Not Disturb
                                               !
When you hover your mouse over the exclamation
mark, you can see that your license might be                        Orange:      Away
restricting the number of group contacts that you see.

                                                                      Grey:      Offline or unknown state

        !

                                                         Page 8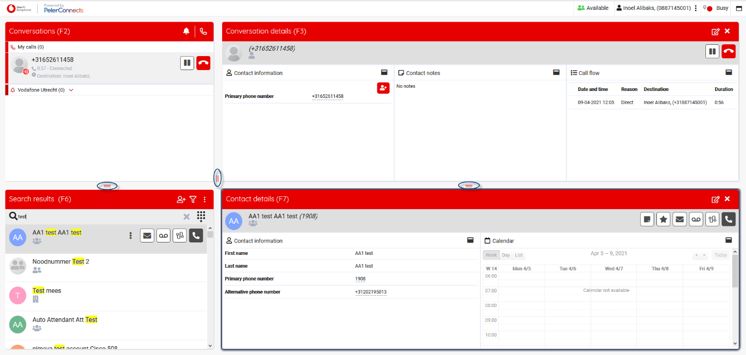
PeterConnects
Receptionist User Manual

4.4 Hook states                                                     In the Contact details panel (F7) and Conversation
                                                                    details panel (F3) you see both the presence state
                                                                    and the hook state simultaneously:
Just like the presence, also the hook states of your
contacts are shown. The following hook states can
be distinguished:

             Idle: The contact is free.

             Connected: The contact is currently busy               When you hover over either the presence or the
             in a conversation.                                     hook state, you will see a corresponding tool tip:

             Hold: The contact currently has a
             conversation on hold.
                                                                                 Tom Janssen (6500)

             Ringing: The phone of the contact is
             currently ringing.

             Dialing: The contact is currently dialing a            4.5 Favorites
             number.
                                                                    You can mark a contact as favorite by clicking on the
             Do not disturb: The contact has turned                 star in the contact details area (F7):
             on the function “Do not disturb”.
             This state overrides all the hook states
             above.
             Call Forwarding always: The contact is
             automatically forwarding all calls. This               When the contact has been marked as favorite, a star
             state overrides all the hook states above.             will become visible:
             The number to which the calls are
             forwarded is shown in the tooltip:

                                                                    You can click on the button again, to remove the
                                                                    contact from your favorites.
When the contact has any of these hook states, it
overrides the presence state. When you hover over
the hook state, then you can see both states:

                                                           Page 9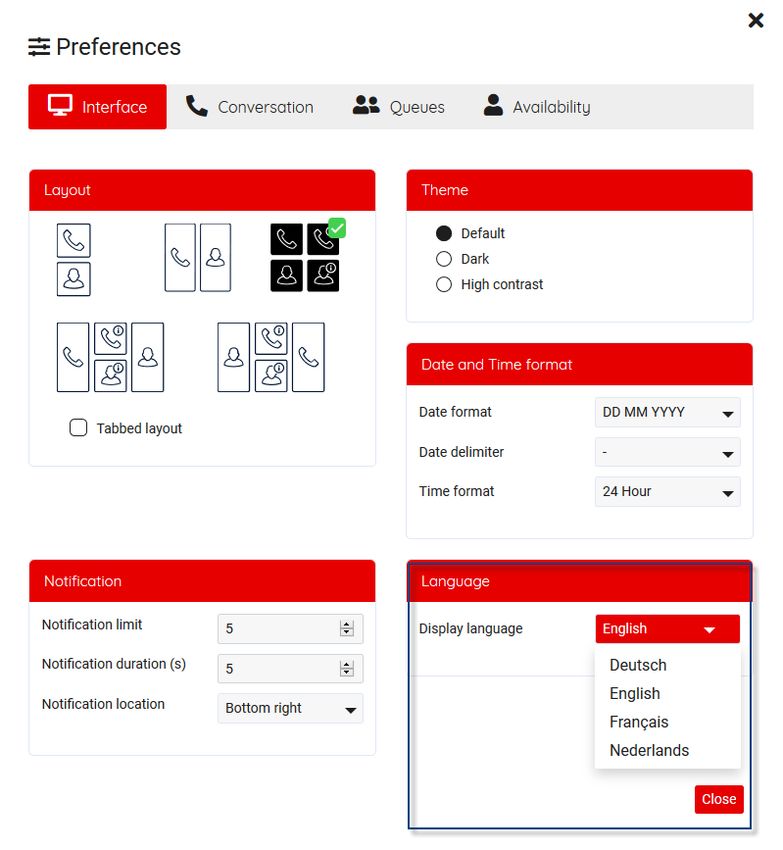
PeterConnects
Receptionist User Manual

The contact list indicates your favorites with a star:

                                                                                                               Filter on
                                                                                                               contact type

                                                                                                               Filter on
                                                                                                               custom
                                                                                                               directory

You can filter your contact list by favorites, see next
paragraph.

4.6 Filtering of contacts
The contact list can be filtered in various manners.
This feature is only available in the Premium and
Advanced edition.                                                   You can filter on one of the sections. For example,
                                                                    if you only want to show favorites, you check the
When you click on ‘Filter settings’, you can check by               checkbox in front of ‘Favorites’. Or if you only want
which item(s) you want to filter the contact list.                  to see Personal contacts and Queues, you check
                                                                    these checkboxes.

                                                                    Or if you only want to see contacts that are in
The filter settings will be displayed in a drop-down                custom directory ‘Pca’, you can check this radio
menu. The filter contains two sections: contact types               button.
and custom directories.
                                                                    You can also combine these sections. So you can
                                                                    indicate that you only want all Group contacts in
                                                                    custom directory ‘Pca’. Or only your favorite
                                                                    corporate contacts.

                                                          Page 10
PeterConnects
Receptionist User Manual
To actually filter the contact list, you have to click on 4.7 Editing contacts
‘Filter Contacts’ first.
4.7.1 Adding a contact
You can add personal contacts to the contact list.
The steps are:
Now, the contact list is filtered by the items you have 1. Click on the ‘Add personal contact’ button in
checked. the title bar of F6:
In the example below, a filter on favorites has been set.
2. Now, a pop-up appears in which you can
enter the data of the new contact. Click on
the ‘Save’ button to save the new contact.
Click on ‘X’ to cancel.
Another way to add a contact is:
You can turn off the filter by clicking again on ‘Filter 1. Search for a number in the search box of the
Contacts’.
contact list.
When the ‘Filter Contacts’ icon is like this: , the filter
is active.
When the ‘Filter Contacts’ icon is like this: , the filter
is not active.
Your filter settings will be remembered between your
sessions. 2. Click on the ‘unknown number’ contact in F6.
Then in the Contact Detail panel, you will see
4.6.1 Changes in Custom directories a button “Add” in the contact information
A custom directory is actually just a quick list of widget. Click on that button.
existing contacts. When contacts are added to or
removed from a custom directory, it will take at least
5 minutes for the changes to have effect in the
search results in the Receptionist. This is to improve
the performance. 3. Then the personal contact pop-up appears,
see at the beginning of this paragraph.
Page 11PeterConnects
Receptionist User Manual
4.7.2 Editing a contact 4.8 Sending an email
When you want to edit a personal contact, first
search for the contact via the search box in the to a contact
contact list and select the contact. Then click on the
button “Edit” in the Contact Information widget in F7: To send an email to a contact, press the email button
in the contact list next to the person that you want to
send the email to. This feature is only available in the
Premium edition.
The personal contact pop-up appears. When you are
ready editing the contact, click on the button ‘Save’
to save the changes or on the ‘X’ to cancel editing.
4.7.3 Deleting a contact
To delete a personal contact, first search for the
contact in the search box of the contact list and
select the contact. Then click on the button ‘Delete’ Then the send mail popup will be shown. Here you
in the contact information widget in F7. can enter your email.
A confirmation message will be displayed, asking if
you really want to delete this contact. Depending on
the browser that you use, this message can look a bit
different.
Click on “Yes” to confirm to delete the contact or
click on “no” if you don’t want to delete the contact.
Page 12PeterConnects
Receptionist User Manual
The form contains the following fields: 4.9 Making a contact note
There are mail templates of the If you want to make a contact note, click on the ‘Add
languages Dutch, English, German note’ button in F7/F3. A pop-up appears, in which
and French. The configured user the note can be written. This feature is only available
Language
language is used as default. The in the Premium edition.
language of the template can be
changed in the pop-up of the email.
The email address that will be used
to send this email. This field cannot
be edited in the Receptionist. For
changing this email address, see
Send from
chapter [Global configuration]. Note
that this field is not shown, when this Click on ‘Save’, if you want to save the note. With the
has not been configured in the
‘Clear’ button, all text is cleared and when this is
global configuration.
saved, the contact note is gone. Click on ‘X’, if you
want to cancel adding/editing.
The email address of the contact.
This field is prefilled when the email When the note is saved, in F7/F3 a sticky note icon is
Send to address of the contact is known. displayed in the contact info header.
Otherwise you can enter an email
address.
The subject of the mail. The subject This icon has a tooltip, that contains the first 80
will contain a predefined text with characters of the contact note. Be aware that the
Subject the data of the most recently contact note can be seen by anyone, who has access
selected call in the calls list (F2). You to that same contact.
can change the text if needed.
The contact notes are also displayed at the bottom
of the contact information widget.
The content of the mail. The
message will contain a predefined
text with the data of the most Editing a contact note can be done by clicking the
Message ‘Edit note’ button in F7/F3. It can also be done by
recently selected call in the calls list
(F2). You can change the text if hovering over the contact note area (in the contact
needed. information widget or in the contact note widget)
and click on the ‘Edit’ button, that appears while
hovering.
Press button “Send” to send the mail.
To cancel the email, you can press the “X” button in
the top right corner or click with your mouse outside
the popup screen.
Page 13PeterConnects
Receptionist User Manual
5. Call functionality 5.1.2 Destination information
A call can show the following information about the
original destination of the call:
5.1 Call states, destination and
call actions This is the destination of the
call
In the screen below, there are three calls: This shows from which
destination the call falls back
- A call on hold with +31612345678
into Conversations
- An active call Tom Janssen
- An incoming call Cathy Anderson This is shown when somebody
is calling to a contact, who has
set his call forwarding to you
or to the queue, that you have
joined/monitored. Note that
+31612345678
the forwarding information is
only shown, when the call is in
the My Calls section of the
Conversation panel F2. In the
parentheses you can see the
reason of this forwarding:
- Always: The call is
always forwarded
- Busy: The call is
forwarded when the
agent is busy
The following paragraphs describe the elements you
- No answer: The call is
can see in the calls in the Conversations (F2) panel.
forwarded in case of no
answer
5.1.1 Call states
- Unavailable: The call is
The state of the calls is indicated in a small circle in forwarded because the
the avatar of the other party. agent is unavailable
This is the active (connected) call
This call is on hold
The caller is hearing a pre-alert
announcement
Page 14PeterConnects
Receptionist User Manual
5.1.3 Call actions 5.3 Transferring a call
Depending on the state of the call, you can perform
the following actions: There are several ways to transfer a call.
1. Transfer an active call to a hold call
Pick up the incoming call (announced transfer)
When you have an active call and a call on
Hang up the active call hold, you can click on the transfer button to
Decline an incoming call transfer the active call to the held call:
Hang up a call that is on hold
Put the current call on hold
Retrieve a call from hold
2. Transfer an active call directly to a contact
Transfer the call (blind transfer)
When you have an active call, you can search
in the contact list and transfer the call to that
Add to the current conversation contact:
5.2 Directed call pickup
Via the contact list, you can pick up a call that has
been made to one of the other colleagues. For
example, when someone is calling Allison Price, and
she’s not at her desk, you can pick up the call here:
Technical note: On the telephony system, the
receptionist must have the Directed Call
Pickup service assigned.
Page 15PeterConnects
Receptionist User Manual
3. “Drag and drop” a call to a contact (blind A conference call has the following action buttons:
transfer)
When you have an active call, you can drag Put the conference on hold. The other
that call to a person in the contact list. When members of the conference can still
dragging, you will see dotted lines where you talk, but you will be temporarily out of
can drop the call. the conference.
Retrieve the conference call from hold
(only when it is currently on hold).
0612345678
peter Hang up. This will end the entire
conference call.
such a tab, the name of that member is displayed
in
The conference call contains a small tab for every
member of the conference call. When you click on
5.4 Conference calls the Conversation details panel (if the name of that
member is available).
You can set up a conference call by clicking on the
You can apply the following actions on any member:
‘Add to current conversation’ button, when there
are at least 2 connected calls.
Mute the conference member. This way
You can add a new call to a conference call by the member can still hear the conference
but cannot be heard by other members
clicking on the ‘Add to current conversation’ button.
anymore.
When a conference member is muted, the
icon is shown red:
Click on the icon again to unmute the
member.
Deaf the conference member. This way the
member cannot hear the conversation
anymore. When a member is deafened, he
is also automatically muted.
When a conference member is deafened,
Conference calls can be identified by the the icon is shown red:
‘conference’ icon:
Click on the icon again to undeafen the
member.
Page 16PeterConnects
Receptionist User Manual
You can toggle the visibility of all monitored queues
Remove the member from the conference. simultaneously by clicking the eye icon in the F2
This action cannot be undone.
header.
5.5 Working with queue calls
When you have chosen to join or to monitor queues,
the display of the calls will be different. Queue
functionality is only available in the Premium edition.
NB: For more information about joining and
monitoring queues, see the paragraph about Queue
Management in chapter [Personalizing the
Receptionist].
My call
+ 31612345678
Calls on joined queues
+3145678910
Calls on monitored queues
When you have selected queues to join or to
monitor, the calls will be divided by headers:
- A header named ‘My calls’. These are the calls
that are on your phone. (The calls that you
make yourself, the calls that are directly
made to you and the calls that are dispatched
to you from a queue)
- A header for each joined queue
- A header for each monitored queue
5.5.1 Toggling visibility of all joined or all
monitored queues
You can toggle the visibility of all joined queues
simultaneously by clicking the bell icon in the F2
header.
Page 17PeterConnects
Receptionist User Manual
When both the joined and monitored queues are
toggled off, the Conversations panel will only contain
your direct calls. In that case the division into my
calls/joined queues/monitored queues is no longer
relevant and will be turned off.
5.5.2 Toggling visibility of a single queue
The calls in each queue can be made visible/invisible
by clicking on the expand/collapse arrow in the
queue header.
+31612345678
5.5.3 Restriction in picking up queue calls
There is a limitation in picking up queue calls. One
user can pick up a maximum of 5 calls concurrently.
Therefore, when you try to pick up the 6th queue call,
you will get a message like shown below:
5.6 Calling other numbers
of a contact
The contact information widget shows all phone
numbers of a contact. For example the primary
phone number, the mobile number etc.
The phone numbers are underlined to indicate that
they are links. When you hover over a row that
contains the phone number, a small dial button will
appear. When you click on this dial button, a phone
call will be made to that phone number.
Page 18PeterConnects
Receptionist User Manual
For switching the “Do not disturb” setting on or off,
see the paragraph about Conversation settings in
chapter [Personalizing the Receptionist].
When you click on the number itself, a pop-up will be
shown, asking if you want to make a call to the
specified phone number:
6.3 Forward all calls
When you have “Forward all calls” switched on, it will
be indicated with the forward sign as follows:
Press on ‘Dial’ if you want to make the call and on ‘X’
if you don’t.
When you hover over the forward sign, it will display
to which number all calls are forwarded.
6. Receptionist status
6.1 Presence
In the right top corner of the Receptionist you can
see your own states. Default you will only see your
presence state: For switching the “Forward all calls” setting on or off,
see the paragraph about Conversation settings in
chapter [Personalizing the Receptionist].
Note: When you have both “forward all calls” and “do
not disturb” switched on, only the “forward all calls”
state will be shown.
6.2 Do not disturb
When you have “Do not disturb” switched on, it will
be indicated by the do not disturb sign as follows:
Page 19PeterConnects
Receptionist User Manual
7. Personalizing the = Conversation area (F2)
Receptionist = Conversation detail area (F3)
You can open the “Preferences” dialog from the = Contact list (F6)
menu bar:
= Contact detail area (F7)
Tom Janssen (6500)
Theme
You can also select a theme: The default theme is
shown from the start. The High Contrast theme can
be used when you have difficulty seeing contrast.
In the preferences dialog, there are four main
settings: Layout, Conversation, Queues and Profile. Notification
They will be described in the next paragraphs. On the bottom of this screen you can select a
location for popup notification messages and how
7.1 Layout preferences many you will get maximum at one time.
A notification can look like this:
In the preferences dialog, in the Layout part, you can
select a layout, a theme and some notification
settings:
7.2 Conversation settings
Layout
There are currently five layouts to be chosen, ranging
from one to three columns. In these layout settings,
the icons mean the following:
Page 20PeterConnects
Receptionist User Manual
On tab “Conversation” you can configure some This setting is for automatically forwarding all calls to
settings, that have to do with telephone a specified number. This feature is only available in
conversations. The settings are described in the the Premium and Advanced edition.
following paragraphs.
The ‘Ring splash’ setting is to play a notification on
7.2.1 Call handling your phone as a reminder that “Forward all calls” has
been activated.
7.2.4 Busy camp on
Call Waiting allows you to put your current call on
hold to answer a different incoming call.
When you turn on ‘Auto answer direct calls’,
incoming direct calls (i.e. joined queue calls and calls This feature allows you to camp on a call to a busy
to the operator directly, not queue calls that not destination. You can configure the time before the
have been joined) will automatically be picked up for call will fallback. This feature is only available in the
you. A direct call is only picked up, if you don’t have a Premium and Advanced edition.
current connected call yet. When you hang up your
current connected call, the next incoming direct call You can also indicate whether it must be prohibited
will automatically be picked up. to transfer to voice mail.
Note that Auto Answer only works, when you are 7.3 Queue management
logged in into the Receptionist.
7.2.2 Do not disturb
By activating ‘do not disturb’, you can block all
incoming calls. If configured, they will be forwarded
to voice messaging. This feature is only available in
the Premium and Advanced edition.
The ‘Ring splash’ setting is to play a notification on
your phone as a reminder that “Do not disturb” has
been activated.
7.2.3 Forward all calls
Queue functionality is only available in the Premium
edition.
Page 21PeterConnects
Receptionist User Manual
7.3.1 Joined queues You can select a maximum of 10 queues to monitor.
To add a queue to join, open the drop-down box (with
the arrow pointing down) and check which queues Note: When you have chosen to monitor a queue,
you want to join. To remove a queue, click on the X but you have not joined it, phone calls on that queue
behind the queue or uncheck the queue. will only be visible in your Receptionist application.
You can select a maximum of 10 queues to join. 7.4 Profile settings
When you have selected a queue to join, phone calls
on that queue will also ring directly on your phone,
when it is dispatched to you.
7.3.1.1 ACD state
For the Joined queues you can set your ACD state
(Automatic Call Distribution).
When you put your ACD state to ‘Available’, incoming
calls on the joined queues will also ring on your
phone.
When you put your ACD state to ‘Unavailable’,
incoming calls on the joined queues will not ring on
your phone.
Note: In case another setting was set in the On the tab ‘Interface’ you can change the language.
BroadWorks admin module, like ‘Sign out’, this one is
shown. However, the user can only change the ACD
state into 'Available' and 'Unavailable'.
7.3.2 Queues to monitor
With a similar drop down as for selecting joined
queues, you can also select which queues you want
to monitor.
Page 22PeterConnects
Receptionist User Manual
8. Keyboard navigation
The Receptionist allows keyboard navigation via shortcut keys.
This will help keyboard centric operators to operate faster.
The shortcuts are shown in the Help menu:
Tom Janssen (6500)
Page 23PeterConnects
Receptionist User Manual
9. Widgets Note: The actual widgets that are available to you might be
different than the ones displayed below. This image is just for
demo purposes.
The detail areas of the Receptionist (and the
homepage as well) contains widgets. These are small
application parts that operate on either the currently
selected conversation or the currently selected
contact.
9.1 Moving the widgets around
When you want to change the layout of the widgets,
you can click on the ‘Edit widgets’ button. The
widgets become editable and you can drag and drop
them and resize them. The widgets are positioned on
a grid that becomes visible when dragging / resizing: Select a widget and click on the button “Add”. After
adding a widget, you can configure it in the next step:
The widgets will automatically snap to the closest
line on the grid. You can give the widgets any size
and position.
You can automatically organize the widgets again by
clicking on the ‘Arrange widgets’ button.
At least you can edit the title and the icon. Some
You can remove a widget by clicking on the ‘X’ widgets require more configuration. Those will be
(Remove widget) in the title bar of the widget. described in the next paragraph.
You can stop editing the widget by clicking on the If you want to change the icon, you can click on the
‘Stop editing’ button. icon to show the icon selector. Then you can search
for a specific icon, for example ‘note’.
9.2 Adding a widget The icon search is only available in English, because
When you go to the edit modus of the widgets, you
the icons are coming from a public library named
can click on the button ‘Add a widget’
‘Font Awesome’.
Then the widget library will be shown where you can
select a widget:
Page 24PeterConnects
Receptionist User Manual
- Not all websites can be run in the web page
widget, which is actually a element.
Not all websites allow this. Some websites
have an X-frame-options set to any of the
following values:
- deny: The website is not allowed to run in
an .
- sameorigin: The website can only be run
in an when they both have the
same origin (domain)
- allow-from : The website is only
allowed to be run in an by a
9.3 Specific widgets website that is run from a specific uri.
9.3.1 Web page widget The web page that is shown in the widget can be
By inserting a Web Page widget, you can embed an opened in a new window, using the button
external website into the Receptionist. For example, a
page of a corporate website. This feature is only 9.3.2 URL placeholders for widgets
available in the Premium edition. Widgets that need a URL can have placeholders.
These placeholders will be used by the Receptionist
When inserting the Web Page widget, you can enter a to provide the target data provider with extra request
URL to the page to embed: data. The placeholders are:
This placeholder stands for "Calling Line
Identification". This is the phone
[CLI]
number of the person that is calling.
The receptionist uses this tag as
placeholder for the email-address of
the currently selected person. For
example, if a call is selected and the
email address of the calling person is
[EMAIL]
known, the email placeholder will be
filled with that email address. If the
email address is not available, an empty
Technical notes: string will be used.
- The URL is mandatory and needs to contain
‘http(s)://’
- The URL can contain the placeholders [EMAIL]
and [LANG]. The placeholders are described in
paragraph "URL placeholders for widgets" at
the end of this chapter.
Page 25PeterConnects
Receptionist User Manual
This tag will be placeholder for the Startup
currently selected language in the This widget is shown on the homepage screen, when
receptionist. The following placeholders the Receptionist is just started up.
are provided:
[LANG]
en = English
fa = French,
nl = Dutch,
10. Help function
de = German
(Only for the Webpage widget). This
placeholder will be replaced with the
[THEME]
name of the current theme. (Standard, Tom Janssen (6500)
HighContrast)
9.4 Overview of all widgets
Calendar
This widget shows the calendar information for a
contact, when the calendar has been configured by
your administrator. This widget is only available in the
Premium edition. Via the main menu you can open the Help popup:
Contact information
This widget shows the basic contact information for 10.1 Receptionist version
the selected contact. Note that for contacts from the
Broadworks Receptionist, "extension" is displayed as In the title of the Help popup, the current version of
"primary phone number" in the widget and "number" the Receptionist is mentioned.
as "alternative phone number". When there is no
extension, the number is displayed as primary phone
number in the widget.
Contact notes
With this widget, you can read and edit contact notes.
Be aware that the contact note can be seen by
anyone who has access to the same contact. This
widget is only available in the Premium edition.
10.2 Keyboard shortcuts
My call history
This widget shows the calls that you have received, The first tab page of the Help menu describes the
including missed calls. keyboard shortcuts, as described in the chapter
about Keyboard navigation.
Web page
This widget will display a custom website with
information about the currently selected contact.
10.3 User Manual
This widget is only available in the Premium edition.
On the second tab page of the Help menu you can
download the user manual.
Page 26PeterConnects
Receptionist User Manual
12.1 Calendar
11. Sign out The Receptionist contains a calendar widget, that
displays the calendar of the selected contact.
When you open the main menu (1), there is a menu
item to sign out (2). If you click this item, you will be This widget needs some central configuration
logged out of the Receptionist. You will not be asked before it can fetch the data of the calendar.
for a confirmation. That configuration is done in the Admin portal
on the Calendar page.
Tom Janssen (6500) 1 The screen shows a selection of which kind of
calendar connector you want to use. ‘None’ is
selected by default. The other options are ‘Microsoft
Office 365’ and ‘Google Suite’. These are described in
the next paragraphs.
12. Global
configuration
If you are permitted to edit the global configuration,
you can go to the Admin Portal via the main menu:
12.1.1 Microsoft Office 365
Tom Janssen (6500)
In the Admin portal, you can enter
some central configuration for the application. This
configuration applies to all users of the Receptionist.
The following paragraphs describe the configuration,
that can be made. The admin portal is general and
therefore in PeterConnects branding (color blue).
In this screen you can setup a connector for Microsoft
Office 365. You can fill in the Tenant Id, Client Id and
Client Secret. The field Required API Permission has
already been filled in, because this is always the same.
Page 27PeterConnects
Receptionist User Manual
12.2 Mail
For more information about these fields, you can click
on the blue links below the fields. They will open a
In the Receptionist, the user can send a message to
website in a new tab, containing information on how
one of the contacts, for example to leave messages
to configure those fields.
that there was a call for that contact. This
These pages are publicly available websites that are functionality works with a default setting.
not owned by the maker or the supplier of the
Receptionist. Therefore, we cannot guarantee that
these links will always be available. You can customize this to work with your SMTP
server by configuring this in the Admin portal. This
When you have entered all data, you can click on the
can be done on the tab Mail.
button “Test” to check if the settings you entered are
correct. Then you can press the button “Save” to
store those settings.
12.1.2 Google Suite
In this screen you can setup a connector for Google The following settings can be made:
Suite.
- Use custom SMTP server to send mails:
First you have to generate the Service Account ID by When this checkbox is checked,
a click on the “Generate ID” button. This generates the configured settings will be used for
your unique “Service Account ID”, which you have to sending mail.
enter in your Google Suite. - SMTP server: The name of the SMTP server
that should send the mail.
The field “Api scope” has already been filled in for - Server port: The port number of the SMTP
you. This is always the same. server.
- Default from address: The email address that
The field “Google suite” contains a link that will open
will be used for sending the emails, if the
a webpage that contains information about
email address of the Receptionist user has
connecting to the Google Suite from other
not been configured.
applications. It will be opened in a new tab.
- Authentication required: If the SMTP server
In order to test the configuration, you have to fill in a requires authentication, you can check this
“Test username”, which has to be a valid email address checkbox to enable the fields where you can
from your Google Suite. When you click on the button enter the credentials.
“Test”, the configuration is tested. Then you can press - Username: The username that will be used
the button “Save” to store those settings. for sending mail via the configured SMTP
server.
Page 28PeterConnects
Receptionist User Manual
- Password: The password that will be used for
sending mail via the configured SMTP server.
You can test your settings by clicking on the button
“Test” and save your changes using the button “Save”.
After setting the custom SMTP, the users need to
login into the Receptionist again in order to see the
new settings.
Page 29You can also read