LoadMaster HA for Azure - Installation Guide UPDATED: 19 March 2021 - Kemp
←
→
Page content transcription
If your browser does not render page correctly, please read the page content below
LoadMaster HA for Azure
Installation Guide

UPDATED: 19 March 2021
LoadMaster HA for Azure

     Copyright Notices

     Copyright © 2002-2021 Kemp Technologies, Inc. All rights reserved. Kemp Technologies and the
     Kemp Technologies logo are registered trademarks of Kemp Technologies, Inc.

     Kemp Technologies, Inc. reserves all ownership rights for the LoadMaster and Kemp 360 product line
     including software and documentation.

     Used, under license, U.S. Patent Nos. 6,473,802, 6,374,300, 8,392,563, 8,103,770, 7,831,712, 7,606,912,
     7,346,695, 7,287,084 and 6,970,933

    kemp.ax                                 2                Copyright 2002-2021, Kemp Technologies, All Rights Reserved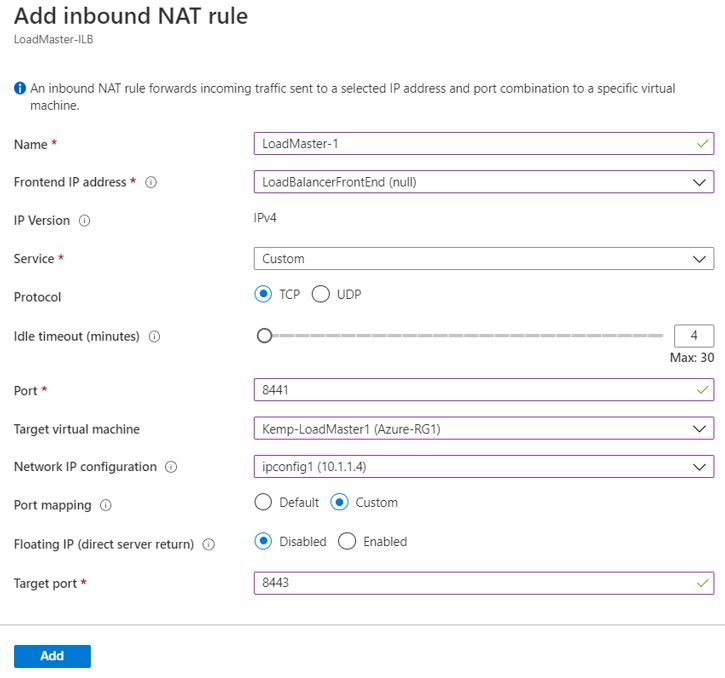
LoadMaster HA for Azure

     Table of Contents
       1 Introduction                                                                                                  5

          1.1 Related Firmware Version                                                                                     7

       2 Prerequisites                                                                                                 8

       3 Manually Configure LoadMaster HA in Azure                                                                    10

          3.1 Licensing Options                                                                                       10

          3.2 Create the First Virtual LoadMaster in Azure                                                            10

          3.3 Create the Second LoadMaster in Azure                                                                   16

          3.4 Enable a 10 Gb Interface (Optional)                                                                     16

                3.4.0.0.1 Add a Single Interface to the LoadMaster                                                    16

                3.4.0.0.2 Add Multiple Interfaces to the LoadMaster                                                   18

       4 Create the Internal Load Balancer (ILB)                                                                      20

       5 Configure the Azure Load Balancer                                                                            23

          5.1 Create a Back-end Pool                                                                                  23

          5.2 Create Inbound NAT Rules                                                                                25

          5.3 Create a Probe to Monitor LoadMaster Health                                                             27

          5.4 Create Load Balancing Rules to Allow Traffic                                                            29

       6 Network Security Groups                                                                                      32

       7 Configure the LoadMasters                                                                                    33

       8 LoadMaster Firmware Upgrades/Downgrades                                                                      36

          8.1 Upgrade the LoadMaster Firmware                                                                         36

          8.2 Downgrade the LoadMaster Firmware                                                                       36

    kemp.ax                                3                 Copyright 2002-2021, Kemp Technologies, All Rights Reserved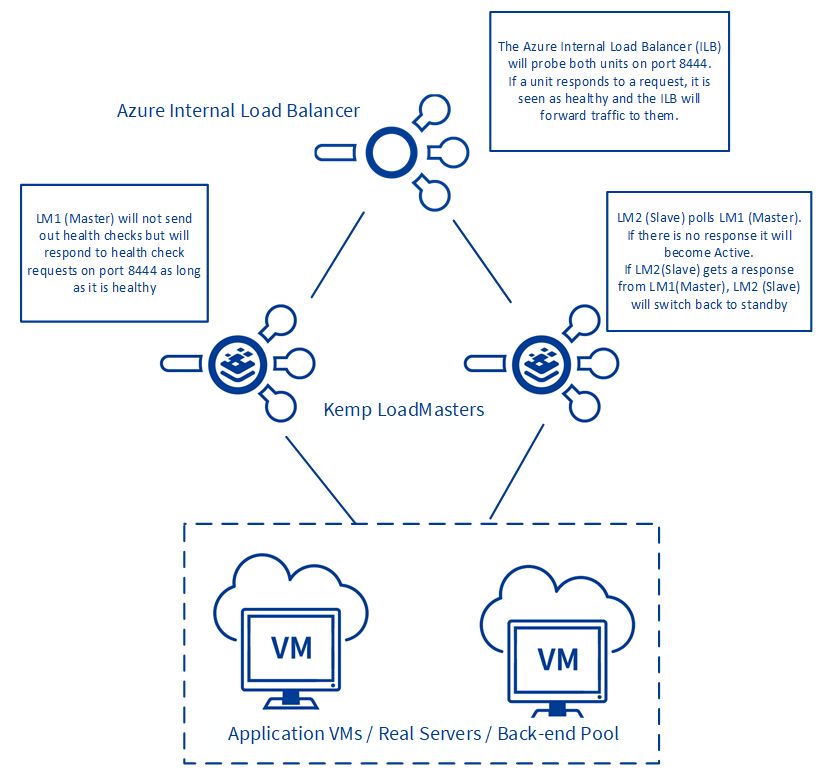
LoadMaster HA for Azure

       9 Troubleshooting                                                                                      38

          9.1 Check which LoadMaster is Active                                                                38

          9.2 Master/Slave Unconnected                                                                        38

          9.3 Connection to Default Gateway Failed                                                            39

          9.4 Virtual Machine Inaccessible                                                                    39

          9.5 Run a TCP Dump                                                                                  39

          9.6 Sync Problems                                                                                   40

          9.7 Misconfigured ILB                                                                               41

          9.8 Problems Reaching a Virtual Service                                                             41

       References                                                                                             42

       Last Updated Date                                                                                      43

    kemp.ax                                  4       Copyright 2002-2021, Kemp Technologies, All Rights Reserved
LoadMaster HA for Azure
1 Introduction

       1 Introduction
       When deploying an application using the Microsoft Azure Infrastructure as a Service (IaaS) offering,
       you usually need to provide load balancing and other application delivery functions such as content
       switching, SSL Termination and IPS. Some of this functionality may also be necessary when
       deploying applications in Microsoft Azure Platform as a Service (PaaS). Kemp’s LoadMaster for Azure
       enables you to address your needs of application delivery and High Availability (HA).

       Deploying a single LoadMaster for Azure does not provide you with the high availability you need for
       your applications. When deploying a pair of LoadMasters in Azure, you can achieve high availability
       for your application. This document provides the details for a HA Kemp LoadMaster solution.

       When using LoadMaster in High Availability on Azure, HA operates in much the same way as it does
       on non-cloud platforms, but with some key differences, which are listed below:

           l     LoadMaster HA for Azure involves two LoadMasters that synchronize settings bi-directionally.
                 Changes made to the master are replicated to the slave and changes made to the slave are
                 replicated to the master.

           l     The replication (synchronization) of settings (from master to slave) is not instant in all cases
                 and may take a few moments to complete.

           l     When synchronizing the GEO settings from master to slave, any Fully Qualified Domain Name
                 (FQDN) or cluster IP addresses that match the master’s IP address are replaced with the
                 slave’s IP address. Likewise, when synchronizing from slave to master, the slave’s IP address
                 is replaced with the master’s IP address.

           l     All user-defined settings are synchronized, with the exception of the following:

                     l   Default gateway (both IPv4 and IPv6)

                     l   IP addresses and netmasks

                     l   Hostname

                     l   Name server

                     l   Domain

                     l   Admin default gateway

                     l   Administrative certificate settings (.cert, .pem and .setadmin files)

       kemp.ax                                     5                Copyright 2002-2021, Kemp Technologies, All Rights Reserved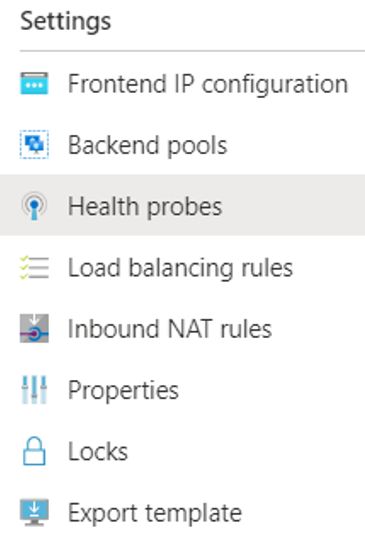
LoadMaster HA for Azure
1 Introduction

                     l   Network interface settings: Link Status (Speed and Duplex), MTU and additional
                         addresses

                     l   Virtual LAN (VLAN) configuration

                     l   Virtual Extensible LAN (VXLAN) configuration

                     l   Additional routes

           l     The cloud HA LoadMaster does not have a "force update" option.

           l     By default, the master unit is always set as active and the slave unit can be standby or active
                 if the master fails. The master unit is the master and never becomes the slave, even if it fails.
                 Similarly the slave unit never becomes the master. When the master unit comes back up it is
                 set as active and connections are automatically directed to the master again. Either the
                 master or slave unit can be active or standby.

           l     The HA Check Port must be set to the same port on both the master and slave units for HA
                 to work correctly.

           l     Depending on the design of the Network Security Groups, you must ensure the necessary
                 ports are open inbound to allow for the traffic.

       kemp.ax                                   6                 Copyright 2002-2021, Kemp Technologies, All Rights Reserved
LoadMaster HA for Azure
1 Introduction

       A complete description of non-cloud LoadMaster HA can be found in the High Availability (HA),
       Feature Description document.

       1.1 Related Firmware Version
       Published with LMOS version 7.2.48.4 LTS. This document has not required substantial changes
       since 7.2.48.4 LTS. However, the content is in sync with the latest LoadMaster LTS firmware.

       kemp.ax                              7               Copyright 2002-2021, Kemp Technologies, All Rights Reserved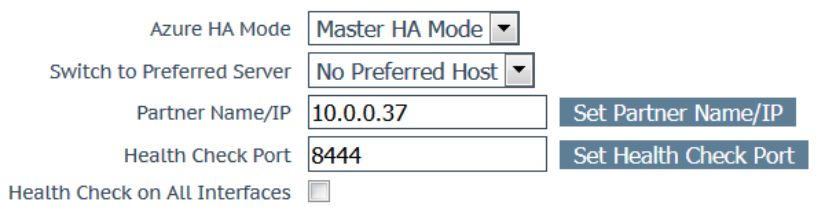
LoadMaster HA for Azure
2 Prerequisites

       2 Prerequisites
       The following prerequisites must be met before proceeding to a high availability configuration:

           l     An Azure Resource Manager (ARM) (V2) Virtual Network added to Azure to place the
                 LoadMaster VMs

           l     Application VMs deployed in Azure in the Virtual Network

           l     An Azure Internal Load Balancer deployed to create the high availability pair

           l     Two LoadMaster VMs deployed in ARM on the same Virtual Network as the Application VMs

                             - Both LoadMasters should be configured to be part of an availability set

       The following diagram provides overview of the configuration described above:

       To configure high availability using the LoadMaster, the following configuration must be in place:

       kemp.ax                                  8                Copyright 2002-2021, Kemp Technologies, All Rights Reserved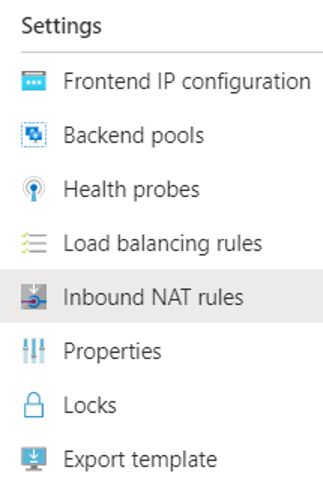
LoadMaster HA for Azure
2 Prerequisites

           l     Application VMs are installed and configured

           l     LoadMaster for Azure VMs are installed and configured

           l     Important: The HA Check Port must be set to the same port on both the master and slave
                 units for HA to work correctly. The same port must be configured as the probe port on the
                 Internal Load Balancer.

           l     The following management Load Balanced NAT Rules may be needed to access the
                 LoadMasters:

                            - TCP Port 22 for SSH access

                            - TCP Port 8443 for Management Web User Interface (WUI) access

                            - Additional Load Balanced Rules for any traffic that is being transmitted through
                            the LoadMaster

                         If using Kemp 360 Central, you must configure special
                         NAT rules.

       Use this table to record the necessary information required to create the LoadMaster Pair in Azure:

                                    Fields Required for creation of LoadMaster Pair

                                   Primary LoadMaster Name

                                 Secondary LoadMaster Name

                                          Pricing Tier

                                   Password for LoadMasters

                                   Availability Service Name

                                     Resource Group Name

                                        Virtual Network

                                 Internal Load Balancer Name

                   Internal Load Balancer Public IP Address (PIP), if required

                         It is not possible to bond interfaces on Azure LoadMasters.

       kemp.ax                                  9                Copyright 2002-2021, Kemp Technologies, All Rights Reserved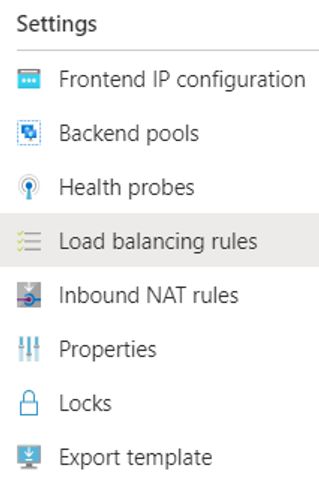
LoadMaster HA for Azure
3 Manually Configure LoadMaster HA in Azure

      3 Manually Configure
      LoadMaster HA in Azure
                        The steps in this section were correct at the time of writing.
                        However, the Azure interface changes regularly so please refer
                        to Azure documentation for up-to-date steps if needed.

      Please complete the prerequisites documented in the earlier section.

      3.1 Licensing Options
      There are four main licensing options when deploying a LoadMaster for Azure:

          l     Hourly consumption

          l     Bring Your Own License (BYOL)

          l     Free version

          l     License Agreement - Service Provided License Agreement (SPLA)/Metered

      To use the BYOL option, follow the steps below:

                 1. Download the BYOL – Trial and perpetual license version of the Virtual LoadMaster
                 (follow the steps in the section below to do this).

                 2. Contact a Kemp representative to get a license.

                 3. Update the license on your LoadMaster to apply the license change (System
                 Configuration > System Administration > Update License).

                 4. Kemp recommends rebooting the LoadMaster after updating the license.

      For more information on MELA and SPLA, refer to the relevant Feature Description on the
      Kemp documentation page.

      3.2 Create the First Virtual LoadMaster in Azure
      The steps in this document reflect the steps in the Azure Marketplace (http://portal.azure.com).

      kemp.ax                                 10                Copyright 2002-2021, Kemp Technologies, All Rights Reserved
LoadMaster HA for Azure
3 Manually Configure LoadMaster HA in Azure
To deploy a new LoadMaster using ARM, follow the steps below::
1. From the Azure Management Portal dashboard, click Create a resource.
2. Enter Kemp in the search bar and press Enter on your keyboard.
3. Select LoadMaster Load Balancer ADC Content Switch.
4. From the drop-down menu, select the desired LoadMaster type and click Create.
kemp.ax 11 Copyright 2002-2021, Kemp Technologies, All Rights ReservedLoadMaster HA for Azure
3 Manually Configure LoadMaster HA in Azure
5. Under Project details, complete the following fields:
a) Select the Azure Subscription.
b) Select an existing or create a new Resource group to deploy the LoadMaster into.
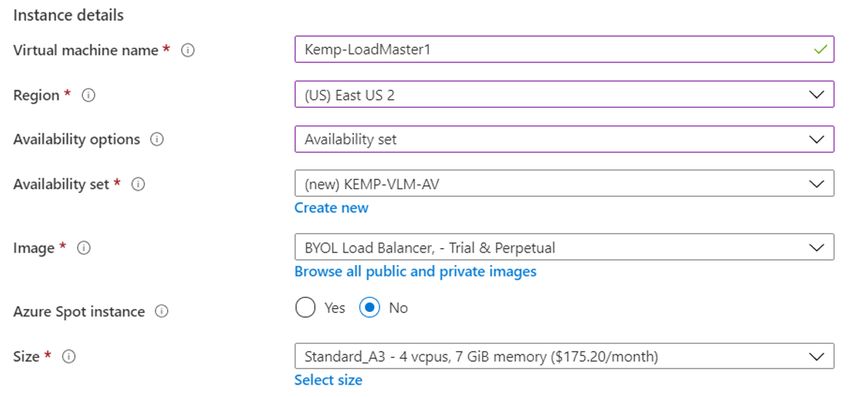
6. Under Instance details, complete the following fields:
a) Enter a Virtual machine name for the LoadMaster.
b) Select an Azure Region.
c) Select Availability set under Availability options.
d) Select an existing or new Availability set for the HA pair.
e) Confirm the desired LoadMaster type is selected in the Image drop-down list.
f) Enable or disable Azure Spot instance.
g) Select the desired Size for the virtual machine.
kemp.ax 12 Copyright 2002-2021, Kemp Technologies, All Rights ReservedLoadMaster HA for Azure
3 Manually Configure LoadMaster HA in Azure
If you want to enable 10 Gb throughput for a LoadMaster
virtual machine (VM) in Azure, you must select an Azure VM
instance type that supports the 10 Gb Mellanox driver. For
more information, refer to the Enable a 10 Gb Interface
(Optional) section.
7. Under Administrator account, complete the following fields:
a) Select the Authentication type (SSH public key or Password).
Kemp recommends using a password, but either way will work
fine.
b) Enter a Username.
This username is not used by the LoadMaster for Azure. The
default username to access the LoadMaster is bal.
c) Enter a Password for the bal account and confirm it.
The password is used to access the LoadMaster WUI.
d) SSH public key source: You can either create a new key pair, use an existing key
stored in Azure, or use an existing public key.
It is recommended to store SSH keys in a secure location.
8. Click Next: Disks.
9. Leave the default options for Disk options and Data disks.
kemp.ax 13 Copyright 2002-2021, Kemp Technologies, All Rights ReservedLoadMaster HA for Azure
3 Manually Configure LoadMaster HA in Azure
10. Click Next: Networking.
11. Under Network interface, complete the following fields:
a) Select an existing or create a new Virtual network.
b) Select an existing or create a new Subnet.
c) (Optional) A Public IP is not required to do the access provided using the Azure Load
Balancer outlined later in this guide.
d) Keep the default setting for NIC network security group.
The security group should contain rules for port 8443
(management), 22 (SSH), and any other ports that are needed
by the back-end. Do not black port 6973.
e) If the VM size selected supports Accelerated networking, select On.
kemp.ax 14 Copyright 2002-2021, Kemp Technologies, All Rights ReservedLoadMaster HA for Azure
3 Manually Configure LoadMaster HA in Azure
f) (Optional) Select an existing load balancer or follow the steps outlined later in this
document to create one.
12. Click Next: Management.
13. You can optionally make any necessary updates to the Monitoring, Identity, and Auto-
Shutdown sections or leave them as the default settings.
14. Click Next: Advanced.
15. You can optionally make any necessary updates to the Extensions and Custom data
sections or leave them as their defaults.
16. Click Next: Tags.
17. You can optionally make any necessary changes to the Tags section or leave the
defaults.
18. Click Next: Review + create.
19. You can optionally click Download a template for automation to download an ARM
template.
20. Click Create.
If you chose to create a new SSH key pair, you are now
prompted to store the private key for the public key you
created. Azure does not store the private key. After the SSH key
is created, you will not be able to download the private key.
kemp.ax 15 Copyright 2002-2021, Kemp Technologies, All Rights ReservedLoadMaster HA for Azure
3 Manually Configure LoadMaster HA in Azure
3.3 Create the Second LoadMaster in Azure
The process of setting up the second LoadMaster for Azure is similar to the first with a few
exceptions, which are listed below:
l You must select the same Resource Group that was used during the first LoadMaster
deployment.
l You must select the same Virtual Network that was used during the first LoadMaster
deployment.
l You must select the same Availability Set that was created during the first LoadMaster
deployment.
3.4 Enable a 10 Gb Interface (Optional)
Follow one of the two procedures below depending on whether you are adding a single network
interface or multiple network interfaces to the LoadMaster.
To enable 10 Gb throughput for a LoadMaster virtual machine (VM) in Azure, you must select an
Azure VM instance type that supports the 10 Gb Mellanox driver. Accelerated Networking is
supported on most general purpose and compute-optimized instance sizes with two or more vCPUs.
These supported series are: D/DSv2 and F/Fs. On instances that support hyperthreading, Accelerated
Networking is supported on VM instances with four or more vCPUs. Supported series are: D/Dsv3,
E/Esv3, Fsv2, Lsv2, Ms/Mms and Ms/Mmsv2. Refer to the Sizes for Linux virtual machines in Azure
page for further details.
3.4.0.0.1 Add a Single Interface to the LoadMaster
To enable 10 Gb interfaces on the LoadMaster, perform the following steps:
1. Deploy the LoadMaster.
For the purposes of this document, the Standard DSv2
machine size is used.
When you instantiate a 10 Gb interface, it appears as two
interfaces in the LoadMaster Web User Interface (WUI). The two
interfaces are related and have the same MAC address. Only
the first interface has an IP address. If you want to modify the
kemp.ax 16 Copyright 2002-2021, Kemp Technologies, All Rights ReservedLoadMaster HA for Azure
3 Manually Configure LoadMaster HA in Azure
interface, you must do this on the interface that has the IP
address listed.
2. License the LoadMaster.
3. Verify that the Mellanox driver has instantiated correctly by performing the following
steps:
a) If the LoadMaster was deployed with a single interface, two interfaces are displayed
under System Configuration > Interfaces on the LoadMaster WUI. If only one interface
is displayed this means that the Mellanox driver has not instantiated.
b) To instantiate the Mellanox driver, you must shut down the LoadMaster. Navigate to:
System Configuration > System Administration > System Reboot and click
Shutdown. You must also stop the LoadMaster from the Azure WUI by clicking Stop.
c) To start the LoadMaster on the Azure WUI, click Start.
d) When the LoadMaster boots up, navigate to: System Configuration > Interfaces on
the LoadMaster WUI and verify that two interfaces (eth0 and eth1) are displayed under
System Configuration > Interfaces.
e) You can also verify that two interfaces are active by checking performing an Ifconfig.
To perform an Ifconfig, navigate to System Configuration > Logging Options > System
Log Files and click Debug Options. On the Debug Options screen, click Ifconfig. This
displays two interfaces with the same hardware address.
kemp.ax 17 Copyright 2002-2021, Kemp Technologies, All Rights ReservedLoadMaster HA for Azure
3 Manually Configure LoadMaster HA in Azure
3.4.0.0.2 Add Multiple Interfaces to the LoadMaster
The Azure WUI does not allow interfaces with accelerated networking to be added. You must add
the interface by using the Azure command line interface (CLI) or by using PowerShell.
You must run the command with the LoadMaster in a powered
off state.
1. Create the interface using the Azure CLI similarly to the example below:
PS C:\Users\test> az network nic create --resource-group testdoc --name myNic2
--vnet-name myVnet --subnet subnet2 --accelerated-networking true --public-ip-
address myPublicIp2 --network-security-group myNetworkSecurityGroup --location
eastus
2. When the interface is created, you can add this interface to the LoadMaster when it is in a
powered off state. Navigate to the Networking tab of the LoadMaster on the Azure WUI.
3. Click Attach network interface.
4. When the attachment is complete, both interfaces appear on the Azure WUI.
5. Restart the LoadMaster.
6. Verify that the interfaces are displayed under System Configuration > Interfaces on the
LoadMaster WUI. The LoadMaster WUI should now display four interfaces.
kemp.ax 18 Copyright 2002-2021, Kemp Technologies, All Rights ReservedLoadMaster HA for Azure
3 Manually Configure LoadMaster HA in Azure
You can also verify that four interfaces are active by checking performing an Ifconfig. To perform an
Ifconfig, navigate to System Configuration > Logging Options > System Log Files and click Debug
Options. On the Debug Options screen, click Ifconfig.
Unlike the single interface case where eth0 and eth1 are related, for multiple interfaces, eth0 and
eth2 and eth1 and eth3 are related (with the same MAC address). eth0 and eth1 have the IP
addresses, the other interfaces without the IP addresses are related by the HWaddr (the MAC
address).
kemp.ax 19 Copyright 2002-2021, Kemp Technologies, All Rights ReservedLoadMaster HA for Azure
4 Create the Internal Load Balancer (ILB)
4 Create the Internal Load
Balancer (ILB)
An Azure Internal Load Balancer must be deployed to monitor the health of the LoadMasters and
direct traffic accordingly.
The following procedure describes how to set up an Azure Load Balancer from the Microsoft Azure
portal:
The steps in this document reflect the steps in the Azure
Marketplace (http://portal.azure.com).
To deploy a new load balancer using ARM, follow the steps below:
1. From the Azure Management Portal dashboard, click Create a resource.
2. Enter Load Balancer in the search bar and press Enter on your keyboard.
kemp.ax 20 Copyright 2002-2021, Kemp Technologies, All Rights ReservedLoadMaster HA for Azure
4 Create the Internal Load Balancer (ILB)
3. Click Create.
4. Under Project details, complete the following fields:
a) Select the Azure Subscription.
b) Select the existing Resource Group used to deploy the LoadMasters.
5. Under Instance details, complete the following fields:
kemp.ax 21 Copyright 2002-2021, Kemp Technologies, All Rights ReservedLoadMaster HA for Azure
4 Create the Internal Load Balancer (ILB)
a) Enter a Name for the load balancer.
b) Select the Azure Region used to deploy the LoadMasters.
c) Select the Type of load balancer determined by Public access or Internal only.
d) Select the load balancer SKU.
e) If creating a public load balancer, provide a new or use an existing Public IP address.
f) Enter a Public IP address name.
g) Select either Dynamic or provide a Static IP Assignment.
h) Select whether or not to Add a public IPv6 address.
6. Click Next: Tags.
7. You can optionally make any necessary changes to the Tags section or leave the defaults.
8. You can optionally click Download a template for automation to download an ARM
template.
9. Click Create.
It may take some time for the ILB to propagate.
If you chose to use a Public IP (PIP) address the front end IP configuration is created automatically.
kemp.ax 22 Copyright 2002-2021, Kemp Technologies, All Rights ReservedLoadMaster HA for Azure
5 Configure the Azure Load Balancer
5 Configure the Azure Load
Balancer
There are several settings that need to be configured to provide the high availability of the
LoadMasters:
l Create a back-end address pool and add the LoadMasters to the pool.
l Create Inbound NAT rules to direct traffic to the appropriate LoadMaster.
l Create a Probe to monitor the health of the LoadMasters.
l Create Load Balancing Rules to allow the necessary traffic.
Refer to the sections below for further information on each of these.
5.1 Create a Back-end Pool
The Backend Pool is a collection of virtual machines (LoadMasters) which is load balanced to
provide High Availability.
1. In the search bar, search for Load Balancer and press Enter on your keyboard.
2. Select the load balancer that was created in a previous section.
3. Click Backend pools.
kemp.ax 23 Copyright 2002-2021, Kemp Technologies, All Rights ReservedLoadMaster HA for Azure
5 Configure the Azure Load Balancer
4. Click Add.
5. Provide the following:
a) Enter a Name for the back-end pool.
b) Select the Virtual network used for the LoadMasters.
c) Select either IPv4 or IPv6 as the IP version.
d) Select Virtual machines in the Associated to drop-down list.
6. Under Virtual machines, click Add.
7. Select the LoadMasters for the HA pair.
8. Click Add.
kemp.ax 24 Copyright 2002-2021, Kemp Technologies, All Rights ReservedLoadMaster HA for Azure
5 Configure the Azure Load Balancer
9. Click Add to create the back-end pool.
When finished, you can see the two machines in the back-end pool.
5.2 Create Inbound NAT Rules
On Azure cloud, the ILB is used to create the Shared IP address (SIP) and to probe and route traffic
to the LoadMaster instances. To allow 'public' access to the WUI of each LoadMaster, Kemp
recommends creating ILB NAT rules:
l :8441 maps to Node-1 port 8443
l :8442 maps to Node-2 port 8443
If using the HA pair awareness functionality in Kemp 360
Central, you must be able to probe the shared IP address on
the WUI port (for example, :8443). This requires an ILB
inbound rule for 8443 to allow access to the back-end pool.
kemp.ax 25 Copyright 2002-2021, Kemp Technologies, All Rights ReservedLoadMaster HA for Azure
5 Configure the Azure Load Balancer
However, the ILB does not allow a port used in a NAT rule to
also be used in an inbound rule. Therefore, if you want to use
the HA pair awareness in Kemp 360 Central, you must create a
different set of NAT rules.
Inbound NAT rules provide a translation for management access into each of the LoadMasters in the
back-end pool. Each LoadMaster does not require a Public IP Address (PIP). A unique port must be
configured in an Inbound NAT rule for each LoadMaster. The example rules are the following:
Target Port Target Port
LoadMaster1 - WUI 8441 8443
LoadMaster1 – SSH 221 22
LoadMaster2 – WUI 8442 8443
LoadMaster2 – SSH 222 22
The LoadMaster uses port 22 and 8443 by default. The remaining port numbers listed above are
recommended, but you can use other port numbers if needed.
To create the inbound NAT rules, follow the steps below:
1. Select Inbound NAT rules in the load balancer navigation.
kemp.ax 26 Copyright 2002-2021, Kemp Technologies, All Rights ReservedLoadMaster HA for Azure
5 Configure the Azure Load Balancer
2. Create four inbound NAT rules based on the table provided earlier in this section.
When finished, you can see the four inbound NAT rules.
5.3 Create a Probe to Monitor LoadMaster Health
A probe must be created to monitor the health of the LoadMasters. This probe determines which
LoadMaster is active and sends the necessary traffic. Should that LoadMaster go offline, the probe
takes that LoadMaster out of service and directs all traffic to the secondary LoadMaster.
kemp.ax 27 Copyright 2002-2021, Kemp Technologies, All Rights ReservedLoadMaster HA for Azure
5 Configure the Azure Load Balancer
1. Select Health probes in the load balancer navigation.
2. Click Add.
kemp.ax 28 Copyright 2002-2021, Kemp Technologies, All Rights ReservedLoadMaster HA for Azure
5 Configure the Azure Load Balancer
3. Provide the following information:
a) Provide a Name.
b) Select HTTP as the Protocol.
c) Enter 8444 as the Port.
d) Enter / as the Path.
e) Enter 5 as the Interval.
f) Enter 2 as the Unhealthy threshold.
4. Click OK.
5.4 Create Load Balancing Rules to Allow Traffic
Load Balancing Rules must be configured for any traffic that is published through the LoadMaster. A
Rule is set up for Port 8444 which can be used to check the state of the LoadMasters within the
Backend Pool.
kemp.ax 29 Copyright 2002-2021, Kemp Technologies, All Rights ReservedLoadMaster HA for Azure
5 Configure the Azure Load Balancer
1. Select Load balancing rules in the load balancer navigation.
2. Click Add.
3. Provide the following information:
kemp.ax 30 Copyright 2002-2021, Kemp Technologies, All Rights ReservedLoadMaster HA for Azure
5 Configure the Azure Load Balancer
a) Provide a Name.
b) Select the IP Version.
c) Select TCP as the Protocol.
d) Enter 8444 as the Port.
e) Enter 8444 as the Backend port.
f) Select your Backend pool.
g) Select the Health probe for port 8444.
h) Select None as the Session persistence.
i) Select 4 as the Idle timeout (minutes).
j) Select Disabled for Floating IP (direct server return).
4. Click OK.
Create additional Load Balancing Rules for any other traffic
that is published through the LoadMaster.
kemp.ax 31 Copyright 2002-2021, Kemp Technologies, All Rights ReservedLoadMaster HA for Azure
6 Network Security Groups
6 Network Security Groups
Network Security Groups are used in Azure to control what traffic is allowed or denied access to
Virtual Machines. Depending on your configuration, you are required to update one or more
Network Security Groups to allow published traffic to access the LoadMasters and backend Real
Servers.
The security group must contain a rule for 8443. This is the WUI
port. If the LoadMaster is public-facing, other best practice,
recommended (but not mandatory) ports that should be in the
security group, are; 8441, 8442, 8444, 22, 221, 222, the Virtual
Service ports (such as 80) and any other ports that are needed
by the backend.
Do not block port 6973.
kemp.ax 32 Copyright 2002-2021, Kemp Technologies, All Rights ReservedLoadMaster HA for Azure
7 Configure the LoadMasters
7 Configure the LoadMasters
To configure LoadMaster for HA, follow the steps outlined in the sections below:
1. If the LoadMaster does not have a public address itself and you are going through the
Internal Load Balancer (ILB), you can access the WUI of the LoadMaster which is the master
unit:
a) Access the WUI of master LoadMaster by going to https://:8441.
b) Access the WUI of the slave LoadMaster by going to https://:8442.
c) The default username is bal and the password is the password entered during the
creation of the LoadMaster.
2. In the main menu, go to System Configuration > Azure HA Parameters.
3. Select Master HA Mode in the Azure HA Mode drop-down list.
4. Select the desired option in the Switch to Preferred Server drop-down list:
- No Preferred Host: Each unit takes over when the other unit fails. No
switchover is performed when the partner is restarted.
kemp.ax 33 Copyright 2002-2021, Kemp Technologies, All Rights ReservedLoadMaster HA for Azure
7 Configure the LoadMasters
- Prefer Master: The HA1 (master) unit always takes over. This is the default
option.
5. Enter the internal address of the slave LoadMaster unit in the Partner Name/IP text box
and click Set Partner Name/IP.
6. Enter 8444 as the Health Check Port and click Set Check Port.
The Health Check Port must be set to 8444 on both the master
and slave units for HA to function correctly.
7. If using a multi-arm configuration, select the Health Check on All Interfaces check box.
If this option is disabled, the health check listens on the
primary eth0 address.
8. Then, access the WUI of the slave unit. Complete the following steps in the slave unit, but
select Slave HA Mode as the Azure HA Mode instead: In the main menu, go to System
Configuration > Azure HA Parameters. to Enter the internal address of the slave
LoadMaster unit in the Partner Name/IP text box and click Set Partner Name/IP.
HA will not work if both units have the same value selected for
the Azure HA Mode.
9. After configuring both LoadMasters, reboot both units (System Configuration > System
Administration > System Reboot > Reboot).
When HA is enabled on both devices, changes made to the Virtual Services in the master unit is
replicated to the slave.
kemp.ax 34 Copyright 2002-2021, Kemp Technologies, All Rights ReservedLoadMaster HA for Azure
7 Configure the LoadMasters
If a unit is in standby mode, WUI access is restricted to Local Administration only. Full WUI access
is available if the unit is in an active or unchecked state.
You can tell, at a glance, which unit is the master, and which is the slave, by checking the mode in
the top bar of the LoadMaster.
The current status of each LoadMaster, when HA is enabled, is shown as follows:
Status Description
This is the master LoadMaster and it is currently active.
This is the slave LoadMaster and it is currently active.
This is the slave unit and it is currently the standby unit.
kemp.ax 35 Copyright 2002-2021, Kemp Technologies, All Rights ReservedLoadMaster HA for Azure
8 LoadMaster Firmware Upgrades/Downgrades
8 LoadMaster Firmware
Upgrades/Downgrades
Do not downgrade from firmware version 7.2.36 or higher to a version below 7.2.36. If you do this,
the LoadMaster becomes inaccessible and you cannot recover it.
You should never leave two LoadMasters with different firmware versions paired as HA in a
production environment. To avoid complications, follow the steps below in sequence and do not
perform any other actions in between the steps. Please upgrade/downgrade during a maintenance
window and expect service disruption because there are reboots.
The steps below are high-level, for detailed step-by-step instructions on how to upgrade the
LoadMaster firmware, refer to the Updating the LoadMaster Software Feature Description on the
Kemp documentation page: https://kemptechnologies.com/loadmaster-documentation.
8.1 Upgrade the LoadMaster Firmware
To upgrade the LoadMaster firmware with the least disruption, follow the steps below in sequence:
1. Identify the STAND-BY unit.
2. Upgrade the LoadMaster firmware on the STAND-BY unit. Once the STAND-BY unit has
rebooted, it remains in the STAND-BY state and the WUI is limited to the Local
Administration options.
3. Upgrade the LoadMaster firmware on the ACTIVE unit. When the ACTIVE unit is rebooting,
the STAND-BY unit becomes ACTIVE.
4. Depending on Preferred Host settings in the HA configuration, the Slave unit may failback
over to the Master unit.
After these steps are completed the upgrade is finished.
8.2 Downgrade the LoadMaster Firmware
To downgrade the LoadMaster firmware with the least disruption, follow the steps below in
sequence:
1. Identify the STAND-BY unit.
kemp.ax 36 Copyright 2002-2021, Kemp Technologies, All Rights ReservedLoadMaster HA for Azure
8 LoadMaster Firmware Upgrades/Downgrades
2. Downgrade the LoadMaster firmware on the STAND-BY unit. Once the STANDY-BY unit
has rebooted, it remains in the STAND-BY state and the WUI is limited to the Local
Administration options.
3. Downgrade the LoadMaster firmware on the ACTIVE unit. When the ACTIVE unit is
rebooting, the STAND-BY unit becomes ACTIVE.
4. Depending on Preferred Host settings in the HA configuration, the Slave unit may failback
over to the Master unit.
After these steps are completed the downgrade is finished.
kemp.ax 37 Copyright 2002-2021, Kemp Technologies, All Rights ReservedLoadMaster HA for Azure
9 Troubleshooting
9 Troubleshooting
The sections below provide some basic troubleshooting tips. If further assistance is required, please
contact Kemp Support: https://support.kemptechnologies.com.
9.1 Check which LoadMaster is Active
In addition to checking the status in the top-right of the LoadMaster WUI, it is also possible to check
which LoadMaster is active by accessing port 8444 through the Public IP address since the Load
Balanced Rule was created for this port, that is,
http://:8444
Ensure to use HTTP, not HTTPS. On the active unit, you should see "Master/Slave is active". On the
standby, you should see a 503 service unavailable error. If you see these messages, it means the
LoadMasters are working correctly/
9.2 Master/Slave Unconnected
When initially setting up cloud HA, the master unit should have MASTER in the top-right corner of
the LoadMaster WUI.
The slave unit should show SLAVE.
After setting up the load balancer (Internal Load Balancer (ILB) for Azure or Network Load Balancer
for AWS) the units should switch from:
l Master to Master Unconnected
l Slave to Slave Unconnected
This means the LoadMasters have not been polled by the load balancer. Once the load balancer has
the health check correctly set, the units should switch from:
l Master Unconnected to Master (Active)/Master (Standby)
l Slave (Unconnected) to Slave (Active)/Slave (Standby)
kemp.ax 38 Copyright 2002-2021, Kemp Technologies, All Rights ReservedLoadMaster HA for Azure
9 Troubleshooting
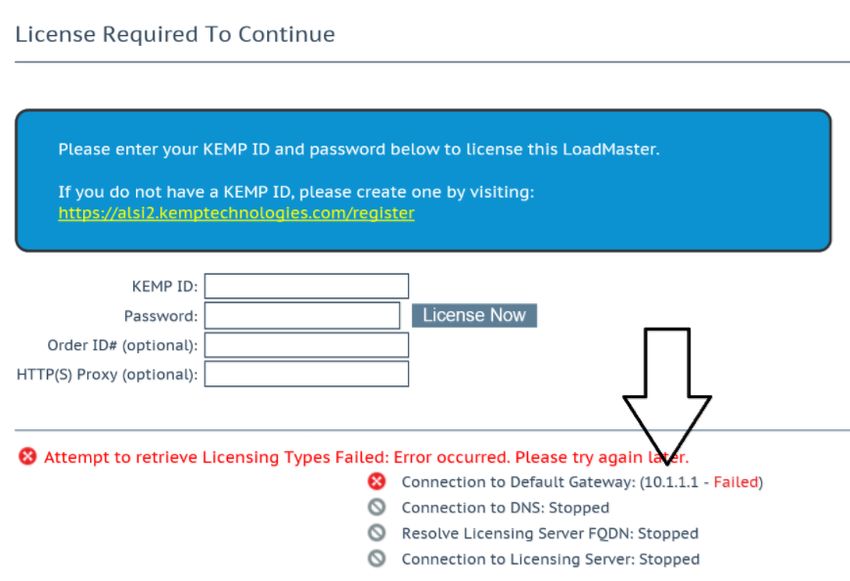
9.3 Connection to Default Gateway Failed
Azure blocks pings in some cases. Therefore, on older LoadMaster firmware you may see an error
message like the one above when licensing. This is a red herring and can be ignored - there is likely
another problem such as an incorrect Kemp ID/password. If you are running the latest version of
LoadMaster firmware, this check should be skipped.
9.4 Virtual Machine Inaccessible
It takes approximately five minutes for the Virtual Machine to become accessible after booting.
9.5 Run a TCP Dump
Running a TCP dump and checking the results can also assist with troubleshooting. To do this,
follow the steps below in the LoadMaster WUI:
1. In the main menu, go to System Configuration > Logging Options > System Log Files.
kemp.ax 39 Copyright 2002-2021, Kemp Technologies, All Rights ReservedLoadMaster HA for Azure
9 Troubleshooting
2. Click Debug Options.
3. In the TCP dump section, enter the relevant IP Address and the Azure HA Port.
4. Click Start.
5. Let the capture run for a few minutes.
6. Click Stop.
7. Click Download.
8. Analyse the results in a packet trace analyser tool such as Wireshark.
Checks from the partner LoadMaster should appear in the results. If nothing is shown there is a
problem, for example Azure may be blocking the connection.
9.6 Sync Problems
In most scenarios, the configuration settings are automatically synchronized between partners every
two minutes. If a new Virtual Service is created, the settings are immediately synchronized. Because
of this, creating a new Virtual Service is a good way of checking if the synchronization is working.
To trace this, follow the steps below:
1. Start a TCP dump, as detailed in the Run a TCP Dump section, but use port 6973.
2. Create a Virtual Service.
3. Stop the TCP dump.
kemp.ax 40 Copyright 2002-2021, Kemp Technologies, All Rights ReservedLoadMaster HA for Azure
9 Troubleshooting
4. Download the TCP dump file.
5. Analyse the results.
After creating a Virtual Service, a lot of traffic should have been immediately triggered.
Generally, if a lot of packets are being transferred it means that the synchronization is working. If
only a few packets are transferred, it may mean that the connection was unsuccessful. In this case,
there may be a problem such as unmatched SSH keys.
9.7 Misconfigured ILB
It is possible that the two LoadMasters are able to communicate but the ILB might be
misconfigured. Connect to both units on http://LoadMasterAddress:8444. On the active unit, you
should see "Master/Slave is active". On the standby, you should see a 503 service unavailable error.
If you see these messages, it means the LoadMasters are working correctly and the problem is
elsewhere. Confirm that the health check probe on the ILB is configured correctly.
9.8 Problems Reaching a Virtual Service
If you experience problems reaching a Virtual Service, confirm the network security group and the
ILB inbound rules are configured correctly.
kemp.ax 41 Copyright 2002-2021, Kemp Technologies, All Rights ReservedLoadMaster HA for Azure
References
References
Unless otherwise specified, the following documents can be found at
http://kemptechnologies.com/documentation.
Licensing, Feature Description
LoadMaster for Azure, Installation Guide
Azure Virtual Machines – tutorials and guides:
http://www.windowsazure.com/en-us/documentation/services/virtual-machines/
High Availability (HA), Feature Description
kemp.ax 42 Copyright 2002-2021, Kemp Technologies, All Rights ReservedLoadMaster HA for Azure
Last Updated Date
Last Updated Date
This document was last updated on 19 March 2021.
kemp.ax 43 Copyright 2002-2021, Kemp Technologies, All Rights ReservedYou can also read