LOAD BALANCING MCAFEE WEB GATEWAY - V1.4.2 - DEPLOYMENT GUIDE - LOADBALANCER.ORG
←
→
Page content transcription
If your browser does not render page correctly, please read the page content below

DEPLOYMENT GUIDE

Load Balancing McAfee Web
Gateway
v1.4.2

Deployment Guide
Contents
1. About this Guide................................................................................................................................................................................................................................................................ 4
2. Loadbalancer.org Appliances Supported................................................................................................................................................................................................... 4
3. Loadbalancer.org Software Versions Supported................................................................................................................................................................................. 4
4. McAfee Web Gateway Appliances Supported...................................................................................................................................................................................... 4
5. Benefits of Implementing a Load Balancer.............................................................................................................................................................................................. 5
6. Load Balancer Configuration Options........................................................................................................................................................................................................... 5
     Deployment Modes...................................................................................................................................................................................................................................................................5
       Layer 4 (Recommended)................................................................................................................................................................................................................................ 5
       Layer 7............................................................................................................................................................................................................................................................................ 5
     Persistence / Server Affinity..............................................................................................................................................................................................................................................6
       Source IP Address (Recommended)................................................................................................................................................................................................... 6
       Destination Hash................................................................................................................................................................................................................................................... 6
7. Web Gateway Deployment Modes................................................................................................................................................................................................................... 6
     1 – Explicit Proxy Mode (Recommended).............................................................................................................................................................................................................6
     2 – Transparent Routed Proxy Mode........................................................................................................................................................................................................................6
8. Summary of Deployment Options.................................................................................................................................................................................................................... 6
9. Loadbalancer.org Appliance – the Basics.................................................................................................................................................................................................. 7
     Virtual Appliance Download & Deployment.......................................................................................................................................................................................................7
     Initial Network Configuration............................................................................................................................................................................................................................................8
     Accessing the Web User Interface (WebUI)......................................................................................................................................................................................................8
     HA Clustered Pair Configuration...................................................................................................................................................................................................................................9
10. Option 1 – Explicit Proxy Mode (Recommended)............................................................................................................................................................................. 9
     Option 1A – Using DR (Direct Return) Mode (Recommended).....................................................................................................................................................10
       Deployment Architecture............................................................................................................................................................................................................................ 10
       Load Balancer Configuration...................................................................................................................................................................................................................... 11
       Web Gateway Configuration..................................................................................................................................................................................................................... 12
       Finalize Settings................................................................................................................................................................................................................................................... 13
     Option 1B – Using NAT Mode........................................................................................................................................................................................................................................14
       Deployment Architecture............................................................................................................................................................................................................................ 14
       Load Balancer Configuration.................................................................................................................................................................................................................... 15
       Web Gateway Configuration..................................................................................................................................................................................................................... 18
       Finalize Settings................................................................................................................................................................................................................................................... 18
     Option 1C – Using NAT Mode (Preferred NAT Topology)....................................................................................................................................................................19
       Deployment Architecture............................................................................................................................................................................................................................ 19
       Load Balancer Configuration................................................................................................................................................................................................................... 20
       Web Gateway Configuration.................................................................................................................................................................................................................... 22
       Finalize Settings.................................................................................................................................................................................................................................................. 22
     Configuration Settings Common to Options 1A, 1B & 1C...................................................................................................................................................................22
       Web Gateway Operating Mode............................................................................................................................................................................................................ 22
       Proxy Port Configuration............................................................................................................................................................................................................................. 23
       Client Configuration........................................................................................................................................................................................................................................ 23
11. Option 2 - Transparent Routed Proxy Mode....................................................................................................................................................................................... 25
       Deployment Architecture........................................................................................................................................................................................................................... 25

                                                                                                                                                                                                                                                                                       2
                                                                    © Copyright Loadbalancer.org • www.loadbalancer.org • sales@loadbalancer.org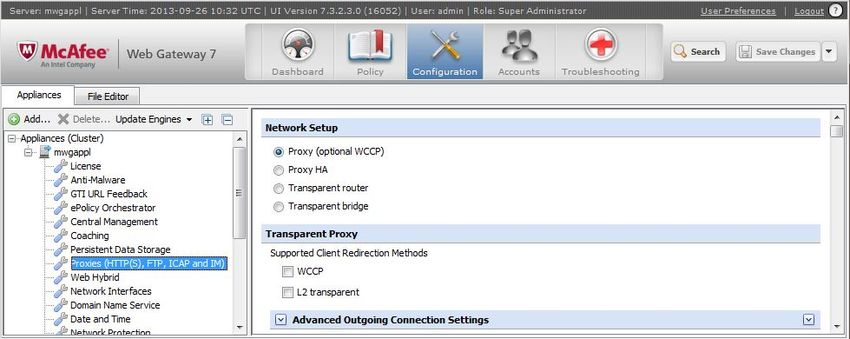
Load Balancer Configuration.........................................................................................................................................................................................................................................26
       Create the Virtual Service (VIP)........................................................................................................................................................................................................... 26
       Add the Floating IP........................................................................................................................................................................................................................................... 27
       Configure Firewall Rules.............................................................................................................................................................................................................................. 27
       Define the Real Servers (RIPs).............................................................................................................................................................................................................. 28
     Web Gateway Configuration..........................................................................................................................................................................................................................................29
       Web Gateway Operating Mode............................................................................................................................................................................................................ 29
     Router/Default Gateway Configuration...............................................................................................................................................................................................................30
     Client Configuration................................................................................................................................................................................................................................................................31
12. Testing & Validation................................................................................................................................................................................................................................................... 31
     Layer 4 – Current Connections....................................................................................................................................................................................................................................31
13. Technical Support...................................................................................................................................................................................................................................................... 32
14. Further Documentation........................................................................................................................................................................................................................................ 32
15. Conclusion........................................................................................................................................................................................................................................................................ 32
16. Appendix............................................................................................................................................................................................................................................................................ 33
     1 – Clustered Pair Configuration – Adding a Slave Unit.......................................................................................................................................................................33
     2 – Modified Transparent Mode Firewall Rules............................................................................................................................................................................................35
17. Document Revision History............................................................................................................................................................................................................................... 36

                                                                                                                                                                                                                                                                                      3
                                                                   © Copyright Loadbalancer.org • www.loadbalancer.org • sales@loadbalancer.org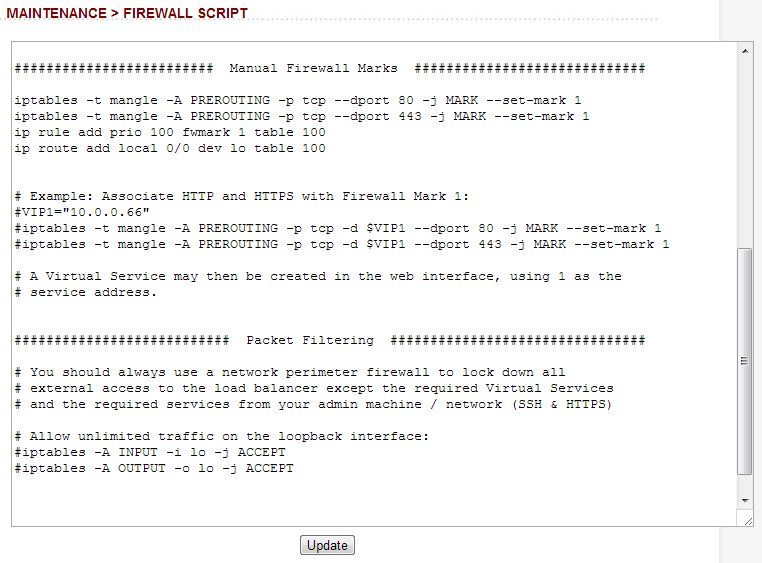
1. About this Guide
This guide details the steps required to configure a load balanced McAfee Web Gateway environment utilizing
Loadbalancer.org appliances. It covers the configuration of the load balancers and also any McAfee Web Gateway
configuration changes that are required to enable load balancing.
For more information about initial appliance deployment, network configuration and using the Web User Interface
(WebUI), please also refer to the relevant Administration Manual:

    •   v7 Administration Manual

    •   v8 Administration Manual

2. Loadbalancer.org Appliances Supported
All our products can be used for load balancing McAfee Web Gateways. The complete list of models is shown below:

Discontinued Models            Current Models *
Enterprise R16                 Enterprise R20
Enterprise VA R16              Enterprise MAX
Enterprise VA                  Enterprise 10G
Enterprise R320                Enterprise 40G
                               Enterprise Ultra
                               Enterprise VA R20
                               Enterprise VA MAX
                               Enterprise AWS **
                               Enterprise AZURE **
                               Enterprise GCP **

* For full specifications of these models please refer to: http://www.loadbalancer.org/products/hardware
** Some features may not be supported, please check with Loadbalancer.org support

3. Loadbalancer.org Software Versions Supported

    •   v7.6.4 and later

4. McAfee Web Gateway Appliances Supported

    •   All versions

                                                                                                                   4
                             © Copyright Loadbalancer.org • www.loadbalancer.org • sales@loadbalancer.org
5. Benefits of Implementing a Load Balancer
Implementing Loadbalancer.org appliances enables multiple McAfee Web Gateways to be deployed in a cluster. This
provides the following key benefits:

    •     High-Availability – If a Web Gateway fails, service is not interrupted

    •     Maintenance – Web Gateways can easily be taken out of the cluster for maintenance

    •     Performance – For additional performance simply add more Web Gateways to the cluster

6. Load Balancer Configuration Options
The following sections describe the various load balancer deployment modes and persistence options that are used
when load balancing Web Gateways.

Deployment Modes

Layer 4 (Recommended)

DR Mode - Direct Server Return Mode (Recommended)
In this mode, traffic from the client to the Web Gateway passes via the load balancer, return traffic passes directly back
to the client which maximizes performance. Direct routing works by changing the destination MAC address of the
incoming packet on the fly which is very fast. This mode is transparent by default meaning that the Web Gateway sees
the real client IP address and not the IP address of the load balancer.
Due to its speed, overall simplicity and effectiveness, Direct Routing (DR) mode with source IP persistence is our
recommended method and can be used in both Explicit Proxy Mode & Transparent Routed Proxy Mode.

NAT Mode - Network Address Translation Mode
This mode requires the implementation of a two-arm infrastructure with an internal and external subnet to carry out the
translation (the same way a firewall works). Return traffic MUST pass back via the load balancer. This can be achieved
by either setting the default gateway on the Web Gateways to be the load balancer or by configuring a static route on
the Web Gateways that forces client return traffic to pass back via the load balancer. This mode offers high
performance and like DR mode is transparent by default.

Layer 7

SNAT Mode - Source Network Address Translation
Using HAProxy in SNAT mode means that the load balancer is acting as a full proxy and therefore it doesn't have the
same raw throughput as the layer 4 methods. Also, this method is not transparent by default so the real servers (i.e. the
Web Gateways) will see the source address of each request as the load balancers IP address. This is generally not
desirable, although this can be resolved in two ways: either by reading the X-Forwarded-For header that's included by
default when using HAProxy, or by enabling TProxy on the load balancer. The issue with using TProxy is that the default
gateway on the real servers must be changed to be the load balancer and it also requires a two-arm infrastructure with
two subnets which complicates the deployment. The same requirements apply when using layer 4 NAT mode as
mentioned above. SNAT mode does not have the raw throughput of the layer 4 solutions and is therefore not normally
used for Web Gateway load balancing deployments.

                                                                                                                         5
                               © Copyright Loadbalancer.org • www.loadbalancer.org • sales@loadbalancer.org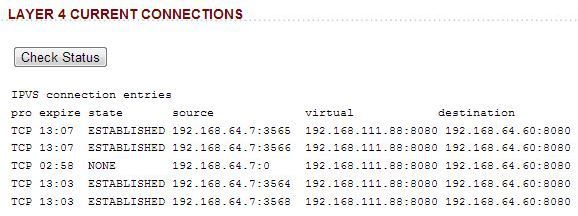
Persistence / Server Affinity
Persistence may or may not be required and depends on the specific Web Gateway being used. Two possible methods
are described in the following sections.

Source IP Address (Recommended)
Source IP persistence is the default option for Layer 4 services and can easily be selected for Layer 7 services. When
set, clients connecting from the same source IP address within the persistence timeout period (the default is 5
minutes) will always be sent to the same Web Gateway.

Destination Hash
Another option at Layer 4 is to change the load balancing algorithm (i.e. the “scheduler”) to destination hash (DH). This
causes the load balancer to select the proxy based on a hash of the destination IP address. This causes session
requests to be directed at the same server based solely on the destination IP address of a packet which therefore
makes client connections persistent for a particular Internet host.
Since this setting is a scheduler, the way connections are load balanced will also change. However it should still provide
a well balanced distribution of client sessions between Web Gateway servers.

7. Web Gateway Deployment Modes
There are two implementation methods that are typically used – Explicit Proxy Mode & Transparent Routed Proxy
Mode.

1 – Explicit Proxy Mode (Recommended)
This mode requires the load balancers VIP address to be defined in users browsers. This means that the load balancer
will receive client requests and distribute these requests across the back-end Web Gateways. McAfee refer to this as
“Direct Proxy Mode”. Please refer to the section starting on page 9 for configuration details.

2 – Transparent Routed Proxy Mode
With this mode, client requests must be routed to the load balancer/Web Gateway cluster. This can be achieved by
either setting the default gateway on the client PCs to be the load balancer, or by adding rules to the default gateway
device. Rules would typically be configured for HTTP & HTTPS traffic on ports 80 and 443. McAfee refer to this as
“Transparent Routed Mode”. Please refer to the section starting on page 25 for configuration details.

8. Summary of Deployment Options

Option                  Web Gateway Mode                         Load Balancer Mode               Notes

Option 1A               Direct Proxy Mode                        DR Mode                          The Web Gateways must be
                                                                                                  configured to accept traffic for
                                                                                                  the VIP.

                                                                                                                                     6
                             © Copyright Loadbalancer.org • www.loadbalancer.org • sales@loadbalancer.org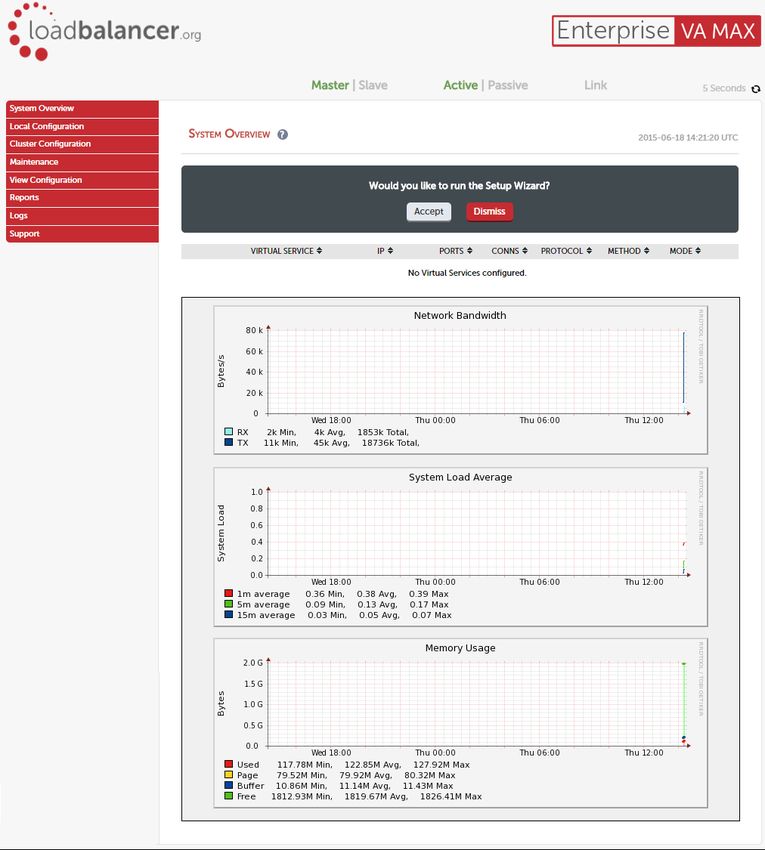
(Recommended)
                                                                                                  Please refer to page 10 for
                                                                                                  configuration details.

Option 1B               Direct Proxy Mode                        NAT Mode                         The load balancer must be set as
                                                                                                  the default gateway for the Web
                                                                                                  Gateways.

                                                                                                  Please refer to page 14 for
                                                                                                  configuration details.

Option 1C               Direct Proxy Mode                        NAT Mode                         A static route must be configured
                                                                                                  on the Web Gateways to send
                                                                                                  client return traffic back via the
                                                                                                  load balancer.

                                                                                                  Please refer to page 19 for
                                                                                                  configuration details.

Option 2                Transparent Routed Mode                  DR Mode                          Firewall rules must be added to
                                                                                                  the load balancer to transparently
                                                                                                  send traffic to the Web Gateways.

                                                                                                  Please refer to page 25 for
                                                                                                  configuration details.

9. Loadbalancer.org Appliance – the Basics

Virtual Appliance Download & Deployment
A fully featured, fully supported 30 day trial is available if you are conducting a PoC (Proof of Concept) deployment. The
VA is currently available for VMware, Virtual Box, Hyper-V, KVM and XEN and has been optimized for each Hypervisor. By
default, the VA is allocated 1 CPU, 2GB of RAM and has an 8GB virtual disk. The Virtual Appliance can be downloaded
here.

              Note: The same download is used for the licensed product, the only difference is that a license key file
              (supplied by our sales team when the product is purchased) must be applied using the appliance's
              WebUI.

              Note: Please refer to the Administration Manual and the ReadMe.txt text file included in the VA download

                                                                                                                                   7
                             © Copyright Loadbalancer.org • www.loadbalancer.org • sales@loadbalancer.org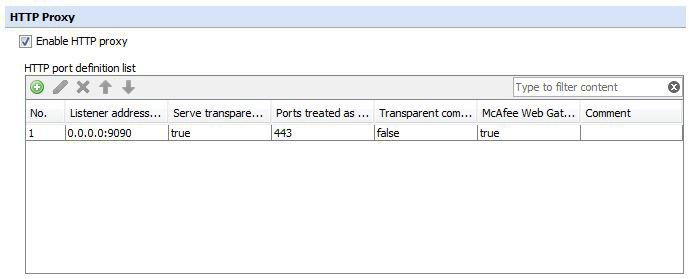
for more detailed information on deploying the VA using various Hypervisors.

Initial Network Configuration
The IP address, subnet mask, default gateway and DNS settings can be configured in several ways as detailed below:

Method 1 - Using the Network Setup Wizard at the console
After boot up, follow the instructions on the console to configure the IP address, subnet mask, default gateway and DNS
settings.

Method 2 - Using the WebUI
Using a browser, connect to the WebUI on the default IP address/port: https://192.168.2.21:9443
To set the IP address & subnet mask, use: Local Configuration > Network Interface Configuration
To set the default gateway, use: Local Configuration > Routing
To configure DNS settings, use: Local Configuration > Hostname & DNS

Accessing the Web User Interface (WebUI)

    1.   Browse to the following URL: https://192.168.2.21:9443/lbadmin/
         (replace with your IP address if it's been changed)
         * Note the port number → 9443

    2.   Login to the WebUI:

         Username: loadbalancer
         Password: loadbalancer

              Note: To change the password , use the WebUI menu option: Maintenance > Passwords.

Once logged in, the WebUI will be displayed as shown below:

                                                                                                                     8
                               © Copyright Loadbalancer.org • www.loadbalancer.org • sales@loadbalancer.org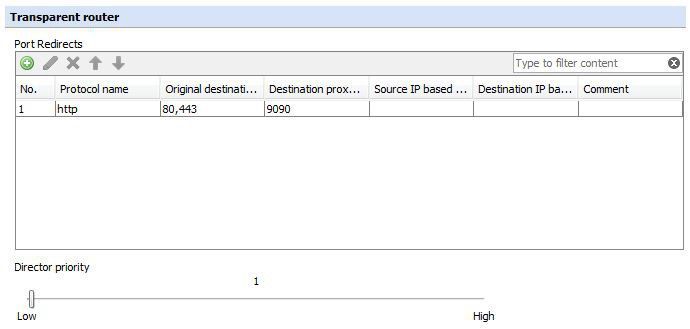
HA Clustered Pair Configuration
Loadbalancer.org recommend that load balancer appliances are deployed in pairs for high availability. In this guide a
single unit is deployed first, adding a secondary slave unit is covered in section 1 of the Appendix on page 33.

10. Option 1 – Explicit Proxy Mode (Recommended)

                                                                                                                        9
                             © Copyright Loadbalancer.org • www.loadbalancer.org • sales@loadbalancer.org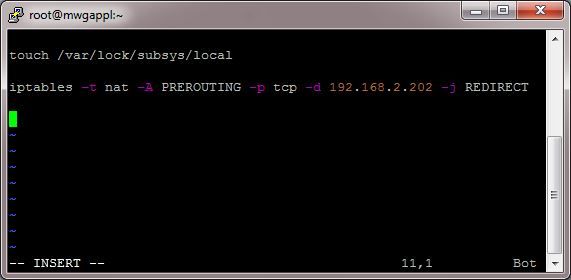
Option 1A – Using DR (Direct Return) Mode (Recommended)

Deployment Architecture

                                                                          Default Gateway

                                   Loadbalancer.org Clustered Pair

                                     Master

                                                                       Heartbeat

                                     Slave

                                                          McAfee Web Gateway 1

                                                          McAfee Web Gateway 2

Notes:

   •     Browser settings on client PC's must be changed to point at the Virtual Service (VIP) on the load balancer (see
         page 23)

   •     The load balancer is configured in one-arm Layer 4 DR mode

   •     The McAfee Web Gateways must be configured to accept traffic for the VIP (see page 12)

                                                                                                                      10
                             © Copyright Loadbalancer.org • www.loadbalancer.org • sales@loadbalancer.org
• Loadbalancer.org recommend that load balancer appliances are deployed in pairs for high availability. In this
guide a single unit is deployed first, adding a secondary slave unit is covered in section 1 of the Appendix on
page 33
• For more information on McAfee Web Gateway deployment options please refer to this URL
Load Balancer Configuration
Create the Virtual Service (VIP)
1. Using the WebUI, navigate to: Cluster Configuration > Layer 4 – Virtual Services
2. Click Add a New Virtual Service
3. Enter the following details:
4. Enter an appropriate label (name) for the VIP, e.g. Proxy
5. Set the Virtual Service IP address field to the required IP address, e.g. 192.168.2.202
6. Set the Virtual Service Ports field to the required port, e.g. 9090
7. Ensure that Protocol is set to TCP
8. Ensure that Forwarding Method is set to Direct Routing
9. Click Update
10. Now click Modify next to the newly created VIP
11. Ensure Persistence is enabled and set Persistence Timeout to 3600 (i.e. 1 hour)
12. Click Update
Define the Real Servers (RIPs)
1. Using the WebUI, navigate to: Cluster Configuration > Layer 4 – Real Servers
2. Click Add a new Real Server next to the newly created VIP
3. Enter the following details:
11
© Copyright Loadbalancer.org • www.loadbalancer.org • sales@loadbalancer.org4. Enter an appropriate label (name) for the first Web Gateway, e.g. Proxy1
5. Change the Real Server IP Address field to the required IP address, e.g. 192.168.2.210
6. Click Update
7. Repeat the above steps to add your other Web Gateway(s)
Web Gateway Configuration
Modify the Web Gateways to accept traffic for the VIP
Concept
As mentioned previously, DR mode is our recommended load balancer operating mode. To use this mode, changes are
required to the real servers, i.e. the Web Gateways. The real servers must accept traffic for the VIP, but they must not
respond to any ARP requests for that IP, only the VIP should do this.
To configure a Linux based Web Gateway to accept traffic for the VIP, the iptables command below must be added to an
appropriate startup script such as /etc/rc.local so that it is automatically executed each time the Web Gateway boots. It
can also be executed immediately by running the command at the command prompt, but the setting will be lost after a
reboot unless the command has been added to a startup script.
iptables -t nat -A PREROUTING -p tcp -d -j REDIRECT
e.g.
iptables -t nat -A PREROUTING -p tcp -d 192.168.2.202 -j REDIRECT
i.e. Redirect any incoming packets destined for the VIP to the local address
Note: For more information please refer to the Administration Manual and search for 'ARP Problem'.
12
© Copyright Loadbalancer.org • www.loadbalancer.org • sales@loadbalancer.orgConfiguring the McAfee Web Gateway Appliance
Note: These steps must be followed on all Gateways.
1. Login as root either at the console or using a remote SSH session
2. Edit the file /etc/rc.local using vi, vim or a remote editor such as the one included in WinSCP
3. Then add the following additional line to this file, setting the VIP address as required, as shown below:
iptables -t nat -A PREROUTING -p tcp -d -j REDIRECT
4. Reboot the Web Gateway to apply the new setting
Finalize Settings
Now refer to the section “Configuration Settings Common to Options 1A, 1B & 1C” on page 22 to finalize Web Gateway
settings and configure client browser settings.
13
© Copyright Loadbalancer.org • www.loadbalancer.org • sales@loadbalancer.orgOption 1B – Using NAT Mode
Deployment Architecture
Default Gateway
Loadbalancer.org Clustered Pair
Master
Heartbeat
Slave
Slave
McAfee Web Gateway 1
McAfee Web Gateway 2
Notes:
• Browser settings on client PC's must be changed to point at the Virtual Service (VIP) on the load balancer (see
page 23)
• The load balancer is configured in two-arm Layer 4 NAT mode
• Return traffic MUST pass back via the load balancer. To enable this, the default gateway for the Web Gateways
14
© Copyright Loadbalancer.org • www.loadbalancer.org • sales@loadbalancer.orgis configured to be the load balancer. For an HA pair, a floating IP address must be configured to allow the
gateway to move between master and slave in the event of a failover (see page 15)
• Loadbalancer.org recommend that load balancer appliances are deployed in pairs for high availability. In this
guide a single unit is deployed first, adding a secondary slave unit is covered in section 1 of the Appendix on
page 33
• For more information on McAfee Web Gateway deployment options please refer to this URL
Load Balancer Configuration
Configure Network Settings
Two interfaces are required. Typically eth0 is used for the internal (Web Gateway) subnet and eth1 is used for the
external (client & VIP) subnet, although this is not mandatory since interfaces can be used as required / preferred.
To configure network settings on the load balancer:
1. Ensure that the required cables are plugged in (hardware) or virtual NICs are connected (virtual)
2. Using the WebUI, navigate to: Local Configuration > Network Interface Configuration
3. Define the required IP addresses and subnet mask:
4. Configure the required IP address for eth0, e.g. 192.168.4.200/24
5. Configure the required IP address for eth1, e.g. 192.168.2.200/24
6. Click Configure Interfaces
Define a Floating IP to be used as the Default Gateway for the Web Gateways
As mentioned, when using a clustered pair of load balancers for HA (our recommended configuration), a floating IP must
be used as the default gateway for the Web Gateways. This will 'float' between the master and slave units in the event of
a failover or failback. This ensures that the Web Gateways always have a consistent return path via the load balancer –
whether the master or slave is active.
15
© Copyright Loadbalancer.org • www.loadbalancer.org • sales@loadbalancer.orgTo configure a Floating IP:
1. Using the WebUI, navigate to: Cluster Configuration > Floating IP's
2. Define a suitable IP address for the default gateway , e.g. 192.168.4.205
3. Click Add Floating IP
Create the Virtual Service (VIP)
1. Using the WebUI, navigate to: Cluster Configuration > Layer 4 – Virtual Services
2. Click Add a New Virtual Service
3. Enter the following details:
4. Enter an appropriate label (name) for the VIP, e.g. Proxy
5. Set the Virtual Service IP address field to the required IP address, e.g. 192.168.2.202
6. Set the Virtual Service Ports field to the required port, e.g. 8080
7. Ensure that Protocol is set to TCP
8. Ensure that Forwarding Method is set to NAT
9. Click Update
10. Now click Modify next to the newly created VIP
11. Ensure Persistence is enabled and set Persistence Timeout to 3600 (i.e. 1 hour)
12. Click Update
Define the Real Servers (RIPs)
1. Using the WebUI, navigate to: Cluster Configuration > Layer 4 – Real Servers
2. Click Add a new Real Server next to the newly created VIP
3. Enter the following details:
16
© Copyright Loadbalancer.org • www.loadbalancer.org • sales@loadbalancer.org4. Enter an appropriate label (name) for the first Web Gateway, e.g. Proxy1
5. Set the Real Server IP Address field to the required IP address, e.g. 192.168.4.210
6. Set the Real Server Port field to the required port, e.g. 8080
7. Click Update
8. Repeat the above steps to add your other Web Gateway(s)
Enable Auto-NAT
By default, servers behind the load balancer in a NAT configuration will not have access to the outside network. By
enabling Auto-NAT, servers (i.e. the Web Gateways) will have their requests automatically mapped to the load balancer's
external IP address. The default configuration is to map all requests originating from internal network eth0 to the
external IP on eth1. A different interface can be selected if required.
To enable Auto-NAT on the load balancer:
1. Using the WebUI, navigate to: Cluster Configuration > Layer 4 – Advanced configuration
2. Set the Auto-NAT field to the external interface. As mentioned the default configuration is to use eth1 and the
external interface and eth1 as the internal interface, but can be set to suit your needs.
3. Click Update
17
© Copyright Loadbalancer.org • www.loadbalancer.org • sales@loadbalancer.orgWeb Gateway Configuration
Configure the Default Gateway
As mentioned, Option 1B requires the default gateway on the Web Gateway to be the load balancer. When using an HA
pair of load balancers, the gateway on the load balancer must be a Floating IP to provide a consistent return path via the
load balancer – whether the master or slave is active. Page 15 details how to create the Floating IP.
Note: Please refer to the McAfee Web Gateway documentation for instructions on setting the default
gateway. This should be done on all Web Gateways.
Finalize Settings
Now refer to the section “Configuration Settings Common to Options 1A, 1B & 1C” on page 22 to finalize Web Gateway
settings and configure client browser settings.
18
© Copyright Loadbalancer.org • www.loadbalancer.org • sales@loadbalancer.orgOption 1C – Using NAT Mode (Preferred NAT Topology)
Deployment Architecture
Default Gateway
client subnet
McAfee
Loadbalancer.org Clustered Pair Web Gateway 1
Master
Master
Heartbeat
Slave
McAfee
Web Gateway 2
a static route is added to the Web Gateways to enable traffic to
return to the client subnet via the load balancer
Notes:
• Browser settings on client PC's must be changed to point at the Virtual Service (VIP) on the load balancer (see
page 23)
• The load balancer is configured in two-arm Layer 4 NAT mode
• Return traffic MUST pass back via the load balancer. To enable this, a static route is configured on the Web
Gateways to send return traffic back via the load balancer. For an HA pair, a floating IP address must be
configured to allow the gateway to move between master and slave in the event of a failover (see page 20)
19
© Copyright Loadbalancer.org • www.loadbalancer.org • sales@loadbalancer.org• This method is more efficient & faster than Option 1B since the Web Gateways can access the Internet directly
rather than going via the load balancer
• Loadbalancer.org recommend that load balancer appliances are deployed in pairs for high availability. In this
guide a single unit is deployed first, adding a secondary slave unit is covered in section 1 of the Appendix on
page 33
• For more information on McAfee Web Gateway deployment options please refer to this URL
Load Balancer Configuration
Configure Network Settings
Two interfaces are required. Typically eth0 is used for the internal (Web Gateway) subnet and eth1 is used for the
external (client & VIP) subnet, although this is not mandatory since interfaces can be used as required / preferred.
To configure network settings on the load balancer:
1. Ensure that the required cables are plugged in (hardware) or virtual NICs are connected (virtual)
2. Using the WebUI, navigate to: Local Configuration > Network Interface Configuration
3. Define the required IP addresses and subnet mask:
4. Configure the required IP address for eth0, e.g. 192.168.4.200/24
5. Configure the required IP address for eth1, e.g. 192.168.2.200/24
6. Click Configure Interfaces
Define a Floating IP to be used as the gateway for the Static Route on the Web Gateways
As mentioned, when using a clustered pair of load balancers for HA (our recommended configuration), a floating IP must
be used as the gateway for the static route on the Web Gateways. This will 'float' between the master and slave units in
the event of a failover or failback. This ensures that the Web Gateways always have a consistent return path via the load
balancer – whether the master or slave is active.
20
© Copyright Loadbalancer.org • www.loadbalancer.org • sales@loadbalancer.orgTo configure a Floating IP:
1. Using the WebUI, navigate to: Cluster Configuration > Floating IP's
2. Define a suitable IP address for the default gateway , e.g. 192.168.4.205
3. Click Add Floating IP
Create the Virtual Service (VIP)
1. Using the WebUI, navigate to: Cluster Configuration > Layer 4 – Virtual Services
2. Click Add a New Virtual Service
3. Enter the following details:
4. Enter an appropriate label (name) for the VIP, e.g. Proxy
5. Set the Virtual Service IP address field to the required IP address, e.g. 192.168.2.202
6. Set the Virtual Service Ports field to the required port, e.g. 8080
7. Ensure that Protocol is set to TCP
8. Ensure that Forwarding Method is set to NAT
9. Click Update
10. Now click Modify next to the newly created VIP
11. Ensure Persistence is enabled and set Persistence Timeout to 3600 (i.e. 1 hour)
12. Click Update
Define the Real Servers (RIPs)
1. Using the WebUI, navigate to: Cluster Configuration > Layer 4 – Real Servers
2. Click Add a new Real Server next to the newly created VIP
3. Enter the following details:
21
© Copyright Loadbalancer.org • www.loadbalancer.org • sales@loadbalancer.org4. Enter an appropriate label (name) for the first Web Gateway, e.g. Proxy1
5. Set the Real Server IP Address field to the required IP address, e.g. 192.168.4.210
6. Set the Real Server Port field to the required port, e.g. 8080
7. Click Update
8. Repeat the above steps to add your other Web Gateway(s)
Web Gateway Configuration
Configure a Static Route
As mentioned, Option 1C requires a Static Route to be defined on the Web Gateway that forces client return traffic to
pass back via the load balancer. When using an HA pair of load balancers, the gateway for the static route must be a
Floating IP to provide a consistent return path via the load balancer – whether the master or slave is active. Page 20
details how to create the Floating IP.
Note: Please refer to the McAfee Web Gateway documentation for instructions on configuring a
Static Route. This should be done on all Web Gateways.
Finalize Settings
Now refer to the section “Configuration Settings Common to Options 1A, 1B & 1C” below to finalize Web Gateway and
client browser settings.
Configuration Settings Common to Options 1A, 1B & 1C
The steps in the following 3 sub sections must be followed for options 1A, 1B & 1C.
Web Gateway Operating Mode
The McAfee Web Gateway can easily be configured for Explicit Proxy Mode using the WebUI option: Configuration > Proxies
(HTTP(S), FTP, ICAP and IM) and selecting the option Proxy (optional WCCP) as shown below:
22
© Copyright Loadbalancer.org • www.loadbalancer.org • sales@loadbalancer.orgProxy Port Configuration
The required proxy port can be set as shown below, simple edit the default entry and change the port as required:
Note: The default proxy port for McAfee Web Gateways is 9090.
Client Configuration
Client browser settings must be set so that browsers connect via the VIP. In a Microsoft based LAN environment, this is
typically achieved using AD group policy.
Note: Depending on your requirements, it may be necessary to use an FQDN rather than an IP
address for the Proxy server address. If you use an FQDN, make sure you have a valid DNS
configuration that correctly resolves the hostname.
23
© Copyright Loadbalancer.org • www.loadbalancer.org • sales@loadbalancer.orgBrowser Network Settings:
24
© Copyright Loadbalancer.org • www.loadbalancer.org • sales@loadbalancer.org11. Option 2 - Transparent Routed Proxy Mode
Deployment Architecture
Default Gateway
(see notes below)
Loadbalancer.org Clustered Pair
Master
Heartbeat
Slave
McAfee Web Gateway 1
McAfee Web Gateway 2
Notes:
• Rules must be added to the router/firewall so that the required traffic (typically HTTP & HTTPS on port 80 &
443) is sent transparently to the load balancer, please see page 30 for example rules for a Linux router
• As with Explicit Proxy Mode, the load balancer is configured in Layer 4 DR mode
• Firewall rules must be added to the load balancer to transparently send traffic to the Web Gateways (see page
25
© Copyright Loadbalancer.org • www.loadbalancer.org • sales@loadbalancer.org27)
• Loadbalancer.org recommend that load balancer appliances are deployed in pairs for high availability. In this
guide a single unit is deployed first, adding a secondary slave unit is covered in section 1 of the Appendix on
page 33
• For more information on McAfee Web Gateway deployment options please refer to this URL
Load Balancer Configuration
Create The Virtual Service (VIP)
1. Using the WebUI, navigate to: Cluster Configuration > Layer 4 – Virtual Services
2. Click Add a New Virtual Service
3. Enter the following details:
4. Enter an appropriate label (name) for the VIP, e.g. Proxy
5. Change the Virtual Service IP address field to 1
Note: This is the reference number for the 'Firewall Mark' . The same reference number is used when
configuring the firewall rules – please see page 27 for more details.
6. Clear the Virtual Service Ports field, the ports are defined in the firewall rules on page 27
7. Ensure that Protocol is set to Firewall Marks
Note: The ports field will be disabled when this is done.
8. Ensure that Forwarding Method is set to Direct Routing
26
© Copyright Loadbalancer.org • www.loadbalancer.org • sales@loadbalancer.org9. Click Update
10. Now click Modify next to the newly created VIP
11. Ensure Persistence is enabled and set Persistence Timeout to 3600 (i.e. 1 hour)
12. Under the Health Checks section change Check Type to Ping Server
13. Click Update
Add The Floating IP
1. Using the WebUI, navigate to: Cluster Configuration > Floating IPs
2. Enter an appropriate IP address for the Virtual Service, e.g. 192.168.2.202
3. Click Add Floating IP
Configure Firewall Rules
Note: The Firewall Script page is locked by default on newer Loadbalancer.org appliances as part of
“Secure Mode”, which makes applying the changes described below impossible.
To enable editing of the firewall script, navigate to Local Configuration > Security, set Appliance
Security Mode to Custom, and click the Update button to apply the change. Editing the Firewall Script
page will then be possible.
1. Using the WebUI, navigate to: Maintenance > Firewall Script
2. Scroll down to the Firewall Marks section
3. Add the following lines to this section as shown in the screen shot below:
iptables -t mangle -A PREROUTING -p tcp --dport 80 -j MARK --set-mark 1
iptables -t mangle -A PREROUTING -p tcp --dport 443 -j MARK --set-mark 1
ip rule add prio 100 fwmark 1 table 100
ip route add local 0/0 dev lo table 100
Note: Please see section 2 in the Appendix if you intend to forward ALL traffic to the Web Gateways.
27
© Copyright Loadbalancer.org • www.loadbalancer.org • sales@loadbalancer.org• Click Update
Define The Real Servers (RIPs)
1. Using the WebUI, navigate to: Cluster Configuration > Layer 4 – Real Servers
2. Click Add a New Real Server next to the newly created VIP
3. Enter the following details:
4. Enter an appropriate label (name) for the first Web Gateway, e.g. Proxy1
5. Change the Real Server IP Address field to the required IP address, e.g. 192.168.2.210
28
© Copyright Loadbalancer.org • www.loadbalancer.org • sales@loadbalancer.org6. Click Update
7. Repeat the above steps to add your other Web Gateway(s)
Web Gateway Configuration
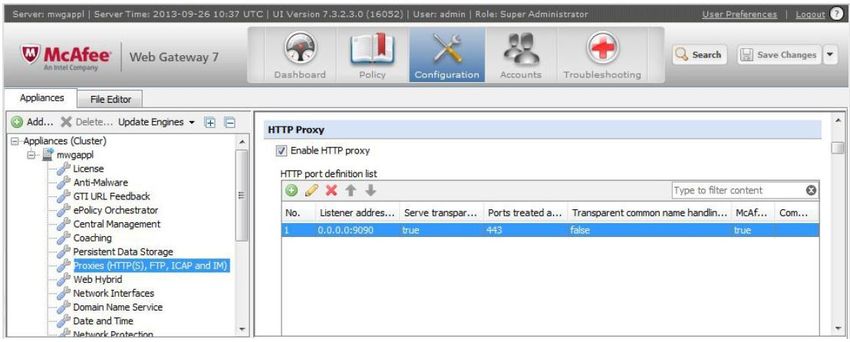
Web Gateway Operating Mode
The McAfee Web Gateway can easily be configured for transparent routed mode using the WebUI option: Configuration >
Proxies (HTTP(S), FTP, ICAP and IM)
Configure the following options:
1) Enable transparent router mode
2) Enable port redirection so that HTTP ports 80 & 443 are forwarded to the Web Gateway. Also set Director Priority to at
least 1 to enable the director
3) enable the HTTP Proxy
29
© Copyright Loadbalancer.org • www.loadbalancer.org • sales@loadbalancer.orgNote: When using transparent routed mode, it's not necessary to modify the Web Gateway to accept
traffic destined for the VIP, this is only required when using Explicit Proxy Mode.
Router/Default Gateway Configuration
Depending on your network configuration, rules must be added to the router/default gateway so that all required traffic
(typically HTTP & HTTPS on port 80 & 443) is sent to the floating IP address on the load balancer. The load balancer
then distributes this traffic between the Web Gateways. The example shown below is for a Linux based router:
Example iptables rules for a Linux based router:
SUBNET="192.168.2.0/24"
FWMARK="5"
TABLE="10"
LOADBALANCER ="192.168.2.202"
iptables -t mangle -A PREROUTING -s $SUBNET -p tcp -m tcp --dport 80 -
j MARK --set-mark $FWMARK
iptables -t mangle -A PREROUTING -s $SUBNET -p tcp -m tcp --dport 443
-j MARK --set-mark $FWMARK
ip route add default via $LOADBALANCER dev eth3 table $TABLE
ip rule add fwmark $FWMARK table $TABLE
This example uses policy routing via firewall marks. This works by first selecting and marking the packets we want to be
sent to the Web Gateway, i.e. all packets on port 80 & 443. Then, when the kernel goes to make a routing decision, the
marked packets aren't routed using the normal routing table, instead via table 10 in this case. Table 10 has only one
entry: route packets to the Web Gateway.
30
© Copyright Loadbalancer.org • www.loadbalancer.org • sales@loadbalancer.orgNote: This is required when no changes have been made to the clients default gateway settings.
Client Configuration
If rules are configured on the router as described in the section above, no client change are required. If such rules are
not configured, then the default gateway on the client PCs must be modified to be the load balancer.
12. Testing & Validation
To verify that the traffic is passing through the load balancer correctly the following reporting options can be used:
System Overview
Reports > Layer 4 Status
Reports > Layer 4 Current Connections
Many reporting and dashboard options are also available in the McAfee user interface. For more details please refer to
the appropriate McAfee documentation
Layer 4 – Current Connections
Explicit Proxy Mode
The example screen shot below illustrates that the test client (192.168.64.7) sends requests to the VIP (192.168.111.88),
the load balancer then forwards the request onto the Web Gateway (192.168.64.60).
Transparent Mode
The example screen shot below illustrates the difference when running in transparent mode.
31
© Copyright Loadbalancer.org • www.loadbalancer.org • sales@loadbalancer.orgMany reporting and dashboard options are also available in the McAfee Web Gateway user interface. For more details
please refer to the appropriate McAfee documentation.
13. Technical Support
If you have any questions regarding the appliance or would like assistance designing your deployment, please don't
hesitate to contact our support team: support@loadbalancer.org.
14. Further Documentation
The Administration Manual contains much more information about configuring and deploying the appliance. It's available here:
http://pdfs.loadbalancer.org/loadbalanceradministrationv8.pdf
15. Conclusion
Loadbalancer.org appliances provide a very cost effective solution for highly available load balanced McAfee Web
Gateway environments.
32
© Copyright Loadbalancer.org • www.loadbalancer.org • sales@loadbalancer.org16. Appendix
1 – Clustered Pair Configuration – Adding a Slave Unit
If you initially configured just the master unit and now need to add a slave - our recommended procedure, please refer
to the relevant section below for more details:
Note: A number of settings are not replicated as part of the master/slave pairing process and
therefore must be manually configured on the slave appliance. These are listed below:
• Hostname & DNS settings
• Network settings including IP addresses, bonding configuration and VLANs
• Routing configuration including default gateways and static routes
• Date & time settings
• Physical – Advanced Configuration settings including Internet Proxy IP address & port, Firewall
table size, SMTP relay and Syslog server
• SNMP settings
• Graphing settings
• Firewall Script & Firewall Lockdown Script settings
• Software updates
Version 7:
Please refer to Chapter 8 – Appliance Clustering for HA in the v7 Administration Manual.
Version 8:
To add a slave node – i.e. create a highly available clustered pair:
• Deploy a second appliance that will be the slave and configure initial network settings
• Using the WebUI, navigate to: Cluster Configuration > High-Availability Configuration
33
© Copyright Loadbalancer.org • www.loadbalancer.org • sales@loadbalancer.org• Specify the IP address and the loadbalancer users password (the default is 'loadbalancer') for the slave (peer)
appliance as shown above
• Click Add new node
• The pairing process now commences as shown below:
• Once complete, the following will be displayed:
• To finalize the configuration, restart heartbeat and any other services as prompted in the blue message box at
the top of the screen
Note: Clicking the Restart Heartbeat button on the master appliance will also automatically restart
heartbeat on the slave appliance.
Note: Please refer to chapter 9 – Appliance Clustering for HA in the Administration Manual for more
detailed information on configuring HA with 2 appliances.
34
© Copyright Loadbalancer.org • www.loadbalancer.org • sales@loadbalancer.org2 – Modified Transparent Mode Firewall Rules
If ALL traffic is to be forwarded to the Web Gateways, the firewall rules below should be used rather than the rules on
page 27, i.e.:
Replace:
iptables -t mangle -A PREROUTING -p tcp --dport 80 -j MARK --set-mark
1
iptables -t mangle -A PREROUTING -p tcp --dport 443 -j MARK --set-mark
1
ip rule add prio 100 fwmark 1 table 100
ip route add local 0/0 dev lo table 100
With:
iptables -t mangle -A PREROUTING -p tcp -j MARK --set-mark 1
iptables -t mangle -A PREROUTING -p udp -j MARK --set-mark 1
iptables -t mangle -A PREROUTING -p tcp -d -j MARK --set-mark
2
iptables -t mangle -A PREROUTING -p udp -d -j MARK --set-mark
2
ip rule add prio 100 fwmark 1 table 100
ip route add local 0/0 dev lo table 100
Notes:
• should be replaced with the base IP address of the load balancer (typically eth0), this is the address
used by heartbeat and for administration purpose
• If these modified firewall rules are used, then either the default gateway for client PC's should be changed to be
the load balancer, or the rules on the router should be changed to forward all traffic to the load balancer
• This will only work for TCP and UDP traffic. So for example, ICMP and some VPN technologies will not work
because the load balancer only supports TCP and UDP.
Don't hesitate to contact our support team if you need further assistance: support@loadbalancer.org
35
© Copyright Loadbalancer.org • www.loadbalancer.org • sales@loadbalancer.org17. Document Revision History
Version Date Change Reason for Change Changed By
1.4.0 20 August 2019 Styling and layout General styling updates RJC
1.4.1 17 January 2020 Added note explaining how to Required update RJC
disable “Secure Mode” to unlock
the firewall script page
1.4.2 26 August 2020 New title page Branding update AH
Updated Canadian contact Change to Canadian contact
details details
36
© Copyright Loadbalancer.org • www.loadbalancer.org • sales@loadbalancer.orgAbout Loadbalancer.org
Loadbalancer.org’s mission is to ensure that its clients’ businesses are never interrupted. The load balancer
experts ask the right questions to get to the heart of what matters, bringing a depth of understanding to each
deployment. Experience enables Loadbalancer.org engineers to design less complex, unbreakable solutions - and
to provide exceptional personalized support.
United Kingdom Canada
Loadbalancer.org Ltd. Loadbalancer.org Appliances Ltd.
Compass House, North Harbour 300-422 Richards Street, Vancouver,
Business Park, Portsmouth, PO6 4PS BC, V6B 2Z4, Canada
UK:+44 (0) 330 380 1064 TEL:+1 866 998 0508
sales@loadbalancer.org sales@loadbalancer.org
support@loadbalancer.org support@loadbalancer.org
United States Germany
Loadbalancer.org, Inc. Loadbalancer.org GmbH
4550 Linden Hill Road, Suite 201 Tengstraße 2780798,
Wilmington, DE 19808, USA München, Germany
TEL: +1 833.274.2566 TEL: +49 (0)89 2000 2179
sales@loadbalancer.org sales@loadbalancer.org
support@loadbalancer.org support@loadbalancer.org
© Copyright Loadbalancer.org • www.loadbalancer.orgYou can also read