Implementing a Dojo dataGrid in IBM WebSphere Portal applications
←
→
Page content transcription
If your browser does not render page correctly, please read the page content below
Implementing a Dojo dataGrid in IBM WebSphere
Portal applications

Mark Polly
Senior Solution Architect
Perficient, Inc.
Mayfield Heights, OH USA

April 2011

© Copyright International Business Machines Corporation 2011. All rights reserved.

Summary: IBM® WebSphere® Portal now includes the powerful Dojo framework that can add
significant Web 2.0 capabilities to your portal. In this article, we explore in detail the dataGrid
feature, encountering additional Dojo features along the way. The dataGrid component
implements a feature-rich, scroll-able, sortable table that gives your applications a beautiful look
while saving you a tremendous amount of development time.

Table of Contents
1 Introduction...............................................................................................................................2
2 Defining the dataGrid................................................................................................................3
3 Using ItemFileWriteStore..........................................................................................................5
   3.1 Store data format..............................................................................................................6
4 Instantiating Dojo components..................................................................................................6
5 Loading and reloading the dataGrid..........................................................................................7
6 Formatting columns................................................................................................................10
   6.1 Formatter.........................................................................................................................10
   6.2 Get..................................................................................................................................10
   6.3 Simple Get function.........................................................................................................11
   6.4 Complex Get function......................................................................................................11
7 Altering the dataGrid’s style....................................................................................................14
8 Using the Standby widget to provide visual feedback.............................................................15
9 Conclusion..............................................................................................................................17
10 Resources.............................................................................................................................17
About the author........................................................................................................................17

                                                                      1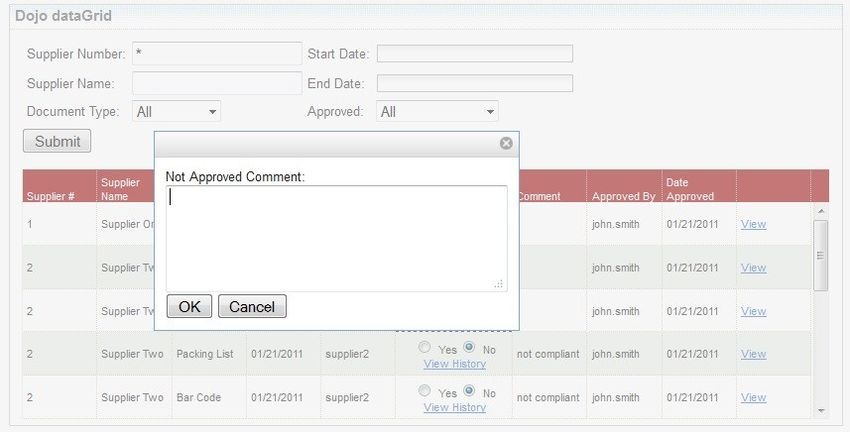
1 Introduction
Many of the custom portlet projects I have developed over the years have required some sort of
table to display the results of a query. I'm often asked to make the table scroll-able, so it doesn't
take up the whole page, and to enable the data to be sorted within the columns. These
requirements convert a simple table-building project into a very complex task, if you try to do it
from scratch.
Fortunately, WebSphere Portal versions 6.1 and later ship with the Dojo framework embedded
into the theme. Now any portlet can take advantage of all the great features of Dojo, including
the dataGrid, which provides a scroll-able, sortable table that is easy to implement within any
portlet.
You can combine the dataGrid with other Web 2.0 features of WebSphere Portal and Dojo to
create a portlet that is browser independent and that takes advantage of the latest in
asynchronous communications.
Using an example portlet, we address the implementation details of the dataGrid. Our sample
code is based on Dojo version 1.3.2, which is shipped with WebSphere Portal. (WebSphere
Portal version 7.0 makes Dojo 1.4 available for one of the themes.)
For our example, we have a requirement to search through a database of supplier documents
that have been uploaded by other users. Our goal is to find a set of documents, view them, and
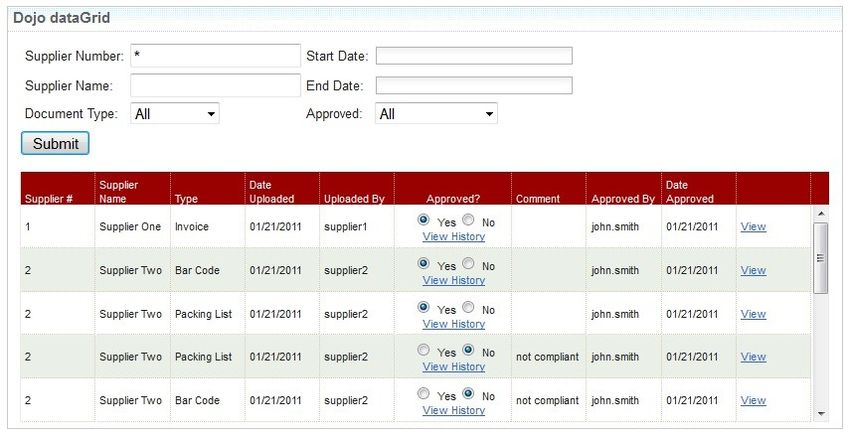
ultimately approve or reject the documents. Figure 1 shows our final portlet with the list of
documents displayed in a Dojo dataGrid.
Figure 1. Document Review portlet
As you can see in our example portlet, we have a set of search fields, a Submit button, and a
table of results. Because we want our portlet to be Web 2.0-like, we have implemented the Dojo
dataGrid to display our search results, allowing the portlet to display a scroll-able list of results,
to keep our portlet size to a minimum.
2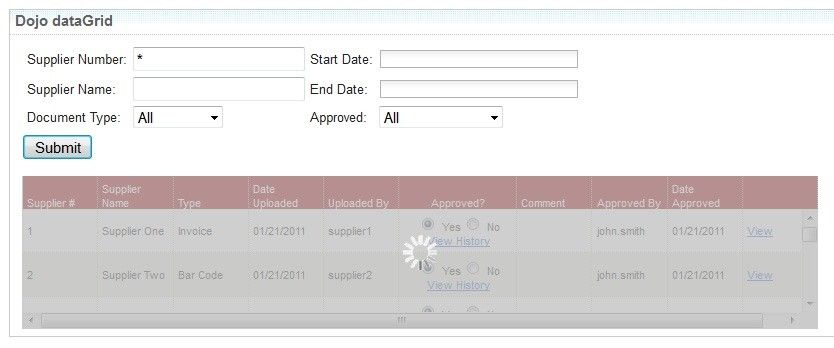
2 Defining the dataGrid
There are two ways to define a dataGrid on our page. One way is to use JavaScriptTM to create
the grid and add it to the page. The second method is to use a regular HTML  to
define the grid.

We choose the HTML table method because it is easy to define and understand the layout of
the grid. Listing 1 shows the HTML table code for our grid, which is placed on
DojoDataGridPortletView.jsp.

Listing 1. dataGrid definition
formatter="formatDate">

The dataGrid is defined by a standard HTML  tag. Below are highlighted the key
components of the table definition that are used by Dojo to create the dataGrid.

   •   dojoType="dojox.grid.DataGrid". After the page loads, Dojo performs a parsing
       operation on the page, looking for Dojo components that need to be created or
       manipulated. When Dojo finds a dojoType tag, it makes a Dojo component out of that
       Document Object Model (DOM) node. In this case, we are telling Dojo to make our
        into a dojox.grid.DataGrid component.

   •   class=”tundraGrid” . The dataGrid control uses css to lay out the grid, so you
       need to tell the table which theme-based css class contains the correct elements. In our
       portal theme (and in the default portal theme), we have included links to Dojo's Tundra
       theme. Since we are using the Tundra theme, we define the tundraGrid class to make
       sure the grid uses the correct styles.

   •   jsId="documentsGrid. Dojo uses the jsId tag to assign
       a global variable to the dataGrid, using the name you specify. Because the variable is
       global to our Web page, we need to namespace it properly, using the standard portal jsp
       tag  to do that. In any of our custom JavaScript, we can now refer
       to the dataGrid by this global name.

   •   store="documentsStore". dataGrid gets all its data from
       a Dojo store (more on this later), so we must tell the grid which store has its data. We
       have included a namespace on our store name to prevent name collisions with other
       portlets.

   •   query="{}". dataGrid provides a query function to allow data in the store to be
       filtered. For example, if your store contains all documents and you wanted to show just
       those that are new, you would use the query object to return only new documents from
       the store. Since our grid will display all items in the store, our query is empty.

   •   escapeHTMLInData="false". Your store may contain HTML formatting that you
       want to display. Setting this property to “false” tells Dojo to pass the HTML code to the
       browser for processing. The default value is “true”, by which Dojo will convert HTML
       codes so they are not processed as code. In our example, we want to display some links
       in our data using the  tag.

Columns in the grid are defined in table head tags, . In the code in listing 1 there are
11 columns defined by use of the  tag. The critical items to look at when defining columns
are as follows:

                                               4
• . The “field” element of the tag defines the name of
a field held in our grid’s store. In this example we are telling the grid to display the
supplierNumber field from a row in the store.
• . dataGrid uses the
text in between the and tags as the column header for that column. In our
example, we want to localize the column name for the supplierNumber, so we used the
JSTL tag to display the text.
That’s pretty much all you need to define a basic Dojo dataGrid in your portlet. However, there
are two more items you must define in order to display data in the grid: a Dojo data store and
instantiation of the Dojo components.
3 Using ItemFileWriteStore
In our example portlet, we use Dojo’s ItemFileWriteStore component to hold data for our grid.
Dojo includes many data storage implementations that can be used with a grid.
ItemFileWriteStore is a writable version of Dojo’s ItemFileReadStore and basically stores a
collection of JavaScript Object Notation (JSON) structured objects in memory for quick access.
We chose the ItemFileWriteStore because our portlet needs to write user comments back to
the store whenever a document is rejected.
Just as with the dataGrid, we can define a store using JavaScript or regular HTML markup.
Here we use the following markup in our portlet .jsp to keep it simple:
There are several elements defined in the tag that are specific to Dojo:
• The dojoType element defines the type of store Dojo will create. In this case we define
an ItemFileWriteStore.
• jsId= instructs Dojo to assign the value as the name of a global JavaScript object, so
that any of our JavaScript code can now reference the store directly by name
(documentsStore).
Note that we use portlet namespacing to ensure we don’t cause collisions with other
stores that may be defined on the page. The value here is what we reference in our grid
definition (store=).
• data= defines the name of the JavaScript object that contains data for the store. The
“data” tag tells the store that its data will be coming from the JavaScript object defined
on the page.
As an alternative, we could use the element “url=” to indicate that the data will be loaded
from a location on the Internet. The initial store won’t have any data because the user
needs fill in the search fields, so our initial store data will be an empty object.
53.1 Store data format
Store data for the ItemFileWriteStore is a JavaScript object that includes an “items” array of
objects. If we want to supply data to our grid when the page loads, we can set the
documentData variable as shown in listing 2.
Listing 2. Store data
var documentData = (items:[
{"documentId":146,"uploadDate":"01/21/2011","comment":"",
"supplierNumber":"1","fileName":"Book1.xls",
"approvalDate":"01/21/2011",
"approved":"Yes","mimeFileType":"application/vnd.ms-excel",
"approver":"john.smith","uploader":"supplier1",
"canDelete":false,"documentType":"Invoice",
"supplierName":"Supplier One","documentTypeCode":"INV"},
{"documentId":147,"uploadDate":"01/21/2011","comment":"",
"supplierNumber":"2","fileName":"test.xls",
"approvalDate":"01/21/2011",
"approved":"Yes","mimeFileType":"application/vnd.ms-excel",
"approver":"john.smith","uploader":"supplier2",
"canDelete":false,"documentType":"Invoice",
"supplierName":"Supplier Two","documentTypeCode":"INV"};
]}
Note that we define the data in this example by using JSON notation.
In the sample portlet, we don’t want to display any data until the user enters some search
criteria and clicks Submit, so we instantiate our data object with an empty array of items:
var documentData = {items:[]};
4 Instantiating Dojo components
So far, we have defined dataGrid and ItemFileWriteStore components, but they won't do
anything until we tell Dojo about them, which we do in two ways:
(1) First, we must tell Dojo which components we want to use on our page, using JavaScript
calls to dojo.require(). These JavaScript calls are at the top of our portlet, a sample of
which is shown in listing 3.
Listing 3. Sample JavaScript call
dojo.require("dojo.parser");
dojo.require("dojo.number");
dojo.require("dojo.data.ItemFileWriteStore");
dojo.require("dojox.grid.DataGrid");
…
(2) Second, we must tell Dojo where on our portlet page it should look for Dojo components.
Dojo contains a parser that looks through the HTML code for Dojo calls, and interprets and
executes them. Since you may have Dojo code mixed with other JavaScript code, Dojo
provides a mechanism by which you can limit the scope of the parser. Here is a sample
from our portlet:
6function init(){
dojo.parser.parse( "portletWidgetContainer" );
}
• This parse() method instructs Dojo to parse the portion of the DOM identified by the id
“portletWidgetContainer”. In our portlet, we want Dojo to parse
the entire portlet .jsp, so we create the following around our entire jsp page:
...
• You can also put similar code into your theme, to have Dojo parse every portal page,
rather than going portlet-by-portlet.
• Finally, the parse() method should run only after the entire page has been loaded by
the browser. I like to put all commands that must run after the loads into my own init()
function. Then I call Dojo’s addOnLoad() method to ensure init() runs at the right time:
dojo.addOnLoad(init());
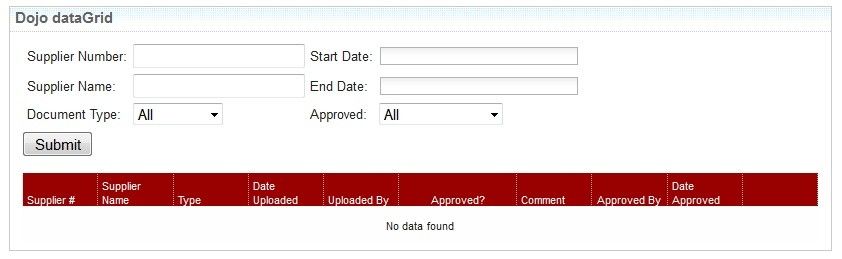
By now, we have a fully functional dataGrid that displays an empty grid on our page. We told
the grid to display the message “No data found” by setting the element noDataMessage in the
table tag (see figure 2). noDataMessage is another customer element defined by the dataGrid
that allows you to display a customized message when the table is empty.
Figure 2. Empty dataGrid
Let’s now look at some advanced dataGrid techniques that allow us to display the data based
on our users' search criteria.
5 Loading and reloading the dataGrid
We won’t cover the specifics of the input fields and the Submit button because that is basic
HTML markup. Instead of submitting the entire page to our server using form.submit(), we use
AJAX to call a servlet to perform a search and return data for our grid. The basic sequence of
events is:
1. Submit key pressed (onclick="Submit_Me(this.form);")
2. Call dojo.xhrGet() to retrieve new data.
73. Load returned data into a new store.
4. Assign the new store to the grid.
5. Refresh the grid.
Listing 4 displays the JavaScript code that implements this sequence, followed by descriptions
of key portions of the code.
Listing 4. Code to load data into dataGrid
function Submit_Me(searchForm){
errorNode.innerHTML = "";
GetDocuments(searchForm);
}
function GetDocuments(searchForm){
standby.show();//turn on the ajax loader
var url = '';
dojo.xhrGet({
url: url,
form: searchForm,
handleAs: 'json',
preventCache: true,
load: LoadDocumentsData,
error: DisplayFetchError
});
return false;
}
function LoadDocumentsData(returnedData){
if(returnedData.errorMsg){
errorNode.innerHTML = returnedData.error;
}else{
documentData = new dojo.data.ItemFileWriteStore(
{data:returnedData});
documentsGrid.store=documentData;
documentsGrid.sort();
standby.hide();
}
}
• Submit_Me() receives a form object from the Submit button and passes the form to
function GetDocuments(). If we want to perform any field validation on the form, we
could do it in the Submit_Me() function before calling GetDocuments.
• GetDocuments() calls dojo.xhrGet() to send an asynchronous HTTP Get request to our
search servlet that is part of our portlet .war file. The servlet url is built by use of the
standard technique for building a portlet context path to the servlet.
• xhrGet() accepts a JavaScript object of parameters and values, which we define using
the JSON format:
o url: Provides the url to our servlet.
8o form: Tells Dojo to send all fields from the form to the server as request
parameters. In our case, all our search fields will be sent to the servlet.
o handleAs: Indicates to Dojo the format of the data returned by the servlet. The
value ‘json’ means our servlet will return text data in a JSON format. Dojo
automatically converts the returned text into a JavaScript object.
o preventCache: You can control whether Dojo uses the browser’s cache for
servlet data. By setting this parameter to “true”, you ensure the browser cache is
bypassed, and the servlet is called every time.
o load: This is the name of the JavaScript function that Dojo calls after the servlet
runs successfully. Returned data is passed to that function automatically. It is
important to note that the servlet runs asynchronously to our Web page, so our
data may come back quickly or take some time. Dojo ensures that our load:
function will be called as soon as the servlet returns a successful message.
o error: This is the name of the JavaScript function that Dojo calls, if there is an
error with the URL (such as a 404 or 500). The error message from the servlet is
passed to that function automatically.
• Assuming our servlet runs successfully, Dojo automatically calls
LoadDocumentsData() and passes to it the data returned by the
servlet. Since we told Dojo our data is formatted as JSON, we receive a true JavaScript
object created by Dojo, using the text supplied by the servlet:
o In LoadDocumentsData() we first check whether our JavaScript object (which we
called returnedData) contains any error messages. This is a convention we use
in our servlet; if there was some problem with our servlet that we caught, we
return a nice error message. The JSON notation for the error object returned by
our servlet looks like this:
{errors:’there was an error…’}
o If our servlet finds data for the user, we return the list of documents in an array
called items. The JSON notation for the object returned by our servlet looks like
this:
{items:[{documentId: 1,…},…]}
o Next we create a new ItemFileWriteStore object and load the returned data into
the new store. The “data:” parameter accepts a JavaScript object containing our
new data.
o We then tell the grid to use the new store, effectively changing the data available
to the grid.
o Finally, to display the new data in our grid, we must call the grid’s sort() method.
dataGrid does not have a refresh method, but the sort method refreshes the grid.
So really, we are not sorting the grid, we are just using that to refresh the
display.
9You may be wondering, if the store can use a URL for its data, why go through this process to
refresh the data? Why not just call something like store.refresh()? Well, in Dojo 1.3.2, the store
object does not have a refresh() method!
6 Formatting columns
The dataGrid is outstanding at displaying the data contained in the Dojo store---quite useful
when you read data from a backend database and store it locally for the grid. But what if you
want to transform some of the column data for display without altering the data in the underlying
store?
For instance, maybe you want to display a number using a locale-specific format or need to
convert data into a link. Dojo provides two methods, Formatter and Get, for transforming data
displayed in the grid.
6.1 Formatter
In Listing 1, you may have noticed that some of our tags included an element called
“formatter=”, which is not standard HTML. When the dataGrid object sees the formatter
element, it calls the function defined by that element and passes it the column data for each
row. The grid expects your function to return it some data to display in the grid.
Formatter is quite useful for translating dates and numbers into other languages or formats. In
our portlet, we have a formatDate() function that localizes dates in the grid for our users. Listing
5 displays the formatDate function, which uses Dojo’s locale features to convert dates into the
proper format for the user.
Listing 5. formatDate function
function formatDate(date) {
if(date == "") return date;
return dojo.date.locale.format(new Date(date),
{selector: "date",datePattern:''});
}
Notice that we used JSTL to control the formatting of the date pattern.
Although this is not necessary, it is one way to control date patterns using standard Java
resource bundles.
6.2 Get
If you need more advanced data manipulation in your grid, then you want the Get element. In
our portlet, we have three use cases that Get will solve:
1. First, we must provide a “View” link to the actual document referenced by each row in the
grid. We do this by creating a link to a servlet that finds the document and streams it back
to the user.
2. Second, we want to provide an approval function for each row in the grid; specifically, we
want to display whether the document has been approved by showing a Yes/No radio
button:
Also, if the user clicks No to reject the document, we want the user to enter a comment,
which is then stored in our backend database.
103. Finally, we need a link in this column to allow the user to see the approval history for the
document.
We could simply make these changes in our search servlet; as we get rows back from the
database, we could replace the actual data with HTML code. But this is cumbersome for the
servlet and places extra load on the server. And what if the data is coming from another source,
such as a Web service, that we may not be able to alter?
6.3 Simple Get function
The Get element allows us to make these adjustments to the column data in the browser via
JavaScript. Get= defines the JavaScript function to call for each row in the grid, and Dojo
passes the entire row object from the store and grid row number to your function. Your
function’s obligation is to return what you want displayed to the grid.
In the last column of our grid, we want to display a link that opens the document in a new
window. This View link (see figure 3) calls a servlet within our portlet that streams the actual
document to the user.
Figure 3. View link
Listing 6 shows a simple example of one of our Get functions. The GetDocLink function builds a
url to the servlet and includes a document ID (value of itemSel.documnetId) as a query
parameter. Dojo passes two parameters to our function: row is the row number of the grid, and
itemSel is the entire row object including its data. You can name these parameters anything.
The function returns HTML code to build a link to the grid and, in the grid table definition, we set
the value of escapeHTMLInData to “false,” to prevent the grid from escaping our link HTML.
Listing 6. Simple Get function
function GetDocLink(row, itemSel){
if(itemSel != null){
url = '?docId=' +
itemSel.documentId +
'&getDoc=true';
return 'View';
}
}
6.4 Complex Get function
To implement the approval use case, we need a much more complex Get function. Here we
need to transform a simple “Yes/No” data value returned by our server into two radio buttons,
one of which has an onclick event, as well as an HTML link to display approval history for the
document.
11Figure 4 shows the resulting grid, and figure 5 shows the window that pops up in response to
the onclick event.
Figure 4. Approval feature in the grid
Figure 5. Not Approved Comment window
Listing 7 shows the Get function that builds the approval feature.
Listing 7. Complex Get function
function GetApprovalRB(row, itemSel){
if(itemSel != null){
var approved = itemSel.approved;
var supplierNumber= itemSel.supplierNumber;
var docType= itemSel.docType;
var docId= itemSel.documentId;
var rbYes = '';
var rbNo = '';
var approveHist = '';
if(approved == 'Yes'){
rbYes = " Yes";
12rbNo = "
No";
approveHist = '' + GetApproveHistLink(row,
itemSel);
}else if(approved == 'No'){
rbYes = " Yes";
rbNo = " No";
approveHist = '' +
GetApproveHistLink(row, itemSel);
}else{
rbYes = " Yes";
rbNo = " No";
}
return rbYes + rbNo + approveHist;
}
}
function GetApproveHistLink(row, itemSel){
if(itemSel != null){
return 'View History';
}
}
The following are some important sections of this code:
13• Dojo passes to your function the store object for the row being processed and the row
number. We call the row object “itemSel,” but you can use any name.
• Since we are passed a JavaScript object, we can access data, using the field names
from the store itemSel.approved . In our data, approved has a value of either “yes” or
“no”.
• With a radio button, you must include the “checked” element to turn on the button, so we
must check the value of the approved field for the row to determine which radio button
to check, if any.
• Our function needs to create two radio buttons, one for Yes and one for No. Since we
want the buttons to work together, we give both buttons the same name, approvalRB.
However, we don’t want all the radio buttons in the grid to interact, so we add the row
number to distinguish the radio buttons in row one from row two.
• To implement the ability for a rejection to display a comment box, we add an onclick
element to the “No” radio button. In this case, we have the onclick event call our custom
JavaScript function ShowCommentDialog() and pass along the original row from the
grid. The row value corresponds to the index of that item in the underlying Dojo store.
• Below the radio button we want to display a link that shows approval history for each
item. We build the HTML for the link, using our custom JavaScript function
GetApproveHistLink(), and pass along to this function the itemSel object and row so it
can build the history link correctly.
• Finally, our function returns the HTML code for the two radio buttons and the view
history link, after which the grid displays that HTML code in the browser.
7 Altering the dataGrid’s style
When we defined the grid using the HTML table tag, we set the class to “tundraGrid”, which
styles the grid using Dojo’s Tundra theme. Out of the box, the WebSphere Portal theme
automatically loads the Tundra theme, but not the tundraGrid classes.
You can add links to the grid Cascading Style Sheets (CSS) files into each portlet. Since we are
planning to use dataGrid in multiple portlets, we decide to add these links directly into the
theme.
In WebSphere Portal 6.1, links to theme files are normally located in head_links.jspf, which is
where we added the following links:
In this article's figures, you can see that our column headings are red and that we use a gray
color for every other row. We did this by overriding several tundraGrid css classes. We included
the css in our theme (see listing 8), and we made sure it loaded after the links shown above,
thus overriding selected portions of the grid css.
14Listing 8. CSS to change header and row colors
.dojoxGrid table {
margin: 0;
}
.dojoxGridRowOdd table {
background-color:#EAEFE8;
}
.tundra .dojoxGridHeader, .tundra .dojoxGridHeader .dojoxGridCell {
vertical-align: bottom;
color: #FFFFFF !important;
background: #990000; !red
border-color: #ECE2D8;
font-weight: normal;
}
We set the alternating row colors by setting the background color of .dojoxGridRowOdd. We
could also change even rows, but we left the default color. Also, .dojoxGridHeader controls the
header row, so we set the background color here to red.
8 Using the Standby widget to provide visual feedback
The last Dojo component we want to highlight is the Standby widget, dojox.widget.Standby.
You may have noticed the following lines in listing 4:
standby.show();//turn on the ajax loader
…
…
standby.hide();
Since our search servlet runs asynchronously from our Web page, we like to give our users
some feedback that some process is running to update the grid. In other Web 2.0 Web sites
you have likely seen a “spinning” icon somewhere on the page that provides this visual
feedback.
Dojo’s Standby widget provides an extremely easy way of displaying this type of feedback;
specifically, it shows a gray box over the control you are refreshing, along with a spinning icon
(see figure 6).
Figure 6. Dojo Standby widget
15To implement the Standby widget, use these steps:
1. Define the Standby widget and identify which DOM node the widget will overlay by placing
the following div at the bottom of our portlet’s JSP, inside the portletWidgetContainer div:
where the jsId element makes our node a global JavaScript object, dojoType makes it the
Standby widget, and the target element tells the widget which area of the page or DOM
node to overlay. In our case, we want the Standby widget to overlay the entire data grid
while the grid is being refreshed, so our target is the ID of the data grid table.
2. Define style aspects of the standby widget, using css classes. These styles can be inserted
in your portlet or added to your theme directly:
.standbyUnderlayNode {
display: none;
opacity: 0;
z-index: 9999;
position: absolute;
cursor: wait;
}
.standbyImageNode {
opacity: 0;
display: none;
z-index: -10000;
position: absolute;
top: 0px;
left: 0px;
cursor: wait;
}
3. Finally, be sure to include a dojo.require() for the widget:
dojo.require("dojox.widget.Standby");
With the widget defined, you show or hide the widget at the appropriate time. For our portlet, we
call standby.show() immediately before calling xhrGet to get new
data from the server.
After we load data into the grid, we call standby.hide()to turn off
the widget. Note that we refer to the Standby widget using the jsId we defined for it, and we
include the portlet namespace tag to make it unique to our portlet.
You can use the Standby widget to overlay any node on your page, and you can have multiple
Standby widgets defined on the page; simply give each widget a different jsId value so you can
refer to each widget independently.
169 Conclusion
By including the Dojo framework in WebSphere Portal, IBM has provided powerful capabilities
with which you can build rich Internet applications into your portlets. The dataGrid, in particular,
is an extremely useful widget for displaying tabular-based data. By taking advantage of
advanced features in the dataGrid and other Dojo tools, you can implement Web 2.0 portlets
quickly and easily.
10 Resources
• Dojo toolkit home page:
http://dojotoolkit.org/
• developerWorks® WebSphere article, “Developing custom widgets for Business Space
using Dojo, Part 2: Creating a Dojo DataGrid component using a generic grid handler:”
http://www.ibm.com/developerworks/websphere/library/techarticles/1001_khanna/1001_kha
nna.html
• developerWorks WebSphere Portal zone:
http://www.ibm.com/developerworks/websphere/zones/portal/
About the author
Mark Polly works in Perficient's Portal and Collaboration practice as a Senior Solutions
Architect. For the past six years he has worked with a variety of customers implementing IBM
WebSphere Portal projects. You can reach him at mark.polly@perficient.com or view
Perficient's Portal Solutions Blog.
Trademarks
• developerWorks, IBM, and WebSphere are trademarks or registered trademarks of IBM Corporation
in the United States, other countries, or both.
• Java and all Java-based trademarks and logos are trademarks or registered trademarks of Sun
Microsystems, Inc. in the United States, other countries, or both.
• Other company, product, and service names may be trademarks or service marks of others.
17You can also read


