XR-3 METER WIFI OPERATIONS - DOCUMENT FILENAME WI-FI OPERATIONS REVISION 2.9 DATE 5 MARCH 2019 - APPLIED INSTRUMENTS
←
→
Page content transcription
If your browser does not render page correctly, please read the page content below
WiFi Operations
 XR-3 Meter

Document Filename Wi-Fi Operations
           Revision 2.9
               Date 5 March 2019
Wi-Fi Operations XR-3
1 Introduction
This document covers the operations of the Wi-Fi features available as an option to the XR-3
meter.
The features enabled by this Wi-Fi option are:
1. Wirelessly download software updates to XR-3 meter
2. Wirelessly upload Scan results files from XR-3 to a server via FTP
3. Hands-free mobile device display (requires XR-3 Remote app purchase for Android or iOS Apple
phone/tablet)
1.1 Hardware Compatibility
Not all XR-3 instruments are Wi-Fi ready. To check the hardware version of your XR-3, power it
on, press MENU soft-key, and select Versions.
Base HW Version:
< 3.0 the XR-3 main circuit board is not Wi-Fi ready.
3.00, Wi-Fi ready, but doesn’t have the Wi-Fi or Ethernet module installed.
3.01, you have the Wi-Fi module installed.
3.02, you have the Ethernet module installed.
3.03, you have the Wi-Fi and Ethernet modules installed.
3.05, you have the Wi-Fi module installed and
meter is compatible with unlocked version of XR-3 Remote app
If you have a Wi-Fi ready XR-3, but don’t yet have the Wi-Fi module installed, contact Applied
Instruments to obtain a quote and request a RMA# before sending in your XR-3 for modification.
1.2 Meter Software Update Downloads
The basic XR-3 can have firmware and Field Guide updates installed using a USB connection to
a Windows PC. With the Wi-Fi option, you can still use the USB connection, or you can update
the meter without a PC, just using the Wi-Fi connection to a wireless router or mobile hotspot to
access the internet.
1.3 File Uploads
With the basic XR-3 you can upload PoP Scans, Limit Scans, and more to a Windows PC using
the USB connection. With the Wi-Fi option, you can also upload files to an FTP server without a
wired connection.
1.4 Hands Free Display (XR-3 Remote Phone/Tablet app for Android & iOS)
With the Wi-Fi option and the purchase of the optional XR-3 Remote app from the Google Play
store or iTunes store, you can connect the XR-3 meter to a system being tested and then monitor
and control the test screens on an Android or iOS mobile device (i.e. smartphone, tablet, iPhone,
iPad).
For example, you could connect the meter to the ground block of a satellite antenna installation
and then verify alignment of dish or point the dish while watching the meter display on your
smartphone strapped to your arm. This method provides speed and safety benefits and is
particularly useful when troubleshooting an existing satellite system whose dish antenna reflector
is mounted up high (i.e. on roof or eave mount), which would require the technician to climb a
ladder. Or when troubleshooting coax cable in a building, leave your XR-3 at one point in the
network while you walk to inspect and resolve an issue at another point in the network. Then
remotely monitor the XR-3 using the XR-3 Remote app on your mobile device to quickly confirm
the issue has been resolved.
Page 2Wi-Fi Operations XR-3
2 Operations
2.1 Wi-Fi Networks
Select WiFi from Main Menu.
Hint: Once on the Main Menu screen, you can press the “WiFi” soft-key or press the number “5”
on the meter’s numeric keypad twice to skip down 10 spaces to toggle to WiFi quicker.
You will be presented with a list of available Wi-Fi networks within range.
The network name being broadcast (SSID), signal strength indicator, and encryption status of
each Wi-Fi network are displayed.
The signal strength is displayed using a color coded icon:
Green = strong signal, should work fine
Yellow = medium signal, some delays may be encountered
Red = weak signal, likely will not work reliably
To connect to one of the Wi-Fi networks within range, select the network name using the up or
down arrow buttons, and press Enter. If network is not encrypted, meter will begin to connect.
Page 3If network is encrypted, you will go to a login screen to enter a password. 2.2 Wi-Fi Login To enter a password, first press the Enter key. An on-screen keyboard will appear. There are three different views for the on-screen keyboard: 1) Upper case letters and numbers – Press “ABC” soft-key 2) Lower case letters and numbers – Press “abc” soft-key 3) Symbols – Press “Sym” soft-key Use the four arrow buttons to select a character and press Enter to record it. When all characters are entered, press “Save” soft-key to save the entire field.
Other soft-keys:
   1) Backspace – to delete the character to the left of the cursor
   2) Clear – to delete all characters and “clear” the field
   3) Save – to save the entire field and exit from the keyboard screen
   4) Cancel – to return to previous screen without saving changes

After you’ve entered a password, you can press “Save as Fav” to save it as one of your favorite
Wi-Fi networks. You can save up to 5 favorite Wi-Fi networks.

Press “Connect” to connect to the specified network.

Now press OK to return to the Wi-Fi Menu screen. The connection status is shown at the
bottom of the Wi-Fi Menu and Wi-Fi Networks screens.

2.3   Wi-Fi Menu

The Wi-Fi Menu list options are:
   1) Wi-Fi Networks
   2) Favorite Networks
   3) File Upload – use to upload saved scans from meter to server via FTP
   4) Meter Software Update – use to download software updates for the meter
   5) Wi-Fi Options – use to change Wi-Fi options settings
   6) Main Menu – exits to Main Menu
Wi-Fi Operations                                                                                 XR-3

       2.4    Wi-Fi Network Refresh
       The Wi-Fi Networks screen is usually used to connect to a network as described above.
       However, there are two functions not covered above: the Advanced and Refresh soft keys.

       The Refresh button simply updates the detected network list from a new scan.

                                                    Page 6
Wi-Fi Operations XR-3
2.5 Wi-Fi Networks Advanced Info
If you press Advanced soft-key, the meter displays the following for the selected network:
1) MAC Address of Wi-Fi access point
2) Security level (whether network is open or encrypted and if encrypted, the type of
encryption) of Wi-Fi access point
3) RF level of Wi-Fi signal - Please note that this is a static value measured before you
entered the Advanced screen. It is not updated within the screen.
4) Channel used for Wi-Fi
5) Custom - Within the Advanced screen, if you press Custom soft-key, you can type in a
custom network ID and password (if applicable) for a network, even if you’re not within
range of the network or if the network ID (SSID) isn’t being broadcast.
2.6 Favorite Networks
This screen displays your favorite Wi-Fi networks and allows you to edit them or connect to them.
You can save up to five favorite Wi-Fi networks.
Page 7Wi-Fi Operations XR-3
2.7 Wi-Fi Options
You can customize a few Wi-Fi options settings:
1) Auto Connect – Select “OFF” or “ON” using left or right arrow button. If ON, the meter
will automatically connect to one of your favorite Wi-Fi networks (if it’s detected to be
within range) upon selecting “Wi-Fi” from the Main Menu.
2) Show IP – If connected wirelessly, press the ‘Show IP’ soft-key to display the IP
address that has been assigned to the XR-3.
3) Hands Free Cfg – Specify the SSID and Password for your XR-3 if you’d like to
connect to the XR-3 directly from your mobile device (i.e. Android phone or tablet,
iPhone, or iPad) using the XR-3 Remote app
4) Upload Config – Press to edit the File Upload Configuration, as described below in the
Upload Configuration section, to specify the webserver domain, subdirectory, username,
and password to use for the file upload destination.
5) Dnload Config – Press to edit the File Download Configuration, as described below in the
Download Configuration section, to specify the webserver domain and subdirectory where
the meter files will be downloaded from.
2.8 Download Configuration
Most commonly, the files being downloaded will be software update files for the meter. We
recommend using the default settings (press Default soft-key to load those). Then press Save.
Your company may wish to distribute updates on your own schedule from your own server. In
this case you would need to enter your own server's address on this screen.
Page 8Wi-Fi Operations XR-3
2.9 Upload Configuration
The XR-3 supports file upload via FTP (File Transfer Protocol). FTP is a standard network
protocol used to quickly and simply transfer computer files between a client and server. In this
instance, the XR-3 is the client.
Most modern PC and mobile device operating systems support FTP. This implies that any
computer or device connected to a TCP/IP based network can manipulate files on another
computer on that network, regardless of which operating systems are involved, provided that they
are open to FTP connections. There are many existing FTP client and server programs. Many of
these are available free or open source.2
1
https://en.wikipedia.org/wiki/File_Transfer_Protocol
2
https://simple.wikipedia.org/wiki/FTP
If you’re a small business XR-3 Wi-Fi user, you might like to store the files on one of these
popular online file storage (cloud storage) programs.
Dropbox™ - Visit https://www.dropbox.com/ftp for more information
Google Drive
Microsoft OneDrive
Box™ - Visit https://app.box.com/services/box_ftp_server or
https://community.box.com/t5/Managing-Your-Content/Using-Box-with-FTP/ta-p/312
for more information.
WebDrive makes it easier for users to copy and paste files from the FTP site to their cloud storage
platform after mapping drives to each. Visit https://southrivertech.com/products/webdrive/ for more
information.
In order to upload files, you need to specify some information about the FTP server that will be
accepting the files sent.
Page 9Wi-Fi Operations XR-3
The Default soft-key will fill in the fields with default settings that use the Applied Instruments FTP
server. This is intended for evaluation use only. Files uploaded with this setting are open for
public access and will be deleted periodically. You will need to enter your own FTP server's
information before actually using this feature.
These fields use the same keyboard screen described above to allow entry of all standard
keyboard characters.
Address: the destination webserver/website domain (i.e. www.appliedin.com)
Subdirectory: the name of the subdirectory to receive the files (i.e. upload).
For example: If you type “upload/John_Smith” as your Subdirectory, the upload destination would
be “www.appliedin.com/upload/John_Smith”.
Note: it’s not necessary to type the “/” character at the very beginning or end of the subdirectory
User ID: the username for the destination webserver/website
Password: the password for the destination webserver/website
Press Save soft-key to save your entered data.
Page 102.10 File Upload Screen If you haven’t already configured the details of where to send your files, press the “Upload Config” soft-key and refer to the Upload Configuration section above. This screen lets you select which files to upload. Only one type of file is displayed at a time. You can upload several files of the same type at once. If you have several types, you will need to upload them in batches, with each batch containing files of the same type. To change the type of displayed files, press the “File Type” soft-key. Use the up or down buttons to highlight the desired file type and press Enter.
Wi-Fi Operations                                                                                        XR-3

To select a file to upload, highlight it with the up and down arrows and press Enter to set the check mark.
You can check as many as you like. To select all files, press Enter when the “Select All” row is
highlighted.

Once the desired files are checked, press the “Upload” soft-key. The meter will display a message when
uploading each individual file. When upload is complete, meter will display “NOTE: Files posted to
server.”

                                                      Page 12
Wi-Fi Operations XR-3
Page 13Wi-Fi Operations XR-3
2.11 Meter Software Update
When you select “Software Update” from the Wi-Fi Menu, the meter will connect to the server
(using file directory path specified in the Download Configuration screen within the Options
screen) and obtain the latest available versions for the various software components.
You will briefly see “Opening XR-3.txt” message.
And then you will see the versions installed (Have column) and versions available (Avail column)
for each XR-3 software component. If the version installed is lower than the version available, the
meter will automatically place a check mark next to the related component. You can manually
check or uncheck a software component by highlighting it with the up or down arrows and
pressing Enter. Normally, there is no need to check anything that isn’t already checked and we
don’t recommend manually check marking the boxes. A description of the type of each software
component is displayed at the bottom center of the screen.
Some components have different options available. To see all available options, highlight the
component using the up or down arrows and then press the left or right arrow to select between
the various options. For example, when you scroll down to the Field Guide field, you can select
North American, South American, European, African, etc. For Postal Codes, you can select USA
ZipCodes, Canadian Postal, or No Postal Codes. For Dish Limits, you can select Dish East, Dish
Central, Dish West, or No Limits.
Page 14Wi-Fi Operations XR-3
When you have the desired components selected, press Update. The meter will begin
downloading each component and will display a progress bar for each.
The download process can take up to 8 minutes to complete, depending on the number of
components that need to be updated. When complete, the meter will reboot and default back to
the main Run screen.
2.11.1 Field Guides
(Applies to satellite modules only)
There are several Field Guides (satellite transponder databases) available now and more may be
added in the future. Each Field Guide covers a different geographic region of the world. You can
select the Field Guide you need from the above list.
1. North American
2. South American
3. European
4. African
5. Middle East
6. Asian
7. South Pacific
8. Alaska-Hawaii
9. Caribbean-Central America
Page 15Wi-Fi Operations XR-3
2.11.2 Limit Values
(Applies to satellite modules only)
For Dish Network related work, there are three Limit Value databases available: ‘Dish East’, ‘Dish
Central’, and ‘Dish West’. If you won’t be using the XR-3 for Dish Network applications, select
‘No Limits’.
You can select the Limit Values using the left or right arrow button when the Limit Values field is
highlighted.
2.11.3 Postal Codes
(Applies to satellite modules only)
Postal Code files provide look-up of latitude and longitude based on the postal code. Postal code
files for the United States and Canada are available now and more may be added in the future.
You can select the Postal Code file you need using the left or right arrow button when the Postal
Code field is highlighted.
If you are using the meter outside of the United States and Canada, then choose “No Postal
Codes.” This lets you type in and save the latitude and longitude for your location. Based on the
lat/long coordinates provided, the meter can still calculate the azimuth, elevation, and skew
settings of the dish antenna for each satellite.
Page 163 Updating the Wi-Fi Module
The Wi-Fi features are implemented using a separate hardware module within the XR-3 base
instrument. The firmware for this module can be updated a.) using the Wi-Fi update feature
described above or b.) using the FlashUpdate program on a Windows computer or c.) using a
device that has Wi-Fi or a computer that is connected to a network that includes a Wi-Fi access
point. Below are the various methods you can use to update the firmware in the XR-3’s optional
internal Wi-Fi module.
3.1 Using the FlashUpdate within the XR-3 while connected via Wi-Fi
Follow the process described in section 2.11 of this document above.
3.2 Using the FlashUpdate program running on a Windows PC while the XR-3 is
connected to the PC via USB.
Run FlashUpdate and follow the normal software update process, as described in the XR-3 user
operation manual.Wi-Fi Operations XR-3
3.3 From a Wi-Fi enabled device
(e.g. smartphone, laptop PC, etc.)
1. First, download the Wifi module firmware update file to your device. For example, one
way to do this on an Android phone is to use Chrome or some other browser and
enter the following web address:
www.appliedin.com/XR-3/wifiV113.rom
Your browser should save the file in a download folder somewhere in your device's file
system. You will need to be able to find this file in a later step.
Note: the file name will change with each new version; the exact filename will be included
in the update announcement.
2. Turn on the XR-3 meter.
3. On your PC or mobile device, go to the screen that displays available Wi-Fi networks.
Pick the network (SSID) related to your XR-3. If you’re not sure of your XR-3’s SSID
and password, in your XR-3, go to MENU WiFi WiFi Options Hands Free Cfg.
By default, your XR-3’s SSID will be “XR-3_XXXXXXX”, (the XXXXXXX will vary
depending on your unit’s serial number).
4. Navigate your PC or mobile device's web browser to 192.168.0.1 and log in
with “admin” and “PASSWORD”.
5. Follow the “Common steps” below.
3.4 From a networked computer
Use this method if you have a networked computer and connect the meter to the same network
through a Wi-Fi access point.
1. First, download the Wifi module firmware update file to your computer. One way to do
this is to use a browser and enter the following web address:
www.appliedin.com/XR-3/wifiV113.rom
Your browser should save the file in a download folder somewhere in your computer's file
system. You will need to be able to find this file in a later step.
Note: the file name will change with each new version; the exact filename will be included
in the update announcement.
2. Turn on the XR-3 and connect to the wireless network as described in previous sections.
Once connected, go into the ‘Wifi Options’ screen of the WiFi Menu and press the
‘Show IP’ soft-key. This should display an IP address in the top left of the screen. This
is the IP address that has been assigned to your XR-3.
3. Navigate your computer's web browser to this IP address and log in with
“admin” and “PASSWORD”.
4. Follow the “Common steps” below.
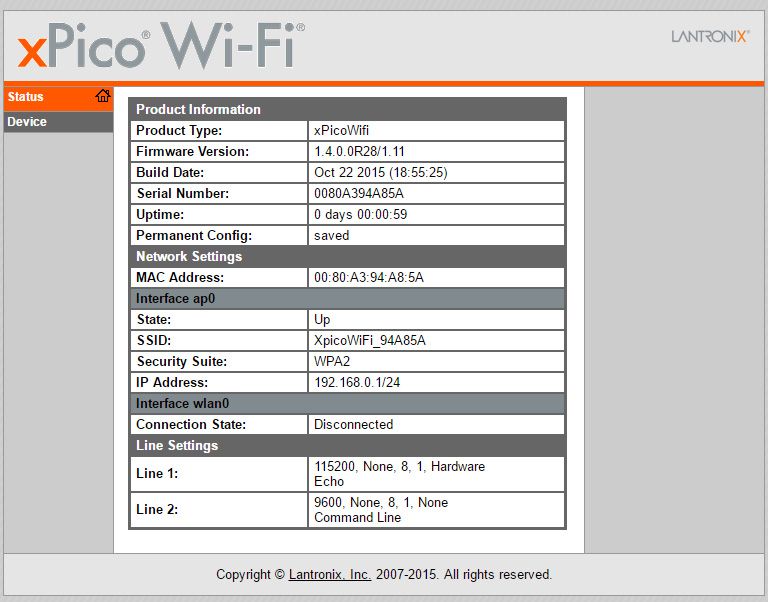
3.5 Common steps (for methods described in sections 3.3 & 3.4)
1. After logging into the xPico module as described above, the module's web
manager should load.
Page 18Wi-Fi Operations XR-3
2. Once there, click “Device” near top left corner, then click on “Firmware Upload” near the
bottom, then click “Okay” in the confirm message at the top.
3. It will then reboot the WiFi module within the XR-3
4. Click on “Choose File”. Then find and select or open the rom file that you downloaded in
step 1 of the previous section.
5. Click upgrade and wait for the upgrade to finish. It should say “Upgrade successful” and
allow you to reboot the device. After clicking Reboot and OK, the upgrade is finished. A
“Please wait” screen will be displayed while the Wi-Fi module resets and an attempt to
reconnect is made. The reconnect will most likely not be successful, but that is OK.
6. Power the XR-3 off and restart it before use.
Page 19Wi-Fi Operations XR-3
4 Error Messages
Wi-Fi operations rely on a wireless connection to another device, the internet, and a server.
Errors may be encountered if that connection is weak or marginal. Some of the error
messages that may be encountered are described below.
4.1 Unable to connect to network.
Causes:
1. Invalid login information
2. Weak signal
3. Login not supported on network device
Remedies:
1. Find a stronger signal
2. Verify login information
4.2 Web page not found.
May occur when using update feature. Indicates the web page where the meter was trying to
obtain the update files could not be accessed.
Causes:
1. The network does not allow complete internet access. Many public hot spots, such as
hotels and restaurants, lock the network access to their own web page and don't allow
access without going through their portal.
2. Invalid download configuration.
Remedies:
1. Try another network.
2. Verify the download configuration (available from Wi-Fi Options screen) is valid.
The general release website provided by Applied Instruments is the default:
a) Address: www.appliedin.com
b) Subdirectory: XR-3
4.3 FTP username or password incorrect
May occur when using the file upload function.
Causes:
1. The User Id and Password provided did not pass the FTP site login.
Remedies:
1. Verify the login information on the Upload Configuration screen (available from the Wi-Fi
Options screen or the File Upload screen).
4.4 Failed opening FTP port
Could not establish a connection to an FTP server at the configured address.
Causes:
1. Poor signal strength.
2. The addressed FTP server does not exist or does not respond.
3. Connected network does not allow access to FTP server.
Remedies:
1. Verify the address on the Upload Configuration screen (available from the Wi-Fi Options
screen or the File Upload screen).
2. Obtain better signal strength.
3. Use a different network.
4.5 FTP subdirectory not found
A connection to the FTP server was made but the subdirectory to receive the files does not exist.
Causes:
1. The subdirectory given in the Upload Configuration screen is not correct.
Page 20Wi-Fi Operations XR-3
2. The subdirectory does not exist on the FTP server.
Remedies:
1. Correct the subdirectory field in the Upload Configuration screen.
2. Have your network administrator create the subdirectory on the server.
4.6 DNS lookup failed.
The unit was unable to obtain a translation from the given web address to an actual IP address.
Causes:
1. A timeout waiting for a DNS server to supply the translation.
Remedies:
1. Try again.
4.7 Data read from web page failed
May occur during update file download when progress bar reaches the end.
Causes:
1. The size of the data obtained in file did not match the expected file
length.
Remedies:
1. Try again.
4.8 DHCP unable to assign network IP
This error may occur while trying to connect to a network.
Causes:
1. Weak signal
2. Network DHCP server problem
Remedies:
1. Try again.
2. Find a stronger signal.
3. Contact the network administrator to be sure a DHCP server is serving the Wi-Fi access
point you are trying to connect to.
4.9 Unknown limits error
This error has been observed when retrying a function after an earlier error. It indicates an
internal synchronization problem. Power the unit off and then start over.
4.10 Stuck while Establishing FTP connection
Indicates an internal synchronization problem. Power the unit off and then start over.
4.11 Unknown Wi-Fi error
Indicates an internal synchronization problem. Power the unit off and then start over.
Page 21You can also read