Computer lab information - TAOP24, Advanced course on optimization - MAI
←
→
Page content transcription
If your browser does not render page correctly, please read the page content below
Linkp̈ing University                                                            April 2, 2019
Department of Mathematics
Division of Optimization
Oleg Burdakov

                      Computer lab information

              TAOP24, Advanced course on optimization

1    General information
Three computer exercises are included in the course. These cover the following:
    Computer exercise 1: Network optimization
    Computer exercise 2: Integer optimization
    Computer exercise 3: Heuristics for traveling salesman problem
    Registration for the computer exercises are made on the very first lessons. Computer
facilities for exercises 1 and 2 are located in building B at entrance B21, 2nd floor, hallway
B and to the left. The lab room names are Glan, Roxen, Boren and Hunn (they are a
part of Sjösystemet). Computer facilities for exercise 3 are located in building E, rooms
PC1, PC2, ..., PC5. The computer lab exercises are organized as follows. Students make
the three computer exercises at their own using either the university computer facilities,
or their own computers. One computer lab session is scheduled for assisting with all three
exercises. It is not compulsory to attend this lab session. The lab results are reported by
each team of students to the lecturer for his approval.
    The following regulations refer to all computer exercises:

    • A team should normally consist of six students.

    • The examination consists in an oral team work presentation to the lecturer. The
      date and time is to be agreed with the lecturer. For more information regarding the
      presentations, see the last section. The three parts (network, integer and heuristics)
      should be presented all together. The total time for the presentation is assumed to
      be around 1 hour.

    • It is allowed to split up the work among the team members. However, each member
      should be able to explain the results of each of the tasks given to the team.

    • The oral presentation for all three part is to be performed no later than by Friday,
      May 24 .

                                              1
2 Computer system
Logging in on computer system is done with a user name and password for which you
should have available (from the student portal).
In computer lab rooms Glan, Roxen, Boren and Hunn, the computer operating system
is LINUX. LINUX commands are entered in a terminal window which can be opened up by
going to Applications in the left upper corner, then choosing System Tools and Terminal.
An alternative is to choose Open Terminal after clicking the right mouse button.
It is possible to reuse and edit old commands by virtue of the arrow keys. Listed below
are some useful LINUX commands.
ls Listing of content of current directory.
cd dir Change directory to dir.
mkdir dir Create a new directory dir.
more file Print file on the screen with a stop after each page.
rm file Remove file.
cp file1 file2 Copy file1 to file2.
lpr file Print file on the default printer.
In computer exercise 2, it is required to create and edit text files. The text editors can
be found in Applications → Acessories. The most common is gedit.
In lab rooms PC1, PC2, ..., PC5, the operating system is Windows. Computer exercise
3 requires using Microsoft Excel spreadsheet which is accessible via Apps on Windows
computers.
23 Computer Excercise 1: Network optimization
In this computer exercise, the team shall formulate and solve a min-cost flow problem.
The purpose is to
• learn how to approach to solving network optimization problems;
• practice in mathematically formulating problems.
The software Vineopt is to be used for solving the problem. This software is available
on the lab computers. One can find its manual on the course web page.
Preparation
The computer exercise preparation by the team assumes: a mathematical formulation of
the problem in the form of a network with specified arc costs, upper and lower (if any)
bounds on the flow, and strengths of sources and sinks, in such a way that it can be solved
by a min-cost flow software.
Each team (at most 6 students) will receive three problems to solve. These are handed
out at due time. If the students are unsure of how to formulate the given problems, they
can discuss their model with the lecturer.
Presentation of results
The oral presentation is to mainly report the following:
1. The mathematical model (network model). Students should be able: to explain the
meaning of each detail of the network and also the relation of any nodal and arc data
with the original problem.
2. The results. The students should be able: to interpret the results, that is, to be
able to explain the arc flow in terms of the original problem; to explain any surpris-
ing/interesting results.
To make the discussions easier for everyone, bring with you printouts of the network
models with node strengths, arc data and the results for the optimal solution.
34 Computer exercise 2: Optimization of an integer problem
In this computer exercise, you are required to formulate and solve integer programming
problems. The purpose is to
• learn how to approach to solving integer programming problems;
• practice in mathematically formulating problems;
• learn how to use a commercial modeling language (Ampl).
The software Ampl is to be used for solving the problem. In the course textbook, one
can find a description of the Ampl. This software is available on the lab computers. To
define the application path, it is required to type in the terminal window the following
command:
module add prog/ampl-demo/
Ampl is also available for downloading (student version with a maximum of 300 variables
and constraints).
To run Ampl, it is required to type in the terminal window the following command:
ampl < command file.run
where command file.run is your own command file (use any name you want). The model
file, data file and command file are written and edited using a text editor.
Preparation
The problem, which is required to be solved, is to be formulated mathematically as an
integer programming problem. You should introduce decision variables, objective function
and constraints. The problem can contain both integer, binary and continuous variables.
All the functions that define the problem must be linear. The problem is to be written
in the Ampl format. To your help, there is a data file (labname.dat) and the necessary
definitions are found in a model file (labname.mod). To your help is also a command file
(labname.run). What you need is to add in the model file a declaration of variables,
objective function and constraints. One might also want to make proper changes in the
command file to get printed your results. You should not need to change anything in the
data file or the definitions in the model file.
Each team (at most 6 students) will receive three problems to solve. These are handed
out at due time. If the students are unsure of how to formulate the given problems, they
can discuss their model with the lecturer.
Presentation of results
The oral presentation shall mainly include the following:
1. The mathematical model. Be able to explain the assumptions made in the model and
also be able to explain the meaning of variables, objective function and conditions.
42. The results. Be able to interpret the results in terms of the original problem. Be
able to explain for unexpected/interesting results.
To make the discussions easier for everyone, bring with you printouts of the Ampl models
(with detailed comments) and the corresponding optimal solutions.
55 Computer Exercise 3: Heuristics for traveling salesman
problem
Introduction
This computer exercise aims at learning how Excel and Visual Basic can be used as
programming environment in solving complex optimization problems. The purpose is to
also learn about an application of one of the classical optimization problems, and how it
can be solved by heuristics.
The problem to find an order in which a predefined set of holes should be drilled in a
metallic disc (done by an automated drilling machine), so that the total distance that the
drill moves is minimized. This applied problem can be modeled as a Travelling Salesman
Problem (TSP). One of the tasks includes implementation of two TSP heuristics.
In this computer exercise, an Excel-file (lab3holes.xls) will be used. It can be found
on the course webpage.
Observe that when you download or open an Excel-file containing macros, a prompt
appears concerning activation of macros (depending on the settings in Excel or the
browser). This file contains macros which must be activated in order for the application to
function.
Next in this section, one can find: a recommended preparation, a more detailed problem
description, a sequence of tasks for this computer exercise, requirements for presenting
your results. At the end of the section: Excel-files related to this computer exercise are
described along with macros containing a Visual Basic code. The TSP heuristics to be
implemented are described in the course textbook.
Preparation
• Look at Figure 3 and suggest (manually) a reasonably good TSP tour for the depicted
nodes. Write down the sequence of nodes in Table 1 (for Task 1a).
• Read about the heuristics Cheapest insertion and Farthest insertion in the course
textbook (chapter 16).
• Write (for instance, on a paper) a suitable Visual Basic code for Task 2a). The
Visual Basic syntax that you will need to know for implementating the heuristics is
in the end of this section.
6Problem description
Company Hole Makers plans to produce a new product with a rate of 1000 units/day.
A part of the production process consists in drilling in a metallic plate 25 holes of two
different sizes. In order to do this, an automated drilling machine is used. A conveyor belt
transports metallic plates to the drilling machine. each plate is put in a special place for
drilling. After the drilling plate is transported from the machine via the conveyor belt, see
Figure 1. When the plate is transported in and out the drilling place, the drill head must
be placed aside in a so called resting point (corresponds to node 1 in Figure 2).
Figure 1: A schematic of the conveyor belt and the drilling machine
The usage of drilling machine is a bottle neck operation in the company’s production
line, because it does not want to use the machine for more than the daily shift (8 hours).
Additional production when going beyond 8 hours raises an overtime cost at approximately
1000 kr/h.
The time of usage of drilling machine is mainly determined by the following operations:
• Placement and removal of every metallic plate, takes 10 seconds in total.
• Drilling of the holes, takes a total of 10 seconds for each metallic plate.
• Movement of the drill head.
• Change of drill heads.
The time it takes to move the drill head can be approximated as the total distance
it moves in the sequence (start and finish in node 1) divided by the movement speed v,
(v = 20 cm/second).
Because the holes are of two different sizes, one needs to include in the total drilling
time the time for changing the drill head. Change of drill head is necessary whenever two
consecutive holes (nodes) in the sequence has a different size.
In our problem of minimizing the time of moving the drill head, it is natural to assume
that the time for initial change of the drill head is zero. This makes it equivalent to solving
a TSP, in which one starts in node 1 and visits all the other nodes (holes) given that the
Euclidean distance between the nodes is taken into account.
In Figure 2, one can find an example of a TSP tour for the drilling problem. A thin
line around a node indicates hole type 1, and a thicker line indicates hole type 2.
7Figure 2: An example of TSP solution. (TSP tour: 1 13 12 14 20 7 3 2 17 19 18 21 22 23
26 24 25 15 16 11 10 9 4 8 5 6 1).
Task 1: Disregard the change of drill size
Consider the problem of finding a drilling sequence where all holes are assumed to be of
the same size, that is there is no need to change the drill heads. This problem reduces to
finding a shortest TSP tour where the Euclidean distance between the nodes is taken into
account. Data sheet ”Euclidean Dist” in the Excel file contains the required pairwise
distances.
a) [Preparation!] In Figure 3, start in node 1, suggest manually a good solution to
the TSP problem. Enter the resulting sequence of nodes in Table 1.
Sequence: 1 2 3 4 5 6 7 8 9 10 11 12 13
Node: 1
14 15 16 17 18 19 20 21 22 23 24 25 26 27
1
Table 1: Your proposed TSP tour
8Figure 3: The apperance of a metallic plate with 25 holes to be drilled
b) Enter your proposed sequence in the Excel sheet ”Problem”, coulmn ”Suggestion”.
c) Run the macro ”main” and choose ”Euclidean distances”, ”Draw suggested solu-
tions” and then ”Draw simple solution”. In the end of this section, there is more infor-
mation on how to run macros in Excel. The results can be studied in the Excel sheets
”Sug solution” and ”Simple solution”. Compare the total distance in your proposed route
with the total distance in ”create simple path” which is shown in the Excel sheet ”Sim-
ple solution”.
Task 2: Implementation of heuristics
a) [Preparation!] Prepare on paper a Visual Basic code for the two heuristcs Cheapest
insertion and Farthest insertion for their further implementation. On page 12, see ”How
to use and modify code” for some information about the code and the Visual Basic syntax.
b) Open the Visual Basic editor and write your code in procedures ”create cheapest path”
and ”create farthest path”.
c) Run macro ”main” to calculate the total distance which produced by your new
procedures and choose to draw all four solutions. Compare the obtained solutions.
Task 3: Change of drill size in node 1
The original design of the machine assumes that the drill head is placed in node 1 whenever
the drill head is to be changed from one size to another. The time required for changing
9the drill head in node 1 is negligible comparing to the time of moving to node 1. If two
consecutive holes are of different size, the drill needs to go via node 1. This can be taken
into account in the TSP problem by modifying the distance between two holes of different
size. In the Excel file, the sheet ”Change drill” contains the modified distances. They
are used when one chooses ”Use change drill distances” for running the macro.
Test your implemented heuristics on the problem where the drill head should be
changed. Compare your solutions with the one produced by heuristic ”create simple path”.
The total distance in this solution is 442 cm, which means that it takes 442/20 + 10 + 10 =
42.1 seconds to drill all the holes in the metallic plate. The total time for a days work of
1000 units is then 11.69 hours.
Task 4: Changing the drill size with the help of a cassette
The company considers an alternative design of the machine. It consists in a possibility to
change drill heads without passing via node 1. This is achieved by mounting a cassette with
several different drill head sizes on the drill. However, this alternative demands that the
drill pauses for half a second each time the drill head is to be changed. This is equivalent
to adding 10 centimeters to the Euclidean distances between two holes of different sizes.
In the Excel file, the sheet ”Use cassette” contains the modified distances. They are used
when one chooses ”Use cassette distances” for running the macro.
The extra cost of this investment is estimated as 200 kr/day, which is based on both
labor and capital costs during the lifetime of the extra equipment.
Use your heuristics in order to compare the two alternatives of either changing the drill
head size in node 1 or changing the drill head size with the help of a cassette. Compare the
cost reduction for overtime (due to shorter operation time) with the cost of investment of
a cassette and give the company a recomendation of whether or not to invest in a cassette.
Task 5: Solving a larger problem
Now go on and try your heuristics on a somewhat larger problem. To this end, choose
”Use Euclidean distances - Large” for running macro ”main”. What sequences/tours and
total distances are obtained?
Presentation of results
For your oral presentation, bring the following printouts:
1. Visual Basic codes for the implemented heuristics (Cheapest insertion and Farthest
insertion). Think of making comments in the codes which would be helpful for your
presentation.
2. Your results and short comments concerning tasks 1 to 5. For the results, it is
sufficient to printot the ”Solution” sheet from Excel. However, do not forget to
make comments on the tasks.
10Application shell in Excel for TSP problem
This section is composed of four parts. Part 1 describes the Excel file you will be using
in the laboration. Part 2 exemplifies and describes briefly the macro modules which are
used in Excel. Part 3 contains some help on how to implement the procedures ”cre-
ate cheapest path” and ”create farthest path”. Part 4 contains instructions on how to use
the operations which will most likely be needed in the tasks.
Contents of the Excel file
The Excel file contains a number of sheets which deals with input and output, namely
the sheet ”Problems” and the four sheets which draws different solutions. The Excel
file also contains four sheets with distance matrices used in the corresponding tasks. The
program is available in macro modules.
Problem sheet
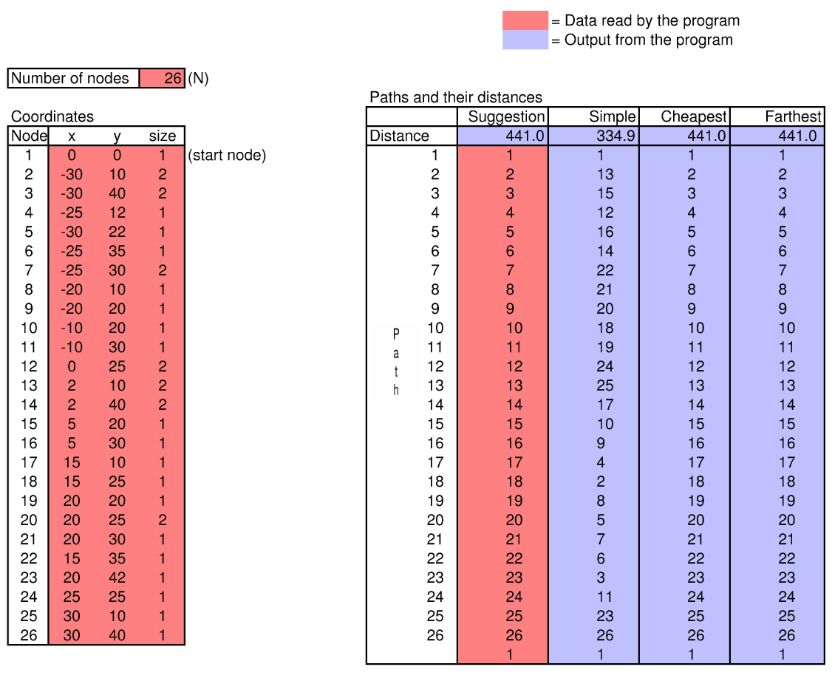
The Excel sheet ”Problems” contains most of the input for the program, see Figure 4.
Figure 4: Sheet ”Problems” with 26 nodes
11Input data contains the number of nodes, x, y coordinates for each hole to be drilled and
the distance matrices. Depending on the problem to be solved, different distance matrices
are used. They are available in certain sheets in the Excel file. The coordinates of the
holes (nodes) are used for calculating the distance matrices and drawing the solutions.
The sheet ”Problems” also presents the numerical results. In the column Suggestion it
is possible to enter an arbitrary (but feasible) sequence of nodes. Columns Simple, Cheapest
and Farthest contain the solution sequences produced by the heuristics. The total distance
for each sequence is calculated and presented in this sheet as well. All output is updated
when the program runs.
Output sheet
Excel sheets ”Sug solution”, ”Simple solution”, ”C solution” and ”F solution” contain
the solutions produced by the corresponding heuristics. The larger holes are represented
by larger circles to distinguish from the smaller holes. The sheets visualize the solutions
produced by the different heuristics. These sheets are easy to print, just use the standard
print command in Excel.
Sheets for the distance matrices
These sheets contain the distance matrices for the different problem settings. In particular,
they include:
• Euclidean distances disregarding change of drill head (”Euclidean Dist.”).
• Euclidean distances between each pair of holls plus the distance forth and back to
node 1 if they are of a different size. This corresponds to changing the drill head size
in node 1 (”Change Drill”).
• Euclidean distances plus 10 cm if the couple of nodes is of a different size. This is
the case of a drill head change with a cassette (”Use Cassette”).
The macro modules in Excel
The program is found in macro module ”main”. The program contains the code for
the main program, for reading and writing data. It also contains the simple heuristic
”create simple path” and also templates for heuristics ”create cheapest path” and ”cre-
ate farthest path”, which you are required to be completed with your own implementation
of the heuristics. To be able to view and edit the macros which is a program file, choose
DEVELOPER → Macros → main → Edit.
How to use and modify code
To run the program, choose DEVELOPER → Macros → main → Run. A simpler way is to
enter the command Ctrl-r and a dialogue window will appear. Select the sequences that are
to be drawn and thereafter run the program by clicking the Run button. There is no need to
compile the code, just change the code in the program and then run the macro, Excel will
itself compile the code. It is sufficient to complete the procedures ”create cheapest path”
and ”create farthest path” where one can use certain smaller parts of the code from the
12procedure ”create simple path”, see below. For additional help, one can use Excel’s help
function, or by selecting Visual Basic and then pressing F1.
Sub create_simple_path(N As Integer, d() As Single, path() As Integer)
’This procedure is an example of a very simple heuristic for finding a path.
Dim i, tempused As Integer
Dim used(MaxNode) As Boolean
Dim temp As Single
For i = 1 To N
used(i) = False
Next i
path(1) = 1 ’Assuming node 1 is the start node
used(1) = True
path(2) = 1 ’The tour should end in node 1
For i = 1 To N - 1
temp = 100000
For j = 2 To N
If d(path(i), j) < temp And Not used(j) Then
temp = d(path(i), j)
tempused = j
End If
Next j
InsertElementInVector path, i + 1, tempused
used(tempused) = True
Next i
End Sub
Specifications for ”create cheapest path” and ”create farthest path”
The format of the output vector
In the procedure, the vector ”path” keeps track of the nodal sequence in the TSP tour.
The first element in this vector must always be node 1, and the second element the next
node in the sequence, and so on. The last element however, is always node 1, which means
that the sequence always returns to node 1. This implies that the number of elements in
the vector is always one more than the number of nodes.
13Procedure InsertElementInVector
There is a procedure in the macro which inserts a new node in an already existing vector.
This procedure has the arguments:
The vector to include the value in, Position in the vector to receive the value,
The value to insert.
Assume that five nodes have already been included in a sequence, the vector path has
the following composition: path = (1, 22, 2, 19, 6, 1, −, −, . . .). Assume that nextnode has
the value 9 and that intoposition has the value 4, then it follows that node 9 shall be
included between node 2 and 19 (that is, take position 4 in the new vector). The procedure
call is then:
InsertElementInVector path, intoposition, nextnode
After calling the procedures the vector will have the following composition:
path = (1, 22, 2, 9, 19, 6, 1, −, −, . . .).
Operations
Enter a sequence manually and calculate the total distance
In the sheet ”Problems” there is column ’Suggestion’. A sequence of nodes can be manually
entered in this column. When one runs the macro the total distance is calculated for such
a sequence and the result will appear in row ’Distance’ of column ’Suggestion’.
Running macros in Excel
Depending on whether you are in the Excel sheet or in the Visual Basic editor, one runs
macros a bit differently. If you are using the Excel sheet one runs the macros by choosing
DEVELOPER → Macros → main → Run. It is also possible to do this faster by simply
entering the command Ctrl-r. If you are using the Visual Basic editor a macro in run by
choosing ’Run → Run Sub/UserForm’ in the menu and thereafter choosing which macro
to be run (here the macro ”main”) and then click Run.
Opening the Visual Basic editor and writing code
In order to open the Visual Basic editor choose DEVELOPER → Macros → main → Edit.
The module appears in the right window. To write a new code or modify a code, use the
appeared window. Visual Basic checks the fundamental syntax row by row, such that if
you write any erroneous row Visual Basic will give an error message. You need to use a ’
in front of every line you want to comment out. It is very useful to make comments in the
code, both to make it easier for others and in this case to simplify the oral presentation.
Use the tab-key to structure your program.
14You can also read