DOCUMENTATION VERSION 4 - IMAGINE NOCLOUDS - GEOSYSTEMS
←
→
Page content transcription
If your browser does not render page correctly, please read the page content below
IMAGINE NoClouds

Documentation
Version 4

Date:   07/04/2021
Page:   Page 1 of 24

© GEOSYSTEMS GmbH, 2021
Documentation IMAGINE NoClouds                                                                                                                                Page 2/24

Content
1       Product Overview ........................................................................................................... 3
1.1     Single Scene Processing ................................................................................................................................ 3
1.2     Scene List Processing ..................................................................................................................................... 3
1.3     Processing and Mosaicking ............................................................................................................................. 4

2       Processing Functionality ................................................................................................. 4
2.1     Single Scene Processing ................................................................................................................................ 4
2.1.1   Settings ........................................................................................................................................................... 5
2.1.2   Results ............................................................................................................................................................ 5
2.2     Scene List Processing ..................................................................................................................................... 6
2.2.1   Settings ........................................................................................................................................................... 6
2.2.2   Results ............................................................................................................................................................ 7
2.3     Processing and Mosaicking............................................................................................................................. 8
2.3.1   Settings ........................................................................................................................................................... 9
2.3.2   Results .......................................................................................................................................................... 10
2.4     Processing time ............................................................................................................................................. 15

3       Input Data ..................................................................................................................... 16
3.1     Sentinel data ................................................................................................................................................. 16
3.2     Download ...................................................................................................................................................... 16
3.2.1   SMS .............................................................................................................................................................. 16
3.2.2   Earth Explorer ............................................................................................................................................... 17

4       Hardware Requirements ............................................................................................... 17
5       Installation .................................................................................................................... 17
5.1     Prerequisite ................................................................................................................................................... 17
5.2     Installation of IMAGINE NoClouds ................................................................................................................ 17

6       Licensing ...................................................................................................................... 21
6.1     ERDAS IMAGINE .......................................................................................................................................... 21
6.2     ATCOR Workflow for IMAGINE (optional) ..................................................................................................... 21
6.3     IMAGINE NoClouds ...................................................................................................................................... 22

7       File management .......................................................................................................... 22
7.1     Input Files...................................................................................................................................................... 22
7.2     Temp folder ................................................................................................................................................... 22
7.3     Results folder ................................................................................................................................................ 22
7.4     Parameter file ................................................................................................................................................ 23

8       Contact and Support ..................................................................................................... 23
9       Appendix A ................................................................................................................... 24

© GEOSYSTEMS GmbH, 2021
Documentation IMAGINE NoClouds                                                            Page 3/24

1 Product Overview

IMAGINE NoClouds is a fully automatic tool for extracting cloud/haze/shadow – free parts of
Sentinel_2 images and combining them to cloudless mosaics. The results are optimized with
regard to radiometric homogeneity and quality. Ideally the S2 images selected by the user are
captured within as short as possible periods in order to avoid too much vegetation or other
surface change. IMAGINE NoClouds can be run on one or several S2 frames and thus
produces multi-frame mosaics if requested. Users can choose various S2 band combinations
for mosaicking as well the resulting pixel size. They may keep or discard the generated
cloud/haze/shadow – masks, which contain different codes for these three image contamination
classes and have a fixed pixel width of 20m. Keeping the masks will enable users for example
to later add further S2 Images and thus produce more complete mosaics than perhaps in a first
run with heavy cloud coverage in all contributing images. In the metadata (raster images)
coming with the mosaic, users can identify the contributing S2 images at each location. Even
though short image acquisition periods are preferable, the mosaicking tool allows for combining
the good parts of up to 16 Sentinel 2 scenes per S2 frame. The first eight S2 scenes (per frame)
are being mosaicked considering the radiometric properties of all input images, while all
additional images are only filled into remaining gaps.
Find the product keywords in the following list:

      ✓ Cloud-free data
      ✓ Cloud-shadow-free data
      ✓ Cloud-free and cloud-shadow-free temporal and spatial mosaics
      ✓ Country-wide mosaics
      ✓ Multi-temporal input data sets of different atmospheric conditions
      ✓ Cloud and cloud-shadow mask: raster file, 1 layer, resolution 20 metres
      ✓ Optional: atmospherically corrected data (using separate tool ATCOR Worklfow for
        IMAGINE)
      ✓ Mosaic: raster file, selection of different band combinations, resolution 10 metres
      ✓ Possible output formats for cloud-shadow masks: img, tif
      ✓ Possible output formats for UTM tile mosaics and combined mosaic: img, tif, ecw, jp2

1.1     Single Scene Processing

      ✓ Cloud and cloud-shadow mask generation of a single Sentinel scene

1.2     Scene List Processing

      ✓ Same functionality as Single Scene processing
      ✓ Processing of multiple scenes in list mode

© GEOSYSTEMS GmbH, 2021
Documentation IMAGINE NoClouds Page 4/24
1.3 Processing and Mosaicking
✓ List processing of single scenes
✓ Mosaicking of available Sentinel scenes and advanced averaging of input values per
pixel using a sophisticated algorithm, up to 8 overlapping files can be used for the UTM
tile mosaic
✓ Additional scenes are used to fill evenutally remaining gaps
2 Processing Functionality
2.1 Single Scene Processing
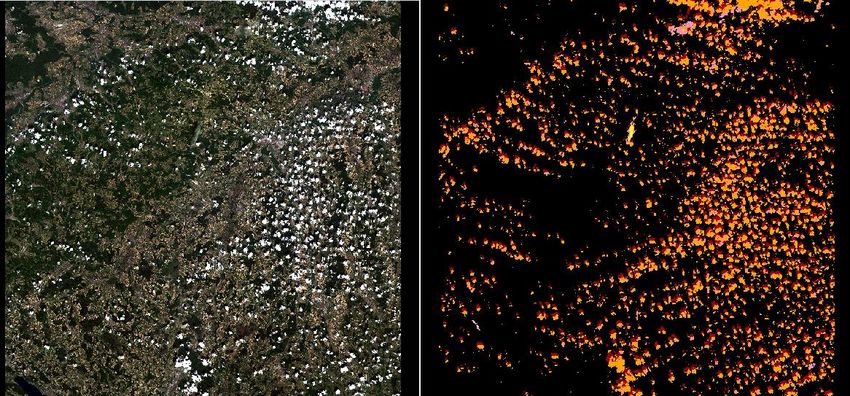
The Single Scene Processing derives one cloud/cloud-shadow mask per Sentinel Scene. The
final result can be arbitrarily used in the user’s workflow to replace clouds and cloud-shadows in
the Sentinel scene with nodata values or use it in a visual comparison. It may serve as a quality
indicator for the single scene.
Figure 1: Sentinel T32UNU of 12/05/2018 (RGB) on the left and derived cloud mask on the right
© GEOSYSTEMS GmbH, 2021
Documentation IMAGINE NoClouds                                                            Page 5/24

2.1.1 Settings

Figure 2: Scene Processing dialogue

    ✓ Path to manifest.safe-file of single Sentinel scene
    ✓ Path to directory of results
    ✓ Path to directory of temporary files
    ✓ Delete content of temporary directory when processing is finished (true/false)
    ✓ Format of results: img, tif

2.1.2 Results

    ✓ YYYY-MM-DD__HH_MM_SS__UTM-Tile_clouds-haze-shadows.img (or *.tif)
    ✓ YYYY-MM-DD__HH_MM_SS__UTM-Tile_raw_cloud_mask.img (or *.tif)
    ✓ output.json
    ✓ parametres_singleSceneExecution.json
    ✓ Pixel size: 20 m
    ✓ One thematic raster layer, unsigned 4-bit
    ✓ 7 classes (clouds 1/2, haze 3/4, shadows 5) and no data

         Color       Id     Classes                                     Opacity setting
                     0      no clouds or haze, no snow or ice, nodata   0
                     1      Clouds                                      1
                     2      Semi-transparent clouds                     1
                     3      Haze 1                                      1
                     4      Haze 2                                      1
                     5      Shadows                                     1
                     6      Water bodies                                0
                     7      Larger snow covered areas                   0

© GEOSYSTEMS GmbH, 2021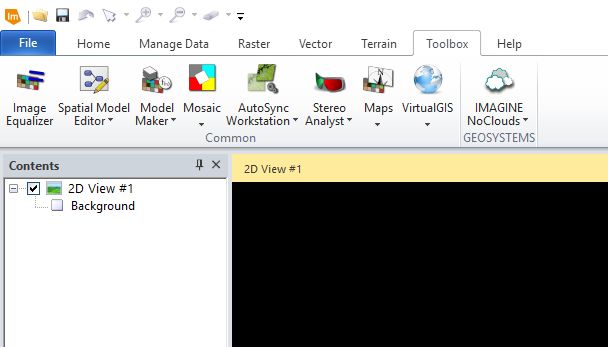
Documentation IMAGINE NoClouds                                                                        Page 6/24

2.2     Scene List Processing

The Scene List Processing derives one cloud/cloud-shadow mask per Sentinel Scene in
batch/list mode. The final results can be arbitrarily used in the user’s workflow to replace clouds
and cloud-shadows in the scene with nodata values or can be valuable in a visual comparison.
It may serve as a quality indicator for the single scene.

Figure 3: Scene List Processing of multiple single Sentinel scenes, organized in UTM tile structure

2.2.1 Settings

Figure 4: Scene List Processing dialogue

      ✓ Path to manifest filelist of all usable Sentinel scenes
      ✓ Path to directory of results
      ✓ Path to directory of temporary files

© GEOSYSTEMS GmbH, 2021
Documentation IMAGINE NoClouds Page 7/24 ✓ Delete content of temporary directory when processing is finished (true/false) ✓ Format of results: img, tif ✓ Replace existing masks (true/false) Provide a manifest filelist in txt-format with the following syntax: The following delimiter to separate to file paths are supported. ✓ comma: , ✓ semicolon: ; ✓ new line: \n The delimiter can also be mixed. Empty lines at the end of the file are supported. The only prerequisite is that the files specified have to exist. To create a suitable manifest file open the DOS Command Line (Start Menu – cmd) and move to the directory containing the SAFE folders. Enter the following command to create the manifest.txt-file: E:\NoClouds> dir /s/b manifest.safe >manifest.txt Such file can be used directly as an input for the list processing steps. 2.2.2 Results ✓ YYYY-MM-DD__HH_MM_SS__UTM-Tile_clouds-haze-shadows.img (or *.tif) ✓ YYYY-MM-DD__HH_MM_SS__UTM-Tile_raw_cloud_mask.img (or *.tif) ✓ output.json ✓ parametres_singleSceneExecution.json ✓ Pixel size: 20 m ✓ One thematic raster layer, unsigned 4-bit © GEOSYSTEMS GmbH, 2021
Documentation IMAGINE NoClouds Page 8/24
✓ 7 classes (clouds 1/2, haze 3/4, shadows 5) and no data
Color Id Classes Opacity setting
0 no clouds or haze, no snow or ice, nodata 0
1 Clouds 1
2 Semi-transparent clouds 1
3 Haze 1 1
4 Haze 2 1
5 Shadows 1
6 Water bodies 0
7 Larger snow covered areas 0
2.3 Processing and Mosaicking
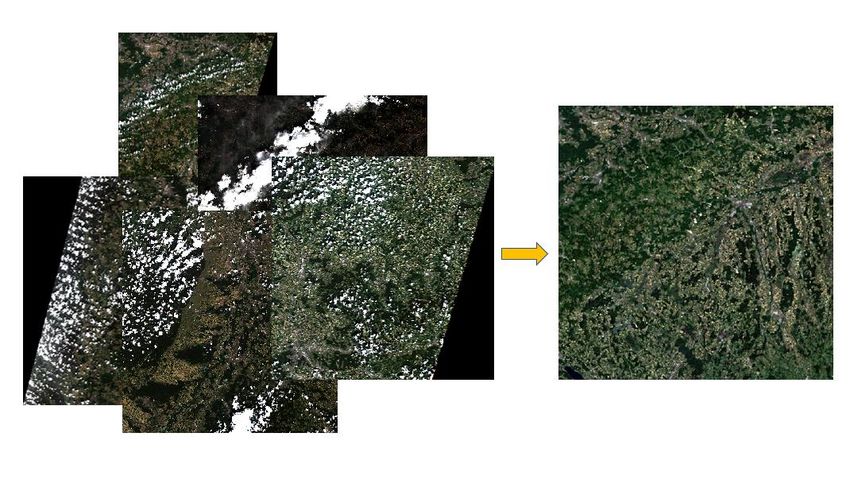
This application produces in a first step a cloud/cloud-shadow mask for every single Sentinel
scene. In a second step, a mosaic per UTM tile of all available scenes is created. Up to 8
overlapping scenes can be used for one UTM tile mosaic. In a third step, a combined mosaic of
all scenes can be processed. The number of neighbouring scenes is not limited.
If more Sentinel scenes than 8 scenes per UTM tile are provided, the scene number 9 to 17 (if
available) will be used for the gap filling process. This setting is adaptable in the
parameters.json file (see Parameter file).
If selected and licenced accordingly, the original Sentinel-2 scenes can be atmospherically
corrected (ATCOR-2 or ATCOR-3) and used as input imagery for the mosaic process.
Optionally, a base image data layer can be assigned which is intended to be used to fill
remaining gaps in the combined mosaic.
Figure 5: Complete process of scene list processing and mosaicking
© GEOSYSTEMS GmbH, 2021Documentation IMAGINE NoClouds Page 9/24
2.3.1 Settings
The Mosaic Processing dialog allows for the following settings:
Figure 6: Processing and Mosaicking dialogue
✓ List of files to process and mosaic (*.txt-file)
✓ Path to directory of results
✓ Format of cloud/cloud-shadow masks output files
✓ Path to directory of temporary files
© GEOSYSTEMS GmbH, 2021Documentation IMAGINE NoClouds Page 10/24
✓ Delete content of temporary directory when processing is finished (true/false)
✓ Apply atmospheric correction (true/false), ATCOR Workflow is not part of IMAGINE
NoClouds and requires an additional license. If licensed, it can be seamlessly used with
IMAGINE NoClouds.
✓ Select type of atmospheric correction (ATCOR-2 for flat terrain, ATCOR-3 for rugged
terrain)
✓ Digital elevation model for ATCOR-3 terrain correction
✓ Path to elevation repository for ATCOR-3 pepared elevation input data to improve
processing performance.
✓ Mosaic band selection
✓ Create a combined mosaic of all files listed (true/false)
✓ Resolution of combined mosaic output (metres)
✓ Mosaic output pixel format (float)
✓ Output format of combined mosaic
✓ Replace existing masks (true/false)
✓ Replace existing ATCOR results (true/false)
✓ Mosaicking with already existing cloud/cloud-shadow masks
Provide a manifest filelist in txt-format as described in section 2.2.1. for list of files to process
and mosaic. If the cloud mask generation should be completely skipped (last point), enter the
result file of a previous run of the Scene List Processing (cloudMaskResult.json) which is
stored in the results folder. This file can also be manually created if data comes from external
applications.
2.3.2 Results
The mosaicking mode produces different outputs which are described in detail in the following
sections. The main product is the UTM Tile mosaic or in case of an injection of several UTM
tiles, the combined mosaic.
2.3.2.1 Single Scene Cloud Masks
In a first phase, the cloud/cloud-shadow mask of every single Sentinel scene is processed in list
mode. The file structure created is the same as described in the Single Scene Processing and
Scene List Processing. If cloud/cloud-shadow masks already exist the renewed calculation can
be skipped by choosing the setting Replace existing masks = false.
2.3.2.2 Image stacks
In a second phase, the stack of every single Sentinel scene is created containing all available
bands. A virtual stack (*.vsk) of each Sentinel Scene is stored in its scene folder following the
file naming pattern YYYY-MM-DD__HH_MM_SS__UTM-Tile.vsk. Virtual stacks are text files
© GEOSYSTEMS GmbH, 2021Documentation IMAGINE NoClouds Page 11/24 which describe the path to the single band files. IMAGINE software can create and interpret this format and build a layer stack upon the listed files. On the basis of this ASCII file a stack image of the corresponding scene is created named YYYY-MM-DD__HH_MM_SS__UTM-Tile.img. All stack images produced during this step are 13-band-images. 2.3.2.3 Prepared Input The folder preparedInput is created within the UTM tile results folder. According to the chosen band combination during the setting Mosaic band selection the folder preparedInput gets an extension like e.g. preparedInput_R-G-B-NIR. There the image stacks are stored following the file naming pattern YYYY-MM-DD_HH_MM_SS__UTM-Tile.img. Depending on the chosen band combination a stack image of the Sentinel bands is generated. 2.3.2.4 Atmospheric Correction The single Sentinel scenes can be optionally atmospherically corrected which enhances the final mosaics and give more brilliant results in general. The option Compute ATCOR results must be set to true. After the stack building of every single Sentinel scene, an ATCOR process is following. The resulting image stacks get the names or YYYY-MM-DD__HH_MM_SS__UTM- Tile_dh_atcor2.img. Please note, that ATCOR Workflow is not part of IMAGINE NoClouds and requires an additional license. If licensed, it can be seamlessly used with IMAGINE NoClouds. 2.3.2.5 UTM Tile Mosaic The third step of mosaicking produces the UTM tile mosaic. That means all temporally available scenes of this tile are combined into one mosaic. As defined in the default settings, up to 8 layers are used for the mosaicking process. If more scenes are available, they are used for the gap filling process. The Temp folder will need more than 24 GByte of disk space for this processing step. The naming of the resulting mosaic follows the pattern Mosaic_UTM-Tile.img ✓ Pixel size: 10 metres ✓ Multi-band, according to the chosen band combination ✓ Unsigned 16-bit ✓ No-data value: 65536 © GEOSYSTEMS GmbH, 2021
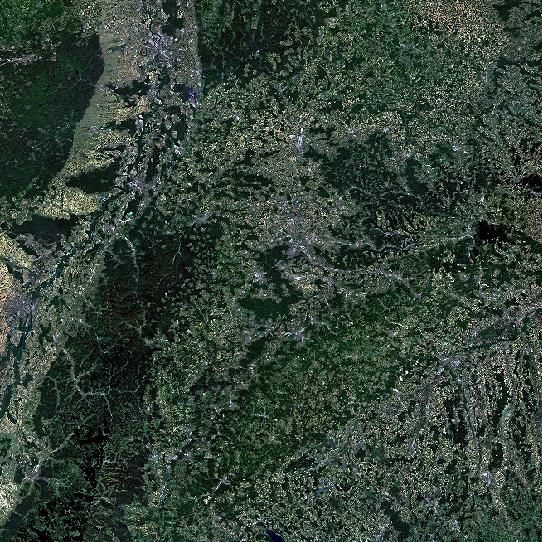
Documentation IMAGINE NoClouds                               Page 12/24

Figure 7: Mosaic_T32UNU.img in a true color representation

© GEOSYSTEMS GmbH, 2021
Documentation IMAGINE NoClouds                                                           Page 13/24

A second product generated during the mosaicking process is Mosaic_UTM-
Tile_meta_stack.img. This file contains as many bands as the number of layers which were
used in the mosaic process. Each layer is representing one input file. It is coded with 1 for a
pixel used in the mosaic whereas unused pixels are coded with 0.
      ✓ Pixel Size: 10 metres
      ✓ Continuous, number of bands according to input tiles
      ✓ Unsigned 4-bit

Figure 8: Mosaic_T32UNU_meta_stack.img

The third product is the file Mosaic_UTM-Tile_meta_codes.img. Meta codes is a one layer
representation of the mosaic. Each pixel in the mosaic is derived from 0, 1 or many scenes.
That means that the information of up to 8 layers can be merged into one pixel. The grey value
per pixel allows for a precise determination of the pixel history. The values in the table below
show pixels which stem from only one layer. An extended overview of possible layer
combinations and the relating coded grey value can be found in the table in Appendix A.

 Grey value                       Binary value                    Scene No.
 1                                20                              1
 2                                21                              2
 4                                22                              3
 16                               23                              4
 32                               24                              5
 64                               25                              6
 128                              26                              7
 256                              27                              8

© GEOSYSTEMS GmbH, 2021
Documentation IMAGINE NoClouds Page 14/24 Figure 9: Mosaic_T32UNU_meta_codes.img ✓ Pixel Size: 10 metres ✓ One-band thematic layer ✓ Unsigned 8-bit 2.3.2.6 Combined Mosaic Finally, a combined mosaic of all input UTM tiles is generated. It has a temporal (per UTM tile) and a spatial resolution (over many UTM tiles). The default settings for this process are defined in parameter.json which can be found in the folder C:\Program Files (x86)\IMAGINE NoClouds 2018\models. The default output is JPG2000, a compressed format to keep the output sizes small. The compression factor is derived from the IMAGINE Preferences – Target JP2 Compression (Multiband). The factor can be adapted there to the personal needs. The general output format can be changed by editing the CommonMosaicOutputFormat in parameter.json, see section 7.4. © GEOSYSTEMS GmbH, 2021
Documentation IMAGINE NoClouds                                               Page 15/24

Figure 10: CommonMosaik.jp2 of UTM Tiles T32UNU, T32UNV, T32UMU and T32UMV

      ✓ Pixel size: 10 metres
      ✓ Multi-band, according to the chosen band combination
      ✓ Unsigned 16-bit
      ✓ No-data value: 0

2.4     Processing time

      ✓ Single Scene processing: 40 - 50 minutes per scene
      ✓ Atmospheric correction: 50 – 60 minutes per scene in addition
      ✓ Final UTM Tile mosaic: ca. 2 hours using 8 scenes
      ✓ Combined mosaic: dependant on number of input scenes and UTM tiles

© GEOSYSTEMS GmbH, 2021
Documentation IMAGINE NoClouds Page 16/24
3 Input Data
With the Copernicus-Programme by the European Space Agency ESA, for the first time in
history of remote sensing there are free and actual satellite images available around the clock.
The Sentinel-Satellites, specially developed for Copernicus, deliver since 2014 continuously
radar data (Sentinel-1) and optical data (Sentinel-2) with high coverage rate. IMAGINE
NoClouds is targeting the optical data of the Sentinel-2 satellites to offer cloud and cloud-
shadow free single scenes and mosaics.
3.1 Sentinel data
IMAGINE NoClouds is designed for SENTINEL data of the following format:
✓ Sentinel-2A or Sentinel-2B, Instrument: MSI, Multispectral Optical data, 13 bands,
resolution 10 to 60 metres
✓ Wavelength: 445 to 2200 nm
✓ Format: SENTINEL-SAFE, granules or tiles
✓ Level-1C, Top-Of-Atmosphere reflectances in cartographic geometry
✓ Data Volume: ~600 MB (each 100 km x 100 km)
✓ UTM/WGS84 projection
3.2 Download
Sentinel data can be downloaded for free from the ESA premises. You have two options to get
the data. The single scene download can be easily done with the help of ESA Earth Explorer. If
you need to download mass data, the use of GEOSYSTEMS Sentinel Made Simple (SMS) is
highly recommended.
3.2.1 SMS
Sentinel Made Simple developed and distributed by GEOSYSTEMS enables operational
download and fast processing for Sentinel-2 (and Sentinel-1) data.
SMS is a robust, resource-friendly and autonomous procedure to build up regional and time-
controlled Sentinel archives. In addition, appropriate products can be integrated in a processing
chain. SMS is adapted by GEOSYSTEMS to work seamlessly together with IMAGINE
NoClouds. Further information can be found at
https://www.geosystems.de/en/products/sentinel-made-simple.
© GEOSYSTEMS GmbH, 2021Documentation IMAGINE NoClouds Page 17/24 3.2.2 Earth Explorer The download of single scenes can be done manually via the ESA Earth Explorer https://scihub.copernicus.eu/dhus/#/home. 4 Hardware Requirements IMAGINE NoClouds is a product developed on the basis of the IMAGINE Spatial Modeler. To have it work properly, a 64-bit operating system is essential. The Spatial Modeler processes utilize the CPU power to its maximum amount. 5 Installation 5.1 Prerequisite ERDAS IMAGINE 2020 Update 3 (64-bit) Optional: ATCOR Workflow for IMAGINE, v1.2.4 (64-bit) 5.2 Installation of IMAGINE NoClouds The IMAGINE NoClouds 2020, v1.4 (64-bit), 86.4 MB installer can be downloaded from https://www.geosystems.de/en/products/imagine-noclouds It is advisable to close all other applications during the installation of IMAGINE NoClouds. Unzip the installer and start the setup.exe. Follow the instructions. First you are asked for the application language. German and English can be chosen. Figure 11: Installer Language © GEOSYSTEMS GmbH, 2021
Documentation IMAGINE NoClouds                                                    Page 18/24

Figure 12: IMAGINE NoClouds Setup

Accept the license agreement.

Figure 13: License Agreement

Choose which features to install. If you have GEOSYSTEMS licensing already running, uncheck
the option Licensing Tools.

© GEOSYSTEMS GmbH, 2021
Documentation IMAGINE NoClouds              Page 19/24

Figure 14: Choose Components

Choose the installation location.

Figure 15: Install Location

Wait until the installation is completed.

© GEOSYSTEMS GmbH, 2021
Documentation IMAGINE NoClouds                                                        Page 20/24

Figure 16: Installation Complete

After the installation is finished, the IMAGINE NoClouds application can be found on the
IMAGINE Ribbon - Toolbox Tab within the GEOSYSTEMS group.

Figure 17: IMAGINE NoClouds Application in the IMAGINE Ribbon Interface

The IMAGINE NoClouds software includes three single stand-alone applications: Single Scene
Processing, Scene List Processing and Processing and Mosaicking. In addition, an online help
and the about information of the product are accessible through the menu.

© GEOSYSTEMS GmbH, 2021
Documentation IMAGINE NoClouds                                                        Page 21/24

Figure 18: IMAGINE NoClouds Menu

6 Licensing

Depending on the applications you are going to use – creating cloud/cloud-shadow masks
and/or generating mosaics - different licenses will be needed.

6.1     ERDAS IMAGINE

To have an ERDAS IMAGINE application running together with IMAGINE NoClouds you will
need at least an Essentials tier. If you plan to generate spatially combined mosaics, an
IMAGINE Advantage license is mandatory in addition. The single temporal mosaic per UTM tile
can be produced with the IMAGINE Essentials tier. For full support of IMAGINE features, a
professional license is advisable.
      ✓ IMAGINE Essentials / Advantage
      ✓ Licensed by Hexagon Geospatial licensing mechanism (contact your local Hexagon
        Geospatial software distributor)

6.2     ATCOR Workflow for IMAGINE (optional)

The mosaicking step allows for the atmospheric correction of the Sentinel scenes to gain
brilliant and haze-free mosaics. To acquire a license, please contact your local Hexagon
Geospatial software distributor. If your company’s seat is located in US or Germany, contact
GEOSYSTEMS directly via e-mail: info@geosystems.de.
Further information on ATCOR Workflow for IMAGINE can be found at
https://www.geosystems.de/en/products/atcor-workflow-for-imagine/overview.
Please note that ATCOR is not used during the Single Scene Processing or the Scene List
Processing, but later in the mosaic creation process.

© GEOSYSTEMS GmbH, 2021
Documentation IMAGINE NoClouds Page 22/24
6.3 IMAGINE NoClouds
The IMAGINE NoClouds license is split into two separate licenses, depending on your personal
requirements:
✓ License for single scene cloud/cloud-shadow mask generation (Single Scene Processing
or Scene List Processing)
✓ License for Mosaicking (UTM Tile (temporal) mosaic and combined (spatially) mosaic)
Both kinds of licenses are floating licenses. To acquire a license, please contact your local
Hexagon Geospatial software distributor. If your company’s seat is located in US or Germany,
contact GEOSYSTEMS directly via e-mail: info@geosystems.de.
7 File management
7.1 Input Files
Sentinel scenes must come in Level-1C SAFE format. Unzip the files and copy the *.SAFE-
folder to your input file folder.
If you plan to ingest more than one scene, prepare a txt file containing the file paths. Every path
must point to the manifest.safe-file of the single Sentinel scene. Further details on the creation
and syntax of the manifest filelist can be found in section 2.2.1.
Furthermore, an already existing mosaic or dataset of the same area can be used as a base
layer in the mosaicking process.The format should be img or tiff. Compression formats are not
applicable if good results are to be expected.
7.2 Temp folder
Provide a Temp folder with sufficient disk space. Here the intermediate results are stored.
Per scene a disk space of approximately 5 GB is needed. If temporary files should be kept, the
disk space has to increase accordingly depending on the number of input files.
The scene list processing and the mosaicking process produce a separate folder called
tile_files. Information on every single Sentinel scene is stored here for further processing steps.
Those files are of no value to the user, but necessary for later processing steps.
7.3 Results folder
At the beginning of each process the general file structure is built. The folder assigned as
“Results folder” contains a subfolder with the name of the UTM tile, e.g. T32UMA. Inside this
folder, another folder is located, named accordingly to the UTM tile and the sensing date and
time like 2018-05-05__10_31_25__UTM-Tile. If new processes are run at a later time, these
folders can be kept with the already processed cloud/cloud-shadow masks (Replace existing
© GEOSYSTEMS GmbH, 2021Documentation IMAGINE NoClouds Page 23/24 masks set to false) or can be overwritten by the new results (Replace existing masks set to true). After the process has successfully finished, the cloud and cloud-shadow masks of each single scene can be found in the corresponding folders, named YYYY-MM-DD__HH_MM_SS__UTM- Tile_clouds-haze-shadows.img. Another result file created is YYYY-MM-DD__HH_MM_SS__UTM-Tile_raw_cloud_mask.img which is of no value to the user, but is necessary for later mosaicking processes and should therefore be kept. The single scene processing results in a one-band thematic cloud/cloud-shadow mask layer. The resulting file sizes are therefore definitely small. Per scene a file size of less than 1 MByte can be expected whereas the raw_cloud_mask.img-files can have sizes of up to 20 MBytes including pyramid files (*.rrd). The final file size of the mosaic output varies depending on the number of input files and the spatial extension. A single processed Sentinel scene with 5 bands, where clouds and cloud- shadows had been removed, might consist in approximately 500 to 1000 MByte. If the input files are overlapping, the final mosaic file size wouldn’t increase that much. 7.4 Parameter file The IMAGINE NoClouds application uses several json files for the input or processing parameters. The essential parameter file is stored in C:\Program Files (x86)\IMAGINE NoClouds 2018\models\parameter.json. Most of its content is not relevant to the user, because the settings are mainly needed for the model assignment to the separate IMAGINE NoClouds processes. Two settings allow the user to define the output formats of the UTM tile mosaics and cloud masks, and of the combined mosaic respectively. Valid formats for the OutputFormat of the cloud masks and UTM tile mosaics are IMG (*.img) or TIFF (*.tif). Compressed formats are not recommended because the final mosaic will lack in quality as a consequence. The CommonMosaicOutputFormat is per default set to JPEG2000 (*.jp2). It can be changed to IMG (*.img), TIFF (*.tif) or ECW (*.ecw). Compression factors are hereby determined by the preference settings. If the quality of the output format is not satisfying, settings should be changed there. TIFF output is limited to 4 GByte (BigTIFF). 8 Contact and Support For further information and support please contact our free service hotline +49-89-89 43 43 44, support@geosystems.de, business hours from Monday to Friday, 9 am to 12 am and 1 pm to 5 pm except on public holidays. © GEOSYSTEMS GmbH, 2021
Documentation IMAGINE NoClouds                                                         Page 24/24

9 Appendix A

 Grey Value      Binary                                             Scene No Combination
 0               -                                                  -
 1               20 = 1                                             1
 2               21 = 2                                             2
 3               20 + 21 = 1 + 2 = 3                                1+2
 4               22 = 4                                             3
 5               20 + 22 = 1 + 4 = 5                                1+3
 6               21 + 22 = 2 + 4 = 6                                2+3
 7               20 + 21 + 22 = 1 + 2 + 4 = 7                       1+2+3
 8               23 = 8                                             4
 9               20 + 23 = 1 + 8 = 9                                1+4
 10              21 + 23 = 2 + 8 = 10                               2+4
 11              20 + 21 + 23 = 1 + 2 + 8 = 11                      1+2+4
 12              22 + 23 = 4 + 8 = 12                               3+4
 13              20 + 22 + 23 = 1 + 4 + 8 = 13                      1+3+4
 14              21 + 22 + 23 = 2 + 4 + 8 = 14                      2+3+4
 15              20 + 21 + 22 + 23 = 1 + 2 + 4 + 8 = 15             1+2+3+4
 16              24 = 16                                            5
 17              20 + 24 = 1 + 16 = 17                              1+5
 18              21 + 24 = 2 + 16 = 18                              2+5
 19              20 + 21 + 24 = 1 + 2 + 16 = 19                     1+2+5
 20              22 + 24 = 4 + 16 = 20                              3+5
 21              20 + 22 + 24 = 1 + 4 + 16 = 21                     1+3+5
 22              21 + 22 + 24 = 2 + 4 + 16 = 22                     2+3+5
 23              20 + 21 + 22 + 24 = 1 + 2 + 4 + 16 = 23            1+2+3+5
 24              23 + 24 = 8 + 16 = 24                              4+5
 25              20 + 23 + 24 = 1 + 8 + 16 = 25                     1+4+5
 26              21 + 23 + 24 = 1 + 8 + 16 = 26                     2+4+5
 27              20 + 21 + 23 + 24 = 1 + 2 + 8 + 16 = 27            1+2+4+5
 28              22 + 23 + 24 = 4 + 8 + 16 = 28                     3+4+5
 29              20 + 22 + 23 + 24 = 1 + 4 + 8 + 16 = 29            1+3+4+5
 30              21 + 22 + 23 + 24 = 2 + 4 + 8 + 16 = 30            2+3+4+5
 31              20 + 21 + 22 + 23 + 24 = 1 + 2 + 4 + 8 + 16 = 31   1+2+3+4+5
 32              25 = 32                                            6
 33              ……..                                               …….

© GEOSYSTEMS GmbH, 2021
You can also read