DECKBLATT - European Society of Radiology
←
→
Page content transcription
If your browser does not render page correctly, please read the page content below
DECKBLATT
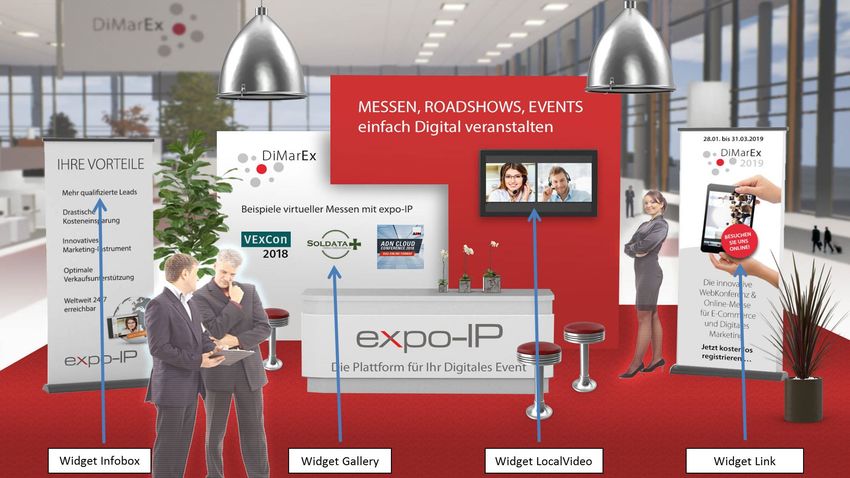
Table of contents
1.      Virtual booth – an introduction................................................................................................ 3

2.      Virtual booth set up – step by step instructions ....................................................................... 5
     (1) Log in .............................................................................................................................................. 5
     (2) Upload your background image ..................................................................................................... 6
     (3) Upload your company logo ............................................................................................................ 8
     (4) Upload various media (documents, videos, images) ..................................................................... 8
     (5) Edit your virtual booth ................................................................................................................... 9
     (6) Booth preview .............................................................................................................................. 15
     (7) Log out ......................................................................................................................................... 16
     Minimum requirements for setting up your booth ............................................................................ 16

3.      Widget types ......................................................................................................................... 17
     (1) Infobox ......................................................................................................................................... 17
     (2) Download ..................................................................................................................................... 19
     (3) LocalVideo .................................................................................................................................... 19
     (4) YoutubeVideo ............................................................................................................................... 19
     (5) Vimeo Video ................................................................................................................................. 20
     (6) Gallery .......................................................................................................................................... 20
     (7) Conference List ............................................................................................................................. 20
     (8) Link ............................................................................................................................................... 21

4.      Protected documents ............................................................................................................ 22

5.      Implement a chat tool............................................................................................................ 23

6.      Booth visitor statistics ........................................................................................................... 27

7.      Visitor journey ....................................................................................................................... 28

8.      Conferences ........................................................................................................................... 29
     (1) Create a Webinar URL / Webinar Key .......................................................................................... 29
     (2) Create conference in the EXPO-IP CMS ........................................................................................ 32
     (3) Add widget ‘Conference List’ ........................................................................................................ 34
     (4) Conference stats ........................................................................................................................... 36

                                                                                                                                                              2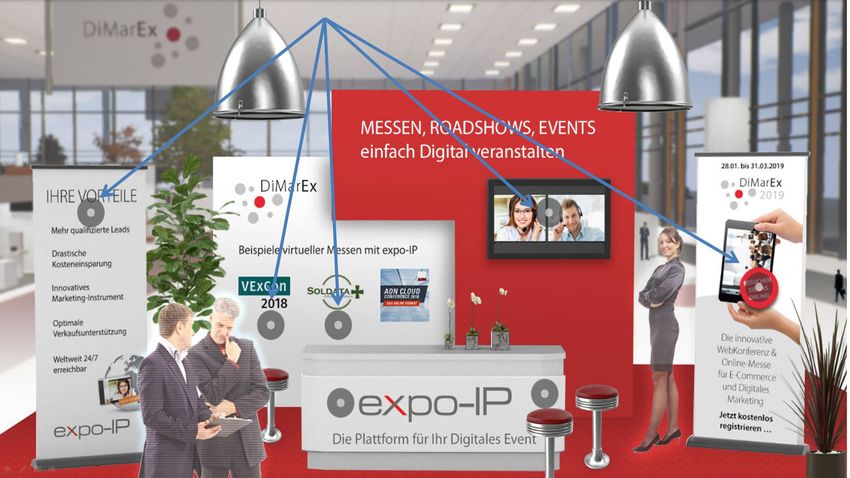
1. Virtual booth – an introduction

The following introduction for setting up your virtual booth will provide a general overview of available
features and their possible application. Please find the step by step instructions here. To use the EXPO-
IP Content Management System (CMS) you need a browser that supports the current HTML5 standard.

A virtual booth consists of three major elements:

    •   A background image (= your virtual booth)
    •   Widgets for providing and depicting media
    •   Contact information and visitor interaction

Before you start editing your booth we recommend 1) to prepare all information (media files) you
would like to provide your visitors with and 2) to define where you would like to place these on your
background image. All media files will be placed on your background image via so called ‘widgets’.

The background image of your virtual booth should be a .jpg, .png or .gif file with the following
measurements:

    •   width 1920 px
    •   height 1136 px

The measurements are not only required for the consistent look of the virtual exhibit but also for your
widgets to be displayed correctly. Find the ECR 2020 themed virtual booth templates as well as
templates by EXPO-IP here. Please note, you do not have to base the background of your booth on a
template! Feel free to use any image of your choice (e.g. collage of your products, photograph, etc.).

Above you can see a background image, which has been based on one of the EXPO-IP templates and
edited by inserting banner contents, logos, an image for the monitor, various texts and
representatives. If you now wanted a video to start playing once your visitor clicks on the monitor, you
would need to upload a video file in the navigation tab ‘Media’ and then place a video widget on your
                                                                                                       3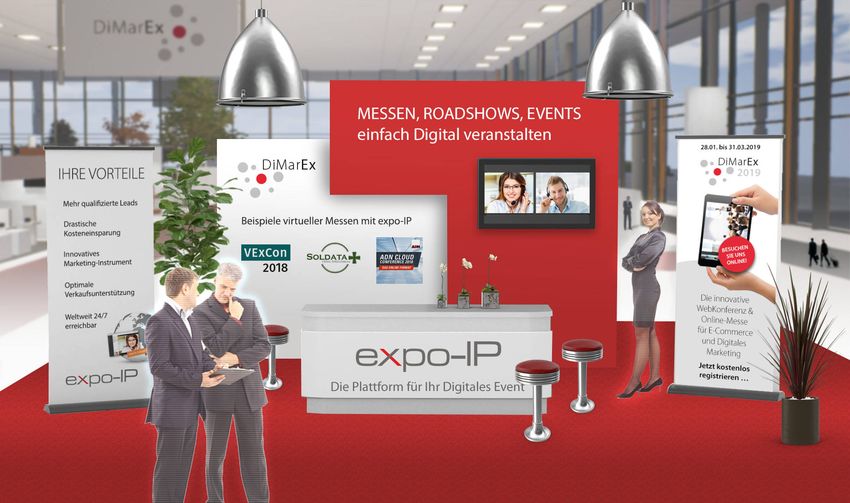
monitor, which you assign your video file to. You can also use Youtube or Vimeo videos by simply
entering their Video ID in the respective widget types (see more ‘3. Widget types’). If you want to
provide a document for downloading on another position on your background image, you choose the
widget type ‘Download’ and assign the pdf you previously uploaded in the menu tab ‘Media’.

In this way you can provide different media types and features on any position of the background
image. The following image illustrates the positions we want to place various widget types on our
background image.

Widgets are depicted as pulsating circles. This highlights the availability of further information or media
at the respective position for visitors.

Since you assign media files or information to all of your widgets, we recommend to upload all media
files and information you require as a first step via the menu tab ‘Media’ before you start placing
widgets on your background image.
                                                                                                         4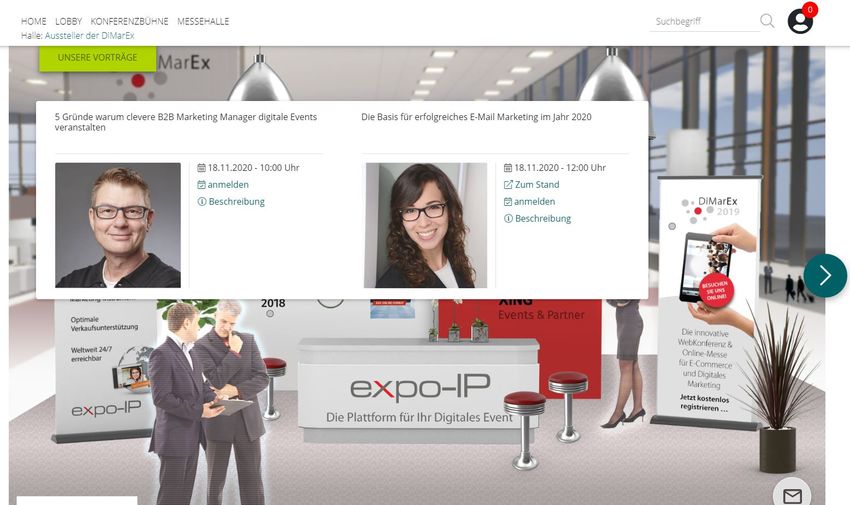
2. Virtual booth set up – step by step instructions
Before you start editing your virtual booth, you should prepare a background image of your choice as
well as all media files you would like to provide at your virtual booth. Please make sure to use distinct
names for all files, so you can easily find them in your list of media.
How to set up your virtual booth in the EXPO-IP CMS, step by step:
1. Log in
2. Upload your background image
3. Upload your company logo
4. Upload various media (documents, videos, images)
5. Edit your virtual booth
a. Select your background image
b. Select your company logo
c. Add texts and contact information
d. Place your widgets
6. Booth preview
7. Log out
In the following step by step description we will set up a virtual booth with all necessary basic settings
and also provide a brochure to download.
(1) Log in
• Log into the EXPO-IP CMS system (https://ecr2020admin.expo-ip.com), using your personal
login information, which you received by email.
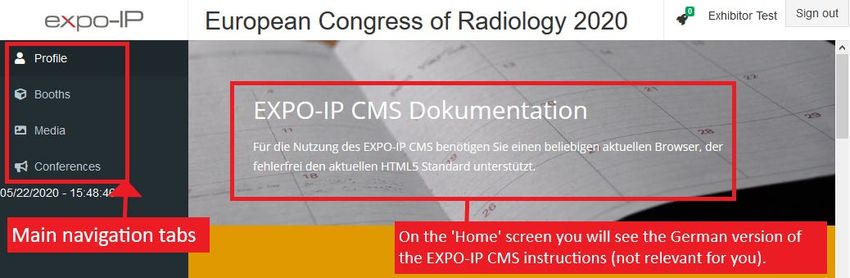
• The following screen will appear:
The Home screen provides information in German because our platform is from a German provider. We
therefore created our own English manual by translating the instructions and adding information
specific to our event. Therefore, we would like to ask you to mainly work with this manual, if your
mother tongue is German.
Please note, the same login details can be used by multiple users in parallel.
5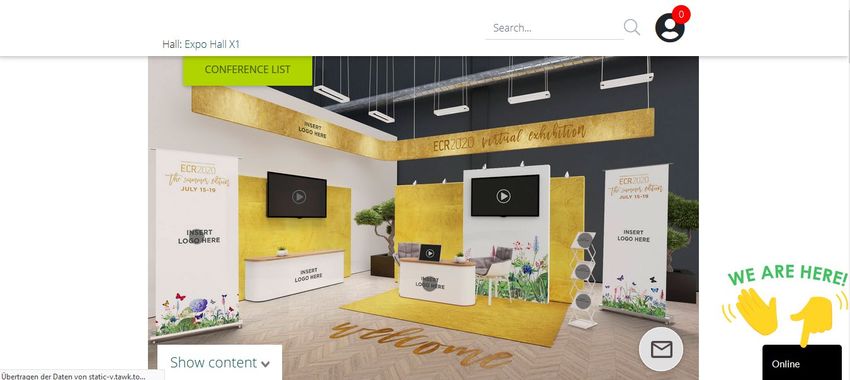
(2) Upload your background image

    •   Select the tab ‘Media’ of the main navigation tabs
    •   Click on ‘Upload Media’

The following fields will appear:

    •   ‘Booth’ – all media have to be assigned to a virtual booth
            o   Your booth is already pre-selected (if you set up only one booth, which is the most
                common case for ECR 2020)
            o   If you are setting up multiple virtual booths, please select the respective booth you
                want to upload the media file for
    •   ‘Type’ – select the media type ‘Background Image’
    •   ‘File’ – upload your background image here
    •   ‘Preview file’ – not relevant for the upload of the background image
    •   ‘Name’ – choose a file name
    •   ‘Description’ – there is no description required for a background image
    •   ‘Language’ – this field cannot be empty (use EN for English please)
    •   ‘Metatags’ – not relevant for the upload of the background image
    •   ‘Status’ – select ‘Live’ and save your settings.

Please note, the status ‘live’ does not mean, that participants will already be able to see your booth.
According to the ECR 2020 virtual exhibition timeline the booths will only be accessible from July 15,
8:00 CEST until July 20, 24:00 CEST.

Please make sure the file size of your background image is as small as possible (up to 1MB). This
ensures that visitors – especially visitors using a smartphone – can load and view your booth in a
reasonable amount of time.

                                                                                                     6
7
After the successful upload of a file, it will appear in a preview list of all your uploaded files. In this list
you always have the option to filter, edit and delete files if necessary.

(3) Upload your company logo

Again, select the menu tab ‘Media’ and click on the ‘Upload Media’ button to upload your company
logo. Make sure to select the correct media type (‘Logo’). Company logos should be .jpg, .png or .gif
files with following measurements:

    •   width: 350px
    •   height: 200px

Assign a name to your file (e.g. ‘logo’). There is no need for a preview file, description or metatags for
this media type. Make sure you choose the status ‘Live’ and save your settings.

The ECR encourages to upload your company logo by all means to ensure an appropriate appearance
of your company in the virtual exhibition.

(4) Upload various media (documents, videos, images)

Upload all media files you want to provide for your visitors one by one via the ‘Upload Media’ button:

    •   Make sure to assign a distinctive name to each file
    •   Always select the correct media ‘Type’ (dropdown menu)
    •   We recommend using PDF files for brochures, flyers or product information. You can also
        upload product images (for use in one or multiple galleries) or videos (maximum file size 512
        MB, for bigger files use the widgets YoutubeVideo or VimeoVideo)
    •   Add a short description text for all media files – except for background image and company
        logo – this will help the visitor to understand what media files they can view/download
                                                                                                    8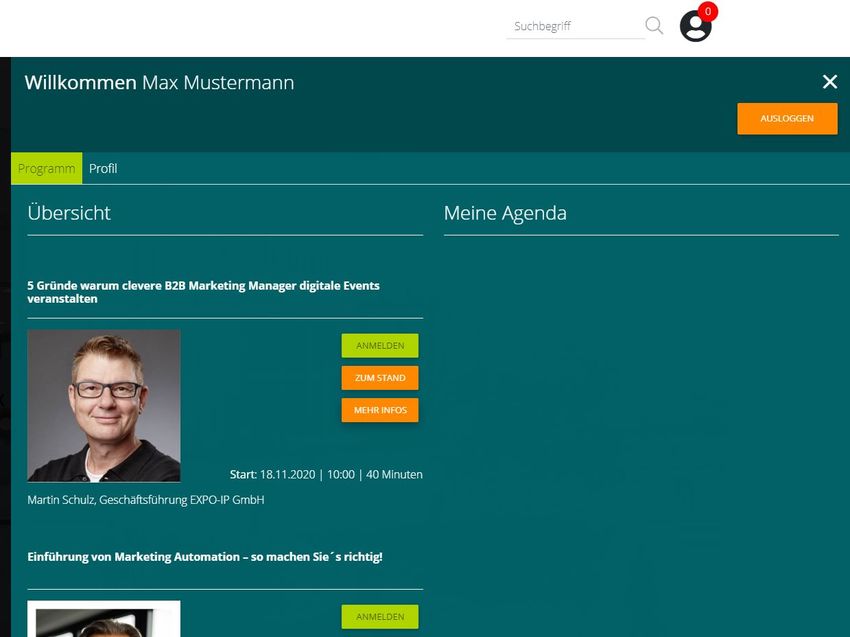
•   for PDF files additional metatags can be assigned

 Both, your description text and the metatags, will be scanned by the EXPO-IP search
 function.

   •   Always select the status ‘Live’ and save your settings

(5) Edit your virtual booth

Select the menu item ‘Booths’ and click on the pencil symbol to edit your booth.

                                                                                       9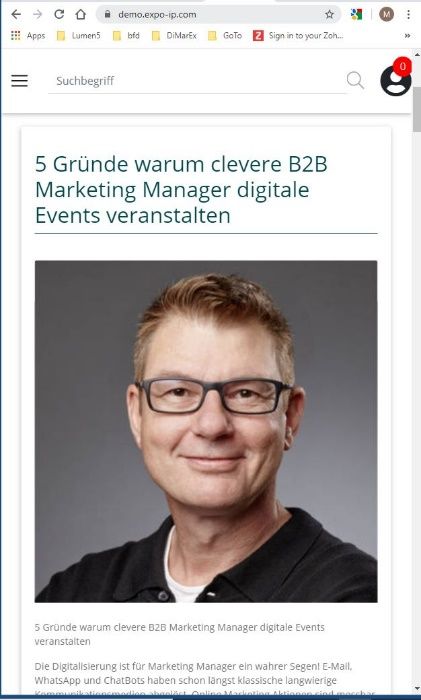
a) Select your background image

Within your ‘Edit booth’ screen click on the tab ‘Booth’, select your previously uploaded background
image and save your settings.

b) Select your logo

Within your ‘Edit booth’ screen click on the tab ‘Settings’ and select your previously uploaded
company logo.

c) Add texts and contact information

Add description texts and contact information in the tabs ‘Settings’ and ‘Contact information’.

                                                                                                 10
In ‘Settings’ you should enter the following fields – in case they are prefilled please edit them
accordingly if necessary:
• ‘Name’ – name of your company
• ‘Imprint’ – URL leading to the imprint of your website
• ‘Short URL’ – this field is prefilled with your full company name, please enter a short name
this will automatically generate a complete URL, which will directly link to your booth
o For example, if we enter ‘ESR’ in this field, the direct link to the ESR booth will be
‘https://ecr2020.expo-ip.com/ESR’
• ‘Description’ – add a short description of your company this text is displayed right below
your booth and besides your company logo
• ‘Text for Catalog’ – you can enter the same text as for ‘Description’ here – this text will appear
in the list of exhibitors; it will also be scanned by the EXPO-IP search function
o We suggest to add the ‘Categories’ shown in ECR 2020 List of Exhibitors
o Side note: Clicking on the list of exhibitors, exhibitors will appear in a random order;
this order will then be saved by the cookies of the visitor
• ‘Chat implementation’ – please see ‘5. Implement a chat tool’
• Checkbox ‘Public’ – make sure to check this box right away in order to make the booth visible
for visitors
o Please note, even with the box checked, visitors will not be able to view the booth
before the opening of the virtual exhibit on July 15, 08:00 CET! This is just to ensure
you do not forget this step.
• Checkbox ‘Stage’ – this is not relevant for our purposes
In ‘Contact information’ you can edit and enter your company data. Please note, messages sent via
the contact form will be sent to the email address you enter in the field ‘Contact email’.
11Add links to your company’s social media profiles in the provided boxes (XING, LinkedIn, Twitter,
Facebook or Instagram). All links have to start with https://
Your contact details as well as the contact form will appear at the bottom of your booth page (see
‘Preview booth’). Your company location will be depicted on a map below. Visitors can easily reach
your contact details by clicking on a little envelope button that will automatically appear on the
bottom right of the background image of your booth.
12d) Place widgets
After you finished setting up the basics, you can start creating widgets. In this example we will now
place the first widget, a ‘Download’ widget, to offer our potential visitors a brochure.
• Within your ‘Edit booth’ screen select the tab ‘Booth’
• Click on the ‘create new widget’ button
• A window will pop up asking you to select a widget type, for this example we will use the type
‘Download’
• ‘Tooltip’ – enter a few descriptive words here, these will appear when a visitor is hovering over
the widget with their cursor (before clicking)
• Select both ‘Desktop’ and ‘Mobile’ to make this information available for both PC and
smartphone users
• ‘Download’ – select the PDF file you previously uploaded to assign it to this widget
• Save your settings
13Newly created widgets are depicted as pulsating circles at the lower left corner of your virtual booth.
Click and hold the pulsating circle to drag and drop it at your desired position on the background
image. Alternatively, make use of the x/y coordinates below.
Save your progress before further editing your widget!
After you positioned the widget and saved your progress, you can edit the widget in the widget
overview list below your background image by clicking on the pencil button.
14In this editing view you can again select the widget type, check the Desktop and Mobile boxes, enter a
tooltip or the x/y coordinates and select a previously uploaded media file.
Select ‘save and back’ to be redirected back to the ‘Edit booth’ screen, where you can view all your
selected widgets.
Please note, for PC-users a pulsation circle is depicted at the widget position on
your virtual booth. These pulsating circles are not shown to smartphone users!
Instead, they will first see your background image, followed by the company logo and description.
After this standard view, you can choose the order of widgets that will be shown. Simply assign a
number in the editing or list view of your widgets in the field ‘Position’. The contact form,
company contact data and a map depicting your company’s location will always be shown on the
very bottom of your page.
(6) Booth preview
Select the tab ‘Booths’ > click on the pencil button on the right of the booth you want to preview >
select the tab ‘Booth’ and click on the blue arrow symbol besides the heading on the top of the page.
The preview will open in a new browser tab.
15To simulate smartphone view, please reduce the size of your browser window accordingly.
Please note, your visitors can also scroll down on their desktop and view all mobile information.
(7) Log out
To log out please select the ‘Sign out’ button in the upper right corner of the backend.
Minimum requirements for setting up your booth
(1) Upload your background image
(2) Upload your company logo
(3) Edit your virtual booth
(a) Select your background image
(b) Select your logo
(c) Add texts and contact information
163. Widget types
The following chapter describes the features of the available widget types. The system offers the
following widget types:
1. Infobox
2. Download
3. Local Video
4. Youtube Video
5. Vimeo Video
6. Gallery
7. Conference List
8. Link
(1) Infobox
Infobox is the most comprehensive widget available. All kinds of different media files and their
description can be provided.
In our example the widget ‘Infobox’ is named ‘Download Center’, enter the name in the field ‘Tooltip’.
For title displayed within the Infobox we entered ‘All information at a glance’ at ‘Infobox title’, below
you can fill out the ‘Infobox description’.
To fill your Infobox with media files, drag & drop previously uploaded files in the green box on the
right-hand side.
17The navigation within the Infobox is created automatically and depends on the added media files:
• If only a description text is entered and no media file is added no button will appear
• If at least one media file is added an ‘Info’ button will appear
• If a pdf document is added a ‘Documents’ button will appear
• If a video file is added a ‘Video’ button will appear
• If an image file is added a ‘Gallery’ button will appear
This is how an Infobox equipped with one document will look like from a visitor’s perspective:
Further descriptions of the media files appear when clicking on the arrow symbol.
18(2) Download
Use the widget ‘Download’ if you want to provide a file for downloading (.pdf files only). Select the file
from a list of previously uploaded documents.
(3) LocalVideo
If you upload a video file (maximum file size 512MB) in the menu tab ‘Media’, you can assign this file
to your ‘LocalVideo’ widget and place it on your background image.
Videos with a file size bigger than 512MB should be uploaded to YouTube or Vimeo and can be
integrated in your booth using the YouTube or Vimeo widgets.
(4) YoutubeVideo
To use a video you uploaded to Youtube, create the widget type ‘YoutubeVideo’ and fill in the field
‘YouTube Video ID’. Please do not use the entire URL - just the assigned ID. Video ID is shown at the
end of the respective URL after the equal sign (=).
e.g. ‘https://www.youtube.com/watch?v=-aVa3guWND0’
19(5) Vimeo Video
Please repeat the steps above for Vimeo videos and use the respective video ID at the end of the URL
(e.g. https://vimeo.com/76979871)
Please make sure to only use videos you own the respective licence rights for.
(6) Gallery
This widget allows you to show one or multiple image files and add a descriptive text. Select the
desired images by dragging & dropping previously uploaded image files into the green box on the
right-hand side.
(7) Conference List
For more information on this widget please see ‘8. Conferences’.
20(8) Link
The widget ‘Link’ only supports links to websites, which are 1) encoded by SSL, 2) accessible via
the protocol ‘HTTPS’ and 3) 100% responsive. Please also make sure your website complies
with current EU data protection agreements.
There are two options for links to external websites:
1. Recommended: Open the external website directly at your booth within an iFrame. Visitors
will not leave your virtual booth and will still have access to and can navigate within the
external page.
2. Alternatively (not recommended): If you check the box ‘not via iFrame’ your visitor will be
directed to the external page and leave the virtual exhibition. Your visitor will see a warning
message when clicking on this link.
Link – please enter without the protocol type (https://), this will be generated automatically
Not via iFrame
Additional widgets …
such as ‘FairhallList’, ‘LinkInternal’, ‘LinkFairhall’ or ‘StandList’ are only relevant to the organisers of
the virtual exhibition and not the exhibitors.
214. Protected documents
You can provide the visitors of your virtual booth with diverse information. In addition to texts, images
and videos you can also provide PDF files for downloading.
In the ‘Upload Media’ settings you may add descriptive texts to your media files, in order for our
visitors to find them via the EXPO-IP search function. For PDF documents you can add ‘metatags’ as
well, which will also be scanned by the search function.
There is also the possibility to add documents, which cannot be downloaded anonymously by your
visitors. They will be available for download once the visitor has agreed to submit his contact details
(name and email address).
To use this feature:
• Please select the Status ‘Only after confirmation’ in your ‘Upload Media’ settings
o This will work for PDF documents only!
• This protection will work using the widgets ‘Download’, ‘Infobox’ as well as in the search
results
• Make sure you filled out the field ‘email address’ in the tab ‘contact details’ of your ‘Edit
booth’ screen If this field is empty, EXPO-IP cannot deliver the contact details of your
visitor.
225. Implement a chat tool
Chats are tools of third-party providers.
Please note, that we are not offering support for third party products. For questions on
the application of chat tools, which you implement on the EXPO-IP platform, please
turn to the chat tool provider.
There are two options for implementing a chat:
1) Via an embed code (applies to all chat systems)
With this option you will not be able to identify visitors of your booth
2) Via Chat-ID (recommended for tawk.to users)
This option will use the EXPO-IP Chat-API, which enables identification of booth visitors in real
time without them having to join the chat. You will be able to view the name of your visitor in
your tawk.to account and you can then proactively reach out to them via the chat tool.
So in principle, any chat system that offers an embed code can be implemented on your virtual booth.
In the following step-by-step instruction we will demonstrate the implementation of a chat tool for
both options (embed code & Chat-ID). We will be using the free chat tool tawk.to for both. If you are
using another chat system, the steps on how to generate an embed code may differ.
The following steps apply to both options:
• Create a (free) tawk.to account (https://www.tawk.to)
• You will be asked to enter a ‘Site Name’ and ‘Enter Site URL’. Please use the name and URL of
our virtual exhibit.
‘Site Name’: ECR 2020
‘Enter Site URL’: https://ecr2020.expo-ip.com
23For option (1) EMBED CODE:
• Log into tawk.to (https://dashboard.tawk.to/login)
• Select tawk.to settings (gear wheel symbol) > select the tab ‘Chat Widget’
• Copy the Widget Code (for option 1 embed code)
24• To implement this widget code, select the booth you want to use this chat tool for on the
EXPO-IP backend and click on the tab ‘Settings’ on your ‘Edit booth’ screen:
• Select the option ‘Other chat’ at ‘Please select chat tool’ and paste the tawk.to Widget Code
in the box below
For option (2) Chat-ID:
• Log into tawk.to (https://dashboard.tawk.to/login)
• Select tawk.to settings (gear wheel symbol) > select the tab ‘Chat Widget’
• Copy the Chat ID (= part of the ‘Direct Chat Link’):
o e.g. https://tawk.to/chat/5eb01505a1bad90e54a17fdc/default
25• To implement this Chat ID, select the booth you want to use this chat tool for on the EXPO-IP
backend and click on the tab ‘Settings’ on your ‘Edit booth’ screen
• Select the option ‘tawk.to’ at ‘Please select chat tool’ and paste the tawk.to Chat ID in the box
below
Visitor’s view of the chat tool:
Notes:
• The chat symbol will appear in the bottom right corner of your virtual booth
• The look of it can be altered within your tawk.to account
• When you are logged in your tawk.to account, the chat symbol will read ‘Online’
• Once you are logged out it will show ‘Offline’ – your visitors can still contact you via a contact
form that will appear in the chat window
• Tawk.to also offer an add-on for video chatting for a fee
266. Booth visitor statistics
Log into the EXPO-IP backend > select ‘Booths’ in the navigation menu > click on the pencil symbol on
the right side to enter the ‘Edit booth’ screen and select the tab ‘Statistics’.
In here you can see and export a statistic of all of your booth visitors. The data can be exported in
different formats (html, csv, text, pdf, excel).
Please note, that the ECR is working on the registration process for visitors for the ECR 2020 virtual
exhibition and data security issues with its legal consultants. For the moment we can therefore not
confirm which statistics and personal data of your booth visitors will be available! Details on the
generated leads will be provided as soon as possible.
277. Visitor journey
The visitor will have to fill in a short registration form on https://ecr2020.expo-ip.com to enter the
virtual exhibition (no costs involved). After doing so, the visitor will be directed to a welcome screen,
which will lead to the ECR 2020 city map. On this map they will find:
• the exhibition halls X1 to X5, as well as X6 for all new exhibitors
• the main congress building, the ACV, which will show the Expo Gallery and different Lounges
(including the Radiographers Lounge)
• the M building, which will host the society booths (‘International Village’)
The location, position and approx. dimension of your booth will be as they would have been for the
onsite congress in March. Clicking on the exhibition hall, you will find your booth from a bird’s eye
perspective. Once you are viewing a virtual booth, you can also navigate within the exhibition hall by
using the arrows on the sides of the screen.
Welcome Page ECR City Map Exhibition Hall Your Booth
Please note, we are using separate systems for the ECR 2020 scientific programme broadcasting (ESR
Connect) and the virtual exhibition (EXPO-IP). As we are not allowed to merge those two systems due
to data protection issues, both systems will require a separate registration.
Both our platforms, ESR Connect and ECR 2020 Virtual Exhibition, will be promoted equally and link
to each other. Find the ECR 2020 Scientific Programme here.
Official link to the ECR 2020 Virtual Exhibition: https://ecr2020.expo-ip.com
Please do not use the official link to promote the ECR 2020 Virtual Exhibition or the direct link to your
virtual booth before June 15, 2020 as we are still finalising the registration process.
288. Conferences
EXPO-IP does not offer its own solution for webinars, live streams or live
simulations. You will your own separate system, which is accessible via URL like e.g.
WebEx, Adobe Connect, GoToWebinar, GoToMeeting, Zoom, Webinarjam, Spreed,
Vimeo, Youtube or other individual solutions.
Note: The term ‘Conferences’ used in the EXPO-IP CMS refers to webinars.
To organise a webinar at your booth, the following steps are required:
(1) Create a Webinar URL/Webinar Key
(2) Create conference in the EXPO-IP CMS
(3) Add widget ‘Conference List’
(1) Create a Webinar URL / Webinar Key
Ideally participants should be able to sign up for your webinar with only one click. Webinar platforms
like Spreed or Adobe Connect offer the option to extend the access URL in a way that participants may
enter the conference without an additional registration.
(a) Personalised Webinar URL (not applicable for GoToWebinar)
If your webinar system offers a link, which you can extend with personalised parameters, please use
the EXPO-IP parameters:
• [vorname] - first name
• [nachname] - last name
• [email] - email address
A personalised access link for Adobe Connect may look like:
http://ihraccount.adobeconnect.com/testmeeting_mit_html/?guestName=[vorname][nachname]
A personalised access link for Spreed may look like this:
https://eu42.spreed.com/checkin/jc/750029144?n=[email]&direct=1&lang=de
Make sure to refer to the manual or provider of your system to find out if they offer the possibility of
an extended access URL, so that your webinar participants may enter without an additional
registration. They could e.g. also offer guest access links.
(b) GoToWebinar Key
To access GoToWebinar conferences without an additional registration step, the GoToWebinar API
has to be activated. After it has been activated, the GoToWebinar Key can be entered in the EXPO-IP
CMS.
29Step 1 – Activate the API
You will first have to set up an API activation within GoToWebinar. To do so please log into
https://goto-developer.logmeininc.com with your GoToWebinar login details and select the tab ‘My
Apps’.
Click on the button ‘Add a new app’. Name your new app and optionally add a short description. For
‘Product API’ select ‘GoToWebinar’ and enter the following URL in the field ‘Application URL’:
https://api.getgo.com. Then click on ‘Create App’.
You will now receive the API parameters 1) Consumer Key and 2) Consumer Secret.
30Your API can initially only be used to a restricted extent. After a successful set up the API is limited to
500 visits per day. To lift this restriction, you have to send an email to the support of LogMeIn. Please
make sure your API works, before you contact them. In this email you include the following details:
• Name of the ‘app’ you have created
• Consumer Key
• Consumer Secret
• The email address you use to log into GoToWebinar
In the subject line and body of the email you then ask LogMeIn to please transfer your API to the status
‘Production’.
To send your email to the LogMeIn support use the contact details provided at the bottom of the page.
Check the status of your app in the tab ‘Details’. If the row ‘API Products’ shows the text
‘G2W_Production’, your API can be retrieved 5.000 times per second and basically, there are no more
restrictions.
In the EXPO-IP CMS you can now insert your API Keys (Consumer Key and Consumer Secret). Log into
the EXPO-IP CMS, select the tab ‘Booths’, click on the pencil symbol besides your booth to access the
‘Edit booth’ screen, select the tab ‘Settings’ and click on the button ‘Edit GoTo API Settings’.
31Enter your GoTo Consumer Key, Consumer Secret, username, password and save The API is now
configured for all conferences at the selected booth.
Step 2 – Generate the GoTo Webinar Key
Now that the link between GoToWebinar and EXPO-IP has been established via the API parameters for
your virtual booth, you will need a webinar key for each conference you would like to set up.
To generate the GoTo Webinar Key, setup a webinar in GoTo (proceed as normal). Click on ‘Edit’ of the
newly created webinar and select ‘Menu’ > ‘Share event’. The GoTo Webinar Key is the digit sequence
at the end of the signup URL.
While you are on the GoToWebinar platform, make sure to deactivate the reminder function. EXPO-
IP will send out two reminder emails before the start of the conference to all participants, who have
signed up (see next page).
(2) Create conference in the EXPO-IP CMS
Now that you have generated either 1) a personalised webinar ULR or 2) a GoTo Webinar Key, you can
create a conference in the EXPO-IP CMS.
32To do so click on the menu tab ‘Conferences’ and ‘Create conference’. You will need to assign your
conference to your booth and insert the following information:
‘Booth’ Assign the webinar to your booth
‘Title’ Enter the title of your webinar here
‘Conference image’ Select the previously uploaded file
(450 x 450px, file format: .jpg or .png, e.g. a picture of your speaker)
Please note, the name of the media file will be displayed as a caption
below your conference image. Make sure you select the media type
‘Speaker or Conference Photo’ when uploading this file.
‘Booth redirect’ This field should also be assigned to your booth. Visitors can access your
webinar at several points, e.g. via your booth but also via the visitor’s
dashboard. If they click on your conference in their dashboard, they will
be redirected to your booth before they are directed to your conference.
This way you may point out contents of your virtual booth or the option to
use the chat tool at your booth.
‘Description’ Enter a short description of your webinar here
‘Short description’ Please enter the same description as above
‘email text for When signing up to your conference the participant will receive an email
registration’ with the text entered in this field. Make sure to enter the variable
[konferenz_url] in your mailing text, so that the participant may access the
conference via the link.
Example text: Dear visitor, thank you for signing up for the webinar ‘(title)’.
Please log into ECR 2020 virtual exhibition on time for the webinar at
(conference start). Alternatively, login directly via: [konferenz_url]
We’re looking forward to welcoming you to the webinar! Kind regards
‘Privacy Policy’ For you to receive the contact data of all participants after your webinar,
you must enter a text to be GDPR compliant.
Example text: ‘By signing up for this webinar we are sending your contact
details to the presenting company, so they may contact you in relation to
the webinar.’
‘Extended Privacy Participants can either accept or refuse the conditions you put into this
Policy’ (optional) box. Their selection has no influence on their participation in the webinar.
Use this box, e.g. if you want the participant’s permission to be put on your
newsletter contact list – in a GDPR compliant way
Example text: ‘I agree that the presenting company may send me their
newsletter. I may withdraw my permission at any time.’
‘Conference start & Please note, time displayed is Central European Time (CET)
end’ Participants will be directed to your webinar 5 minutes before the set time.
For webinars which require a signup (standard), each participant will
receive a reminder mail approximately 1 day as well as 1 hour before the
start of the conference.
33‘Conference URL’ Enter your webinar URL here
‘GoTo Webinar’ Make sure to check this box if you are using a GoTo Webinar Key
checkbox
‘GoTo Webinar Key’ Enter your GoTo Webinar Key here
‘Registration Make sure to check this box, so that visitors can add this conference to
required’ checkbox their personal agenda when in their dashboard
‘Status’ Make sure to select the status ‘Live’
Make sure to save your settings!
Please note that all texts above may only be seen as examples and have not been reconfirmed with a
GDPR expert or lawyer.
(3) Add widget ‘Conference List’
To display the set-up conferences within your booth, add the widget ‘Conference List’. The widget
cannot be placed freely, it will show up as a green button on the upper left corner of your background
image. Clicking on the button, a window displaying information about the next two scheduled
conferences at your booth will appear. In the mobile view, all scheduled conferences will be listed
chronologically.
Desktop view:
34Mobile view:
As mentioned before, the visitors will also be able to view all scheduled conferences in their
dashboard, where they can also sign up for the webinars to add them to their personal agenda.
Dashboard view:
35To set up your widget ‘Conference List’:
• Add a ‘Tooltip’ – the text you enter here will appear in the green box on your background
image
• Make sure to check the boxes for desktop and mobile, to make this information available for
both PC and smartphone users
• Add a ‘Conference list title’ and optionally ‘Conference List info’ – this is for the mobile view
only
• Finally, assign your webinars to your widget by selecting your previously set-up webinars from
the list in the yellow box on the left and drag & drop it into the green box on the right
o Please note, the yellow box will display all conferences set up in the EXPO-IP CMS for
ECR 2020 Virtual Exhibit
(4) Conference stats
To access the statistics of your conference, enter the edit mode for your conference. Within the tab
‘Member‘ you will see a list of all participants, who have signed up for your conference. You can
export this list in various formats.
36You can also read