Prism Pipeline Documentation - Release 1.2.0 Richard Frangenberg - Read the Docs
←
→
Page content transcription
If your browser does not render page correctly, please read the page content below
Prism Pipeline Documentation
                  Release 1.2.0

           Richard Frangenberg

                      Oct 29, 2020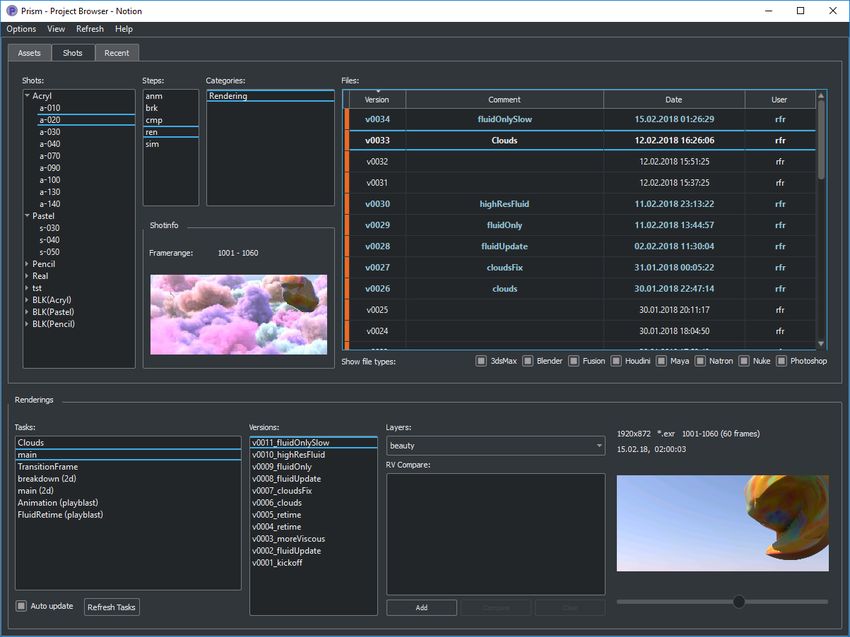
Contents:

1 Overview                                                                                                                                       1
  1.1 Introduction . . . . . . . . . . . . . . . . . . . . . . . . . . . . . . . . . . . .                                                       1
  1.2 Changelog . . . . . . . . . . . . . . . . . . . . . . . . . . . . . . . . . . . .                                                          1
  1.3 Supported Software . . . . . . . . . . . . . . . . . . . . . . . . . . . . . . .                                                           1

2 Getting Started                                                                                                                              3
  2.1 Installation . . . . . . . . . . . .      .   .   .   .   .   .   .   .   .   .   .   .   .   .   .   .   .   .   .   .   .   .   .   . 3
  2.2 Create a project . . . . . . . . .        .   .   .   .   .   .   .   .   .   .   .   .   .   .   .   .   .   .   .   .   .   .   .   . 3
  2.3 Create scenes . . . . . . . . . .         .   .   .   .   .   .   .   .   .   .   .   .   .   .   .   .   .   .   .   .   .   .   .   . 5
  2.4 Export objects . . . . . . . . . .        .   .   .   .   .   .   .   .   .   .   .   .   .   .   .   .   .   .   .   .   .   .   .   . 6
  2.5 Import objects . . . . . . . . . .        .   .   .   .   .   .   .   .   .   .   .   .   .   .   .   .   .   .   .   .   .   .   .   . 9
  2.6 Create a playblast of a scene . .         .   .   .   .   .   .   .   .   .   .   .   .   .   .   .   .   .   .   .   .   .   .   .   . 10
  2.7 Render your scene . . . . . . .           .   .   .   .   .   .   .   .   .   .   .   .   .   .   .   .   .   .   .   .   .   .   .   . 12
  2.8 Create a video from renderings            .   .   .   .   .   .   .   .   .   .   .   .   .   .   .   .   .   .   .   .   .   .   .   . 13

3 Feature Reference                                                                                                                             15
  3.1 Installation . . . . . . . . . . .    .   .   .   .   .   .   .   .   .   .   .   .   .   .   .   .   .   .   .   .   .   .   .   .   .   15
       3.1.1 Installing on Windows          .   .   .   .   .   .   .   .   .   .   .   .   .   .   .   .   .   .   .   .   .   .   .   .   .   15
       3.1.2 Installing on Linux . .        .   .   .   .   .   .   .   .   .   .   .   .   .   .   .   .   .   .   .   .   .   .   .   .   .   17
       3.1.3 Installing on Mac OSX          .   .   .   .   .   .   .   .   .   .   .   .   .   .   .   .   .   .   .   .   .   .   .   .   .   18
       3.1.4 Installation dialog . . .      .   .   .   .   .   .   .   .   .   .   .   .   .   .   .   .   .   .   .   .   .   .   .   .   .   19
       3.1.5 Uninstall . . . . . . . .      .   .   .   .   .   .   .   .   .   .   .   .   .   .   .   .   .   .   .   .   .   .   .   .   .   19
       3.1.6 Updating Prism . . . .         .   .   .   .   .   .   .   .   .   .   .   .   .   .   .   .   .   .   .   .   .   .   .   .   .   20
  3.2 Integrations . . . . . . . . . . .    .   .   .   .   .   .   .   .   .   .   .   .   .   .   .   .   .   .   .   .   .   .   .   .   .   21
       3.2.1 3dsMax . . . . . . . .         .   .   .   .   .   .   .   .   .   .   .   .   .   .   .   .   .   .   .   .   .   .   .   .   .   21
       3.2.2 Blender . . . . . . . .        .   .   .   .   .   .   .   .   .   .   .   .   .   .   .   .   .   .   .   .   .   .   .   .   .   21
       3.2.3 Fusion . . . . . . . . .       .   .   .   .   .   .   .   .   .   .   .   .   .   .   .   .   .   .   .   .   .   .   .   .   .   22
       3.2.4 Houdini . . . . . . . .        .   .   .   .   .   .   .   .   .   .   .   .   .   .   .   .   .   .   .   .   .   .   .   .   .   23
       3.2.5 Maya . . . . . . . . . .       .   .   .   .   .   .   .   .   .   .   .   .   .   .   .   .   .   .   .   .   .   .   .   .   .   24

                                                                                                                                                 i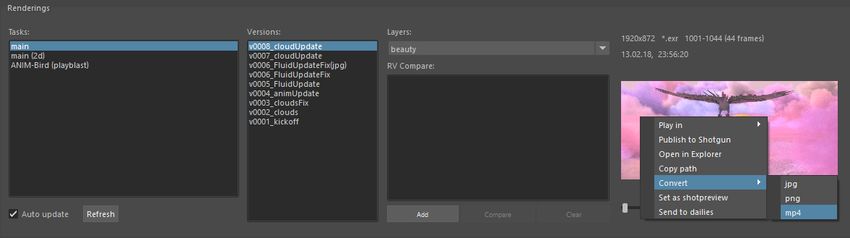
3.2.6 Natron . . . . . . . . . . . . . . . . . . . . . .      .   .   .   .   .   .   .   .   .   .   .   .   24
           3.2.7 Nuke . . . . . . . . . . . . . . . . . . . . . . .      .   .   .   .   .   .   .   .   .   .   .   .   25
           3.2.8 Photoshop . . . . . . . . . . . . . . . . . . . .       .   .   .   .   .   .   .   .   .   .   .   .   25
           3.2.9 Standalone . . . . . . . . . . . . . . . . . . .        .   .   .   .   .   .   .   .   .   .   .   .   27
     3.3   Prism Dialogs . . . . . . . . . . . . . . . . . . . . . .     .   .   .   .   .   .   .   .   .   .   .   .   27
           3.3.1 Create Project . . . . . . . . . . . . . . . . . .      .   .   .   .   .   .   .   .   .   .   .   .   27
                 3.3.1.1 Opening the “Create Project” window             .   .   .   .   .   .   .   .   .   .   .   .   27
                 3.3.1.2 Create Project dialog . . . . . . . . .         .   .   .   .   .   .   .   .   .   .   .   .   27
           3.3.2 Change User dialog . . . . . . . . . . . . . .          .   .   .   .   .   .   .   .   .   .   .   .   29
           3.3.3 Project Browser . . . . . . . . . . . . . . . . .       .   .   .   .   .   .   .   .   .   .   .   .   30
           3.3.4 State Manager . . . . . . . . . . . . . . . . .         .   .   .   .   .   .   .   .   .   .   .   .   32
           3.3.5 Prism Settings dialog . . . . . . . . . . . . . .       .   .   .   .   .   .   .   .   .   .   .   .   35
     3.4   Plugins . . . . . . . . . . . . . . . . . . . . . . . . . .   .   .   .   .   .   .   .   .   .   .   .   .   37
           3.4.1 Overview . . . . . . . . . . . . . . . . . . . .        .   .   .   .   .   .   .   .   .   .   .   .   37
           3.4.2 Creating a new plugin . . . . . . . . . . . . .         .   .   .   .   .   .   .   .   .   .   .   .   38

4 Support and License                                                                                                    39

ii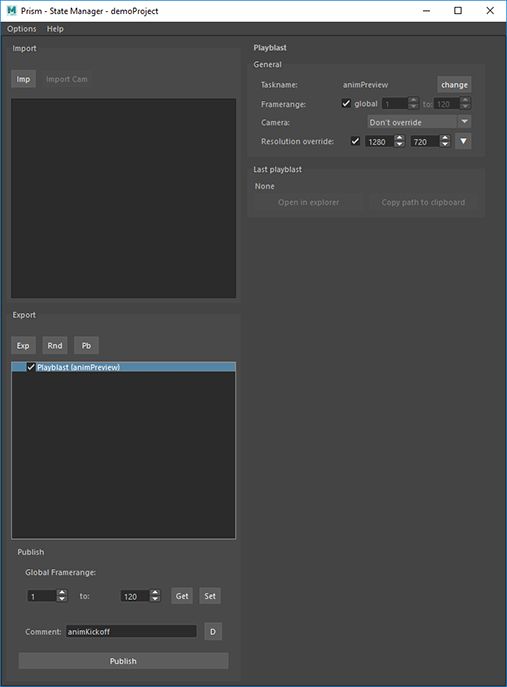
CHAPTER 1

                                                                            Overview

1.1 Introduction

Prism is a software aimed at animation and VFX projects. Its goal is to automate organi-
zational tasks and simplify different steps of the workflow, when creating digital images.
One key aspect of Prism is that it is very artist friendly and easy to use. No programming
skills are required to setup and to use Prism, which make it the perfect tools for teams
and individuals, who want to focus on the creative parts of a project.
The images in this documentation were mostly taken from Prism Standalone, Houdini-
or Maya- integration of Prism, but the Prism user interface in other DCC applications
is almost identical. The features described in this documentation can be applied to the
integration of all supported programs.

1.2 Changelog

For a list of new features go to the Changelog

1.3 Supported Software

Prism can be used as a separate software (standalone), but most of the time you will
use Prism inside some DDC apps (Digital Content Creation Application). In the list below

                                                                                        1
Prism Pipeline Documentation, Release 1.2.0

you can see, which DCC integrations are available on which OS and which versions are
supported. Additional versions can work but are untested and not officially supported.
The goal is always to support the latest version of a DCC app.

    Integration   Windows   Linux   Mac OSX   Supported Versions

    3dsMax        X                           2017-2021 (with Python 2.7)
    Blender       X         X                 2.79-2.90
    Fusion        X                           9.02-16
    Houdini       X         X       X         16.0-18.5
    Maya          X         X       X         2016-2020 (earlier versions untested)
    Natron        X         X                 2.13-2.15 (earlier versions untested)
    Nuke          X         X       X         >10.0 (earlier versions unstable)
    Photoshop     X                 X         CS6, CC (earlier versions untested)
    Standalone    X         X       X

Additional integrations can be developed by 3rd parties and can be used in combination
with the official Prism software.

2                                                               Chapter 1. Overview
CHAPTER 2
Getting Started
This overview describes the basic workflow of the Prism Pipeline. For more details about
specific options and features go to the corresponding pages in this documentation.
2.1 Installation
Go to the downloads page and download the latest version of Prism: https://
prism-pipeline.com/downloads/ Follow the instructions of the Installation section to set
up Prism on your PC.
2.2 Create a project
If you installed Prism for the first time, a dialog shows up after the installation, which ask
you to open an existing project or to create a new one.
3Prism Pipeline Documentation, Release 1.2.0 If you have accidentally closed the dialog, you can reopen it by clicking on the Prism Tray-Icon (the Prism symbol on the right side of your task bar) or by typing “PrismProject- Browser” in the start menu search. Click “Create new project” to open the “Create Project” dialog. Set a name and a path for your new project. Each option has a tooltip to give you detailed information about its functionality. Click “Create Project” to finish the project setup and create your first project. 4 Chapter 2. Getting Started
Prism Pipeline Documentation, Release 1.2.0

2.3 Create scenes

The next step is to create scenefiles, where you can save your work in. For this you
need to open the Prism “ProjectBrowser”. You can open it by clicking on the Prism Tray-
Icon, by typing “PrismProjectBrowser” in the start menu search or by opening a DCC
application (e.g. Maya, Houdini). The ProjectBrowser opens automatically during the
program startup.
If this is the first time you use Prism, a dialog pops up and ask for your name. The name
is used to identify, which user created which scenefiles. More information

In the ProjectBrowser you can create scenefiles in the “Assets” and in the “Shots” tab. Be-
fore you can create a scenefile you have to create an asset/shot. You can do this through
the context menu (right-click) or by double clicking in a empty area of the asset/shot list.
You also need to create a pipeline step in the “Steps” list. You can to this by selecting an
asset/shot and double clicking in the steps list.
When you have a step selected (in the “Shots” tab you need to select a category) you can
create a new scenefile in the “Files” list. Open the context menu (right-click in the files list)
and choose “Create empty file” or “Create new version from current” (only available if you
are inside a DCC application).

2.3. Create scenes                                                                             5
Prism Pipeline Documentation, Release 1.2.0

If you are in a DCC app the new scenefile gets opened immediately. Otherwise you can
double click the version in the ProjectBrowser to open it.
To create new versions of your scenefile you can use the “save” option in the Prism
shelf/menu of your DCC app or the different options in the context menu of the Project-
Browser.

2.4 Export objects

To exchange data between different scene files, the data (or objects) need to be exported.
Only data that was exported from one scene can be imported into another scene. This
is useful for example when a character asset should be imported to different shotscenes.
Also, when you want to switch to another pipeline step and you want to bring the objects
into another software, you need to export the objects.
To export objects with Prism you have the use the “StateManager” tool. This tool can be
found in the Prism shelf/menu of your DCC app.

6                                                           Chapter 2. Getting Started
Prism Pipeline Documentation, Release 1.2.0

The second list on the left side of the StateManager is the list of export states. To export
objects, you have to create an export state. You can do this by clicking the “Export” button
or through the context menu of the export list. When you created an export state, select
the state to see its properties on the right side of the StateManager.

2.4. Export objects                                                                       7
Prism Pipeline Documentation, Release 1.2.0

8                                             Chapter 2. Getting Started
Prism Pipeline Documentation, Release 1.2.0

If the “Export whole scene” option is unchecked only objects in the “objects” list will be
exported. Select the objects you want to export in the scene and press the “Add selected”
button to add them to the list. You can remove objects from the list through the context
menu.
It’s a good practice to set a meaningful taskname for each export. For example: “Charac-
terAnim” or “EnvironmentGeo”.
Now you need to execute the export state to export the objects in its list. You do this by
publishing your scene: Set a comment (e.g. “FasterAnimation”) in the comment field at
the bottom left of the StateManager and press the “Publish” button to execute all states in
the export list. A popup shows up when the export is done.

During the publish your scene was saved as a new version. Now you can close the
StateManager and your scenefile if you like.

2.5 Import objects

After you have exported objects from one scene you usually want to import them into
another scene. Create a new scene through the ProjectBrowser in which you want to im-
port your objects. In Prism imports are managed through the StateManager like exports.
Open the StateManager from the Prism shelf/menu and click the “Import” button above
the import list. The “Select Task” dialog opens and shows you all exports from all different
DCC apps in your current project.

2.5. Import objects                                                                       9
Prism Pipeline Documentation, Release 1.2.0

Select an asset/shot and a taskname to show all versions of this task on the right side. To
import a version double click it. The “Select Task” dialog closes and a new import state
gets created in the StateManager. The version is now imported to your scene and you
can close the StateManager.

2.6 Create a playblast of a scene

A playblast is a viewport preview of your current scenefile. When working on a project you
can use playblasts to preview an animation or simulation without waiting for renderings.
Creating playblasts is done through the StateManager, similar like exporting objects.
Open the StateManager from the Prism shelf/menu and create a playblast state in the
export list by clicking the “Playblast” button or through the context menu.

10                                                           Chapter 2. Getting Started
Prism Pipeline Documentation, Release 1.2.0

Set a taskname for the playblast state and add a comment in the comment field on the
bottom left of the StateManager. Press the “Publish” button to execute the playblast state
and the images will be saved to disk.
After the publish is done you can playback your playblast. This is done through the Project-
Browser. Open the ProjectBrowser from the Prism shelf/menu and select the asset/shot
you are currently working on. At the lower half of the ProjectBrowser you can select your
playblast task and a version of this task. Now a small preview will be displayed in the
lower right corner of the ProjectBrowser. Double click it when you have RV or DJV in-

2.6. Create a playblast of a scene                                                       11
Prism Pipeline Documentation, Release 1.2.0

stalled to playback the image sequence. You can also open the folder in the file browser
by selecting “Open in explorer” from the context menu of the preview image.

2.7 Render your scene

Rendering a scene in Prism is much like creating a playblast only with a different state
type.
You need to open the StateManager and create an ImageRender state in the export list.
Now you only need to set a taskname and a publish comment before you can publish the
scene. During the publish your scene will be rendered. To review your rendering, you
can open the ProjectBrowser and navigate to the version and playback the sequence as
described in the Create a playblast chapter.

12                                                         Chapter 2. Getting Started
Prism Pipeline Documentation, Release 1.2.0

2.8 Create a video from renderings

After you rendered your scene you can create a video file from the image sequence.
Alternatively, you can bring the images into Nuke for additional compositing, but for this
overview we will just convert the raw renderings.
Renderings produced by Prism are usually in the OpenEXR format, which is nice for
compositing, but not very handy when you want to send it to external people, who may
not have a media player which supports .exr sequences.
With Prism you can create a video file from your renderings (and also playblasts) with just
a few clicks.
Open the ProjectBrowser, navigate to the asset/shot and the rendering/playblast you want
to convert. Then right-click the preview image and choose “Convert->mp4”.

A video file gets created and in the version list a new version appears with a “(mp4)”
ending. The path to the video file is copied to your clipboard and you can select “Open in
explorer” from the context menu of the version to open the location of the video file in the
windows explorer.

2.8. Create a video from renderings                                                      13
Prism Pipeline Documentation, Release 1.2.0

14                                            Chapter 2. Getting Started
CHAPTER 3

                                                                 Feature Reference

The following chapter explains all the different tools and features in Prism. It is not a step
by step guideline about how to work with Prism, instead it explains the individual features,
which can be used in different combinations during a project.

3.1 Installation

3.1.1 Installing on Windows

Download Prism, run the executable and follow the instructions of the installer. In some
cases, Windows displays a warning, because the source of the installer is unknown to
Windows.
You can ignore this warning by clicking on “More info” and then on the “Run anyway”
button.

                                                                                           15
Prism Pipeline Documentation, Release 1.2.0 Follow the installer instructions: After the files are extracted, an additional installation dialog opens. Prism will be installed into this location by default, but you can change the location during the installation: C:/Prism/* After the installation the Prism Tray Icon starts, where you can open or create a new project. On the last page of the installer there is a checkbox called “Setup integrations”. This dialog let’s you setup the Prism integration in all your installed DCC apps. After the installation you can find the “PrismTray”, “PrismProjectBrowser” and the “Prism- 16 Chapter 3. Feature Reference
Prism Pipeline Documentation, Release 1.2.0

Settings” items in the windows start menu. By default, the Prism Tray icon will start, when
you start Windows. You can disable this in the “Miscellaneous” tab of the Prism Settings
dialog.

3.1.2 Installing on Linux

Download Prism, extract the archive and move the folder to the location where you want
to have Prism installed. In the Prism directory start the “Prism_Setup_Linux.sh” file with
root privileges. You can do this by opening the terminal in the directory and typing:
sudo ./Prism_Setup_Linux.sh
This will setup your Prism integrations in your DCC apps and it will setup some start-
menu entries. After the installation you can open Prism from the start menu, from the
PrismProjectBrowser desktop icon or in any supported DCC app. After the next system
restart a Prism Tray icon will be visible, which allow you to access all the Prism tools by
right-clicking on it. (you can also start the tray icon from the start menu)
Dependencies:

FFmpeg:
FFmpeg is needed to convert image sequences to videos or into other image formats. It
is also needed to playback previews of video files in the Project Browser. You need to
install FFmpeg and make sure the “ffmpeg” command is available on your system.
FFmpeg 3.0 or higher is required.
Ubuntu:
sudo apt-get install ffmpeg
On CentOS you can get the latest FFmpeg version here:
sudo yum update
sudo yum install epel-release
sudo yum-config-manager --add-repo https://negativo17.org/repos/
epel-multimedia.repo
sudo yum install ffmpeg

3.1. Installation                                                                       17
Prism Pipeline Documentation, Release 1.2.0

PIL:
If you don’t see preview images of .jpg files in the standalone Project Browser, you need
to install the python imaging library (PIL):
Ubuntu:
sudo apt-get install python-pil
CentOS:
sudo yum install python-imaging

OpenImageIO:
To preview .exr images in the Project Browser you need to install the OpenImageIO python
library on your system. You can install it like this:
Ubuntu:
sudo apt-get update
sudo apt-get install python-openimageio
CentOS:
sudo yum update
sudo yum install epel-release
sudo yum install python-OpenImageIO
Alternatively, you can find some builds here. If OpenImageIO is not available, Prism will
fall back to the “ImageMagic” library (if available on your system).

3.1.3 Installing on Mac OSX

Download Prism, mount the .dmg file and copy the Prism folder and the
Prism_Setup_Mac.command file to the location, where you want to have Prism installed.
in the Prism directory start the “Prism_Setup_Mac.command” file with the “Open” option
in the context menu. You are asked to enter the root password in order to install Prism.
After the installation you can open Prism from the TrayIcon from the PrismProjectBrowser
desktop icon or in any supported DCC app. The TrayIcon allows you to access all the
Prism tools by right-clicking on it.
Dependencies:

18                                                      Chapter 3. Feature Reference
Prism Pipeline Documentation, Release 1.2.0

OpenImageIO:
To preview OpenEXR images in the Project Browser you need to install OpenImageIO on
your system by entering the following in a terminal:
brew install openimageio
You can find more infos about installing OpenImageIO here

3.1.4 Installation dialog

The installation dialog lets you select for which programs you want to install the Prism
integration.

index/images/installer.png

DCC integrations: All supported DCC applications are listed here. The installer automat-
ically detects which DCCs you have installed on your PC and enables the corresponding
options. In most cases you can leave all settings to default. The “custom” options for 3ds
Max and Maya can be used to install Prism for additional versions like 2016.5.
If you want to install Prism for a different DCC version, you can double click a path on the
right side of the dialog. For 3ds Max and Maya this only works in the “custom” line. A new
dialog opens and lets you select a different path (for example to install Prism for an older
Houdini version).
You can also add and remove DCC integrations of Prism after the installation in the “DCC
apps” tab of the Prism settings.

3.1.5 Uninstall

To uninstall Prism, you have to execute the “Uninstall” file in the Prism installation direc-
tory. This will remove all Prism integrations and startmenu entry of Prism. Then you
can delete the Prism installation directory manually. In some programs (like Houdini) the
Prism shelf needs to be deleted manually. Your projects, scenefiles and renderings will
remain unaffected.

3.1. Installation                                                                         19
Prism Pipeline Documentation, Release 1.2.0

3.1.6 Updating Prism

You can update Prism simply by installing another version of Prism. It’s not necessary to
uninstall the previous version.
The installer which you can find on the downloads page of the Prism website is the latest
stable release. If you want to use the latest feature additions and bugfixes you can update
your Prism version to the latest “development” version, which is available in the official
Prism GitHub repository.
To update your current Prism version to the latest development version, open the Prism
Settings dialog, for example from the Windows startmenu or the Prism Tray. In the “Gen-
eral” tab you can find a “Update” section with an “Check now” button. Click this button to
check if there is a newer version available an if so follow the instructions to update your
Prism version.

You can install a Prism version from a zip file (like the one which you can download
manually from GitHub), by rickclicking on the “Check now” button and selecting “Update
from .zip”.
If you encounter problems during the update process, try to update from the standalone
Prism Settings dialog and not from inside any DCC app.

20                                                       Chapter 3. Feature Reference
Prism Pipeline Documentation, Release 1.2.0

3.2 Integrations

3.2.1 3dsMax

In 3ds Max Prism can be accessed from the “Prism” menu in the main toolbar.

You can also access the Prism tools in the “Customize User Interface” dialog in 3ds Max.
You can find them in the group “Main UI”, category “Prism” and add them to a custom
toolbar. You can also find the tools in the global 3dsMax search (pressing “x” in the
viewport), by typing the names you can find in the Prism menu (like “Project Browser” or
“State Manager”)

3.2.2 Blender

In Blender Prism can be accessed from the “Prism” panel on the left side of the Blender
window.

You can also type the names on the buttons (like “Project Browser”) in the global search

3.2. Integrations                                                                    21
Prism Pipeline Documentation, Release 1.2.0

(“space” button) to open the Prism tools. Due to some limitations in Blender, the Prism
dialogs will be always on top of other dialogs from Blender and other programs.
In the Blender integration you have the option to save every test rendering from Blender.
You can enable this feature in the Prism Settings dialog. Go to the “DCC apps” tab and
then to the “Blender” tab. Here you can enable the “Auto save renderings” checkbox. If
this is enabled, every image you render in Blender will be saved to the specified location.
The “use path only for current project” lets you set this path globally or different for every
Prism project. Renderings which will be rendered through the Prism State Manager will
not be saved to this folder. The idea behind this feature is to have all test renderings
saved, when iterating on different lighting setups and to see the progress afterwards.
Renderpasses:
Prism handles renderpasses in Blender differently than in other applications. You can
view all active renderpasses in the ImageRender state settings in the StateManager, but
you cannot delete or create new states here. In order to let Prism recognize your ren-
derpasses you need to go to the “Node Editor” in Blender and enable the “Use Nodes”
checkbox for the “Compositing” compositing context. Here you have “Render Layers”
node with all available renderpasses as output. You can add more renderpasses in the
Blender “Properties” panel in the “Render Layers” tab. Create a “File Output” node in the
Node Editor and connect all renderpasses from your “Render Layers” node to an input
of a “File Output” node. You can use multiple “Render Layers” nodes and multiple “File
Output” nodes if you like. Now Prism displays all connected passes in the ImageRender
state. Prism takes care of the output paths in the “File Output” nodes, but you can modify
all other settings on this node. Usually you want to set the filetype to OpenEXR Float(half).
In case you modify the passes between the “Render Layers” node and the “File Output”
node (for example with a Mix node or a Gamma node) Prism uses the “Label” setting of
the node which is connected to the “File Output” node as the name of the renderpass (or
“beauty” if the “Label” setting is empty).

3.2.3 Fusion

In order to use Prism within Fusion, you need to set up Python scripting in Fusion by
installing Python (2.7) on your computer. In Fusion Prism can be accessed from the
“Prism” sub-menu in the “Script” menu of the main toolbar.

22                                                         Chapter 3. Feature Reference
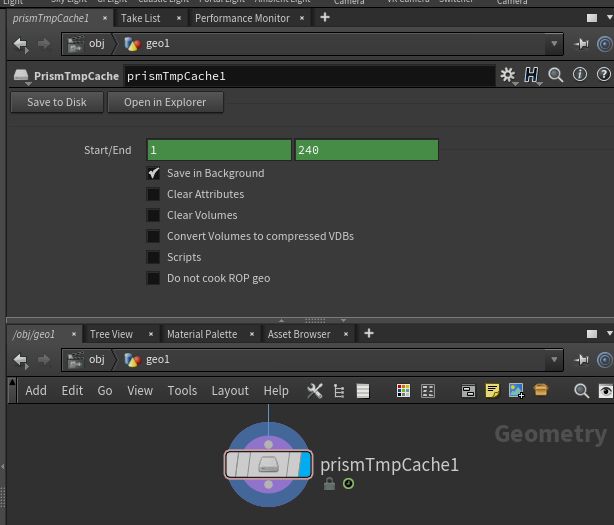
Prism Pipeline Documentation, Release 1.2.0

To import images from your Prism project, you can right-click on the preview in the Project
Browser and choose “Import images. . . ”. To write out images to your current Prism project
you can use the “WritePrism” Macro in the Flow graph. (Context menu of the graph->Add
Tool->Macros->WritePrism)

3.2.4 Houdini

In Houdini you can access the Prism tools from the Prism shelf in the top left shelf set. If
the shelf is not visible on your computer (for example because you use another Houdini
desktop), you can add the “Prism” shelf from the list of available shelves to any shelf set.
The Prism shelf is being created during the Houdini startup if it doesn’t exist yet. To reset
it to the default state you can delete the shelf and restart Houdini.

The Houdini integration of Prism comes with a custom HDA for quickly caching geometry
or simulations to disk. In the “Geometry” context you can create a “PrismTmpCahce”
node. You can connect some input, press the “Save to Disk” button and disconnect the
input. The PrismTmpCache node will then read the .bgeo files from disk. This is a quick
way of caching out temporary data, without the need to set output paths. The caches will
be saved in subfolders at 03_Workflow/Caches/ in your current Prism project, so you can
access these caches even after reloading your scenefiles.

3.2. Integrations                                                                         23
Prism Pipeline Documentation, Release 1.2.0

3.2.5 Maya

In Maya you can access the Prism tools from the Prism shelf.

Some users experienced missing icons on the Prism shelf. In most cases this could be
fixed by deleting the shelf manually and reinstalling Prism/adding the Maya integration in
the Prism Settings.

3.2.6 Natron

In Natron you can access the Prism tools from the Prism menu on the main toolbar.

24                                                       Chapter 3. Feature Reference
Prism Pipeline Documentation, Release 1.2.0

To import images from your Prism project, you can right-click on the preview in the Project
Browser and choose “Import images. . . ”. To write out images in Natron, you can use the
WritePrism node (“Other”->”WritePrism”)
If Natron crashes on startup after you added the Prism integration you can fix this by
disabling the Natron “Check for updates on start-up” option in the Natron preferences.
Remove the Natron-Prism integration in the Prism Settings dialog, start Natron, disable
the check-for-updates option and add the Prism integration again through the Prism Set-
tings dialog.

3.2.7 Nuke

In Nuke you can access the Prism tools from the Prism menu on the main toolbar.

To import images from your Prism project, you can right-click on the preview in the Project
Browser and choose “Import images. . . ”. To write out images in Nuke, you can use the
WritePrism node (“Prism”->”WritePrism”)

3.2.8 Photoshop

To access the Prism tools in Photoshop you have multiple options. The first one is from
the menu under File->Scripts

3.2. Integrations                                                                       25
Prism Pipeline Documentation, Release 1.2.0

The second option is when you start a .psd file from the standalone Project Browser, a
small window “Prism Tools” opens with all the Prism tools accessable. You can move this

26                                                     Chapter 3. Feature Reference
Prism Pipeline Documentation, Release 1.2.0

dialog to the side, while you are working and use it to quickly access the Prism tools.
The third option is to open a standalone Project Browser. On the main menu bar you
can select “Options”->”Photoshop”->”Connect”. This will connect the Project Browser to
an open Photoshop instance or it open a new Photoshop instance, if Photoshop isn’t
running. When the Project Browser is connected to Photoshop you can select “Options”-
>”Photoshop”->”Open tools” to open a small window, which lets you access all the Prism
tools.
The Prism dialogs will be always on top of other dialogs from Photoshop and other pro-
grams.

3.2.9 Standalone

The standalone version of Prism can be opened from the Prism Tray icon or from the start
menu. You can use it to browse scenefiles, renderings or set project settings, but you
cannot create exports, renderings or playblasts from it.

3.3 Prism Dialogs

3.3.1 Create Project

3.3.1.1 Opening the “Create Project” window

When you haven’t created a project yet, click on the Prism tray icon or try to open the
ProjectBrowser or the StateManager in your 3d application from the Prism shelf. A window
will open to ask you to open an existing or to create a new project.
When you already have a current project, you can open the “Create Project” window from
the “Prism Settings” dialog. You can open the “Prism Settings” from the context menu of
the Prism tray icon, from the Prism shelf in your 3d application or from the options menu in
the ProjectBrowser or the StateManager. Go to the “Projects” tab and click on the “Create
new Project” button.

3.3.1.2 Create Project dialog

The “Create Project” dialog lets create a new Prism Pipeline project and edit the settings
of the new project. Each setting has a tooltip. Hover over a setting to get additional
information. Most settings can be changed later on in the “Project Settings” tab of the
“Prism Settings”.

3.3. Prism Dialogs                                                                        27
Prism Pipeline Documentation, Release 1.2.0

Project Name:
This is the name of the new project. The name is used at different places in the Prism
Pipeline. For example, it shows up in the window title of the ProjectBrowser. The name
doesn’t need to be included in the project path.
Project Path:
Here you can enter a path, where you want to save the new project. All files that Prism
will create (scenefiles, exports, renderings. . . ) will be saved at this location. Usually you
want this directory to be empty or not existent. The project name will NOT be appended
to this path automatically. The “. . . ” button lets you browse your PC to select a folder.
Additional local project folder:
This is a very important feature, when you are working in a team on the same project. This
option lets you define a location for your local project files. When this option is enabled,
Prism will save most files in the local project folder and only files, which are relevant to
other people, are saved to the main project folder. When you create new scenefiles, these
files are saved in the local location by default. When you publish your scenefile, the file
will be saved in the main project folder. When creating exports, playblasts and renderings,
there is on option in the StateManager, which lets you define, whether the files should be
saved to the local location. Local files can be moved to the main project folder in the
project browser from the context menu of the scenefile/version.
This is very useful if your main project folder is on a network location or synchronized to

28                                                          Chapter 3. Feature Reference
Prism Pipeline Documentation, Release 1.2.0

a cloud and you want to reduce the network traffic.
The path for the local project path is only used for the current PC. When the checkbox is
enabled, and another PC opens the project, a window will show up, where the user has
to set a local path for the PC.
Folder Structure:
Here you can define the top-level folder structure, which will be created in the project path.
The buttons on the right side lets you customize the structure. Double-click on a folder
name to edit it and Double-click on a type to change it to another folder type. Available
types are: “Default”, “Scenes”, “Assets”, “Dailies”. Every type can only be set once except
“Default”. Folders with the type “Default” are not handled by Prism and no files are saved
in them automatically. You can use them to place your own files in there like concepts,
management plans, notes. . . . All types with an asterisk need to be set before creating
the project (“Scenes” and “Assets”). In the scenes folder all scenefiles, exports, playblasts
and renderings will be saved. Prism handles the folder structure in there automatically.
The “Assets” folder will be used to save textures, external models, HDRIs and so on. The
dailies folder is used by the Prism tray icon. Click here for more information.
You can create additional folders in the project folder manually later in the windows ex-
plorer.
Force program versions:
When this option is enabled, you can set a program version for each DCC integration.
When someone opens a program with a different version, a warning will show up to notify
the user, that he is using a wrong version. This helps to ensure, that everyone in the
project uses the same software version. Using different software versions can lead to
incompatibility problems, when someone wants to open a scene, which was saved with a
different version. The buttons on the right side give you some presets, but you can also
type a different version in the version field.
This option doesn’t prevent the use of a different software version, it only warns the user.
Shotgun integration:
When this option is enabled, you can enter your Shotgun information, which are needed
to use the Shotgun related features of Prism. See the Shotgun integration page for more
information.

3.3.2 Change User dialog

The “Change User” dialog will show up, when no username is saved in your preferences
and you try to open some Prism tools. You can also change the user name in the “User”
tab of the Prism Settings dialog.
This username will be used to identify who created a scenefile in Prism. It has to be at
least one character for the first name and two characters for the last name. The user

3.3. Prism Dialogs                                                                         29
Prism Pipeline Documentation, Release 1.2.0

name will be used globally for all your projects, but it can be changed anytime.

3.3.3 Project Browser

The Project Browser is one of the most important tools in Prism. It allows you to create
assets/shots, manage your scenefiles and browse your renderings or playblasts.

The upper half of the Project Browser contains three tabs:
Assets:
This tab lets you organize your scenefiles for assets like characters or environment, which
will be used in shots later. You can create new entities in the “Hierarchy” list by double-
clicking on it or from the context menu. You can create folders to group your assets or
sub-folders. For example, you could create a group “Character”, which contains a folder
“Creature”, which contains the assets “Alien-A” and “Alien-B”. Assets or bold, while folder
are in regular type. When you have selected an asset in the hierarchy, you can create
pipeline steps in the “Steps” list by double-click or from the context menu. The “Select
Steps” dialog shows up and lets you select one or more steps, which will be created. You
can also create new pipeline steps in this dialog. To remove existing steps, you have to

30                                                       Chapter 3. Feature Reference
Prism Pipeline Documentation, Release 1.2.0

edit this file in your project directory: 00_Pipeline/pipeline.ini
When you have a step selected, you can create new scenefiles in the files list from the
various options in the context menu. The color on the left side of the version determines
the file type. Every DCC app has a different color. For example, orange means it is a
Houdini scene. To open a scenefile double click on it.
Shots:
The shots tab works much like the Assets tab. When you create a new shot, you can also
define a frame range and a preview image. The frame range is a guideline when working
in the scenefiles and can be applied to the scene easily, but it is not forced anywhere. The
preview image be set in this dialog, but also from the context menu of the preview image
at the lower right corner of the Project Browser: “Set as shotpreview”. To edit the shot
settings, you can open the “Edit shot” dialog from the context menu of the shot or when
you double click on the shotpreview.
The Shots tab has also a “Categories” list. One scenario, where this can be useful: When
you have a shot with an FX step and you have multiple simulations in this shot. Then you
can create a category “Fire”, a category “Dust” and a category “Fluid” in order to separate
this simulations into different scenefiles.
Recent:
The recent tab show you the last 10 scenefiles, which you opened with Prism. This can
be scenes from the asset or from the shots tab. You can open them by double clicking on
it.
The lower half of the Project Browser contains the “Renderings” section, where you can
browse your 3d/2d renderings, playblasts and external media.
The first list “Tasks” depends on your selection in the upper half of the Project Browser.
It displays the tasks of the currently selected asset or shot. You create new tasks in your
scenefiles from the State Manager or by creating External Tasks. When you select a task,
the “Versions” list updates to display all versions of the currently selected task. When a
version from a 3dRender task is selected, you can select a render layer (or render pass)
from the “Layer” dropdown. The image preview on the right shows you the media of the
selected version/layer with some information on top. You can double click the preview to
open the media in RV or DJV (if it is installed on your system). You can also drapg&drop
the media from the preview into other programs.
If you have RV installed, you can use the “RV Compare” list to add multiple versions to the
list and compare the in RV. When you right-click on the compare button you have multiple
options of compare types.

3.3. Prism Dialogs                                                                       31
Prism Pipeline Documentation, Release 1.2.0

3.3.4 State Manager

The State Manager lets you manage your imported and exported objects. It is also used
to create playblasts and renderings. The State Manager is only available in the Prism
integration for 3d DCC apps.

32                                                    Chapter 3. Feature Reference
Prism Pipeline Documentation, Release 1.2.0

3.3. Prism Dialogs                                           33
Prism Pipeline Documentation, Release 1.2.0

You can open the State Manager from the Prism menu/shelf or from the main menu of the
Project Browser.
On the left side of the StateManager you have two lists. The upper one is for imports and
the lower one for exports (playblasts and renderings are considered as export). You have
to create states in these lists in order to perform an action.
On the right side of the State Manager you can see the settings of the currently selected
state on the left side.
You can create new states from the buttons above the lists, from the context menu of the
lists or by pressing tab on your keyboard, when you have focused a list.
These are the available state types:
ImportFile:
The ImportFile state is used to import new objects into your current scene. When you
create an ImportFile state, the “Select task” dialog shows up. Here you can select any
previous export from your current project to import it. You can also import external files
by using the “Import custom files” button.
Export:
The Export state is used to export objects from your current scene. You can select from a
list of export formats and define other settings. In Houdini you can submit your exports as
a renderjob to Deadline or Pandora. You can import the exported files later through the
ImportFile state.
Playblast:
The Playblast state create a viewport preview of your current scene. The playblast will be
visible in the “Renderings” section of the Project Browser.
ImageRender:
This state lets you create renderings from your current scenefile. You can render locally
or submit a renderjob to Deadline or Pandora (if installed).
Folder:
The Folder state is the only state, which is available in both the import- and the export-list.
It is used to group multiple other states.
Dependency:
This state is only available in Houdini. It can be used to make renderjobs dependent
on each other on your renderfarm. For example, you can create an Export state to ex-
port a simulation, create a dependency state and select the export rop and create an
ImageRender state, which will be dependent on the export and will start to render, when
the export is done. In Deadline this create a frame-dependency. That means as soon as
one frame of the export-job is completed, the corresponding frame of the render-job can
start rendering by other renderslaves.

34                                                          Chapter 3. Feature Reference
Prism Pipeline Documentation, Release 1.2.0

To start the exports/playblasts/renderings you have to execute the states. You execute
states by publishing your scene with the button on the lower left corner of the State Man-
ager. During the publish your scenefile will be saved to a new version and all checked
states in your export list will be executed.
The “Global Framerange” setting will be used for states, which have the “global” checkbox
next to the “Framerange” setting enabled. This can be used to change the execution
range of multiple states at once.
You can also execute state from the context menu of a state. Here you can also execute a
state as previous version. Normally when executing an ImageRender state, it will create
a new render version. If you execute a state as previous version, you can render into an
existing version in order to complete missing frames or overwrite existing frames.

3.3.5 Prism Settings dialog

The Prism settings dialog contains global settings, which are saved on your current com-
puter. It can be opened from multiple locations, like the start menu, the tray icon or the
Prism menu/shelf in your DCC app.

3.3. Prism Dialogs                                                                     35
Prism Pipeline Documentation, Release 1.2.0

The dialog contains multiple tabs:
User:
Here you can set a user name
If the Shotgun integration is enabled in your current project, you can also define a Shotgun
username and password of an existing Shotgun account, which will be used when creating
Shotgun versions.
Project:
Here you can see your active project, switch to existing Prism projects or create a new
one.
Project Settings:
This is the only tab in the Prism Settings dialog, which can change settings, which can

36                                                        Chapter 3. Feature Reference
Prism Pipeline Documentation, Release 1.2.0

affect other users. The settings in this tab are applied to the project and therefore also
apply to all users of the project. You can change the settings anytime during a project, but
you may need to restart your Prism dialogs/DCC apps to apply them completely.
DCC apps:
This tab contains a sub-tab for each supported DCC integration plugin. These plugins
a loaded dynamically from the “Plugins” folder in your Prism installation. The settings in
these tabs can be different for every plugin, but most plugins contain options to override
an executable when starting a scenefile in the standalone Project Browser and the options
to add/remove DCC integrations.
Miscellaneous:
In this tab you can find some general Prism settings. You can also define explicit paths
for RV or DJV, if they couldn’t be found automatically by Prism.

3.4 Plugins

3.4.1 Overview

Prism uses a plugin structure to manage the integration and communication with external
tools. Adding and removing support for an external tools can be done easily by creating
or deleting a Prism plugin.
Plugins can also be used to customize any existing features of Prism. It is preferrable to
use a plugin, when you want to customize a Prism feature. This allows you to update your
Prism version and keeping your customizations. If you would add your custom code to a
default Prism script, your code would be lost when you update Prism to a newer version.
Prism comes with a bunch of default plugins, but you can create as many additional
plugins as you like. You can also share plugins with other people to give them access to
your customizations or added features.
There are four types of Prism plugins:
   • App Plugin
          An App plugin is used to integrate Prism into a DCC app (like Houdini,
          Maya. . . )
   • Custom
          Plugins of type “Custom” can be used to customize existing Prism fea-
          tures. They contain many callback function, where you can add your cus-
          tom code, which will be executed by Prism at specific events.
   • ProjectManagers

3.4. Plugins                                                                             37
Prism Pipeline Documentation, Release 1.2.0
“ProjectManagers” plugins are used to connect Prism to external project
tracking tools like Shotgun.
• RenderfarmManagers
This plugin type adds support for renderfarm managers like Deadline or
Pandora. They show up as an option in the State Manager, so that artists
can submit jobs easily.
3.4.2 Creating a new plugin
• Open the Prism Settings dialog and go to the “Plugins” tab.
• Click on “Create new plugin”, enter a name for your plugin and accept.
• That will open the directory where the scripts from the new plugin are located. There
you will see a file “Prism__Functions.py”. Open that file in a text
editor.
• Add your custom code to one of the existing function in that file. For example “on-
ProjectChanged”. This function will be called everytime you change the project (that
also happens when you launch a DCC app).
• Make sure the indentations match with the rest of the file and save the file.
• In the Prism Settings click on “Reload all plugins”.
• Change the Prism project or restart your DCC app to execute the code in the “on-
ProjectChanged”.
38 Chapter 3. Feature ReferenceCHAPTER 4
Support and License
If you find any bugs or if you have special feature requests and need any kind of support,
please write a mail to:
contact@prism-pipeline.com
Prism is licensed under the open source GPL v3 license or later. You can find the full
license text in the license.txt file in your Prism installation directory or under this Link.
If you require a different license, please contact the developer.
39You can also read