Texas Unified Licensure Information Portal - (TULIP) Training Guide August 20, 2018 Version 3.0
←
→
Page content transcription
If your browser does not render page correctly, please read the page content below
TULIP Training Guide

Texas Unified Licensure Information Portal
(TULIP)
Training Guide

August 20, 2018

Version 3.0

                                            Page 1 of 71
TULIP Training Guide

TULIP PORTAL PROVIDER TRAINING GUIDE

1. TRAINING GUIDE OVERVIEW: TULIP PORTAL

This training guide is organized into the following major components:
        ▪   Portal Navigation: login & registration, user management, general navigation, and settings
        ▪   Applications: create, upload documents, review deficiencies, pay for, and submit an application
        ▪   Account Updates: submit a change that does not incur a fee
        ▪   Facility / Agency Management: manage a facility or agency account after application
            submission or license approval. This section details the following:
            -   How to upload a document to your facility or agency account
            -   How to renew existing licenses
            -   How to submit and edit a monthly resident death report
            -   How to access the Incident Self Reporting Portal

Please note that TULIP is optimized for Google Chrome and should be used in this browser
whenever possible.

                                                                                               Page 2 of 71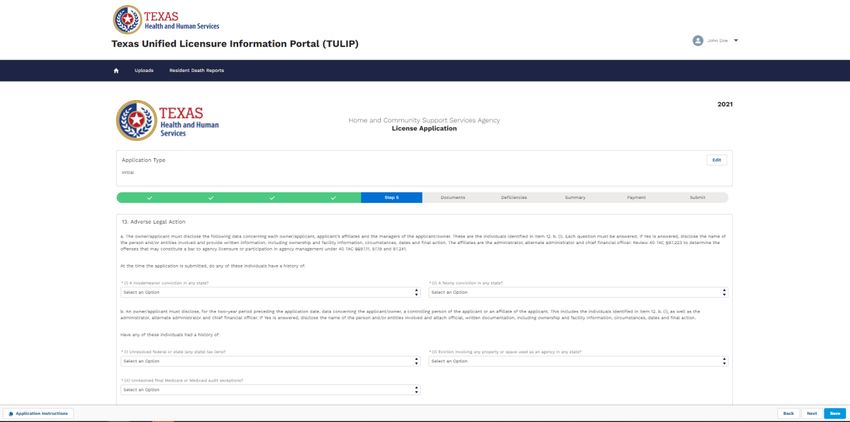
TULIP Training Guide

CONTENTS

TULIP PORTAL PROVIDER TRAINING GUIDE ................................................................................... 2
1. TRAINING GUIDE OVERVIEW: TULIP PORTAL ............................................................................. 2
  1.1 PROVIDER REGISTRATION AND LOGIN ......................................................................................................... 4
     1.1.A. Overview ..................................................................................................................................... 4
     1.1.B. Create a Provider Account .......................................................................................................... 4
     1.1.C. Log in as a Provider ..................................................................................................................... 6
     1.1.D. Granting Access to New Users.................................................................................................... 8
     1.1.E. Manage Provider Access ........................................................................................................... 10
  1.2. PORTAL NAVIGATION ............................................................................................................................ 12
     1.2.A. Homepage................................................................................................................................. 12
     1.2.B. Application Statuses ................................................................................................................. 13
     1.2.C. Application Types ...................................................................................................................... 14
  1.3. APPLICATIONS ...................................................................................................................................... 16
     1.3.A. Overview ................................................................................................................................... 16
     1.3.B. Submit an Agency Application .................................................................................................. 19
     1.3.C. Submit a Facility Application..................................................................................................... 35
     1.3.D. Renew an Existing License ........................................................................................................ 55
     1.3.E. Address Deficiencies After Submission ..................................................................................... 57
     1.3.F Account Updates ........................................................................................................................ 60
  1.4. FACILITY / AGENCY MANAGEMENT .......................................................................................................... 63
     1.4.A. Overview ................................................................................................................................... 63
     1.4.B. Upload a Form .......................................................................................................................... 63
     1.4.C. Submit a Resident Death Report .............................................................................................. 66
  1.5. ADDITIONAL FUNCTIONALITY .................................................................................................................. 70
  1.6. CONTACT HHS ..................................................................................................................................... 71

                                                                                                                                          Page 3 of 71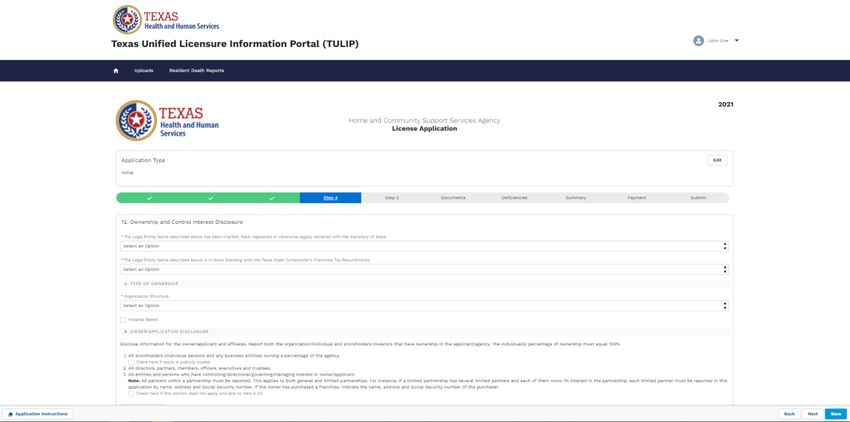
TULIP Training Guide

1.1 PROVIDER REGISTRATION AND LOGIN

1.1.A. OVERVIEW

Figure 1. Provider Registration and Login Process Overview

1.1.B. CREATE A PROVIDER ACCOUNT
Once on the Registration page, providers can select from three paths:

Figure 2. TULIP Registration Page

    1. If they do not already have a TULIP account, users will first be prompted with the question “Have
       you or a representative of your business completed first time registration?” If “Yes”, search for your
       Business Entity. Enter the user-specific details below and select the “Submit” button when finished.

                                                                                                 Page 4 of 71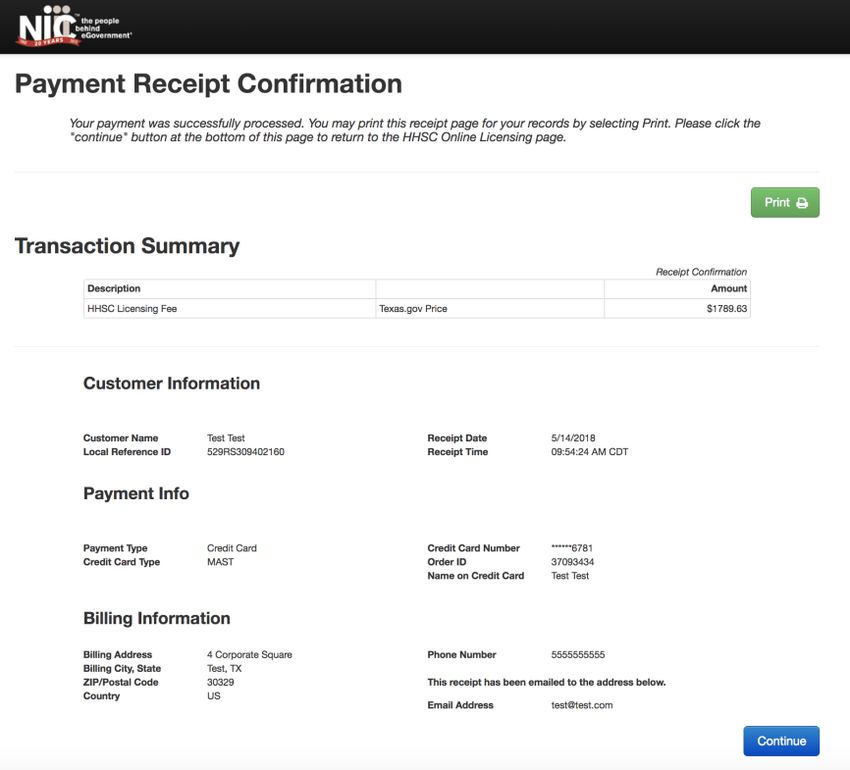
TULIP Training Guide

Figure 3. TULIP Registration Page - Business Entity Search

    2. If they do not already have a TULIP account, you will first be prompted with the question “Have
       you or a representative of your business completed first time registration?” If “No”, you will still the
       user-specific details below. In addition, the user will need to disclose the following four items:

Figure 4. TULIP Registration Page - New User Registration and Disclosures

              a. Representation: Disclose whether you represent one or more facilities, one or more agencies,
                 or both facilities and agencies.
              b. Consultancy: Check this box if you are a consultant. This will add minor restrictions to your
                 account to ensure your employer is legally responding to attestations.

                                                                                                   Page 5 of 71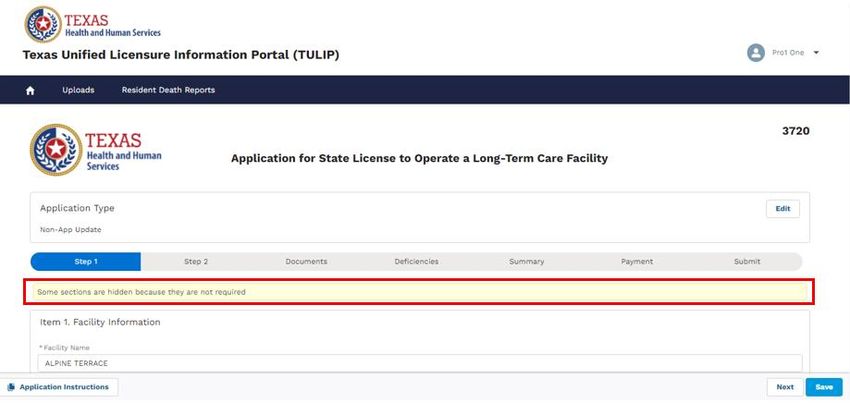
TULIP Training Guide

              c. Outside Ownership: Select “Yes” if your business is owned by another legal entity. If you
                 select “Yes”, additional fields will display. If you have been provided with a registration
                 code(s), enter those here. If you do not have a registration code, select “No” and proceed.

Figure 5. TULIP Registration Page - Outside Ownership

              d. Security Authority: Identify whether you are the single individual that will approve / reject
                 access requests on behalf of your business. If you select “No”, you will be prompted to enter
                 the user-specific details for the designated Security Authority.
When you have completed the Registration page, click “Submit”. An email will be sent confirming your
registration and prompting you to log in with credentials. Please note this email may take up to 30 minutes to
arrive.
    3. If you are a returning TULIP user, select the “Already have an account?” link under the Texas Health
       and Human Services logo to log into TULIP with your existing provider credentials. Skip to section
       1.1.C. below.

1.1.C. LOG IN AS A PROVIDER
It is highly recommended that providers bookmark the login screen for easy access to their TULIP account
portal. To log in, enter your username and password.
From this initial login page, you may navigate back to the initial registration page (Section 2.1.2.B., “Create a
Provider Account”) by selecting the “Not a member?” link.

                                                                                                     Page 6 of 71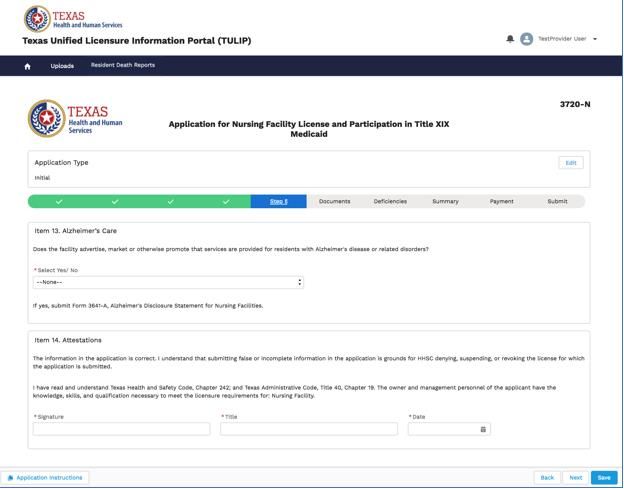
TULIP Training Guide

Figure 6. TULIP Login Screen

Resetting your password
If you have forgotten your password, select the “Forgot your password?” link from the screen above, just
under the login fields. You will be prompted to enter your username (the email address used to register). The
following screen will display, allowing you to return to the login screen or resend the password reset email.

Figure 7. TULIP Login Screen - Forgotten Password

                                                                                                 Page 7 of 71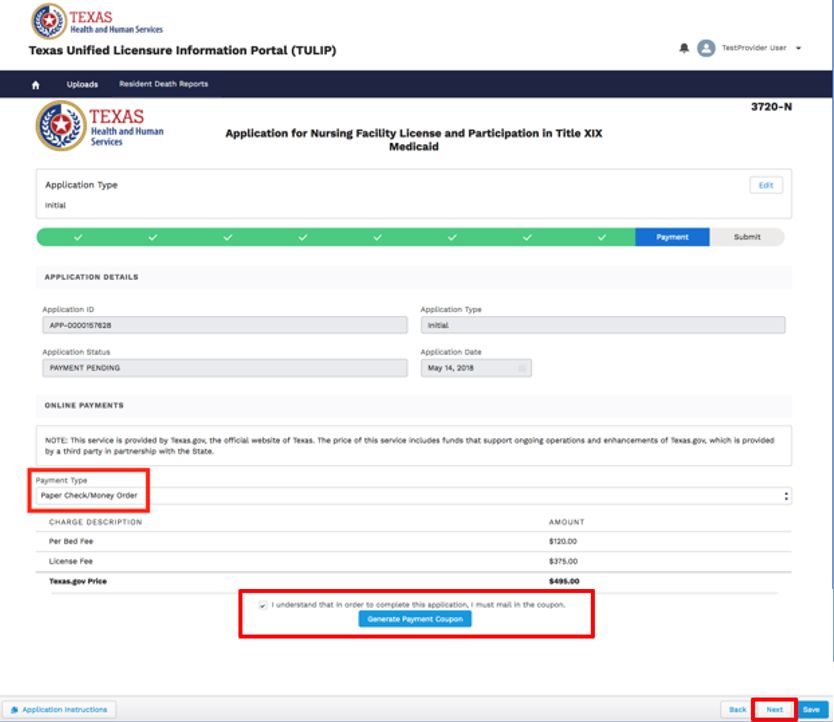
TULIP Training Guide

Additional TULIP Information
HHSC maintains a webpage to host the most updated information regarding TULIP. Access this webpage by
clicking the link at the bottom of the login screen that reads, “Click here for additional information about
TULIP”.

Figure 8. TULIP HHSC Webpage Link

1.1.D. GRANTING ACCESS TO NEW USERS
To grant portal access to new users or remove old users, the Security Authority must first log into their
Salesforce TULIP account. Once logged in, the Security Authority will navigate to Manage Users in their
provider portal. If someone other than the Security Authority logs into TULIP, they will not see a Manager
Users option.

                                                                                                Page 8 of 71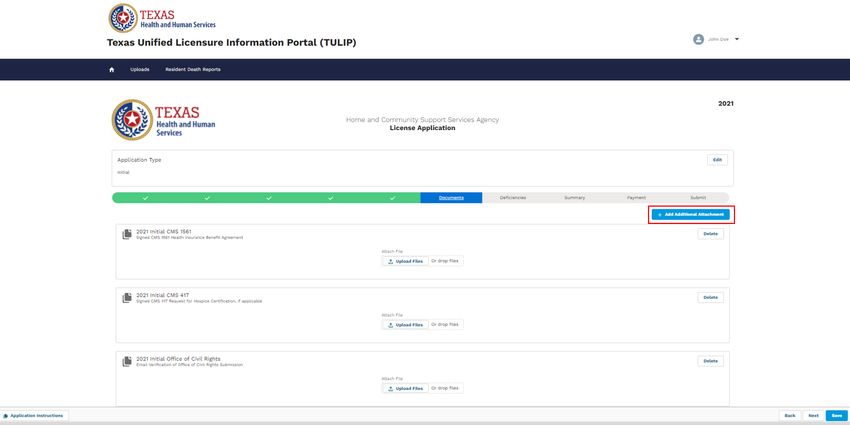
TULIP Training Guide

Figure 9. TULIP User Management

A list of recently viewed contacts will be displayed. Use the dropdown list on the left side of the page to
change views.
    •    The Pending Approval list will display users waiting for approval to the user group they wish to join.
         To take action on a pending user, click on the user. You will see three buttons on the record:
         Approve, Reject, and Deactivate.

Figure 10. TULIP User Management - Pending Approval

    •    The Active Users list allows Security Authorities to deactivate and manage users.
    •    The Deactivated Users list allows Security Authorities to reactivate and manage users.

                                                                                                    Page 9 of 71
TULIP Training Guide

Figure 11. TULIP User Management - Deactivated Users

1.1.E. MANAGE PROVIDER ACCESS
To manage access, the Security Authority must first log into their Salesforce TULIP account.

Figure 12. TULIP Facility/Agency Management

A list of Entity Access records will be displayed. An Entity Access record describes the relationship between
a user and an entity. Use the dropdown list on the left to change views.

                                                                                                Page 10 of 71
TULIP Training Guide
Figure 13. TULIP Facility/Agency Mangement - Entity Access Records
Edit and delete access records using the dropdown arrows to the right of each line item record.
Note: Selecting “Delete” for an entity access record will remove access for that particular entity. Selecting this button does not
delete the entity from existence.
Link an existing entity to an existing user in TULIP
To tie an existing entity to an existing user, follow the steps outlined below. If the user or entity you wish to
link is not yet created, please reference Section 1.1.B. Create a Provider Account to register a new account.
1. Select the “New” button from the Entity Access page above. A New Entity Access Record box will
open.
Figure 14. TULIP Facility/Agency Management – New Entity Access Record
2. Search and select the account and the contact you wish to link. Use the checkboxes provided to
designate whether a user is also a Security Authority and whether they have permissions to submit
applications on the entity’s behalf. Click “Save” when you are finished.
Page 11 of 71TULIP Training Guide
Note: There is no limit on how many Security Authorities can be designated for a given entity; the number of Security
Authorities allowed for a given provider entity is up to the discretion of the provider entity.
1.2. PORTAL NAVIGATION
1.2.A. HOMEPAGE
The image below is an example of a provider homepage, the screen you will see when you first log into the
TULIP portal. From here you can submit applications, update resident death reports, upload forms, view
account details, and address deficiencies. To return to this page from anywhere in the portal, simply select the
Home icon on the leftmost side of the page banner.
Figure 15. TULIP Provider Homepage
The following sections can be found on a provider homepage:
• Pending Provider Action
The Pending Provider Action list displays either incomplete or pending payment applications. This
list also displays applications marked with the status “Response Required” (used to denote items that
must be completed by a provider as soon as possible).
• Previously Submitted Applications
All submitted applications will be added to this list. Users can see the date submitted and status of
the submitted application. For more information on application statuses, see Section 1.2.A.
Application Statuses directly below.
• Facility / Agency Details
Page 12 of 71TULIP Training Guide
If you manage multiple or a blend of facilities and agencies, you can toggle between the various
providers to quickly reference their details by selecting the provider name from the dropdown list. If
you would like to change the details you see listed, clicking the “Update” button will direct the user
to the application list to submit a Change of Information. It is imperative that providers ensure
the accuracy of the contact information on file with HHSC for each of their licensed entities.
• Other Actions
The Other Actions section features links on the righthand righthand side of the homepage. From
these links, providers can submit and manage resident death reports, upload a form, or access the
external Self Reporting Incident Portal. Security Authorities will also see links to Manage Users and
Manage Facility/Agency Access.
For details on these links, see Section 1.5. Facility / Agency Management.
1.2.B. APPLICATION STATUSES
All applications will feature a status to communicate the stage at which an application sits in processing. The
following statuses will help providers track the progress of their TULIP applications:
Status Description
NEW An application has been created and is in data entry progress.
READY TO SUBMIT All required fields have been completed on the application and it is
ready for payment and submission.
SUBMITTED PAYMENT PENDING Payment has been submitted or mailed. The application will not be
processed until payment is sent and cleared.
SUBMITTED An application has been submitted and is under initial review. This
application has not completed deficiency review.
COMPLETE A Licensing Specialist has requested all necessary information
through the deficiency review period and has moved onto the next
stage of processing.
RESPONSE REQUIRED The application requires a response or action from the provider as
soon as possible to proceed with processing.
DENIED The submitted application has been denied by HHS.
WITHDRAWN Marks an application that has been withdrawn by the provider.
EXPIRED A renewal application was automatically generated but not
submitted before license expiration. See Section 1.3.D. Renew an
Existing License for more information.
Page 13 of 71TULIP Training Guide
Status Description
APPROVED / LICENSE ISSUED A license has been issued and mailed to the provider based on an
approved application.
CERTIFICATION GRANTED A certification has been granted and mailed to the provider based
on an approved application.
1.2.C. APPLICATION TYPES
The following application types are offered through TULIP.
Agency or Facility Application Number Application Type
Facility 3720 Account Update
Capacity Increase/Decrease
Change – Management Company
Change – Relocation
Change – Shares Transfer
Change of ICF/IID Administrator
Change of Ownership (CHOW)
Initial
Initial – New Construction Provisional
Reactivate (Bed Suspension)
Real Estate Change
Facility 3720-N Account Update
Capacity Increase/Decrease
Change – Management Company
Change – Relocation
Change – Shares Transfer
Change of ICF/IID Administrator
Change of Ownership (CHOW)
Initial
Initial – New Construction Provisional
Reactivate (Bed Suspension)
Real Estate Change
Page 14 of 71TULIP Training Guide
Agency or Facility Application Number Application Type
Facility 3720-P Account Update
Capacity Increase/Decrease
Change – Admin/CFO
Change – Operating Hours
Change – Relocation
Change of Ownership (CHOW)
Initial
Management Company
Real Estate Change
Transfer of Ownership Interest
Facility 3720-G Initial
Facility 3721 Capacity Increase/Decrease
Change – Relocation
Change of Ownership (CHOW)
Initial
Facility 3736 Renewals only
Agency 2021 Change – Accreditation Status
Change – Admin/CFO
Change – Alternate Administrator
Change – Update Cateogry of Service
Change – Controlling Person
Change – DBA (not CHOW)
Change – Mailing Address
Change – Name of Owner (not CHOW)
Change – Phone/Fax/Email/Operating Hours
Change – Relocation
Change – Service Area Expansion
Change – Service Area Reduction
Change – Stock Transfer
Change of Ownership (CHOW)
Initial
Page 15 of 71TULIP Training Guide
Agency or Facility Application Number Application Type
Agency 2023 Adding Licensed & Certified Category
Change of Ownership (CHOW)
Initial
Agency 2024 Initial
Change – Update Category of Service
Change – Relocation
Change – Phone/Fax/Email/Operating Hours
Change – Service Area Expansion
Change – Service Area Reduction
Change of Ownership (CHOW)
Agency 2025 Initial
Change of Ownership (CHOW)
Change – Relocation
Change – Update Category of Service
Change – Phone/Fax/Email/Operating Hours
Change – Service Area Expansion
Change – Service Area Reduction
1.3. APPLICATIONS
1.3.A. OVERVIEW
TULIP online applications will enable both agencies and facilities to submit license and certification
applications from start to finish. The following flow lays out the steps to complete an application:
Figure 16. Applications Process Overview
Quick Reference: TULIP Online Application Features
Page 16 of 71TULIP Training Guide
The applications as represented in TULIP are made to reflect the previous HHS paper applications as much
as possible. Depending on each question, data entry fields will vary between free text fields, date calendars,
numerically restricted, or picklists. The following features are unique to TULIP and of note:
• Progress Bar: This bar is featured at the top of each application and will help providers track progress
during data entry. Each step within the bar maybe be clicked to jump to different application pages.
Figure 17. TULIP Application Progress Bar
• Date Calendars: Throughout applications, providers will find date fields with three options for entry: a
“mm/dd/yyyy” manual keyboard option, up/down selection arrows, or a dropdown calendar at the
far right of the field box.
Figure 18. Date Calendar
• Instructions: Instructions can be accessed both from the initial Application List page and within the
footer at the bottom of all applications. When selected, this link will open in a new tab so as to not
disrupt application progress.
Figure 19. TULIP Application Instructions Button
• Saving: Moving to a new step or selecting the “Next” or “Save” buttons in the footer at the bottom of
the application will automatically save application progress. After saving, you may navigate away
from TULIP or close your browser entirely to resume the application at a later date. The saved
application will be stored in the Pending Provider Action section of the homepage.
Figure 20. Back, Next, and Save buttons
• Required Fields: TULIP applications include required fields and documents, marked both in red and
with an asterisk (*). Providers will not be blocked from moving between steps or
saving/closing/exiting the application if required fields are left blank. Missing required fields will be
displayed in the “Deficiencies” step and will, however, prevent access to the final stages of payment
and application submission.
Page 17 of 71TULIP Training Guide
Figure 21. Example of TULIP Required Field
• Exemptions: Applications will vary by type. On some applications, providers may notice checkboxes
or Yes/No fields that could exempt them from certain pieces of the application. TULIP applications
will use the concept of required fields (explained above) to enforce fields that apply to all users. If
you complete a field that exempts you from another non-required field, continue through the
application. The following examples will help illustrate exemptions:
o Example, Address entry fields: A provider enters their Physical Address. Instead of entering a
Mailing Address, they select a checkbox that reads “Same as Physical Address” and continue
through the application. The information entered into the physical address fields will also
populate the mailing address fields upon application approval.
o Example, Yes/No selection fields: A provider selects “Yes” in a Yes/No selection field.
Oftentimes, if the selection is No the provider may simply move onto the next question.
TULIP applications include all necessary instructions around Yes/No fields. If you need
further help, please access the Instructions document using the button at the bottom left of
the screen.
• Attestations: Secured by Salesforce’s logins, TULIP applications ask for an attestation in place of prior
notarized affidavits. Please note that most applications will still require a separate fire marshal
approval upload.
Figure 22. TULIP Attestation Example
Page 18 of 71TULIP Training Guide
1.3.B. SUBMIT AN AGENCY APPLICATION
Create and Select Your Application
To create a new application for your agency, follow the steps below.
1. Select the “Submit a New Application” button next to the “Pending Provider Action” heading.
Figure 23. TULIP "Submit a New Application" Button
A list of either agency, facility, or both application types will be displayed (this varies based on who
an entity manages). Select the “Start Application” button next to the correct application type. You
may also open accompanying instructions in a new tab by selecting the "Instructions” button. For
training purposes, we will select Application 2021, the initial application for agencies.
Figure 24. TULIP Application Selection List
2. Select an Application Type. If you are not submitting an initial application, you may select
multiple Changes to update your information. Note than Change types will prompt you to enter
both a License Number and an Effective Date. Fees associated with all applications can be found
in the Instructions.
Page 19 of 71TULIP Training Guide
Figure 25. TULIP License Number and Effective Date Entry
For training purposes, we will select the “Initial” checkbox. Note that because the agency has not
yet been licensed, a License Number is not required, and the field will disappear from view.
Select the “Save” button at the bottom to continue.
3. The application should open and a success message should display upon saving. At the top of
the screen, you will see the Application Type reflected. You will not be able to change the
application type once information is saved to an application; if you save data and need to change
your application type, you will need to delete this record and create a new application.
Enter Application Data
The following screenshots will show the layout of an online application in TULIP. The fields within each
application will vary in type:
• Free text
• Numerically-restricted
• Email-restricted
• Picklists (both single- and multiple-selection)
• Checkboxes)
• Popup entry boxes
Familiar help text that matches previous HHS paper applications will still be used within TULIP applications
to guide the user.
Page 20 of 71TULIP Training Guide
Figure 26. TULIP Application - Step 1
Figure 27. TULIP - Application Step 2
Page 21 of 71TULIP Training Guide
Figure 28. TULIP Application - Step 3
Figure 29. TULIP Application - Step 4
Page 22 of 71TULIP Training Guide
Figure 30. TULIP Application - Step 5
Ownership Control and Disclosure
Certain application types request ownership information. To enter the ownership hierarchy, navigate to the
Ownership and Control Interest Disclosure section in the application. Here providers can enter the Type of
Ownership, Disclosure checkboxes, and build a Hierarchy.
To enter an Ownership Hierarchy, select the “Add Owner” button, shown below.
Figure 31. TULIP Application – Ownership and Disclosure Section
Page 23 of 71TULIP Training Guide
A detail box will appear. Enter the details for this owner, including the ownership percentage, Taxpayer
Identification Number (TIN), and start date of association. The ownership percentage will be default to
100% for the first entry. Select the “Save” button to return to the application and see the saved record.
Figure 32. TULIP Application – Ownership Entity Record Edit
The user will see the saved record listed until the Ownership Hierarchy section, and will notice that the
record offers the option to add an owner of that record.
Figure 33. TULIP Application – Ownership Record Display
Repeat this process with each owner in the hierarchy until you have represented the agency’s ownership
structure. Levels of the hierarchy and each ownership percentage will indent to accurately show relationships,
and businesses and individuals will be represented with different icons for easy reference. An example is
shown below:
Page 24 of 71TULIP Training Guide
Figure 34. TULIP Application – Ownership Hierarchy Example
Upload Documents
After the final data entry screen, the “Next” button will take the user to the “Documents” step of the
progress tracker. On this screen, each application will display the various documents associated with that
application type. Required documents are denoted with the phrase “This document is required” in red.
Users may either select the “Upload Files” button to select a local file or drag and drop a file onto the
corresponding document row. Once the document upload is complete, the user can click “Done” and see
their document name reflected in the document row with the ability to delete the document if desired, as
shown above.
Figure 35. TULIP Application - Documents
Page 25 of 71TULIP Training Guide
To upload a document that is not on the list (or upload an additional page of a document), scroll to the top of
the page and select “Add Additional Attachment” button. Enter a Name and Description for the document,
and Save the document.
Figure 36. TULIP Application - New Attachment
A placeholder will be created for your document. Again, either select the “Upload Files” button to select a
local file or drag and drop a file onto your custom document row. You may delete both the uploaded
document and the overall document placeholder using the delete buttons, marked below.
Figure 37. TULIP Application - Delete Document
When you are finished uploading documents, click the “Next” button to continue.
Review Application Deficiencies
The “Deficiencies” step ensures a complete application before the Provider is able to proceed to application
payment and submission. The Provider is required to select the “Review” button; otherwise, the “Payment”
step will not display any information and instead direct the Provider back to the “Review” button.
Page 26 of 71TULIP Training Guide
Figure 38. TULIP Application - Deficiencies
The “Review” button will capture incorrect values entered into required fields (including blanks or improper
formats) and missing attachments on required documents and list the deficiencies. Deficiencies will be listed
in the order in which they appear in the application.
In all cases, the deficiency will be delineated by a light gray box and will display the Item (section) in which
the deficiency appears; each section can have one or more deficiencies. In some cases, the deficiency will
further display the specific field that is deficient within the Item through the deficiency’s Description.
To quickly navigate through the application to the deficiency, select the “Go to Step” button associated with
the deficiency; the hyperlink will direct the Provider to the specific step on which the deficiency appears.
Page 27 of 71TULIP Training Guide
Figure 39. TULIP Application - Deficiencies List
In many cases, deficient fields will be outlined in red boxes to flag the fields for the Provider and may be
accompanied by help text. To resolve deficiencies, click into the deficient fields and fill appropriate values, or
attach a correct required document if resolving a document deficiency.
Figure 40. TULIP Application - Deficiencies Example
You must continue to select the “Review” button on the “Deficiencies” tab to ensure that all deficiencies are
resolved. Once all deficiencies have been resolved, the application will display a success message indicating
that there are no deficiencies to address and the Provider will be able to proceed to the following tabs.
Page 28 of 71TULIP Training Guide
Figure 41. TULIP Application - Successful Review
Review Application Summary and Print Application
The “Summary” tab of the application submission process displays a read-only concatenation of all Steps in
the application to allow the user to quickly review all entered information. From the “Summary” tab,
Providers can print the application for their own records before application submission.
Figure 42. TULIP Application - Summary and Print Screen
Page 29 of 71TULIP Training Guide
Providers can similarly print their applications after application submission also from the “Summary” tab.
Navigate to the “Previously Submitted Applications” section of the Provider Portal homepage to find and
select a previously submitted application to be printed; use the “See More” action if the application is not
immediately displayed in the list.
Figure 43. Previously Submitted Applications List Preview
The Provider will be directed to the “Summary” tab of the previously submitted application; from here, the
Provider can review and print the application by again using the “Print” button located above the progress
bar.
Important Note: Because TULIP applications are modified to display online, the traditional paper sections
1-4 are rolled up into a common process before the application opens. It may be handy to note the
application number and entity name if you choose to file anything personally as a paper copy.
Generate and Print a Payment Coupon
On the Payment step of the application, the user will see an overview of basic application details such as
Application ID, Application Type, Application Status, and Application Date. Underneath these details the
user will select a Payment Type from the dropdown picklist field containing three payment options:
1. ACH
2. Credit Card
3. Paper Check / Money Order
If the third option is selected, the page will display a checkbox alongside the price asking you to confirm “I
understand that in order to complete this application, I must mail in the coupon”. When checked, the button
below this statement is activated. This button generates a populated payment coupon in a new browser tab.
The payment coupon must be printed and mailed to the provided address along with their paper check or
money order for the full amount before the application will be processed by HHS. Providers can print the
generated payment coupon PDF as their computer normally allows.
Select the “Next” button to continue to the submission step.
Page 30 of 71TULIP Training Guide
Figure 44. TULIP Application - Paper Check / Money Order Payment
Pay Online Through Texas.gov
Texas.gov is the statewide government website and also the official payment processor for Texas agencies.
Payments made online with TULIP will be made through the Texas.gov checkout process.
If either the ACH or Credit Card option is chosen as the Payment Type, this payment option will display a
Texas.gov price and a link to pay through Texas.gov in a separate tab. Please note that the link is valid for 30
minutes. If the 30 minutes elapse and the link expires, you will need to close the application and refresh the
page to re-enter.
Page 31 of 71TULIP Training Guide
Figure 45. TULIP Application - ACH or Credit Card Payment
Figure 46. TULIP Application - Payment Address Information
Page 32 of 71TULIP Training Guide
Figure 47. TULIP Application - Payment Credit Card Information
Once you complete the online payment, you will receive a confirmation email from Texas.gov. Press the
“Continue” button to return to the application and submit the application.
Figure 48. TULIP Application - Payment Receipt Confirmation
Page 33 of 71TULIP Training Guide
Submit a Completed Application
Your application is not considered completed or eligible for processing unless both your payment is
submitted and the application itself is submitted.
The Submit step is the final step in the progress tracker and displays a single “Submit Application” button.
Press this button to submit your application.
Figure 49. TULIP Application - Submit Application
Once submitted, TULIP will display text that reads “Application submitted”. In addition, you will receive an
email confirmation notifying you of your application’s receipt at HHS for review after payment processing.
Figure 50. TULIP Application - Application Submitted Confirmation
Page 34 of 71TULIP Training Guide
Once you navigate back to your Provider Homepage, your application will reflect a status of “Submitted”
under the Previously Submitted Applications section.
Figure 51. TULIP Provider Homepage - Submitted Application
1.3.C. SUBMIT A FACILITY APPLICATION
Create and Select Your Application
To create a new application for your facility, follow the steps below.
1. Select the “Submit a New Application” button near the top of the page.
Figure 52. TULIP Provider Homepage - Submit a New Application
2. A list of Applications will be displayed. Find the application you would like to submit and select
the “Start Application” button. You may also open accompanying instructions in a new tab by
selecting the "Instructions” button. For training purposes, we will select Application 3720-N, the
initial application for Nursing and Title XIX facilities.
Page 35 of 71TULIP Training Guide
Figure 53. TULIP Application Type Selection List
3. Select an Application Type. If you are not submitting an initial application, you may select
multiple Changes to update your information. Change types will prompt you to enter both a
License Number and an Effective Date.
Note: ICF Initial applications in TULIP were previously referenced as “ICF reactivations”. Please use the
application type “Initial” if looking for ICF reactivations and select “ICF/IID” as the facility type as you
normally would.
Figure 54. TULIP Application - License Number and Effective Date Entry Screen
For training purposes, we will select the “Initial” checkbox. Note that because the facility has not
yet been licensed, a Facility ID is not required. Select the “Save” button.
Page 36 of 71TULIP Training Guide
Figure 55. TULIP Application - Initial
4. The application should open and a success message should display when the “Save” button is
selected. At the top of the screen, you will see the Application Type reflected. You will not be
able to change the application type once information is saved to an application; if you save data
and need to change your application type, you will need to delete this record and create a new
application.
Enter Application Data
The following screenshots will show the layout of an online application in TULIP. The fields within each
application will vary in type:
• Free text
• Numerically-restricted
• Email-restricted
• Picklists
• Checkboxes
• Popup entry boxes
Familiar help text that matches previous HHS paper applications will still be used within TULIP applications
to guide the user.
Page 37 of 71TULIP Training Guide
Figure 56. TULIP Application - Step 1
Page 38 of 71TULIP Training Guide
Figure 57. TULIP Application - Step 2
Page 39 of 71TULIP Training Guide
Figure 58. TULIP Application - Step 3
Page 40 of 71TULIP Training Guide
Figure 59. TULIP Application - Step 4
Page 41 of 71TULIP Training Guide
Figure 60. TULIP Application - Step 5
Ownership Control and Disclosure
Certain application types request ownership information. To enter the ownership hierarchy, navigate to the
Applicant Information section in the application. Here providers can enter the Type of Ownership,
Disclosure checkboxes, and build a Hierarchy.
To enter an Ownership Hierarchy, select the “Add Owner” button, shown below.
Page 42 of 71TULIP Training Guide
Figure 61. TULIP Application – Facility Ownership Section
A detail box will appear. Enter the details for this owner, including the ownership percentage, Taxpayer
Identification Number (TIN), and start date of association. The ownership percentage will be default to
100% for the first entry. Select the “Save” button to return to the application and see the saved record.
Figure 62. TULIP Application – Ownership Entity Record
Page 43 of 71TULIP Training Guide
The user will see the saved record listed until the Ownership Hierarchy section, and will notice that the
record offers the option to add an owner of that record.
Figure 63. TULIP Application – Ownership Record Display
Repeat this process with each owner in the hierarchy until you have represented the agency’s ownership
structure. Levels of the hierarchy and each ownership percentage will indent to accurately show relationships,
and businesses and individuals will be represented with different icons for easy reference. An example is
shown below:
Figure 64. TULIP Application – Ownership Hierarchy Example
Upload Documents
After the final data entry screen, the “Next” button will take the user to the “Documents” step of the
progress tracker. On this screen, each application will display the various documents associated with that
application type. Required documents are denoted with the phrase “This document is required” in red.
Users may either select the “Upload Files” button to select a local file or drag and drop a file onto the
corresponding document row. Once the document upload is complete, the user can click “Done” and see
their document name reflected in the document row with the ability to delete the document if desired, as
shown above.
Page 44 of 71TULIP Training Guide
Figure 65. TULIP Application - Documents
To upload a document that is not on the list (or upload an additional page of a document), scroll to the top of
the page and select “Add Additional Attachment” button. Enter a Name and Description for the document,
and Save the document. Again, either select the “Upload Files” button to select a local file or drag and drop a
file onto your custom document row.
When you are finished uploading documents, click the “Next” button to move on.
Figure 66. TULIP Application - New Attachment
Page 45 of 71TULIP Training Guide
Figure 67. TULIP Application - Custom Document
Review Application Deficiencies
The “Deficiencies” step ensures a complete application before the provider is able to proceed to application
payment and submission. Without reviewing the application, the “Payment” step will not display any
information and instead direct the provider back to the “Review” button.
Page 46 of 71TULIP Training Guide
Figure 68. TULIP Application - Deficiencies
The “Review” button will capture incorrect values entered into required fields (including blanks or improper
formats) and missing attachments on required documents and list the deficiencies. Deficiencies will be listed
in the order in which they appear in the application.
In all cases, the deficiency will be delineated by a light gray box and will display the Item (section) in which
the deficiency appears; each section can have one or more deficiencies. In some cases, the deficiency will
further display the specific field that is deficient within the Item through the deficiency’s Description.
To quickly navigate through the application to the deficiency, select the “Go to Step” button associated with
the deficiency; the hyperlink will direct the Provider to the specific step on which the deficiency appears. See
the image below:
Page 47 of 71TULIP Training Guide
Figure 69. TULIP Application - Deficiencies List
In many cases, deficient fields will be outlined in red boxes to flag the fields for the Provider and may be
accompanied by help text. To resolve the deficiency, click into the deficient fields and fill appropriate values,
or attach a correct required document if resolving a document deficiency.
Figure 70. TULIP Application - Deficiencies Example
You must continue to select the “Review” button on the “Deficiencies” tab to ensure that all deficiencies are
resolved. Once all deficiencies have been resolved, the application will display a success message indicating
that there are no deficiencies to address and the provider will be able to proceed to the following tabs.
Page 48 of 71TULIP Training Guide
Figure 71. TULIP Application - No Deficiencies Message
Figure 72. TULIP Application - Successful Review
Review Application Summary and Print Application
The “Summary” tab of the application submission process displays a read-only concatenation of all Steps in
the application to allow the user to quickly review all entered information. From the “Summary” tab,
Providers can print the application for their own records before application submission.
Page 49 of 71TULIP Training Guide
Figure 73. TULIP Application - Summary and Print Screen
Providers can similarly print their applications after application submission also from the “Summary” tab.
Navigate to the “Previously Submitted Applications” section of the Provider Portal homepage to find and
select a previously submitted application to be printed; use the “See More” action if the application is not
immediately displayed in the list.
Page 50 of 71TULIP Training Guide
Figure 74. Previously Submitted Applications List Preview
The Provider will be directed to the “Summary” tab of the previously submitted application; from here, the
Provider can review and print the application by again using the “Print” button located above the progress
bar.
Generate and Print a Payment Coupon
On the Payment step of the application, the user will see an overview of basic application details such as
Application ID, Application Type, Application Status, and Application Date. Underneath these details the
user will select a Payment Type from the dropdown picklist field containing three payment options:
1. ACH
2. Credit Card
3. Paper Check / Money Order
If the third option is selected, the page will display a checkbox alongside the price asking you to confirm “I
understand that in order to complete this application, I must mail in the coupon”. When checked, the button
below this statement is activated. This button generates a populated payment coupon in a new browser tab.
The payment coupon must be printed and mailed to the provided address along with their paper check or
money order for the full amount before the application will be processed by HHS. Providers can print the
generated payment coupon PDF as their computer normally allows.
Page 51 of 71TULIP Training Guide
Figure 75. TULIP Application - Paper Check / Money Order Payment
Select the “Next” button to continue to the submission step.
Pay Online Through Texas.gov
Texas.gov is the statewide government website and also the official payment processor for Texas facilities.
Payments made online with TULIP will be made through the Texas.gov checkout process.
If either the ACH or Credit Card option is chosen as the Payment Type, this payment option will display a
Texas.gov price and a link to pay through Texas.gov in a separate tab. Please note that the link is valid for 30
minutes. If the 30 minutes elapse and the link expires, you will need to close the application and refresh the
page to re-enter.
Page 52 of 71TULIP Training Guide
Figure 76. TULIP Application - ACH or Credit Card Payment
Figure 77. TULIP Application - Payment Address Information
Page 53 of 71TULIP Training Guide
Figure 78. TULIP Application - Payment Credit Card Information
Once you complete the online payment, you will receive a confirmation email from Texas.gov. Press the
“Continue” button to return to the application and submit the application.
Figure 79. TULIP Application - Payment Receipt Confirmation
Page 54 of 71TULIP Training Guide
Submit a Completed Application
Your application is not considered completed or eligible for processing unless both your payment is
submitted and the application itself is submitted.
The “Submit” step is the final step in the progress tracker and displays a single “Submit Application” button.
TULIP will display a green success banner that reads, “Application was submitted”. In addition, you will
receive an email confirmation notifying you of your application’s receipt at HHS for review after payment
processing.
Figure 80. TULIP Application - Submit Application
Once you navigate back to your Provider Homepage, your application will reflect a status of “Submitted”.
Figure 81. TULIP Provider Homepage - Submitted Application Example
1.3.D. RENEW AN EXISTING LICENSE
Users will have the ability to renew an existing license beginning 120 days before their license expires. This
renewal application will generate automatically through TULIP. You can access the renewal application from
the Pending Provider Action list on your homepage. You will also see the due date for this application
displayed to help you plan your time.
Continue with the data entry, document upload, payment, and submission steps as detailed above in sections
1.3.B. Submit an Agency Application or 1.3.C. Submit a Facility Application.
Page 55 of 71TULIP Training Guide
Renewals will appear in the Pending Provider Action section of the homepage with a Type of “Renewal” and
a Status of “New”.
Figure 82. TULIP Provider Homepage – Renewal Homepage Notification
When selected, the generated renewal application will open, fully populated, for review. Edit any fields
needed, ensuring all required fields are complete. Proceed with deficiency review, document upload, and
payment as normal. See sections 1.3.C. and 1.3.D for submission instructions.
Figure 83. TULIP Provider Homepage – Populated Renewal Application
Generated renewal applications are valid (with a late fee applied) until close of the day of license expiration.
After that, providers must begin a new initial application to file for a license. If you try to access a renewal
application after your license has expired, you will see the following message displayed when you open the
application:
“Our records indicate that the license you are attempting to renew has expired and, therefore, you cannot submit an application to
renew the license through this portal. If you believe that you have received this message in error or you would like to request an
exception, which will allow you to submit a renewal application after a license has expired, please send relevant information to the
Provider Licensure and Certification Manager at bobby.schmidt@hhsc.state.tx.us. HHSC will review the information you
submit, notify you of its determination, and provide you with additional instructions, if necessary. Please note that HHSC will
Page 56 of 71TULIP Training Guide
grant an exception to file a renewal application only under limited circumstances, such as when a waiver has been granted by the
Governor after a hurricane.”
1.3.E. ADDRESS DEFICIENCIES AFTER SUBMISSION
After application submission, an HHS Licensing Specialist will review your application in full and mark any
information that needs to be corrected or added. Once sent back to providers, these deficiencies must be
corrected as soon as possible; if HHS does not receive a corrected response within 30 days, the submitted
application will be proposed for denial.
Providers will receive an email to their designated applicant contact when deficiencies are noted on an
application and the 30-day correction period has begun.
To find an application marked with deficiencies, navigate to the provider home page. The Pending Provider
Action section should be the first section on the page, and any applications waiting for provider response will
be listed here with a Status of “Response Required”.
Figure 84. Pending Provider Action Section
Providers will immediately see deficiencies when the application link is opened. To view a list of all
deficiencies marked by an HHS Licensing Specialist, select the “Deficiencies” tab.
Page 57 of 71TULIP Training Guide
Figure 85. Marked Deficiencies
Each marked deficiency will be delineated with a light gray box. The deficiencies will display the Item
(section) in which the deficiency occurs and a description of the deficiency entered by the HHS Licensing
Specialist. The Provider can add a comment to the deficiency with the “Add Comment” button; the comment
will appear in the “Provider Comments” field of the deficiency. Comments cannot be added after a deficiency
is marked as addressed. To quickly navigate to the Step on which the deficiency occurs, select the “Go to
Step” button.
Once the Provider has navigated to the deficient Item (section), the Provider will see a red banner across the
top of the section containing a list of deficiency descriptions for deficiencies occurring within the section. If
there are multiple deficiencies within the section, they will all be listed in the banner on separate lines.
Page 58 of 71TULIP Training Guide
Figure 86. Deficient Item
To resolve a deficiency, click into the deficient field and update the information. Once a specific deficiency is
corrected, select the “Mark as Addressed” action next to the deficiency description in the banner. When all
deficiencies in the section are marked as addressed, the deficiency banner will disappear. The Provider can
also mark deficiencies as addressed with the “Mark as Addressed” buttons in the “Deficiencies” tab, but it is
recommended that the Providers correct the deficiencies within the sections first before marking a deficiency
as addressed.
The Provider can return to the “Deficiencies” tab after resolving a deficiency. The red crossout icon will be
replaced with an orange crossout icon, and the “Addressed by Provider” field will display “Yes”. The
“Resolved” field will still display “No”, as this field is used by the HHS Licensing Specialist when reviewing
addressed deficiencies. Once the Provider has addressed all deficiencies, be sure to select the “Save” button
to send the corrections back to HHS.
Page 59 of 71TULIP Training Guide
Figure 87. Addressed Deficiency
1.3.F ACCOUNT UPDATES
Account updates will be available on Applications 3720, 3720-N, and 3720-P for facility providers who wish
to update fields on their application that do not incur a fee and are not covered by a Change of Information
application type. Note: Facilities that use a 3720-G application form type will simply use a 3720.
To make a Account update:
1. Navigate to the Details section of your provider homepage and select the correct facility
from the dropdown field.
2. Click the “Update” button.
Page 60 of 71TULIP Training Guide
Figure 88. Facility Details and Update Button
The user will see the usual application list. Select the proper application as it applies to your facility, and then
select the “Start Application” button.
Figure 89. Application List
Once inside the application, select “Account Update” as the application type and enter both the effective date
and the Facility ID. Enter the application to begin updating your information.
Page 61 of 71TULIP Training Guide
Figure 90. Select Update Application Type
TULIP will generate the most recently submitted application—fully populated—for the user to update. Note
that only application sections that do not incur a fee will be displayed. If you need to update information in a
section that is hidden, you will need to submit a new Change application and pay the associated fee.
Figure 91. Generated Update Application
Use the “Next” and “Save” buttons to navigate the application as you normally would. When you have made
all necessary field updates, select the “Submit” button to submit the update application to a Licensing
Specialist for review. You will not be charged a fee on the Payment tab when submitting.
Page 62 of 71TULIP Training Guide
1.4. FACILITY / AGENCY MANAGEMENT
Figure 92. Facility / Agency Management Overview
1.4.A. OVERVIEW
Through your account, you can utilize additional links and shortcuts to upload documents to your account
submit and manage Resident Death Reports, and access external links.
1.4.B. UPLOAD A FORM
Providers may upload documents in both the Uploads tab at the top banner of the page or from the “Upload
a Form” link on the righthand side of their home page.
Figure 93. Upload a Form
Once selected, the Uploads tab will display a list of recent uploads to your account. To submit a new one,
select the “New” button on the righthand side of the screen. The “Upload a Form” will automatically open a
new record.
Create the Document Shell
Page 63 of 71TULIP Training Guide
When selected, this link will open a New Provider Upload popup box in the same window. The user will:
• Enter a name for the document
• Add a description for the document. This helps HHS quickly identify the upload
• Searched for and select the associated provider
• Click “Save” to move to the upload portion. The user will see a green success ribbon that reads
“Document _____ was created”.
Figure 94. Upload a Form - New Upload
Upload a File
Once created and saved, the user will see the document details displayed. On this screen, the user can either
drag and drop a file into the designated box or select the “Upload Files” button to manually select a file.
More than one file may be uploaded to the same named document (in the event that a document is multi-
page but saved separately), but should be uploaded one at a time. A small, secondary popup box will show the
upload progress; when the document is fully uploaded, the user will be prompted to acknowledge the upload
by clicking the “Done” button.
Page 64 of 71TULIP Training Guide
Figure 95. Upload a File
To manage files within a document, select the “View All” link in the bottom right corner of the “Notes &
Attachments” section. From here, users can see the upload date and size of the files. To upload a new
version, delete, or download the file added, click the arrow box on the far right of the file row.
Figure 96. Notes and Attachments
To manage created document uploads, select the Uploads tab in the banner at the top of the screen at any
time. Records can be created by clicking the “New” button and edited / deleted at a row level using the arrow
box on the far right of each file row.
Page 65 of 71You can also read