MAPQUEST NAVIGATOR USER MANUAL
←
→
Page content transcription
If your browser does not render page correctly, please read the page content below
MapQuest Navigator
        ®

   User Manual
Legal Notice
This guide and the information it contains belongs solely to MapQuest, Inc. and Telmap Ltd.
The guide and the software products described therein are furnished under license. The
software and guide may be used only in accordance with such license. Except as permitted by
such license, no part of this guide may be reproduced, copied, stored in a retrieval system, or
transmitted, in any form or by any means, electronic, mechanical, recording, or otherwise,
without the prior written permission of MapQuest, Inc. and Telmap Ltd.
The text and graphics are for the purpose of illustration and reference only. The information
provided in this document and the specifications of the software it describes are subject to
change without notice and MapQuest, Inc. and Telmap Ltd. reserve the right to update,
change or otherwise modify the specification, configuration and information of its products or
services, at any time. MapQuest, Inc. and Telmap Ltd. assume no responsibility or liability for
any errors or inaccuracies that may appear in this guide.
MapQuest, Inc. and Telmap and the names of its software products contained herein are
trademarks of MapQuest, Inc. and Telmap Ltd., and may be registered in some jurisdictions. All
other company and/or product names are trademarks or registered trademarks of their
respective owners, and are hereby acknowledged.
Copyright © 2006, MapQuest, Inc. and Telmap Ltd. All rights reserved.
2Contents
Getting Started 4
Planning a Route and Starting Navigation 6
In-Car Navigation 14
Pedestrian Navigation 21
Using Maps 23
Advanced Functions 29
Frequently Asked Questions and Troubleshooting 31
Appendix and Glossary 35
Contents 3Getting Started
About This Manual
This user manual is designed to guide you through the tasks involved in planning a route and
using MapQuest® Navigator. The pictures of screens may vary slightly on different cell phone
models. In these cases there are notes specifying the differences.
The manual assumes you are familiar with the usage of your cell phone. For information about
using the cell phone, please refer to your cell phone manufacturer's user manual.
You can access MapQuest® Navigator in the same way that you would access any other
application on your cell phone. In joystick-based phones, menus that appear on the screen are
accessed by scrolling with the joystick and then pressing on the appropriate highlighted item.
Other menu options are accessed by the cell phone's soft buttons, usually the one on the left
of the joystick that opens the Options menu.
In touch screen phones like the menu items are accessed by tapping on the appropriate item
on the screen with the stylus. Other options are accessed by tapping on the MapQuest®
Navigator Menu at the top left hand corner of the screen and then selecting the required
option from the drop-down menu.
Getting Started 4Getting Started
Setting up MapQuest® Navigator
To start MapQuest® Navigator for the first time
1. Check if MapQuest® Navigator is preinstalled on your cell phone. If not, download
MapQuest® Navigator and installation should proceed automatically. You should have
received download instructions upon purchase of your subscription package.
2. Make sure that the GPS on your cell phone is enabled and functioning properly according
to manufacturer instructions.
3. From the list of applications in your cell phone menu, select MapQuest® Navigator.
The splash screen is displayed while MapQuest® Navigator is loading. When done, the
screen displays a disclaimer.
4. To confirm, select I Agree
The Main Menu screen is displayed.
Note: For information on using the various application
features of your cell phone, please refer to your cell phone
manufacturer's user manual.
Note: For a detailed explanation of GPS technology, see
Using GPS to Determine Locations (on page 35).
5. Start navigating!
Getting Started 5CHAPTER 1
Planning a Route and Starting Navigation
Planning a route with MapQuest® Navigator is easy. All you have to do is use the system's
powerful and flexible capabilities to determine your origin and destination. The system does
the rest.
To plan a route, start by setting your origin (where you will start) and destination (where you
are going).
Setting Your Origin
If you are in a car, the easiest way to define your origin is to use the in-car GPS, which is the
default setting automatically provided by the system. If you are on foot, have a weak GPS
signal, or want to start the navigation process before entering the car (at home, hotel or
office), it's best to use MapQuest® Navigator's powerful address search functions, with
exactly the same tools used to set your destination.
Setting Your Destination
MapQuest® Navigator uses powerful search mechanisms to make the most of what you know
about your destination. First, specify a country or state, and then specify a city, town, or zip
code.
With those two criteria, MapQuest® Navigator can start navigating to the geographic center of
the designated destination. If you add the street name and address, or an intersection
MapQuest® Navigator will bring you to your exact destination.
You can also choose a location you have recently visited or an entry from the address book.
All locations are defined in terms of latitude and longitude. When you specify an address, the
system automatically locates the latitude and longitude of the specified address.
Planning a Route and Starting Navigation 6Planning a Route and Navigating
To plan a route and start navigation
1. Make sure the GPS is enabled and in clear sky view.
2. In the Main Menu screen, select Navigate.
The Navigate screen appears displaying your current location as the default origin.
3. Leave the default origin if you are in a car. If you are on foot, or have a weak GPS signal,
use the Origin button to manually choose an origin (see Selecting a Location or Address
(on page 9)).
4. To select a destination, select the Destination button (see Selecting a Location or Address
(on page 9)).
The Navigate screen displays the origin / destination you entered.
5. To start navigation, select Navigate.
The application connects to the MapQuest® Navigator server to calculate and download
the route. As the route is being downloaded, you will begin to get oral travel instructions
and your immediate position will be displayed on the cell phone screen. When you reach
your destination, a map of the area is automatically displayed. (For instructions about
using the map, see Using Maps (on page 23)).
Planning a Route and Starting Navigation 7Tip: Some car manufacturers use heat reflecting windshields that reflect all electromagnetic
signals including GPS, blocking the signal from entering the car. To improve the GPS fix, use an
external antenna. See also Frequently Asked Questions and Troubleshooting (on page 31) in
this manual.
Tip: In joystick-based cell phones, you may also click left and right on the joystick to cycle
through the GPS and the Route Options screens.
Tip: You can select Route Options to pick special route options, such as the fastest route, the
shortest route or a route without highways.
Tip: You can use the Navigation menu to select special options, such as viewing the route
itinerary or route Overview Map (see Navigation Options (on page 20)).
Planning a Route and Starting Navigation 8Selecting a Location or Address
To select an address
1. Select Address.
A screen for entering the address is displayed.
Note: You must specify the Country or State, and a city or zip code. Additional
information is optional. The Country / State will stay on the menu as your active region
of navigation. If you move to a different Country or State you need to change the active
region by selecting the Country / State field and then choosing the new region.
2. To pinpoint your location, enter a street name and number.
3. If you are seeking an intersection, select the Type button at the top of the screen to
switch the setting to Intersection and enter both street names. If you enter only one
street name, the screen lists all the possible intersections of the street.
4. From the menu, select Search.
The application now finds matches for the address. The results are listed under Address
Search Results.
5. Select the Address you want from the list.
The address is selected.
Every Address you select is saved in your list of recent locations and can be used again for
navigation. For more permanent storage, save the address under My Places.
Tip: When entering address information, just type the first few letters for the city or street,
and the application will present a list of all the names that begin with the same letters, or
that sound similar to the address you are seeking.
Tip: In joystick-based cell phones, you can view a list of recent input by clicking right on the
joystick.
Planning a Route and Starting Navigation 9To save the origin or destination to the Address Book
1. On the Navigate screen, from the Options menu, select Save Origin or Save Destination.
The screen displays the entry form for My Places.
2. Type a name (like Aunt Jane, for example) for the saved location.
3. You may add a comment as well as a telephone number.
4. Save.
Tip: Make your own frequently used addresses (home, office, etc.) the first addresses you
enter into My Places.
Note: If the origin or destination is a downloaded Point of Interest (POI) the name field is
automatically set to the POI name.
Planning a Route and Starting Navigation 10Using My Places to Set Origins or Destinations
To select a My Places entry
1. Select My Places.
The screen displays the My Places screen with all the saved locations.
2. Scroll through the entries to find your selection.
3. Select the required entry.
The saved name of the location appears in the origin or destination button.
Note: If you selected My Places directly from the main menu, after finding your selection,
select Set as Origin or Set as Destination from the Options menu
To select a recent location as origin or destination
1. Select Recent Locations.
The screen displays a list of recent locations.
2. Scroll through the entries to find your selection.
3. Select the required entry.
The location is selected.
Note: In touch screen phones, you can use the Next and Prev buttons to scroll through My
Places and the list of Recent Locations.
Planning a Route and Starting Navigation 11Selecting Points of Interest (POI)
Points of Interest is a feature that makes MapQuest® Navigator especially valuable to you, as
a traveler, helping you navigate efficiently to the closest gas station, ATM or hotel, and
helping you to find restaurants, theaters or other important addresses. By default, the
application searches for POIs near your current location as determined by the GPS. You can,
however, instruct the application to search for POIs near different locations, such as specific
cities or addresses. Some POI information includes a telephone number. Use this feature to
call ahead and reserve a place at a restaurant or check on opening hours.
To navigate to a Point of Interest
1. In the Find or Navigate screens, select Point of Interest .
A screen for specifying the POI category and approximate location is displayed.
2. To choose a category, select the What? button.
The Choose Category list displays a list of categories.
3. From the Choose Category list, choose a category.
4. To set the vicinity you want, select Where?. This can be any location you specify or a
place saved in your Recent Locations or under My Places. The default is the current
location as determined by the GPS.
5. You may also enter a key word in the Name field to be used in the POI search. (This is
optional).
6. Select Search.
The results are listed under POI Results.
7. Select the required POI in the list.
The POI is selected.
Planning a Route and Starting Navigation 12To place a phone call to a POI
1. Locate the required POI (follow steps 1-6 above). Choose Details from the Options menu.
The Details screen for the selected POI is displayed.
2. Choose Call from the Options menu.
The telephone number is displayed for editing if necessary
3. Choose Call again from the menu.
The telephone number is displayed at the bottom of the screen.
4. To confirm, select Yes.
The call is placed automatically.
5. When you finish the call, you may need to use the phone menu to select MapQuest®
Navigator and return to the main menu.
Note: When calling a POI, you may have to add a dialing prefix.
Planning a Route and Starting Navigation 13CHAPTER 2
In-Car Navigation
While navigating, MapQuest® Navigator provides you with clear and precise oral and visual
navigation instructions. The oral instructions include a series of maneuvers, actions and
directions, such as “turn right” or “bear left”. The instructions include the distance to the next
maneuver, for example “In 0.3 miles turn left.” In addition to oral instructions, the Navigation
screen provides a graphic display of the next maneuver as well as information, such as
distance, time to destination, and the general direction you are traveling in. It also displays a
progress bar indicating the distance to the turn.
This chapter explains how to:
y Make the system find the kind of route you want (fastest or shortest, etc.)
y What to do when you get accidentally off the course navigated by MapQuest® Navigator.
y How to make the most of MapQuest® Navigator's oral and visual navigation aids.
In-Car Navigation 14Route Options
When planning a route you can choose one of two map display options:
y Sliding Maps
y Maneuver Maps
When planning a route you can also choose one of the following route calculation options:
y Fastest route
y Shortest route
y Pedestrian route
You can also:
y Define restrictions to the planned route.
y Change the default route calculation options. (The default is set to calculate the fastest
route without restrictions.)
To set the route calculation options
1. In the Navigate screen, select Route Options from the menu.
The Route Options screen is displayed.
2. To choose the map display option, select the Display Mode button:
Sliding Maps: If selected, the screen will continuously display your current location
on a moving map which will zoom in and provide a clear arrow on the map as you
approach the turn.
Maneuver Maps: If selected, the screen will constantly show a highly zoomed map
with your next turn clearly marked.
In-Car Navigation 153. To display the route calculation options, select the Route Type button and then select the
preferred calculation option:
Fastest
Shortest
Pedestrian
4. Select any restriction you want to impose on the route:
Toll Ways: If selected, an attempt is made to avoid toll ways in the calculated route.
Highways: If selected, an attempt is made to avoid highways in the calculated
route.
Ferries: If selected, an attempt is made to avoid ferries in the calculated route.
5. If you want to save these options as defaults, select Set as Default.
6. Select OK.
In-Car Navigation 16Off-Route Behavior
In real life navigation there are many reasons that may cause you to go off-route – a blocked
road, a beautiful view, or traffic conditions. MapQuest® Navigator reacts automatically to any
deviations from the route and gives you the best possible instructions from where you are
right now. If, however, you drive very far out from the original route – outside an area called
the MOND – Mobile Optimized Navigation Data set – MapQuest® Navigator will automatically
recalculate a new route from your current location and inform you that it is starting navigation
according to the new route. (See the Glossary (on page 36) at the end of the booklet for more
information on MOND.)
Back to Route Guidance
There are extreme scenarios in which users go off-route, driving totally outside the geographic
area covered by the MOND and there is no wireless Internet connection available. As a last
resort, MapQuest® Navigator still provides some guidance back to the original route in the
form of a visual arrow that points Back to Route until you reach an area where you can start
receiving navigation instructions again.
In-Car Navigation 17Navigation Instructions
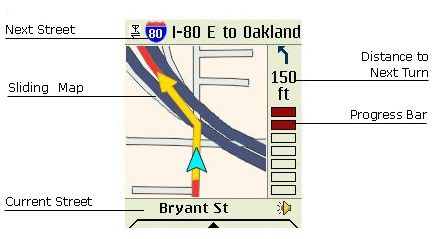
While navigating, MapQuest® Navigator uses the default Navigation screen as shown below,
and also gives you oral instructions before each turn.
The oral instructions tell you to:
y Turn
y Bear
y Keep
y Exit: right or left
y Take a certain exit from a traffic circle
y Make a legal U-turn
The system also tells you where to perform the next action. For example:
y In 0.3 miles
y At the end of the road
y At the traffic circle
Each maneuver is announced in advance and displayed on the screen. The instructions are
adapted to driving conditions – on highways, for example, the instructions come earlier then
in urban areas where speed limits are lower.
The progress bar on the right indicates the remaining distance to the next maneuver. The
progress bar adapts to the driving speed, so that in city limits it shows progress in smaller
distances compared to highways.
In-Car Navigation 18Note: When approaching a traffic circle the oral instructions tell you to exit at a numbered exit
(“Take the second exit”). When counting exits the application considers only available exits
(excluding roads with No Entry signs).
Tip: In joystick-based cell phones, you may also click left and right on the joystick to cycle
through the Navigation Options, Route Overview Map, Route Details, Route Itinerary and GPS
screens.
Combined Maneuvers
When maneuvers are physically close to each other (about 150 feet) and there are no other
possible turns between them, a single instruction will be generated. For example: “Turn right
then turn left.” (After the first turning the system will say “Turn left”).
In-Car Navigation 19Navigation Options
The default Navigation screen is focused on what the user needs to do next. There is however
more useful information available in the options screen during navigation - once the route has
been downloaded.
To display the Navigation Options screen
¾ While Navigating, select Options.
The Navigation Options screen appears.
Note: In touch screen-based cell phones, you can reach the Options screen by tapping the
Options button.
The following table lists the actions available during navigation.
Options Select to...
Route Overview View a map of the route. Menus (or icons in some cell phone
models) allow you to zoom in, or out or view maps of the origin
and destination.
Route Details View details of the current route, such as the distance to the
destination, Estimated Time of Arrival and other useful information.
Itinerary View a list of all the street names, distances and turnings you will
have to make during the trip.
Note that your current location is always highlighted in red.
Reroute Recalculate the route from your current location
Day/Night Mode Change the screen from Day to Night display and vice versa.
Settings Change the application settings.
GPS Status Display the GPS screen.
Main Menu Stop navigation and display the main menu.
Exit Exit MapQuest® Navigator
In-Car Navigation 20CHAPTER 3
Pedestrian Navigation
Pedestrian navigation is totally different from in-car navigation. It is free of traffic regulations
thus allowing entry into one-way streets and making turns that are illegal for cars.
You do not have to have your GPS functionality enabled for Pedestrian navigation.
The main difference between a pedestrian and automotive route is that the pedestrian route
is shown in a series of legs, or sections that follow one particular road. When you reach a
turning you have to manually click to the next leg of the journey.
To plan a pedestrian route and start navigation
1. In the Main Menu screen, select Navigate.
2. To select an origin, select the Origin button.
3. To select a destination, select the Destination button.
The Navigate screen displays the information you entered.
4. From the Options menu, select Route Options.
The Route Options screen displays various options.
Note: In joystick-based cell phones, select Route Options by tilting your joystick to the
right.
5. Select the Route Type button.
A list of Route Calculation options is displayed.
Pedestrian Navigation 216. Select Pedestrian.
The following screen is displayed.
7. Select OK.
The Navigate screen is displayed.
8. To start navigation, select Navigate.
The screen displays the navigation map with the navigation instructions displayed at the
top of the screen.
The number shows the current leg of the trip.
Note: In joystick-based cell phones, click to the next leg of the
journey by tilting your joystick up. In touch screen-based cell
phones, click to the next leg of the journey by tapping the
arrows on the top right of the screen.
9. You can also use the Navigation Options screen to view the entire map, the itinerary
and other information.
Pedestrian Navigation 22CHAPTER 4
Using Maps
MapQuest® Navigator is equipped with powerful mapping software to allow you to explore
any area, and search for locations and destinations to safely plan your trip.
The maps are displayed in the Map Screen, which has two display modes:
y View Mode: Displays a map of a selected location (current location, address, etc).
y Select Mode: Used to graphically select a location.
You can select a location on the map and then use the MapQuest® Navigator menu to find
the selected address, navigate to or from the location, search for nearby POIs or save the
location to My Places.
Using Maps 23View Mode - Mapping and Zooming
You can use the mapping feature to map the areas around:
y Your current location.
y Any location defined by an address including addresses from My Places or recently used
locations.
y Any Point of Interest.
To view a map of your current location
¾ In the Main Menu screen, select Find and then from the Find screen select My Location.
If your GPS has a position fix, the application loads and displays a map of your current
location. Otherwise the application displays a map of your last known location.
Using Maps 24To view a map of a selected location
1. In the Main Menu screen, select Find.
The Find screen displays a list of location types you can look up.
2. Look up the location you want to map and select if from the list of results
The map of the selected location is displayed. The selected location is marked by an X.
Your current location (if on the map) is marked by a circle.
Note: In joystick-based cell phones, Zoom and other Mapping Menu functions are reached
with the Options button to the left of the joystick.
Note: In touch screen-based cell phones, Mapping Menu functions appear both at the bottom
of the screen and in the MapQuest® Navigator menu.
Using Maps 25Selection Mode - Selecting Locations
In Selection mode you can select any location on the map determine its address, set it as the
route origin or destination or add it to My Places.
You can map all the Points of Interest in any category in the area displayed by the map.
To display a map in Selection mode and fix locations
1. Display the map in View mode.
A + sign marks the location for which you displayed the map.
2. Move the cursor around the map to the location you want with your stylus or joystick.
One click or tap will select the location.
Once you have selected a location it appears on the map with a pin icon.
3. Use the menu to set the location either as Origin or Destination.
Once you have assigned a location as the Origin or Destination it will appear with an
appropriate icon on the map.
Note: In joystick-based cell phones, press once on the joystick to activate selection mode. Use
the joystick to move around on the map, pressing once when you want to select a location.
Note: In touch screen-based cell phones, tap the pin icon to activate selection mode and then
tap on any spot on the map to select a location.
Using Maps 26Points of Interest (POIs), Address Location on a Map
MapQuest® Navigator Points of Interest allows you to pinpoint restaurants or ATMs, and many
other businesses and institutions wherever you are.
When looking at a map you can also get a precise address fix on any location you choose.
To look at POIs near a location on a map
1. Display a map of the location in Selection mode.
2. Select a location.
3. From the menu, select Find Nearby.
A screen for specifying the POI category is displayed.
4. To select a category, select the Category button.
A list of categories is displayed.
5. To search for a specific POI, you may also enter a key word in the Name field. (This is
optional).
6. Select Search.
The map displays POIs in the selected category on the map.
7. You may select a POI (use Selection Mode as described above) and then select More
Information from the menu for more details on the POI.
Using Maps 27To use Address Location on a map
1. Display the map in Selection mode.
2. Move the cursor to the location for which you want address information and select Mark
Position.
The selected location is marked by a pin icon.
3. To get the address, select More Information.
4. To save the location to My Places, select Save.
Using Maps 28CHAPTER 5
Advanced Functions
Shifting between Day and Night Display Modes
MapQuest® Navigator has different display modes for driving by day and by night.
To shift Display Mode
¾ While navigating, from the menu, select Day/Night mode.
The screen toggles between these two types of display.
Advanced Functions 29Changing Application Settings
Before you start using the application make sure the settings are configured according to your
preferences. You can adjust the settings through the menu of most of the screens in
MapQuest® Navigator.
Distance Units
You can change the units of distance (either Miles and Feet, or Kilometers and Meters).
Backlight Mode
When using MapQuest® Navigator, the cell phone backlight is set, by default, to be switched
on during navigation. You can reset the backlight to the default settings of the cell phone
(Normal mode) or set it to be always on whenever the MapQuest® Navigator application is
active (Always on mode).
Daylight Saving
To calculate the estimated time of arrival you need to specify whether the daylight saving
mode is activated.
To adjust application settings
1. From the MapQuest® Navigator menu, select Settings.
The Settings screen displays the current settings selected.
2. Change the settings according to your preferences.
3. Select OK
The new settings are activated.
Advanced Functions 30CHAPTER 6
Frequently Asked Questions and Troubleshooting
I cannot get a GPS fix - what could be wrong?
y Make sure the GPS has a clear view of the sky.
y It may take 15 minutes for the GPS to get a “first fix” - this is the time when it calibrates
itself and locates the satellites. The information it discovers in this time is remembered,
and from that point on it shouldn't take longer than about 1-2 minutes to get a fix. If
traveling to another country, the GPS needs to recalibrate itself, and can therefore take
up to 15 minutes to acquire a first fix.
y Some car manufacturers use athermic heat-reflecting windshields that reflect all
electromagnetic signals including GPS, blocking the signal from entering the car. Owners
of vehicles fitted with athermic windshields might need to use an external GPS antenna
that is compatible with their phone to ensure adequate GPS signal reception.
The GPS status switches between "Position Fix" and "Acquiring Satellites"
The receiver requires direct visual contact with the GPS satellites in order to receive signals
and correctly determine your position. A variety of factors can interfere and cause your
receiver to momentarily lose its position fix. Metallic materials, such as the roof of a car, block
the signals. Narrow streets between tall buildings reduce the field of view of the receiver and
glass surfaces can, in certain circumstances, lead to reflections of the satellite signals, which
can impair the performance of the receiver. Even dense foliage, such as a tree-lined avenue,
can hamper reception due to the water in the leaves.
Frequently Asked Questions and Troubleshooting 31Can I receive calls when using MapQuest® Navigator?
Yes. But the cell phone cannot transfer phone data and packet data at the same time. When a
network-enabled application is transmitting packet data, the phone services will be blocked.
This means that if you go off-route while receiving a call, MapQuest® Navigator will not be
able to recalculate the route during the call.
Can I place calls when using MapQuest® Navigator?
Yes. You can place a call in the usual manner. If you do not exit the MapQuest® Navigator
application it will continue running in the background.
Why do I hear "Recalculating route" when I have not left the route?
Inaccuracy of the map data and the GPS position fix may cause the application to think that it
is not on the planned route. If you have not left the route, the phone should resume guidance
momentarily.
I keep getting a network error and cannot download maps or routes
To download maps or routes, your phone must be able to establish an Internet connection
over the GPRS network. To properly configure your cell phone for Internet access contact your
service provider.
Frequently Asked Questions and Troubleshooting 32Troubleshooting
Error Messages
The following table lists the MapQuest® Navigator error messages with detailed explanations
of the errors. It also includes suggestions on what you should do if the error message is
displayed.
Error message This error message is displayed
when...
Poor GPS signal, unable to determine You try to use an application feature that
current position. requires the GPS coordinates and these are
unavailable (for example, navigating from
"current position")
Phone number field is empty. You try calling a location for which no phone
number has been specified.
My Places memory full. Please delete one You try to add an item to a full address book.
of the entries and try
Registration failed, please try again or The registration process fails.
contact customer support for assistance.
Network error: Could not send message, A general network error occurs. Check your
please check your connection settings and connection settings. If you need assistance
try again. contact your service provider.
Origin and destination points are identical, The same location was entered for origin and
please select a different origin or destination.
destination point.
The requested location is not on a digitized You try to view or navigate to a location
map. which is not on the map (for example at sea).
An error occurred, the requested map The requested map is unavailable.
cannot be displayed.
Cannot display overview map, there is no You try to display a map of the route when
active route. there is no active route.
Frequently Asked Questions and Troubleshooting 33Error message This error message is displayed
when...
The requested route cannot be calculated. You try to calculate a route which cannot be
calculated (For example, between continents
or to a location in the ocean)
Login failed, if problem persists, contact Logging in to the application fails.
customer support for assistance.
Compatibility error, your application may The application is out of date and needs to be
be out of date. Contact customer support upgraded.
for assistance.
Could not perform the requested search, A location search has failed.
please refine your search and try again.
Could not synchronize with remote server, The phone cannot connect to the wireless
please check connection settings. network, check the phone's connection
settings and try again.
Frequently Asked Questions and Troubleshooting 34CHAPTER 7
Appendix and Glossary
Using GPS to Determine Locations
The Global Positioning System (GPS) is a worldwide radio-navigation system formed from a
constellation of 24 satellites and their ground stations. GPS uses these satellites as reference
points to calculate positions accurate to a matter of feet.
GPS positioning is calculated using the following:
y Triangulation using satellites:
The satellites are used as reference points for locations on earth. By precisely measuring
our distance from three satellites we can “triangulate” our position anywhere on earth.
y Measuring travel time:
The distance to a satellite is determined by measuring the time a radio signal from the
satellite takes to reach the GPS device.
Appendix and Glossary 35Glossary
Geocoding
The process by which geographic coordinates of a location are determined based on street
address, zip code, or other location descriptors. These coordinates can then be used by
computer programs to graphically represent geographic data points and their relationship with
specific types of data.
Latitude / Longitude
Any location on Earth is described by two numbers, its latitude and its longitude. If a pilot or a
ship's captain wants to specify a position on a map, these are the “coordinates” they use.
Mobile Optimized Navigation Data - MOND
The MOND is a unique feature that enables MapQuest® Navigator to quickly identify
deviations from the planned route and, for minor deviations, return to the planned route
without the need for reconnecting to the server. When downloading a route, the downloaded
data includes information of the roads surrounding the route. This information includes the
road type: highway, toll way, street or lane as well as distances, traffic lights and traffic signs.
Using this and other information such as one-way streets and distances, the application can
quickly detect deviations from the route and acts accordingly.
Appendix and Glossary 36You can also read