EScription One Mobile for iOS Devices - User Guide
←
→
Page content transcription
If your browser does not render page correctly, please read the page content below
March 2021

eScription One
Mobile for iOS
Devices
User Guide

        All content is the exclusive property of DeliverHealth | Copyright © 2021 DeliverHealth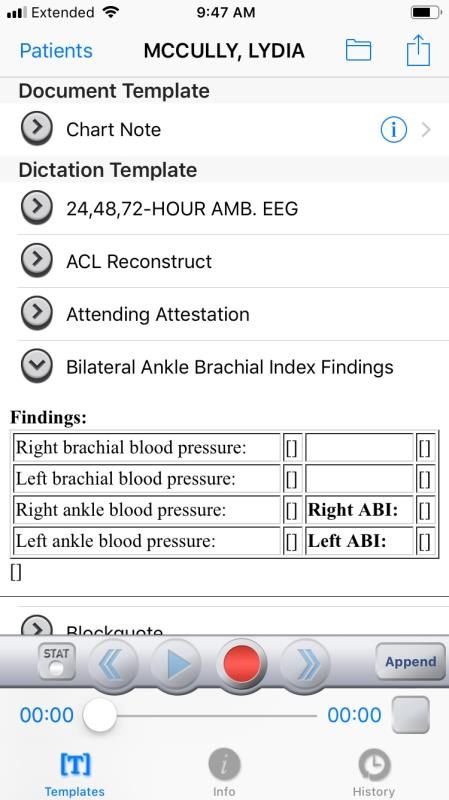
2   eScription One                                                                                                                         March 2021

           Table of contents

           Introduction ............................................................................................................................. 4

           Requirements .......................................................................................................................... 4

           Important: Receiving Calls While Dictating ........................................................................ 4

           Installing eScription One Mobile on All Apple Devices ..................................................... 5

           Starting eScription One Mobile ............................................................................................. 5
           Setting up Multi-Factor Authentication .......................................................................................... 9

           Select Region ........................................................................................................................ 11

           Email Verification .................................................................................................................. 12

           Resetting your Password .................................................................................................... 12

           Using eScription One Mobile .............................................................................................. 15
           The Patients Screen .................................................................................................................. 15
           The Dictation Screen ................................................................................................................. 16
           The Info Tab.............................................................................................................................. 16
           The Templates Tab ................................................................................................................... 18
           The History Tab......................................................................................................................... 19
           Recording a Dictation ................................................................................................................ 20
           Creating a New Appointment ..................................................................................................... 21
           Creating Multiple Dictations on One Appointment ....................................................................... 21
           The Transcriptions Tab .............................................................................................................. 21
           The Folder View ........................................................................................................................ 22
           Searching for Transcriptions ...................................................................................................... 23
           Transcription Viewer .................................................................................................................. 24
           Editing a Transcription ............................................................................................................... 25
           The Settings Screen .................................................................................................................. 27
           The Account Screen .................................................................................................................. 28

                                                                                                  © 2021 DeliverHealth SOLUTIONS, Inc. All rights reserved.
3   eScription One                                                                                                                          March 2021

           eScription One on the iPad ................................................................................................. 29
           Appointments on the iPad .......................................................................................................... 29
           Recording Dictations on the iPad ............................................................................................... 30
           Editing a Transcription on the iPad ............................................................................................. 30
           The Settings Screen on the iPad ................................................................................................ 31

           Inpatient ................................................................................................................................. 31

           Troubleshooting and FAQ ................................................................................................... 33

           Removing eScription One Mobile ....................................................................................... 34

           Additional Support ............................................................................................................... 34

                                                                                                   © 2021 DeliverHealth SOLUTIONS, Inc. All rights reserved.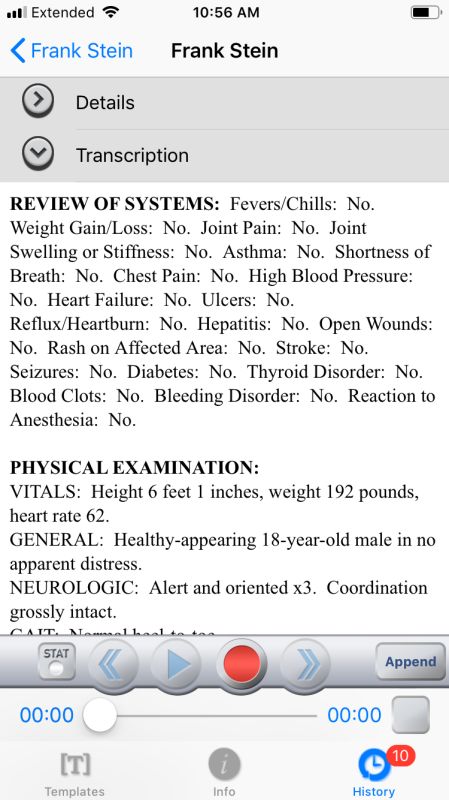
4   eScription One                                                                                                                March 2021

           Introduction
           eScription One Mobile for iOS offers a convenient, portable, end-to-end documentation process. Clinicians can easily
           create, review, edit and complete documentation on their mobile device, as well as submit them for transcription.

           eScription One Mobile is a safe, secure application that supports HIPAA compliance.

           Requirements
           – Any iOS device with iOS 12 or greater (the latest iOS version is recommended).

           – Internet Access through a wireless Local Area Network (LAN) connection or through a phone service provider. It is
             strongly recommended to use a Wi-Fi LAN connection when uploading dictations. Minimum bandwidth: LTE/4G data
             connection; recommended is stable Wi-Fi.

           – Communicates over port 443 to https://mobile.escription-one.com using TLS 1.2.

           Important: Receiving Calls While Dictating
           The iPhone application cannot block incoming phone calls. Apple Inc. makes it impossible for eScription One Mobile, or
           any application, to block phone calls. If you have concerns about receiving calls while making a dictation, switch your
           phone to “Do Not Disturb” or “Airplane Mode” while dictating. To continue using the application while in Airplane Mode,
           please enable Wi-Fi.

           If a phone call is received while dictating, eScription One Mobile will pause the recording. Dictation that was made prior to
           the incoming call will not be lost; to resume dictating after finishing the call, tap the record button again and continue to
           dictate.

           Note: The eScription One Mobile application is being constantly updated and improved. Some of the screen shots in this
           manual may not match the current version of the application.

                                                                                         © 2021 DeliverHealth SOLUTIONS, Inc. All rights reserved.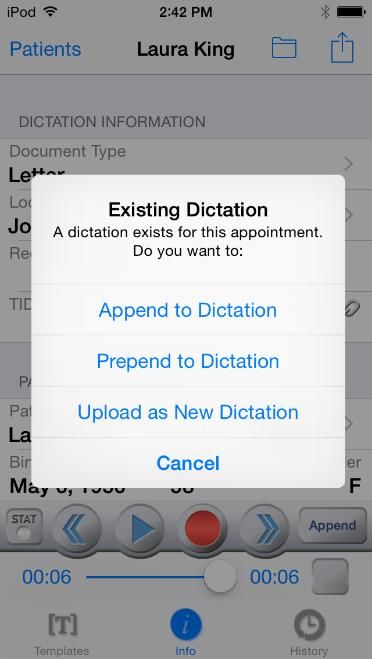
5   eScription One                                                                                                               March 2021

           Installing eScription One Mobile on All Apple
           Devices
                     To install eScription One Mobile, go to the Apple App Store, search for
                     “eScription One Mobile,” and download the eScription One Mobile
                     application.

           Starting eScription One Mobile
                          After the installation has completed, launch the eScription One
                          Mobile application from the home screen. Enter your login
                          credentials. These are the same credentials used to log into
                          Inquiry. Press the Login button at the top right or bottom of the
                          screen.

                                                To log in, press the New Login button or the + button in the upper right corner of
                                                the screen.

                                                                                        © 2021 DeliverHealth SOLUTIONS, Inc. All rights reserved.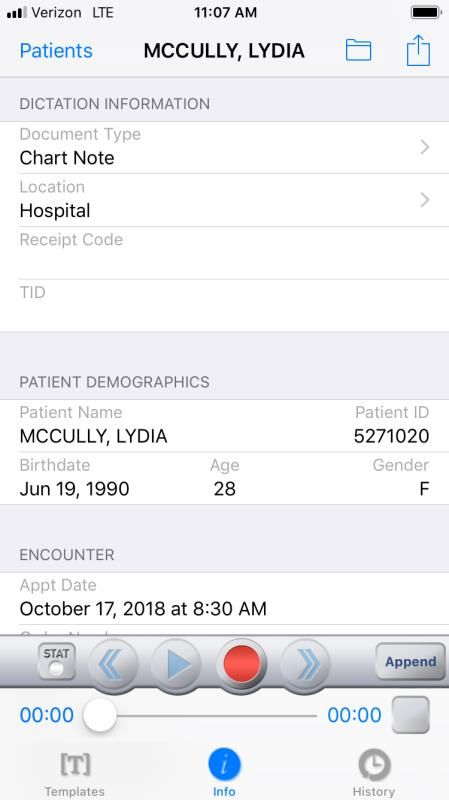
6   eScription One                                                                                                               March 2021

           The credentials screen opens.

           Enter your username, password, and client information, then press Log In.

           The “Forgot Password?” link next to the Login button allows users who have
           saved a valid email address to receive password reset instructions by email
           if it is lost or forgotten. For more information, go to Email Verification and
           Resetting your Password.

           Note: If multi-factor authentication (MFA) has been enabled for your
           company, please see ‘Setting up Multi-Factor Authentication’.

           If your password is expired, you are prompted to change it.

                                                                                        © 2021 DeliverHealth SOLUTIONS, Inc. All rights reserved.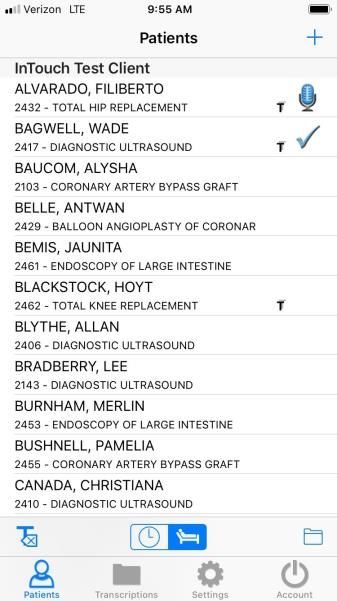
7   eScription One                                                                                                                      March 2021

           The first time you log in, the Remember login? screen will appear next, asking if
           you want the app to remember the login name or login name and password on the
           device you are logging into.

           (The ‘Remember my login with password’ option will not appear if the admin has
           disabled this feature for clients/users.)

           You can also choose Do not remember.

           Note: This screen will initially appear for each profile you log into if you have
           multiple profiles.

           If you later want to change your login options, go to the app’s Settings
           screen.

                                                                                               © 2021 DeliverHealth SOLUTIONS, Inc. All rights reserved.
8   eScription One                                                                                                                  March 2021

           After you make your selection(s), a confirmation box appears.

           Select OK.

           Note: Please note that with ‘Save Password’ enabled, anyone with access to your
           device can access your eScription One account and the confidential medical
           records in it.

           When the login name is saved, the profile appears on the login screen (with a
           combination of First name Last name username up to 20 characters long). Tap
           the profile to log in as that user. You will be prompted for the password if it has
           not been (or cannot be) saved.

           Only the last saved profile to log in will appear on the login screen. You can still
           link multiple profiles in the Account tab to switch between profiles quickly.

                                                                                           © 2021 DeliverHealth SOLUTIONS, Inc. All rights reserved.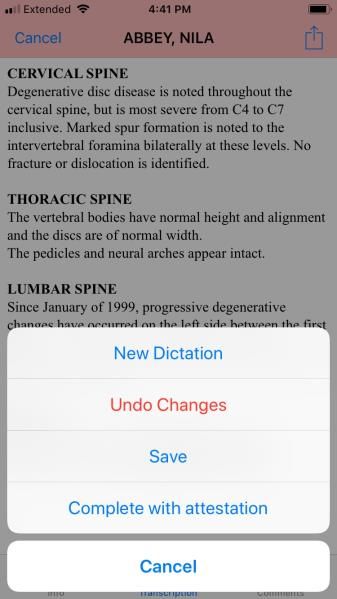
9   eScription One                                                                                                                 March 2021

           Setting up Multi-Factor Authentication
           Multi-factor authentication is another way to verify a user’s identity, adding an extra level of security to the login process.
           For eScription One applications, it is recommended that users set up MFA using the Auth0 Guardian authentication
           application. However, due to a limitation with the Auth0 Guardian app, users cannot set up MFA for the mobile apps on a
           mobile device. To do so, you must perform the initial setup on InQuiry or InSync. Once this initial setup is complete, MFA
           will work for the mobile app as well. Logging in will require you to accept a notification sent to your phone.

           Note: Other authentication apps may work as well but are not officially supported.

           Logging in with Multi-Factor Authentication
           Once the initial MFA setup has been completed, you will subsequently log in to your mobile app as shown in the steps
           below.

           Note: If you log in with saved credentials for both username and password, you will not need to authenticate with MFA. No
           notification will be sent to your phone.

           1.   Open the Guardian app.

           2.   In your eScription One app, enter your login credentials.

                The Verify Your Identity screen opens, indicating that a notification has been sent to your phone and is awaiting
                confirmation.

           3.   In the Guardian app, click Allow.

                                                                                          © 2021 DeliverHealth SOLUTIONS, Inc. All rights reserved.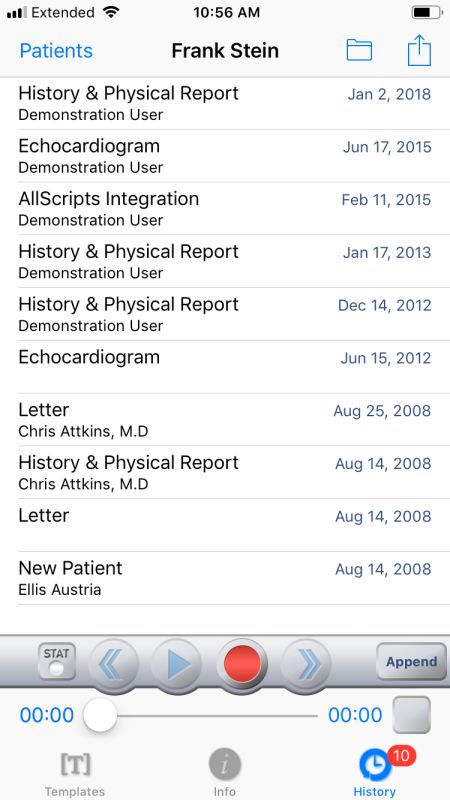
10   eScription One                                                                                                               March 2021

            After successful authentication, you will automatically be logged into your eScription One app.

            If you do not receive the notification, you can choose to have the notification resent, or you can manually enter the code at
            the bottom of the Guardian app (see below).

            To manually enter the code, choose Manually Enter Code
            on the ‘Verify Your Identity’ screen.

                                                                                         © 2021 DeliverHealth SOLUTIONS, Inc. All rights reserved.
11 eScription One March 2021
Enter the code appearing at the bottom of the Guardian app.
Click Continue. After successful authentication, you will automatically be logged into your eScription One app.
Note: If for some reason you cannot log in with MFA after having done so previously, please contact your admin to have it
reset.
Select Region
Upon launching the eScription One mobile app for the first time you will be
prompted to select a region. This allows the app to connect to the proper
servers for your client. Choose the region that applies to your location or client
and press Select.
In the unlikely event that you need to change your region you will need to
uninstall and reinstall the application. Note: Uninstalling the app will
permanently delete any incomplete (on-hold) dictations; please verify all
started dictations have been uploaded prior to uninstalling the app. You
will be prompted to choose your region upon the first login after reinstalling the
app.
© 2021 DeliverHealth SOLUTIONS, Inc. All rights reserved.12 eScription One March 2021
Email Verification
After logging in, the eScription One Mobile application checks for a valid and verified
email address.
Valid Email Check: If you have not entered an email address, you will be prompted
to add one. You can skip this step, but will be prompted again on your next login.
Email verification: Once an email address is added, an email is sent to your
address to verify it.
Click the link in the email, and your address will be verified.
When accessing the eScription One Mobile application without a verified email address, you will receive a notice, but will
still be able to use the application.
Editing email address: To edit the user email address, go to Contact Information in the Settings tab. If the email address
has previously been verified and is then edited, you will be prompted to verify the updated email address.
Resetting your Password
If you have forgotten your password, you can reset it using the steps below.
1. On the login screen, enter your Username and Client code, then click Forgot
Password?.
© 2021 DeliverHealth SOLUTIONS, Inc. All rights reserved.13 eScription One March 2021
2. On the ‘Forgot Password’ screen, click either the Send Email button or ‘Have
reset code?’ link (if you already have a reset code).
3. If you choose Send Email, you must have a verified email address (see above). If
so, an email will be sent to you with instructions and a link for resetting your
password. Once you click the link, the ‘Reset Password’ screen appears with the
reset code filled in. Enter the remaining information, then click the Reset
Password button.
© 2021 DeliverHealth SOLUTIONS, Inc. All rights reserved.14 eScription One March 2021
If you choose ‘Have reset code?, the ‘Reset Password’ screen appears
without the reset code filled in. Enter the code and remaining information,
then click the Reset Password button.
If you selected ‘Send Email’, you can also copy and paste the code from
the email and paste it here.
© 2021 DeliverHealth SOLUTIONS, Inc. All rights reserved.15 eScription One March 2021
Using eScription One Mobile
The Mobile iOS application screens have four tabs at the bottom: Patients, Transcriptions, Settings, and Account. Use
these to navigate between the four main screens of the app. The active tab is indicated with blue coloring. After logging in,
the Patients screen is the active screen.
This tab opens the Patients screen, where users can record new dictations and view patient appointments
(in an outpatient workflow) and/or inpatient encounters (in an inpatient workflow).
This tab opens the Transcriptions screen, where users can view, approve, and edit transcriptions.
This tab opens the Settings screen, where users can configure default settings for appointments, document
types, locations, and other application features.
This tab opens the Account Screen, where users can link accounts for quickly switching between multiple
eScription One Mobile logins.
The Patients Screen
Use the Patients screen to review appointments and create new appointments
and dictations.
The calendar opens to the last viewed date in the previous session. If a
dictation is over three days old, and has not been uploaded, eScription One
Mobile displays a reminder.
To choose a specific date, tap the calendar button in the upper left
corner. The date selector appears. To choose the current day from the date
selector, tap the ‘Today’ button at the upper right of the screen.
To view the prior or next day’s schedule, press the left or right arrow
buttons. Alternatively, you can swipe left or right to change the schedule date
by one day.
Tap the add button at the upper right corner of the screen to create a new
appointment. This is covered in detail on page 16.
© 2021 DeliverHealth SOLUTIONS, Inc. All rights reserved.16 eScription One March 2021
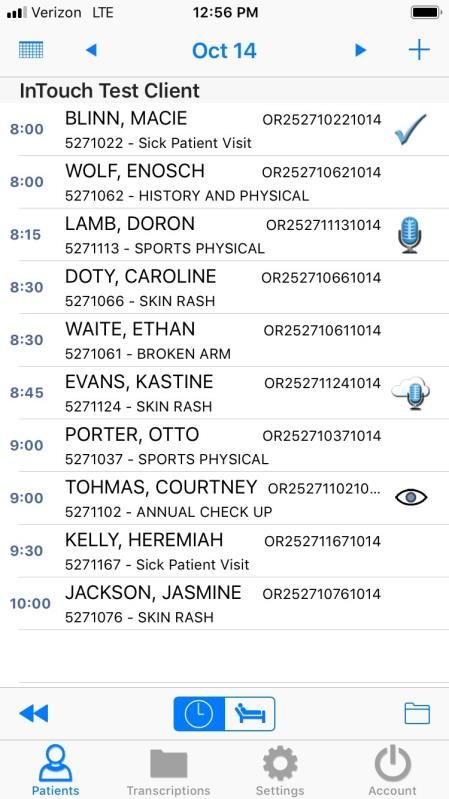
Tap the folder button at the lower right corner of the screen to filter which appointments will be visible. Appointments
can be filtered based on dictation status. In the appointment list, an icon appears to the right of a dictation to indicate its
status:
The appointment has a dictation that has not yet been uploaded.
The appointment has a dictation that is currently uploading.
The appointment has a recorded dictation and has been successfully sent to the transcription company.
The appointment has been recorded and uploaded from another device.
The appointment has been hidden from the appointment list.
Note: An appointment without a dictation will have no icon next to it.
Appointments can also be filtered based on Schedule Resources. One or more Resource IDs can be assigned to a
provider, and they can be filtered out as necessary.
Press and swipe down anywhere in the appointment listing to refresh it. Note that this works when the view is already
scrolled to the top.
The Dictation Screen
On the Patients tab, select an appointment from the list to view its details and record a dictation. To create a new
appointment, tap the Add button in the upper right corner of the screen. The dictation recording controls appear at the
bottom of the screen.
The dictation screen has three tabs: Info, Templates, and History.
By default, the Info tab appears when an appointment is opened. To change the default screen, see the Settings screen
on page 27.
The Info Tab
The Info Tab contains all the information about that specific appointment, including the Document Type and Location. If a
Document Type or Location is not selected, those fields are highlighted in red.
Only the Document Type and Location can be edited for dictations created from an appointment in the appointment list.
On ad hoc dictations started with the Add button (from the Patients tab), the Patient ID and Appointment Date and
Time can also be edited.
© 2021 DeliverHealth SOLUTIONS, Inc. All rights reserved.17 eScription One March 2021
The two screens below show the Info tab.
By default, when new dictations are created, eScription One Mobile does not select a Document Type or Location for that
dictation. When uploading a dictation with no Document Type or Location selected, the user is prompted to select one
from a list. To avoid receiving this prompt, users can choose a default Document Type and Location from the Settings
Screen (page 27).
The facility scheduling software or EMR can also set the location for an appointment. This location will appear by default.
If necessary, it can still be changed by tapping the location bar and selecting the new location.
© 2021 DeliverHealth SOLUTIONS, Inc. All rights reserved.18 eScription One March 2021
The Templates Tab
The Templates tab shows the Document and Dictation Templates. These
templates can be used as a reference while dictating. To select the Document
Type, tap the icon to the right of the Document Template field, or select it
from the Info tab. To display the template, tap anywhere else in the field.
© 2021 DeliverHealth SOLUTIONS, Inc. All rights reserved.19 eScription One March 2021
The History Tab
The History button at the bottom of the screen indicates how many completed transcriptions have the same Patient ID as
the current patient.
Tap the History tab to show the list of prior transcriptions, which are each identified by document type, dictating clinician,
and appointment date. Select an item to review its transcription and demographic details.
© 2021 DeliverHealth SOLUTIONS, Inc. All rights reserved.20 eScription One March 2021
Recording a Dictation
To begin recording a dictation, press the red Record button
(after choosing a patient appointment). Press the Pause button
to pause/stop the Recording. Press the Play button to play back
the dictation. Use the Rewind and Fast Forward buttons to navigate
within the location of the dictation in increments of 5 seconds per button press. Alternatively, you can use the dictation
slider to navigate to the desired dictation location.
The STAT button toggles the STAT mode on (the button is green) and off. Marking a
dictation as STAT indicates a higher priority, but it may also incur additional transcription
rates.
Underneath the recording buttons, the timer on the left side shows which part of the
dictation is currently playing or being recorded into. The timer on the right shows the total
length of the dictation. The slider can be dragged to play different parts of the dictation or
to insert or overwrite the dictation where desired.
There are three recording modes: Append, Overwrite, and Insert. To switch between
modes, tap the button at the far right side of the screen. This button indicates the current
recording mode.
The box to the right of the recording timer is a sound level meter. This meter indicates
the volume of the dictation or sound received by the microphone.
When the dictation is complete, tap the Upload button in the top right corner of
the screen. The eScription One Mobile application will prompt you to select a
Document type and/or Location if one has not yet been chosen. Tapping the
Upload button sends the dictation for transcription. Once a dictation is uploaded,
no more changes can be made to it, including changing the STAT mode.
Tapping the menu button provides the option to delete the recorded dictation
from the device. If the appointment was created new on the phone, the
appointment will be removed. If the appointment was downloaded from the
eScription One servers, the appointment will not be removed from the Patients
screen.
Please note that the options available from the menu button change depending on
the status of the dictation. If a dictation has not been started, the option to Hide
Appointment appears in the menu. This option removes the appointment from the
Patients tab. To view the appointment again, add Hidden Appointments to the status filter
in the Patients tab (the appointment will be marked with the hidden appointment icon
). Opening the hidden appointment and tapping the menu button will give you
the option to unhide the appointment.
If a dictation has been started, pressing the menu button displays the option to delete
the dictation. If a dictation has been uploaded, pressing the menu button displays the
option to create a new dictation (see page 21 for more details).
Tap the Patients button at the top left corner of the screen to save the dictation, place it on hold, and return to the Patients
screen. The Patients button can be tapped while recording or when recording is paused.
© 2021 DeliverHealth SOLUTIONS, Inc. All rights reserved.21 eScription One March 2021
Creating a New Appointment
Use the button at the top right corner of the Patients screen to create a new appointment, which can then be dictated.
The appointment date populates with the current date and time. This can be changed if necessary.
An arrow appears next to the Patient ID field. Tap this button to enter the Patient ID, Account Number, or Order Number
for this appointment, depending on your individual configuration. The patient’s name and demographic data will be
associated with the appointment when the dictation is uploaded to the transcription company.
Creating Multiple Dictations on One Appointment
If it is necessary to create an additional transcription for an appointment, return to the
Patient Screen and select the appointment.
Press the edit button and select the option for “New Dictation.” Select Document
Type and Location, then record normally.
Press the upload button and eScription One Mobile will prompt for the dictation
type:
• Append: Attach this transcription to the end of the prior transcription.
• Prepend: Attach the new transcription to the beginning of the prior
transcription.
• Upload as New Dictation: Upload this dictation as a standalone transcription.
This Transcription will not be attached to any prior transcriptions.
The Transcriptions Tab
Use the Transcriptions tab to view, edit, and complete (sign) transcriptions. The main
transcriptions screen gives an overview of how many transcriptions appear in each
workflow folder. The workflow folders display the label name assigned by your medical
facility.
Tapping on any of the folders shows a list of the transcriptions that are currently in that
stage of the workflow. The first folder, here called “To Be Typed”, contains dictations
that are at the transcription company, but have not yet been transcribed.
Use the Search button to search for any transcription in any workflow folder,
including transcriptions that have completed the workflow.
© 2021 DeliverHealth SOLUTIONS, Inc. All rights reserved.22 eScription One March 2021
The Folder View
When a workflow folder is opened, eScription One Mobile lists all transcriptions that
would be seen in that folder in InQuiry. The patient name, patient ID, appointment date
and time, and dictating clinician’s name are shown for each transcription in that folder.
On the Settings tab, you can configure an additional user field to be displayed.
Use the Edit button at the lower right corner of the screen to complete all or selected
transcriptions and move them to the next folder in the workflow. To select or de-select
transcriptions, tap on them; a checkmark will appear next to the selected transcriptions.
Then tap the complete button to complete them, or the cancel button to cancel without
completing the selected transcriptions.
You can sort the order of the folder view by Date Dictated, Patient Name, or
Appointment Date. To change the sort order, tap the Dictated, Patient, and Appt buttons
at the bottom of the screen.
To refresh the workflow folder listing, tap and hold your finger down while swiping down
anywhere in the transcription listing. Note that this works when the view is already
scrolled to the top.
© 2021 DeliverHealth SOLUTIONS, Inc. All rights reserved.23 eScription One March 2021
Searching for Transcriptions
The Search button appears in the upper right corner
of both the main Transcriptions screen and the screens
for each individual folder. When the Search button is
used from the main Transcriptions screen, it searches
in all folders of the workflow (except Referral).
When the Search Button is used from within a folder in
the workflow, it only searches transcriptions in that
folder.
The icons next to the Search Results indicate which workflow folder that dictation is in. The icons are:
– Dictation –the dictation has yet to be transcribed.
– Review –the transcription is in one of the Review folders of the workflow.
– Preliminary – the transcription is in the Preliminary folder of the workflow and can be electronically signed.
– Final – the transcription is in one of the Final folders at the end of the workflow.
– Referral – the transcription is in the Referral folder; a folder to view dictations as associates.
– Archive – the transcription has been moved through the entire workflow and is now archived.
© 2021 DeliverHealth SOLUTIONS, Inc. All rights reserved.24 eScription One March 2021
Transcription Viewer
Tap on one of the entries in any workflow folder (other than the Dictation Status folder) to view the transcription. The
Patient Name is displayed at the top, between the back-arrow button to the left and the Action Menu button to the right.
The Transcription viewer opens to the Transcription tab by default. This tab displays the transcription text.
Press the Info tab to view patient and appointment details. Press the Comments tab to read comments and
comment tags attached to the transcription.
The Comments tab icon will have a red apostrophe if at least one comment or comment tag exists. The tab being
displayed is identified with a blue icon.
Tap the Action Menu button in the upper right corner to create a New Dictation, Complete, or Edit a transcription. After
completing a transcription, the application loads the next transcription immediately. The Edit screen is covered in the next
section of this manual.
The attestation template editor box appears when a dictation is completed and a signature requires an attestation.
eScription One Mobile prompts you to select an attestation with your electronic signature. Choose from available
attestation templates or complete without a template.
Recorded dictations are stored on the phone for two weeks after the dictated date, but they cannot be listened to from the
transcription viewer. To listen to a recorded dictation that is still saved on the device, go to its entry on the Patients
screen.
© 2021 DeliverHealth SOLUTIONS, Inc. All rights reserved.25 eScription One March 2021
Editing a Transcription
The Edit option is intended for small or minor edits. If more extensive editing and formatting is needed, consider using
InQuiry on a desktop computer.
To access the Edit Screen, tap the action menu button at the top right corner of the transcription viewer, then choose
Edit.
To edit a transcription’s demographic details, go to the Info tab and tap on the field to be
changed. Depending on the type of field selected, the keyboard, date selector, or a list of
options will appear.
To edit the text of a transcription, go to the
Transcription tab and press the action menu button .
Then select Edit. (You can also navigate between the
Info and Transcription tabs while in edit mode.) Tap the
transcription text area where edits are needed. The
keyboard will open to make the necessary changes. To
close the keyboard for a full-screen view, press Done
above the keyboard or press return (next to the space
bar). Closing the keyboard does not save changes
made.
Transcription Comments and Comment Tags can only be viewed in the mobile app.
Please use InQuiry if edits are needed on those items.
Note: Changes are not saved automatically.
© 2021 DeliverHealth SOLUTIONS, Inc. All rights reserved.26 eScription One March 2021
Press the action menu button to receive a list of available actions:
– New Dictation: Save changes and begin dictation for a new transcription for the
same patient.
– Undo Changes: Undo any changes and return to the transcription viewer.
– Save: Save changes and return to the transcription viewer.
– Complete or Complete with attestation: Save changes and complete the
transcription from the workflow folder (and apply an attestation template if
applicable).
– Cancel: Return to the editing screen.
Dual Resident/Attending Workflow
If the ‘Dual Resident/Attending Workflow' option has been enabled for a client in InCommand, attending physicians
(authenticators) will be allowed to complete documents in the workflow even if the dictating resident has not yet reviewed
or approved the document. With this option, documentation can be completed more quickly if needed.
In this workflow, a transcription requiring an extra signature(s) will appear in the resident’s and attending’s Preliminary
folders at the same time. Either the dictating resident or attending physician can review and edit the document (provided
they have proper rights to location and document type).
Note: The attending physician should not have proxy to the resident dictator when this workflow is enabled.
There are two paths this workflow can follow:
– Resident Reviews/Approves an Uncompleted Transcription, then Attending Completes
The resident can review and approve the transcription in the Preliminary folder. After the resident completes the job, it is
removed from their Preliminary folder. The attending can then complete the transcription and it will move on to the next
workflow folder.
– Attending Completes an Unreviewed Transcription
An attending can also complete an unreviewed transcription in the Preliminary folder. In this workflow, the resident has
not reviewed/approved the transcription.
Once the attending completes the job, the transcription moves on in the workflow and out of their Preliminary folder. The
next time the resident searches or refreshes their Preliminary folder, the dictation will no longer be shown.
© 2021 DeliverHealth SOLUTIONS, Inc. All rights reserved.27 eScription One March 2021
The Settings Screen
Use the Settings Screen to set default screens and behavior for the eScription One
Mobile application.
– Help Desk Support: Contains contact details for support, along with the version
number of the mobile app.
– Change Password: Change the user password. The
password requirements configured for the company are
shown at the top of the screen. If the password does not
meet these requirements, the screen will display which
ones have not been met after the user presses the
‘Change Password’ button.
Remember that InQuiry, InSync, and eScription One
Mobile all use the same password.
– Recording Screen: Choose which tab is selected when
opening a patient appointment: Templates, Info, or History.
Info is selected by default until changed here.
– Document Type: Select a default document type for all
dictations. The document type can be changed on each
dictation if needed. If “Prompt on Upload” is selected, eScription One Mobile will prompt
you to select a document type when uploading a dictation that does not have one
selected. “Prompt on Upload” is the default setting.
– Location: Select a default Location for all dictations. The Location can be changed on
each dictation if needed. If “Prompt on Upload” is selected, eScription One Mobile will prompt you to select a Location
when uploading a dictation that does not have one selected. “Prompt on Upload” is the default setting.
– Silence Detection: Select the length of time silence can be recorded before eScription
One Mobile pauses the recording. The default value is “None” and recording will not
be automatically paused when silence is detected.
– Transcription Text Size: Select how large text is when viewing a transcription. Please
note that this setting does not change the text size in all screens of the mobile app.
– Custom Encounter Field: Select an additional data field to be displayed to the right of
the patient name on the appointment listing.
– Document Types (in the Favorites section): Filter the document types that are
available when choosing a document type for a dictation. If a facility has thirty
document types, but a dictator only needs five of those document types, this setting is
used to remove the other twenty-five from the list of document types.
– Locations (in the Favorites section): Filter the locations that are available when
choosing a location for a dictation. If a facility has fifteen locations and a dictator only
works at three of them, this setting is used to remove the other twelve from the list of
possible locations.
– Confirm Uploads and Confirm Logout: Turn the confirmation pop-up for those
actions on or off.
© 2021 DeliverHealth SOLUTIONS, Inc. All rights reserved.28 eScription One March 2021
The Account Screen
To log out of the application, tap the Account button located in the lower right corner of the application screen and then
press the logout button in the upper left corner.
Users who want to quickly switch between user profiles can link additional accounts by pressing the button in the upper
right corner of the Accounts screen. Enter the login credentials and select login.
To remove unwanted accounts, swipe the account name from right to left and press the delete button that appears.
© 2021 DeliverHealth SOLUTIONS, Inc. All rights reserved.29 eScription One March 2021
eScription One on the iPad
Using eScription One mobile on an iPad is quite similar to using it on an iPhone with only a few visual changes, as
identified below.
Appointments on the iPad
Given the extended screen size on the iPad, the patient
appointment list and recording screen can be displayed
simultaneously while in landscape mode. This allows the
patient appointment list to be displayed on the left side of
the screen, while the dictation screen with templates,
appointment/patient details, and history information, is
displayed on the right side.
When the device is held in portrait mode, the navigation
panel will overlay the display panel until a selection is made,
then it will minimize to the size. To access the navigation
panel again, press the Patients or Transcriptions buttons in
the top left corner of the screen.
© 2021 DeliverHealth SOLUTIONS, Inc. All rights reserved.30 eScription One March 2021
Recording Dictations on the iPad
The recording controls remain the same, apart from
the recording mode. Instead of tapping the recording
mode box to open the list of options, a button for
each of the recording modes (Append, Overwrite,
Insert) appears above the dictation slider. The
activated dictation mode button will be blue. While in
landscape mode, the transcription list and transcription
text can be viewed concurrently. The list of
transcriptions available in the chosen workflow folder
or search results is displayed on the left side, while the
transcription viewer with the three transcription tabs
(Info, Transcription, Comments) is displayed on the
right side.
When the iPad is rotated to portrait mode, the
transcription list will overlay the transcription viewer
panel until a transcription is selected. The transcription
list will then close to fill the entire screen with the
transcription viewer. To reopen the transcription list,
press the Transcriptions button in the top left corner.
Notice that the iPad separates the New Dictation, Edit, and Complete functions into three separate buttons at the top of
the transcription viewer screen, rather than consolidating them into one action menu. Tap the Add button to create a
new dictation, tap the Edit button to edit the transcription text or patient and appointment details, and tap Complete to
move the transcription to the next stage of the workflow.
Editing a Transcription on the iPad
When in Edit mode, the edit functions are displayed at
the top of the transcription viewer. Tap Undo to remove
all changes made, tap Save to retain all edits, and tap
Complete to save and move the transcription to the next
stage of the workflow.
© 2021 DeliverHealth SOLUTIONS, Inc. All rights reserved.31 eScription One March 2021
The Settings Screen on the iPad
The settings screen functions the same as the appointment list and transcription viewer. It displays both the list panel on
the left side and the details panel on the right in landscape mode. In portrait mode, the Settings list panel will overlay th e
details panel until a selection is made. To reopen the Settings list, tap the Settings button in the top left corner.
Inpatient
This optional feature is active only if requested by the client, and is not available for all users.
The inpatient workflow is an alternative scheduling method that lists patients based upon inpatient encounters, rather than
listing patients by appointment.
For example, a physician is required to make regular rounds to all patients admitted to Critical Care. The inpatient
workflow allows the physician to easily track which patients are on his ward, and if he has dictated on them today, or if he
still needs to visit them. Inpatient mode also allows the physician to clear his schedule manually when he needs to see
patients more frequently.
To switch between the standard appointment screen and the inpatient feature, use the toggle at the bottom of the patient
tab.
Highlight the clock for appointment mode.
Highlight the bed for Inpatient mode.
Sort inpatient encounters by Author Groups or by Location. To change views between Author Groups and
Location, select the Filter button.
© 2021 DeliverHealth SOLUTIONS, Inc. All rights reserved.32 eScription One March 2021
– AUTHOR GROUPS: Use Author Groups to group patients based on the schedule resource.
The account administrators can enroll users in multiple Author Groups. Select an Author
group to view all patients for all users enrolled in this group. You do not have be enrolled in a
group to view the patients. To view an Author Group, tap on the group name. Enrolling in a
group allows other users to view your patients. Tap the toggle button to enroll and disenroll.
• My Patients: Displays all patient encounters linked to the default schedule resource of
the logged-in user. This is the default view in inpatient mode.
– LOCATIONS: Use Locations to show all inpatient encounters based on the location resource,
regardless of the associated schedule resource.
– SORT: Use the Sort option to order the patient encounters by Treatment Status (marked as
Treated or not), Patient Full Name, Patient First Name, Patient Last Name, or Admit Date.
Patients who have received treatment are marked with this icon . This indicates that a
dictation has been started for this patient or the patient has been marked as Treated.
The Treated status is automatically applied when a dictation is stared for the patient.
The checkmark still indicates a completed dictation; the microphone indicates a dictation
on hold.
To mark patients as Treated without dictating, select the
Set Treatment Status option within the Options menu
in the patient encounter details. Patients can also be
removed from a work list by choosing Remove from my
work list.
To add patients to a work list, press the Add button in the upper right corner of the
Patients screen and search for a patient with an existing inpatient encounter record.
Note: The Cloud Icon is not used with inpatient encounters.
© 2021 DeliverHealth SOLUTIONS, Inc. All rights reserved.33 eScription One March 2021
To remove the Treatment Status icon from all patients, press this button from the My
Patients screen.
To remove Treatment Status can be removed from a single patient, select the
appointment, select the options button in the top right, and then choose Clear
Treatment Status.
The process of recording and uploading a dictation for an inpatient encounter is the same as recording for an outpatient
appointment. See page 20 for more details.
Troubleshooting and FAQ
Q: My dictations get interrupted when I receive a phone call on my iPhone; how do I stop this from happening?
A: By design, Apple does not allow our application to block incoming phone calls while you are dictating. You will not lose
any work if a phone call comes in while dictating. When the Accept/Message/Reject screen pops up, recording will pause.
You will be returned to the record screen upon ending or rejecting the phone call. You can then resume dictating by
pressing the Record button.
If you have concerns about incoming phone calls while dictating, you can switch your phone to “Airplane Mode” or “Do Not
Disturb.”
Q: My appointments are gone or are not appearing as they should.
A: There are two common causes of this problem. The most frequent is that the filter view has been changed. Please see
Appointment Filters for filtering information. There could also be an issue with the way appointments have been uploaded
to our system from your facility’s scheduling software or EHR. Please call our Help Desk at 1-800-858-0080 to help
resolve this issue.
Q: My application has not been updated. How do I update eScription One Mobile?
A: Apple devices do not support automatic updates. To update apps on an Apple device, go to the Apple Store. If there
are updates available, it will open to the Updates tab, and updates can be manually applied there.
Q: How is my data protected in the app?
A: All data that is stored on the device is protected by Apple’s AES 256-bit crypto engine. Additionally, all the data that is
transferred over the Internet is encrypted by a TLS connection, the same protection that banks use to give you safe and
secure access to your accounts. Both mechanisms ensure that data-at-rest and data-in-motion are always secure when
you use eScription One Mobile.
The encryption keys are derived from the passcode that you set to lock your device, therefore using an alpha-numeric
password is much more secure than a four-digit PIN.
© 2021 DeliverHealth SOLUTIONS, Inc. All rights reserved.34 eScription One March 2021
Removing eScription One Mobile
To uninstall eScription One Mobile, exit the application. Press and hold the eScription One Mobile icon. The icon should
display an “X” on the top left corner. Click the “X” icon, and you will be prompted to uninstall the application.
Additional Support
Get additional assistance for the eScription One mobile application, and all other eScription One applications, here:
– Phone Support: 1-800-858-0080
– Email Support: esone.support@DeliverHealth.com
© 2021 DeliverHealth SOLUTIONS, Inc. All rights reserved.You can also read