Moneris Checkout Using the MCO Configurator Reference Guide
←
→
Page content transcription
If your browser does not render page correctly, please read the page content below
Moneris® Checkout
Using the MCO Configurator
Reference Guide

                             (06/2021)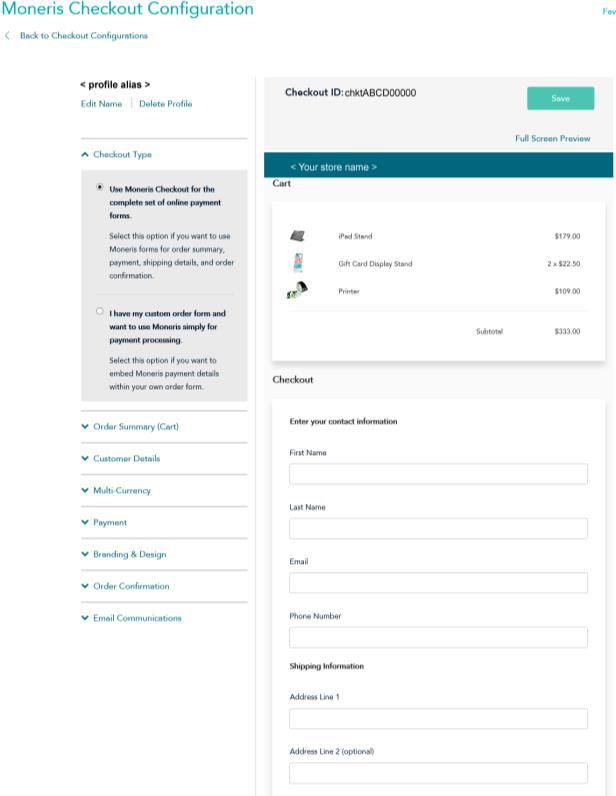
Need help?
Web: moneris.com/support-gateway
Email: onlinepayments@moneris.com
     Toll-free: 1-866-319-7450

    Record your Moneris merchant ID here:

   ____________________________________
Contents
Getting started ............................................................................................................2
  What is Moneris Checkout? .......................................................................................................................... 3
   How to get started ..............................................................................................................................................3

Using the Moneris Checkout Configurator ....................................................................5
  Creating a Moneris Checkout profile............................................................................................................. 6
  Reopening an existing Moneris Checkout profile .......................................................................................... 7
  List of Moneris Checkout configurator settings ............................................................................................. 8
     Configuring a Moneris Checkout profile's checkout type setting ....................................................................10
     Changing a Moneris Checkout profile's alias ....................................................................................................11
     Configuring a Moneris Checkout profile's order summary cart detail settings ...............................................12
     Configuring a Moneris Checkout profile's customer details settings ...............................................................14
     Configuring a Moneris Checkout profile's multi-currency pricing settings ......................................................17
     Configuring a Moneris Checkout profile's payment settings ...........................................................................21
     Configuring Apple Pay for a Moneris Checkout profile ....................................................................................26
     Configuring a Moneris Checkout profile's branding and design settings .........................................................31
     Configuring a Moneris Checkout profile's order confirmation settings ...........................................................33
     Configuring a Moneris Checkout profile's confirmation email content ...........................................................34
  Deleting a Moneris Checkout profile........................................................................................................... 37

Merchant Support ......................................................................................................38

Moneris® Checkout Using the MCO Configurator Reference Guide                                                                                                       1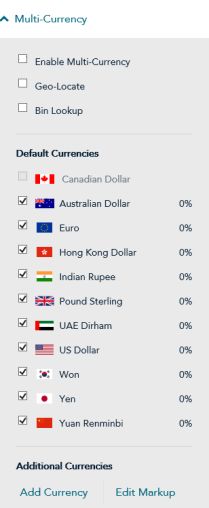
Getting started

Getting Started
In this section, we give you an overview of
Moneris Checkout and describe everything you
need to know to get started on integrating your
ecommerce solution with Moneris Checkout.

Moneris® Checkout Using the MCO Configurator Reference Guide   2
What is Moneris Checkout?
Moneris Checkout allows you to process transactions by integrating a Moneris-hosted checkout page into your
ecommerce Website. Moneris Checkout uses server-to-server communications at the back end in conjunction
with your own merchant server and identifies each transaction with a unique ticket number, without exposing
the data in the Web browser.
Moneris Checkout supports a cohesive, modular pay page design with parameters that you can customize such
as order summary, customer details, and payment details. Once you integrate Moneris Checkout into your
solution, you can use the Merchant Resource Center's Moneris Checkout (MCO) configurator to configure your
checkout parameters and manage anti-fraud tools such as Moneris Kount®, AVS, CVV, 3-D Secure. You can also
set minimum/maximum purchase limits. Supported payment types include credit, debit, gift cards and digital
wallets, including Apple Pay® and Google Pay™.
How to get started
The steps below describe what you need to do to integrate Moneris Checkout into your ecommerce solution.
1. Review the specifications in the Moneris Checkout Integration Guide. This guide is available on the Moneris
Developer Portal at https://developer.moneris.com.
2. Use the Moneris Checkout (MCO) configurator to create, and configure a Moneris Checkout profile per your
integration requirements:
Note: A profile's unique checkout ID is used in the preload request to identify and regulate a specific
Moneris Checkout integration in your ecommerce solution.
a. Log into your Merchant Resource Center store.
Note: For login instructions, see Logging into the Merchant Resource Center (page 4).
b. Create a Moneris Checkout profile (see Creating a Moneris Checkout profile on page 6).
c. Define your Moneris Checkout profile's configuration parameters per your integration requirements:
For full list of configurable settings, see List of Moneris Checkout configurator settings (page 8).
If you need to delete a Moneris profile, see Deleting a Moneris Checkout profile (page 37).
Moneris® Checkout Using the MCO Configurator Reference Guide 3Logging into the Merchant Resource Center
The steps below describe how to log into your Merchant Resource Center production store.
Note: If your Merchant Resource Center store account is not yet activated, see Activating a Merchant Resource
Center store below.
1. Visit https://www3.moneris.com/mpg.
2. Enter your credentials in the login fields (Username, Store ID, and Password).
3. Click on the Submit button to start your login session.
Activating a Merchant Resource Center store
The steps below describe how to activate a Merchant Resource Center store in the production environment.
1. Visit moneris.com/activate.
2. In the Moneris Merchant ID and Moneris Store ID fields, enter your Merchant ID and Store ID.
Note: Refer to the "Your Moneris Order is Ready" email that you received when you signed up for a
Moneris Gateway account. This email contains your merchant ID and store ID.
3. Click on the Next button, and continue following the prompts until the store is activated.
4. When the store is activated, you may log in (see Logging into the Merchant Resource Center above).
Moneris® Checkout Using the MCO Configurator Reference Guide 4Using the Moneris Checkout Configurator Using the Moneris Checkout Configurator In this section, we describe everything you need to know to use the Moneris Checkout configurator to create a Moneris Checkout profile and configure the profile's parameter settings. Moneris® Checkout Using the MCO Configurator Reference Guide 5
Creating a Moneris Checkout profile
This procedure describes how to create a Moneris Checkout profile. A Moneris Checkout profile defines the
parameters and behaviour of a Moneris Checkout integration.
Important! To integrate Moneris Checkout into your ecommerce solution, you need to create and configure
your Moneris Checkout profile in conjunction with developing your ecommerce solution according to Moneris'
integration specifications as outlined in How to get started (page 3).
1. Log into the Merchant Resource Center (see Logging into the Merchant Resource Center on page 4).
2. On the menu bar, click on Admin > Moneris Checkout Config.
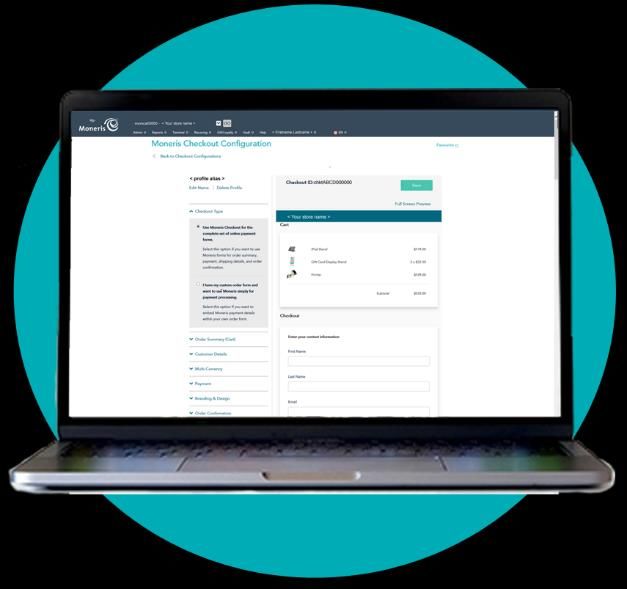
3. When the "Moneris Checkout Configuration" page displays, click on the Create Profile button.
4. When the "Saved" dialog box displays (shown below), click on its OK button to close the dialog box.
5. When the new profile is displayed in your MCO configurator (shown below), click on the Save button located
above the live preview area.
CHECKOUT ID
SETTINGS PANEL
LIVE PREVIEW AREA
6. Configure the other parameter settings for this Moneris Checkout profile per your ecommerce solution's
integration requirements (see List of Moneris Checkout configurator settings on page 8).
Moneris® Checkout Using the MCO Configurator Reference Guide 6Reopening an existing Moneris Checkout profile
The steps below describe how to reopen a Moneris Checkout profile and display it in your MCO configurator.
1. Log into the Merchant Resource Center (see Logging into the Merchant Resource Center on page 4).
2. On the menu bar, click on Admin > Moneris Checkout Config.
3. When the "Moneris Checkout Configuration" page displays a list of your existing profiles (see example
below), locate the profile that you want to edit, and click on its Edit button.
4. When the desired profile opens in your MCO configurator (shown below), configure the settings per your
ecommerce solution's integration requirements:
CHECKOUT ID
SETTINGS PANEL
LIVE PREVIEW AREA
For a list of configurable profile settings, see List of Moneris Checkout configurator settings on page 8.
To return to the list of your existing profiles, click on Back to Checkout Configurations above the
configurator settings panel.
Moneris® Checkout Using the MCO Configurator Reference Guide 7List of Moneris Checkout configurator settings Use the Moneris Checkout configurator to change the parameter settings of the Moneris Checkout profile that regulates your Moneris Checkout integration. Important! Please ensure that you configure these settings per your ecommerce solution's integration requirements. You must develop your ecommerce solution per Moneris' integration specifications as outlined in How to get started (page 3). Setting See procedure: 3-D Secure Configuring a Moneris Checkout profile's payment settings (page 21). Alias / name Changing a Moneris Checkout profile's alias (page 11). Apple Pay Configuring Apple Pay for a Moneris Checkout profile (page 26). AVS Configuring a Moneris Checkout profile's payment settings (page 21). Brand colours Configuring a Moneris Checkout profile's branding and design settings (page 31). Business logo Configuring a Moneris Checkout profile's branding and design settings (page 31). Button customization Configuring a Moneris Checkout profile's branding and design settings (page 31). Card logos Configuring a Moneris Checkout profile's payment settings (page 21). Checkout type Configuring a Moneris Checkout profile's checkout type setting (page 10). Confirmation page Configuring a Moneris Checkout profile's order confirmation settings (page 33). Customer email Configuring a Moneris Checkout profile's confirmation email content (page 34). Customer personal Configuring a Moneris Checkout profile's customer details settings (page 14). details* CVV Configuring a Moneris Checkout profile's payment settings (page 21). Email contents Configuring a Moneris Checkout profile's confirmation email content (page 34). Gift cards Configuring a Moneris Checkout profile's payment settings (page 21). Google Pay Configuring a Moneris Checkout profile's payment settings (page 21). Header/footer Configuring a Moneris Checkout profile's branding and design settings (page 31). Kount Configuring a Moneris Checkout profile's payment settings (page 21). Merchant email Configuring a Moneris Checkout profile's confirmation email content (page 34). Multi-currency pricing Configuring a Moneris Checkout profile's multi-currency pricing settings (page 17). Order confirmation Configuring a Moneris Checkout profile's order confirmation settings (page 33). processing Order summary Configuring a Moneris Checkout profile's order summary cart detail settings (page 12). details* Payment security Configuring a Moneris Checkout profile's payment settings (page 21). Shipping destinations Configuring a Moneris Checkout profile's customer details settings (page 14). Transaction limits Configuring a Moneris Checkout profile's payment settings (page 21). Moneris® Checkout Using the MCO Configurator Reference Guide 8
Setting                           See procedure:
 Transaction type                  Configuring a Moneris Checkout profile's payment settings (page 21).

* These settings are configurable only if the Moneris Checkout profile is configured to use Moneris for the complete set of online payment forms (see
Configuring a Moneris Checkout profile's checkout type setting on page 10).

Moneris® Checkout Using the MCO Configurator Reference Guide                                                                                            9
Configuring a Moneris Checkout profile's checkout type setting
Specify the checkout type for the Moneris Checkout profile that regulates your Moneris Checkout integration.
The checkout type setting configures the integration to use Moneris for the complete set of online payment
forms or use Moneris only for payment processing. This procedure describes how to specify the checkout type.
Important! Please ensure that you configure this setting per your ecommerce solution's integration
requirements. You must develop your ecommerce solution per Moneris' integration specifications as outlined
in How to get started (page 3).
1. Ensure the Moneris Checkout profile that you want to configure is open in your MCO configurator.
Note: If you need to reopen the profile, see Reopening an existing Moneris Checkout profile (page 7) for
instructions.
2. On your MCO configurator's settings panel (shown below), click on Checkout Type.
3. On the expanded "Checkout Type" menu (shown below), select a checkout type per your integration
requirements:
To use Moneris for all order processes, select the Use Moneris for the complete
set of online payment forms radio button.
To use your own custom order form, select the I have my custom order form
and want to use Moneris simply for payment processing radio button.
4. Save your new configuration settings:
a. Go to the top of your live checkout preview, and click on the Save button.
b. When the "Success" dialog box displays, click on its OK button to close the
dialog box.
Note: Your live preview area refreshes to reflect the updated configuration
settings.
5. To continue configuring other settings for this Moneris Checkout profile, see the list of options in List of
Moneris Checkout configurator settings (page 8).
Moneris® Checkout Using the MCO Configurator Reference Guide 10Changing a Moneris Checkout profile's alias
Specify the alias for the Moneris Checkout profile that regulates your Moneris Checkout integration. An alias
that you specify yourself can make it easier for you to identify a specific profile if you have more than one. This
procedure describes how to edit a profile's alias setting.
1. Ensure the Moneris Checkout profile that you want to configure is open in your MCO configurator.
Note: If you need to reopen the profile, see Reopening an existing Moneris Checkout profile (page 7) for
instructions.
2. On your MCO configurator's settings panel (shown below), click on Edit Name.
3. When the "Edit Checkout Alias" dialog box displays (shown below), enter the new profile name in the Alias
field.
4. Click on the Save button in the dialog box to close it.
Note: When the page refreshes, the new alias displays in place of the previous one.
5. To continue configuring other settings for this Moneris Checkout profile, see the list of options in List of
Moneris Checkout configurator settings (page 8).
Moneris® Checkout Using the MCO Configurator Reference Guide 11Configuring a Moneris Checkout profile's order summary cart detail
settings
Specify the order summary cart detail content for the Moneris Checkout profile that regulates your Moneris
Checkout integration. Cart content can include product images, product names, product price, quantity, and
Subtotal. This procedure describes how to configure a profile's order summary (shopping cart) detail settings.
Note: Order summary details settings are visible only if the profile is configured to use Moneris for the
complete set of online payment forms (see Configuring a Moneris Checkout profile's checkout type setting on
page 10).
Important! Please ensure that you configure these settings per your ecommerce solution's integration
requirements. You must develop your ecommerce solution per Moneris' integration specifications as outlined
in How to get started (page 3).
1. Ensure the Moneris Checkout profile that you want to configure is open in your MCO configurator.
Note: If you need to reopen the profile, see Reopening an existing Moneris Checkout profile (page 7) for
instructions.
2. On your MCO configurator's settings panel (shown below), click on Order Summary (Cart).
3. On the expanded "Order Summary (Cart)" menu (shown below), enable/disable order summary cart details:
To enable support for order summary cart details:
a. Checkmark the Order Summary (Cart) details box.
b. Enable/disable specific order summary details (Product Image, Product Name,
Product Price, Quantity, and Subtotal).
Note: To enable a detail, checkmark the box beside the desired detail to enable it.
To disable a detail, unmark the box beside the undesired detail.
If a field/checkbox is greyed out/locked, it means you cannot enable/disable it from here.
To disable support for order summary cart details:
a. Unmark the Order Summary (Cart) details box.
4. Save your new configuration settings:
a. Go to the top of your live checkout preview, and click on the Save button.
b. When the "Success" dialog box displays, click on its OK button to close the dialog box.
Moneris® Checkout Using the MCO Configurator Reference Guide 12Note: Your live preview area refreshes to reflect your updated configuration settings. 5. To continue configuring other settings for this Moneris Checkout profile, see the list of options in List of Moneris Checkout configurator settings (page 8). Moneris® Checkout Using the MCO Configurator Reference Guide 13
Configuring a Moneris Checkout profile's customer details settings
Specify the customer details configuration for the Moneris Checkout profile that regulates your Moneris
Checkout integration. Customer details fields are used to capture personal data such as first name, last name,
phone, email, billing address, and shipping address. This procedure describes how to configure a profile's
customer details settings.
Note: Customer details settings are visible only if the Moneris Checkout profile is configured to use Moneris for
the complete set of online payment forms (see Configuring a Moneris Checkout profile's checkout type setting on
page 10).
Important! Please ensure that you configure these settings per your ecommerce solution's integration
requirements. You must develop your ecommerce solution per Moneris' integration specifications as outlined
in How to get started (page 3).
1. Ensure the Moneris Checkout profile that you want to configure is open in your MCO configurator.
Note: If you need to reopen the profile, see Reopening an existing Moneris Checkout profile (page 7) for
instructions.
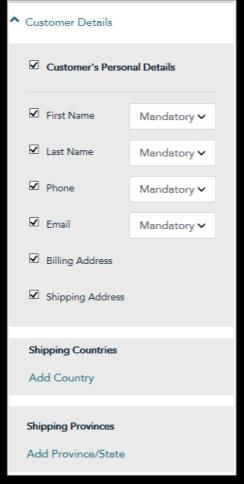
2. On your MCO configurator's settings panel (shown below), click on Customer Details.
3. On the expanded "Customer Details" menu (shown below), enable/disable support for capturing customer
personal details in your checkout:
To enable support for capturing these data:
a. Checkmark the Customer's Personal Details box.
b. Enable/disable the specific personal fields First Name, Last Name, Phone, and Email.
Note: To enable a field, checkmark the box beside the desired field, and then set
the field for mandatory or optional data entry by clicking on Mandatory or Optional
respectively in the corresponding drop-down list. To disable a field, unmark the box
beside the undesired field.
To disable support for capturing these data:
a. Unmark the Customer's Personal Details box.
4. Enable/disable the Billing Address and Shipping Address fields in your checkout.
Note: To enable a field, checkmark the box beside the desired field. To disable a field,
unmark the box beside the undesired field.
Moneris® Checkout Using the MCO Configurator Reference Guide 145. Add/remove shipping restrictions by country for your checkout:
Note: If you do not restrict shipping to at least one country, customers using your checkout will be able to
enter any country name as part of their shipping information.
To add a ship-to restriction by country:
a. Go to the "Shipping Countries" area on the expanded menu (shown below), and click on Add Country.
b. When the "Add Shipping Controls" dialog box displays (shown below), click on the "Country" drop-down
list and select the country (e.g., Canada, the United States, etc.) to which you want to restrict the
shipping of your products.
c. After selecting the desired country, click on the Add button.
d. When the "Successfully added Country restriction: " response displays in the dialog
box, do one of the following:
To add another country restriction, go back to step 6b.
To proceed without adding another country restriction, go to step 6e.
e. Click on the dialog box's Close button.
Note: When the page refreshes, any country that you added will be listed in the "Shipping Countries"
area on the settings panel.
To remove a country from your ship-to-country restriction list:
a. Go to the "Shipping Countries" area on the settings panel, and unmark the box beside the country to
which you do not want to ship products.
b. When the "Success" dialog box displays, click on its OK button to close the dialog box.
Note: When the page refreshes, the removed country will be de-listed from the "Shipping Countries"
area on the settings panel.
Moneris® Checkout Using the MCO Configurator Reference Guide 156. Add/remove shipping restrictions by province/state for your checkout:
To add a ship-to restriction by province/state:
a. Go to the "Shipping Provinces" area on the expanded menu (shown below), and click on Add
Province/State.
b. When the "Add Shipping Controls" dialog box displays (shown below), click on the "Province/State"
drop-down list and select the province/state (e.g., Alberta, Ontario, Quebec, etc.) to which you want to
restrict the shipping of your products.
c. After selecting the desired province/state, click on the Add button.
d. When the "Successfully added Province/State restriction: < Name of
Province/State >" response displays in the dialog box, do one of the
following:
To add another province/state restriction, go back to step 6b.
To proceed without adding another province/state restriction, go
to step 6e.
e. Click on the dialog box's Close button.
Note: When the page refreshes, any province/state restriction that you added will be listed in the
"Shipping Provinces" area on the expanded menu.
To remove one or more provinces/states from your ship-to restriction list:
a. Go to the "Shipping Provinces" area on the expanded menu, and unmark the box beside the
province/state that you want to remove.
b. When the "Success" dialog box displays, click on its OK button to close the dialog box.
Note: When the page refreshes, the removed province/state will be de-listed from the "Shipping
Provinces" area on the expanded menu.
7. Save your new configuration settings:
a. Go to the top of your live checkout preview, and click on the Save button.
b. When the "Success" dialog box displays, click on its OK button to close the dialog box.
Note: Your live preview area refreshes to reflect your updated configuration settings.
8. To continue configuring other settings for this Moneris Checkout profile, see the list of options in List of
Moneris Checkout configurator settings (page 8).
Moneris® Checkout Using the MCO Configurator Reference Guide 16Configuring a Moneris Checkout profile's multi-currency pricing
settings
Specify the multi-currency pricing (MCP) configuration for the Moneris Checkout profile that regulates your
Moneris Checkout integration. With multi-currency pricing, customers can pay in the currency of their choice
while you receive settlement and reporting in Canadian dollars. This procedure describes how to configure a
profile's MCP settings, including geo-location, currency defaults, and currency markups.
Note: The multi-currency settings described in this procedure are applicable only to the payment page through
which you are integrating Moneris Checkout and are not applicable to your entire Website.
Important! Please ensure that you configure these settings per your ecommerce solution's integration
requirements. You must develop your ecommerce solution per Moneris' integration specifications as outlined
in How to get started (page 3).
1. Ensure the Moneris Checkout profile that you want to configure is open in your MCO configurator.
Note: If you need to reopen the profile, see Reopening an existing Moneris Checkout profile
(page 7) for instructions.
2. On your MCO configurator's settings panel (shown below), click on Multi-Currency.
1
3. On the expanded "Multi-Currency" menu (shown below), configure the settings for the checkout profile per
your integration requirements (follow the setup steps of this procedure).
Moneris® Checkout Using the MCO Configurator Reference Guide 174. Enable/disable multi-currency pricing for the checkout profile:
To enable multi-currency pricing, checkmark the Enable Multi-Currency box (go to step 5).
To disable multi-currency pricing, unmark the Enable Multi-Currency box (go to step 10).
5. Enable/disable location-based multi-currency pricing (geo-location) for your checkout profile:
Note: Geo-location detects the IP address of customers using your checkout and displays product prices
and transaction amounts in the currency corresponding to the country/location in which customers are using
the checkout subject to the following restrictions: If a customer's IP address does not correspond with a
currency that your checkout is configured to support, the checkout will display prices and transaction
amounts in United States dollars (USD). If a customer's IP address does not correspond with a supported
currency and your checkout is not configured to support USD, the checkout will display prices and transaction
amounts in Canadian dollars (CAD).
To enable geo-location, checkmark the Geo-Locate box.
Note: To use this feature, you must enable multi-currency pricing for the profile (see step 4).
To disable geo-location, unmark the Geo-Locate box.
6. Enable/disable Bin Lookup for your checkout profile:
Note: BIN Lookup is supported only for Visa and Mastecard. BIN lookup compares the customer billing
currency (determined by card issuer) against the default currencies supported by your checkout (or, if geo-
location is enabled, BIN lookup compares customer billing currency against the currency corresponding to the
location in which the customer is using the checkout). If BIN lookup detects a discrepancy and the checkout
supports more than one default currency, the checkout will prompt the customer to choose a preferred
(supported) currency for the transaction. If the checkout supports only one default currency, the customer
will not be prompted to choose a different currency.
To enable BIN Lookup, checkmark the BIN Lookup box.
Note: To use this feature, you must enable multi-currency pricing for the profile (see step 4).
To disable BIN lookup, unmark the BIN Lookup box.
7. Enable/disable the default currencies that you want to support in your checkout profile:
Note: If a default currency is enabled, customers may opt to pay for their purchases in that currency while
using your checkout. Please ensure that multi-currency pricing is enabled for the profile (see step 4).
To enable a default/additional currency:
To enable a default currency, checkmark the box beside any currency listed under "Default Currencies"
that you want to enable (Australian Dollar, Euro, Hong Kong Dollar, Indian Rupee, Pound Sterling, UAE
Dirham, US Dollar, Won, Yen, and/or Yuan Renminbi).
Note: Support for pricing in Canadian dollars is mandatory (i.e., the Canadian Dollar option is always
enabled).
To disable a default currency:
a. Unmark the box beside the default currency that you want to disable.
Moneris® Checkout Using the MCO Configurator Reference Guide 188. Add/remove other currencies from your list of supported currencies:
To add a currency to your list of supported currencies:
a. Go to the "Additional Currencies" area on the expanded menu, and click on Add Currency.
b. When the "Add Currency" dialog box displays (shown below), go to the "Currency" drop-down list and
click on the currency that you want to add.
c. Click on the Add button in the dialog box.
d. Confirm the newly added currency is displayed under "Additional Currencies" on your expanded menu.
Note: Once listed on your expanded menu, the new currency will automatically be enabled
(checkmarked).
e. Do one of the following:
To add another currency, repeat steps 8a to 8d of this procedure.
When you are finished, click on the Close button to close the dialog box (continue to the next step).
To remove/disable an added currency:
a. If you want to disable an added currency, go to the list under "Additional Currencies", and unmark the
additional currency that you want to disable.
9. If you want to change a percentage markup of a supported currency, follow steps 9a to 9d below.
Otherwise, to bypass changing the markup of a supported currency, go directly to step 10.
Note: The markup is added to the checkout customer's total transaction amount in Canadian currency prior
to currency conversion. The default percentage markup for each currency is "0".
a. Go to the "Additional Currencies" area on the expanded menu, and click on Edit Markup.
b. When the "Edit Currency Markup" dialog box displays (shown below), locate the currency for which you
want to edit the markup and enter a whole number in the corresponding field.
c. Click on the Save button to close the dialog box.
Moneris® Checkout Using the MCO Configurator Reference Guide 19d. Confirm that the newly configured markup is displayed beside the affected currency on your expanded
menu.
10. Go to the top of your live checkout preview, and click on the Save button.
11. When the "Success" dialog box displays, click on its OK button to close the dialog box.
12. To continue configuring other settings for this Moneris Checkout profile, see the list of options in List of
Moneris Checkout configurator settings (page 8).
Moneris® Checkout Using the MCO Configurator Reference Guide 20Configuring a Moneris Checkout profile's payment settings
Specify the payment configuration for the Moneris Checkout profile that regulates your Moneris Checkout
integration. This procedure describes how to configure a profile's payment settings, including digital wallets,
card logos, card details, 3-D Secure, AVS, CVV, Moneris Kount, transaction type, gift cards, and transaction limits.
Important! Please ensure that you configure these settings per your ecommerce solution's integration
requirements. You must develop your ecommerce solution per Moneris' integration specifications as outlined
in How to get started (page 3).
1. Ensure the Moneris Checkout profile that you want to configure is open in your MCO configurator.
Note: If you need to reopen the profile, see Reopening an existing Moneris Checkout profile (page 7) for
instructions.
2. On your MCO configurator's settings panel (shown below), click on Payment.
3. On expanded "Payment" menu (shown on the right), continue the next steps to configure
the settings per your integration requirements.
4. Go to the "Accepted Digital Wallets" area, and enable/disable digital wallet support per
your integration requirements:
To enable/disable Apple Pay, see Configuring Apple Pay for a Moneris Checkout profile
(page 26).
To enable Google Pay, checkmark the Google Pay box, and then review the terms-of-
use by clicking on Google Pay API Terms of Service. To disable Google Pay, unmark the
Google Pay checkbox.
5. Go to the "Card Logos" area, and enable/disable the display of card logos for all card types
enabled for your merchant account:
To display (enable) the display of card logos, checkmark the Display Supported Cards
box.
To hide (disable) the display of card logos, unmark the Display Supported Cards box.
Moneris® Checkout Using the MCO Configurator Reference Guide 216. Go to the "Payment Security" area, and configure your checkout's fraud-prevention tools per your
integration requirements:
a. Determine whether to allow Moneris to manage auto-decisioning concerning how transaction requests
are handled and processed through your checkout:
Note: Decisions are based on fraud-prevention response codes from supported fraud-prevention tools
such as AVS, CVV, 3-D Secure, and Moneris Kount. Auto-decisioning may/may not be configurable from
your expanded menu and may be enabled/disabled by default depending on the fraud-prevention
features for which your store is enabled.
To enable Moneris auto-decisioning, checkmark the Auto Decision by Moneris box.
To disable Moneris auto-decisioning, unmark the Auto Decision by Moneris box.
b. Enable/disable each fraud-prevention tool (AVS, Postal Code Onlyǂ, CVV, 3D Secure, and Kount) if
displayed on your expanded menu.
Note: To enable a fraud-prevention tool, checkmark the box beside the tool. To disable a tool, unmark
the box beside the tool. The fraud-prevention tools displayed on your expanded menu are dependent on
the fraud-prevention features for which your store is enabled. Some fraud-prevention tools may be
enabled/disabled by default and may/may not be configurable from your expanded menu.
c. If "Auto Decision by Moneris" is enabled (step 6a) and you enabled one or more fraud-prevention tools
in step 6b, configure each tool to make its "pass" response mandatory or optional in transaction
requests (for each tool, select Mandatory or Optional from its corresponding drop-down).
Note: For supported Moneris auto-decisioning rule permutations, refer to the table in Auto-decisioning
rules and responses for Moneris Checkout on page 24. This table can help inform your configuration
choices.
d. If you checkmarked (enabled) the "Kount" fraud-prevention tool in step 6b (this tool is configurable if
your store is enabled for Moneris Kount Enterprise), you must enter your Kount account details in the
following Kount fields:
In the Kount Merchant ID field, enter your Kount merchant ID (if you need to obtain this ID, contact
your authorized Kount representative).
In the Kount API Key field, enter your Kount API key (if you need to obtain this key, contact your
authorized Kount representative).
In the Kount Website ID field, enter the ID of the Kount fraud-prevention program that you want to
apply to your Moneris Checkout (if you need to obtain this ID, contact your authorized Kount
representative).
7. Go to the "Transaction Type" area, and select the radio button beside a debit/credit transaction type
(Purchase, Pre-authorization, or Card Verification) per your integration requirements.
To enable Moneris to tokenize transactions that are processed through your checkout and then store
the token in the Moneris Vault upon successful completion of the transaction, checkmark the Tokenize
Card box.
ǂ If "Postal Code Only" is enabled but "3D Secure" is disabled, checkout customers will be prompted to enter their postal code instead of a full billing
ǂ
address (billing address must be enabled for the profile). If "Postal Code Only" and "3D Secure" are both enabled, checkout customers will be prompted
to enter their full billing address (if enabled) but only their postal code data will be sent for address verification. In all circumstances, if shipping address
is enabled for the profile, checkout customers will be prompted to enter their full shipping address. (To enable/disable customer shipping and billing
address fields, see Configuring a Moneris Checkout profile's customer details settings on page 14).
Moneris® Checkout Using the MCO Configurator Reference Guide 228. Go to the "Gift Cards" area, and enable/disable gift card processing per your integration requirements:
Note: To enable gift card processing, checkmark the Accept Gift Cards box (Moneris will always process a
gift transaction as a "Purchase" even if your checkout is configured to support Pre-authorizations).
To disable gift card processing, unmark the Accept Gift Cards box.
If gift transactions are enabled, and you want to configure gift card limits, enter a numeric value from
1 to 5 in the Max Number of Gift Cards field. Otherwise, to disable limits, leave the field unfilled.
Note: The numeric value represents the number of gift cards that can be used to pay for any one
transaction.
9. Go to the "Transaction Limits" area, and enable/disable a minimum and maximum transaction dollar limit
type.
Note: Transaction limits control the maximum and minimum dollar amounts that can be charged for any
one order submitted by a customer in the checkout. To enable a limit, checkmark the box beside the desired
limit type (Transaction Min ($) and Transaction Max ($)), and then enter a dollar amount (#.##) in the
corresponding field. To disable a limit, unmark the box beside the undesired limit type.
10. Save your new configuration settings:
a. Go to the top of your live checkout preview, and click on the Save button.
b. When the "Success" dialog box displays, click on its OK button to close the dialog box.
Note: Your live preview area refreshes to reflect your updated configuration settings.
To continue configuring other settings for this Moneris Checkout profile, see the list of options in List of
Moneris Checkout configurator settings (page 8).
Moneris® Checkout Using the MCO Configurator Reference Guide 23Auto-decisioning rules and responses for Moneris Checkout
If you enabled the "Auto Decision by Moneris" feature for your checkout as described in step 6.a (page 22) of
Configuring a Moneris Checkout profile's payment settings, please refer to the table below to inform your fraud-
prevention tool configuration choices.
AVS = address verification service | CVV = card verification value1 | CAVV = cardholder authentication verification value
Fraud-Prevention Enabled? Pass Response Deny Description of Deny Response Codes
Tool Mandatory? Response
Codes
Full address, including postal code, submitted but not verified due
Yes C
to incompatible formats.
Yes I Address information not verified.
Yes N No match, or no billing information supplied.
Yes Yes R Retry, system unable to process.
AVS
AVS will be performed on address and postal code but no decision
will be made by Moneris.
No N/A
Note: Client2 may opt to decision manually.
No N/A N/A AVS not performed.
Postal code submitted but not verified due to incompatible
Yes C
formats.
Yes I Postal code submitted but not verified.
Postal code submitted. No match, or no billing information
Yes N
supplied.
Yes
Postal Code Only Yes R Retry, system unable to process.
Postal code verification will be performed, but no decision will be
made by Moneris.
No N/A
Note: Client2 may opt to decision manually.
No N/A N/A AVS not performed.
N No match.
P Not processed.
S CVV1 should be on card but no CVV1 was presented.
Yes
Invalid security code.
CVV 1 Always D
Note: American Express & JCB only.
Other Invalid response code.
CVV1 will be performed but no decision will be made by Moneris.
No N/A
Note: Client may opt to decision manually.
CAVV could not be verified or CAVV data was not provided when
0
expected.
Yes Always
3D Secure CAVV passed verification—attempted authentication, no liability
B
shift.
No N/A N/A 3-D Secure not performed.
Moneris® Checkout Using the MCO Configurator Reference Guide 24Fraud-Prevention Enabled? Pass Response Deny Description of Deny Response Codes
Tool Mandatory? Response
Codes
Moneris denies transaction requests based on the risk categories
assigned to the client upon enrolment in the Moneris Kount
Kount Essential solution.
Always Always N/A
(Essential)
Note: This setting cannot be changed as it is required for
participation in the Moneris Kount Essential solution.
As per Client2 determines rules and responses based on their risk portfolio.
Yes client's2 Moneris Checkout makes decisions based on an "Accept" or "Deny"
rules notification from the client's rule configuration with Kount.
Kount Yes Client2 determines rules and responses based on their risk portfolio.
As per
(Enterprise) Moneris Checkout will not make a decision based on these
No client's2
responses, but will return the response from Kount to the client to
rules
inform post-transaction risk management.
No N/A N/A Kount risk inquiry not performed.
1 May be referenced as "CVD" (card verification digits) on Merchant Resource Center reports and transaction pages.
2 Refers to you, the merchant.
Moneris® Checkout Using the MCO Configurator Reference Guide 25Configuring Apple Pay for a Moneris Checkout profile
Define Apple Pay acceptance in the Moneris Checkout profile that regulates your Moneris Checkout integration.
This procedure describes how to enable/disable a profile's Apple Pay acceptance.
Important! Please ensure that you configure this setting per your ecommerce solution's integration
requirements. You must develop your ecommerce solution per Moneris' integration specifications as outlined
in How to get started (page 3).
1. Ensure the Moneris Checkout profile that you want to configure is open in your MCO configurator.
Note: If you need to reopen the profile, see Reopening an existing Moneris Checkout profile (page 7) for
instructions.
2. On your MCO configurator's settings panel (shown below), click on Payment.
3. On the expanded "Payment" menu (shown partially below), continue the next steps to configure Apple Pay
per your integration requirements:
Do you want to enable Apple Pay acceptance in your Moneris Checkout integration?
To enable Apple Pay acceptance in your Moneris Checkout integration, you need to complete an Apple Pay
configuration by registering one or more domains to allow Moneris to decrypt the Apple Pay payment
token:
If you have already registered the necessary domains/certificates, go to Enabling Apple Pay in Moneris
Checkout: using currently registered domain(s) on page 27.
If you need to register one or more domain(s), go to Enabling Apple Pay in Moneris Checkout: registering
a new domain on page 28.
Do you want to disable Apple Pay acceptance in your Moneris Checkout integration?
Go to Disabling Apple Pay in a Moneris Checkout profile on page 30.
Moneris® Checkout Using the MCO Configurator Reference Guide 26Enabling Apple Pay in Moneris Checkout: using currently registered domain(s)
The steps below describe how to enable Apple Pay in your Moneris Checkout integration using one or more
of the domains that you have already registered through your Merchant Resource Center store.
Note: This procedure continues from Configuring Apple Pay for a Moneris Checkout profile (page 26).
a. On your profile's expanded "Payment" menu (shown partially below), locate the "Apple Pay" area under
"Accepted Digital Wallets".
b. Click on Moneris Terms of Use, and read the Moneris terms that display.
c. Click on Apple Terms of Use, and read the Apple terms that display.
d. Checkmark the Apple Pay box.
e. When the "Apple Pay Enablement" dialog box displays (shown below), review its listing of your
registered domain(s).
f. Click on the dialog box's Enable Apple Pay for the registered domains button.
g. When the "Success" dialog box displays, click on its OK button to close the dialog box.
Note: Your live preview area refreshes to reflect your updated configuration settings.
h. Go to the top of your live checkout preview, and click on the Save button.
i. When the "Success" dialog box displays, click on its OK button to close the dialog box.
j. You have successfully followed the steps to enable Moneris to decrypt the Apple Pay payment token for
your Moneris Checkout integration.
Note:
If your customers want to use Apple Pay to pay for goods/services on your ecommerce solution, they
must use the Safari browser.
If you ever need to register a new domain or deregister a domain for this profile, use the Merchant
Resource Center's Apple Pay Configuration feature (refer to the "Apple Pay configuration" section in
the Merchant Resource Center User Manual for details).
k. To continue configuring other settings for this Moneris Checkout profile, see the list of options in List of
Moneris Checkout configurator settings (page 8).
Moneris® Checkout Using the MCO Configurator Reference Guide 27Enabling Apple Pay in Moneris Checkout: registering a new domain
The steps below describe how to enable Apple Pay acceptance in your Moneris Checkout integration using a
new domain that you want to register now.
Note: This procedure continues from Configuring Apple Pay for a Moneris Checkout profile (page 26).
a. On your profile's expanded "Payment" menu (shown partially below), locate the "Apple Pay" area under
"Accepted Digital Wallets".
b. Click on Moneris Terms of Use, and read the Moneris terms that display.
c. Click on Apple Terms of Use, and read the Apple terms that display.
d. Checkmark the Apple Pay box.
e. When an "Apple Pay Enablement" dialog box displays (shown below), click on its Add a new domain
button.
Note: If the dialog reads "Please register your domain with Apple first" (see image below on the left), it
means this profile is not associated with a registered domain.
OR
f. When the "Register for the Apple Pay Enablement Service" dialog box displays (shown below), read its
terms of service.
g. In the http// field, enter the domain address that you want to register (include "www" in the address),
and click on the Next button.
Moneris® Checkout Using the MCO Configurator Reference Guide 28h. When the dialog box refreshes, click on its Download button.
Important! This action will initiate the download of a file to your computer.
i. Ensure that you place the file in the location for your Website as specified in the dialog box (this will
allow Apple to validate your domain), then click on the Verify button.
j. When the "Apple Pay Enablement" dialog box displays (shown below), review its listing of your
registered domain(s).
Note: The domain that you just registered will be listed in this dialog box along with any of your other
registered domain(s) if any.
k. Do one of the following:
If you want to register another domain, repeat steps e to j of this procedure.
If you do not want to add another domain, go to step l.
l. Click on the dialog box's Enable Apple Pay for the registered domains button.
m. When the "Success" dialog box displays, click on its OK button to close the dialog box.
Note: Your live preview area refreshes to reflect your updated configuration settings.
n. Go to the top of your live checkout preview, and click on the Save button.
o. When the "Success" dialog box displays, click on its OK button to close the dialog box.
p. You have successfully followed the steps to enable Moneris to decrypt the Apple Pay payment token for
your Moneris Checkout integration.
Note:
If your customers want to use Apple Pay to pay for goods/services on your ecommerce solution, they
must use the Safari browser.
If you ever need to register a new domain or deregister a domain for this profile, use the Merchant
Resource Center's Apple Pay Configuration feature (refer to the "Apple Pay configuration" section in
the Merchant Resource Center User Manual for details).
q. To continue configuring other payment-related settings for this Moneris Checkout profile, see
Configuring a Moneris Checkout profile's payment settings (page 21).
To configure other settings for this Moneris Checkout profile, see the options listed in List of
Moneris Checkout configurator settings (page 8).
Moneris® Checkout Using the MCO Configurator Reference Guide 29Disabling Apple Pay in a Moneris Checkout profile
The steps below describe how to disable Apple Pay acceptance in your Moneris Checkout integration.
Note: This procedure continues from Configuring Apple Pay for a Moneris Checkout profile (page 26).
a. On your profile's expanded "Payment" menu (shown partially below), locate the "Apple Pay" area under
"Accepted Digital Wallets".
b. Unmark the Apple Pay checkbox.
c. Go to the top of your live checkout preview, and click on the Save button.
d. When the "Success" dialog box displays, click on its OK button to close the dialog
box.
Note: Your live preview area refreshes to reflect your updated configuration
settings.
e. To continue configuring other payment-related settings for this Moneris Checkout profile, see
Configuring a Moneris Checkout profile's payment settings (page 21).
To configure other settings for this Moneris Checkout profile, see the list of options in List of
Moneris Checkout configurator settings (page 8).
Moneris® Checkout Using the MCO Configurator Reference Guide 30Configuring a Moneris Checkout profile's branding and design
settings
Specify the branding and design configuration for the Moneris Checkout profile that regulates your Moneris
Checkout integration. This procedure describes how to configure a profile's branding and design settings,
including logo, colours, and customizations like payment window type, merchant name, headers, footers, and
navigation button names.
Important! Please ensure that you configure these settings per your ecommerce solution's integration
requirements. You must develop your ecommerce solution per Moneris' integration specifications as outlined
in How to get started (page 3).
1. Ensure the Moneris Checkout profile that you want to configure is open in your MCO configurator.
Note: If you need to reopen the profile, see Reopening an existing Moneris Checkout profile (page 7) for
instructions.
2. On your MCO configurator's settings panel (shown below), click on Branding & Design.
3. On the expanded "Branding & Design" menu (shown below), continue the next steps to configure the
settings per your integration requirements.
4. Go to the "Logo" area, and enable/disable a logo.
Note: To enable a logo, enter the logo image file address in the URL field. Otherwise, to
disable a logo, leave the URL field unfilled.
5. Go to the "Colours" area, and do the following:
a. In the Header Text and Header Background fields, enter HEX values to format the
respective colour aspects of your checkout header.
b. In the Button Text and Button Background fields, enter HEX values to format the
respective colour aspects of the button on which your customer will click on to
submit their order for processing.
c. In the "Background" drop-down list, click on a supported background colour (e.g.,
Light Grey or White).
Moneris® Checkout Using the MCO Configurator Reference Guide 316. Go to the "Customizations" area, and do the following:
a. Determine which agent controls the size of your checkout's payment form window:
To enable Moneris to control the size of the payment form window, checkmark the Enable
Fullscreen box.
Note: If this option is enabled, you may customize your checkout's payment form further by
configuring additional options on your expanded menu as instructed in step 6b of this procedure.
To control the size of the payment form window yourself, unmark the Enable Fullscreen box.
b. Enable/disable the payment form customization options Header, Merchant Name in Header, Powered
By Moneris Footer, and Card Borders/Shadows per your requirements.
Note: If the "Enable Fullscreen" customization option is disabled (unmarked), all other payment form
customization options on your expanded menu will be disabled (greyed out/locked) except for the "Card
Borders/Shadows" setting.
To enable a customization, checkmark the box beside the desired customization.
To disable a customization, unmark the box beside the undesired customization.
c. From the "Process Text" drop-down list, select a label to display on the button on which your checkout
customers will click to submit their order (e.g., Checkout, Buy, Purchase, Book, Subscribe, Donate, or
Process).
d. From the "Cancel Text" drop-down list, select the text of the hyperlink on which your checkout
customers will click to interrupt the submission of their order so that they can return to your
ecommerce site (e.g., Cancel, Back, Back to Store, or Continue Shopping).
7. Save your new configuration settings:
a. Go to the top of your live checkout preview, and click on the Save button.
b. When the "Success" dialog box displays, click on its OK button to close the dialog box.
Note: Your live preview area refreshes to reflect your updated configuration settings.
8. To continue configuring other settings for this Moneris Checkout profile, see the list of options in List of
Moneris Checkout configurator settings (page 8).
Moneris® Checkout Using the MCO Configurator Reference Guide 32Configuring a Moneris Checkout profile's order confirmation settings
Specify the order confirmation configuration for the Moneris Checkout profile that regulates your Moneris
Checkout integration. This procedure describes how to configure a profile's order confirmation processing
settings, including all available order details and a customizable message.
Important! Please ensure that you configure these settings per your ecommerce solution's integration
requirements. You must develop your ecommerce solution per Moneris' integration specifications as outlined
in How to get started (page 3).
1. Ensure the Moneris Checkout profile that you want to configure is open in your MCO configurator.
Note: If you need to reopen the profile, see Reopening an existing Moneris Checkout profile (page 7) for
instructions.
2. On your MCO configurator's settings panel (shown below), click on Order Confirmation.
3. On the expanded "Order Confirmation" menu (shown below), go to the "Order Confirmation Processing"
area, and set which agent is to perform the order confirmation processing for your checkout:
To enable Moneris to perform the order confirmation processing, select the
Use Moneris radio button.
To enable your own system to perform the order confirmation processing, select
the Use Own Page radio button.
4. Go to the "Confirmation Page Content" area, and enable/disable specific information
fields (Order ID, Customer Info, Shipping Info, Billing Info, Payment Info, and Custom
Message) to include in your checkout's confirmation page.
Note: To enable a field, checkmark the box beside the desired field (if you enabled the
Custom Message field, enter your message in the field). To disable a field, unmark the
box beside the undesired field. If a field/checkbox is greyed out/locked, it means you
cannot enable/disable it from the settings panel.
5. Save your new configuration settings:
a. Go to the top of your live checkout preview, and click on the Save button.
b. When the "Success" dialog box displays, click on its OK button to close the dialog box.
Note: Your live preview area refreshes to reflect your updated configuration settings.
6. To continue configuring other settings for this Moneris Checkout profile, see the list of options in List of
Moneris Checkout configurator settings (page 8).
Moneris® Checkout Using the MCO Configurator Reference Guide 33Configuring a Moneris Checkout profile's confirmation email content
Specify the email content configuration for the Moneris Checkout profile that regulates your Moneris Checkout
integration. This procedure describes how to configure a profile's confirmation email content settings, including
order, payment, customer, and shipping details; and host responses that trigger auto-responses.
Important! Please ensure that you configure these settings per your ecommerce solution's integration
requirements. You must develop your ecommerce solution per Moneris' integration specifications as outlined
in How to get started (page 3).
1. Ensure the Moneris Checkout profile that you want to configure is open in your MCO configurator.
Note: If you need to reopen the profile, see Reopening an existing Moneris Checkout profile (page 7) for
instructions.
2. On your MCO configurator's settings panel (shown below), click on Email Communications.
3. On the expanded "Email Communications" menu (shown below), continue the next steps to configure the
settings per your integration requirements.
4. Go to the "Email Contents" area, and enable/disable fields (Order Info, Customer
Info, Shipping Info, and Payment Info) for your confirmation emails.
Note: To enable a field, checkmark the box beside the desired field. To disable a
field, checkmark the box beside the undesired field.
5. Go to the "Customer Emails" area, and specify which host response (Approved
Transactions and/or Declined Transactions) can trigger the sending of a
confirmation email to your checkout customer.
Note: To enable a response trigger, checkmark the box beside the desired
response trigger. To disable a response trigger, unmark the box beside the
undesired response trigger.
Moneris® Checkout Using the MCO Configurator Reference Guide 34You can also read